
Word for Microsoft 365 Word for Microsoft 365 for Mac Word for the web Word 2021 Word 2021 for Mac Word 2019 Word 2019 for Mac Word 2016 Word 2016 for Mac More…Less
To use versioning in Word, you need to store your documents in either OneDrive or in a SharePoint Library.
When documents are stored online, you can turn on AutoSave to automatically save as your work. You can also share documents by inviting someone to the library, or providing a link rather than sending a discrete copy of the document. Lastly, you can work with others to co-author a document at the same time.
For more information on saving to OneDrive or SharePoint, coauthoring, or using AutoSave, see:
OneDrive and SharePoint
-
Save a document to your OneDrive
-
Should I save to OneDrive or SharePoint
-
How does versioning work in a SharePoint list or library
-
Restore a previous version of an item or file in SharePoint
-
Enable and configure versioning for a list or library
Coauthoring and AutoSave
-
Document collaboration and coauthoring
-
Video: Coauthor Office files
-
What is AutoSave
-
Turn on AutoSave
Need more help?
Table of Contents
- How do you add version numbers in Word?
- How do I create a version in Word?
- How do you insert a revision symbol in Word?
- How do I create a document version control?
- How do I use version control in Word?
- How do you write version control?
- Where do you put the version number on a document?
- How do you type a circumflex?
- How do I install version control in Word 2010?
- How do I create a version in numbers?
- How do I make a file version?
- How do I add a version number to a Word document?
- How to add the version number to a SharePoint document?
- How to create and set up multilevel numbering in word that?
- How can I use versioning in Microsoft Word?
Right-click the file and select the Version history option. The browser will open a new tab with a pane on the right with all the available versions for the document. Select and review the version. Click the Restore option.
How do you add version numbers in Word?
Inserting the Document Revision Number
- Position the insertion point where you want the revision number to appear.
- Display the Insert tab of the ribbon.
- Click Quick Parts (in the Text group) and then click Field.
- Choose Numbering from the Categories list.
- In the Field Names list choose RevNum.
Saving Document Versions
- Choose Versions from the file menu. Word displays the Versions dialog box.
- Click on the Save Now button. Word displays the Save Version dialog box.
- Enter any comments you want associated with this version. (A good idea is to indicate why you are saving the version.)
- Click on OK.
How do you insert a revision symbol in Word?
Inserting Revision Symbols
- Click Insert Revision Symbol (Toolbox toolbar) or Toolbox > Revision Table > Insert Revision Symbol.
- Locate the revision symbol by clicking in the graphics area or by typing coordinates in the Command window and pressing Enter.
- To add additional revision symbols, repeat step 2.
How do I create a document version control?
How to Get Started with Document Version Control
- Add a table to the front page of the document with the author’s name, a summary of changes in that version and the date.
- Add a version number that increases in increments.
- Versions are 0.1, 0.2, etc.
- Subsequent edited versions become 1.1, 1.2 or if it’s a major update 2.0.
How do I use version control in Word?
Office has built-in, automagic version control. Every time you save a file a new “version” is created. To view, compare, and restore previous versions of a document, select File -> Info -> Versions (File -> History in Office Mobile).
How do you write version control?
Where do you put the version number on a document?
Add a version control table to the front of the document that records:
- the version number.
- the author.
- a brief summary of changes in that iteration of the document.
- the date.
How do you type a circumflex?
A long press on any vowel key on your iPhone, iPad, or Android mobile phone or tablet keyboard displays options for the key you are pressing. One of those options is the circumflex mark. Slide your finger to the option you want to use. Thank you for signing up!
How do I install version control in Word 2010?
Manage Auto-Saved Versions Click on File | Info | Versions and select required version based on the given time-stamp. Selected auto-save version of the document will open in read-only mode.
How do I create a version in numbers?
Version numbers usually consist of three numbers separated by dots. For example: 1.2. 3 These numbers have names. The leftmost number (1) is called the major version….Reading version numbers
- If the major version is higher, your version is newer.
- If the minor version is higher, your version is newer.
How do I make a file version?
Simple file versioning: Include information about the status of the file, such as “draft” or “final. For the final version, substitute the word FINAL for the version number. Only save as FINAL when no more edits will be made. Include information about changes that were made, such as “original” or “cropped”.
How do I add a version number to a Word document?
We can use Quick Parts in Word document to add the Version number in the Word. This requires to configure in both SharePoint and your Word document. Click on “Versioning settings” and make sure that you’re either having it “create major versions” or “create major and minor (draft) versions”.
We can use Quick Parts in Word document to add the Version number in the Word. This requires to configure in both SharePoint and your Word document. To configure document library in SharePoint: Click on Settings > Document Library Settings.
How to create and set up multilevel numbering in word that?
Select the text that you want to number (this can be a section of text or the whole document). 2. Select the Home tab. 3. Click the multilevel numbering icon in the Paragraph group. 4. You can either select an existing layout from the list to use as a starting point, or you can create a new numbering system from scratch.
How can I use versioning in Microsoft Word?
To use versioning in Word, you need to store your documents in either OneDrive or in a SharePoint Library. When documents are stored online, you can turn on AutoSave to automatically save as your work. You can also share documents by inviting someone to the library, or providing a link rather than sending a discrete copy of the document.
I’ve been having a crack at using fields in Word 2007 and have hit a slight stumbling block. I want to add a field which I can use in several parts of the document to represent the current version (something of the form v0.1 but I can’t see an obvious way to do it).
The only provision I’ve found for this is something called RevNum but that gets updated every time I save the document.
Is there a field I’ve missed or a way of adding custom fields or something?
![]()
asked Apr 30, 2010 at 7:50
![]()
You can create a custom Document Property (View or change the properties for an Office document):
Click the Microsoft Office Button Button image, point to
Prepare, and then click Properties.In the Document Information Panel, click the arrow next to
Document Properties, and then click
Advanced Properties.In the Document Properties dialog box, click the Custom tab.
In the Name box, type a name for the custom property, or select a name
from the list.In the Type list, select the data type for the property that you
want to add.In the Value box, type a value for the property. The value that you
type must match the selection in the
Type list. For example, if you select
Number in the Type list, you must type
a number in the Value box. Values that
don’t match the property type are
stored as text.Click Add.
Then insert the custom Document Property into your document (Add property information to a document):
Click where you want to add a property control in your document.
On the Insert tab, in the Text group, click Quick Parts.
Click Document Property, and click the control that you want.
![]()
answered Apr 30, 2010 at 7:58
![]()
ShevekShevek
16.5k7 gold badges46 silver badges75 bronze badges
3
On Office 365, seems you need to do it slightly differently to the above answers. You need to add a custom property to the document, and then access it indirectly via a «DocProperty» field.
To make the custom property
- Click File > Info.
- Click the drop-down triangle next to Properties on the right.
- Click Advanced Properties.
- Click Custom tab.
- At Name: type a name for the property, e.g. «Version».
- At Value: type its value, e.g. «0.3».
- Click OK. The dialogue closes.
To insert it in your document
- If you’re in the Info screen, Click the (<-) back arrow top-left to go back to the main Word screen.
- Click the Insert tab.
- In the Text tools, click the Explore quick parts button; click Field… to open the Field dialogue.
- At Categories: select Document Information.
- At Field names: select DocProperty. The Field properties pane changes to show the properties.
- At Property: click Version (or whatever you called the custom property).
- Click OK. The version number appears in your doc.
Whenever you change the value of the custom property, the document changes too.
![]()
answered Apr 19, 2016 at 15:48
![]()
Rob MRob M
511 silver badge3 bronze badges
Revision Number is not the same as document version. Revision Number gets updated every time a document is saved, whether the document is updated or not. IMO the version number should be manually set in the document properties itself, along with Author, Title etc, and these should be readable. However, MS in their infinite wisdom haven’t included «Version» as a selectable document property/field. Why have it in document properties if you can’t dso anything with it in the document itself like you can with other properties? Bravo MS. Again.
answered Nov 8, 2019 at 10:41
![]()
Update to Office365,
- Click Insert Tab
- Click Quick Parts, choose Field
- Scroll to RevNum, select Numeric format, press OK
answered Sep 23, 2019 at 13:26
![]()
1
 Please Note:
This article is written for users of the following Microsoft Word versions: 2007, 2010, 2013, 2016, 2019, Word in Microsoft 365, and 2021. If you are using an earlier version (Word 2003 or earlier), this tip may not work for you. For a version of this tip written specifically for earlier versions of Word, click here: Inserting the Document Revision Number.
![]()
Written by Allen Wyatt (last updated July 9, 2022)
This tip applies to Word 2007, 2010, 2013, 2016, 2019, Word in Microsoft 365, and 2021
Every time you save a document in Word, the information in the document properties is updated. Part of the information is a count of how many times the file has been saved. This is referred to as the revision number. You can insert the revision number in your documents and have it updated automatically, if you so desire. To insert the revision number in your document, follow these steps:
- Position the insertion point where you want the revision number to appear.
- Display the Insert tab of the ribbon.
- Click Quick Parts (in the Text group) and then click Field. Word displays the Field dialog box.
- Choose Numbering from the Categories list. Word updates the choices in the Field Names list. (See Figure 1.)
- In the Field Names list choose RevNum.
- Click on OK to close the dialog box and insert your field.
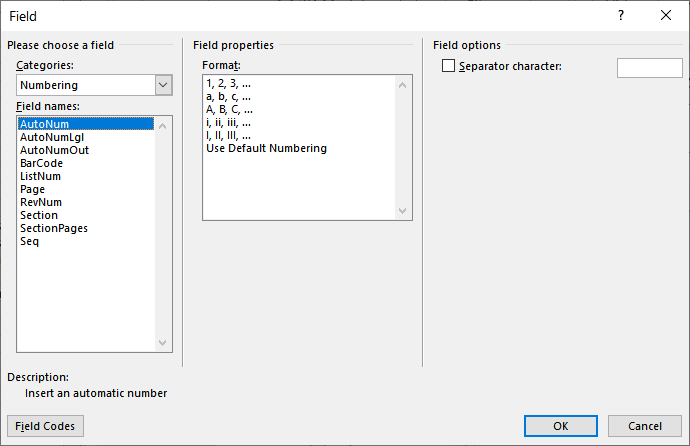
Figure 1. The Field dialog box.
WordTips is your source for cost-effective Microsoft Word training.
(Microsoft Word is the most popular word processing software in the world.)
This tip (6062) applies to Microsoft Word 2007, 2010, 2013, 2016, 2019, Word in Microsoft 365, and 2021. You can find a version of this tip for the older menu interface of Word here: Inserting the Document Revision Number.
Author Bio
With more than 50 non-fiction books and numerous magazine articles to his credit, Allen Wyatt is an internationally recognized author. He is president of Sharon Parq Associates, a computer and publishing services company. Learn more about Allen…
MORE FROM ALLEN
Changing the Way Endnotes Are Numbered
Word is flexible on how it numbers your endnotes. This tip shows how easy it is to make the changes to the numbering system.
Discover More
Deleting a Bookmark
Create a bookmark and you may, at some future point, need to delete that bookmark. It’s easy to do, as described in this tip.
Discover More
Saving Documents as Read-Only by Default
When you save your documents, you can specify that they be saved in a «read-only» format so that they cannot be changed …
Discover More

Do More in Less Time! Are you ready to harness the full power of Word 2013 to create professional documents? In this comprehensive guide you’ll learn the skills and techniques for efficiently building the documents you need for your professional and your personal life. Check out Word 2013 In Depth today!
More WordTips (ribbon)
Indicating the Date Changes were Last Made
Do you want to keep track of when changes were made to your document? This tip looks at a couple of ways to do it, along …
Discover More
Referencing Fields in Another Document
Sometimes you may have two documents that are so integrally related to each other that the one document may require the …
Discover More
Exactly Positioning Text
If you need to control exactly where text will appear on the page or relative to other text, you need to know about the …
Discover More
Subscribe
FREE SERVICE: Get tips like this every week in WordTips, a free productivity newsletter. Enter your address and click «Subscribe.»
View most recent newsletter.
Videos
Links and Sharing

For the last lesson in this Geek School series, we’re going to talk about keeping track of versions in Word and comparing and combining documents.
The Versions feature in Word was removed in recent versions of Word. In Word 2013, the only way you can access previous versions of a document in Word is to open previous automatically saved (autosaved) versions of the document. You can also open recent unsaved documents. However, there is no formal versioning feature in Word. We will show you an alternative you can easily add to Word for free that will provide this capability.
If multiple people have worked on different copies of the same file, instead of using the Track Changes feature on one copy of the file, you can compare the two versions of the file to see the differences. Word contains a comparison tool that allows you to compare two files, as long as they have different file names. We will show you how to use this feature and how to read the results of the comparison.
In addition to comparing documents, you can combine documents after comparing them. We will show you how to merge two versions of the same document and also how to easily merge two different documents, in case multiple authors have worked on separate parts of a document.
Once all changes have been made, the necessary comparisons made, and combining of documents done, you can easily share your document using Microsoft OneDrive. You can also use OneDrive at any point in the collaboration process to provide access to the document for other reviewers.
Keep Track of Versions of a Document
Word used to have a formal versioning feature that allowed you to save different versions of a document within the document itself. That feature has gone away and the only way you can retrieve previous versions of a document is through the Auto-Save feature or by accessing unsaved documents, if available.
By default, Word automatically saves your document at certain intervals. This is the Auto-Save feature. To go back to a previously, automatically saved copy of your document, click the “File” tab and select an “(autosave)” item from the list under “Versions.”

You can also increase or decrease the interval for the Auto-Save feature in Word.
If you have closed your document by accident without saving, or you lost power and the computer unexpectedly turned off, you can recover unsaved documents. To do this, click the “File” tab and click the “Manage Versions” button on the “Info” screen. Select “Recover Unsaved Documents” from the drop-down menu.
If any unsaved files were available, they would be listed on the “Open” dialog box that displays.
Alternatives for Saving Versions of a Word Document
There are alternatives for adding a versioning system to Word. One is an add-in for Word, called Save Versions, and another is a plugin that works with an external version control program called Perforce.
The Save Versions add-in allows you to easily save numbered versions of a Word document from within the file.
Perforce is a version control program that is available for free for up to 20 users. They provide a plugin for Microsoft Office that allows Microsoft Word, Excel, PowerPoint, and Project files to be easily stored and managed in Perforce from within the programs.
Compare Two Versions of the Same Document
If a reviewer has forgotten to use the “Track Changes” feature, and you didn’t lock it on in the document, you can still compare the two versions of the document and accept and reject changes based on the comparison. All you need is your original document and the revised document. Each file must have a different name.
The “Compare” and “Combine” features are similar, but each has its purpose. If you only have two documents you want to compare, and the neither one contains tracked changes, use the “Compare” feature. If you have two or more documents that contain tracked changes, and you need to keep track of who changed what and when, use the “Combine” feature, described later in this lesson.
To compare the original and revised versions of a document, click “Compare” in the “Compare” section of the “Review” tab and select “Compare” from the drop-down menu.
NOTE: You can’t compare two documents if either of them is protected for tracked changes or has any kind of document protection applied. Remove the document protection to continue comparing the documents. See Lesson 2 for information on how to unlock the tracked changes feature and Lesson 4 for information about removing formatting and editing restrictions from a document and a password assigned to a document to open it.
On the “Compare Documents” dialog box, select the “Original document” from the drop-down list.
Select the “Revised document” from the drop-down list. Under the “Revised document,” specify a label to apply to the changes so you know who made them in the “Label changes with” edit box. It can be a user’s name or whatever you like.
Click “More” to access more options.
In the “Comparison settings” section, select the items you want to compare in the two documents. By default, all items are selected.
NOTE: The “Insertions and deletions” item is always grayed out and always checked. When you use “Compare” or “Combine”, insertions and deletions will always be compared.
In the “Show changes at” section, choose to compare character by character (“Character Level”) or word by word (“Word level”). “Character level” allows you to see the exact changes that were made. For example, if the original document has the word “to” and the revised document has the word “too,” to which an “o” was added, the “Word level” setting would show you that “to” was replaced with “too.” However, the “Character level” setting would show the fact that an “o” was added.
By default, the “Compare” feature puts the changes into a new document, as shown in the “Show changes in” section. However, you can choose to put the changes into the “Original document” or the “Revised document.”
Click “OK” once you’ve made your selections.
The comparison between the two documents is made and the changes are displayed in the specified document. In our example, we chose to accept the default of showing the changes in a new document. The “Original document” and the “Revised document” both display in a pane to the right of the “Compared Document” to be used for reference. They cannot be edited.
If you don’t see the pane containing the original and revised documents, click “Compare” in the “Compare” section of the “Review” tab. Then, select “Show Source Document” and then “Show Both.” You can also choose to “Show Original” or the “Show Revised,” if you don’t want to view both.
The “Reviewing pane”, discussed briefly in Lesson 2 and in more detail in Lesson 3, also displays to the left of the “Compared document.”
In the “Compared document,” you can go through the tracked changes, just as discussed in Lesson 2, accepting or rejecting each change.
Then, save the compared document with a different name and you’ll have a document containing changes from both the original and revised documents.
Combine documents
When you have multiple documents containing tracked changes that you need to compare, it helps to be able to keep track of who made which changes and when. The “Combine” command allows you to merge the tracked changes from each document, two at a time, until all changes from all documents have been incorporated into one document.
NOTE: This is not the best way to review documents and incorporate changes. It’s best to share documents and have other people review them sequentially, using “Track Changes.” However, if that was not done, the “Combine” feature can help you gather and incorporate changes made by all reviewers.
Also, as with the “Compare” feature, you can’t combine documents if any of the documents are protected in any way. Remove protection from the documents before combining them.
Combine Multiple Versions of the Same Document
To start combining the first two documents, click “Compare” in the “Compare” section of the “Review” tab and select “Combine” from the drop-down menu.
The “Combine Documents” dialog box is essentially the same as the “Compare Documents” dialog box discussed in the previous section.
For the “Original document” select the earliest version of the original document and then select one of the reviewers’ versions of the document as the “Revised document.” Enter labels for the “Original document” and the “Revised document” using the corresponding “Label unmarked changes with” edit box. This allows you to see who made which changes.
Just as you did when comparing documents, select the “Comparison settings,” the level for “Show changes at,” and which document to “Show changes in.” When combining more than two documents, it might be a good idea to show the changes in the “Original document,” making sure you make a copy of it first, and use the same original document when comparing to each reviewer’s document. This allows you to “gather” all the changes into the original document.
The “Combined Document” displays with all the changes tracked and marked with the specified labels and times. If the changes in the “Revised document” were not tracked, the revision time will be the time the documents were combined, which will be essentially useless.
You can wait until combining all the reviewers’ documents before reviewing and accepting and rejecting editing changes. However, before combining additional documents, you must resolve all formatting changes because Word cannot retain multiple formatting revisions.
The easiest way to do this is to use the “Show Markup” menu to only show the “Formatting” markup. Select “Comments,” “Ink,” and “Insertions and Deletions” so there are no check marks to the left of those options. Only the “Formatting” option should have a check mark. Then, review all the tracked formatting changes and accept or reject each change.
NOTE: If you’re not using tablet, the “Ink” option is irrelevant. It does not matter if that option is on or off.
Once you have resolved all the formatting changes, you can compare the new original document with the next revised document. Continue until all the revised documents have been combined into the original. When this is done, you’ll have a version that contains all of the changes and each change will be marked with who made it. Again, the times when the changes were made are only accurate if the changes were tracked in each revised document.
Now, you can show all the markup using the “Show Markup” menu (turn “Comments” and “Insertions and Deletions” back on – turn on “Ink” only if you are using a tablet) and review all the changes, accepting or rejecting each change.
Merge Two Different Documents
There may be times when multiple authors are working on different parts of a document and you need to combine those separate parts into one document. That’s easily accomplished in Word. Open the main document into which you want to add the other documents and place the cursor at the point where you want to insert another file. Click the “Insert” tab.
In the “Text” section, click the down-arrow on the “Object” button and select “Text from File” from the drop-down list.
On the “Insert File” dialog box, navigate to the location of the file you want to insert, select the file, and click “Insert.”
NOTE: You can also insert a link to a file, which is recommended if that file is going to change. Instead of clicking the “Insert” button, click the down-arrow on the “Insert” button and select “Insert as Link.” An “INCLUDETEXT” field code is inserted, rather than the file’s contents.
When you insert the contents of a file using the “Text from File” option, the styles of the current document are applied to the contents of the incoming file. If styles were used in the incoming file, the formatting of the inserted text will most likely change to the formatting of the current document. However, any information about paper size, orientation, margins, and other Page Layout settings will be discarded and replaced with the settings from the current document.
Share a Document Using Microsoft OneDrive
You can use OneDrive to share your document with other reviewers. A document can be saved to and opened from your OneDrive account directly from within Word, as long as you’re signed into your Microsoft account. To share your document with others, simply click the “File” tab and then click “Save As” from the list of options on the left. On the “Save As” screen, click the “OneDrive” option and then click the “Browse” button on the right.
As long as you have an internet connection, the “Save As” dialog box displays showing you the files and folders in your OneDrive account. Choose a folder in which to save your document (or create a new folder), enter a file name, and click “Save.”
For other people to be able to access the document on OneDrive, you must share the file, or the folder containing the file. See the help on OneDrive’s site for information on how to do this.
Conclusion
And that’s it for the How-To Geek School’s Guide to Using Word in a Team Setting!
It’s been fun, we’ve learned a lot, and hope you did too! If you missed any part of this series, or simply want to review something again, you can easily do so by clicking any of the links in the table of contents at the beginning of the article.
READ NEXT
- › This New Google TV Streaming Device Costs Just $20
- › BLUETTI Slashed Hundreds off Its Best Power Stations for Easter Sale
- › HoloLens Now Has Windows 11 and Incredible 3D Ink Features
- › How to Adjust and Change Discord Fonts
- › The New NVIDIA GeForce RTX 4070 Is Like an RTX 3080 for $599
- › Google Chrome Is Getting Faster
- Remove From My Forums
-
Question
-
Hello,
I will try to explain this as best as I can so forgive me if I fail!
When updating and saving a document in SharePoint the version number is changed automatically in the version history (1.0, 2.0, etc)
Is there any way to automatically add these version numbers from the version history «No.» field to the document that is being edited automatically?
I have created a template and would like to pull the version history from SharePoint so that it automatically populates in the document itself along the header (so it can be seen as the document is edited). E.g. fill in the «Version» field in the
header as below with whatever version number is displayed in «Version history» on SharePoint.I hope this makes sense?
Many thanks
-
Edited by
Friday, August 31, 2018 2:11 PM
-
Edited by
I’m trying to work out a way to display the contents of the version column from SharePoint (i.e. the value that changes every time a file is checked in) as a field (or something similar) inside of a Word document.
Ideally, I’d like to know how to configure SharePoint so I could click something like «Insert > Quick Parts > Document Property > Version», and it would include the version in the document. The goal is to make it easier for someone to correlate a printed version of a document with the version history of SharePoint.
I have been able to add editable text columns to the Document content-type and have them show up as document property quick parts. I’ve also been able to add a calculated column which gets the version as a text string… however this calculated column isn’t showing up in Word as a document property. (Perhaps I’m missing a setting on the calculated column)
![]()
asked Feb 3, 2009 at 18:03
![]()
This is one way to get the version in your document, it’s a bit painful to get it working…
- Enable versioning and content types on your document library.
- Go into document library settings and select the content types you want the version to appear in.
- Select Information management policies settings from the content type menu.
- Select define a policy and click .
- Click on the ‘Enable Label’ Check box
- Do not Check the other two boxes in the Labels section.
-
In the Label Format field, enter the metadata fields in the following format:
Version : {Version} n -
Set the label appearance and click on preview.
- Click at the bottom of the page.
- Go back to the library and create a new document using the content type you have modified.
- Save the file as a Word 2007 format.
- Select the insert tab
- Select Quick Parts from the Ribbon menu and hover over document property
- Select Label from the properties list
- This should display the metadata defined in your label as a field in your word document. The field will update automatically when you next open the document.
- Save.
answered Feb 26, 2009 at 13:03
![]()
8
This requires configuring both SharePoint and your Word document.
TO CONFIGURE SHAREPOINT’S DOCUMENT LIBRARY:
- Go to the document library where you plan to store your version-controlled documents.
- Click on Settings > Document Library Settings
- Click on «Versioning settings» and make sure that you’re either having it «create major versions» or «create major and minor (draft) versions».
- Click OK.
- Click on «Information management policy settings»
- If your library can handle multiple content types, you’ll see a list of them. Click on «Document». If it can only handle one content type, skip this step.
- Select «Define a policy…» and click OK.
- Check the «Enable Labels» box, but don’t check either of the other two boxes in that section.
- Type
{Version}into the «Label format» box. - (Optional) You can format the version label.
- Click on the «Refresh» button to see a preview of your version label. It will say something like {_UIVersionString}
- When you’re satisfied with the label’s appearance, click OK.
- To get back to your document library, click on the document library’s name in the breadcrumb trail at the top of the page.
TO CONFIGURE YOUR WORD DOCUMENT:
- Either create a new document in the library or upload one.
- Open the document and edit it.
- Put the cursor wherever you want the version label to appear.
- Go to Insert > Quick Parts > Document Property > Label
- The version label «{_UIVersionString}» will show up in the document.
- Save the document (and choose what the next version should be). You’re all set!
- If you want to test it, close the document and reopen it. The updated version will automatically appear where you put the version label.
These instructions were based on Erwin’s answer.
answered Sep 15, 2009 at 19:18
![]()
RachelRachel
1891 gold badge2 silver badges5 bronze badges
1
I followed Rachel’s instructions and they worked great. However, capturing this version update in the document does create a problem if you want to do electronic signatures. For instance, if your version is 1.6 and you decide this is the one for people to sign; you’ll find that when they sign it, the document will be saved as version 1.7. When you open the document again, the version 1.7 will not match the authorized version of 1.6 and you’ll be informed that all the signatures are invalid.
answered Jul 24, 2010 at 1:00
![]()
0
IMPORTANT:
In SP2010 you cannot save as a site template when Labels are enabled within a document library under Information management policy settings. The document library will get corrupted and even if we disable the policy, the save as site template function is still broken. The only option seems to be to permanently delete and rebuild the list.
answered Oct 6, 2011 at 10:25
![]()
The RevNum field that I think jaloplo is referring to is not the same as the SharePoint document version number. It updates every time you save the document, but seems to keep its own revision numbering system, correlated to (but independent of) the SharePoint version numbering system.
answered Aug 12, 2009 at 21:06
![]()
RachelRachel
1891 gold badge2 silver badges5 bronze badges
Try creating a calculated field in a custom content type. The field can be equal to the Version. That will give you the ability to add it as a property in the document. This only works well with Office 2007 docs.
Once a custom content type is created, you create a new document based on the content type.
After creating the document, you can extract the document information panel and save it. It is an info path form, so you can customise it if necessary and upload the customised panel to the content type.
answered Feb 3, 2009 at 19:49
![]()
NatNat
14.2k5 gold badges41 silver badges64 bronze badges
0
Erwin’s answer is spot on, but I wanted to leave this in case someone runs into the same issue I did. If you attempt to set the label for version on the site collection content type rather than at the document library level, you will get the error «The label reference, Version, could not be found.» when previewing or saving the Information Policy. Also, you will be unable to save a policy at the document library level if you have previously defined one at the site collection content type level. It must be set to «None» on the site collection content type. Probably should have been obvious to me from the start, but it wasn’t, and maybe this will help someone else down the line.
answered Apr 17, 2011 at 3:27
![]()
AaronAaron
412 bronze badges
All columns of a document library are document properties for a word document. To take the version of the document you have to show document properties and then select «advanced properties». In thit moment, you’ll see the classic document properties window and you can see the «Version» property in the last tab.
So, you can add the value of this property to your document in the place you want, for example, the footer.
answered Feb 5, 2009 at 22:09
![]()
jaloplojaloplo
9312 gold badges11 silver badges32 bronze badges
- Remove From My Forums
-
Question
-
Hello all,
I’m using Labels with the label format {Version} to display the SharePoint document version in MS Office documents stored on my company´s SharePoint site. This works fine if I open the document from the Word client application but if I open it from Word Web
App it displays the previous version number (a minor one). After half an hour or so, when I open the document in Word Web App, the version number is the correct one. I tought it was related with the IE cache so I cleaned it but the results were the same.
Is there any way around this?
Thanks a lot.-
Edited by
Friday, December 19, 2014 11:50 AM
-
Edited by
Answers
-
Hi,
By design. Versioning is a property of a SharePoint item. When displaying an item from SharePoint, Office Web Apps only checks if there has been any change to the file content. It does not check for changes in metadata (if the Properties of the file have
been modified). It then displays the cached image of the last modified version of the file instead of running a new file conversion. This is why the last minor version is displayed in the Content Control instead of the major version. This behaviour is completely
intended and designed to work this way. This is, in fact, a performance optimization. If we would not have this performance optimization in place, then this would mean that Office Web Apps would need to download the file again every time there is a metadata
change (which would, of course, mean overloading the SharePoint server).I found a similar thread as below, please refer to it for workaround:
https://social.msdn.microsoft.com/Forums/sharepoint/en-US/75c09197-934b-42ff-8de6-c321267dfd68/document-property-not-updated-when-viewing-a-word-document-in-office-web-apps
Regards,
Rebecca Tu
TechNet Community Support
-
Proposed as answer by
John NaguibMVP
Sunday, December 21, 2014 8:43 AM -
Marked as answer by
Rebecca Tu
Friday, January 2, 2015 7:58 AM
-
Proposed as answer by

Microsoft Office programs automatically save a copy of open files every ten minutes by default. Whenever the user closes a file without saving it, the user can always return to the most recently save temporary version. This type of feature is available in Microsoft Word, PowerPoint, Excel, and Publisher.
In this tutorial, we will explain:
- How to change the Autosave frequency.
- How to display the previous save file.
- How to display an unsaved document.
- How to delete all files
- How to delete a saved document from the list.
Document versions are temporary copied versions of open files and files that are not saved.
1] How to change the Autosave frequency
Open Microsoft Word.
Click the File tab.

In the Backstage View, click Options.
A Word Options dialog box will open.
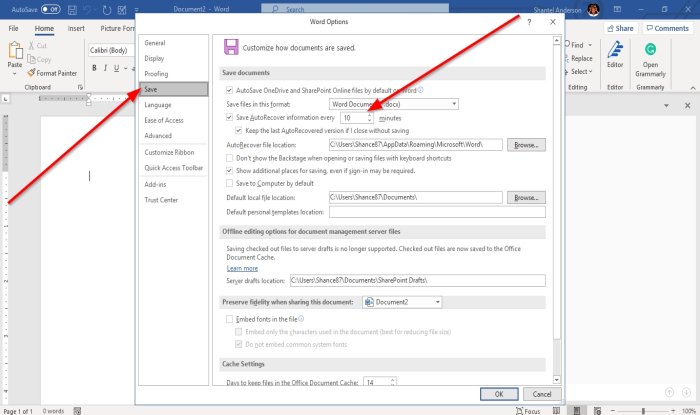
Inside the dialog box, click the Save tab.
On the Save page in the Save AutoRecover information every box, enter the number of minutes you want or use the up and down arrows to input the minutes.
Then, click OK.
2] How to display the previous save file
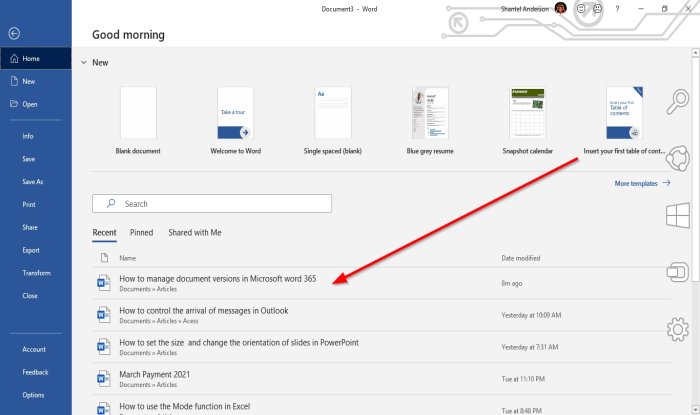
Click File.
In the Backstage View on the Home page under the Recent section, you will see previously saved files.
3] How to display an unsaved document
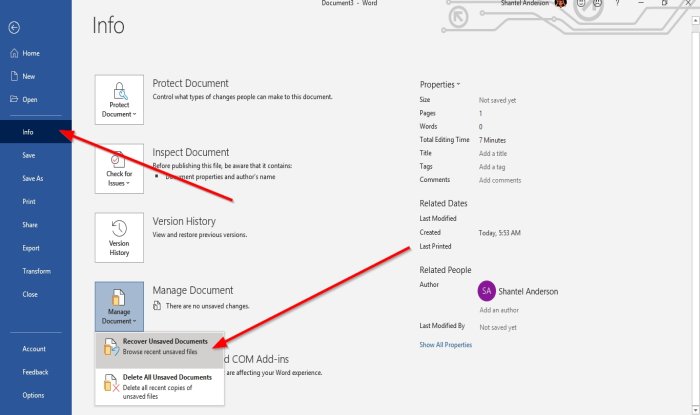
On the Backstage View, click Info.
On the Info page, click the Manage Document button.
In the Manage Document shortcut menu, select Recover Unsaved Documents.
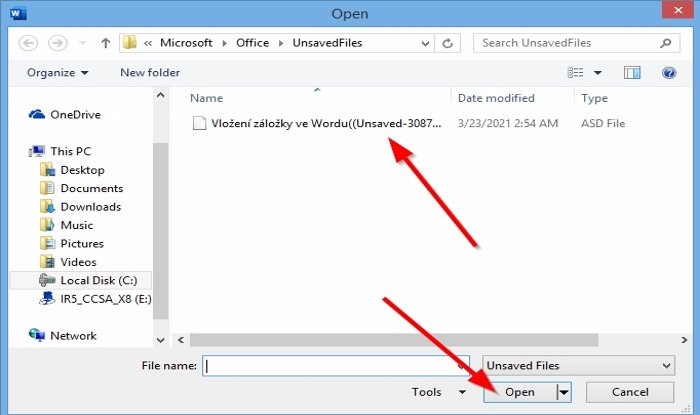
An Open dialog box will appear displaying the unsaved file.
Click the file, then click Open.
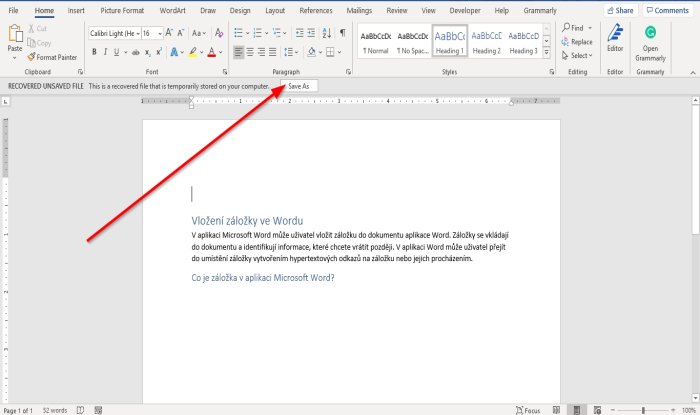
Your file is open; if you want to save the unsaved file, click the Save As banner on top of the document and save the file.
There is another method to recover an unsaved file.

On the Backstage View, on the Home page, on the bottom right, click More Documents.

On the Open page, click Recover Unsaved Documents.
An Open dialog box will open; click the file and click Open.
4] How to delete all Unsaved Documents
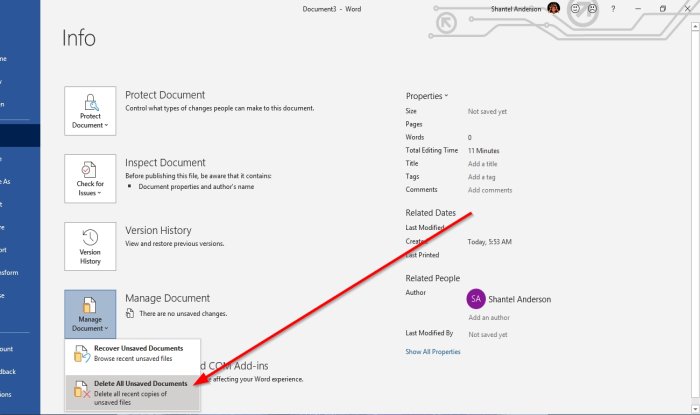
On the Backstage View, click Info.
On the Info page, click the Manage Document button.
In the Manage Document shortcut menu, select Delete all Unsaved Documents.
A message box will pop up; click Yes.
The Delete all Unsaved Documents feature will delete all copies of unsaved files.
5] How to delete a saved document from the list
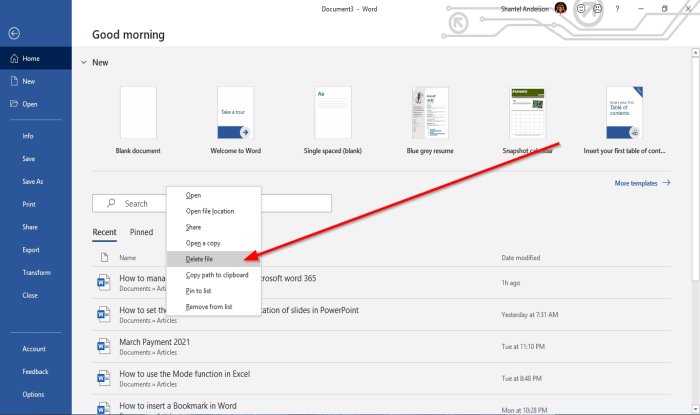
On the Backstage View on the Home page.
Under the Recent section, right-click one of the saved documents from the list.
In the shortcut menu, select Delete File.
A message box will pop up; click Yes.
It is deleted from the list.
Read: How to insert Random Text in Microsoft Word.
I hope this helps; if you have questions, please comment below.