

UPDATED ✅ Do you want to know more about how to insert titles in Microsoft Word documents? ⭐ ENTER HERE ⭐ and learn everything FROM ZERO!
East text processor has become the main tool for most users when they have to prepare a report. And it is that here you can find a large number of tools that will help you achieve results very good at writing.
One of the most important things when carrying out a wording is the titles, since these will always be present in any text. It is because of that Word has a specific tool for them, which will allow you to use them according to your needs.
In this way, here we are going to teach you what are the main steps to insert titles in your Word documents in an easy and fast way. To do this, follow in detail everything that we will teach you in the post.
What are the main types of titles that we can insert in Word?
Microsoft Word It has different tools that will allow you add titles to your essays, this will help you create much more professional and attractive text for the reader. To insert this item into your worksheet You can do it in two ways, either using the tool “Insert” or the tool “Format”.
This means that currently there are two types of headline styles on the platform that you will be able to use, each of them It will depend on the situation in which you want to use them.
That is why here we present each of these types:
Using the Insert Title tool

The first option available is Insert, in this case you will have three types of default titles, in this case you can add numbered labels like “Equation 1”, “Illustrations 1”, “Table 1”, or you can yourself create your own label according to your needs.
This type of title is mainly used when you want to present some image, some data table or a mathematical or chemical formula and they usually go marked with a number. Is very common to read a book or report both digital and physical and see that everyone the objects added in it like images, tables, equations or any other are marked with a number which is increasing as these appear.
This means that this title type is used to carry a sequence of each of the objects that are added to the text. In case you have to remove some of them, example Illustration 4, you will be able modify the enumeration of all the others in an easy and fast way. Also, you can accompany “Illustration 4” with some extra phrase or word.
Using heading formats

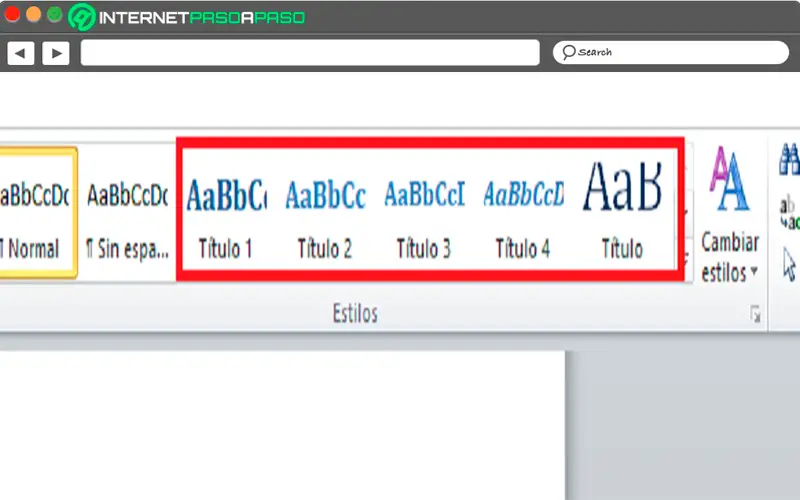
The other tool that can be used to carry out the titles of the text Its the the formats found in the section on “Styles”. In this case you will find five completely different title types what are you going to be able to apply throughout your text.
In this case these formats are applied to indicate the main title of a text or chapter. That is, if your writing consists of several chapters then you can go using each one of them along the same. In this case you will get a text of a different size than the rest of the worksheet with a new style and color, this with the aim that stand out and can be grasped quickly.
Therefore, with the title formats you will be able to present your articles or chapters during writing, while with the insert tool you will be able present the different objects that are added to the text as they are pictures, equations, data tables, graphsamong others.
Steps to insert titles in Microsoft Word documents easily and quickly
Considering what they are types of titles that can be insert into word worksheet, here we are going to explain what are the main steps What do you have to do to apply each of them?
In this way, follow each of the methods that we will explain below in detail:
Insert
The first method that we present to you is about using the “Insert title”, As we explained before, this is mainly used for present some kind of object that is added to the text how is one illustration, chart, graph, equation, among others.
Therefore, follow each of these steps to be able to apply this tool to your texts:
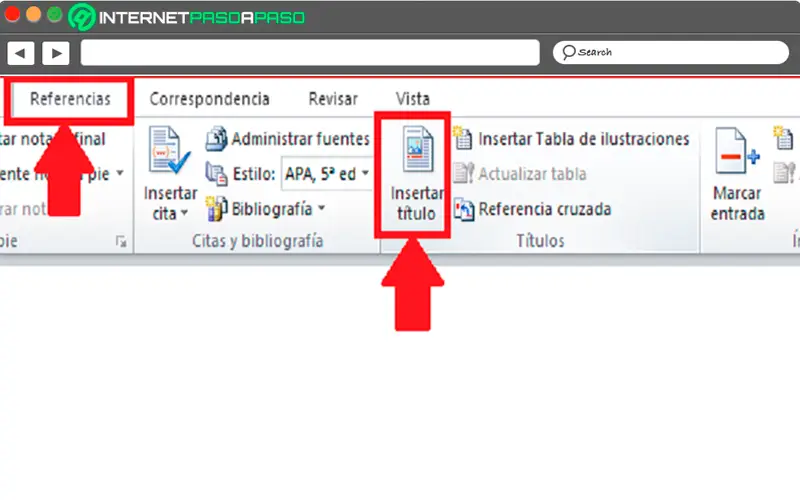
- Once you have entered Microsoft Word You must go to the ribbon, there select the tab of “Reference”.
- Now you will find the section of “Titles”, here you must click on the icon “Insert title”.

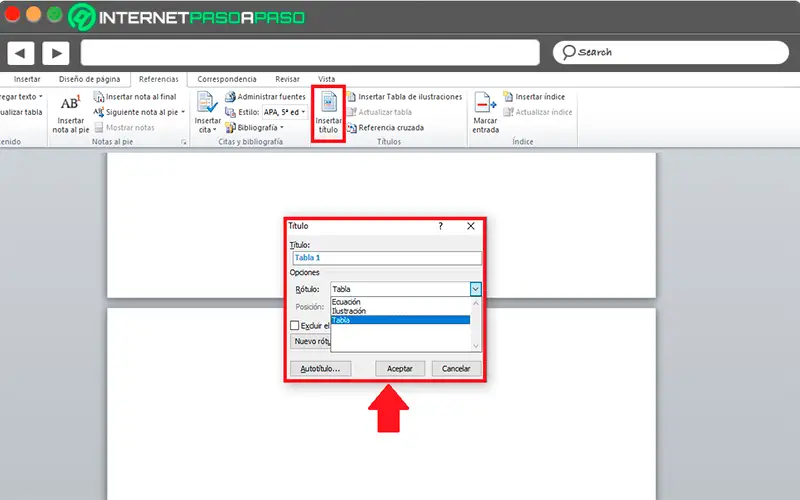
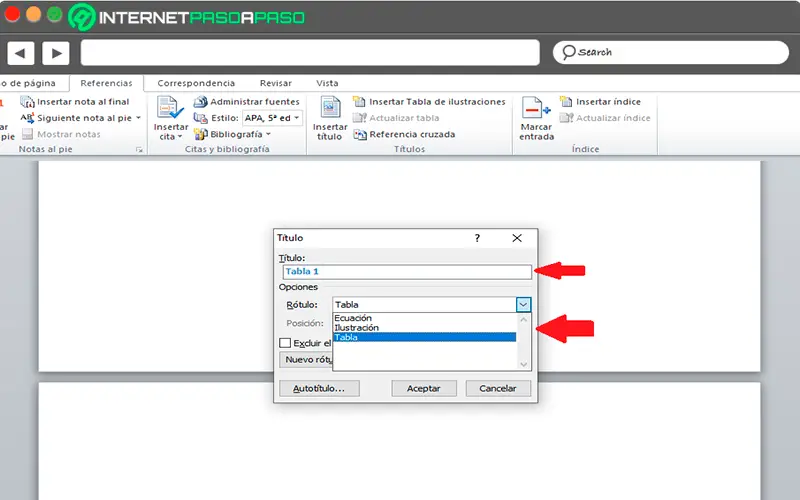
- Then a window will appear in the middle of your screen where you will find different options, as you can see a title and below the option “Label”, which you can scroll to see the options availablein this case you can see the items of “Table”, “Equation” and “Illustration”.

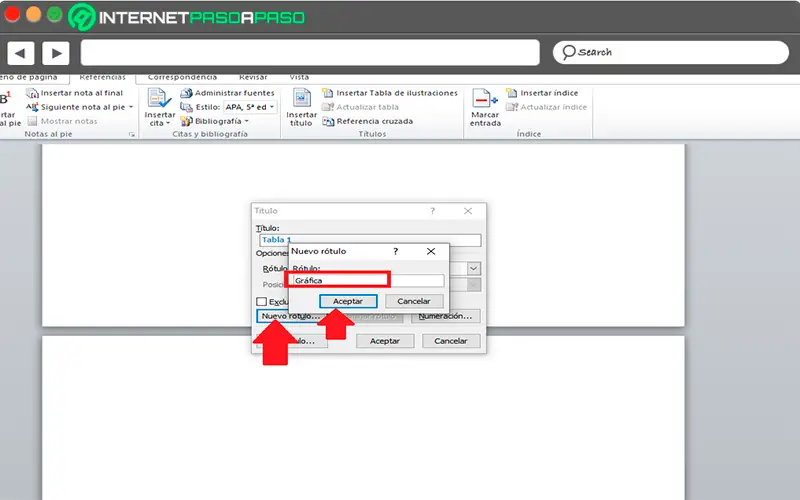
- Here you must select those that you want to use, either because you are going to add an image, a mathematical or chemical formula or a data table. in case you want add a graphyou can also create your own label which you can call “Graphics” to do this you must click on “New label” and you will automatically see a mini window where you should insert the name of “Graph”.

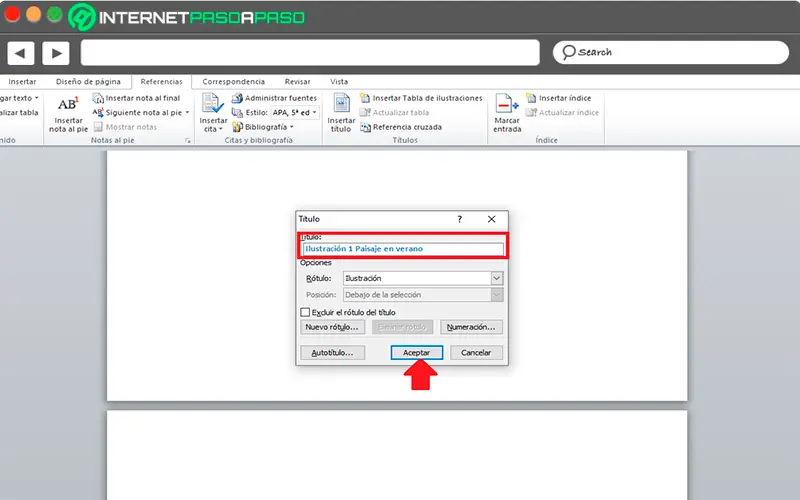
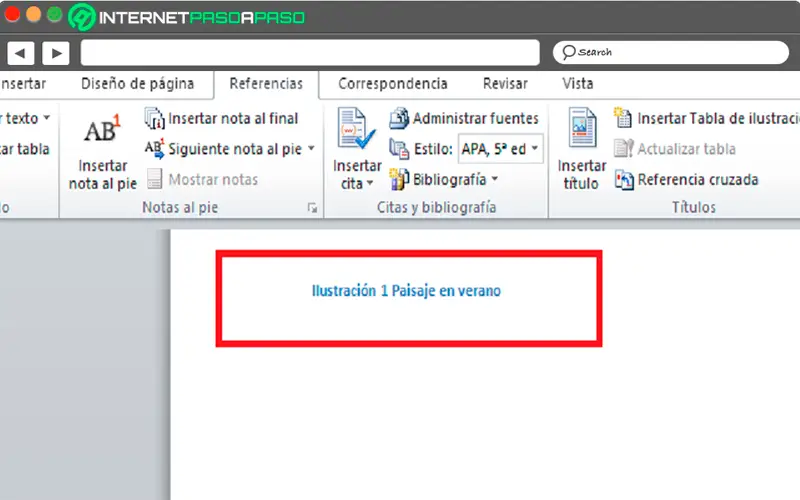
- Once you have the label selected, in the part of Title you will be able add something extra in this case has been selected “Illustration 1” so you can write “Illustration 1 landscape in summer” This will allow you to explain a little more about what is about or signifies the image or object you are adding to the text. When you have added the corresponding text, the following will be to click on “To accept” for that element to be applied to the text.

- This way you can start add this tool in each of your texts and so have a greater order when adding any type of extra element to your drafting.

apply formatting
As we mentioned before, the other method to be able to adding titles is through the formats, in this case these are used as main title of the text or to start a chapter of the same.
Therefore, to apply this tool to your text, you must perform the following steps:
- The first thing will be to enter the Word worksheet.
- When you are there you must write title of what you are going to write.
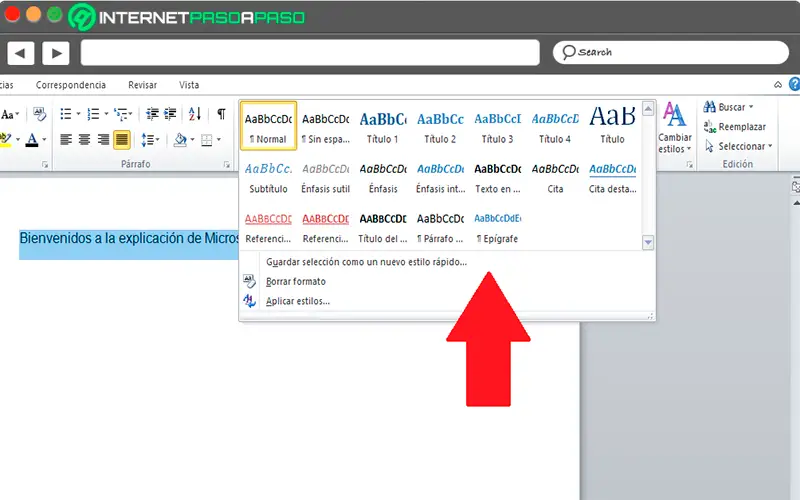
- Once you have written it, the next thing will be to select it and go to the tab of “Start” and there to the section of “Styles”.

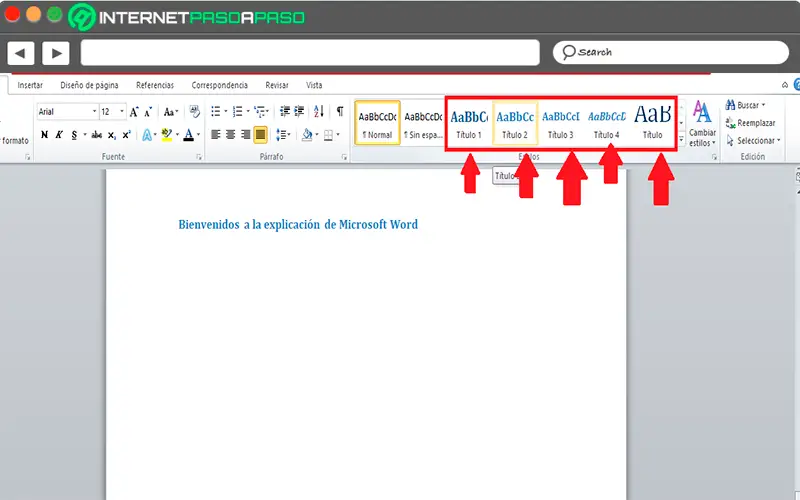
- there you will find the five options available to apply the title to your text, in case you want to see more options you can scroll the window clicking on the arrow located in the lower right corner. There you will see other categories like “Quotes”, “Subheadings”, “Reference”, “Paragraphs” among other.

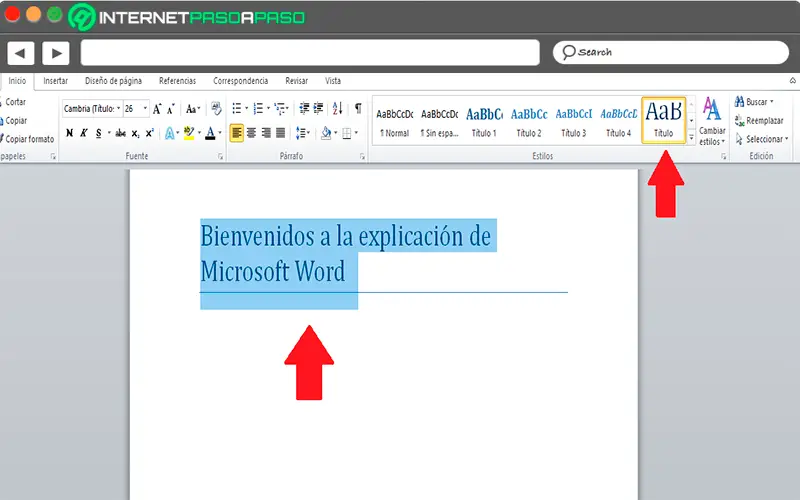
- once you have selected your text you should apply title option that you like, here you can try each of them and so you can check which of the five is more in line with what you are looking for. To select the one that you like the most, you just have to click on the icon.

- In this way you will have the title of your essay. a form of power improve the presentation of the text and make it much more professional.

delete title
If you have created a title and you did not like it or you have written something wrongthen it will be necessary delete it from the text. This process is very simple, it is done just like when any text in the paragraph is deleted. Therefore, in this case you should only select the title you have created and press the “Delete” key this way you can delete everything you don’t like.
Software
Click the “Title” button in the “Styles” group under the “Home” tab on the main menu ribbon to automatically apply a title style to your title text. Click the “Subtitle” button in the “Styles” group to automatically apply the recommended subtitle style to the selected text.
Contents
- 1 How do you create a title in Word?
- 2 How do I make a fancy title in Word?
- 3 Where is the title bar in Microsoft Word?
- 4 How do I add a title to a table of contents in Word?
- 5 How do you shade text in Word?
- 6 Where is the title bar in Windows 10?
- 7 What is the title bar in Word 2016?
- 8 What does title bar look like?
- 9 How do I insert a title style in a table of contents?
- 10 How do you make titles appear in table of contents?
- 11 Do you include title page in table of contents?
- 12 How do I use dictation in Word?
- 13 Is there a note taking template in Word?
- 14 How do I get rid of widow orphan control?
- 15 Where is the widow orphan control in Word?
- 16 How do you put a box around a border in Word?
- 17 How do I add a title bar?
- 18 Which toolbar is on the title bar?
- 19 How do I change my Windows title?
- 20 What is title bar in Word document?
How do you create a title in Word?
Inserting the Document Title in Your Document
- Position the insertion point where you want the title to appear.
- Display the Insert tab of the ribbon.
- Click the Quick Parts tool in the Text group and then choose Field.
- In the Categories list, choose Document Information.
- In the Field Names list choose Title.
How do I make a fancy title in Word?
Create a title style in Word to save time and mouse clicks
- Open a blank document and type Title.
- Select Title and click the Bold and Center buttons on the Formatting toolbar or Home tab.
- Change the font to 22 points.
- Click anywhere in your title text.
Where is the title bar in Microsoft Word?
We will start with the Title bar, which is located at the very top of the screen. On the Title bar, Microsoft Word displays the name of the document you are currently using.
How do I add a title to a table of contents in Word?
(3) To add a Heading to the Table of Contents, highlight the added heading on the document, and click on the correct “Heading” button ( e.i. Heading 1, or Heading 2, etc.) at the “Styles” Section from the “Home” Tab.
How do you shade text in Word?
Apply shading to words or paragraphs
- Select the word or paragraph that you want to apply shading to.
- On the Home tab, in the Paragraph group, click the arrow next to Shading.
- Under Theme Colors, click the color that you want to use to shade your selection.
Where is the title bar in Windows 10?
The title bar is at the top of every window in Windows 10. This includes three buttons at the top right corner of the window and a title for each open window. There are a number of ways you can customize the title bar with a few extra software packages and the options included in Windows 10.
What is the title bar in Word 2016?
name of current document
Title Bar: The title bar displays the name of current document. For the first time it is document when you saved your document the will display on the title bar. C. Sign in: Here you can use most of Microsoft word functionality.
What does title bar look like?
A title bar is a small strip that extends across the top of a window. It displays the title of the window and typically includes the close, minimize, and maximize buttons. In macOS, these buttons are on the left side of the title bar, while in Windows, they are on the right.
How do I insert a title style in a table of contents?
To verify that the Title style will now be added to the Table of Contents:
- Choose the References tab.
- Click Table of Contents.
- Choose Insert Table of Contents…
- Click the Options… button.
- Scroll through the Available styles: list to make sure that the Title style now shows up and that it has the desired TOC level.
How do you make titles appear in table of contents?
To customize your existing table of contents:
- Go to References > Table of Contents.
- Select Custom table of contents.
- Use the settings to show, hide, and align page numbers, add or change the tab leader, set formats, and specify how many levels of headings to show.
Do you include title page in table of contents?
The Table of Contents should appear after the title page in the document. To create the Table of Contents manually, start a new page right after the title page.The Table of Contents should be on its own page. Do not include the introduction or a dedication on the same page as the Table of Contents.
How do I use dictation in Word?
Dictate in Word For the Web
Open a document and click the Dictate icon on the Home Ribbon and dictate your text. When finished, click the icon again to turn off Dictation. To see other languages available for dictation, click the Down arrow next to the Dictate icon and choose the language you’d like to use.
Is there a note taking template in Word?
Organize your notetaking with this notes template in Word. With place for a title and bullet points, a Microsoft Word note taking template is perfect for lectures, important meetings or teleconferences, sales pitches, and more.
How do I get rid of widow orphan control?
How to Turn the Widow Orphan Control Setting On or Off in Microsoft Word
- Open a document in Word.
- Select everything with Ctrl + A.
- Click the Home tab.
- Click the Paragraph button.
- Select the Line and Page Breaks tab.
- Click Widow/orphan control to remove the checkmark.
- Click OK.
Where is the widow orphan control in Word?
Control widow and orphan lines
On the Format menu, click Paragraph, and then click the Line and Page Breaks tab. Select the Widow/Orphan control check box.
How do you put a box around a border in Word?
Boxing text or paragraphs
Select the text you want to box in. Choose the Borders and Shading command from the bottom of the Border menu. The Borders and Shading dialog box appears. If you want to apply the border to only text (words) and not to the entire paragraph, choose Text from the Apply To drop-down list.
How do I add a title bar?
There are two ways to change title bar for your activity:
- Design time (that is, change title in AndroidManifest. xml file).
- By coding (that is, you can code to change the activity title).
Which toolbar is on the title bar?
The toolbar that is present on the left of the title bar is most frequently used commands in the application. Toolbars are mostly present in the word, office suite, web browsers and other such computing languages. Mostly, the toolbar hides the menu bar by default.
How do I change my Windows title?
Right-click on one of the selected windows commands and click Change Window Title. You can also use the Actions button to select the Change Window Title option. Set a common Window title for the selected windows that your want to change and click OK. The windows titles are changed to the new title that you’ve assigned.
What is title bar in Word document?
• Title Bar: A horizontal bar at the top of an active document. This bar displays the. name of the document and application. At the right end of the Title Bar is the Minimize, Maximize and Close buttons. •
![]()
Written by Allen Wyatt (last updated August 13, 2022)
This tip applies to Word 2007, 2010, 2013, 2016, 2019, Word in Microsoft 365, and 2021
Word keeps track of many pieces of information about your document. You can see the information maintained by Word in this manner:
- If you are using Word 2007, click the Office button and then click Word Options. In the resulting Word Options dialog box, you click Prepare and then Properties.
- If you are using Word 2010 or a later version of the program, display the File tab of the ribbon and then click Info | Properties | Advanced Properties.
If you search around through the information that Word maintains about a document, you’ll find that Word provides the opportunity to specify a title for your document. Once you set the title, Word allows you to insert this information into your document and have it updated automatically. This means you can set the title once in the document properties and then have it inserted in the header, footer, or heading for your document. That way, you only have to update it in one place and it will automatically be updated everywhere in the document.
To insert the document title into your document (after you have added it to the document’s properties, as described above), follow these steps:
- Position the insertion point where you want the title to appear.
- Display the Insert tab of the ribbon.
- Click the Quick Parts tool in the Text group and then choose Field. Word displays the Field dialog box.
- In the Categories list, choose Document Information. Word updates the choices in the Field Names list (right side of the dialog box). (See Figure 1.)
- In the Field Names list choose Title.
- Click on OK to close the dialog box and insert your field.
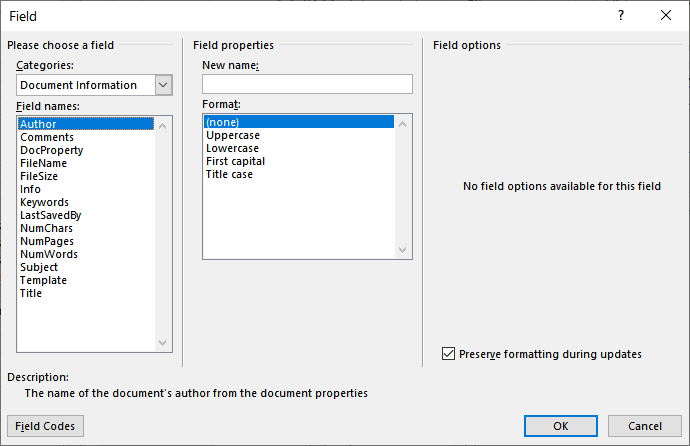
Figure 1. The Field dialog box.
WordTips is your source for cost-effective Microsoft Word training.
(Microsoft Word is the most popular word processing software in the world.)
This tip (6028) applies to Microsoft Word 2007, 2010, 2013, 2016, 2019, Word in Microsoft 365, and 2021.
Author Bio
With more than 50 non-fiction books and numerous magazine articles to his credit, Allen Wyatt is an internationally recognized author. He is president of Sharon Parq Associates, a computer and publishing services company. Learn more about Allen…
MORE FROM ALLEN
Checking for Time Input
Need to know if a cell contains a time value? Excel doesn’t contain an intrinsic worksheet function to answer the …
Discover More
Checking for Valid Hyperlinks
If you have a document containing a lot of hyperlinks, it would be cool if there was a way to check all those hyperlinks …
Discover More
Removing Confusion When Using AutoCorrect
AutoCorrect is a great help when writing, as it can allow you to create regular blocks of text easily. This can cause …
Discover More
More WordTips (ribbon)
Getting Rid of Fields Inserted by Third-Party Programs
Third-party programs can be used to affect a document and change what is contained therein. Of course, getting rid of …
Discover More
Inserting a Dynamic Word Count in Your Document
Need to know how many words are in your document? You can use the NumWords field to add that statistic, dynamically, to …
Discover More
Changing a Field Parameter
Fields are a powerful way to add dynamic content to your documents. Some fields rely on the use of parameters to control …
Discover More
Using document info
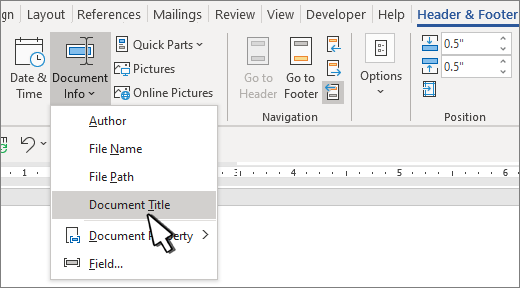
For common information, such as Author name, File name, date, or file path, follow these steps:
-
Double-click the header or footer .
-
Select Document Info, and choose the information you want.

Note: Select Document Property to select additional information, such as Title, Company, or Subject.
-
Select Close Header and Footer or press Esc to exit.
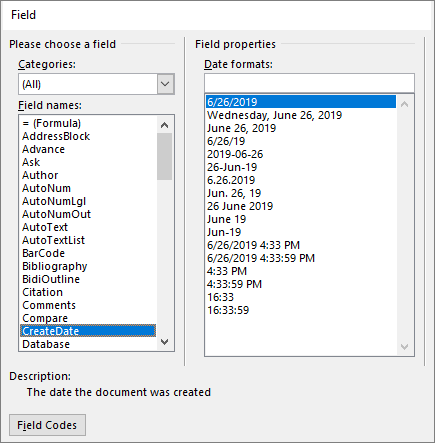
Using field codes
If you don’t find the info you want, such as file size or who it was last saved by, you can use field codes to add a variety of document properties.
Note: If you already added a header or footer from the gallery, this procedure may replace or change the formatting of the current header or footer.
-
Go to Insert > Header or Footer.
-
Select Edit Header or Edit Footer.
-
Select Quick Parts, and select Field.
-
In the Field names list, choose the field you want (such as FileName, Date, Author, or Title), choose the format you want in the Field properties section.
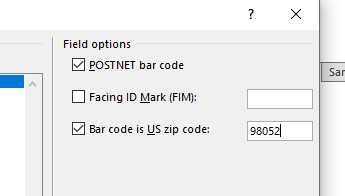
-
If a field property has addition options, choose any you like in the Field options section.
-
Select OK.
-
Select Close Header and Footer or press Esc to exit.

Word for the web doesn’t support adding file names and other document properties to a header or footer.
Select Open in Word to open your document in the desktop version of Word if you have it and follow the steps here on the Windows tab.

This tutorial shows how to insert figure captions and table titles in Microsoft Word.
We will also look at how to create two-line table titles and figure captions that will appear as one line in the list of tables or figures.
Table of Contents
- How to Insert Figure Captions and Table Titles
- How to Create Two-Line Figure Captions and Table Titles
Watch all the steps shown here in real time!
Explore more than 200 writing-related software tutorials on my YouTube channel.
The images below are from Word for Microsoft 365. The steps also apply to Word for Microsoft 365 for Mac (a.k.a., Word for Mac), Word 2021, Word 2019, Word 2016, and Word 2013.
- (Tables only) Hover your pointer over the table and then select the handle that appears on the top, left corner to select the entire table.

- Right-click (PC) or Control-click (Mac) the table or figure and then select Insert Caption from the shortcut menu.

Alternative: Select the figure or table and then select Insert Caption from the References tab in the ribbon.

- Select Figure or Table from the Label menu in the Caption dialog box.
The Figure label is appropriate for visuals such as graphs, charts, photos, illustrations, and maps.

Important Note: Each label type maintains its own number sequence. For example, if you have a Figure 1 and then insert a table, it will be Table 1.
- Select Above selected item or Below selection item from the Position menu.

The default option for Figure is Below selected item. The default option for Table is Above selected item. These defaults will be appropriate for most situations. However, APA style places both the table title and figure title above the item.[i]
Optional Step: Change the Figure or Table Label
- Select the New Label button.

- Enter your new label in the Label text box in the New Label dialog box. (For example, you may want to change Figure to Fig.)

- Select the OK button.

Optional Step: Change Figure or Table Numbering
- Select the Numbering button (PC) or Format button (Mac) to change how your figures or tables are numbered.


- Select numerals, letters, or Roman numerals from the Format menu in the Caption Numbering dialog box.

- If you have already added heading numbers, select Include chapter number to start with the chapter or section number. (This option won’t work if you don’t have established heading numbers.)
For more information, please see “How to Add Heading Numbers to Table Titles and Figure Captions in Microsoft Word (PC & Mac).”

- Select the OK button.

- Type your caption or title after the label and number in the Caption text box.
Pro Tip: Most of our primary style guides recommend placing a period after the figure or table number. However, Word doesn’t provide a way to add that period automatically, so remember to add it manually as you type each caption.

See “How to Write Figure Captions” and “How to Write Table Titles” for information on writing captions and titles according to Chicago style (including Turabian), APA style, and MLA style.
- Select the OK button.

Your caption or title will now appear with your figure or table.

How to Create Two-Line Figure Captions and Table Titles
The following steps show how to place the label (e.g., Table 1) and the title or caption on two separate lines, but format them in such a way that they will still appear on one line in the list of tables or figures.
- Insert your figure caption or table title shown in the previous section.
- Place your cursor at the start of the title or caption and then press the Backspace key on a PC or Delete key on a Mac to remove any extra spaces between the number and the title or caption.

- Press Shift + Enter (PC) or Shift + Return (Mac) to create a soft return instead of a regular hard return.
The label and title or caption should now appear on two different lines.

However, when you create or update your list of tables or figures, it should appear on one line.

Important Note: Caption and title numbers won’t automatically update if you move or delete figures or tables in your document. Visit “How to Update Table and Figure Numbers in Microsoft Word” for information about manually updating table and figure numbers.
[i] Publication Manual of the American Psychological Association, 7th ed. (Washington, DC: American Psychological Association, 2020), 7.23–7.25.
Related Resources
How to Add Background Images to Tables in Microsoft Word (PC & Mac)
How to Add Background Images to Charts in Microsoft Word (PC & Mac)
How to Save Tables and Figures as Images in Microsoft Word (PC & Mac)
Updated March 05, 2023
Ce word processor has become the primary tool of most users when it comes to prepare a report . And here you can find a lot of tools that will help you get very good results in writing .
One of the most important things when writing is the titles, because they will always be present in any text . That is why Word has a specific tool for them, which will allow you to use them according to your needs.
In this way, here we will show you what are the main steps to insert titles in your Word documents quickly and easily. To do this, follow in detail everything we will teach you in the post.
What are the main types of headings we can insert in Word?
Microsoft Word has different tools that will allow you to add titles to your essays, this will help you create a text that is much more professional and attractive to the reader. For’ insert this element into your spreadsheet, you can do this in two ways, either by using the tool «Insert» or the tool «Format».
This means that he There are currently two types of title styles on the platform that you will be able to use, each of them will depend on the situation in which you want to use them.
This is why we present each of these types here:
Using the Insert Title tool
The first option available is Insert, in this case, you will have three types of titles by default, in this case you can add numbered labels such as » Equation 1 «,» Illustrations 1 «,» Table 1 «, where you can create your own label according to your needs .
This type of headline is mainly used when you want to present a picture, data table, or mathematical or chemical formula and who are generally marked with a number . He is very fluent in reading a book or report, both digital and physical, and to see that all objects added to it such as pictures, tables, equations or any other are marked with a number that increases as they appear.
This means that this title type is used to carry a sequence of each of the objects that are added to the text. In case you need to eliminate some of them, example Picture 4, you will be able modify the enumeration of all the others quickly and easily. In addition, you can accompany «Illustration 4» by additional sentence or word .
Using Title Formats
The other tool that can be used to achieve text titles is that of formats which can be found in the section «Styles». In this case you will find five completely different types of titles that you can apply all au along your text .
In this case, these formats are applied to indicate the main title of a text or chapter. In other words, if your writing consists of several chapters, you can use each of them throughout . In this case you will get a text of a different size from the rest of the worksheet with a new style and a new color, this in order to highlight and be able to be captured quickly .
Thus, with the title formats you will be able to present your articles or chapters while writing, while with the Insert tool you will be able present the different objects that are added to the text such as only images, equations, data, graphs , Among others.
Steps to insert titles in Microsoft Word documents quickly and easily
Taking into account types of titles can be inserted into the Word spreadsheet, we will explain here what are the main steps to follow to apply each of them.
In this way, follow each of the methods which we will explain below in detail:
Insert
The first method that we present to you is to use the tool «Insert a title», as we explained earlier, it is mainly used for present a type of object that is added to the text such a illustration, table, graph, equation, among others.
«UPDATE ✅ Want to learn more about how to insert titles in Microsoft Word documents? ⭐ ENTER HERE ⭐ and learn all about SCRATCH! ”
Therefore, follow each of these steps to be able to apply this tool in your texts:
- Once you have entered Microsoft Word, you have to go to the ribbon, select the tab there «Reference».
- You will now find the «Securities» section, here you have to click on the icon «Insert a title».
- Then a window will appear in the middle of your screen where you will find different options, like you can see a title appears and under the option «Label», that you can scroll down to see the options available , in this case you can see the Element of «Table», «Equation» and «Illustration».
- Here you have to select which ones you want to use, either because you are going Add image , a mathematical or chemical formula or a table of data. In case you want add chart , you can also create your own the shipping label that you can call «Graphic». To do this, you must click on «New label» and mini window will appear automatically where you need to insert the name «Graphic».
- Once the caption has been selected, in the section Title you will be able add something more, in that case «Illustration 1» has been selected so you can write «Illustration 1 landscape in summer» this will allow you to explain a little more than processes or points to the image or object that you add to the text. When you have added the corresponding text, the next step will be to click on «Accept» for said element to be applied to the text.
- This way you can start to add this tool in each of your texts and thus have a best order when adding any kind of additional item to your writing .
Apply format
As we mentioned earlier, the other method for adding titles consists of utiliser the format, in this case they are used as main title of the text or to start a chapter .
Therefore, to apply this tool to your text, you need to perform the following steps:
- The first thing will be to enter the Word spreadsheet.
- When you are there you must write the title of what you are going to write.
- Once you have written it, the next thing will be to select it and go to the tab «Home» and there in the «Styles» section.
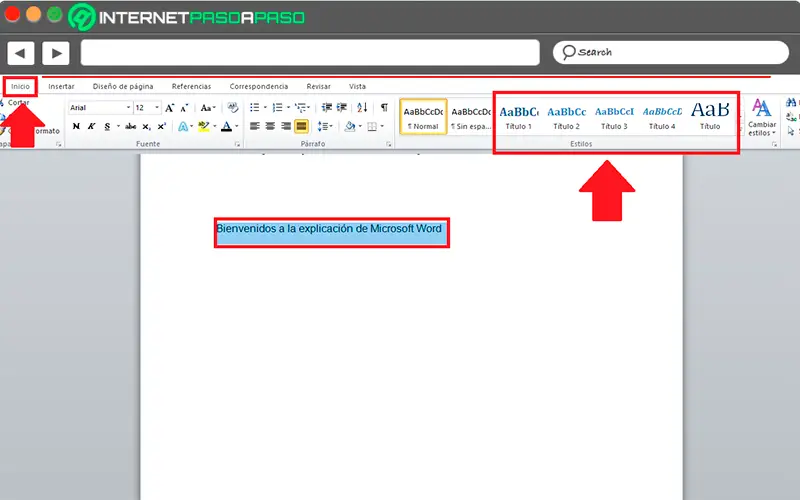
- You will find the five options available to apply the title to your text, in case you want to see more options, you can move window clicking on the arrow in the lower right corner . There you will see other categories such as «Quotations», «Subtitles», «Reference», «Paragraphs» among others.
- Once you have selected your text, you must apply title option which you like the most, here you can try each of them and so you can check which of the five is the most depending on what you are looking for . To select the one that you like the most, you just need to click on the icon.
- Like this, you will have the title of your writing . A way to improve the presentation of the text and make it much more professional .
Delete title
If you have created a title and didn’t like it or wrote something wrong , it will then be necessary to erase text . This process is very simple, it is done as during the deleting a text in the paragraph . Therefore, in this case, you just need to select the title you have created and press the «Delete» button so you can delete anything you don’t like.
If you have any questions, please leave them in the comments, we will get back to you as soon as possible, and it will be a great help for more community members as well. Thank you!

Tables are visual displays of data arranged in rows and columns. Table cells contain numbers, text, or a combination of numbers and text. Some cells can include images, symbols, links, and other objects. See how to create and modify tables in Word.
Each table should be referenced in the document content. Typically, tables have a number and a title, which are referenced. Microsoft Word offers functionality to create automatically updated numbers for figures, tables, and equations. The numbers and titles, created using the Captions functionality, are used to cross-reference tables in a document and create a List of Tables.
The word Table and a number identify a table then follows the caption. A caption is a short block of text that explain table contents without referring to the document content:

See more about creating numbers and captions for figures: images, pictures, charts, etc., creating captions for equations, and creating captions for photographs.
Attention! We highly recommend checking the formatting requirements, accepted by your college, university, company, or established on the project, etc.
Insert a caption for tables
To add automatically updated numbers and a title (caption) for a table, select it by:
- Selecting all rows or columns of the table one by one, or
- Moving the mouse over the table until you see the table selection icons in the upper-left corner of the table and clicking it:

Note: You can also click on the table selection icon in the bottom-right corner for the same effect. See how to select table elements for more details.

After selecting a table, do one of the following:
- On the References tab, in the Captions group, click the Insert Caption button:

- Right-click on the selection and select the Insert Caption… in the popup menu:


In the Caption dialog box:

Select the label and its position
- Under Options:
- From the Label dropdown list, select the item type you need:

- Table,
- Equation – see how to create captions for equations,
- Figure (selected by default) — see how to create captions for figures,
- Another label (in this example, My Caption) was created using the New Label… button (see how to create a new label below).
Note: Remember that each type of object you labeled will be numbered sequentially within its group.
- From the Position dropdown list, select one of the options:
- Above selected item (selected by default for the Table label), or
- Below selected item (selected by default for the Figure label).
Note: The captions for tables are usually located above the tables.
- From the Label dropdown list, select the item type you need:


Exclude label from caption
- Select the Exclude label from caption check box if you don’t need to add the label to the caption:
Some requirements recommend using the lowercase word table instead of the automatically added Table in Word cross-references.
The option Exclude label from caption hides the label from being displayed in cross-references or a List of Tables.
For example:
- When you insert a cross-reference with the selected option Entire captions or Only label and number (see more details how to use cross-references in Word), Word adds the capitalized label and number, as you see in the Caption field of the Caption dialog box. E.g., “are listed in Table 3” or “are listed in Table 3 Number of articles by statuses and products”.
- All captions, created with selected option Exclude label from caption, Word adds in cross-references as their numbers without the labels. Type the word table (as required) and insert a reference to a caption (e.g., “are listed in table 3”).

Add a new label
- Click the New Label… button to create a new label:
In the New Label dialog box, type a new label name:


Note: See also how to delete a custom label.
Modify caption numbering
- Click the Numbering… button if you want to change any of the numbering options:
In the Caption Numbering dialog box:

- In the Format dropdown list, select the numbering format you need (some requirements recommend using Latin capital letters instead of numbers for tables):
- Select the Include chapter number check box to include the chapter number in the caption number. After selecting this option, two more options will be unlocked:
- From the Chapter starts with style dropdown list, select the heading level you need to include in the caption:
- In the Use separator dropdown list, select the punctuation you need to insert between the chapter number and the table number:
- At the bottom of the dialog box, see how your choices will look in the Examples section. E.g., Table 2.3” means the third table in chapter 2.
- Click the OK button.
- From the Chapter starts with style dropdown list, select the heading level you need to include in the caption:


Add a title
- To add the text of your caption, click after the table number and enter the text. E.g.:

Notes:
- There are several standard requirements for table titles:
- Chicago style recommends using the table title in line with the label and number. E.g.:

- In opposite, APA (American Psychological Association) and MLA (Modern Language Association) styles recommend using the table title with one double-spaced line below the table number (see how to adjust line spacing). E.g.:

To create such a title, don’t type any text in the Caption field, leave it, then do the following:
- Create a caption without a title.
- Position cursor after a caption number and add a new line (by pressing Shift+Enter) in which type of title you need.
Note: You can press Enter and create a new paragraph instead of a new line. See how to create a List of Tables (Table of Figures) for more details.
- Format the caption to adjust line spacing (see how to change caption line spacing).
- In addition, MLA style recommends using a hanging indent to the second line of long titles. E.g.:

- Chicago style recommends using the table title in line with the label and number. E.g.:
- Word offers very helpful functionality to create a text that can be displayed in a List of Tables instead of a caption text. See how to create a Table of Contents Entry.
- For most requirements, the number and the title should be without an ending period. If you need a period after a number, type it in the Caption field.
- If a table spans more than one page, the first page of that table should have a complete caption; the subsequent pages should have an abbreviated caption consisting of a label, a number, and the word Continued. E.g., “Table 3. Continued”.


Using an AutoCaption
See Adding captions with AutoCaption.
Group a table and its caption
According to all requirements, a table (or its part) with its caption should appear on the same page. Word adds captions for tables as a regular paragraph with selected Keep with next option. See how to keep lines and paragraphs together for more details.
See also how to keep a table row on one page and keep a table on one page of a Word document.
Edit or modify a caption
Microsoft Word adds numbers in captions as fields.
![]()
You can show all fields in a document with a gray background, see how to turn on or turn off highlighting of fields in a Word document.
- Labels:
If needed, you can change the label. Word for Microsoft 365 will update the reference if available. In this case, Word will not create a new label and a separate numbering. Be careful!
- Numbers:
DO NOT edit caption numbers! If you change a number:
- In some cases, Word will update it, and you will lose your changes,
- Otherwise, the caption number may stop updating automatically.
- Text:
To add or modify a caption text, click on it and change what you need, like in a regular paragraph.
Do not forget to format a caption according to the requirements you use!
Delete a caption and an unnecessary label
If you need to remove some caption, select the caption paragraph (full line or several lines) and press Delete. Do not forget to update fields in the document!
To remove the unnecessary label, do the following:
1. Open the Caption dialog box.
2. In the Label dropdown list, select the label you want to remove.
3. Click the Delete Label to remove a custom label:

Note: You can’t delete predefined labels: Equation, Figure, and Table.
Update caption numbering
Word automatically updates references and numbering if you insert a new text. However, copying, deleting, or moving context often leads to confusion in the document. After such operations, you have to update all dependencies manually.
To update fields in the document, select the entire document by clicking Ctrl+A, and do one of the following:
- Press F9,
- Right-click on any of the fields and select Update Field in the popup menu:


Word will update all fields. You can be sure that the numbering and references are correct.
We strongly recommend checking a document at least visually after changes!