
Word can generate a list of all the tables in a document. Like a Table of Contents, this list of tables or Table of tables can include page references or links to each table.
A Table of tables can be useful for creating a proper appendix or reference within more formal documentation. It can be handy to have a list of all the tables used in a document either for publication or just for ‘in-house’ reference use during writing.
Before you can add a Table of tables to your document, you must add captions to all the tables in your document, as described in Adding Captions in Word. Yes, there is an alternative way making the list from styles but captions works better because each table gets a individual label.
Two Tables in Word
Before we begin, lets try to sort out a linguistic mess. Word has two features both called ‘tables’.
Table – a list of captions etc within a document e.g. Table of Contents, Table of Figures etc.
table – a grid of boxes or cells placed in a Word document from Insert | Table.
Normally the two are separate and it’s clear from the context which one we’re talking about.
For this article we’ll try to make it clear which ‘table’ we’re talking about by using the term ‘list’ but mostly with a capital letter ‘Table’ for the list and lower case ‘table’ for the grid. E.g. a Table of tables.
Slightly less confused? Good, let’s get on with it.
Making a simple Table of tables
Once you have some tables captioned in the document you can make a reference Table of them.
Click where you want the Table to appear (most likely as an appendix or close to your Table of Contents).
Go to References | Captions | Insert Table of Figures (yes, ‘Figures’) to bring up the “Table of Figures” dialog.
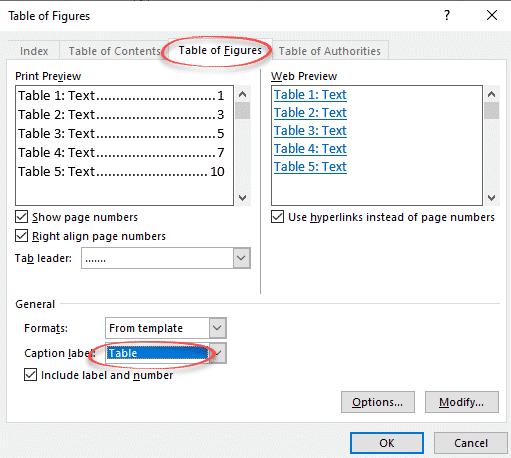
First thing to do is change the Caption Label from Figures to table. And lo! you have a Table of tables!
The “Print Preview” and “Web Preview” panes show how the Table will appear. By default, page numbers are displayed and aligned to the right, although you can change this by deselecting the appropriate checkboxes.
The “Tab leader” dropdown changes what appears between the text and the right-aligned page numbers.
“Use hyperlinks instead of page numbers” for the web preview gives you a clickable table with links to each table in the Word document.
Table Formats
The “Formats” drop-down list directly affects the appearance of the Table of tables. The available options are:
- From template
- Classic
- Distinctive
- Centered
- Formal
- Simple
Select a format to see how it will look in the preview panes. Most people use ‘From template’ because that will match the font etc in the current document or template.
To design a custom Table of tables layout, select “From template” and click the “Modify” button to create your own style.
When you are happy with the layout, click “OK” to build your Table of tables. Word will search for the captions, sort them by number, and display the Table of tables in the document.
Word déjà vu
If all this seems familiar, that’s because it’s almost exactly the same as the ‘Table of Contents’ and Table of Figure options. In fact, a Table of tables uses the same underlying Word technology as Table of Contents (the {TOC } field).
All Word’s Table of Contents options
Four Word tricks to shrink a Table of Contents
Table of Contents basics in Word
When you add several tables and figures or any other objects in your report, it is a best practice to create a list of tables and figures or lists of other objects in the report’s preface. In academic writing, this is a must-have section of your report. Like the table of contents, you can also generate a list of tables and figures or any other objects in Microsoft Word.
Table of Contents
Step 01: Add captions to tables and figures
The lists of tables and figures or lists of any other objects are generated from the captions you added for those objects in your report. If you haven’t added captions yet, you can learn how to add captions in Microsoft Word fro the following post.
How to add Captions in Microsoft Word
Step 02: Insert list of tables and figures
After you add a few captions to tables or figures in your document, you generate a list of those objects.
To generate a list of tables and figures or any other objects;
- Place the cursor where you want to add the list.
- Go to the References tab
- Click Insert Table of Figures in the Caption group
- In the Table of the Figures dialog box select the relevant Caption Label (Table, Figure, & Equation, etc…)
- Do the necessary formatting using the available options in the Table of Figures dialog box,
- Click OK.
The following animation demonstrates the above steps for creating a list of tables and figures.
Updating the lists
You need to update these lists in order to include the tables and figures or other objects you added later in the report. To update these lists,
- Click anywhere in the middle of the list to be updated
- Go to the References tab
- In the Caption group, click Update Table
- In the Update Table of Figures dialog box select the Update Entire Table option
- Click OK.
 As shown in this tutorial, you can quickly create a list of tables or figures in Microsoft Word if you used Word’s caption tool to number your tables and figures. (See “How to Insert Figure Captions in Microsoft Word” for step-by-step instructions on using the caption tool.)
We will also look at how to update the list as you add, move, or delete tables or figures.
Terminology Note: This tutorial uses the terms list of tables and list of figures, which are common terms in the publishing industry. However, Word refers to a list of tables or figures as a table of figures.
This tutorial is also available as a YouTube video showing all the steps in real time.
Watch more than 200 other writing-related software tutorials on my YouTube channel.
The images below are from Word in Microsoft 365 (formerly Office 365). The steps are the same in Word 2021, Word 2019, Word 2016, and Word 2013. However, your interface may look different in those older versions of the software.
Remember that these steps will only work if you used Word’s caption tool to number your tables or figures before creating the list.
- Insert your cursor where you want to place your list.
- Select the References tab in the ribbon.

- Select Insert Table of Figures from the Captions group.

- Select a visual style from the Formats menu in the Table of Figures dialog box. (The From Template option is based on the styles established in your current template.)

- Select Figure or Table from the Caption label menu. (There is no option for listing figures and tables together.)

- Ensure that Include label and number is checked if you want the label (i.e., Figure or Table) and the number to be included in the list. (Recommended)

- (Optional Step) Select additional options concerning page numbers and the tab leaders, which are the dots, dashes, or lines that appear before the page numbers.

Pro Tip: The Web Preview section shows how your list will look if you convert your Word file to a web page.
- Select the OK button.

- Manually type a title above your list.

- Save your file to save your changes.
The next section shows how to update a list of tables or figures.
How to Update a List of Tables or Figures
Word will not automatically update your list as you add or delete tables or figures. Instead, you can manually trigger updates, as necessary.
- Right-click the list and select Update Field from the shortcut menu.

- Select Update entire table from the Update Table of Figures dialog box.

- Select the OK button.

Your updates should appear immediately.
- Save your file to save your changes.
Important Note: Word’s caption tool, which inserts table titles and figure captions, will automatically number new tables and figures as you add titles and captions (e.g., Table 1, Table 2, Table 3). However, Word will not automatically update the numbering if you move or delete tables or figures.
See “How to Update Table and Figure Numbers in Microsoft Word” to learn how to force an update after moving or deleting a table or figure.
Related Resources
How to Create and Customize Charts in Microsoft Word
How to Insert and Modify Images in Microsoft Word
Three Ways to Insert Tables in Microsoft Word
How to Change the Style of Table Titles and Figure Captions in Microsoft Word
How to Cross-Reference Tables and Figures in Microsoft Word
How to Reference Tables and Figures in Text
Updated December 14, 2022
Some requirements demand listing figures, tables, and other visual objects at the end of a document. They are named List of Figures and List of Tables. Microsoft Word offers the functionality named Table of Figures that helps generate and update a list of the captions for pictures, charts, graphs, diagrams, slides, photos, or other illustrations of the document, along with the numbers of the pages on which the captions appear.
Table of Figures pretty much like Table of Content:
- Is helping readers and reviewers navigate to the visual objects in the document,
- Is generated from the figure and table captions or other object captions. All captions you need to include in the appropriate Table of Figures should be added using the Caption functionality.
Depending on the selected type of objects (captions label), the list generated by Table of Figures may contain:
- List of figures (see How to create automatic numbers and captions for figures: images, pictures):

- List of tables (see How to create automatic numbers and titles for tables):

- List of custom objects, labeled in the Caption functionality as a separate item. E.g., a List of photographs (see How to insert numbers, captions, and cutlines for photographs):


Note: See how to transform captions and titles for including or excluding different text parts to the Table of Figures.
Prepare items for a List of Tables or Figures
Before starting a Table of Figures functionality in Word, ensure that all visual objects have captions (or at least style you will use for creating a list). These allow Word to recognize and include them in the appropriate list.
You can create a list of objects and add a caption to the missed object later. Don’t forget to update caption numbering and already created lists!
Create a List of Figures or Tables in Word
To create a list of some objects in a Word document, position the cursor to insert the list. Then, on the Reference tab, in the Captions group, click the Insert Table of Figures button:

In the Table of Figures dialog box, on the Table of Figures tab (is displayed by default, all other tabs are grayed):

- In the General section (we recommend starting from this section because its options can change the selected parameters in other sections):
- From the Format dropdown list, select a visual format:

- From template is based on the styles established in the current template
- Classic
- Distinctive
- Centered
- Formal
- Simple
Note: Choose any proposed formats and see how the new list will look in the Print Preview section. E.g., the Formal format:

- From the Caption label dropdown list, select the type of items you want to include in the Table of Figures:
- (none)
- Figure (selected by default) – see how to create captions for figures,
- Equation – see how to create captions for equations,
- Table – see how to create captions for tables,
- Any other label (in this example, My Caption, Photo) was created using the New Label… button of the Caption dialog box. E.g., see how to create captions for photographs.
Note: There is no option for listing different labels in that list, such as figures and tables together. See how to create a list of all captions in the document below.
- Ensure that the Include label and number check box is selected if you want the label (i.e., Figure or Table) and the number to be included in the list. E.g.:
- With the selected Include label and number check box, the list displays the entire captions:
- With unselected Include label and number check box, the list displays only text from captions:
- From the Format dropdown list, select a visual format:


See all the changes and choices in the Print Preview and Web Preview sections:
- In the Print Preview section (all changes in that section can be changed by the selected options in the General section):
- Clear the Show page numbers check box if you prefer to hide page numbers from the list:
If you deselect this option, all other options in the Print Preview section will disappear.
- Clear the Right align page numbers check box to display page numbers right after items text:
If you deselect this option, you can’t choose the tab leader for page numbers.
- From the Tab leader dropdown list, select the tab leader you need. You can select dots, dashes, or lines that appear before the page numbers:
- Clear the Show page numbers check box if you prefer to hide page numbers from the list:
- In the Web Preview section (shows how your list will look if you convert your Word file to a web page):
- Clear the Use hyperlinks instead of page numbers check box if you prefer to see the same view as in Print Preview:


Create a list for the style or Table entry fields
In the Table of Figures dialog box, on the Table of Figures tab:
- Click the Options… button to use styles and Table entry fields for the Table of Figures instead of caption labels:

In the Table of Figures Options dialog box:
- Select the Style from the dropdown list (check box will be selected automatically) to add all text with the selected style in a Table of Figures:
Note: The Style dropdown list contains all styles already used in the Word document.
So, Word creates a list of all text blocks in a document with that style. E.g., if you select the Caption style, you will see all captions in a List:

Note: You can create a custom style for some titles or blocks of text and include them in the list. See some examples below.
- Select the Table entry fields check box to insert Table of Contents entries (see how to create and use the Table of Contents Entries):

For example, if you have the table titles in the separate line of the label and number, you can create the Table entry fields for such tables:

***

So, the List of Table will display specified titles:

Note: The issue of this example can also be solved using the transformation of the captions and titles.
- Select the Style from the dropdown list (check box will be selected automatically) to add all text with the selected style in a Table of Figures:


Customize the Table of Figures style
In the Table of Figures dialog box, on the Table of Figures tab:
- Click the Modify… button to modify a predefined style for a Table for Figures.
In the Style dialog box:
- In the Styles list, is selected a style that Word will use for a created Table,
- In the Preview field, check how the style looks,
- Under Preview, the main options for the style are listed:

- Click the Modify… button to change the style.
In the Modify Style dialog box, make changes you need, then click the OK button:

For example, the Table of Figures with double spacing and indentation for the long captions:

See how to customize the Table of Figure style for more details.


Add a title to the custom Table of Figures
After inserting a new Table of Figures, manually type a title above the list. E.g.:

Attention! We highly recommend checking the formatting requirements, accepted by your college, university, company, or established on the project, etc. For example:

See also how to customize the Table of Figures style.
Empty Table of Figures or Table of Tables
After creating a Table of Figures, Word can create a message “No table of figures entries found”:
![]()
The leading cause for this message is that Word could not find the text with the Caption style for the selected caption label (e.g., Figures, Tables, etc.).
To solve that problem, check the style for items captions such as figures and tables which you want to be displayed in the Table of Figures.
Don’t forget to update captions and any related items in a document!
Update a List of Tables or Figures
Microsoft Word inserts Table of Figures as a field:
So, you can change the TOC field using switches.
Word will not automatically update any Table of Figures after adding, deleting, or modifying included items and pages. To manually update them, follow the next steps:
1. Click on the list and do one of the following:
- On the References tab, in the Captions group, click the Update Table button:

Note: Only if your cursor is positioned on any of the generated Tables (Table of Figures, Table of Content, etc.), that button is not grayed.
- Right-click the list and select Update Field from the shortcut menu:


2. In the Update Table of Figures dialog box, select elements you need to update:

We recommend selecting the Update entire table option always.
3. Click the OK button to start updating.
Note: See how to turn on or turn off highlighting of fields in a Word document to display all fields in a document with a gray background.
Edit an existing Table of Figures or Table of Tables
If you need to modify an existing Table of Figures, you can:
- Delete existing Table of Figures and create a new one,
- Edit an existing field.
To edit the existing Table of Figures, follow the next steps:
1. Do one of the following:
- Click anywhere on the Table, then on the References tab, in the Captions group, click the Insert Table of Figures button.
- Select all the lines of the Table, then right-click on the selection and choose Edit Field… in the popup menu:

In the Field dialog box, click the Table of Contents… button:

Note: The button is visible only if you have selected all the existing Table of Figures lines.
2. In the Table of Figures dialog box, on the Table of Figures tab, select the options you need.
Be careful! Word opens the Table of Figures dialog box with default options. All the options selected for the existing Table disappear.
Delete a Table of Figures
To delete a List of Figures (List of Tables, or List of any objects), select all the lines of a Table of Figures and press Delete.
Updated: 04/30/2020 by
You can insert a table in a Microsoft Word document to display data in a tabular format. A table is a great way to represent multiple fields of associated data. For example, a list of prices is easier to read when displayed in a table.
Adding a table in Word
- In Word, place the mouse cursor where you want to add the table.
- Click the Insert tab in the Ribbon.
- Click the Table button and select how many cells, rows, and columns you want the table to display. You can also click Insert Table and enter the number of columns and rows for the inserted table.
Inserting or deleting a row or column
In a Microsoft Word table, you can add or remove a row or column at any time.
- Insert a row.
- Insert a column.
- Delete a row.
- Delete a column.
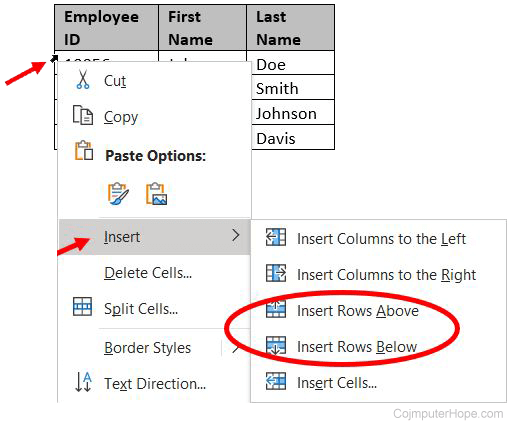
Insert a row
- Move the mouse cursor inside the left edge of a cell in the row where you want to insert a new row. The cursor changes to a small black arrow pointing to the top-right.
- Using your mouse, right-click to open the pop-up menu, select Insert, then select Insert Rows Above or Insert Rows Below, depending where you want to insert the row.
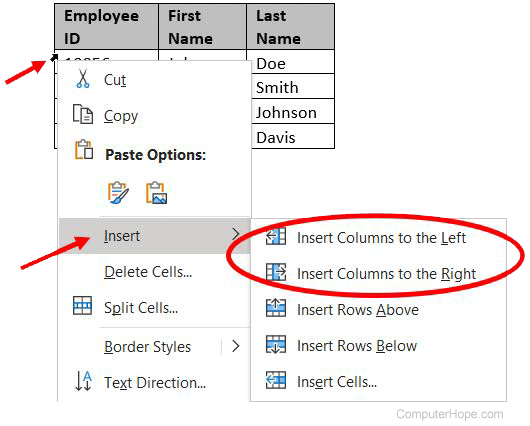
Insert a column
- Move the mouse cursor inside the left edge of a cell in the column where you want to insert a new column. The cursor changes to a small black arrow pointing to the top-right.
- Using your mouse, right-click to open the pop-up menu, select Insert, then select Insert Columns to the Left or Insert Columns to the Right, depending where you want the row inserted.
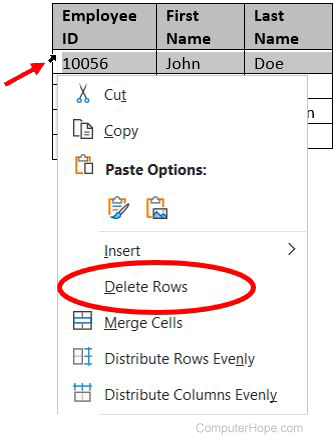
Delete a row
- Move the mouse cursor inside the left edge of a cell in the row you want to delete. The cursor changes to a small black arrow pointing to the top-right.
- Using your mouse, double-click to select the entire row in the table.
- Right-click with the mouse to open the pop-up menu, and select Delete Rows.
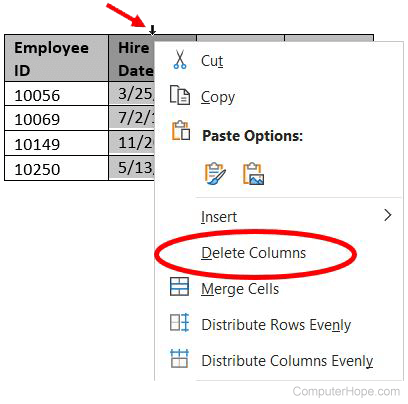
Delete a column
- Move the mouse cursor inside the top edge of the top-most cell in the column you want to delete. The cursor changes to a small black arrow pointing downward.
- Using your mouse, click once to select the entire column in the table.
- Right-click with the mouse to open the pop-up menu, and select Delete Columns.
Moving the table
After the table is added to the document, you can move it anywhere else in the document. To move the table, hover your mouse cursor over the table, then click-and-drag the arrows in the top-left corner of the table.
Resizing the table
Once the table is inserted, you can adjust the table’s size by moving the mouse to the bottom-right corner of the table until you get a double-headed arrow. Once this arrow is visible, click-and-drag the table in the direction you want the table to expand.
Changing the look of the table
After the table is added to the document, move your cursor to a cell in the table, and click the Design tab. In the Design tab, you can adjust the Header Row, Total Row, and how the rows appear. You can also adjust the overall look of the table by clicking one of the table styles.
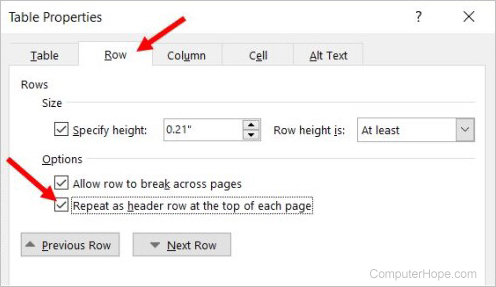
Repeat header row of the table on each page
If the table spans more than one page, you may want to have the header row displayed on each additional page the table spans across. You can make the header row visible on each page by following the steps below.
- Right-click the header row of the table and select Properties in the pop-up menu.
- In the Table Properties window, click the Row tab.
- Check the box for the Repeat as header row at the top of each page option, and click OK.
Deleting a table
If you want to delete a table from a Word document, follow the steps below.
- Move your mouse cursor over the table you want to delete.
- At the upper-left corner of the table, a small square with the move icon
 inside it should be seen. Move your mouse cursor over that icon and click it to select the entire table.
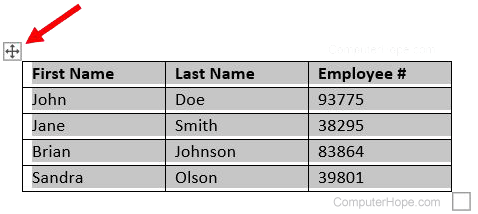
- Right-click anywhere in the table and select Delete Table in the pop-up menu.
![]()
Download Article
![]()
Download Article
A good table in your document can help make your data stand out to your readers, and adding a table in Word is a snap. You have a variety of options for customizing your table’s look at functionality, and you can even choose from existing templates to make inserting tables completely painless. Follow this guide to learn how.
Steps
-

1
Open Word or the document where you wish to put a table. You can insert tables into any version of Word.
-
2
Position the cursor on the area where you want the table to be inserted. Click the “Table” button that is located under the “Insert” tab. In Word 2003, click the “Insert” menu and then select “Table”.
- For best formatting results, place the table between paragraphs or on its own line.
Advertisement
-
3
Choose your method of inserting your table. In Word 2007, 2010, and 2013, you have a few different choices when it comes to inserting a table into your document. A dialog box appears when you click the “Insert” button which allows you select from the following methods:
- Use the Grid to make a table. You may insert the table by using the grid where the squares represent the number of rows or columns you can have on your table. Simply drag your mouse over the grid and click after highlighting the number of squares needed.
- Open the “Insert Table” menu. This menu allows you to specify the number of rows and columns that you want your table to have, as well as the width of the columns. You can set the width to AutoFit to your cell’s contents or have a fixed width. Click “OK” to insert the table.
- Insert an Excel spreadsheet. Click on Excel Spreadsheet if you want to insert a table which allows you to manipulate data like Excel (for example: formulas and filters). Click outside the table if you want to work on the document itself.
- Use prebuilt table templates. On newer versions of Word you can click “Quick Table” if you want to use built-in table templates. Simply replace the sample data with your own.


Advertisement
Add New Question
-
Question
Why do I need bullets and numbering?

To simplify points and paragraphs, bullets are used. If you are writing a long passage, numbering comes in handy. They are also used to make a document look neat.
-
Question
What is the use of table?
Mainly to display data in a neat, organized way. You may or may not have any personal use for a table, but they are often used in scientific papers or business documents to list a set of data.
-
Question
How do I change the size of the columns?
Hover your mouse over the bars separating columns, and your mouse cursor should change into a double arrow symbol (↔) or similar. Click on the bar, and drag it to the left or right. You can also right-click on the same, and select «Table Properties» from the menu that comes up. You should be able to change the size of the columns in the new window that comes up.
See more answers
Ask a Question
200 characters left
Include your email address to get a message when this question is answered.
Submit
Advertisement
Video
-
Additionally, you may draw a table by clicking “Table” on the “Insert” tab and then selecting the “Draw Table” command.
Thanks for submitting a tip for review!
Advertisement
About This Article
Thanks to all authors for creating a page that has been read 270,137 times.
Is this article up to date?
Follow these steps…
(1) Give all your tables a caption.
(2) Click your cursor at where you’d like to place your List of Tables.
Its traditional location in a technical document is right after the Table of Contents (if any) and after the “List of Figures” (if any).
(3) Select the References tab from the main menu. Then click Insert Table of Figures to display the Table of Figures dialog box:

(4) Clear the “Use hyperlinks instead of page numbers” check-box if you do not want to jump to a HTML destination accidentally.
(5) Select the “Show page numbers” check-box. Select the “Right align page numbers” check-box. Select a Tab Leader from the drop-down list.
(6) Select “Table” from the Caption Label drop-down list to display table captions in the Print Preview box. Then select the related “Include name and number” check-box:

(7) Select a template from the Formats drop-down list.
(8) Click OK to display your List of Tables at where your cursor is.
Are you struggling to get your message across? When your Microsoft Word project contains information, try presenting it in the form of a Word table. Learn how to make tables in Word quickly with a template.


A table is a kind of chart that organizes and presents data in rows and columns. It makes information easier to grasp, understand, and analyze at a glance, compared to explaining the same data through plain text.
Microsoft Word gives you various ways to insert or create a table. And you’ve got granular control over the formatting, layout, and appearance of Microsoft Word tables. Table charts are useful in different types of Word projects, whether for personal, educational, or business use.
This article will show you how to make a table in Word using a template. Then edit and format it to change its appearance.
(Note: The screenshots and instructions that follow are made using Microsoft Word for Mac version 16.4. If you’re using a different version of Word, then the interface and steps may be different.)
How to Make & Edit MS Word Tables (Video)
In this video, you’ll learn how to quickly make tables in Mircosoft Word. Find out how to start with a premium template. Quickly customize it to make an attractive, professional MS Word table you can use and reuse.
To learn even more about MS Word tables and about templates than can be used for tables, study the step-by-step tutorial below:
How to Make Basic Tables in Word
Let’s start by learning how to make a basic table in Microsoft Word:
1. Insert a Table
You can create a basic Microsoft Word table in one of two ways:
Method 1. The Insert Tab
Click on the Insert tab, then click the Table button on the ribbon.


The Insert Table panel appears. Drag the cursor over the squares to specify the number of columns and rows you want to create. Click to apply.


Method 2. The Insert Menu
Go to Insert > Table….


The Insert Table panel opens. Specify the number of columns and rows you need. (You can always add or remove columns and rows later.)


Also select the Autofit Behavior you want the table to have. You’ve got several options:
- Initial column width. The default setting is Auto, which divides the entire width of your page window across the number of columns in the table. Or, you can specify a different column width.
- AutoFit to contents. Resizes the column width based on the width of the content inside the column.
- AutoFit to window. Distributes the columns equally across the entire width of the page window.
- Set as default for new tables. Check this option if you want the settings to be applied globally to all new tables you create.
When you’re happy with the options you’ve selected, click OK.


2. Draw a Table
Or, you can draw a table in MS Word. This is a useful feature if you want to create an irregular or more complicated table with columns and/or rows of varying widths.
To draw a table, click Insert > Table > Draw Table.


With your mouse or trackpad, click and drag the cursor to start drawing your table. You can begin by drawing the outermost boundary of the table first.


Then, click and drag the cursor to create columns and rows inside the table. When you’re done, click anywhere outside the table.


Here’s an example of an “irregular” table you can draw using this feature.


If you make a mistake, click Layout > Eraser to erase a line from the table.


Click and drag the eraser along the line you wish to erase. The line that’ll be erased appears as a thick, red line. Release the mouse or trackpad to erase.


Click outside the table when you’re done.
3. Convert Text to Tables and Vice Versa
Another way to create a table is by converting text into a table. This means you can take non-tabular data from a CSV or plain TXT file and convert them into a table.
First, copy and paste the non-tabular data into your Word document.


With the text selected, go to Insert > Table > Convert Text to Table….


The Convert Text to Table panel opens. Specify the settings you wish to use. Click OK.


The text is then converted into a table.


You can also do the opposite, which is to convert a table into text.
Select the cells or entire table you want to convert. Next, click on the Layout tab then click the Convert Table to Text icon.


The Convert Table to Text panel opens. This is where you’ll decide how you want to separate text that’s currently in different columns. When you’ve made a selection, click OK.


For this example, I chose to separate text with commas. This is what the converted table looks like.


4. Advanced: How to Insert a Table from Excel
If you’ve already created a table in Excel, you can embed it into your Word document.
Open the Excel file. Click and drag the mouse to select the table.


Go back to your Word document. Go to Edit > Paste Special ….


In the Paste Special panel, select Microsoft Excel Binary Worksheet Object, then click OK.


This embeds the Excel table into Word. It’s still an Excel table, which means you can’t edit or format the table in MS Word. You’ve got to do so in Excel.


Double-click anywhere in the table to launch the source file in Excel. When you make any changes to the table in Excel, the table embedded in your Word project automatically updates to reflect those changes.
Now you know how to make a table in MS Word using various options.
How to Edit Tables
At any time after creating your table, you can edit and customize it to look the way you want it to. Here are some steps for editing tables in Microsoft Word:
1. Add a Column or Row
To add a row or column, click inside a table cell. Right-click on the mouse, then click Insert.


Select one of the following:
- Columns to the Left. Adds a column to the left of the current column
- Columns to the Right. Adds a column to the right of the current column
- Rows Above. Adds a row above the current row
- Rows Below. Adds a row below the current row
- Cells … Inserts a cell and shifts the rest of the cells either to the right or down from where the cursor is
- Table … Inserts a table inside the current cell
Or, with the cursor in one of the cells, you can click on the Layout tab.


Then choose of the following buttons on the ribbon:
- Insert Above. Inserts a row above the current cell
- Insert Below. Inserts a row below the current cell
- Insert Columns to the Left. Inserts a column to the left of the current cell
- Insert Columns to the Right. Inserts a column to the right of the current cell
Finally, you can add a new row when you’ve reached the last cell in the last row of your table. Simply press tab and a new row appears.
2. Delete a Column or Row
To delete a cell, column, row, or table, click on the Layout tab > Delete.


Select one of the options that appear:
- Delete Cells …
- Delete Columns
- Delete Rows
- Delete Table
You can use the same steps to edit a table you’ve drawn. Or, you can use the Layout tab to add or delete rows and columns.


Merge Cells
Sometimes you may want to merge cells to present information more clearly. To merge cells, click and drag the cursor to select the cells you wish to merge.


On the Layout tab, click on the Merge Cells button.


Or, after selecting the cells to be merged, right-click on your mouse, then click Merge Cells.


Now the cells have been merged into one.


Split Cells
After merging cells, you can always split them again into separate cells.
Place the cursor in the merged cell, then click Layout > Split Cells.


Or, right-click on your mouse, then click Split Cells….


Either way, the Split Cells panel pops up. Specify the number of columns and rows you want to split the cell into. Click OK.


Split Table
You may decide that it makes more sense to split up a table into two separate tables. Microsoft Word lets you do that easily, too.
In this example, I want to split the table right above the Accessories cell. And so, I’ll place the cursor in that cell. Next, click on the Layout tab, then click the Split Table button.


Now, we’ve got two separate tables.


Table Formatting
When you first create a table, it looks plain and boring. But Microsoft Word has many features so you can format tables to look exactly the way you want them. Here are some common ways to format tables:
1. Table Styles
The easiest way to format a table is by using one of the pre-formatted table styles. Put the cursor in any cell in the table. Click on the Table Design tab. Next, click on the arrow to expand the Table Styles group.


Click on a style you want to use and it’s applied immediately.


You can change any style you’ve selected. Again, click on Table Design, expand the Table Style group, then click Modify Style.


The Modify Style panel opens. Make the selections you want, then click OK.


2. Use Your Own Formatting
The Table Design tab gives you control over the appearance of every aspect of your table. Click on the Table Design tab and any of the appropriate buttons on the ribbon.


Resize a Table
You can also resize your table. Click on any cell to select the table, then click and drag one of the corners to resize it.


Or, you can use the Layout tab to resize individual cells, specific rows or columns, or the entire table. Select the columns or rows you wish to resize. Specify the height and/or width you wish to apply.


You can also adjust column width by hand by using the Table Ruler. Click inside a column you want to change. Then, drag the sliders in the Table Ruler to set to desired width.


Text Wrapping
If you want text to flow around the table, you can do so by changing its text wrapping.
Click in any cell to select the table. Click Table > Table Properties….


In the Table Properties panel and under Text Wrapping, click Around > OK.


Now the text flows around the table.


Take note that the Table Properties panel allows you to format other qualities of the table, including:
- Size
- Alignment
- Positioning
- Borders and Shading
On the other tabs, you can change:
- Column, Row, and Cell Size
- Allow row to break across pages
- Repeat as header row at the top of each page
- Cell Vertical Alignment
- Alt Text (Title and Description) — more information about the table, to help people with vision or cognitive impairment who may not see the table
Find Great Styles for Microsoft Word
You don’t have to start from scratch to create an impressive and effective Word document — even if you don’t have design skills. You can find great styles by using a template for Word.


One great source for great Microsoft Word templates and professional graphics is Envato Elements. For one low monthly subscription, you get unlimited downloads of templates, graphics, fonts, and other creative tools you need for your project. It’s a terrific option if you create plenty of materials.
For single projects, GraphicRiver is an outstanding source for templates for Word. This marketplace gives you access to thousands of creative elements on a pay-per-use basis.
Learn More
Microsoft Word has many robust features to help you realize the vision you’ve got for your document. But with power comes complexity. That’s why it’s a good idea to learn how to use Microsoft Word.
These articles will help you get started:
Visualize Your Data with Microsoft Word Tables
Make your information clearer and easier to understand by learning how to make a table in Microsoft Word. Tables organize data into rows and columns, which makes them easier to grasp at a glance. Follow the steps in this article to create, format, and customize tables in Word.
You can also use a premium Word template to get a premium design created by designers. Get Word templates from Envato Elements, if you want unlimited downloads of templates, graphics, and other creative tools you need — all for one flat monthly fee.
Or, get premium templates for Word from GraphicRiver if you prefer to pay for each use of an item. Both sources give you access to thousands of design elements created by professionals, so you can save time, energy, and effort while creating an outstanding Word document.
Did you find this post useful?

Marketing & Communications Professional and Lifelong Learner/Canada
Lexi Rodrigo is a marketing and communications professional, copywriter, and course creator who helps remarkable brands and people get seen, heard, and known. Writing for the web since 2008, she has over 100+ blog posts published on Envato Tuts, Acadium, Mirasee, Vero, Copyblogger, FreelanceFolder, Business2Community, and others.
Lexi has supported multimillion-dollar companies and nonprofits in various marketing and communication roles. She has driven results like tripling the organic search traffic of a blog in three months and generating over $65 million in revenues, donations, and sponsorships.
She has a Bachelor of Arts degree in communications. She is also the co-author of «Blog Post Ideas: 21 Proven Ways to Create Compelling Content and Kiss Writer’s Block Goodbye.» When she’s not reading or writing, Lexi bakes bread, grows food, and takes long walks.
A nested table is one table placed inside of another, where the larger table functions as a container for the smaller one. Nested tables are a way for you to organize objects, such as images or text, in evenly spaced rows and columns. A nested table may also allow you to arrange different sets of data in groups to show clients. You can create a table with different methods using Word’s table tab.
Method 1
-
Open a Word document. Click on the location where you will place the table.
-
Create the outer table. Go to the “Insert” tab and click “Table.” When the submenu opens, click and drag the mouse to select the numbers of rows and columns you will need. For example, to create a 3-by-3 table, click and drag the mouse to the right 3 columns and then down 3 rows.
-
Create the inner table. Click inside any cell in the larger table. Once again, use the “Insert” tab to create a table. For example, click on cell 1, go to “Insert,” “Table” and then create a 2-by-2 table. This 2-by-2 is now nested inside of the 3-by-3.
Method 2
-
Create an outer table inside the Word document using the Table menu. Then go back to the table menu, but this time select “Draw Table.” The pointer will change to a pencil.
-
Click on any cell inside of the outer table. Draw a rectangle that is 1 to 2 mm shorter than the cell it is in.
-
Add horizontal and vertical lines inside of the rectangle. For example, draw one horizontal line and one vertical line to create a 2-by-2 table. This 2-by-2 is now nested inside of the larger outer table.