
![]()
Download Article
![]()
Download Article
Setting tabs on your Microsoft Word document will let you align the text on a page. This will organize your text so it has a uniform look to it. You can set tabs to the right or left or even both sides of the document, and doing so is very easy and straightforward.
Steps
-

1
Open Microsoft Word. On your desktop, double-click the Microsoft Word icon to launch the application.
-
2
Make the ruler visible. By default, the ruler at the top of the document should already be visible. In the case that it is not, click the View option at the very top of the screen, and a window will drop-down. Click on “Ruler” to display it at the top of the document.
Advertisement
-
3
Click the tab selector. At the top-left corner of the document, you can see the tab selector. It should be exactly on the left side of the ruler. Click it and you will be able to select the type of tab you want.
-
4
Set the tab position. Now click anywhere at the bottom edge of the ruler to set where you want the tab.
-
5
Adjust the tab. If you need some more adjusting to your tab, simply drag the tab you set left or right along the ruler.


Advertisement
Add New Question
-
Question
How do I change tabs?

To move left, press Ctrl + Tab; to move right, press Ctrl + Shift + Tab. Or you can just click on the tab you want.
-
Question
Can I set tabs when I have already made a Word document?
Yes you can. Your Word document just needs to be aligned in paragraph format, then you are able to drag the tabs where you would like them.
-
Question
How do I delete a tab in a Word document?
Click the tab stop on the ruler and drag down. Also, you can double-click the tab stop, select the position of the tab stop you want to delete, click clear, and click OK.
Ask a Question
200 characters left
Include your email address to get a message when this question is answered.
Submit
Advertisement
Thanks for submitting a tip for review!
About This Article
Thanks to all authors for creating a page that has been read 194,890 times.
Is this article up to date?
- Place the text cursor in the cell where you want to insert the tab character, using either the mouse or the keyboard.
- Hold down the “Ctrl” key and press “Tab” to insert the tab character.
- Adjust the position of the tab stops using the ruler, if necessary (see Resources).
Contents
- 1 How do you insert a tab in Word?
- 2 Which tab is used to insert a tab?
- 3 What is the Insert tab on Windows 10?
- 4 Where is the Insert key on a laptop?
- 5 Where is tab in Word?
- 6 How do I insert Table Tools tab layout?
- 7 What is Layout tab?
- 8 How do I add tabs to my laptop?
- 9 Which option is not available in the Insert tab?
- 10 How do I set tabs in Word 2010?
- 11 How do I turn on the Insert key?
- 12 How do I enable inserts on my HP laptop?
- 13 What is Insert key on keyboard?
- 14 How do I insert a table tool tab in Excel?
- 15 How do I get the Layout tab in Excel?
- 16 How do I add a Design tab to a chart in Excel?
- 17 Where is the Layout tab?
- 18 How do you use Layout tab?
- 19 What is Home tab?
- 20 How do I add a tab on keyboard?
How do you insert a tab in Word?
Insert or add tab stops
- Go to Home and select the Paragraph dialog launcher .
- Select Tabs.
- Type a measurement in the Tab stop position field.
- Select an Alignment.
- Select a Leader if you want one.
- Select Set.
- Select OK.
Which tab is used to insert a tab?
The Insert Tab is used to insert different features such as tables, pictures, clip art, shapes, charts, page numbers, word art, headers, and footers into a document.
What is the Insert tab on Windows 10?
The Insert tab contains various items that you may want to insert into a document. These items include such things as tables, word art, hyperlinks, symbols, charts, signature line, date & time, shapes, header, footer, text boxes, links, boxes, equations and so on.
Where is the Insert key on a laptop?
Sometimes displayed as Ins, the Insert key is a key on most computer keyboards near or next to the backspace key. The Insert key toggles how text is inserted by inserting or adding text in front of other text or overwriting text after the cursor as you type.
Where is tab in Word?
Tabs are set to distribute text evenly between the left and right margins. Word’s default tabs are set every half-inch. These tabs are indicated at the bottom of the horizontal ruler by tiny tick marks.
How do I insert Table Tools tab layout?
Design tab
- Click in the table that you want to format.
- Under Table Tools, click the Design tab.
- In the Table Formats group, rest the pointer over each table style until you find a style that you want to use. Note: To see more styles, click the More arrow.
- Click the style to apply it to the table.
What is Layout tab?
The Layout tab provides access to page display and layout options. These include page orientation and AutoFit, which is a feature that limits the width of columns in a report to be no wider than the largest value in each column. These options allow you to change the size or orientation of your report.
How do I add tabs to my laptop?
Right-click a tab and then select Add to new group.
- To edit your tab group, right-click the colored circle or name to the left. You can: Name your group.
- To add a tab to an existing group, drag the tab into the group.
- To remove a tab from a group, right-click the tab, then select Remove from group.
Which option is not available in the Insert tab?
Solution(By Examveda Team)
Graph is not available in MS word Insert option.
How do I set tabs in Word 2010?
Step 1 − Click just before the line for which you want to change the tab setting. Drag the tab sign available at the ruler to the left or right. Step 2 − A vertical line marks its position as you drag and when you click and drag a tab, the text moves with the tab.
How do I turn on the Insert key?
How to Enable the Insert key in Microsoft Word:
- Go to file > word options > advanced > editing options.
- Check the box that says, “use the Insert key to control overtype mode”
- Now the insert key works.
How do I enable inserts on my HP laptop?
The Shift key can be used to toggle the Insert key temporarily. Using Shift+0 (on Num pad) even when the Num Lock is turned on can be a viable choice to use the INSERT key in the same way you would press the Shift Key together with a letter for single letter capitalization.
What is Insert key on keyboard?
The Insert key Insert (often abbreviated Ins) is a key commonly found on computer keyboards. It is primarily used to switch between the two text-entering modes on a personal computer (PC) or word processor: overtype mode, in which the cursor, when typing, overwrites any text that is present in the current location; and.
How do I insert a table tool tab in Excel?
Try the following steps.
- Open excel, click on the Office Button.
- Excel options > Customize.
- Click on the dropdown under ‘Choose commands from:’
- Select all Commands from the drop down.
- Then select Table Properties from the list and then click OK.
How do I get the Layout tab in Excel?
The default location of the Layout tab is second from the left immediately following the Home tab. If your Ribbon isn’t displayed at all go to Excel> Preferences> Ribbon & restore the check for Turn on the Ribbon.
How do I add a Design tab to a chart in Excel?
Click the Insert tab; Go to the Chart Layouts group; Select one chart type and insert a chart into worksheet; Select the chart, and then Design tab, Layout tab, and Format tab appear in the far right of Ribbon.
Where is the Layout tab?
The Layout tab is located at the top of the App Studio interface. It is available only when you are creating a report. The Layout tab is shown in the following image. You can change the margins, orientation, paper type, unit of measurement, and page numbering of a report.
How do you use Layout tab?
The Page Layout Tab holds all the options that allow you to arrange your document pages just the way you want them. You can set margins, apply themes, control of page orientation and size, add sections and line breaks, display line numbers, and set paragraph indentation and lines.
What is Home tab?
1. In general, the home tab is a tab or button in an application or web page that returns you to the home section.In Microsoft Office, the Home tab is the default tab in Microsoft Word, Microsoft Excel, Microsoft PowerPoint, and other Microsoft Office products.
How do I add a tab on keyboard?
Open New Tab Shortcut
To open a new tab, hold Command and press T. For PC, hold Ctrl and press T.
Содержание
- Устанавливаем позицию табуляции
- Устанавливаем позицию табуляции с помощью линейки
- Расшифровка параметров индикатора табуляции
- Устанавливаем позицию табуляции через инструмент “Табуляция”
- Изменяем стандартные интервалы между позициями табуляции
- Удаляем интервалы позиций табуляции
- Вопросы и ответы

Табуляция в MS Word — это отступ от начала строки до первого слова в тексте, а необходима она для того, чтобы выделить начало абзаца или новой строки. Функция табуляции, доступная в текстовом редакторе от Майкрософт по умолчанию, позволяет сделать эти отступы одинаковыми во всем тексте, соответствующими стандартным или ранее установленным значениям.
Урок: Как убрать большие пробелы в Ворде
В этой статье мы расскажем о том, как работать с табуляцией, как ее изменить и настроить в соответствие с выдвигаемыми или желаемыми требованиями.
Устанавливаем позицию табуляции
Примечание: Табуляция — лишь один из параметров, позволяющих настроить внешний вид текстового документа. Чтобы изменить его, можно также использовать параметры разметки и готовые шаблоны, доступные в MS Word.
Урок: Как сделать поля в Ворде
Устанавливаем позицию табуляции с помощью линейки
Линейка — это встроенный инструмент программы MS Word, с помощью которого можно менять разметку страницы, настраивать поля текстовом документе. О том, как ее включить, а также о том, что с ее помощью можно сделать, вы можете прочесть в нашей статье, представленной по ссылке ниже. Здесь же мы расскажем о том, как с ее помощью задать позицию табуляции.
Урок: Как включить линейку в Ворде
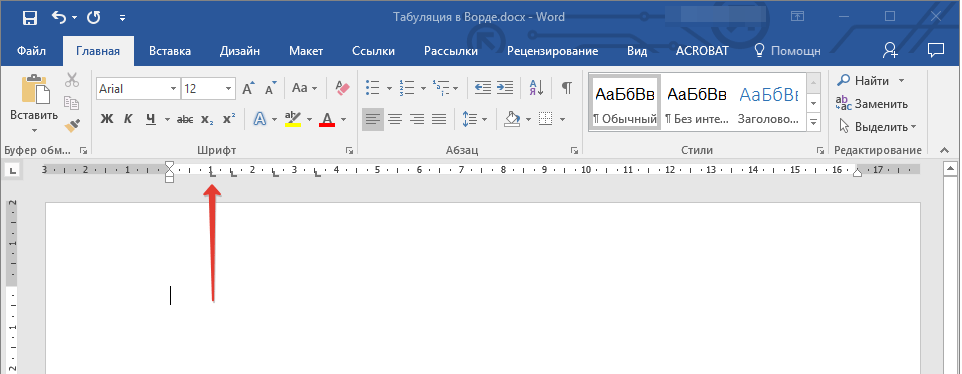
В левом верхнем углу текстового документа (над листом, ниже панели управления) в месте, где начинается вертикальная и горизонтальная линейки, находится значок табуляции. О том, что значит каждый из его параметров, мы расскажем ниже, а пока сразу перейдем к тому, как можно установить необходимую позицию табуляции.

1. Кликайте по значку табуляции до тех пор, пока не появится обозначение нужного вам параметра (при наведении указателя курсора на индикатор табуляции появляется его описание).
2. Кликните в том месте линейки, где необходимо установить табуляцию выбранного вами типа.
Расшифровка параметров индикатора табуляции
По левому краю: начальная позиция текста задается таким образом, чтобы по ходу набора он смещался к правому краю.
По центру: по ходу набора текст будет центрироваться относительно строки.

По правому краю: текст при вводе сдвигается влево, сам параметр задает конечную (по правому краю) позицию для текста.
С чертой: для выравнивания текста не применяется. Использование этого параметра в качестве позиции табуляции вставляет вертикальную черту на листе.
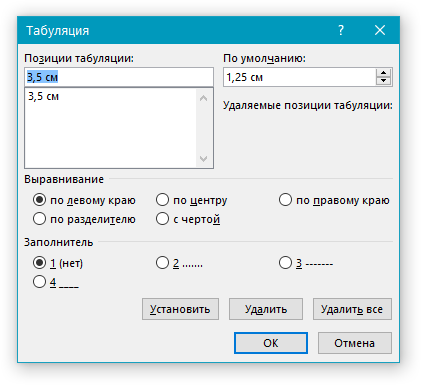
Устанавливаем позицию табуляции через инструмент “Табуляция”
Иногда возникает необходимость задать более точные параметры табуляции, чем это позволяет сделать стандартный инструмент “Линейка”. Для этих целей можно и нужно использовать диалоговое окно “Табуляция”. С его же помощью можно вставить определенный символ (заполнитель) непосредственно перед табуляцией.
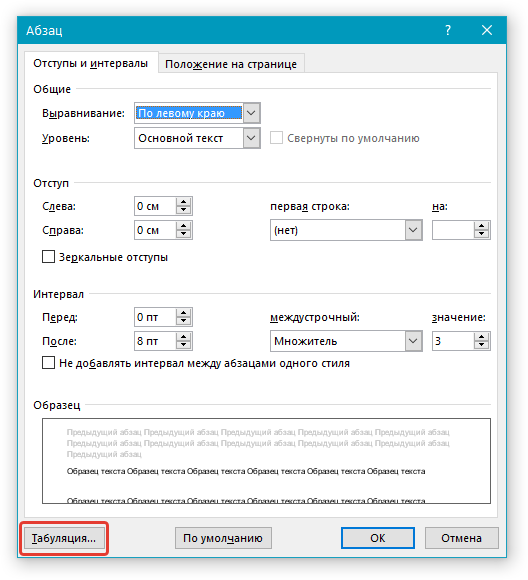
1. Во вкладке “Главная” откройте диалоговое окно группы “Абзац”, нажав на стрелочку, расположенную в правом нижнем углу группы.

Примечание: В более ранних версиях MS Word (вплоть до версии 2012) для открытия диалогового окна “Абзац” необходимо перейти во вкладку “Разметка страницы”. В MS Word 2003 этот параметр находится во вкладке “Формат”.
2. В диалоговом окне, которое перед вами появится, нажмите на кнопку “Табуляция”.
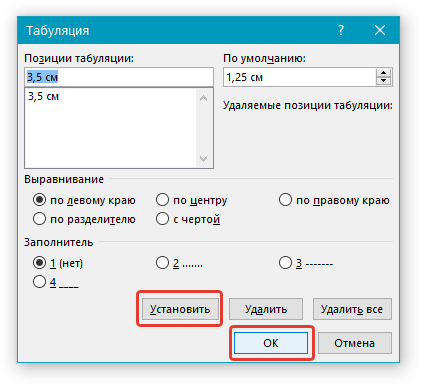
3. В разделе “Позиция табуляции” задайте необходимое числовое значение, оставив при этом единицы измерения (см).

4. Выберите в разделе “Выравнивание” необходимый тип расположения табуляции в документе.
5. Если вы хотите добавить позиции табуляции с точками или каким-либо другим заполнителем, выберете необходимый параметр в разделе “Заполнитель”.
6. Нажмите кнопку “Установить”.
7. Если вы хотите добавить в текстовый документ еще одну позицию табуляции, повторите вышеописанные действия. Если же вы больше ничего не желаете добавлять, просто нажмите “ОК”.
Изменяем стандартные интервалы между позициями табуляции
Если вы устанавливаете позицию табуляции в Ворде вручную, параметры, заданные по умолчанию, перестают быть активными, заменяясь на те, которые вы задали самостоятельно.
1. Во вкладке “Главная” (“Формат” или “Разметка страницы” в Word 2003 или 2007 — 2010, соответственно) откройте диалоговое окно группы “Абзац”.
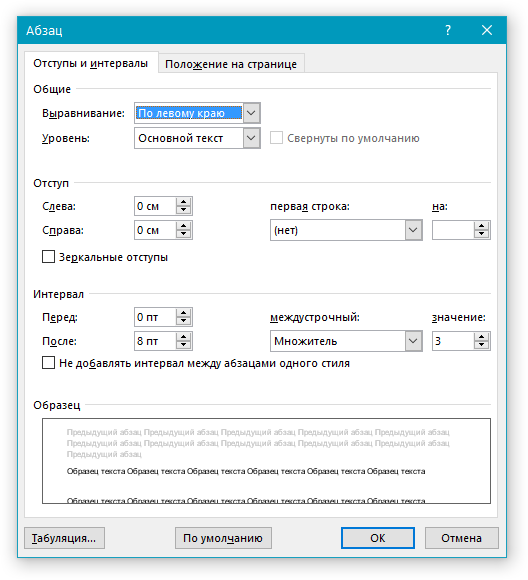
2. В открывшемся диалоговом окне нажмите на кнопку “Табуляция”, расположенную снизу слева.
3. В разделе “По умолчанию” задайте необходимое значение табуляции, которое будет использоваться в качестве значения по умолчанию.

4. Теперь каждый раз, когда вы будете нажимать клавишу “TAB”, значение отступа будет таким, как вы сами его установили.
Удаляем интервалы позиций табуляции
При необходимости, вы всегда можете убрать табуляцию в Ворде — одну, несколько или все сразу позиции, ранее установленные вручную. В таком случае значения табуляции переместятся в места, заданные по умолчанию.
1. Откройте диалоговое окно группы “Абзац” и нажмите в нем на кнопку “Табуляция”.
2. Выберите в списке “Позиции табуляции” ту позицию, которую необходимо очистить, после чего нажмите на кнопку “Удалить”.

- Совет: Если вы хотите удалить все позиции табуляции, ранее установленные в документе вручную, просто нажмите на кнопку “Удалить все”.
3. Повторите вышеописанные действия, если вам нужно очистить несколько ранее заданных позиций табуляции.
Важное примечание: При удалении табуляции, знаки позиций не удаляются. Удалять их необходимо вручную, либо же с помощью функции поиска и замены, где в поле “Найти” нужно ввести “^t” без кавычек, а поле “Заменить на” оставить пустым. После этого нажмите кнопку “Заменить все”. Более подробно о возможностях поиска и замены в MS Word вы можете узнать из нашей статьи.
Урок: Как заменить слово в Ворде
На этом все, в этой статье мы подробно рассказали вам о том, как сделать, изменить и даже убрать табуляцию в MS Word. Желаем вам успехов и дальнейшем освоение этой многофункциональной программы и только положительных результатов в работе и обучение.
This article describes the keyboard shortcuts and function keys in Word for Windows.
Notes:
-
To quickly find a shortcut in this article, you can use Search. Press Ctrl+F, and then type your search words.
-
If an action that you use often does not have a shortcut key, you can record a macro to create one. For instructions, go to Create or run a macro or Use a screen reader to create a macro in Word.
-
If you are using Microsoft Word Starter, be aware that not all the features listed for Word are supported in Word Starter. For more information about the features available in Word Starter, go to Word features that are not fully supported in Word Starter.
-
Get these keyboard shortcuts in a Word document at this link: Word 2016 for Windows keyboard shortcuts.
In this topic
-
Frequently used shortcuts
-
Ribbon keyboard shortcuts
-
Navigate the document
-
Preview and print documents
-
Select text and graphics
-
Edit text and graphics
-
Work with web content
-
Work with tables
-
Review a document
-
Work with references, citations, and indexing
-
Work with mail merge and fields
-
Work with text in other languages
-
Work with document views
-
Use function key shortcuts
Frequently used shortcuts
This table shows the most frequently used shortcuts in Microsoft Word.
|
To do this |
Press |
|---|---|
|
Open a document. |
Ctrl+O |
|
Create a new document. |
Ctrl+N |
|
Save the document. |
Ctrl+S |
|
Close the document. |
Ctrl+W |
|
Cut the selected content to the Clipboard. |
Ctrl+X |
|
Copy the selected content to the Clipboard. |
Ctrl+C |
|
Paste the contents of the Clipboard. |
Ctrl+V |
|
Select all document content. |
Ctrl+A |
|
Apply bold formatting to text. |
Ctrl+B |
|
Apply italic formatting to text. |
Ctrl+I |
|
Apply underline formatting to text. |
Ctrl+U |
|
Decrease the font size by 1 point. |
Ctrl+Left bracket ([) |
|
Increase the font size by 1 point. |
Ctrl+Right bracket (]) |
|
Center the text. |
Ctrl+E |
|
Align the text to the left. |
Ctrl+L |
|
Align the text to the right. |
Ctrl+R |
|
Cancel a command. |
Esc |
|
Undo the previous action. |
Ctrl+Z |
|
Redo the previous action, if possible. |
Ctrl+Y |
|
Adjust the zoom magnification. |
Alt+W, Q, then use the Tab key in the Zoom dialog box to go to the value you want. |
|
Split the document window. |
Ctrl+Alt+S |
|
Remove the document window split. |
Alt+Shift+C or Ctrl+Alt+S |
Top of Page
Close a task pane
To close a task pane using the keyboard:
-
Press F6 until the task pane is selected.
-
Press Ctrl+Spacebar.
-
Use the arrow keys to select Close, and then press Enter.
Ribbon keyboard shortcuts
The ribbon groups related options on tabs. For example, on the Home tab, the Font group includes the Font Color option. Press the Alt key to display the ribbon shortcuts, called Key Tips, as letters in small images next to the tabs and options as shown in the image below.

Note: Add-ins and other programs can add new tabs to the ribbon and might provide access keys for those tabs.
You can combine the Key Tips letters with the Alt key to make shortcuts called Access Keys for the ribbon options. For example, press Alt+H to open the Home tab, and Alt+Q to move to the Tell Me or Search field. Press Alt again to see Key Tips for the options for the selected tab.
Depending on the version of Microsoft 365 you are using, the Search text field at the top of the app window might be called Tell Me instead. Both offer a largely similar experience, but some options and search results can vary.
In Office 2013 and Office 2010, most of the old Alt key menu shortcuts still work, too. However, you need to know the full shortcut. For example, press Alt, and then press one of the old menu keys E (Edit), V (View), I (Insert), and so on. A notification pops up saying you’re using an access key from an earlier version of Microsoft 365. If you know the entire key sequence, go ahead and use it. If you don’t know the sequence, press Esc and use Key Tips instead.
Use the Access Keys for ribbon tabs
To go directly to a tab on the ribbon, press one of the following access keys. Additional tabs might appear depending on your selection in the document.
|
To do this |
Press |
|---|---|
|
Move to the Tell Me or Search field on the Ribbon to search for assistance or Help content. |
Alt+Q, then enter the search term. |
|
Open the File page to use Backstage view. |
Alt+F |
|
Open the Home tab to use common formatting commands, paragraph styles, and the Find tool. |
Alt+H |
|
Open the Insert tab to insert tables, pictures and shapes, headers, or text boxes. |
Alt+N |
|
Open the Design tab to use themes, colors, and effects, such as page borders. |
Alt+G |
|
Open the Layout tab to work with page margins, page orientation, indentation, and spacing. |
Alt+P |
|
Open the References tab to add a table of contents, footnotes, or a table of citations. |
Alt+S |
|
Open the Mailings tab to manage Mail Merge tasks and to work with envelopes and labels. |
Alt+M |
|
Open the Review tab to use Spell Check, set proofing languages, and to track and review changes to your document. |
Alt+R |
|
Open the View tab to choose a document view or mode, such as Read Mode or Outline view. You can also set the zoom magnification and manage multiple document windows. |
Alt+W |
Top of Page
Work in the ribbon with the keyboard
|
To do this |
Press |
|---|---|
|
Select the active tab on the ribbon and activate the access keys. |
Alt or F10. To move to a different tab, use access keys or the arrow keys. |
|
Move the focus to commands on the ribbon. |
Tab key or Shift+Tab |
|
Move between command groupings on the ribbon. |
Ctrl+Left or Right arrow key |
|
Move among the items on the ribbon. |
Arrow keys |
|
Show the tooltip for the ribbon element currently in focus. |
Ctrl+Shift+F10 |
|
Activate the selected button. |
Spacebar or Enter |
|
Open the list for the selected command. |
Down arrow key |
|
Open the menu for the selected button. |
Alt+Down arrow key |
|
When a menu or submenu is open, move to the next command. |
Down arrow key |
|
Expand or collapse the ribbon. |
Ctrl+F1 |
|
Open the context menu. |
Shift+F10 Or, on a Windows keyboard, the Windows Menu key (between the right Alt and right Ctrl keys) |
|
Move to the submenu when a main menu is open or selected. |
Left arrow key |
Top of Page
Navigate the document
|
To do this |
Press |
|---|---|
|
Move the cursor one word to the left. |
Ctrl+Left arrow key |
|
Move the cursor one word to the right. |
Ctrl+Right arrow key |
|
Move the cursor up by one paragraph. |
Ctrl+Up arrow key |
|
Move the cursor down by one paragraph. |
Ctrl+Down arrow key |
|
Move the cursor to the end of the current line. |
End |
|
Move the cursor to the beginning the current line. |
Home |
|
Move the cursor to the top of the screen. |
Ctrl+Alt+Page up |
|
Move the cursor to the bottom of the screen. |
Ctrl+Alt+Page down |
|
Move the cursor by scrolling the document view up by one screen. |
Page up |
|
Move the cursor by scrolling the document view down by one screen. |
Page down |
|
Move the cursor to the top of the next page. |
Ctrl+Page down |
|
Move the cursor to the top of the previous page. |
Ctrl+Page up |
|
Move the cursor to the end of the document. |
Ctrl+End |
|
Move the cursor to the beginning of the document. |
Ctrl+Home |
|
Move the cursor to the location of the previous revision. |
Shift+F5 |
|
Move the cursor to the location of the last revision made before the document was last closed. |
Shift+F5, immediately after opening the document. |
|
Cycle through floating shapes, such as text boxes or images. |
Ctrl+Alt+5, and then the Tab key repeatedly |
|
Exit the floating shape navigation and return to the normal navigation. |
Esc |
|
Display the Navigation task pane, to search within the document content. |
Ctrl+F |
|
Display the Go To dialog box, to navigate to a specific page, bookmark, footnote, table, comment, graphic, or other location. |
Ctrl+G |
|
Cycle through the locations of the four previous changes made to the document. |
Ctrl+Alt+Z |
Top of Page
Navigate the document using the browse options in Word 2007 and 2010
In Word 2007 and 2010, you can browse the document by various types of objects, such as fields, footnotes, headings, and graphics.
|
To do this |
Press |
|---|---|
|
Open the list of browse options to define the type of object to browse by. |
Ctrl+Alt+Home |
|
Move to the previous object of the defined type. |
Ctrl+Page up |
|
Move to the next object of the defined type. |
Ctrl+Page down |
Top of Page
Preview and print documents
|
To do this |
Press |
|---|---|
|
Print the document. |
Ctrl+P |
|
Switch to print preview. |
Ctrl+Alt+I |
|
Move around the preview page when zoomed in. |
Arrow keys |
|
Move by one preview page when zoomed out. |
Page up or Page down |
|
Move to the first preview page when zoomed out. |
Ctrl+Home |
|
Move to the last preview page when zoomed out. |
Ctrl+End |
Top of Page
Select text and graphics
|
To do this |
Press |
|---|---|
|
Select text. |
Shift+Arrow keys |
|
Select the word to the left. |
Ctrl+Shift+Left arrow key |
|
Select the word to the right. |
Ctrl+Shift+Right arrow key |
|
Select from the current position to the beginning of the current line. |
Shift+Home |
|
Select from the current position to the end of the current line. |
Shift+End |
|
Select from the current position to the beginning of the current paragraph. |
Ctrl+Shift+Up arrow key |
|
Select from the current position to the end of the current paragraph. |
Ctrl+Shift+Down arrow key |
|
Select from the current position to the top of the screen. |
Shift+Page up |
|
Select from the current position to the bottom of the screen. |
Shift+Page down |
|
Select from the current position to the beginning of the document. |
Ctrl+Shift+Home |
|
Select from the current position to the end of the document. |
Ctrl+Shift+End |
|
Select from the current position to the bottom of the window. |
Ctrl+Alt+Shift+Page down |
|
Select all document content. |
Ctrl+A |
Top of Page
Extend a selection
|
To do this |
Press |
|---|---|
|
Start extending the selection. |
F8 In the extend selection mode, clicking a location in the document extends the current selection to that location. |
|
Select the nearest character to the left or right. |
F8, Left or Right arrow key |
|
Expand the selection. |
F8 repeatedly to expand the selection to the entire word, sentence, paragraph, section, and document. |
|
Reduce the selection. |
Shift+F8 |
|
Select a vertical block of text. |
Ctrl+Shift+F8, then press the arrow keys |
|
Stop extending the selection. |
Esc |
Top of Page
Edit text and graphics
|
To do this |
Press |
|---|---|
|
Delete one word to the left. |
Ctrl+Backspace |
|
Delete one word to the right. |
Ctrl+Delete |
|
Open the Clipboard task pane and enable the Office Clipboard, which allows you to copy and paste content between Microsoft 365 apps. |
Alt+H, F, O |
|
Cut the selected content to the Clipboard. |
Ctrl+X |
|
Copy the selected content to the Clipboard. |
Ctrl+C |
|
Paste the contents of the Clipboard. |
Ctrl+V |
|
Move the selected content to a specific location. |
F2, move the cursor to the destination, and then press Enter. |
|
Copy the selected content to a specific location. |
Shift+F2, move the cursor to the destination, and then press Enter. |
|
Define an AutoText block with the selected content. |
Alt+F3 |
|
Insert an AutoText block. |
The first few characters of the AutoText block, and then press Enter when the ScreenTip appears. |
|
Cut the selected content to the Spike. |
Ctrl+F3 |
|
Paste the contents of the Spike. |
Ctrl+Shift+F3 |
|
Copy the selected formatting. |
Ctrl+Shift+C |
|
Paste the selected formatting. |
Ctrl+Shift+V |
|
Copy the header or footer used in the previous section of the document. |
Alt+Shift+R |
|
Display the Replace dialog box, to find and replace text, specific formatting, or special items. |
Ctrl+H |
|
Display the Object dialog box, to insert a file object into the document. |
Alt+N, J, J |
|
Insert a SmartArt graphic. |
Alt+N, M |
|
Insert a WordArt graphic. |
Alt+N, W |
Top of Page
Align and format paragraphs
|
To do this |
Press |
|---|---|
|
Center the paragraph. |
Ctrl+E |
|
Justify the paragraph. |
Ctrl+J |
|
Align the paragraph to the left. |
Ctrl+L |
|
Align the paragraph to the right. |
Ctrl+R |
|
Indent the paragraph. |
Ctrl+M |
|
Remove a paragraph indent. |
Ctrl+Shift+M |
|
Create a hanging indent. |
Ctrl+T |
|
Remove a hanging indent. |
Ctrl+Shift+T |
|
Remove paragraph formatting. |
Ctrl+Q |
|
Apply single spacing to the paragraph. |
Ctrl+1 |
|
Apply double spacing to the paragraph. |
Ctrl+2 |
|
Apply 1.5-line spacing to the paragraph. |
Ctrl+5 |
|
Add or remove space before the paragraph. |
Ctrl+0 (zero) |
|
Enable AutoFormat. |
Ctrl+Alt+K |
|
Apply the Normal style. |
Ctrl+Shift+N |
|
Apply the Heading 1 style. |
Ctrl+Alt+1 |
|
Apply the Heading 2 style. |
Ctrl+Alt+2 |
|
Apply the Heading 3 style. |
Ctrl+Alt+3 |
|
Display the Apply Styles task pane. |
Ctrl+Shift+S |
|
Display the Styles task pane. |
Ctrl+Alt+Shift+S |
Top of Page
Format characters
|
To do this |
Press |
|---|---|
|
Display the Font dialog box. |
Ctrl+D or Ctrl+Shift+F |
|
Increase the font size. |
Ctrl+Shift+Right angle bracket (>) |
|
Decrease the font size. |
Ctrl+Shift+Left angle bracket (<) |
|
Increase the font size by 1 point. |
Ctrl+Right bracket (]) |
|
Decrease the font size by 1 point. |
Ctrl+Left bracket ([) |
|
Switch the text between upper case, lower case, and title case. |
Shift+F3 |
|
Change the text to all upper case. |
Ctrl+Shift+A |
|
Hide the selected text. |
Ctrl+Shift+H |
|
Apply bold formatting. |
Ctrl+B |
|
Add a bulleted list. |
Ctrl+Shift+L |
|
Apply underline formatting. |
Ctrl+U |
|
Apply underline formatting to the words, but not the spaces. |
Ctrl+Shift+W |
|
Apply double-underline formatting. |
Ctrl+Shift+D |
|
Apply italic formatting. |
Ctrl+I |
|
Apply small caps formatting. |
Ctrl+Shift+K |
|
Apply subscript formatting. |
Ctrl+Equal sign ( = ) |
|
Apply superscript formatting. |
Ctrl+Shift+Plus sign (+) |
|
Remove manual character formatting. |
Ctrl+Spacebar |
|
Change the selected text to the Symbol font. |
Ctrl+Shift+Q |
Top of Page
Manage text formatting
|
To do this |
Press |
|---|---|
|
Display all nonprinting characters. |
Ctrl+Shift+8 (do not use the numeric keypad) |
|
Display the Reveal Formatting task pane. |
Shift+F1 |
Top of Page
Insert special characters
|
To do this |
Press |
|---|---|
|
Insert a line break. |
Shift+Enter |
|
Insert a page break. |
Ctrl+Enter |
|
Insert a column break. |
Ctrl+Shift+Enter |
|
Insert an em dash (—). |
Ctrl+Alt+Minus sign (on the numeric keypad) |
|
Insert an en dash (–). |
Ctrl+Minus sign (on the numeric keypad) |
|
Insert an optional hyphen. |
Ctrl+Hyphen (-) |
|
Insert a nonbreaking hyphen. |
Ctrl+Shift+Hyphen (-) |
|
Insert a nonbreaking space. |
Ctrl+Shift+Spacebar |
|
Insert a copyright symbol (©). |
Ctrl+Alt+C |
|
Insert a registered trademark symbol (®). |
Ctrl+Alt+R |
|
Insert a trademark symbol (™). |
Ctrl+Alt+T |
|
Insert an ellipsis (…) |
Ctrl+Alt+Period (.) |
|
Insert the Unicode character for the specified Unicode (hexadecimal) character code. For example, to insert the euro currency symbol ( Tip: To find out the Unicode character code for a selected character, press Alt+X. |
The character code, then press Alt+X |
|
Insert the ANSI character for the specified ANSI (decimal) character code. For example, to insert the euro currency symbol, hold down Alt and press 0128 on the numeric keypad. |
Alt+the character code (on the numeric keypad) |
 ), type
 Top of Page
Work with web content
|
To do this |
Press |
|---|---|
|
Insert a hyperlink. |
Ctrl+K |
|
Go back one page. |
Alt+Left arrow key |
|
Go forward one page. |
Alt+Right arrow key |
|
Refresh the page. |
F9 |
Top of Page
Work with tables
Move around in a table
|
To do this |
Press |
|---|---|
|
Move to the next cell in the row and select its content. |
Tab key |
|
Move to the previous cell in the row and select its content. |
Shift+Tab |
|
Move to the first cell in the row. |
Alt+Home |
|
Move to the last cell in the row. |
Alt+End |
|
Move to the first cell in the column. |
Alt+Page up |
|
Move to the last cell in the column. |
Alt+Page down |
|
Move to the previous row. |
Up arrow key |
|
Move to the next row. |
Down arrow key |
|
Move one row up. |
Alt+Shift+Up arrow key |
|
Move one row down. |
Alt+Shift+Down arrow key |
Top of Page
Select table content
|
To do this |
Press |
|---|---|
|
Select the content in the next cell. |
Tab key |
|
Select the content in the previous cell. |
Shift+Tab |
|
Extend a selection to adjacent cells. |
Shift+Arrow keys |
|
Select a column. |
Select the top or bottom cell of the column, and then press Shift+Up or Down arrow key |
|
Select a row. |
Select the first or last cell in the row, and then press Shift+Alt+End or Home. |
|
Select the whole table. |
Alt+5 on the numeric keypad, with Num Lock switched off |
Top of Page
Insert paragraphs and tab characters in a table
|
To do this |
Press |
|---|---|
|
Insert a new paragraph in a cell. |
Enter |
|
Insert a tab character in a cell. |
Ctrl+Tab |
Top of Page
Review a document
|
To do this |
Press |
|---|---|
|
Insert a comment. |
Ctrl+Alt+M |
|
Turn change tracking on or off. |
Ctrl+Shift+E |
|
Close the Reviewing Pane. |
Alt+Shift+C |
Top of Page
Work with references, citations, and indexing
Use the following shortcuts to add references to your document, such as a table of contents, footnotes, and citations.
|
To do this |
Press |
|---|---|
|
Mark a table of contents entry. |
Alt+Shift+O |
|
Mark a table of authorities entry (citation). |
Alt+Shift+I |
|
Choose citation options. |
Alt+Shift+F12, Spacebar |
|
Mark an index entry. |
Alt+Shift+X |
|
Insert a footnote. |
Ctrl+Alt+F |
|
Insert an endnote. |
Ctrl+Alt+D |
|
Go to the next footnote. |
Alt+Shift+Right angle bracket (>) |
|
Go to the previous footnote. |
Alt+Shift+Left angle bracket (<) |
Top of Page
Work with mail merge and fields
To use the following keyboard shortcuts, the Mailings ribbon tab must be selected. To select the Mailings tab, press Alt+M.
Perform a mail merge
|
To do this |
Press |
|---|---|
|
Preview the mail merge. |
Alt+Shift+K |
|
Merge a document. |
Alt+Shift+N |
|
Print the merged document. |
Alt+Shift+M |
|
Edit a mail-merge data document. |
Alt+Shift+E |
|
Insert a merge field. |
Alt+Shift+F |
Top of Page
Work with fields
|
To do this |
Press |
|---|---|
|
Insert a DATE field. |
Alt+Shift+D |
|
Insert a LISTNUM field. |
Ctrl+Alt+L |
|
Insert a PAGE field. |
Alt+Shift+P |
|
Insert a TIME field. |
Alt+Shift+T |
|
Insert an empty field. |
Ctrl+F9 |
|
Update the linked information in a Word source document. |
Ctrl+Shift+F7 |
|
Update the selected fields. |
F9 |
|
Unlink a field. |
Ctrl+Shift+F9 |
|
Switch between a selected field code and its result. |
Shift+F9 |
|
Switch between all field codes and their results. |
Alt+F9 |
|
Run GOTOBUTTON or MACROBUTTON from a field displaying field results. |
Alt+Shift+F9 |
|
Go to the next field. |
F11 |
|
Go to the previous field. |
Shift+F11 |
|
Lock a field. |
Ctrl+F11 |
|
Unlock a field. |
Ctrl+Shift+F11 |
Top of Page
Work with text in other languages
Set the proofing language
Every document has a default language, typically the same default language as your computer’s operating system. If your document also contains words or phrases in a different language, it’s a good idea to set the proofing language for those words. This not only makes it possible to check spelling and grammar for those phrases, but it also enables assistive technologies like screen readers to handle them appropriately.
|
To do this |
Press |
|---|---|
|
Display the Language dialog box to set the proofing language. |
Alt+R, U, L |
|
Set default languages. |
Alt+R, L |
Top of Page
Insert international characters
To type a lowercase character by using a key combination that includes the Shift key, hold down the Ctrl+Shift+symbol keys simultaneously, and then release them before you type the letter.
Note: If you type extensively in another language, you might prefer to switch to a different keyboard instead.
|
To insert this |
Press |
|---|---|
|
à, è, ì, ò, ù, |
Ctrl+Grave accent (`), the letter |
|
á, é, í, ó, ú, ý |
Ctrl+Single quotation mark (‘), the letter |
|
â, ê, î, ô, û |
Ctrl+Shift+Caret (^), the letter |
|
ã, ñ, õ |
Ctrl+Shift+Tilde (~), the letter |
|
ä, ë, ï, ö, ü, ÿ, |
Ctrl+Shift+Colon (:), the letter |
|
å, Å |
Ctrl+Shift+At sign (@), a or A |
|
æ, Æ |
Ctrl+Shift+Ampersand (&), a or A |
|
œ, Œ |
Ctrl+Shift+Ampersand (&), o or O |
|
ç, Ç |
Ctrl+Comma (,), c or C |
|
ð, Ð |
Ctrl+Single quotation mark (‘), d or D |
|
ø, Ø |
Ctrl+Forward slash (/), o or O |
|
¿ |
Ctrl+Alt+Shift+Question mark (?) |
|
¡ |
Ctrl+Alt+Shift+Exclamation point (!) |
|
ß |
Ctrl+Shift+Ampersand (&), s |
Top of Page
Use Input Method Editors for East Asian languages
|
To do this |
Press |
|---|---|
|
Switch to the Japanese Input Method Editor (IME) for a 101-key keyboard, if available. |
Alt+Tilde (~) |
|
Switch to the Korean Input Method Editor (IME) for a 101-key keyboard, if available. |
Right Alt |
|
Switch to the Chinese Input Method Editor (IME) for a 101-key keyboard, if available. |
Ctrl+Spacebar |
Top of Page
Work with document views
Word offers several different views of a document. Each view makes it easier to do certain tasks. For example, Read Mode enables you view the document as a horizontal sequence of pages, which you can quickly browse using the Left and Right arrow keys.
Switch the document view
|
To do this |
Press |
|---|---|
|
Switch to the Read Mode view. In Word 2007 and 2010, this is called Full Screen Reading view. |
Alt+W, F |
|
Switch to the Print Layout view. |
Ctrl+Alt+P |
|
Switch to the Outline view. |
Ctrl+Alt+O |
|
Switch to the Draft view. |
Ctrl+Alt+N |
Top of Page
Outline a document
These shortcuts only apply when the document is in the Outline view.
|
To do this |
Press |
|---|---|
|
Promote a paragraph. |
Alt+Shift+Left arrow key |
|
Demote a paragraph. |
Alt+Shift+Right arrow key |
|
Demote the paragraph to body text. |
Ctrl+Shift+N |
|
Move the selected paragraphs up. |
Alt+Shift+Up arrow key |
|
Move the selected paragraphs down. |
Alt+Shift+Down arrow key |
|
Expand the text under a heading. |
Alt+Shift+Plus sign (+) |
|
Collapse the text under a heading. |
Alt+Shift+Minus sign (-) |
|
Expand or collapse all text or headings. |
Alt+Shift+A |
|
Hide or display the character formatting. |
Forward slash (/) (on the numeric keypad) |
|
Switch between showing the first line of body text and showing all body text. |
Alt+Shift+L |
|
Show all headings with the Heading 1 style. |
Alt+Shift+1 |
|
Show all headings with the specified heading level. |
Alt+Shift+Heading level number |
|
Insert a tab character. |
Ctrl+Tab |
Top of Page
Move through the document in Read Mode
|
To do this |
Press |
|---|---|
|
Move to the beginning of the document. |
Home |
|
Move to the end of the document. |
End |
|
Go to a specific page. |
Type the page number, then press Enter |
|
Exit Read Mode. |
Esc |
Top of Page
Use function key shortcuts
|
Key |
Description |
|---|---|
|
F1 |
|
|
F2 |
|
|
F3 |
|
|
F4 |
|
|
F5 |
|
|
F6 |
|
|
F7 |
|
|
F8 |
|
|
F9 |
|
|
F10 |
|
|
F11 |
|
|
F12 |
|
Top of Page
See also
Word help center
Basic tasks using a screen reader with Word
Use a screen reader to explore and navigate Word
Screen reader support for Word
This article describes the keyboard shortcuts and function keys in Word for Mac.
Notes:
-
The settings in some versions of the Mac operating system (OS) and some utility applications might conflict with keyboard shortcuts and function key operations in Microsoft 365 for Mac. For information about changing the key assignment for a keyboard shortcut, see Mac Help for your version of macOS, your utility application, or refer to Shortcut conflicts.
-
If you don’t find a keyboard shortcut here that meets your needs, you can create a custom keyboard shortcut. For instructions, go to Create a custom keyboard shortcut for Office for Mac.
-
Many of the shortcuts that use the Ctrl key on a Windows keyboard also work with the Control key in Word for Mac. However, not all do.
-
To quickly find a shortcut in this article, you can use Search. Press Command+F, and then type your search words.
For the best experience using your keyboard with the ribbon, enable your keyboard to access all controls.
-
To open the System Preferences, press
+Spacebar, type system preferences, and press Return. -
To go to Keyboard Settings, type keyboard and press Return.
-
In the Shortcuts tab, press Control+F7 to change the Full Keyboard Access setting from Text boxes and lists only to All Controls.
In this topic
-
Frequently used shortcuts
-
Shortcut conflicts
-
Navigate the document
-
Select text and graphics
-
Edit text and graphics
-
Work with tables
-
Drawing
-
Work with fields
-
Outline a document
-
Review a document
-
Use footnotes and endnotes
-
Work with right-to-left languages
-
Use function key shortcuts
Frequently used shortcuts
This table lists frequently used shortcuts in Word for Mac.
|
To do this |
Press |
|---|---|
|
Undo the previous action. |
|
|
Redo the previous action, if possible. |
|
|
Cut the selected content to the Clipboard. |
|
|
Copy the selected content to the Clipboard. |
|
|
Paste the contents of the Clipboard. |
|
|
Display the shortcut menu for the selected item. * |
Shift+F10 |
|
Display the Go To dialog box. |
|
|
Display the Spelling and Grammar dialog box. |
|
|
Enable extended selection mode. |
F8 |
|
Switch to the next window. |
|
|
Switch to the previous window. |
|
|
Display the Save As dialog box. |
|
|
Find text (move focus to the Search in Document box). |
|
|
Display the Find and Replace pane. |
Control+H |
|
Display the Print dialog box. |
|
|
Close the current document. |
|
|
Expand or minimize the ribbon. |
|
|
Find the next spelling or grammatical error. The Check spelling as you type feature must be enabled. |
Option+F7 |
|
Open the Dictionary. |
In Word 2011, Option+Shift+F7 |
Top of Page
Shortcut conflicts
Some Word for Mac keyboard shortcuts conflict with default macOS keyboard shortcuts. This topic flags such shortcuts with an asterisk ( * ). To use these shortcuts, you may have to change your Mac keyboard settings to change the shortcut for the key.
Change system preferences for keyboard shortcuts
-
From the Apple menu, select System Preferences.
-
Select Keyboard.
-
Select the Shortcuts tab.
-
Select Mission Control.
-
Clear the check box for the keyboard shortcut conflicting with the Word for Mac shortcut that you want to use.
Navigate the document
|
To do this |
Press |
|---|---|
|
Move the cursor one word to the left. |
Option+Left arrow key |
|
Move the cursor one word to the right. |
Option+Right arrow key |
|
Move the cursor up by one paragraph. |
|
|
Move the cursor down by one paragraph. |
|
|
Move the cursor to the beginning of the current line. |
Home |
|
Move the cursor to the end of the current line. |
End |
|
Move the cursor to the top of the previous page. |
On a MacBook, press |
|
Move the cursor to the top of the next page. |
On a MacBook, press |
|
Move the cursor to the beginning of the document. |
On a MacBook, press |
|
Move the cursor to the end of the document. |
On a MacBook, press |
|
Move the cursor to the previous insertion point. |
Shift+F5 |
|
Move the cursor by scrolling the document view up by one screen. |
Page up |
|
Move the cursor by scrolling the document view down by one screen. |
Page down |
Top of Page
Select text and graphics
Tip: If you know the key combination to move the cursor, you can generally select the text by using the same key combination while holding down Shift. For example,  +Right arrow moves the cursor to the next word, and +Shift+Right arrow selects the text from the cursor to the beginning of the next word.
|
To do this |
Press |
|---|---|
|
Select multiple items that are not next to each other. |
Select the first item that you want, hold down |
|
Select text. |
Shift+Arrow keys |
|
Select the word to the left. |
Shift+Option+Left arrow key |
|
Select the word to the right. |
Shift+Option+Right arrow key |
|
Select from the current position to the beginning of the current line. |
Shift+Home |
|
Select from the current position to the end of the current line. |
Shift+End |
|
Select from the current position to the beginning of the current paragraph. |
|
|
Select from the current position to the end of the current paragraph. |
|
|
Select from the current position to the top of the screen. |
Shift+Page up |
|
Select from the current position to the bottom of the screen. |
Shift+Page down |
|
Select from the current position to the beginning of the document. |
|
|
Select from the current position to the end of the document. |
|
|
Select from the current position to the bottom of the window. |
|
|
Select all document content. |
|
Top of Page
Extend a selection
|
To do this |
Press |
|---|---|
|
Start extending the selection. * |
F8 In the extend selection mode, clicking a location in the document extends the current selection to that location. |
|
Select the nearest character to the left. |
F8, Left arrow key |
|
Select the nearest character to the right. |
F8, Right arrow key |
|
Expand the selection. |
F8 repeatedly to expand the selection to the entire word, sentence, paragraph, section, and document. |
|
Reduce the selection. * |
Shift+F8 |
|
Select a vertical block of text. |
|
|
Stop extending the selection. |
Esc |
Top of Page
Edit text and graphics
|
To do this |
Press |
|---|---|
|
Cut the selected content to the Clipboard. |
F2 |
|
Copy the selected content to the Clipboard. |
F3 |
|
Paste the contents of the Clipboard. |
F4 |
|
Display the Paste Special dialog box. |
|
|
Cut the selected content to the Spike. |
|
|
Paste the contents of the Spike. |
|
|
Copy the selected formatting. |
|
|
Paste the copied formatting. |
|
|
Create an AutoText entry. |
Option+F3 |
Top of Page
Align and format paragraphs
|
To do this |
Press |
|---|---|
|
Center the paragraph. |
|
|
Justify the paragraph. |
|
|
Align the paragraph to the left. |
|
|
Align the paragraph to the right. |
|
|
Indent the paragraph. |
Control+Shift+M |
|
Remove a paragraph indent. |
|
|
Create a hanging indent. |
|
|
Remove a hanging indent. |
|
|
Apply single-spacing to the paragraph. |
|
|
Apply double-spacing to the paragraph. |
|
|
Apply 1.5-line spacing to the paragraph. |
|
|
Enable AutoFormat. |
|
|
Apply the Normal style. |
|
|
Apply the Heading 1 style. |
|
|
Apply the Heading 2 style. |
|
|
Apply the Heading 3 style. |
|
|
Apply the List style. |
|
|
Insert a nonbreaking space. |
Option+Spacebar |
Top of Page
Format characters
|
To do this |
Press |
|---|---|
|
Increase the font size. |
|
|
Decrease the font size. |
|
|
Increase the font size by 1 point. |
|
|
Decrease the font size by 1 point. |
|
|
Display the Font dialog box. |
|
|
Switch the text between upper case, lower case, and title case. |
Shift+F3 |
|
Change the text to all upper case. |
|
|
Apply bold formatting. |
|
|
Add a bulleted list. |
|
|
Apply underline formatting. |
|
|
Apply underline formatting to the words, but not the spaces. |
|
|
Apply double-underline formatting. |
|
|
Apply italics formatting. |
|
|
Apply small caps formatting. |
|
|
Apply strike-through formatting. |
|
Top of Page
Insert special characters
|
To do this |
Press |
|---|---|
|
Insert an empty field. |
|
|
Insert a line break. |
Shift+Return |
|
Insert a page break. |
|
|
Insert a column break. |
|
|
Insert a nonbreaking hyphen. |
|
|
Insert a registered trademark symbol (®). |
Option+R |
|
Insert a trademark symbol (™). |
Option+2 |
Top of Page
Work with tables
Move around in a table
|
To do this |
Press |
|---|---|
|
Move to the next cell and select its content. |
Tab key |
|
Move to the previous cell and select its content. |
Shift+Tab |
|
Move to the next row. |
Down arrow key |
|
Move to the previous row. |
Up arrow key |
|
Move to the first cell in the row. |
Control+Home |
|
Move to the last cell in the row. |
Control+End |
|
Move to the first cell in the column. |
Control+Page up |
|
Move to the last cell in the column. |
Control+Page down |
|
Add a new row to the bottom of the table. |
Tab key, at the end of the last row |
|
Insert a row. |
|
Top of Page
Select table content
|
To do this |
Press |
|---|---|
|
Select the content in the next cell. |
Tab key |
|
Select the content in the previous cell. |
Shift+Tab |
|
Extend a selection to adjacent cells. |
Shift+Arrow keys |
|
Select a row. |
Select the first or last cell in the row, and then press Shift+Alt+End or Home. |
Top of Page
Resize table columns with the ruler
|
To do this |
Press |
|---|---|
|
Retain the column sizes to the right and change the table width. |
Drag the column boundary in the ruler |
|
Move a single column line and retain the table width. |
Shift+Drag the column boundary in the ruler |
|
Equally resize all columns to the right and retain the table width. |
|
|
Proportionally resize all columns to the right and retain the table width. |
|
Top of Page
Resize table columns directly in a table
Tip: To finely adjust the column width and display the column’s measurements in the ruler when you resize the column, turn off the snap-to functionality by pressing Option with the shortcut keys.
|
To do this |
Press |
|---|---|
|
Move a single column line and retain the table width. |
Drag the column boundary |
|
Retain column sizes to the right and change the table width. |
Shift+Drag the column boundary |
|
Equally resize all columns to the right and retain the table width. |
|
|
Proportionally resize all columns to the right and retain the table width. |
|
Top of Page
Insert paragraphs and tab characters in a table
|
To do this |
Press |
|---|---|
|
Insert a new paragraph in a cell. |
Return |
|
Insert a Tab character in a cell. |
Option+Tab |
Top of Page
Drawing
|
To do this |
Press |
|---|---|
|
Toggle drawing mode. |
|
Top of Page
Work with fields
|
To do this |
Press |
|---|---|
|
Insert a DATE field. |
Control+Shift+D |
|
Insert a LISTNUM field. |
|
|
Insert a PAGE field. |
Control+Shift+P |
|
Insert a TIME field. |
Control+Shift+T |
|
Insert an empty field. |
|
|
Update the selected fields. * |
F9 |
|
Switch between a field code and its result. * |
Shift+F9 |
|
Switch between all field codes and their results. |
Option+F9 |
|
Run GOTOBUTTON or MACROBUTTON from a field displaying field results. |
Option+Shift+F9 |
|
Lock a field. |
|
|
Unlock a field. |
|
Top of Page
Outline a document
These shortcuts only apply when the document is in the Outline view.
|
To do this |
Press |
|---|---|
|
Promote a paragraph. |
Control+Shift+Left arrow key |
|
Demote a paragraph. |
Control+Shift+Right arrow key |
|
Demote the paragraph to body text. |
|
|
Move the selected paragraphs up. * |
Control+Shift+Up arrow key |
|
Move the selected paragraphs down. * |
Control+Shift+Down arrow key |
|
Expand the text under a heading. |
Control+Shift+Plus sign (+) |
|
Collapse text under a heading. * |
Control+Shift+Minus sign (-) |
|
Expand all body text and headings, or collapse all body text. |
Control+Shift+A |
|
Switch between showing the first line of body text and showing all body text. |
Control+Shift+L |
|
Show all headings with the specified heading level. |
Control+Shift+Heading level number |
Top of Page
Review a document
|
To do this |
Press |
|---|---|
|
Insert a comment. |
|
|
Turn change tracking on or off. |
|
|
Move to the beginning of a comment. |
Home |
|
Move to the end of a comment. |
End (The End key is not available on all keyboards.) |
|
Move to the beginning of the list of comments. |
|
|
Move to the end of the list of comments. |
|
Top of Page
Use footnotes and endnotes
|
To do this |
Press |
|---|---|
|
Insert a footnote. |
|
|
Insert an endnote. |
|
Top of Page
Work with right-to-left languages
Word supports right-to-left functionality for languages that work in a right-to-left or a combined right-to-left, left-to-right environment for writing, editing, and displaying text. In this context, right-to-left languages refers to any writing system that is written from right to left and includes languages that require contextual shaping, such as Arabic, and languages that do not.
Before you can use these keyboard shortcuts, you need to ensure keyboard shortcuts are enabled for the language you are using:
-
Go to Apple > System Preferences > Keyboard.
-
On the Input Sources tab, select the language for which you want to enable shortcuts.
-
On the right side of the tab, select the check box for Enable keyboard shortcuts.
|
To do this |
Press |
|---|---|
|
Switch the writing direction to right-to-left. |
Control+ |
|
Switch the writing direction to left-to-right. |
Control+ |
Top of Page
Use function key shortcuts
Word for Mac uses the function keys for common commands, including Copy and Paste. For quick access to these shortcuts, you can change your Apple system preferences so you don’t have to press the Fn key every time you use a function key shortcut.
Note: Changing system function key preferences affects how the function keys work on your Mac, not just in Word. After changing this setting, you can still perform the special features printed on a function key. Just press the Fn key. For example, to use the F12 key to change your volume, press Fn+F12.
If a function key doesn’t work as you expect it to, press the Fn key in addition to the function key. If you don’t want to press the Fn key each time, you can change your Apple system preferences. For instructions, go to Change function key preferences.
The following table provides the function key shortcuts for Word for Mac.
|
Key |
Description |
|---|---|
|
F1 |
|
|
F2 |
|
|
F3 |
|
|
F4 |
|
|
F5 |
|
|
F6 |
|
|
F7 |
|
|
F8 |
|
|
F9 |
|
|
F10 |
|
|
F11 |
|
Top of Page
Change function key preferences
-
In the Apple menu, select System Preferences.
-
Select Keyboard.
-
On the Keyboard tab, select the check box for Use all F1, F2, etc. keys as standard function keys.
See also
Word help center
Basic tasks using a screen reader with Word
Use a screen reader to explore and navigate Word
Screen reader support for Word
This article describes the keyboard shortcuts in Word for the web.
Notes:
-
If you use Narrator with the Windows 10 Fall Creators Update, you have to turn off scan mode in order to edit documents, spreadsheets, or presentations with Microsoft 365 for the web. For more information, refer to Turn off virtual or browse mode in screen readers in Windows 10 Fall Creators Update.
-
To quickly find a shortcut in this article, you can use Search. Press Ctrl+F and then type your search words.
-
When you use Word for the web, we recommend that you use Microsoft Edge as your web browser. Because Word for the web runs in your web browser, the keyboard shortcuts are different from those in the desktop program. For example, you’ll use Ctrl+F6 instead of F6 for jumping in and out of the commands. Also, common shortcuts like F1 (Help) and Ctrl+O (Open) apply to the web browser – not Word for the web.
In this topic
-
Frequently used shortcuts
-
Ribbon keyboard shortcuts
-
Navigate the document
-
Edit and format the document
-
Work with comments
Frequently used shortcuts
This table lists the most frequently used shortcuts in Word for the web.
Tip: To quickly create a new document in Word for the web, open your browser, type Word.new in the address bar, and then press Enter.
|
To do this |
Press |
|---|---|
|
In the Reading view, open a PDF-based view tagged to work with screen readers. |
Press the Tab key until you reach the Accessibility Mode button, and then press Enter |
|
Find text in the Reading view. |
Ctrl+F or F3 |
|
Find text in the Editing view. |
Ctrl+F or Ctrl+G |
|
Find and replace text in the Editing view. |
Ctrl+H |
|
Hide the task pane, if one is open. |
Esc |
|
Switch to the Zoom control. |
Alt+Period, W, then Q or Alt+Windows logo key, W, then Q |
|
Print the document. |
Ctrl+P |
|
Move to the next landmark region. |
Ctrl+F6 |
|
Go to the Tell Me or Search text field. |
Alt+Q |
Top of Page
Ribbon keyboard shortcuts
Word for the web offers shortcuts called access keys to navigate the ribbon. If you’ve used access keys to save time on Word for desktop computers, you’ll find access keys very similar in Word for the web.
On a Windows computer, access keys all start with Alt+Period (.) or Alt+Windows logo key, then add a letter for the ribbon tab. For example, to go to the Review tab, press Alt+Period, R or Alt+Windows logo key, R.
If you’re using Word for the web on a Mac computer, press Control+Period (.) to start.

-
To get to the ribbon, press Alt+Period or Alt+Windows logo key. You can alternatively press Ctrl+F6 until you reach the Home tab.
-
To move between tabs on the ribbon, press the Tab key.
-
To hide the ribbon so you have more room to work, press Ctrl+F3. Repeat to display the ribbon again.
Go to the access keys for the ribbon
To go directly to a tab on the ribbon, press one of the following access keys:
|
To do this |
Press |
|---|---|
|
Open the Tell Me or Search text field on the ribbon to type a search term. |
Alt+Period, Q or Alt+Windows logo key, Q |
|
Open the File tab to use the Backstage view. |
Alt+Period, F or Alt+Windows logo key, F |
|
Open the Home tab to format text and use the Find tool. |
Alt+Period, H or Alt+Windows logo key, H |
|
Open the Insert tab to insert a picture, link, comment, header or footer, or a page number. You can also access the Symbol gallery. |
Alt+Period, N or Alt+Windows logo key, N |
|
Open the Page Layout tab to set page margins, orientation, and size, and paragraph spacing. |
Alt+Period, A or Alt+Windows logo key, A |
|
Open the References tab to insert a table of contents, footnotes, or endnotes. |
Alt+Period, S or Alt+Windows logo key, S |
|
Open the Review tab to check spelling, add comments, or track and review changes to your document. |
Alt+Period, R or Alt+Windows logo key, R |
|
Open the View tab to choose a view, open the Navigation pane, edit the Header & Footer, and to Zoom the document view. |
Alt+Period, W or Alt+Windows logo key, W |
Top of Page
Use Search
To find an option or perform an action quickly, use the Search text field. To learn more about the Search feature, go to Find what you need with Microsoft Search.
Note: Depending on the version of Microsoft 365 you are using, the Search text field at the top of the app window might be called Tell Me instead. Both offer a largely similar experience, but some options and search results can vary.
-
Select the item or place in your document, presentation, or spreadsheet where you want to perform an action.
-
To go to the Search text field, press Alt+Q.
-
Type the search words for the action that you want to perform. For example, if you want to add a bulleted list, type bullets.
-
Press the Down arrow key to browse through the search results.
-
Once you’ve found the result that you want, press Enter to select it and to perform the action.
Work in the ribbon tabs and menus
The following shortcuts can save time when you work with the ribbon tabs and ribbon menus.
|
To do this |
Press |
|---|---|
|
Select the active tab on the ribbon, and activate the access keys. |
Alt+Period or Alt+Windows logo key. To move to a different tab, use an access key or the Tab key. |
|
When a Ribbon tab is selected, move the focus to the tab commands. |
Enter, then Tab key or Shift+Tab |
|
Activate a selected button. |
Spacebar or Enter |
|
Open the list for a selected command. |
Spacebar or Enter |
|
Open the menu for a selected button. |
Alt+Down arrow key |
|
When a menu or submenu is open, move to the next command. |
Down arrow key |
|
Collapse or expand the ribbon. |
Ctrl+F3 |
Top of Page
Navigate the document
|
To do this |
Press |
|---|---|
|
Move the cursor right by one word. |
Ctrl+Right arrow key |
|
Move the cursor left by one word. |
Ctrl+Left arrow key |
|
Move the cursor up by one paragraph. |
Ctrl+Up arrow key |
|
Move the cursor down by one paragraph. |
Ctrl+Down arrow key |
|
Move the cursor to the beginning of the current line. |
Home |
|
Move the cursor to the end of the current line. |
End |
|
Move the cursor to the beginning of the document. |
Ctrl+Home |
|
Move the cursor to the end of the document. |
Ctrl+End |
|
Select text. |
Shift+Arrow keys |
|
Select the word to the right. |
Shift+Ctrl+Right arrow key |
|
Select the word to the left. |
Shift+Ctrl+Left arrow key |
|
Select the paragraph above. |
Shift+Ctrl+Up arrow key |
|
Select the paragraph below. |
Shift+Ctrl+Down arrow key |
|
Select from the current position to the beginning of the line. |
Shift+Home |
|
Select from the current position to the end of the line. |
Shift+End |
|
Select from the current position to the beginning of the document. |
Shift+Ctrl+Home |
|
Select from the current position to the end of the document. |
Shift+Ctrl+End |
|
Select all document content. |
Ctrl+A |
Top of Page
Edit and format the document
|
To do this |
Press |
|---|---|
|
Cut the selected content to the Clipboard. |
Ctrl+X |
|
Copy the selected content to the Clipboard. |
Ctrl+C |
|
Paste the content from the Clipboard. |
Ctrl+V |
|
Undo the previous action. |
Ctrl+Z |
|
Redo the previous action. |
Ctrl+Y |
|
Shrink the font size. |
Ctrl+Left bracket ([) |
|
Grow the font size. |
Ctrl+Right bracket (]) |
|
Apply bold formatting to the selected text. |
Ctrl+B |
|
Apply italic formatting to the selected text. |
Ctrl+I |
|
Underline the selected text. |
Ctrl+U |
|
Align the paragraph to the left. |
Ctrl+L |
|
Align the paragraph to the right. |
Ctrl+R |
|
Center the paragraph. |
Ctrl+E |
|
Justify the paragraph. |
Ctrl+J |
|
Create a bulleted list. |
Ctrl+Period (.) |
|
Create a numbered list. |
Ctrl+Slash (/) |
Top of Page
See also
Word help center
Basic tasks using a screen reader with Word
Use a screen reader to explore and navigate Word
Screen reader support for Word
 When you press the Tab key while working in Microsoft Word, your cursor moves to a specific location called a tab stop. Tabs can be used to indent paragraphs, but they can also be used for other purposes including creating single- and multi-column lists. This tutorial shows (1) how to change Word’s default tab and (2) how to create, change, and delete tabs in Word on the ruler.
Important Note: Although tabs can be used to indent paragraphs, Word’s built-in indent options are more efficient and reliable for longer documents. See “Three Ways to Indent Paragraphs in Microsoft Word” for more information.
Before starting the tutorial, let’s look at the different types of tab stops you can use in Word.
Five Types of Tab Stops in Word
Word includes five different tab stops:
- The left tab places left-aligned text to the right of the tab stop. (This is the most common tab stop.)
- The center tab centers text on the tab stop.
- The right tab places right-aligned text to the left of the tab stop.
- The decimal tab aligns text based on the first decimal placed on the tab stop.
- The bar tab creates a vertical line at the tab stop. (Technically, this is not a tab; it is for formatting multi-column lists.)
This tutorial is available as a YouTube video showing all the steps in real time.
Watch more than 150 other writing-related software tutorials on my YouTube channel.
The images below are from Word for Microsoft 365. The steps also apply to Word 2021, Word 2019, Word 2016, Word 2013, and Word 2010.
How to Change Word’s Default Tab
By default, Word moves your cursor half an inch to the right when you press the Tab key on your keyboard. However, you can change the length of your default left tab stop without creating a new tab.
The following steps only affect your current document. If you want to change the default tab for all future documents, you have to modify your normal.dotm template. We will cover that advanced topic in a separate tutorial.
- Select the Home tab in the ribbon.

- Select the dialog box launcher in the Paragraph group.

- Select the Tabs button in the Paragraph dialog box.

- Use the increment arrows to adjust the default tab stop in the Tabs dialog box. Alternatively, you can type a new number directly into the text box.

- Select the OK button to close the Tabs dialog box.

The steps below use the ruler. You can also create and adjust tabs using the Tabs dialog box. However, that process is less user-friendly than the ruler method, so it will be presented in a separate, advanced tutorial.
How to Create Tabs on the Ruler
Skip to step 3 if your ruler is already visible.
- Select the View tab in the ribbon.

- Select Ruler in the Show group.

- Press Ctrl + A on your keyboard to select your entire document or select the portion of your document to which you want to apply the tab.
If you don’t select all or part of your document before creating your new tab, it will only apply to the paragraph your cursor is currently in or newly created content.
- Click the tab selector button until it changes to the symbol representing the tab you want. (Hover your pointer over each symbol in the tab selector for a tooltip explaining each symbol.)

- Click the location on the ruler where you would like to place the tab stop. The tab symbol will then appear on the ruler.

Note that you can place multiple tab stops on the ruler. Each time you press the Tab key, your cursor will move to the next stop.
How to Change Tabs on the Ruler
- [Optional step] If you want to change the location of a tab stop and update all the text formatted with that tab, select only that text.
- Slide the cursor symbol to a new location on the ruler. If your cursor is currently in a paragraph formatted with that tab, it will automatically update.
How to Delete Tabs on the Ruler
- Ensure that no text or other content is selected.
- Pull the tab symbol downward and release it. It will be removed from the ruler.
Pro Tip: If you accidentally delete a tab, immediately press Ctrl + Z on your keyboard to undo the deletion.
Related Resources
How to Create and Customize Headings in Microsoft Word
Three Ways to Insert Accent Marks in Microsoft Word
How to View the Word Count in Microsoft Word
Updated April 13, 2022
The Insert tab is used to insert and format images, shapes, tables, headers and footers, 3D models, page numbers, equations, etc. in a Word document. As said in the above line, Only this menu adds strengths to the text in a Word document.
Table of Contents
- Groups of Insert Tab in MS Word
- Pages Group in Insert Menu in Microsoft Word
- The table in Insert Ribbon Tab
- Illustrations Group:
- Add-ins:
- Online Video:
- Links Group:

Groups of Insert Tab in MS Word
The Insert menu has 10 groups. These are pages, tables, illustrations, add-ins, media, links, comments, text, and symbols.

The Page Group has 3 commands. These are Cover Page, Blank Page, and Page Break.

Cover Page: The cover page is a beautiful design on top of thick paper that protects the inside content. Its complete information is crafted in a short and compelling title.
Blank Page: This is very useful for adding as many blank pages as you want in a Word document.
How to Add Blank Page in a Word Document: Put a cursor wherever you want to add a blank page in a word document. then click on Blank Page on the Insert Tab.
Page Break: Section break means completing the work of the current page to start a new page, stopping that section there, and starting the next page for the new section.
The table in Insert Ribbon Tab

Using the table, we can organize the information we want as we like. For example, text can be arranged in columns or rows in a beautiful and meaningful way.
Illustrations Group:

The action of illustrating something such as a picture, a diagram, a shape, 3d-models, and a chart helps make something clear or attractive.
Add-ins:
The Add-ins group has 3 commands. These are Get Add-ins, My Add-ins, and Wikipedia.
Get Add-ins: You can get add-ins by finding them here to add new functionality to your word document, excel, and ppt.
My Add-ins: After installing add-ins, you can use and add new features to your work.
Wikipedia: You can easily access Wikipedia content directly from your office applications such as MS Word.
Online Video:
Find and insert online videos to your document from a variety of online websites such as YouTube, and Vimeo.
Links Group:
The links group in Insert Tab has 3 commands. These are Links or Hyperlinks, bookmarks, and Cross-reference.
Link or Hyperlink: Quickly create links from one document to another, one section to another, one page to another, document content to websites, etc. to quickly access and jump to links of the contents and bookmarks.
Bookmark: Bookmark the specific and important document work that you want to access in the future. This functionality enables you to jump to the bookmark location.
What the Insert tab is used for?
An Insert tab is used to insert pictures, shapes, tables, 3D models, etc. into the Word document and to format them.
Табуляция в ворде
Просмотров 1.4к. Обновлено 12 ноября 2019
Одна из наиболее распространенных ошибок обработки текста — использование пробелов для выравнивания текста. Использование табуляции гарантирует, что ваш текст идеально выровнен, и значительно упрощает изменение настроек.
Остановка табуляции — это позиция, в которой находится точка вставки текста при нажатии клавиши табуляции. Нажмите клавишу Tab, чтобы переместить точку вставки вправо, сместив позицию, в которую вы будете вставлять текст.
Документы Word настроены с использованием по умолчанию табуляции через каждые 1,25 см в документе, но вы также можете установить свои собственные вкладки в любом месте. На самом деле есть несколько типов табуляции, которые вы можете использовать (влево, по центру, справа, в десятичном виде или в столбце) и множество других опций:
Для того чтобы установить табуляцию в ворде, необходимо кликнуть левой кнопкой мыши по необходимому месту на линейке, расположенной сверху. На линейке определенными маркерами будут помечены все установленные позиции.
Для изменения маркера табуляции кликнете по нему два раза левой кнопкой мыши. И откроется окно настройки табуляции.
В позиции табуляции выберите необходимую позицию, а в выравнивание выберите необходимый маркер.
Преимущество использования вкладок, а не пробелов. После размещения их в документе вы можете перемещать или изменять позиции вкладок, а затем выделенный текст перемещается вместе с этими вкладками. Вкладки принадлежат абзацам. Если вы установили табуляции при вводе текста и нажали Enter, настройки вкладки переносятся на следующий абзац.
Начнем с вопроса «что такое табуляция в word». Табуляция – это инструмент MS Word, который отвечает как за отступы, так и за выравнивание.
Использование табуляции в ворде намного упрощает форматирования текста. Некоторые пользователи, например, используют пробелы, чтобы перенести текст в правый угол документа. Но существуют определенные требования к оформлению некоторых электронных документов, и использование огромного количества пробелов в таких документах недопустимо. В этой статье мы рассмотрим, как сделать табуляцию в ворде.
Для ввода табуляции в ворде используется клавиша Tab. Если вы включите режим непечатаемых символах, то вы увидите, что табуляция отображается как символ  . По умолчанию шаг табуляции составляет 1,25 см, то есть при нажатии клавиши Tab курсор сместится на расстояние шага табуляции.
Если вы находитесь внутри таблицы, то клавиша Tab используется для перемещения в ячейках таблицы. Чтобы создать табуляцию в таблице Word используйте сочетание клавиш Ctrl+Tab.
Управлять табуляцией в ворде нам поможет горизонтальная линейка.
Если линейка не отображается, то перейдите во вкладку «ВИД» и установите флаг для пункта «Линейка».

Табуляция в Word – Линейка и кнопка табуляции
У левого края горизонтальной линейки находится кнопка табуляции, которая отображает какой тип табуляции будет применен. При повторном нажатии на кнопку табуляции, будет изменяться значок типа табуляции. Существуют несколько типов табуляции:
 |
По левому краю |
 |
По центру |
 |
По правому краю |
 |
По разделителю |
 |
Непрерывная вертикальная черта через выделенный текст |
Для того чтобы поставить табуляцию в ворде, достаточно кликнуть мышкой по необходимому месту на горизонтальной линейке. На линейке определенными маркерами будут отмечаться все установленные позиции табуляции и выглядеть это будет примерно так:

Табуляция в Word – Линейка и маркеры табуляции
Для изменения положения позиции табуляции просто перетащите маркер табуляции влево или вправо на линейке. Для того чтобы убрать табуляцию в ворде, просто перетащите маркер табуляции за пределы линейки.
Если настройка позиций табуляции с помощью линейки не обеспечивает необходимую точность или перед позицией табуляции требуется вставить специальный символ (заполнитель), воспользуйтесь диалоговым окном «Табуляция».
На вкладке «ГЛАВНАЯ» или «РАЗМЕТКА СТРАНИЦЫ» нажмите кнопку вызова диалогового окна «Абзац».

Табуляция в Word – Кнопка вызова диалогового окна «Абзац»
В открывшемся диалоговом окне в нижнем правом углу щелкните кнопку «Табуляция».

Табуляция в Word – Диалоговое окно «Абзац»
Существует второй способ открыть окно настройки табуляции в Word. Достаточно дважды кликнуть на любом маркере табуляции на линейке.

Табуляция в Word – Окно «Табуляция»
В поле «Позиции табуляции» введите расположение, где требуется установить позицию табуляции.
В группе «Выравнивание» выберите нужный тип позиции табуляции.
Чтобы добавить позиции табуляции с точками или другим заполнителем, выберите нужный параметр в группе «Заполнитель». Нажмите кнопку «Установить», а затем кнопку «ОК».
Теоретическую часть мы рассмотрели, теперь перейдем к практическим примерам.
Чаще всего используются три типа табуляции: позиция табуляции по левому краю, позиция табуляции по правому краю, позиция табуляции по центру.

Табуляция в Word – Пример табуляции с выравниванием по правому краю, по левому краю и по центру
На изображении пунктирные линии показывают, как работают табуляции с выравниванием.
Рассмотрим следующий пример позиции табуляции по разделителю.

Табуляция в Word – Пример табуляции по разделителю
В данном случае табуляция по разделителю выравнивает числа по целой и дробной части. То есть все числа выравнены по запятой.
Следующий тип табуляции, который мы рассмотрим на примере, это табуляция «С чертой».

Табуляция в Word – Пример табуляции с чертой
При помощи табуляции с чертой можно создать непрерывную вертикальную черту через выделенный текст. У табуляции «С чертой» есть особенность – для ее добавления не нужно использовать клавишу Tab, она добавляется в текст сразу после установки ее на линейке.
И перейдем к последнему примеру – табуляция с заполнением в Word.

Табуляция в Word – Пример табуляции с заполнителем
В данном случае мы используем табуляцию, чтобы создать черту для подписи. Для этого мы используем две табуляции. Первую с выравниванием по левому краю (позиция 11 см), для того чтобы отступить от текста «Руководитель:». И вторую также с выравниванием по левому краю (позиция 14,5 см), но еще и с заполнителем, чтобы создать подчеркивание определенной длины.
Многие пользователи MS Word используют табуляцию точками для создания оглавления. Но этот способ очень неудобен и непрактичен, поэтому советуем создать автоматическое оглавление.
На этом все. Надеюсь, что теперь вы знаете, что такое табуляция в Word, как сделать табуляцию в ворде, как ее настроить и как убрать.