
Word for Microsoft 365 Outlook for Microsoft 365 Word 2021 Outlook 2021 Word 2019 Outlook 2019 Word 2016 Outlook 2016 Word 2013 Outlook 2013 Word 2010 Outlook 2010 Word 2007 Outlook 2007 More…Less
You can change the spacing between characters of text for selected text or for particular characters. In addition, you can stretch or compress an entire paragraph to make it fit and look the way that you want it to.
Change the spacing between characters
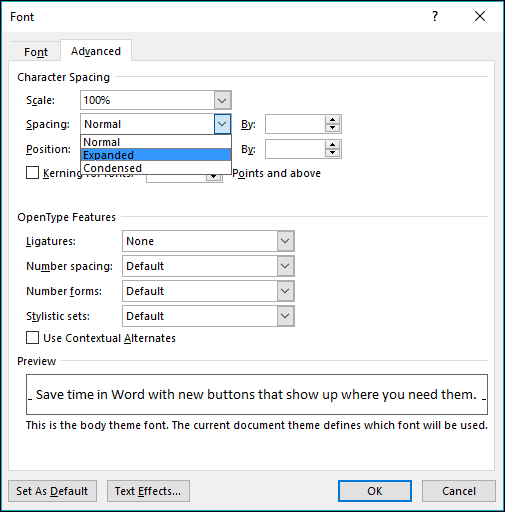
Selecting Expanded or Condensed alters the spacing between all selected letters by the same amount. Kerning alters the spacing between particular pairs of letters — in some cases reducing and in other cases expanding the space depending upon the letters.
Expand or condense the space evenly between all the selected characters
-
Select the text that you want to change.
-
On the Home tab, click the Font Dialog Box Launcher, and then click the Advanced tab.

Note: If you’re using Word 2007 the tab is called Character Spacing.
-
In the Spacing box, click Expanded or Condensed, and then specify how much space you want in the By box.
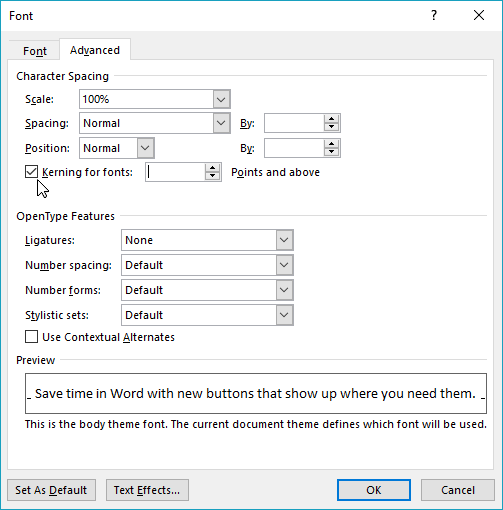
Kern the characters that are above a particular size
Kerning refers to the way spacing between two specific characters is adjusted. The idea is to give a better looking result by reducing the spacing between characters that fit together nicely (such as «A» and «V») and increasing the spacing between characters that don’t.
-
Select the text that you want to change.
-
On the Home tab, click the Font Dialog Box Launcher, and then click the Advanced tab.
Note: If you’re using Word 2007 the tab is called Character Spacing.
-
Select the Kerning for fonts check box, and then enter the point size in the Points and above box.
Stretch or scale the text horizontally
When you scale the text, you change the shapes of the characters by percentages. You can scale text by stretching it or by compressing it.
-
Select the text that you want to stretch or compress.
-
On the Home tab, click the Font Dialog Box Launcher, and then click the Advanced tab.
Note: If you’re using Word 2007 the tab is called Character Spacing.
-
In the Scale box, enter the percentage that you want.
Percentages above 100 percent stretch the text. Percentages below 100 percent compress the text.
Change the line spacing
To increase or decrease the amount of vertical space between lines of text within a paragraph, the best method is to modify the style the paragraph uses.
-
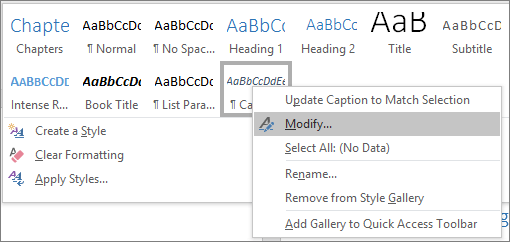
Find the style you’re using in the Styles gallery on the Home tab.
-
Right-click the style you want to change and select Modify.
-
Near the center of the dialog box you’ll find the line spacing buttons that let you select single, 1.5x or double spaced. Choose the spacing you want to apply and click OK.
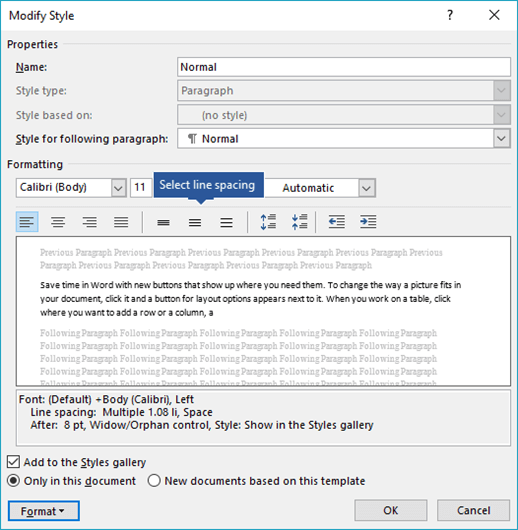
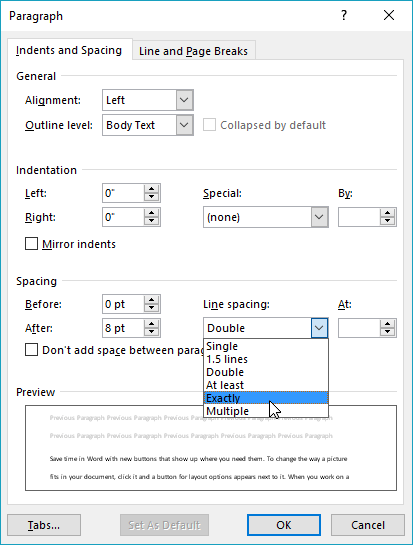
If you’d like to apply more specific line spacing to the style, clickthe Format button at the bottom left corner of the Modify Style dialog box and select Paragraph. The Line spacing drop-down lets you select or set more specific line spacing.
For more information on modifying styles in Word, see: Customize styles in Word.
See also
-
Using Styles in Word — a free, 10-minute video training course.
-
Change the font size
-
Set page margins
-
Align text left or right, center text, or justify text on a page
-
Change the line spacing in Word
Do you have a question about Word that we didn’t answer here?
Post a question in the Word Answers Community.
Help us improve Word
Do you have suggestions about how we can improve Word? Let us know by providing us feedback. See How do I give feedback on Microsoft 365? for more information.
Need more help?
Insert a Nonbreaking Space in Word to Keep Words or Characters Together
by Avantix Learning Team | Updated October 11, 2022
Applies to: Microsoft® Word® 2010, 2013, 2016, 2019, 2021 and 365 (Windows)
If you want to keep words or characters together on the same line in a Word document, you can insert nonbreaking spaces. Nonbreaking spaces can be inserted using the Insert Symbol dialog box or a keyboard shortcut.
Recommended article: 14 Timesaving Microsoft Word Selection Shortcuts to Quickly Select Text
Do you want to learn more about Microsoft Word? Check out our virtual classroom or in-person classroom Word courses >
Note: We are using a US keyboard layout but the strategies and shortcuts apply to English Canada keyboards. Keyboard shortcuts may work differently depending on your keyboard layout / language.
Inserting a nonbreaking space using a keyboard shortcut
To insert a nonbreaking space between two words or characters using a keyboard shortcut:
- Position the cursor between the two words or characters you want to keep together (there should be no space between these characters).
- Press Ctrl + Shift + Spacebar. Word inserts a nonbreaking space.
Inserting a nonbreaking space using Insert Symbol
To insert a nonbreaking space between two words or letters using Insert Symbol:
- Position the cursor between the two words or characters you want to keep together (there should be no space between these characters).
- Click the Insert tab in the Ribbon.
- In the Symbols group, click Insert Symbol and then More Symbols in the drop-down menu. A dialog box appears.
- Select the Special Characters tab.
- Select Nonbreaking space and click Insert.
- Click Close. Word inserts a nonbreaking space.
Below is the Insert Symbol dialog box with Nonbreaking Space selected:

You can also insert several other special characters using Insert Symbol.
Viewing nonbreaking spaces
To view nonbreaking spaces and other nonprinting characters:
- Click the Home tab in the Ribbon.
- Click Show/Hide ¶ on the Home tab in the Ribbon in the Paragraph group. Nonbreaking spaces display as circles but do not print.
- Click Show/Hide ¶ again to hide nonprinting characters.
Nonbreaking spaces can be extremely useful in Word to keep phone numbers together or specific characters that should be kept together on the same line.
Subscribe to get more articles like this one
Did you find this article helpful? If you would like to receive new articles, join our email list.
More resources
How to Quickly Remove Hard Returns in Word Documents
How to Insert, Format and Update Cross-References in Word
3 Ways to Insert the Copyright or Trademark Symbol in Word (with Shortcuts)
5 Ways to Insert the Approximately Equal To or Almost Equal To Symbol in Word
10+ Great Microsoft Word Navigation Shortcuts to Move Around Quickly in Your Documents
Related courses
Microsoft Word: Intermediate / Advanced
Microsoft Excel: Intermediate / Advanced
Microsoft PowerPoint: Intermediate / Advanced
Microsoft Word: Long Documents Master Class
Microsoft Word: Styles, Templates and Tables of Contents
Microsoft Word: Designing Dynamic Word Documents Using Fields
VIEW MORE COURSES >
Our instructor-led courses are delivered in virtual classroom format or at our downtown Toronto location at 18 King Street East, Suite 1400, Toronto, Ontario, Canada (some in-person classroom courses may also be delivered at an alternate downtown Toronto location). Contact us at info@avantixlearning.ca if you’d like to arrange custom instructor-led virtual classroom or onsite training on a date that’s convenient for you.
Copyright 2023 Avantix® Learning
Microsoft, the Microsoft logo, Microsoft Office and related Microsoft applications and logos are registered trademarks of Microsoft Corporation in Canada, US and other countries. All other trademarks are the property of the registered owners.
Avantix Learning |18 King Street East, Suite 1400, Toronto, Ontario, Canada M5C 1C4 | Contact us at info@avantixlearning.ca
Keep words on the same line
- Click where you want to insert the nonbreaking space.
- On the Insert tab, in the Symbols group, click Symbol.
- In the box that opens, click More Symbols.
- In the Symbol dialog box, on the Special Characters tab, click the Nonbreaking Space row to highlight it, and then click Insert.
- Click Close.
Contents
- 1 How do you create a non-breaking space?
- 2 What is a nonbreaking space symbol in Word?
- 3 How do you lock spaces in Word?
- 4 How do you insert a nonbreaking space in Word 2019?
- 5 How do you insert a space between words in Word?
- 6 How do I make a nonbreaking space in HTML?
- 7 How do you insert a nonbreaking hyphen on a Mac?
- 8 What is the code for a nonbreaking space in HTML?
- 9 How do you insert a nonbreaking space in PowerPoint 2010?
- 10 How do you fix no spacing between words in Word?
- 11 How do I fix the spacing between words in Word justified?
- 12 How do I insert spaces between words in an MS Word file which accidentally lost spaces between words during a wrong find replace operation?
- 13 How do I add a non-breaking space in CSS?
- 14 How do you put a space between two words in CSS?
- 15 How do you put a space between two words in HTML?
- 16 Why does hyphenation not work?
- 17 How do you type a soft hyphen?
- 18 What is &# xa0?
- 19 How do I use &NBSP?
- 20 How do you put a space in a URL?
How do you create a non-breaking space?
Non-breaking spaces are easy to add. The quickest way is to press Ctrl+Shift+Spacebar (or on a Mac, type Option+Spacebar). Alternatively, you can select ‘Non-breaking Space’ from the Insert>Special Characters menu.
What is a nonbreaking space symbol in Word?
Nonbreaking spaces are special characters that keep words or individual characters from separating at line breaks. Nonbreaking spaces are particularly useful between ellipsis points. However, you can use them between any words or characters that you want to stay together.
How do you lock spaces in Word?
The answer is to use non-breaking spaces instead of regular spaces when you don’t want Word to break a line at a certain space. To do this, hold down the Ctrl and Shift keys as you press the Spacebar. Word will then not break the line at that point.
Keep words on the same line
- Click where you want to insert the nonbreaking space.
- On the Insert tab, in the Symbols group, click Symbol.
- In the box that opens, click More Symbols.
- In the Symbol dialog box, on the Special Characters tab, click the Nonbreaking Space row to highlight it, and then click Insert.
- Click Close.
How do you insert a space between words in Word?
Change the spacing between characters
- Select the text that you want to change.
- On the Home tab, click the Font Dialog Box Launcher, and then click the Advanced tab.
- In the Spacing box, click Expanded or Condensed, and then specify how much space you want in the By box.
How do I make a nonbreaking space in HTML?
HTML Non-Breaking Space ( )
The simplest way to add a space in HTML (besides hitting the spacebar) is with the non-breaking space entity, written as or .
How do you insert a nonbreaking hyphen on a Mac?
Insert a nonbreaking hyphen
Press Command+Shift+Hyphen . Tips: To insert an en dash (–), press Option+Hyphen .
What is the code for a nonbreaking space in HTML?
 
A commonly used entity in HTML is the non-breaking space: A non-breaking space is a space that will not break into a new line. Two words separated by a non-breaking space will stick together (not break into a new line).
How do you insert a nonbreaking space in PowerPoint 2010?
To insert a non-breaking space on slides in PowerPoint, you have the following options: Use Ctrl+Shift+Space keyboard shortcut introduced by Shortcuts for PowerPoint. Enter the non-breaking space character through the keyboard. This character can be produced by keying in Alt+0160.
How do you fix no spacing between words in Word?
Press Ctrl + A to select all. Select Line Spacing Options and choose an option in the Line spacing box. Adjust the Before and After settings to change spacing between paragraphs. Select OK.
How do I fix the spacing between words in Word justified?
Click the “Home” tab and then select the “Distributed” button in the Paragraph group. Alternatively, press “Ctrl-Shift-J.” This applies a full justification effect that evenly distributes spaces in both words and characters.
How do I insert spaces between words in an MS Word file which accidentally lost spaces between words during a wrong find replace operation?
- select the text or a para you wanted to decrease the extra space.
- go-to replace.
- go-to special.
- select tab character.
- in replace with field press the space button once.
- press replace all button ,
How do I add a non-breaking space in CSS?
The character entity used to denote a non-breaking space which is a fixed space.
How do you put a space between two words in CSS?
You can wrap your text in a p tag, and you can add a margin to that after making it inline-block. Alternatively, you can make the container a flexbox, and use justify-content: space-between; but you’ll need to group each icon with its respective text inside another div or span.
How do you put a space between two words in HTML?
To create extra spaces before, after, or in-between your text, use the (non-breaking space) extended HTML character.
Why does hyphenation not work?
If Hyphenation Doesn’t Work…
If nothing changes when you turn on hyphenation in a document, you may have to change the settings in the Paragraph dialog box. To do this: Select the text you want to hyphenate.To make the hyphenation work, then, deselect it.
How do you type a soft hyphen?
To enter a soft hyphen:
- Place your insertion point where you want to insert the soft hyphen.
- Choose Insert > Special Characters > Hyphen & Dash > Soft Hyphen from the menu bar.
What is &# xa0?
is just the same, but in hexadecimal (in HTML entities, the x character shows that a hexadecimal number is coming). There is basically no difference, A0 and 160 are the same numbers in a different base. You should decide whether you really need a non-breaking space, or a simple space would suffice.
How do I use &NBSP?
Type where you want to insert an extra space.
Add one non-breaking space character for every space you want to add. Unlike pressing the spacebar multiple times in your HTML code, typing more than once creates as many spaces as there are instances of .
How do you put a space in a URL?
URLs cannot contain spaces. URL encoding normally replaces a space with a plus (+) sign or with %20.
When I am trying to Justify text paragraph in MS Word, random space is generating between words. How can I set equal gap between words and how can I change the setting of Justify
![]()
karel
13.3k26 gold badges44 silver badges52 bronze badges
asked Jul 20, 2010 at 10:43
You are probably justifying the text in Center mode, which means that the text must reach both ends of the page, left and right.
If the text-line is not exactly of the width of the printed page, the only way for Word to make both ends meet is by adding space in-between the words. Word in effect distributes the missing width pixels among the white-space in the line.
Word has a nice algorithm for this, and it’s not at all random.
answered Jul 20, 2010 at 10:51
![]()
harrymcharrymc
439k30 gold badges506 silver badges885 bronze badges
Justify is meant to spread the text out over the width of the current container and shouldn’t be used if you want equal widths between your words. To change the width of the space between the words you should change the font settings of the text: You can do this by selecting the text, do a right click and click Font, then go to the advanced tab where you can change the character spacing settings.
answered Jul 20, 2010 at 10:51
![]()
Tamara WijsmanTamara Wijsman
56.8k27 gold badges184 silver badges256 bronze badges
1
Character Spacing in the Font dialog adjusts spacing between letters of the selected text. It barely adjusts the spacing between words. Word does not have a nice algorithm for spacing in my opinion. It is a lame attempt to emulate a publishing layout tool, which it is not. If you want to justify text and control the spacing to the 1/1000th of a em, use a professional layout application like Adobe InDesign. I never justify paragraph text in Word. It creates unsightly rivers (uneven white space between words that flows down the page).
To increase the spacing between words, say in a title that is ALL CAPS, use two spaces. And if that creates too large a gap, reduce the font size of the spaces only. If you’re thinking you could just increase the font size of a single space, then you’ll discover this also affects the vertical line spacing (unless you’ve specified an exact line height).
answered Jun 10, 2014 at 17:15
![]()
Found no way to get rid of that ugly spaces. All I could do is to select the gapped text with some more lines below it, then cut and paste using the option text only. that worked for me.
answered Nov 30, 2020 at 9:26
![]()
1
When writing in Microsoft Word, we place spaces (using the space-bar on the keyboard) between words to make the sentence more readable. When we type a sentence, Word treats a space as a character and uses the space between words to decide where to fold the sentence and continue it on the next line when the sentence gets longer than the line length specified by the page size.
For instance consider the two sentences within a finite boundary defining the line length:

As the length of the first sentence is shorter than the line length, Word is not folding the sentence. However, the second sentence is longer, and Word is folding it using the space between the words Very and Lightly.
For some reason, such as for clarity, we may want Word to retain the two words Very and Lightly on the same line rather than separating them as above. The sentence would then look like:

This requires replacing the regular space present between the words Very and Lightly with a non-breaking space. Such non-breaking spaces are also known as nonbreaking spaces or no-break spaces. Word recognizes non-breaking spaces and treats any two words cojoined by a non-breaking space as a single entity.
We will explain how to let Word insert a non-breaking space in a sentence where it is necessary. You can do this in two ways:
- Using Keyboard Short-Cuts to Introduce Non-Breaking Space
- Using Menus to Introduce Non-Breaking Space
Let’s start.
Method #1: Using Keyboard Short-Cuts to Introduce Non-Breaking Space
Step #1: Open a Word Document
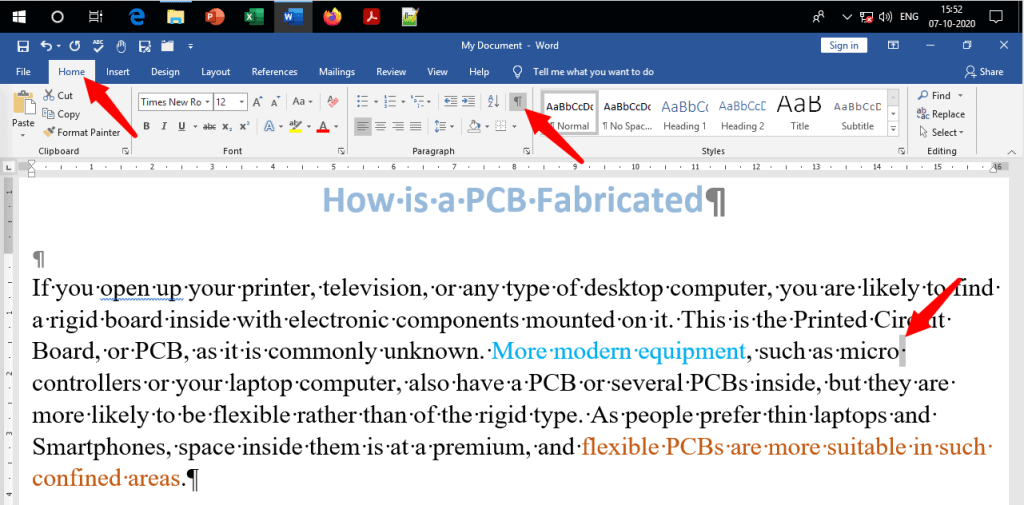
Open a Word document containing the sentence where you want to introduce non-breaking space. For instance, we would like to keep the words micro and controllers together, but Word has split them onto two lines.

Step #2: Show Hidden Characters
Click on the Home tab on the menu bar on top. Next, click on the Show/Hide icon. This will reveal space and other characters between words that normally Word hides from view.
Note: Step #2 is only for instructional purposes. Once you have mastered the technique, you may skip this step.
Step #3: Insert Non-Breaking Space
Select the space between the words micro and controller (represented by the dot). On your keyboard, press the keys Ctrl, Shift, and Space together. Note that the selected dot has now changed into a small circle—meaning Word has replaced the regular space with a non-breaking space. Also note that the two words are no longer on two lines, but appear together on the same line.

Step #4: Hide Hidden Characters
You may repeat Step #3 at as many places in the sentence as necessary. Once you are satisfied, click on Show/Hide icon to revert to the regular view.

To remove the non-breaking space and revert to the regular space, select the non-breaking space and hit the space-bar once on your keyboard.
Method #2: Using Menus to Introduce Non-Breaking Space
Step #1: Open a Word Document
Open a Word document containing the sentence where you want to introduce non-breaking space. For instance, we would like to keep the words micro and controllers together, but Word has split them onto two lines.

Step #2: Show Hidden Characters
Click on the Home tab on the menu bar on top. Next, click on the Show/Hide icon. This will reveal space and other characters between words that normally Word hides from view.
Note: Step #2 is only for instructional purposes. Once you have mastered the technique, you may skip this step.

Step #3: Open Symbols Dialog
Select the space between the words micro and controller (represented by the dot). Click on the Insert tab in the top menu bar to change the ribbon. Then click on Symbol, and in the dialog that opens, click on More Symbols to open the Symbols Selection Dialog.

Step #4: Insert Non-Breaking Space
In the Symbols Selection Dialog, click on the Special Characters tab [1]. Scroll down to Non-breaking Space [2]. Click on Insert [3]. Word will insert the non-breaking space (represented by a small circle) in place of the regular space and place the two words micro and controller on the same line. Close the dialog by clicking on Cancel [4].

Step #5: Hide Hidden Characters
You may repeat Step #4 at as many places in the sentence as necessary. Once you are satisfied, click on Show/Hide icon to revert to the regular view.

Conclusion
Word uses several types of spaces to format sentences. We have discussed two methods of using the non-breaking space to replace a regular space to make the sentence more readable. Use the method you find most suitable.
Text editors are applications that we can use daily, but this does not mean that we can take advantage of the different functions that it has. In the case of Microsoft Word, the Windows Office editor, its versatility and simplicity make it one of the most used tools in the world. And this is why we want to teach you how to insert spaces between text or two words in Word easily.

For a text to be understandable and coherent, we must leave blanks between wordsSo in this way we can get the message across to our readers.
But it is not only about being understood, it also has to do with the presentation. And knowing how to do it can help us a lot and this is the purpose of this article.
You may also be interested in:
Make correct use of the space bar It is important, as you can give the words the necessary space to make the document look presentable.
Although you can also use other functions to search for phrases or words that are repeated several times in a Word document.
How to insert spaces between text or two words in Word easily
In Word there are certain options or functions that most users do not know yet, but they are important for a perfect spacing of the words in the text or tables. This is the case of the function Search for and replace that as we told you before. Which also allows you to add additional spaces if required by the document and thus save a lot of time.
Before explaining how to use the aforementioned function, we can tell you how to insert spaces between text or two words in Word manually.
To do this you must place the cursor between the words and click it will show this, intermittently between them. Then you must press the space bar to leave space or twice, if you want to leave two spaces.
How to insert spaces between text or two words in Word using Find and Replace function
To make use of this function, we are going to go to best menu and we are going to select the home tab. Then you go to the right and go to the Edit group and press the arrow to display the options it contains. The next step you must do is click on the Replace option and this action will generate a window, called Search for and replace.
Now in the field described as Search you must write the words that need a space between them. You must be careful to write the words exactly as they appear in the document. For example, if you want the word Laperla to appear as La perla then write this word in this field The Pearl.
The next step is to write in the Replace field how you want the two words to appear but now with the space between them. Returning to the previous example, now we must write the word La perla, as you see now, we write it with the space between them. This is how this function works you put the words that do not have space and you replace it with the space between them.

The next step is to go to the bottom of the window Search for and replace and you must click on the option Replace everything. Once the operation is done and completed, it will show you a pop-up window and you will click on the OK option. To finish you must click on the Close option found at the bottom of the Search and Replace window.
And so in this way we finish this instructive tutorial, which showed you a little-known function in the Word text editor, as well as the function that will allow you to insert page breaks. And in simple steps we show you what you should do to insert spaces between text or two words in Word easily.
Source by
You may also be interested in:
In my last Microsoft Word tutorial, we adjusted the space between letters. Today, we’re going to adjust the space between words in Microsoft Word without altering the letter spacing.
A Word of Caution: You may be tempted to increase the space between words by adding multiple spaces. I strongly advise against this practice because adding unnecessary spaces (rather than making individual spaces bigger, as shown in this tutorial) can disturb other formatting in your document.
This tutorial is available as a YouTube video showing all the steps in real time.
Watch more than 200 other writing-related software tutorials on my YouTube channel.
The images below are from Word for Microsoft 365. These steps will also work in Word 2021, Word 2019, Word 2016, and Word 2013.
- Select the Home tab in the ribbon.

- (Optional) Select the Show/Hide button in the Paragraph group to reveal your document’s formatting.

- Select the part of the text you want to change. (Pro Tip: Press Ctrl + A to select the entire document.)

- Take note of your current font size in the Font Size menu. The default space between words is based on your current font size.

- Select the Replace button in the Editing group to open the Find and Replace dialog box.

- Place your cursor in the Find what text box and then press your spacebar once to create one space.

- Place your cursor in the Replace with text box and then press your spacebar once to create one space.

- Select the More button to expand the dialog box. (Disregard this step if your dialog box is already expanded.)

- Select the Format button.

- Select Font in the Format menu.

- Select a larger or smaller font size in the Size menu in the Replace Font dialog box. Alternatively, you can type a specific size into the text box at the top of the menu.

- Select the OK button.

- Select the Replace All button.

- A dialog box will report the number of replacements.
-
- Select Yes if you want to expand the replacements to your whole document.
- Select No if you only want the replacements in the text you selected in step 3.

- Select the Close button.

The spacing between words should now be changed in your selected text.

- (Optional) Reselect the Show/Hide button to hide your formatting (see figure 2).
Related Resources
How to Adjust Line Spacing in Microsoft Word
How to Adjust Page Margins in Microsoft Word
Updated February 16, 2023

Text editors are applications that we can use daily , but that does not mean that we can take advantage of the various functions that it has. In the case of Microsoft Word, the Windows editor Office , its versatility and simplicity make it one of the most widely used tools in the world. And that’s why we want you learn how to easily insert spaces between text or two words in Word.

For a text to be understandable and coherent, we must leave empty spaces between words , so that we can carry the message to our readers.
But it’s not just about being understood, it has to do with presentation too. And knowing how to do it can help us a lot and that is the purpose of this article.
Il is important to correctly use the space bar , because you can give the words space to make the document appear presentable.
Although you can also use other functions to search of phrases or words that are repeated multiple times in a Word document.
In Word, there are some options or functions that most people are not familiar with yet, but they are important for a spacing perfect words in text or tables. This is the case with the function Find and replace , as we mentioned earlier. This also allows you to add additional spaces if required by the document and thus save a lot of time.
Before explaining how to use the aforementioned function, we can tell you how to insert manually spaces between text or two words in Word .
To do this, you need to place the cursor between the words and a click will show it, intermittently between them. Then you have to press the space bar to leave a space or twice, if you want to leave two spaces.
How to insert spaces between text or two words in Word using Find and Replace function
To use this function, we will go to the top menu and we will select the boot tab. Then you go to the right and go to the Edit group and press the arrow to view the options in it. The next step you need to do is click on the Replace option and this action will generate a window, called Find and replace.
Now, in the field described as Search, you have to write the words that require a space between them. You must be careful to write the words exactly as they appear in the document. For example, if you want the word Laperla to appear as La perla, write this word La Perla in this field .
The next step is to write in the Replace field how you want the two words to appear, but now with space between them. Going back to the previous example, now we have to write the word La perla, as you see now, we write it with the space between them. This way this function works, you place the words that have no space and replace it with the space between them.
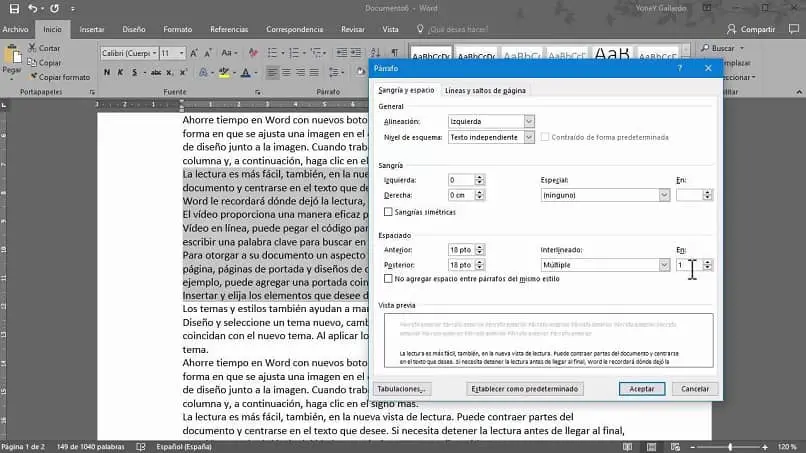
The next step is to go to the bottom of the window Find and replace and you have to click on the option Replace all. When the operation is done and completed, it will show you a pop-up window and you will click on the OK option. To finish, you need to click on the Close option located at the bottom of the Find and Replace window.
And that’s how we end this informative tutorial, which showed you a little-known function of the Word text editor, as well as the function that will allow you to insert page breaks . And in a few simple steps, we show you what you need to do to Easily insert spaces between text or two words in Word.

MS Word
How to Make Letterhead in Microsoft Word
![]()
Published
1 year ago
on
November 18, 2021
How to make a letterhead in Word correctly and neatly is actually easy, but surely there are still many of you who don’t know how to make it.
In an official letter, of course, there is a letterhead and there is always a line at the bottom right. Well, it turned out to be quite easy to make you know.
Apart from being the introduction to a letter, letterhead is also commonly used as a place to write the identity of the letter, such as the identity of the sender and recipient.
For those of you who want to know how to make it, here we explain in full the steps to make a letterhead in Word for you.
HOW TO MAKE LETTERHEAD IN WORD
You should know how to make a letterhead in Word this time, guys, especially when you want to send letters between agencies.
Although not all agencies use it, it doesn’t hurt you to try and find out how to make this letterhead, here are the steps!
- First, open your Word.
- Place the cursor at the back of the last word of the letterhead
- Then select the menu Borders – Borders and Shading.
- After the border menu appears, all you have to do is select the line you want on the menu with a sign like this.
Don’t rush to click Ok, because there’s one more thing you have to do to make it, guys. In the section below, remove it or set it like this to make the line only exist at the bottom, and then Ok.
Yeah, you have successfully drawn the line, Guys, it’s easy and fast, right, how to make a letterhead in Word?
You don’t need to be confused anymore about how to make it. For beginners, making letterhead or letterhead does sound quite difficult.
In fact, how to make a letterhead in Word is fairly easy as long as you already know the procedure. After all, the letterhead cannot be made casually because it is an official identity.
The letterhead contains the official identity of an institution, agency, or company. Well, you can create an official identity on the letterhead in Microsoft Word.
MS Word
How to Create a Background in Microsoft Word
![]()
Published
1 year ago
on
November 18, 2021

This way of making a background in Word aims to beautify the appearance of the document and make it more attractive Guys.
Usually, this is often found in the use of proposals, certificates, covers, and not infrequently in job applications.
With this function, how do you make it? It’s so easy. Yes, although there are several ways you can do this, you can follow this tutorial in full.
HOW TO MAKE A BACKGROUND IN WORD
This background function is very useful if you want to create a document that upholds the originality of Guys, for example, a thesis.
In addition to having to know how to create a table of contents in Microsoft Word, you may also need to know how to create a background in your thesis document, especially in showing the results of the tests you did.
How to make this background is also needed if you want to make an official letter from the agency. Besides needing to know how to make letterhead lines in Word, you also need to know how to add a background to the letter. Here’s how:
- The first thing you can do is change the color.
- Go to Design – Page Color – and immediately choose a color like this.
That is the easiest way and you can change the color according to your needs or tastes, guys. In addition to this method, you can also replace it with an image that you have.
The method is almost the same, guys, pay attention to the following rare:
- Go to the Design menu.
- Click Page Color.
- Select Fill Effects.
- Next, select the tab Picture – Select Picture – From a File.
- Then find the image you have and press Ok
- Finished! The background will change.
But, you also need to remember that both methods will not appear when you print either color or image.
To make it appear when printing, then you need to go to the File menu – Options – Display – and check the Print background colors and Image.
Well, after you go through these few steps, the background will change and also enter when you print, GRATZ!!! It’s easy to make a background in Word.
MS Word
How to Create a Signature in Word
![]()
Published
1 year ago
on
November 11, 2021

There are several ways to make a signature in Microsoft Word. And the method is really easy, just follow the steps below, guys!
Making a signature is really needed, especially in the digital era like now, right? Of course, you need a signature in your Word file, so from that our Team will provide this tutorial in detail.
Actually, you can also use a third application or additional devices such as pens that support your PC or laptop. But this is the easiest way without using other devices and applications Guys.
HOW TO CREATE A SIGNATURE IN WORD
You need to sign first, Guys on a piece of white paper. Make sure the paper is really white and the pen has colour ink that you can really see clearly.
This function is for later photos or files the resolution will be smaller Guys. Not only that, but the customized color saturation will also reduce the thickness of the pen color, you know.
So make sure you give a signature with a clear enough emphasis. Here’s how to create a signature in Word:
- Prepare a white paper with a signature on it. Photos using a smartphone or you can directly scan the signature through a scanner.

- You can reduce the resolution and crop it so that the photo focuses on the signature. For convenience, click the image file > Edit.
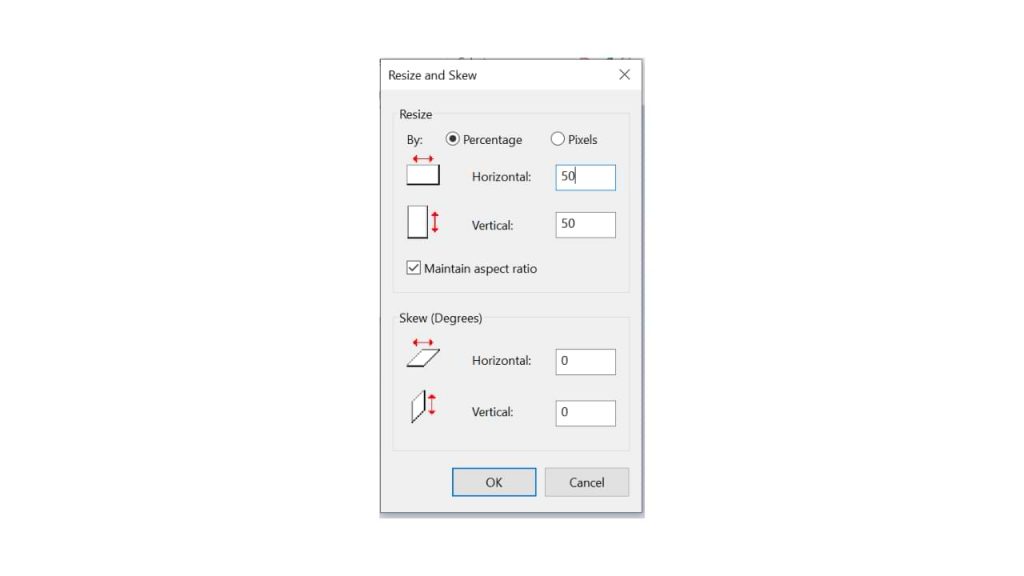
- On the Paint menu, you can resize to reduce the resolution. Choose 50 per cent resolution, fill Horizontal 50 and Vertical 50
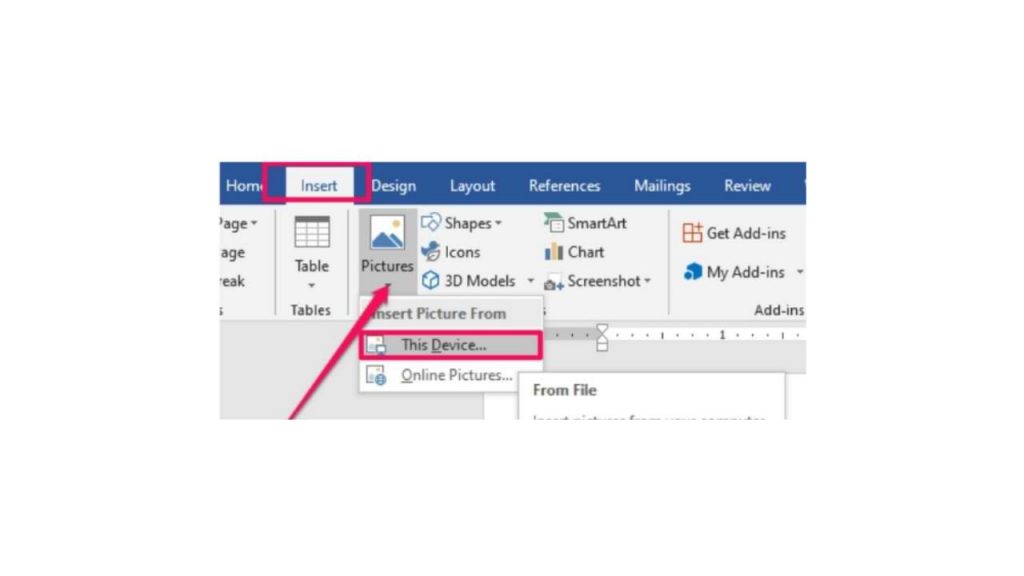
- Hover over the exact position of the word you want to add a signature to. Click Insert > Picture > insert the previous signature image file.
- After you insert the image, reduce the size again using the cursor for more precision.
- Double click on the image.
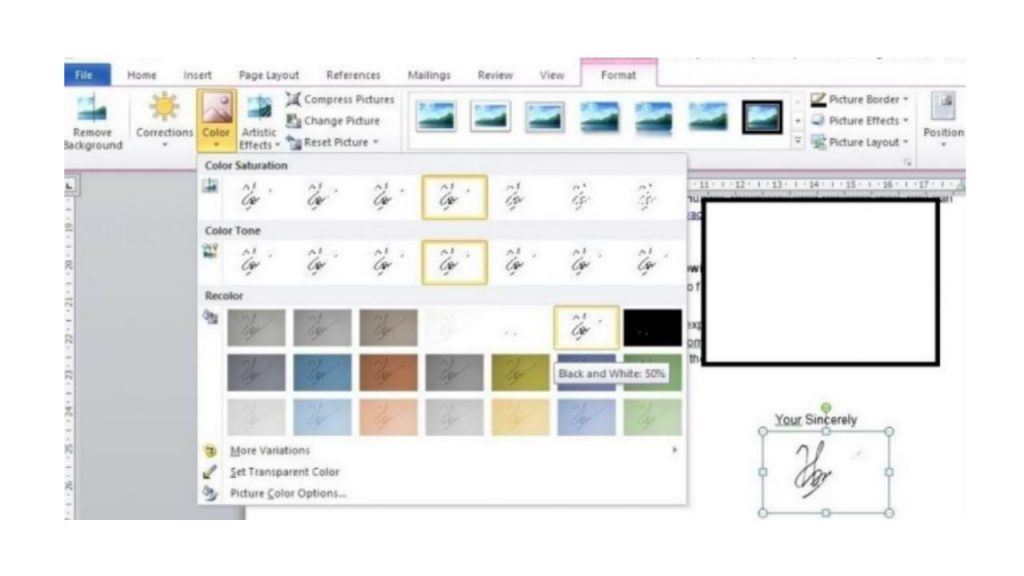
- On the Format menu, select the Color > Recolor > Black and White 50 per cent submenu.
- if your signature is not clear, double click on the image, select menu Correction > Brightness 0 per cent (Normal) Contrast 40 per cent.
You can change the last two steps depending on the contrast and color saturation you want, guys. So you can at the same time adjust the thickness of your signature that has entered the word, so guys.
I also said what Guys, how easy it is to make a signature in Microsoft Word! The most important thing is to make sure your signature is clear enough, and the photos are of high enough quality. Obviously, so that later your signature looks good, it doesn’t break.
Author:
Louise Ward
Date Of Creation:
4 February 2021
Update Date:
12 April 2023

Content
- Type spaces manually
- Step 1
- Step 2
- Step 3
- Use the Find and replace function to insert spaces
- Step 1
- Step 2
- Step 3
- Step 4
- Step 5
- Step 6
- Step 7

Without spaces between the words, reading would be very difficult, with the words merging into a single long string of unintelligible letters. Inserting spaces between two words in MS Word allows your readers to understand the text easily. Even if you simply want to change the visual presentation of words by placing them further away, the space bar can help you reach your goal. If your document contains a word or phrase that occurs multiple times and needs additional space, you can also use Word’s Find and Replace feature to save time.
Type spaces manually
Step 1
Click between the two words. The cursor will appear as a flashing line between them.
Step 2
Press the space bar on your keyboard.
Step 3
Press the space bar on your keyboard again, if you want to leave two spaces between the two words.
Use the Find and replace function to insert spaces
Step 1
Click the Home tab
Step 2
Click Replace in the Editing group. The Find and Replace window will appear.
Step 3
Type the two words that need a space between them in the top field, marked «Find what». Write these words exactly as they appear in the document. For example, if you want to change all instances of the word «allright» to «all right», then type «allright» in this field.
Step 4
Type the two words again in the «Replace with» field, but this time include a space between the two words. If you want to change «allright» to «all right», type «all right» in this field.
Step 5
Click «Replace all» at the bottom of the Find and Replace box.
Step 6
Click «OK» in the pop-up window that explains that Word completed the task.
Step 7
Click «Close» at the bottom of the Find and Replace box.