
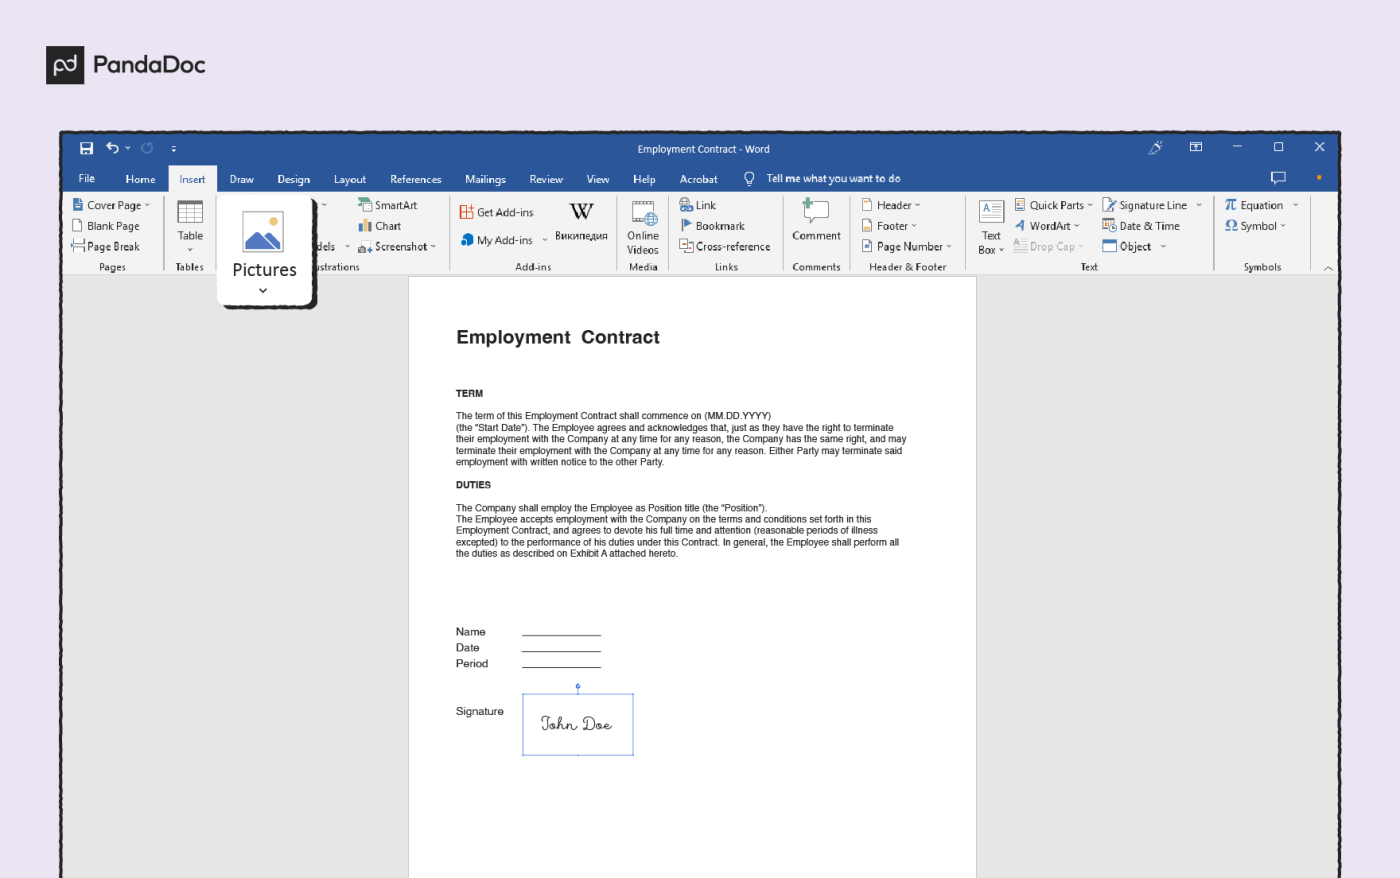
Your handwritten signature gives your document a personal touch. You can scan your signature and store it as a picture to insert in the document.
You can also insert a signature line to indicate where a signature should be written.
Create and insert a handwritten signature
You need a scanner to do this.
-
Write your signature on a piece of paper.
-
Scan the page and save it on your computer in a common file format: .bmp, .jpg, or .png.
For information on how to use your scanner, use the manufacturer’s manual or Web site.
-
Open the image file in Word.
-
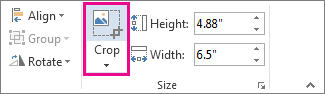
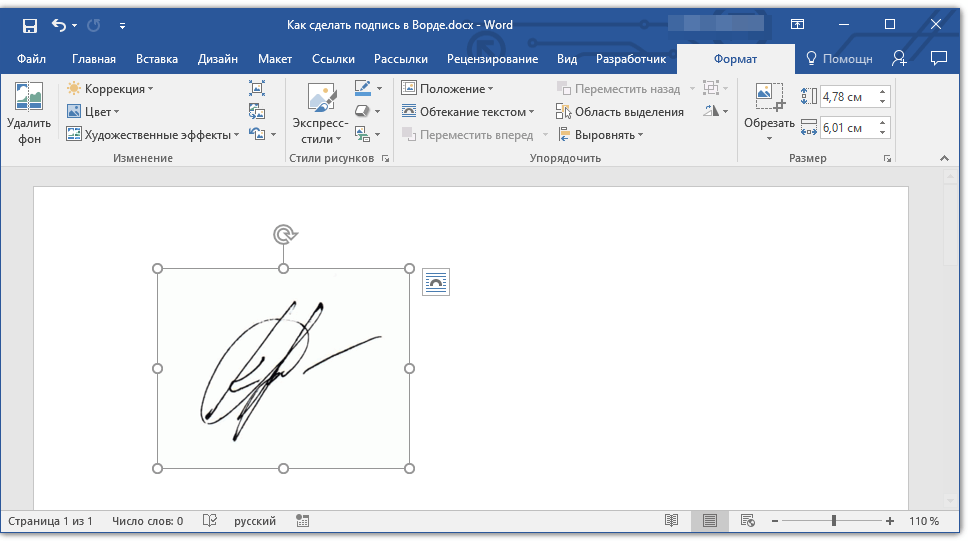
Select the image and on the Picture Format tab, click Crop and use the handles to crop the image.

-
Right-click the image, and choose Save as Picture to save as a separate file.
-
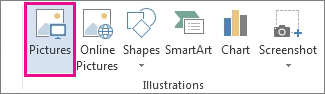
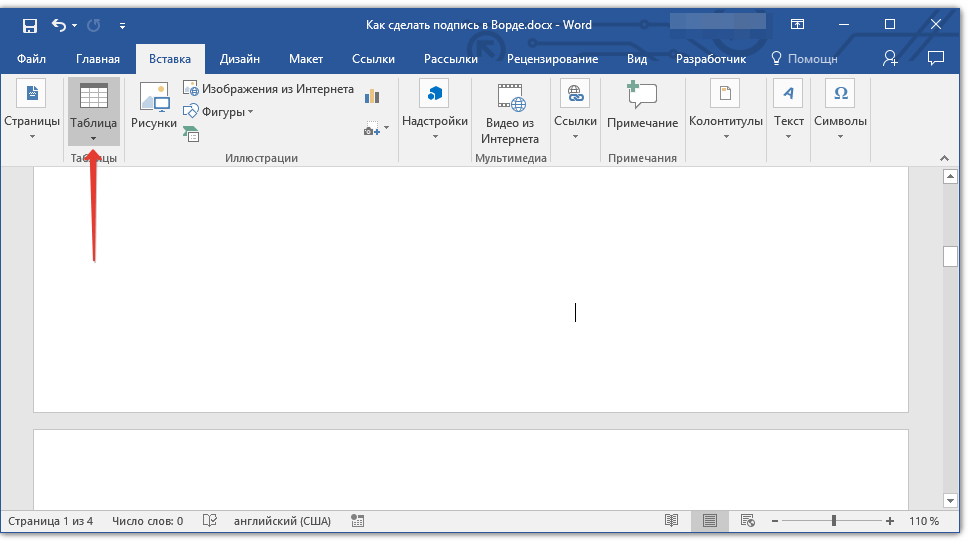
To add the signature to a document, click Insert > Picture s.
Include typewritten text with your reusable signature
If you want information like your job title, phone number, or email address to be part of your signature, save it along with the picture as AutoText.
-
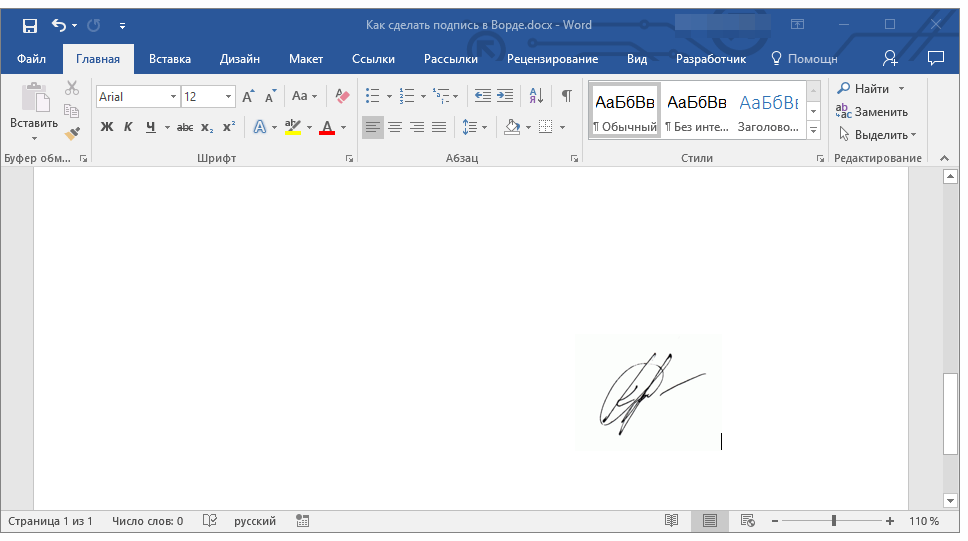
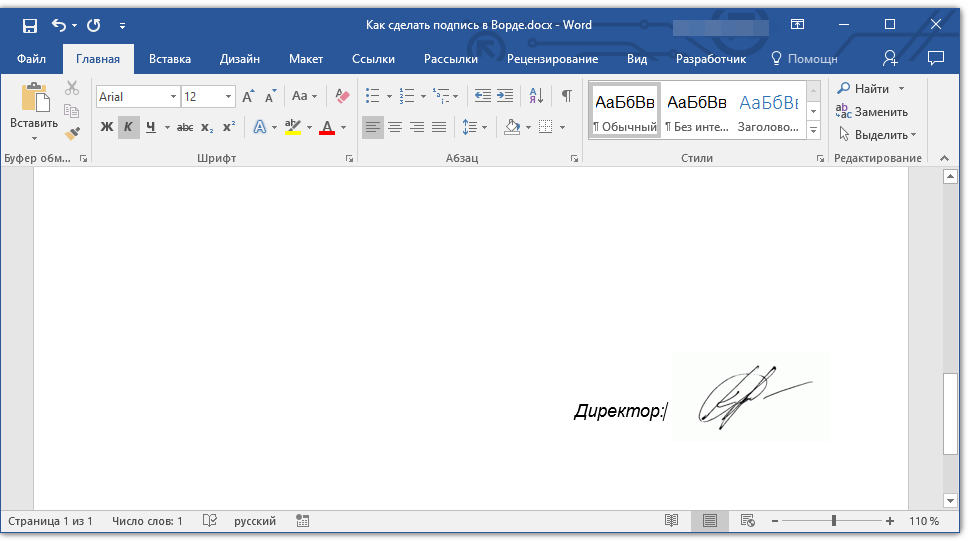
Type the text you want under the inserted picture.
-
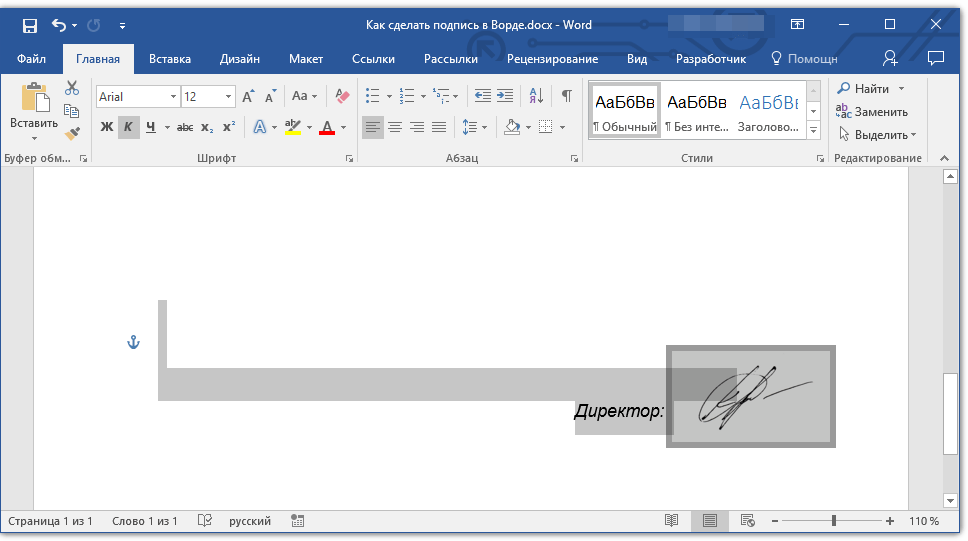
Select the picture and the typed text.
-
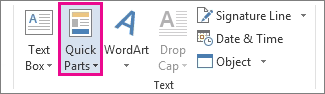
Click Insert > Quick Parts.
-
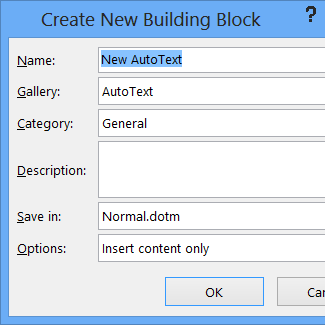
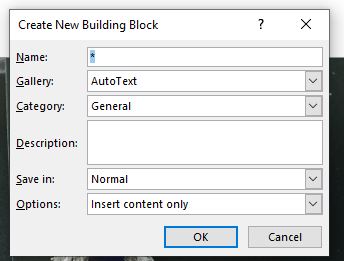
Click Save Selection to Quick Part Gallery. The Create New Building Block box opens.
-
In the Name box, type a name for your signature block.
-
In the Gallery box, select AutoText.
-
Click OK.
-
When you want to use this signature, place the insertion point where you want to insert the signature block.
-
Click Insert > Quick Parts > AutoText, and then click the name of your signature block.
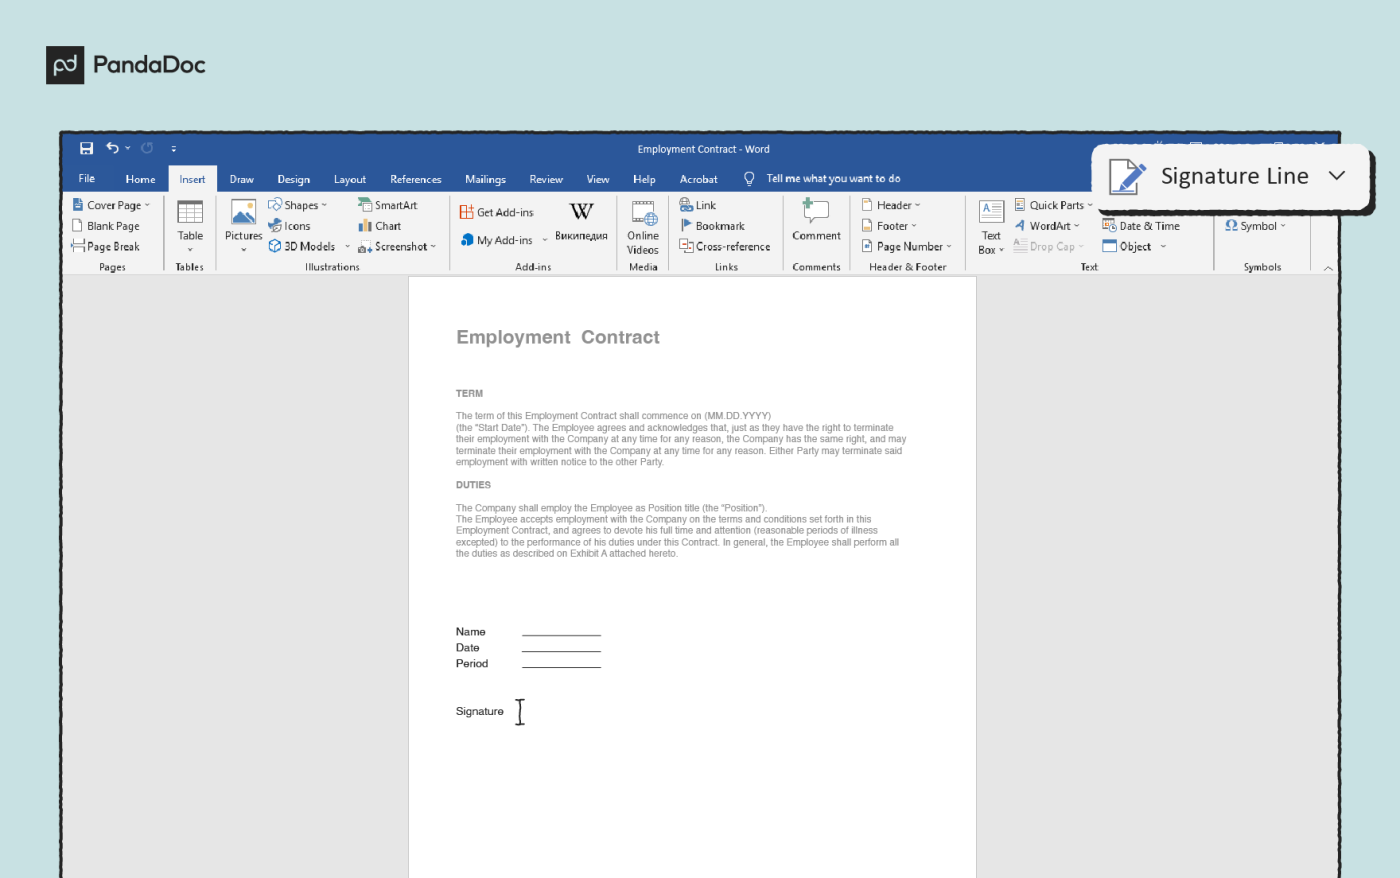
Insert a signature line
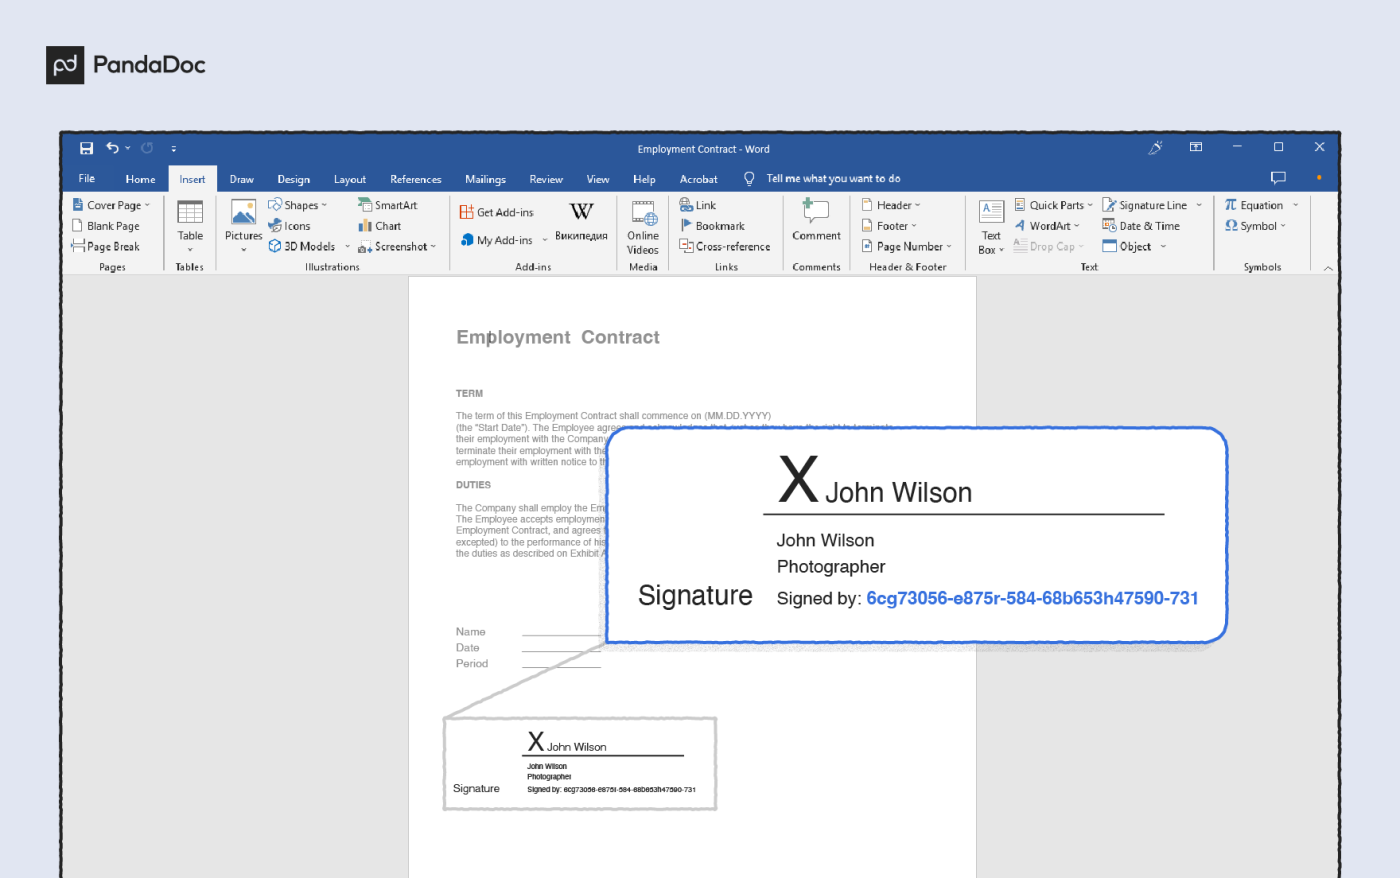
Use the Signature Line command to insert a signature line with an X by it to show where to sign a document.
-
Click where you want the line.
-
Click Insert > Signature Line.
-
Click Microsoft Office Signature Line.
-
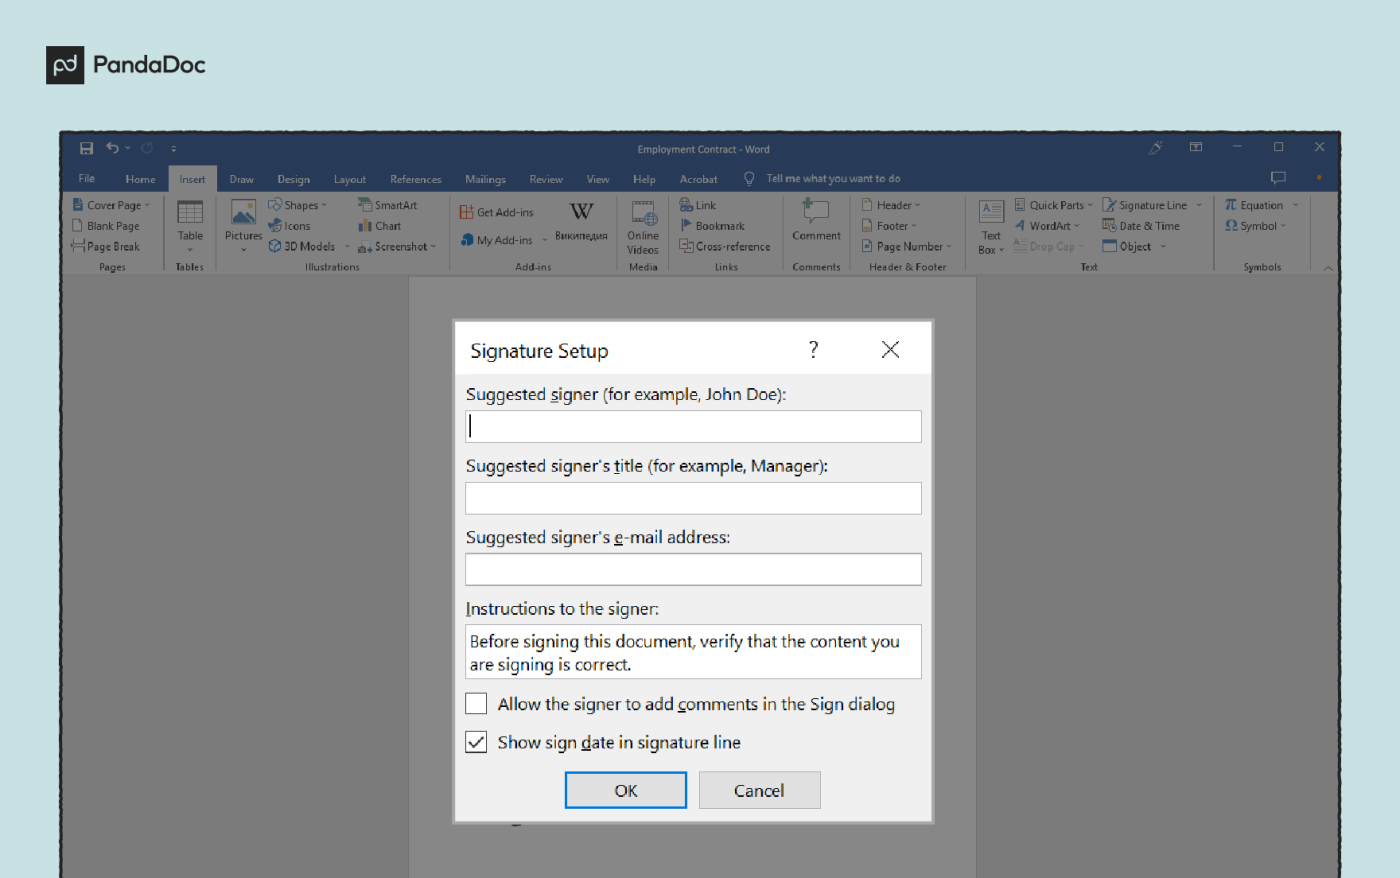
In the Signature Setup box, you can type a name in the Suggested signerbox. You can also add a title in the Suggested signer’s title box.
-
Click OK. The signature line appears in your document.


Your handwritten signature gives your document a personal touch. You can scan your signature, store it as a picture, and then insert your signature in Word documents.
Scan and insert a picture of your handwritten signature
You need a scanner to do this.
-
Write your signature on a piece of paper.
-
Scan the page and save it on your computer in a common file format: .BMP, .GIF, .JPG, or .PNG.
Tip: For information on how to use your scanner, use the manufacturer’s manual or Web site.
-
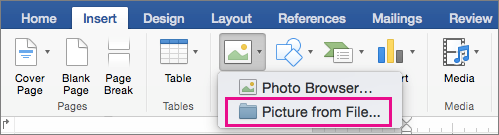
On the Insert tab, click Pictures > Picture from File.
-
Browse to the picture you want to insert, select it, and then click Insert.
-
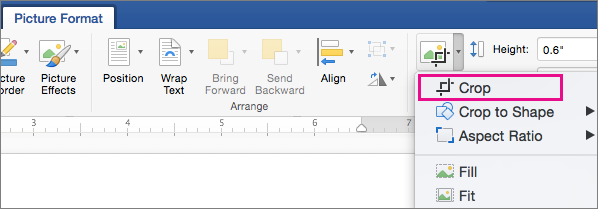
Click the picture to show the Picture Format tab.
-
On the Picture Format tab, click Crop, and then crop the signature.
-
Right-click the picture, and then click Save as Picture to save it as a separate file you can use in other documents.
Include text with your reusable signature
If you want information, such as your job title, phone number, or email address to be part of your signature, save it along with the picture as AutoText.
-
Type the text you want under the inserted picture.
-
Select the picture and the typed text.
-
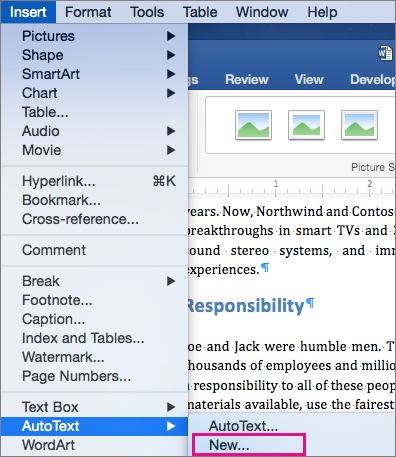
On the Insert menu, click AutoText > New.
-
The Create New AutoText box opens.
Next to Name, type a name for your signature block and click OK.
-
When you want to use this signature, place the insertion point where you want to insert the signature block.
-
On the Insert menu, click AutoText > AutoText, and then click the name of your signature block.

Easily create and insert a signature for your documents
Updated on December 23, 2022
What to Know
- Scan and insert a signature image into a new Word document. Type your information beneath it.
- Select the signature block. Go to Insert > Quick Parts > Save Selection to Quick Part Gallery. Name the signature. Select AutoText > OK.
- Add the saved signature to any document by going to Insert > Quick Parts > AutoText > Name of signature.
This article explains how to insert a signature in Word using the AutoText feature in Word 2019, 2016, 2013, 2010, and Word for Microsoft 365. It also includes information on adding a blank signature line and on inserting an encrypted digital signature.
How to Insert a Signature in Word Using AutoText
Use Word’s Quick Parts and AutoText feature to create a complete signature that includes your handwritten signature and typed text, such as your job title, email address, and phone number. Here’s how.
-
Begin by scanning and inserting a handwritten signature in a new Word document
-
Type the information you want to use directly beneath the inserted signature image. Format the text as you want it to appear when you insert the signature block in documents.
-
Drag your mouse over the image and text to select and highlight it.
-
Go to the Insert tab and select Quick Parts in the Text group.
-
Choose Save Selection to Quick Part Gallery. The Create New Building Block dialog box opens.
-
Type a name for the signature block.
-
Choose AutoText in the Gallery Box and select OK to save the signature block.
-
Any time you want to add the signature in Word, go to the Insert tab, select Quick Parts, point to AutoText, and select the name of the signature block.
How to Add a Blank Signature Line
To add a blank signature line to allow someone to sign a printed document, insert a normal signature line but without any contextual data.
-
Select a space in the Word document.
-
Go to the Insert tab and select Signature Line.
-
Select any options you want and choose OK. Selecting few or no options leaves a blank line.
-
A signature line appears ion the document where you placed your cursor.
How to Add an Encrypted Digital Signature
Use built-in tools to digitally sign a Word document. A digital signature is an encrypted, electronic form of authentication that confirms that a document hasn’t been altered.
To create a digital signature:
-
Place the cursor where you want to create a signature line in your document.
-
Go to the Insert tab.
-
Select Signature Line in the Text group and select Microsoft Office Signature Line.
-
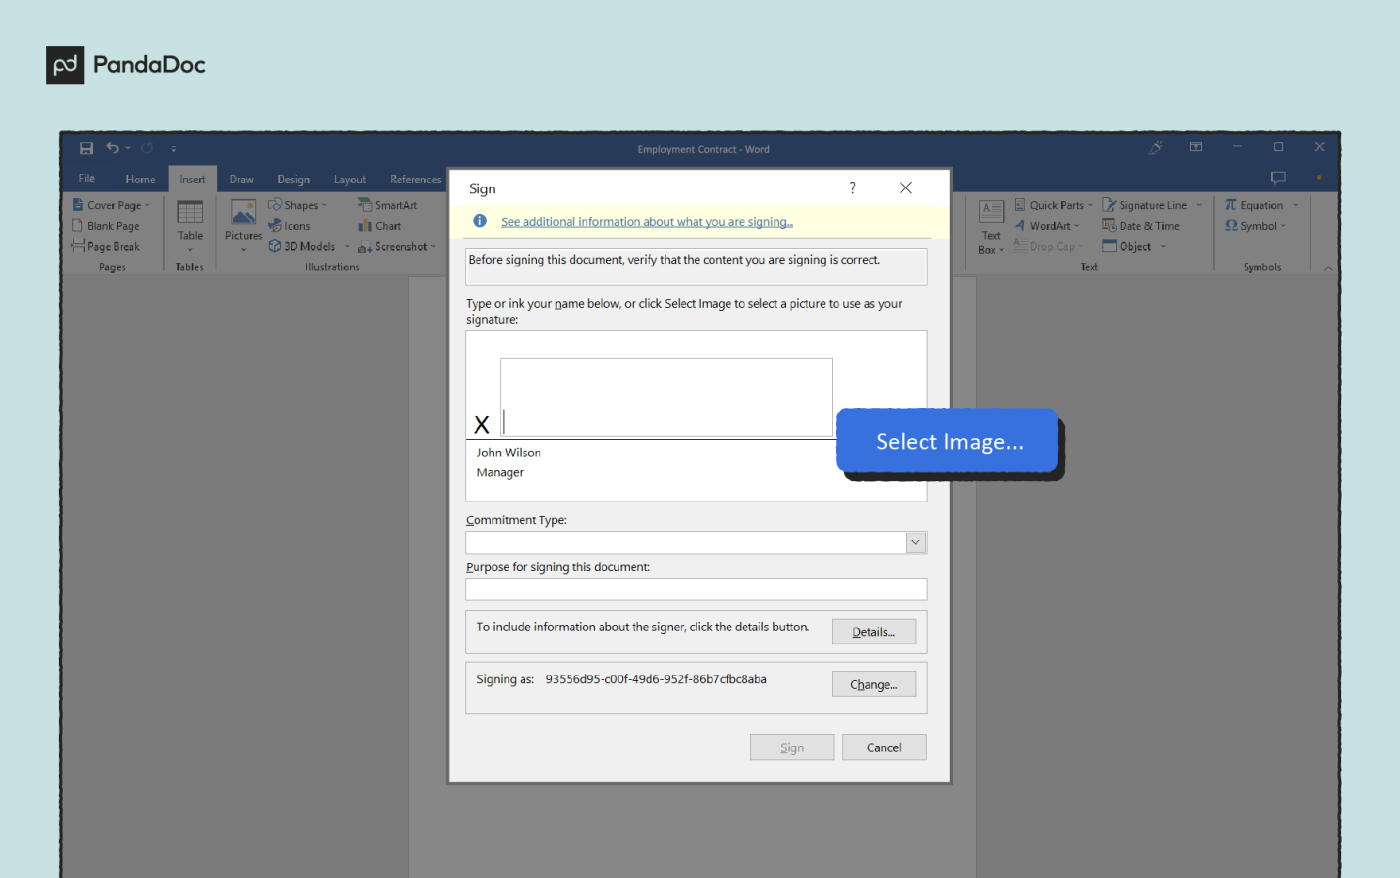
In the dialog box, type the relevant information, including the signer’s full name, title, email address, and instructions.
-
Select Allow the Signer to Add Comments in the Sign Dialog to allow the signer to insert his or her purpose for signing.
-
Select Show Sign Date in Signature Line if you want the date the document was signed to appear.
-
When you’re finished making your selections, click OK and the signature is inserted into your document where you placed the cursor.
-
Right-click the signature line and select Sign to add your signature.
-
In the Sign dialog box that appears, type your name in the box provided, or if you prefer, you can select an image of your handwritten signature. After you’ve made your choices, click Sign.
FAQ
-
How do I insert a footnote in Word?
To insert footnotes in a Word document, place the cursor in the text where you want the footnote and select References. In the Footnotes group, select Insert Footnote. You’ll see a superscript number in the text; the cursor will move to the bottom of the page. Type and format your footnote.
-
How do I insert a checkbox in Word?
To insert a checkbox in Word, place the cursor in the text where you want the checkbox and go to the Home tab. Select the Bullets dropdown; when you see the Bullet Library pop-out, select Define New Bullet > Symbol. Choose a suitable symbol for your checkbox and select OK.
-
How do I insert page numbers in Word?
To add page numbers in Word, place your cursor where you want page numbers to begin and select the Insert tab. Select Page Number > Page Number; choose the position and alignment you want. Click OK. Select Header or Footer on the toolbar to choose your formatting for the page numbering.
Thanks for letting us know!
Get the Latest Tech News Delivered Every Day
Subscribe
Microsoft Word is one of the leading word processing platforms. Whether it be for personal, educational, or professional purposes, countless people depend on Microsoft Word to create important documents.
For professionals using Microsoft Word to create contracts, sales proposals, and other documents that require signatures, it’s important to know how to insert a signature in Word. Learning how to do so can save you the hassle of having to print out documents to sign them before scanning them back onto your computer.
Here’s everything you need to know about how to add a signature in Word using Word’s built-in tools or a third-party electronic signature platform like jSign.
Microsoft Word makes it as easy to add a signature to Word documents. By inserting your custom electronic signature, you can sign documents in a matter of seconds without having to print them out.
Follow these steps to quickly insert a signature in Word:
- Write your signature on a blank piece of white paper.
- Scan the signature to your computer, and make sure to save the file as a .bmp, .gif, .png, or .jpg file.
- Open a new Word document, select Insert, click Pictures, then open the image of your signature.
- Use the Picture Tools Format tab to edit the picture as needed.
- Right-click the image in the document and select Save as Picture.
- Open the Word document that you need to sign, click Insert, select Pictures, then choose the image of your electronic signature.
- Drag and drop the image to the appropriate place in the document.
After uploading and editing a picture of your handwritten signature, you can easily insert it into any Word document to sign it quickly without needing to print or scan it.
How to Add a Signature Line in Word
If you are creating a document and need to collect signatures from others, it’s important to know how to add a signature line in Word. A signature line shows recipients where they should sign once they receive the document.
To add a signature line in Word, follow these steps:
- Create a new Word document or open an existing document that you need to add a signature line to.
- Left-click the place in the document where you want to add the signature line.
- Under the Insert dropdown menu, select Signature Line.
- In the dialogue box that appears, select the appropriate options.
- Click OK.
You can repeat this process as needed to add multiple signature lines to a Word document.
Using a Third-Party App to Sign a Word Document
While Microsoft Word offers a few basic features that allow users to insert a signature in Word documents, it doesn’t have the functionality and features that electronic signature platforms like jSign offer.
Third-party apps like jSign offer several additional features that grant users more flexibility when signing Word documents online.
Rather than handwriting your signature and scanning it to your computer, electronic signature platforms let you create a custom e-signature online that you can easily insert into any document, including Word docs. You can also create name and date fields, add signature lines to documents, send documents to recipients to collect signatures, and save your documents to the cloud for easy organization.
jSign also helps protect the authenticity of your documents by taking advantage of technology like blockchain stamping, two-factor authentication, and Certificates of Completion.
Aside from Word documents, platforms like jSign support a variety of file formats, including .pdf, .ppt, .pptx, .xls, .xlsx, .bmp, .png, and .jpg.
How to Sign a Word Document With jSign
jSign makes it easy to insert a signature in a Word document.
After signing up with jSign and creating your electronic signature, follow these steps to sign a Word document:
- Log into your jSign account.
- Open your computer’s file manager, then drag and drop the Word document to upload it to jSign.
- Add yourself to the document as a signer alongside any recipients.
- Insert signature placeholders as needed throughout the document.
- Edit the signature placeholders to insert your electronic signature.
- Save the Word document.
- If necessary, set up due dates and reminders to collect signatures from others in a timely manner.
- Click Finish to send the document to the recipients.
You can repeat this process with other types of files, including PDFs, to sign documents quickly without having to print or scan them.
After signing a document, you’ll receive a Certificate of Completion that includes IP addresses, device IDs, timestamps, and other information to help verify the authenticity of the document.
jSign Features & Benefits
When it comes to signing Word documents, it’s hard to beat jSign’s wide range of user-friendly features. jSign is designed to make it as easy and convenient as possible to sign, send, and organize documents online.
Sign & Send Documents
With jSign, users can upload documents directly from their computer or a compatible cloud storage platform, insert their signatures, and add placeholders for recipients to sign.
When collecting signatures from others, you can set up due dates and reminders, send documents to an unlimited number of contacts, choose from sequential or parallel signing orders, and save signed documents in the cloud for easy access.
Blockchain Stamping
jSign uses blockchain stamping to track documents and create audit trails. All changes made to your document are recorded to help protect against tampering and fraud.
Compliance
When signing documents online, it’s important to use a platform that complies with e-signature laws to ensure your documents are enforceable. jSign is compliant with all major electronic signature laws, including the ESIGN Act and UETA.
Contact Management
With jSign, you can easily add, save, and manage contacts. Whenever you create a document, you can send it to an unlimited number of contacts, making it easy to streamline communications and document workflows.
4 Ways to Sign
jSign users can choose one of four methods to create their custom electronic signatures. You can choose from a list of signature templates, draw your signature, use a signing pad, or upload a picture of your signature.
Sign Up Now
jSign is available as a limited free trial featuring all of its capabilities, and paid plans start at just $9.99 a month.
Join today to start signing documents online!
Choose a Plan

Содержание
- Создание рукописной подписи
- Вставка рукописной подписи
- Добавление текста к подписи
- Вставка рукописной подписи с машинописным текстом
- Вставка строки для подписи
- Добавление строки для подписи путем подчеркивания пробелов в обычном документе
- Добавление строки для подписи путем подчеркивания пробелов в веб-документе
- Вставка линии
- Вставка линии с сопровождающим текстом для строки подписи
- Вопросы и ответы

Подпись — это то, что может обеспечить неповторимый вид любому текстовому документу, будь то деловая документация или художественный рассказ. Среди богатого функционала программы Microsoft Word возможность вставки подписи тоже имеется, причем, последняя может быть как рукописной, так и печатной.
Урок: Как в Ворд изменить имя автора документа
В этой статье мы расскажем обо всех возможных методах поставить подпись в Word, а также о том, как подготовить для нее специально отведенное место в документе.
Создание рукописной подписи
Для того, чтобы добавить в документ рукописную подпись, сначала ее необходимо создать. Для этого вам понадобится белый лист бумаги, ручка и сканер, подключенный к компьютеру и настроенный.
Вставка рукописной подписи
1. Возьмите ручку и распишитесь на листе бумаги.
2. Отсканируйте страницу со своей подписью с помощью сканера и сохраните ее на компьютер в одном из распространенных графических форматов (JPG, BMP, PNG).

Примечание: Если у вас возникают сложности с использованием сканера, обратитесь к прилагаемому к нему руководству или посетите веб-сайт производителя, где тоже можно найти детальные инструкции по настройке и использованию оборудования.
- Совет: Если у вас нет сканера, заменить его может и камера смартфона или планшета, но в данном случае, возможно, придется хорошенько постараться над тем, чтобы страница с подписью на фото была белоснежной и не выделялась в сравнении со страницей электронного документа Ворд.
3. Добавьте изображение с подписью в документ. Если вы не знаете, как это сделать, воспользуйтесь нашей инструкцией.
Урок: Вставка изображения в Word
4. Вероятнее всего, отсканированное изображение необходимо обрезать, оставив на нем только ту область, в которой располагается подпись. Также, вы можете изменить размер изображения. Наша инструкция вам в этом поможет.
Урок: Как в Ворде обрезать картинку

5. Переместите отсканированное, обрезанное и приведенное к необходимым размерам изображение с подписью в нужное место документа.
Если вам необходимо добавить к рукописной подписи машинописный текст, прочтите следующий раздел данной статьи.
Добавление текста к подписи
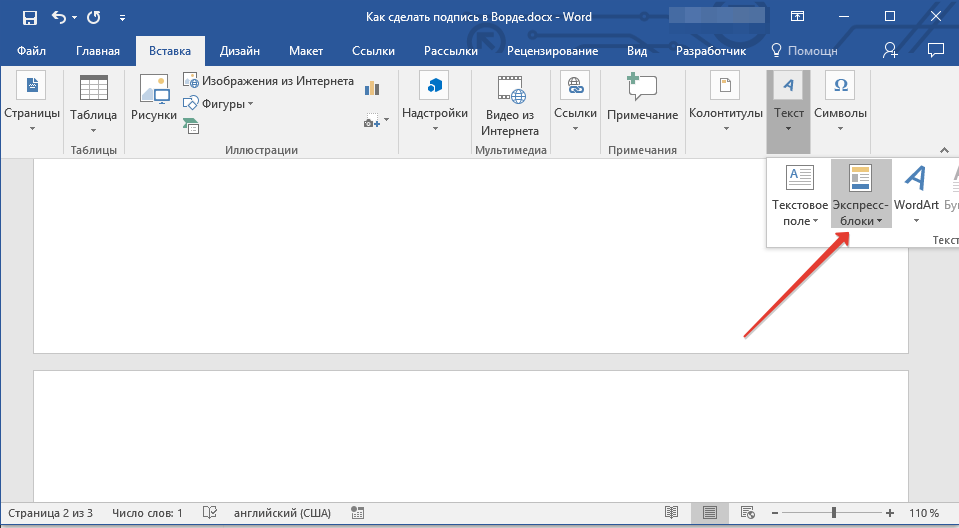
Довольно часто в документах, в которых необходимо поставить подпись, помимо самой подписи, нужно указать должность, контактные данные или какую-либо другую информацию. Для этого необходимо сохранить текстовые сведения вместе с отсканированной подписью в качестве автотекста.
1. Под вставленным изображением или слева от него введите нужный текст.
2. Используя мышку, выделите введенный текст вместе с изображением подписи.
3. Перейдите во вкладку “Вставка” и нажмите кнопку “Экспресс-блоки”, расположенную в группе “Текст”.
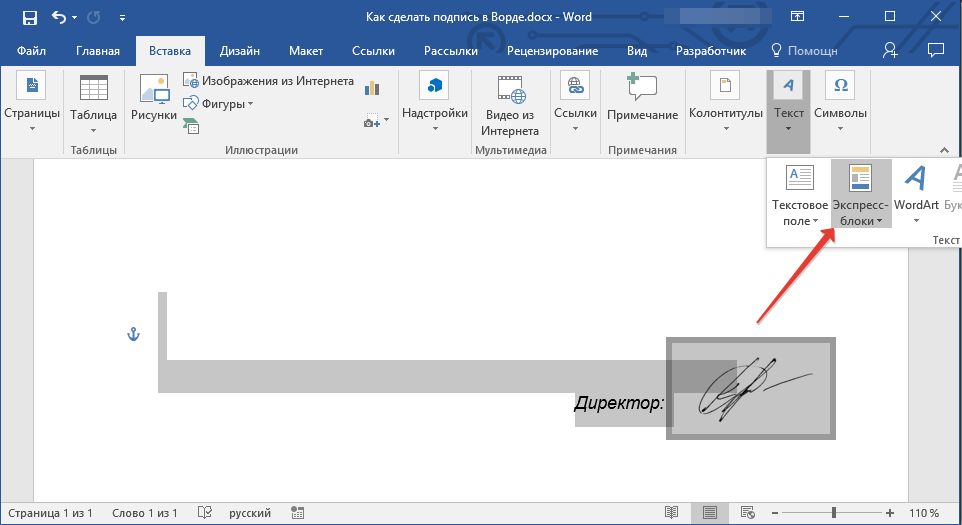
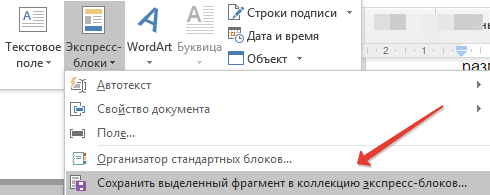
4. В выпадающем меню выберите пункт “Сохранить выделенный фрагмент в коллекцию экспресс-блоков”.
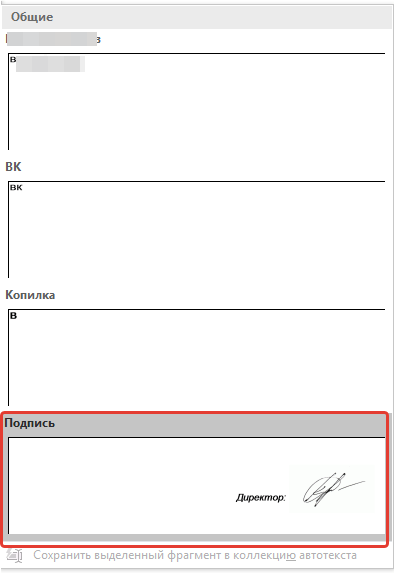
5. В открывшемся диалоговом окне введите необходимую информацию:
- Имя;
- Коллекция — выберите пункт “Автотекст”.
- Остальные пункты оставьте без изменений.
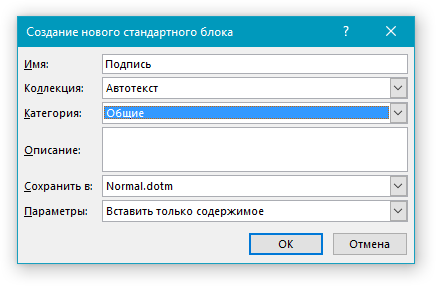
6. Нажмите “ОК” для закрытия диалогового окна.
7. Созданная вами рукописная подпись с сопровождающим текстом будет сохранена в качестве автотекста, готового для дальнейшего использования и вставки в документ.
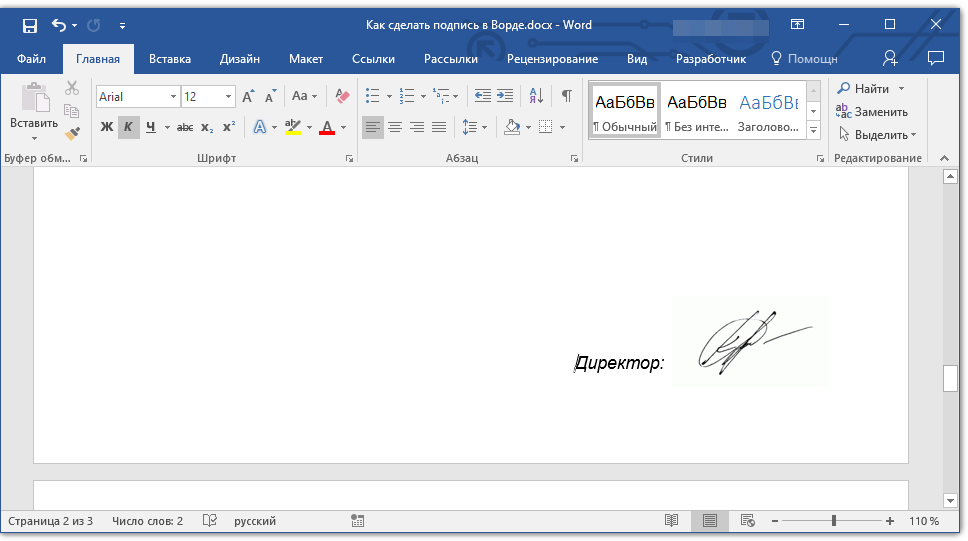
Вставка рукописной подписи с машинописным текстом
Для вставки созданной вами рукописной подписи с текстом, необходимо открыть и добавить в документ сохраненный вами экспресс-блок “Автотекст”.
1. Кликните в том месте документа, где должна находиться подпись, и перейдите во вкладку “Вставка”.
2. Нажмите кнопку “Экспресс-блоки”.
3. В выпадающем меню выберите пункт “Автотекст”.
4. Выберите в появившемся списке нужный блок и вставьте его в документ.
5. Рукописная подпись с сопровождающим текстом появится в указанном вами месте документа.
Вставка строки для подписи
Помимо рукописной подписи в документ Microsoft Word можно также добавить и строку для подписи. Последнее можно сделать несколькими способами, каждый из которых будет оптимальным для конкретной ситуации.
Примечание: Метод создания строки для подписи зависит еще и от того, будет ли документ выводиться на печать или нет.
Добавление строки для подписи путем подчеркивания пробелов в обычном документе
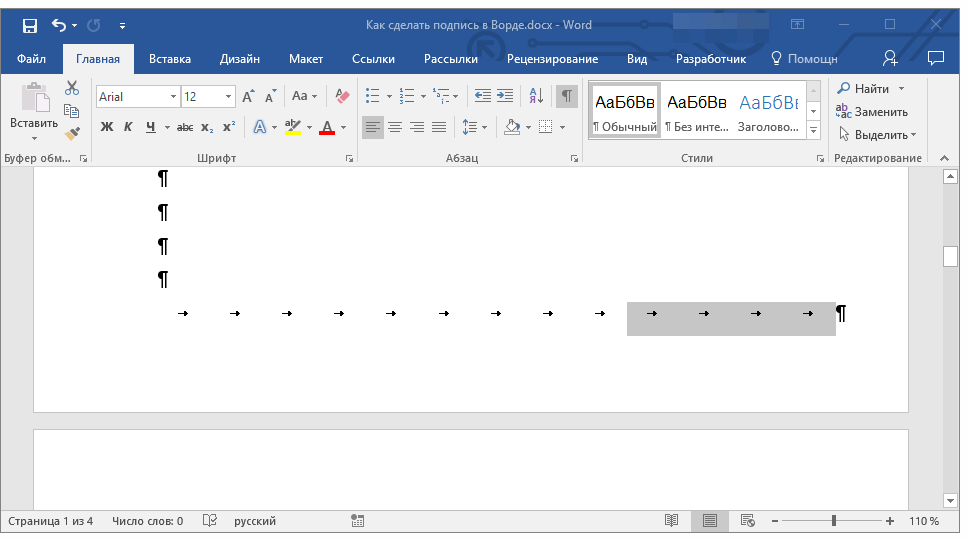
Ранее мы писали о том, как в Ворде подчеркнуть текст и, помимо самих букв и слов, программа позволяет также подчеркивать и пробелы между ними. Непосредственно для создания строки подписи нам понадобится подчеркнуть только пробелы.
Урок: Как в Word подчеркнуть текст
Для упрощения и ускорения решения задача вместо пробелов лучше использовать знаки табуляции.
Урок: Табуляция в Ворде
1. Кликните в том месте документа, где должна находиться строка для подписи.

2. Нажмите клавишу “TAB” один или более раз, в зависимости от того, какой длины строка для подписи вам нужна.

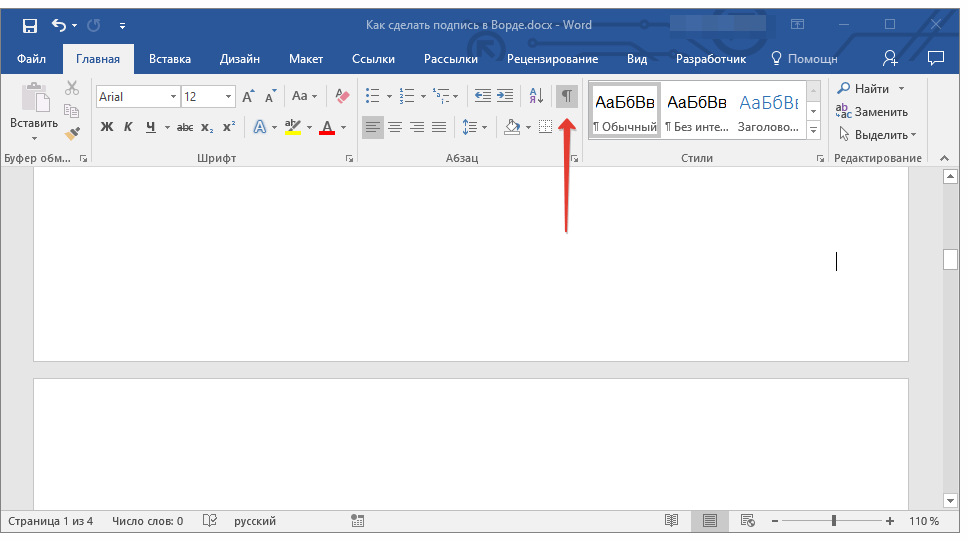
3. Включите режим отображения непечатаемых знаков, нажав на кнопку со знаком “пи” в группе “Абзац”, вкладка “Главная”.
4. Выделите знак или знаки табуляции, которые нужно подчеркнуть. Они будут отображаться в виде небольших стрелок.
5. Выполните необходимое действие:
- Нажмите “CTRL+U” или кнопку “U”, расположенную в группе “Шрифт” во вкладке “Главная”;
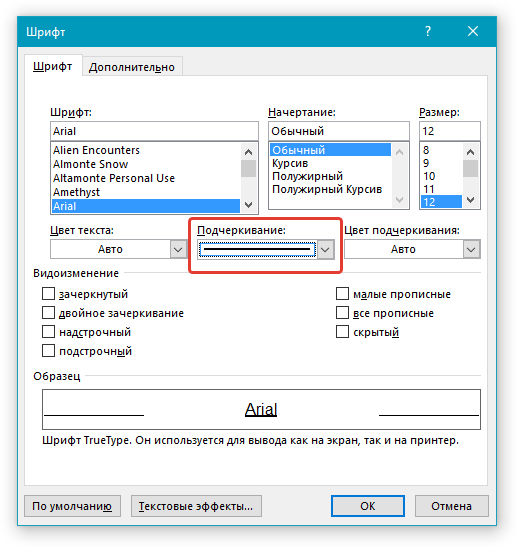
- Если стандартный тип подчеркивания (одна линия) вас не устраивает, откройте диалоговое окно “Шрифт”, нажав на небольшую стрелку в правой нижней части группы, и выберите подходящий стиль линии или линий в разделе “Подчеркивание”.
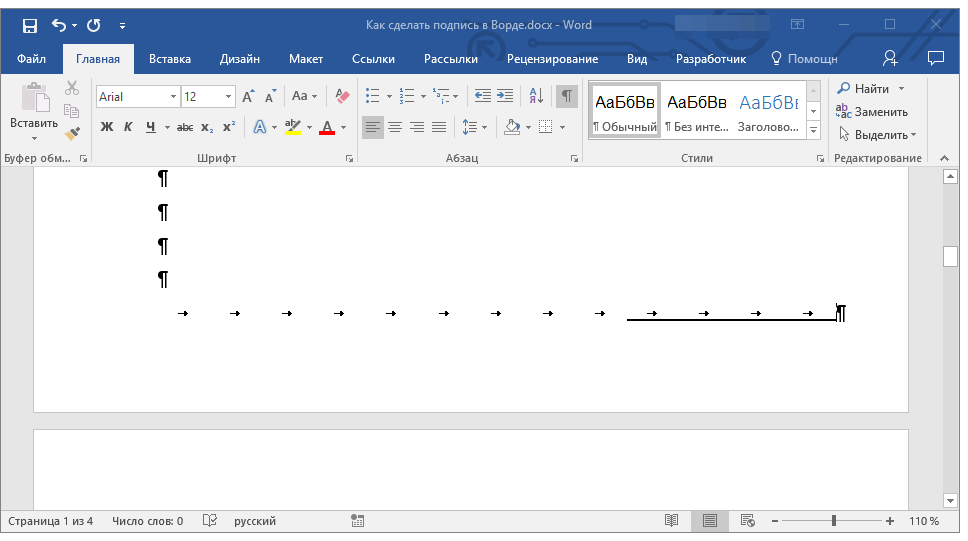
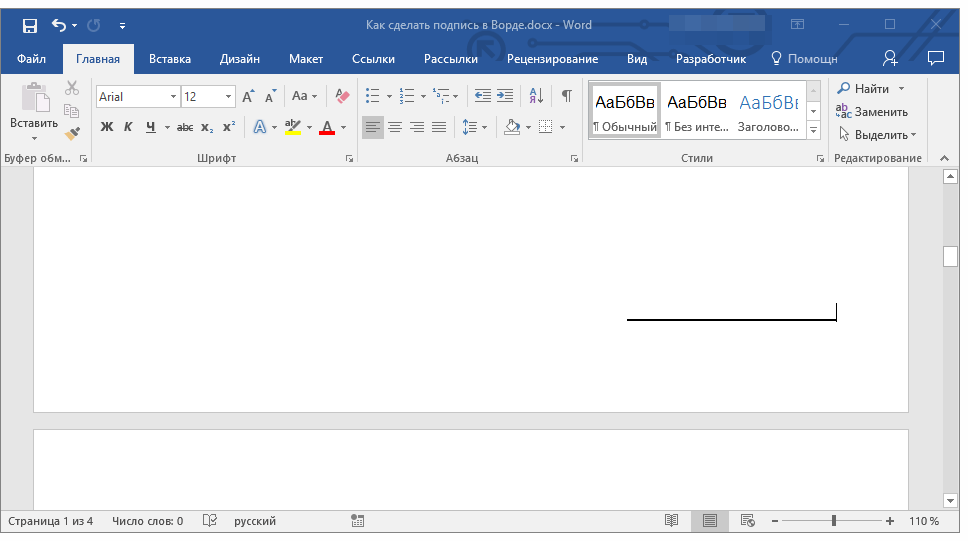
6. На месте установленных вами пробелов (знаков табуляции) появится горизонтальная линия — строка для подписи.
7. Отключите режим отображения непечатаемых знаков.
Добавление строки для подписи путем подчеркивания пробелов в веб-документе
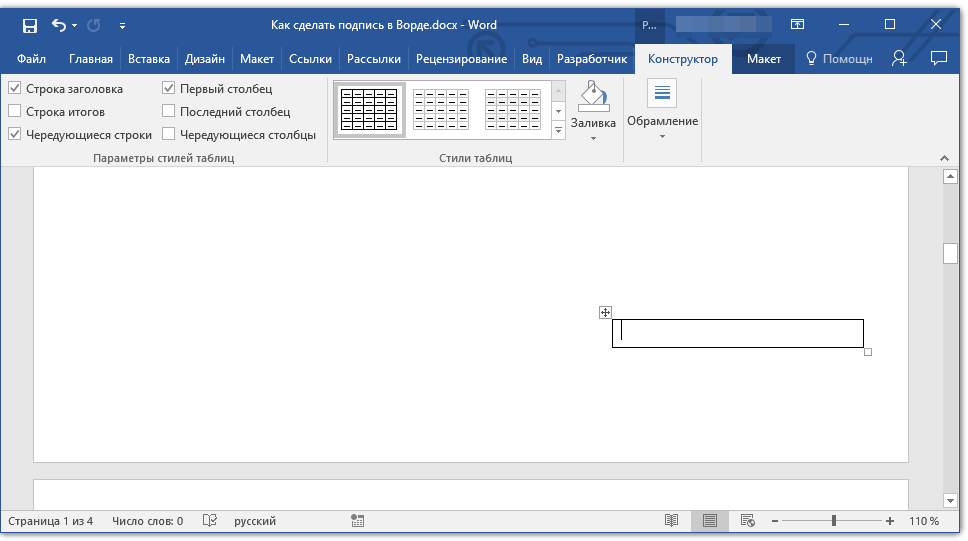
Если вам необходимо создать строку для подписи посредством подчеркивания не в документе, готовящемся к печати, а в веб-форме или веб-документе, для этого необходимо добавить ячейку таблицы, в которой видимой будет только нижняя граница. Именно она и будет выступать в качестве строки для подписи.
Урок: Как сделать таблицу в Word невидимой
В данном случае при вводе текста в документ, добавленная вами линия подчеркивания будет оставаться на своем месте. Линия, добавленная таким образом, может сопровождаться вводным текстом, к примеру, “Дата”, “Подпись”.
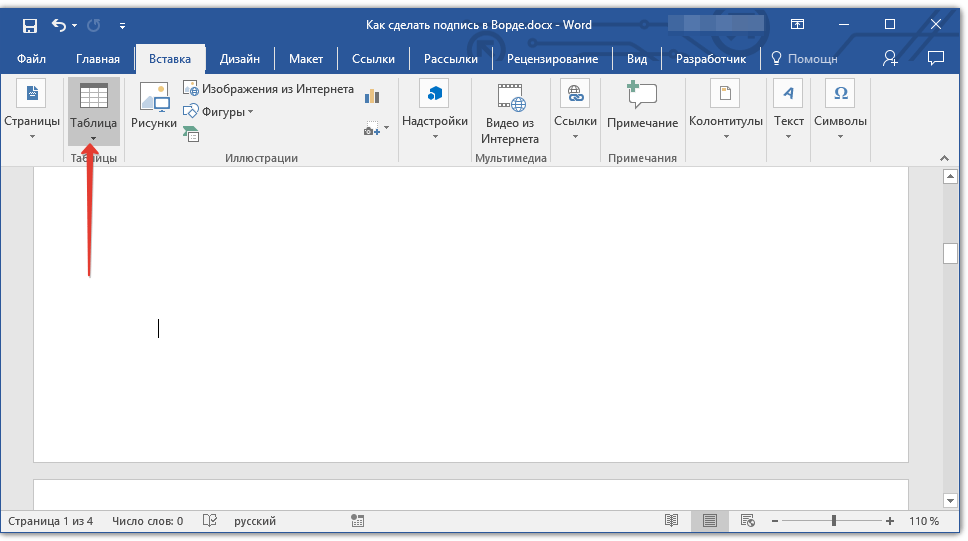
Вставка линии
1. Кликните в том месте документа, где нужно добавить строку для подписи.
2. Во вкладке “Вставка” нажмите кнопку “Таблица”.
3. Создайте таблицу размером в одну ячейку.
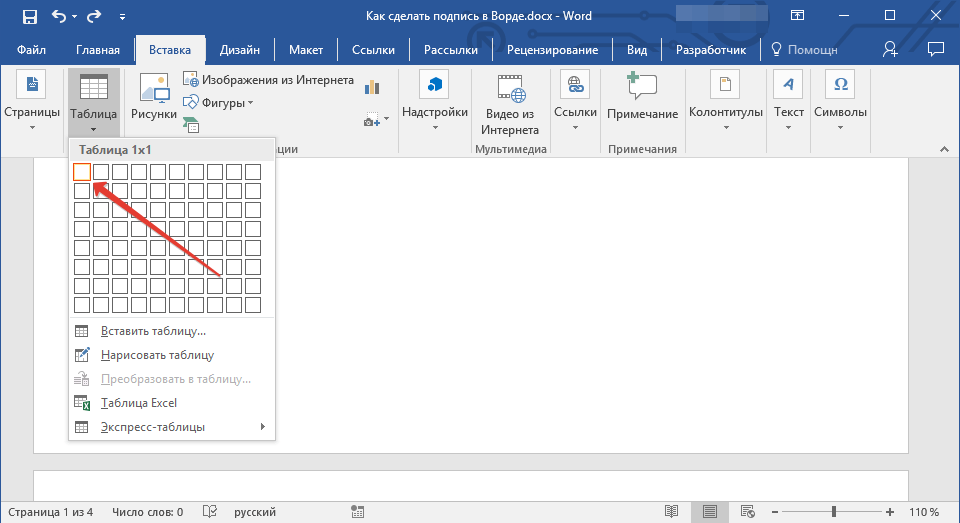
Урок: Как в Ворде сделать таблицу
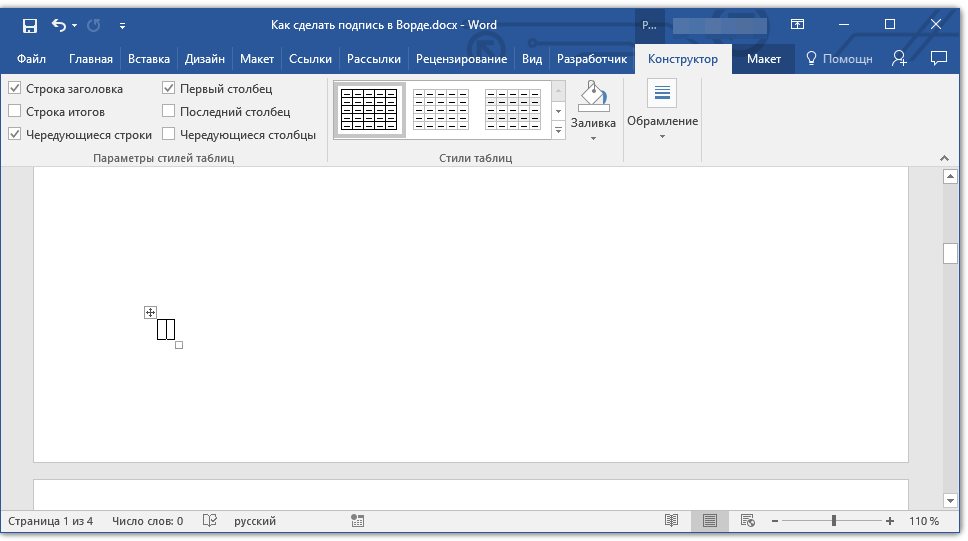
4. Переместите добавленную ячейку в нужное место документа и измените ее размер в соответствии с необходимым размером создаваемой строки для подписи.
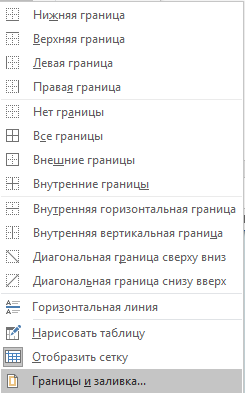
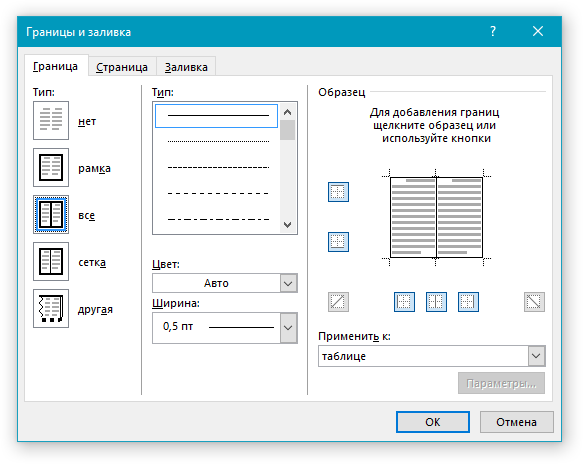
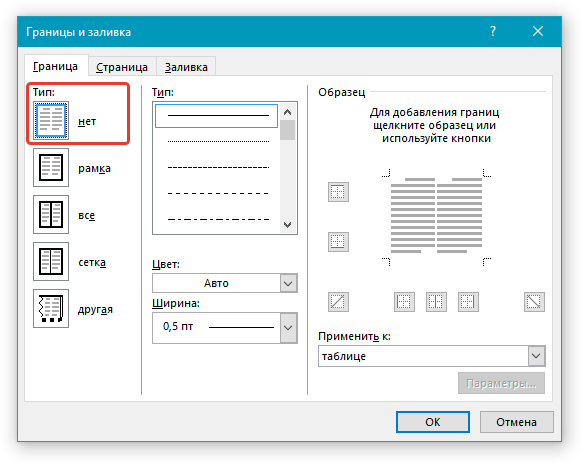
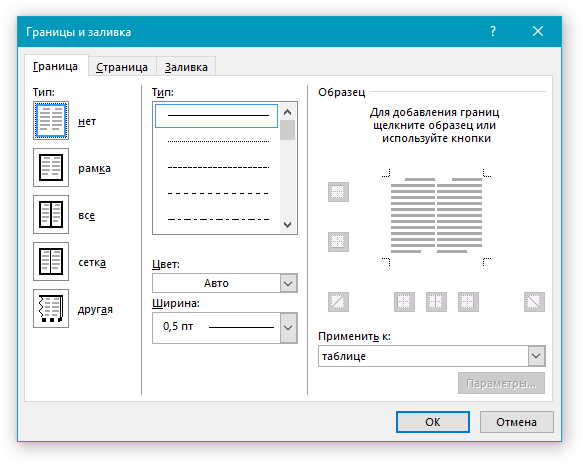
5. Кликните правой кнопкой мышки по таблице и выберите пункт “Границы и заливка”.
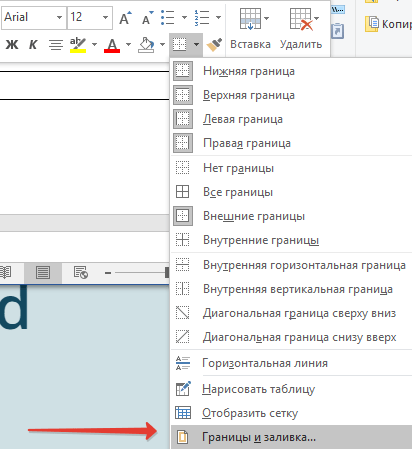
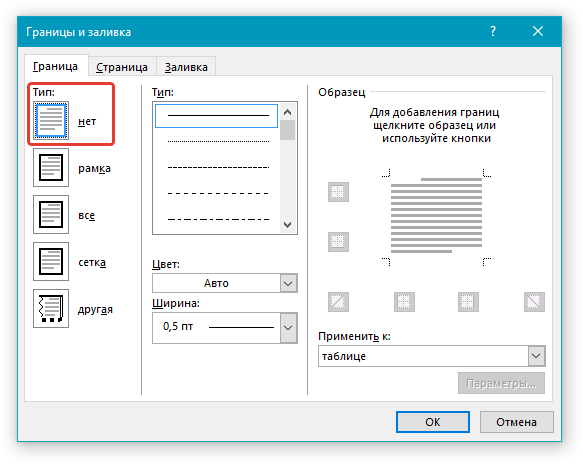
6. В открывшемся окне перейдите во вкладку “Граница”.
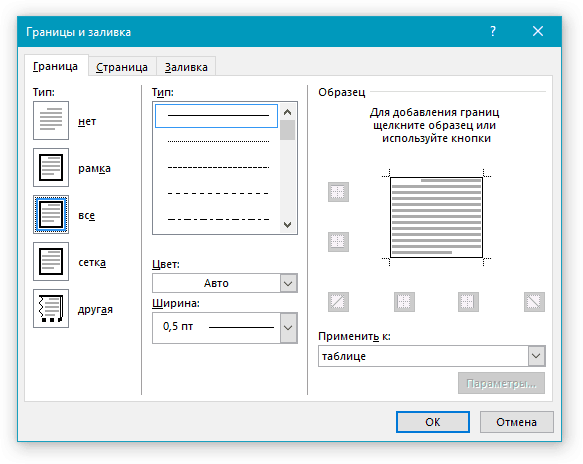
7. В разделе “Тип” выберите пункт “Нет”.
8. В разделе “Стиль” выберите необходимый цвет линии строки для подписи, ее тип, толщину.
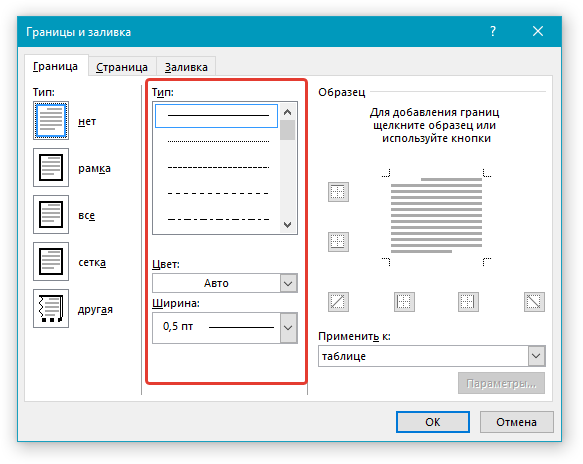
9. В разделе “Образец” кликните между маркерами отображения нижнего поля на диаграмме, чтобы отобразить только нижнюю границу.

Примечание: Тип границы изменится на “Другая”, вместо ранее выбранного “Нет”.
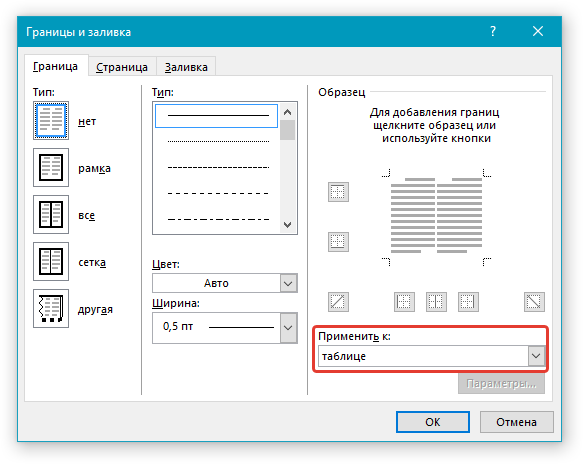
10. В разделе “Применить к” выберите параметр “Таблица”.
11. Нажмите “ОК” для закрытия окна.
Примечание: Для отображения таблицы без серых линий, которые не будут выведены на бумагу при печати документа, во вкладке “Макет” (раздел “Работа с таблицами”) выберите параметр “Отобразить сетку”, который расположен в разделе “Таблица”.
Урок: Как в Word распечатать документ
Вставка линии с сопровождающим текстом для строки подписи
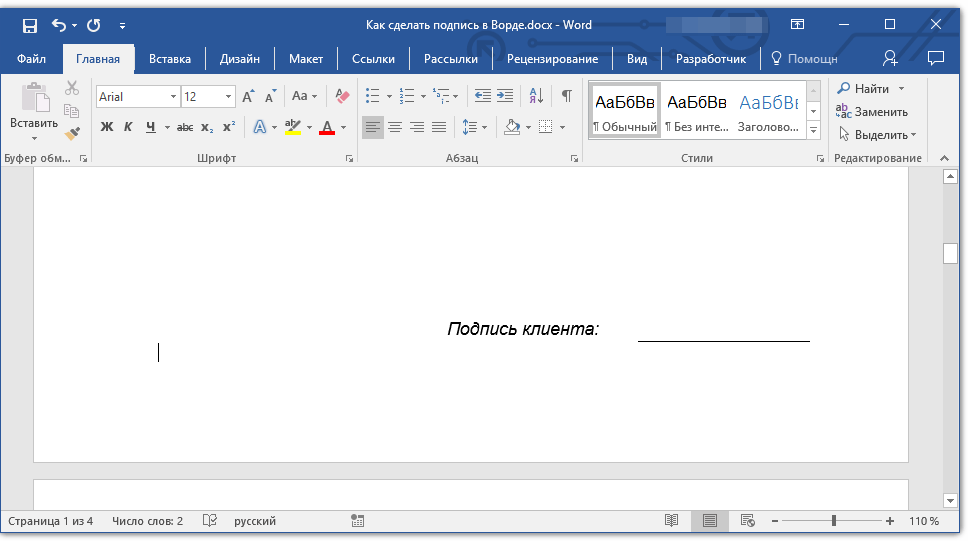
Этот метод рекомендован для тех случаев, когда вам нужно не только добавить строку для подписи, но и указать возле нее пояснительный текст. Таким текстом может быть слово “Подпись”, “Дата”, “ФИО”, занимаемая должность и многое другое. Важно, чтобы этот текст и сама подпись вместе со строкой для нее, находились на одном уровне.
Урок: Вставка подстрочной и надстрочной надписи в Ворде
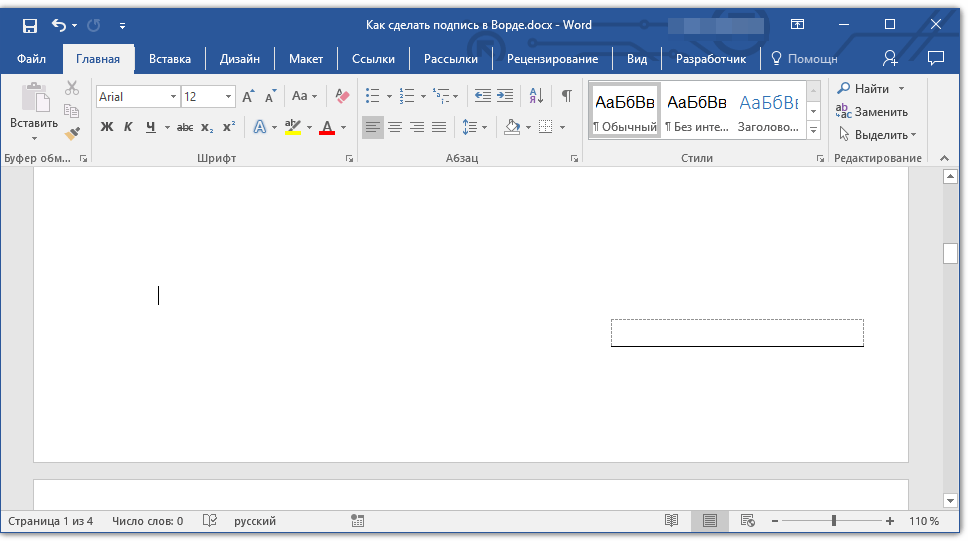
1. Кликните в том месте документа, где должна находиться строка для подписи.
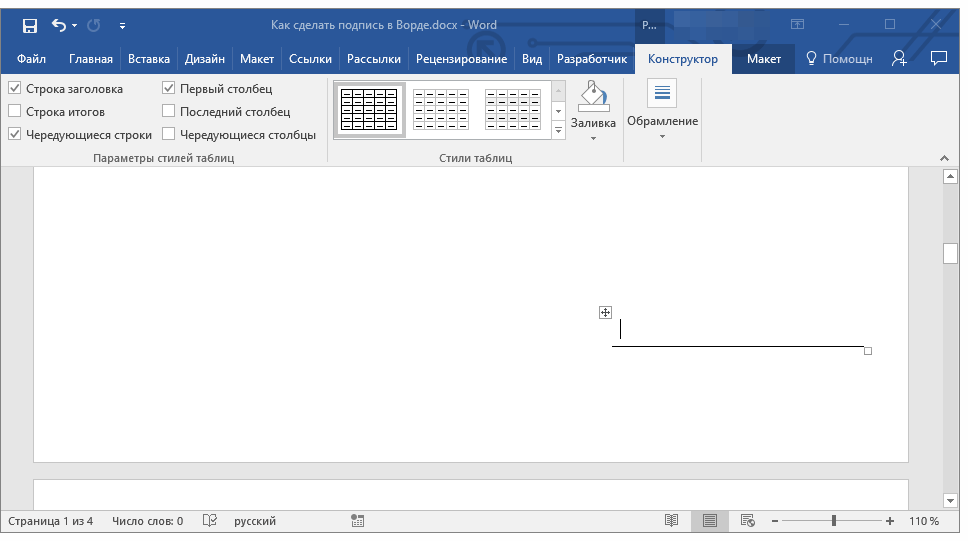
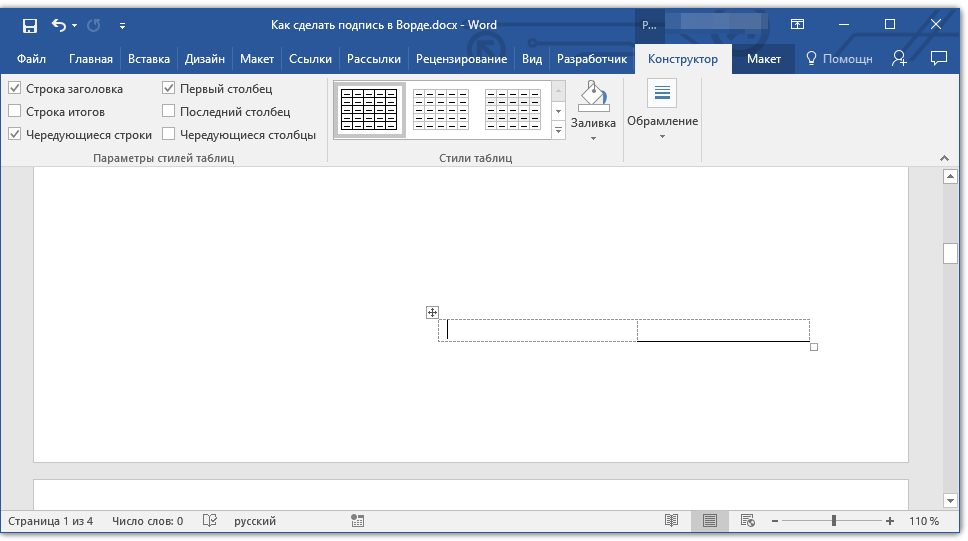
2. Во вкладке “Вставка” нажмите на кнопку “Таблица”.
3. Добавьте таблицу размером 2 х 1 (два столбца, одна строка).
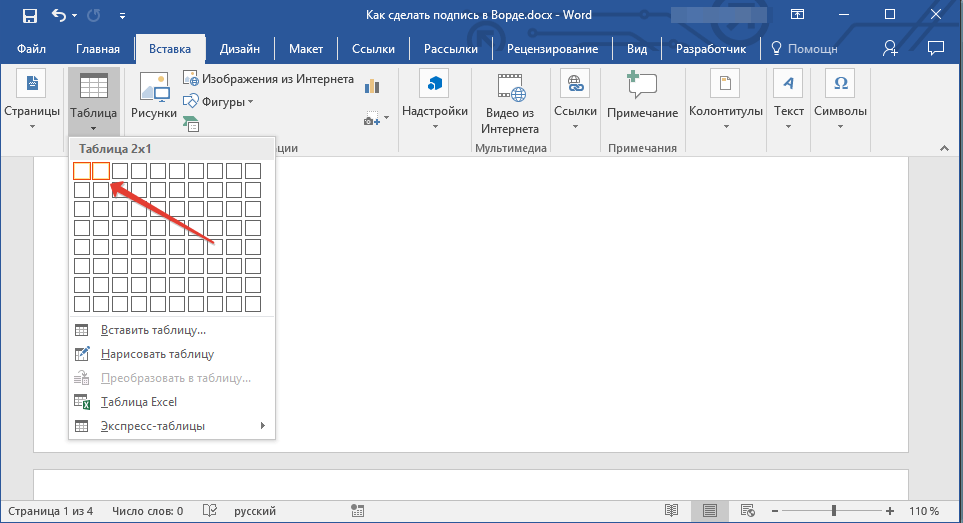
4. Измените местоположение таблицы, если это необходимо. Измените ее размер, потянув за маркер в правом нижнем углу. Отрегулируйте размер первой ячейки (для пояснительного текста) и второй (строка подписи).
5. Кликните правой кнопкой мышки по таблице, выберите в контекстном меню пункт “Границы и заливка”.
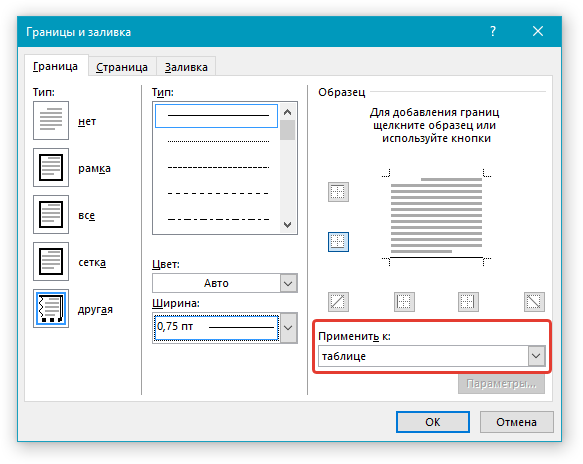
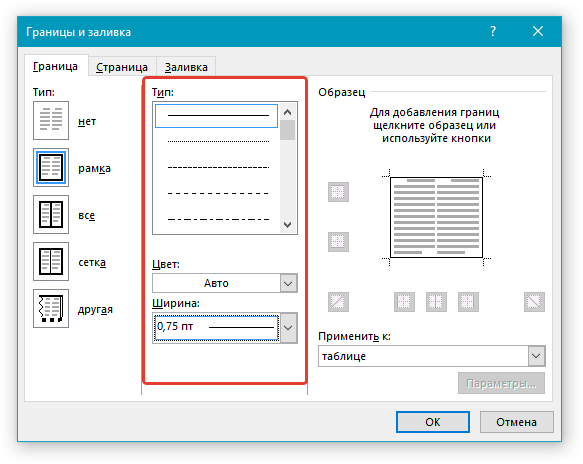
6. В открывшемся диалоговом окне перейдите во вкладку “Граница”.
7.В разделе “Тип” выберите параметр “Нет”.
8. В разделе “Применить к” выберите “Таблица”.
9. Нажмите “ОК” для закрытия диалогового окна.
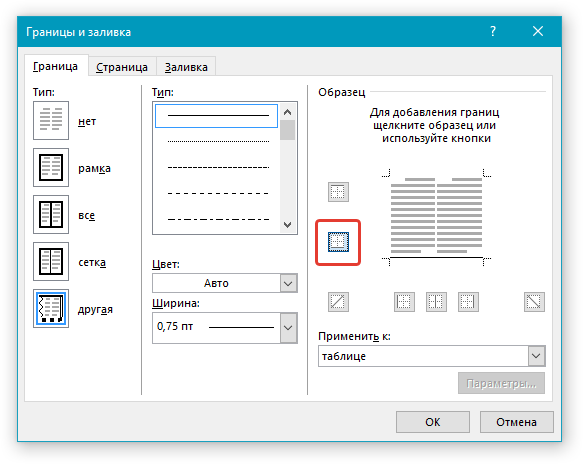
10. Кликните правой кнопкой в том месте таблицы, где должна находиться строка для подписи, то есть, во второй ячейке, и снова выберите пункт “Границы и заливка”.

11. Перейдите во вкладку “Граница”.
12. В разделе “Стиль” выберите подходящий тип линии, цвет и толщину.
13. В разделе “Образец” кликните по маркеру, на котором отображено нижнее поле, чтобы сделать видимой только нижнюю границу таблицы — это и будет строка для подписи.
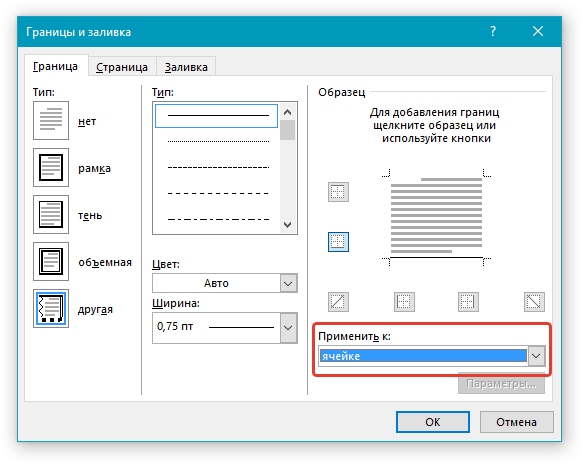
14. В разделе “Применить к” выберите параметр “Ячейка”. Нажмите “ОК” для закрытия окна.
15. Введите необходимый поясняющий текст в первой ячейке таблицы (ее границы, в том числе и нижняя линия, не будут отображаться).
Урок: Как изменить шрифт в Ворд
Примечание: Серая пунктирная граница, обрамляющая ячейки созданной вами таблицы, на печать не выводится. Чтобы скрыть ее или, наоборот, отобразить, если она скрыта, нажмите на кнопку “Границы”, расположенную в группе “Абзац” (вкладка “Главная”) и выберите параметр “Отобразить сетку”.
Вот, собственно, и все, теперь вы знаете обо всех возможных методах поставить подпись в документе Microsoft Word. Это может быть как рукописная подпись, так и строка для добавления подписи вручную на уже распечатанном документе. В обоих случаях подпись или место для подписи могут сопровождаться пояснительным текстом, о способах добавления которого мы вам тоже рассказали.
![]()
To insert a signature line into a Word document, click Insert > Signature, and fill out the «Signature Setup» box. You can also insert a digital signature, or use Insert > Pictures to insert signature from an image.
Adding your signature to a Microsoft Word document is the ultimate way to personalize it as your own, especially for documents like letters or contracts. If you want to add a signature to a Word document, here’s how.
There are several ways to add your signature to a Word document. You can add a signature line for a post-print signature, add a digital signature, or insert your own handwritten signature as a picture.
RELATED: How to Electronically Sign PDF Documents Without Printing and Scanning Them
How to Add a Signature Line in Word
A signature line provides you, or somebody else, with a location to sign a printed document. If you’re planning on printing your Word document, adding a signature line is probably the easiest way for you to add a signature.
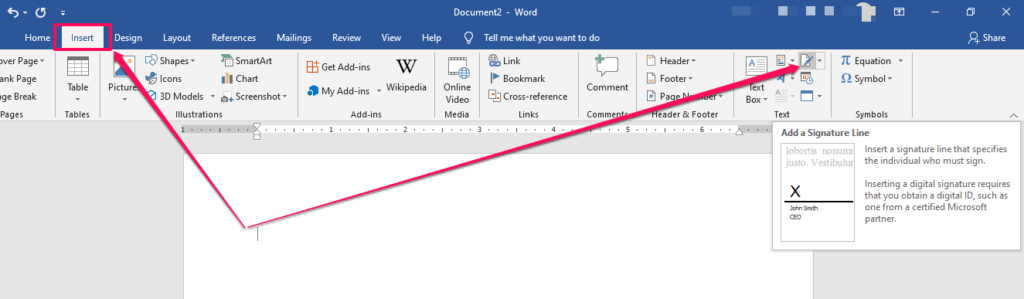
To add a signature line to your Word document, click Insert > Signature Line. This icon is usually included in the “Text” section of your Word ribbon menu bar.

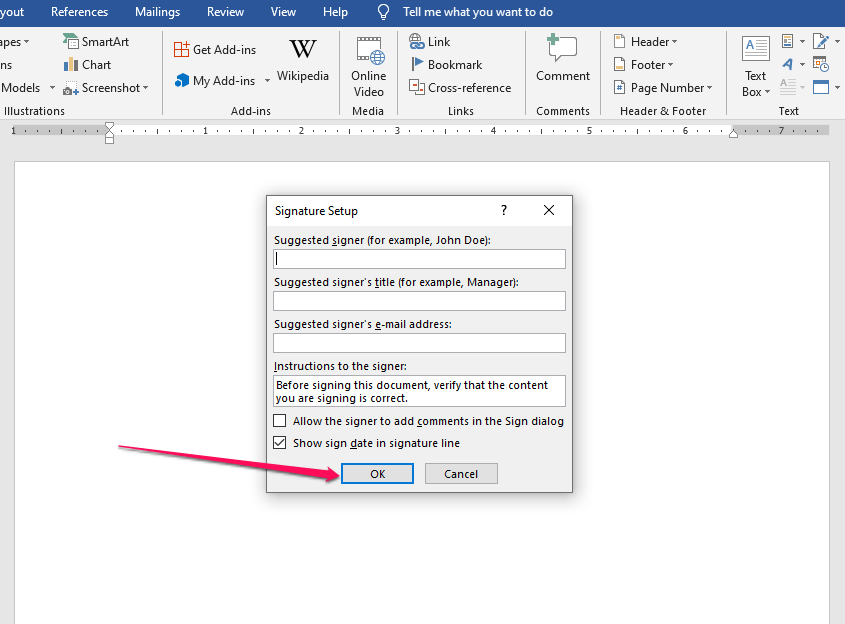
In the “Signature Setup” box that appears, fill out your signature details. You can include the name, title, and email address of the signer. This can be you or somebody else.
You can also provide instructions for the signer. Once you’re ready, click “OK” to insert your signature line.
Once you’ve confirmed your signature options, a signature line is inserted with a cross and a line to signify where to sign.
You can now place this into an appropriate position within your Word document. The document can then be signed at this position after printing or, if you’ve saved your Word document into the DOCX file format, you can insert a digital signature into your document at this point.
RELATED: What Is a .DOCX File, and How Is It Different from a .DOC File in Microsoft Word?
To add a digital signature to your Word document, you’ll need to have followed the above instructions and inserted a signature line first.
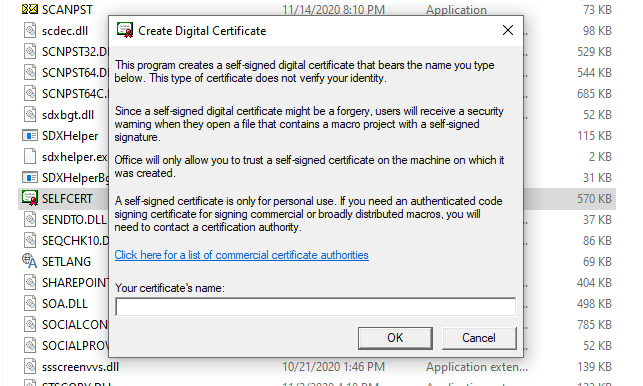
You’ll also need to install a security certificate for your signature. If you don’t have one, Word will ask you if you’d like to acquire one from a “Microsoft Partner” like GlobalSign.
As an alternative, you can create your own digital certificate using the “Selfcert” tool, included in your Microsoft Office installation folder.
Find “Selfcert.exe” in your Office installation folder and double-click it to open it.
In the Selfcert tool, type a name for your security certificate in the “Your Certificate Name” box and then click “OK” to create it.
Once you have a digital certificate installed, return to your Word document and double-click on your signature line.
In the “Sign” box that appears, type your name or click “Select Image” to insert a picture of your handwritten signature.
Click “Sign” to insert your digital signature into the Word document.
Once signed, Word will confirm that the signature has been added.
If you edit the document after signing it, the digital signature will become invalid, and you’ll need to sign it again.
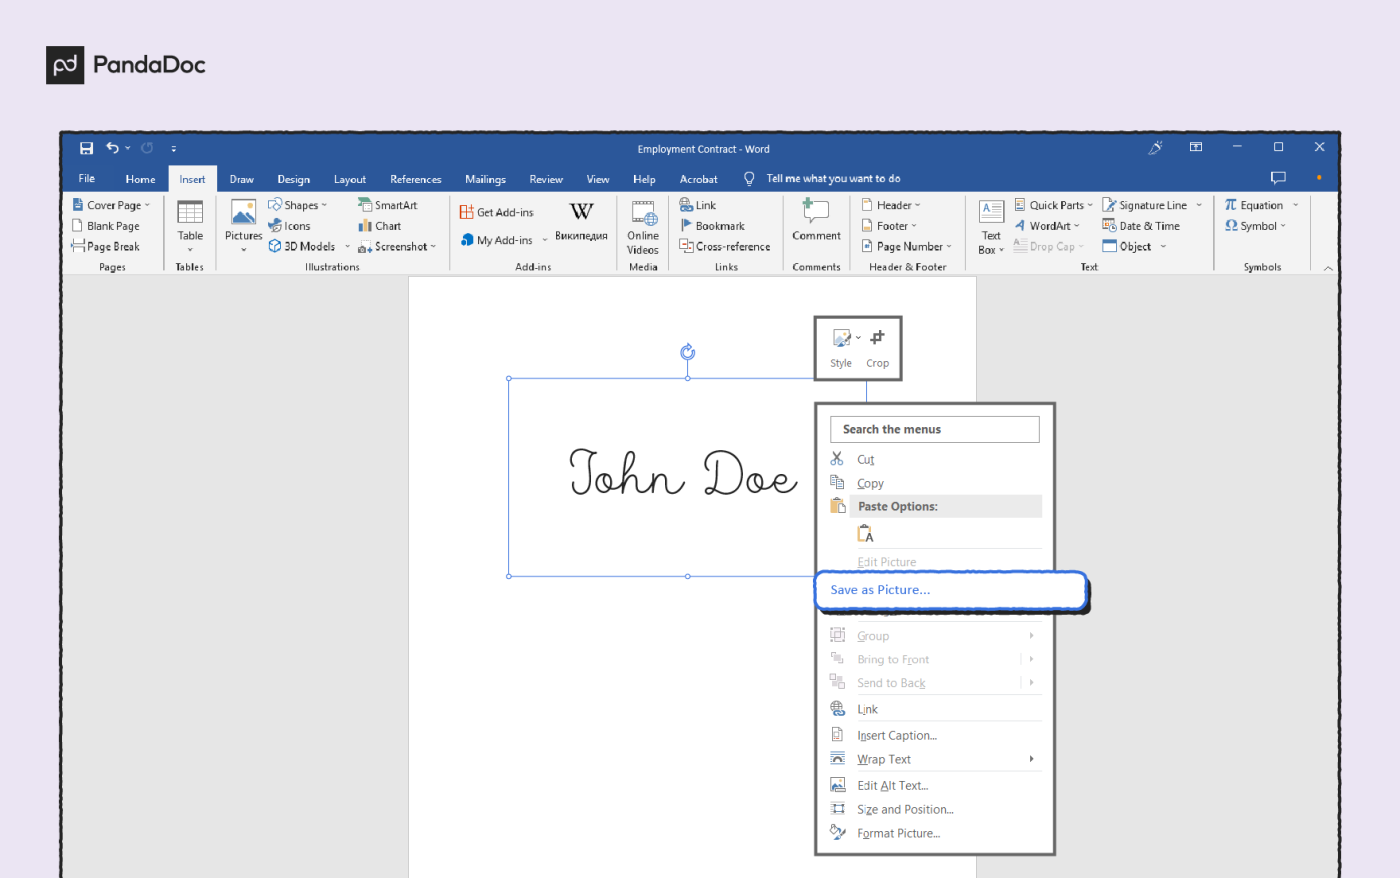
How to Add a Picture Signature in Word
If you’d prefer to use your handwritten signature, you can take a picture or scan a copy of it and then upload it to your computer. You can then insert a picture of your signature into the Word document.
RELATED: How to Insert a Picture or Other Object in Microsoft Office
Click Insert > Pictures to insert the image into your document manually. Alternatively, double-click on your signature line and choose “Select Image” to insert it on your signature line.
In the “Insert Pictures” menu box, click “From a File” and select your signature image file. From there, click “Sign” to place the image onto your signature line.
Once inserted, the image file containing your signature will be inserted above your signature line.
READ NEXT
- › How to Insert a Line in Microsoft Word
- › How to Insert and Customize a Signature Line in Microsoft Excel
- › 7 Awesome Microsoft Word Features You Should Be Using
- › How to Insert a Handwritten Signature in Google Docs
- › This New Google TV Streaming Device Costs Just $20
- › BLUETTI Slashed Hundreds off Its Best Power Stations for Easter Sale
- › How to Adjust and Change Discord Fonts
- › Google Chrome Is Getting Faster
- You can add a signature to a Microsoft Word document in several ways, depending on the computer you’re using.
- You can upload a physical signature using a scanner or a cell phone, add additional text like your job title, and then save it to be reused later.
Inserting your signature into a Microsoft Word document is a way to put your own stamp on it and make it look official and professional. It’s also much easier than signing documents individually if you need to send them out en masse.
You can also insert signature lines into your documents so they can be signed once they’re printed out.
While you can add signatures to Word documents on both Microsoft and Mac computers, the process is slightly different depending on which one you’re using. The methods listed below work for: Word for Microsoft 365, Word for Microsoft 365 for Mac, Word 2019, Word 2019 for Mac, Word 2016, Word 2013, and Word 2016 for Mac.
How to add a signature in Word on Windows computer
Insert a handwritten signature
1. Sign your name on a piece of paper the way you would any physical document. You may want to use a thicker writing instrument than usual.
2. Scan the page and save it as a JPG or PNG.
3. Open the image in your computer’s File Explorer.
4. To crop the image, click the crop tool at the top of your Image Explorer toolbar.
Melanie Weir/Insider
5. Once you’ve cropped the image to your liking, click Save a copy.
Melanie Weir/Insider
6. To add the signature to your document, go to the Insert tab in the Word toolbar, select Pictures, and choose a method to insert the file you just saved. Use the dots at any of the four corners of the image to resize it to your liking.
Melanie Weir/Insider
Insert text with a reusable signature
You can include information like your job title, email, phone number as part of your signature by saving that information as AutoText with the image.
1. Type the text that you want to appear every time you use this signature under the picture of your signature that you just inserted.
2. Use your cursor to highlight both the text and the image.
3. Go to the Insert tab in the toolbar and select Quick Parts. If you don’t see that label, the icon will be located in the Text section of the tab, near the WordArt tool.
Melanie Weir/Insider
4. Click Save Selection to Quick Part Gallery. This will open a window labeled Create New Building Block.
Melanie Weir/Insider
5. Where it says Name, type out a label for the signature block, so you can easily find it to use later.
6. In the Gallery box of the New Building Block window, choose AutoText, then click OK. This will save the signature and the text you selected along with it as a reusable signature.
Melanie Weir/Insider
7. Whenever you want to use this signature, first place the cursor where you want it to go.
8. Go to Insert > Quick Parts > AutoText and select the name of the signature you just created, and it will appear.
How to insert a signature line
1. In the document, click the spot where you want the line to appear
2. Go to the Insert tab and click Signature Line. If you don’t see this written out, it will be an icon in the Text section, near the WordArt tool.
Melanie Weir/Insider
4. Select Microsoft Office Signature Line from the dropdown menu. This will bring up the Signature Setup box.
Melanie Weir/Insider
5. If it’s appropriate, you can type a name in the Suggested signer box, or add a title in the Suggested signer’s title box. This is useful if you would otherwise need the signer to both print and sign their name.
Melanie Weir/Insider
6. When you’re finished, click OK, and the signature line will appear in the document.
How to add a signature in Word on a Mac computer
Insert a handwritten signature
1. Sign your name on a piece of paper the way you would any physical document.
2. Scan the page and save it as a JPG or PNG image.
3. In the Insert tab on the ribbon at the top of the screen, click Pictures.
4. Choose Picture from File from the dropdown menu that appears.
5. Find the picture you just uploaded, click it, then click Insert.
6. Once the picture appears in the document, click on it to bring up the Picture Format tab in the ribbon.
7. In that tab, click Crop, then crop the image to your liking.
8. Right-click the image and click Save as Picture to save it to Word as a file you can use again on other documents.
Insert text with a reusable signature
1. Type the text you want to see with your name in the line underneath the picture.
2. Using your cursor, highlight both the text and the image.
3. On the toolbar at the top of your screen, click Insert.
4. In the dropdown menu, click AutoText > New to open the Create New AutoText box.
5. Give a name to this signature block so you can find it again later, then click OK.
6. The next time you want to use this signature, first place your cursor in the spot where you want it.
7. Go to Insert > AutoText again, and choose AutoText when prompted.
8. Click the name you gave your signature block to insert it into your document.
Melanie Weir
Freelance author
Melanie Weir is a freelance author for Insider, mainly focusing on the Tech Reference section, but occasionally contributing to Lifestyle and Entertainment topics as well. She is also a freelance writer for ScreenRant, and is the Lead Weekend News Editor at TheThings.com. In her spare time she writes plays for both stage and screen. She can be reached at melanie.weir1008@gmail.com, or through LinkedIn.
Read more
Read less
Due to Microsoft Word’s popularity, it comes as no surprise that many businesses use it as an all-around solution to write proposals, quotes, contracts, and other sales docs.
They want to quickly and easily add their signatures in Word itself, without the hassle of printing, hand-signing, or scanning.
The good news is that Microsoft came through, and adding a signature to a Word document is indeed doable.
The better news is that there are also many features in Word that make your life easier — like the option to automatically include more text beneath your signature (for example, your printed name and address).
In this article we will guide you:
- How to add a digital signature in Word
- How to add an electronic signature to Word documents
- How to add a signature line to a Word document
- and more insights on how to automate your document process.
How to add a digital signature in Word
Adding a digital signature in Word is quite simple. To do so, you just need to follow these six steps:
1. Move your cursor to the area you want to sign inside the Word document.
2. Select the Insert tab.

3. Select the Text group and open the Signature Line list.

4. Click Microsoft Office Signature Line and the Signature Setup dialogue box should appear.
5. Input the appropriate data — signer’s name, title, email address, and any further instructions — and tick the boxes if required (if you are signing these will be your details). Click OK.

6. Right-click the signature generator field and type your name or upload an image of your signature.

Make sure though, that in order to use this, you need to first obtain a digital certificate and create a digital signature, since an electronic signature and a digital one aren’t the same thing.
Digital signatures are highly-secure, encrypted digital marks that require special software and a digital certificate from both the sender and the recipient. You have to purchase a certificate from the issuing authority.
An electronic signature, on the other hand, is simply a virtual mark added to a document — most commonly in the form of a signature image or hand-typed text.
Depending on the software with which the document is signed, electronic signatures can come with extra security features, such as certificates that include timestamps and the date of the signature.
Electronic signatures work very much like a hand-drawn signature, so in that regard they are also legally binding in many parts of the world (such as the USA, the UK, Canada, Ireland, among many other countries). Those that don’t accept them include North Korea, Nepal, Afghanistan, Fiji, etc.
Upload your Word document and sign with PandaDoc
You’ll be happy to know that we have a special place in our hearts for Microsoft Word at PandaDoc. Yes, really! You can now upload and sign Word documents with PandaDoc:
- We make security our top priority, and PandaDoc is fully HIPAA, ESIGN, and UETA compliant.
- With us, you always have insights and a bird’s eye view of what goes on where.
- Businesses saved 12 hours/week, saw a 28% increase in closing rates, and a 65% time decrease in document creation — all with the help of PandaDoc’s eSignature tool.
How to add an electronic signature to Word documents
Most people still want to add electronic signatures (as opposed to digital signatures) to their documents because of its security and accessibility. Once you’re set up, it only takes a few clicks.
Follow the steps below to create a signature image and add an electronic signature to your Microsoft Word documents:
1. Handwrite your signature in the middle of a blank piece of white paper.
2. Scan the signature and save it on your computer in one of the following file formats: .bmp, .gif, .png, .jpg.

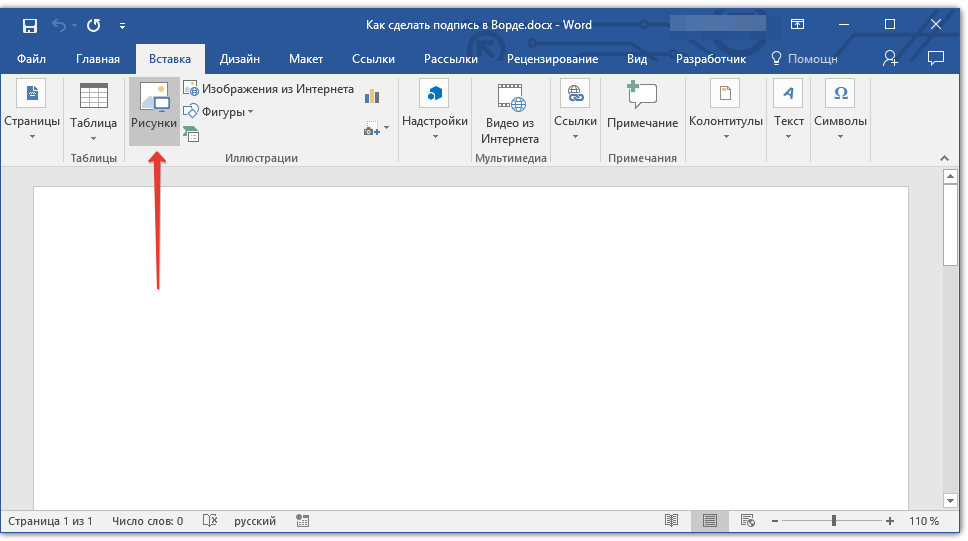
3. Open the image file in Microsoft Word by clicking the Insert tab and selecting Pictures.

4. Click on the image and edit it using the Picture Tools Format tab.

5. When you have finished editing the image, right-click the image and select Save as Picture.
6. Whenever you want to add an electronic signature, select Insert and Pictures and locate the edited image file, and then drag-and-drop it to the appropriate place in the document.
How to add a signature line to a Word document
There’s a very real possibility that your prospects might return a document empty-handed (without a signature) if they don’t see a signature line. In other words, it goes without saying that no signature is complete without a signature line.
To add a signature line to a document, follow these steps:
- Left-click the place in the document where you want the signature line to go.
- Select Signature Line from the Insert drop-down. A dialogue box should appear.
- Select the required options and click OK.
For the most part, you can use the above steps to insert a signature in Word using a Mac or PC. There may be a few slight changes in functionality here and there depending on the kind of device you use.
Why shifting to a dedicated solution is a good move

While the functionality provided by Word is solid, it doesn’t offer as many options as other tools, especially when you consider beating up the competition.
Third-party apps like PandaDoc and some of the other well-known softwares provide a host of features that can make your life easier when it comes to sending or receiving documents.
Compatible across devices
Microsoft Word has different signature creator functionality across different devices and device platforms (like Apple and Android).
Using an app that allows you to use the same piece of software with the same features across all your devices is a solid reason to consider third-party apps.
Adds an extra layer of security
Apps explicitly designed to sign documents have an added layer of protection, like the instant creation of a certificate whenever a document is signed, which also includes an added benefit of featuring the timestamp and the date of when the signature was completed.
Transferable to other formats
If you want to send a signed document as a PDF, as opposed to Microsoft Word, then you can download and send it in your format of choice. (Not trying to dunk on anyone here, but can Word do that?)
How to add a signature in Word with the PandaDoc Add-In
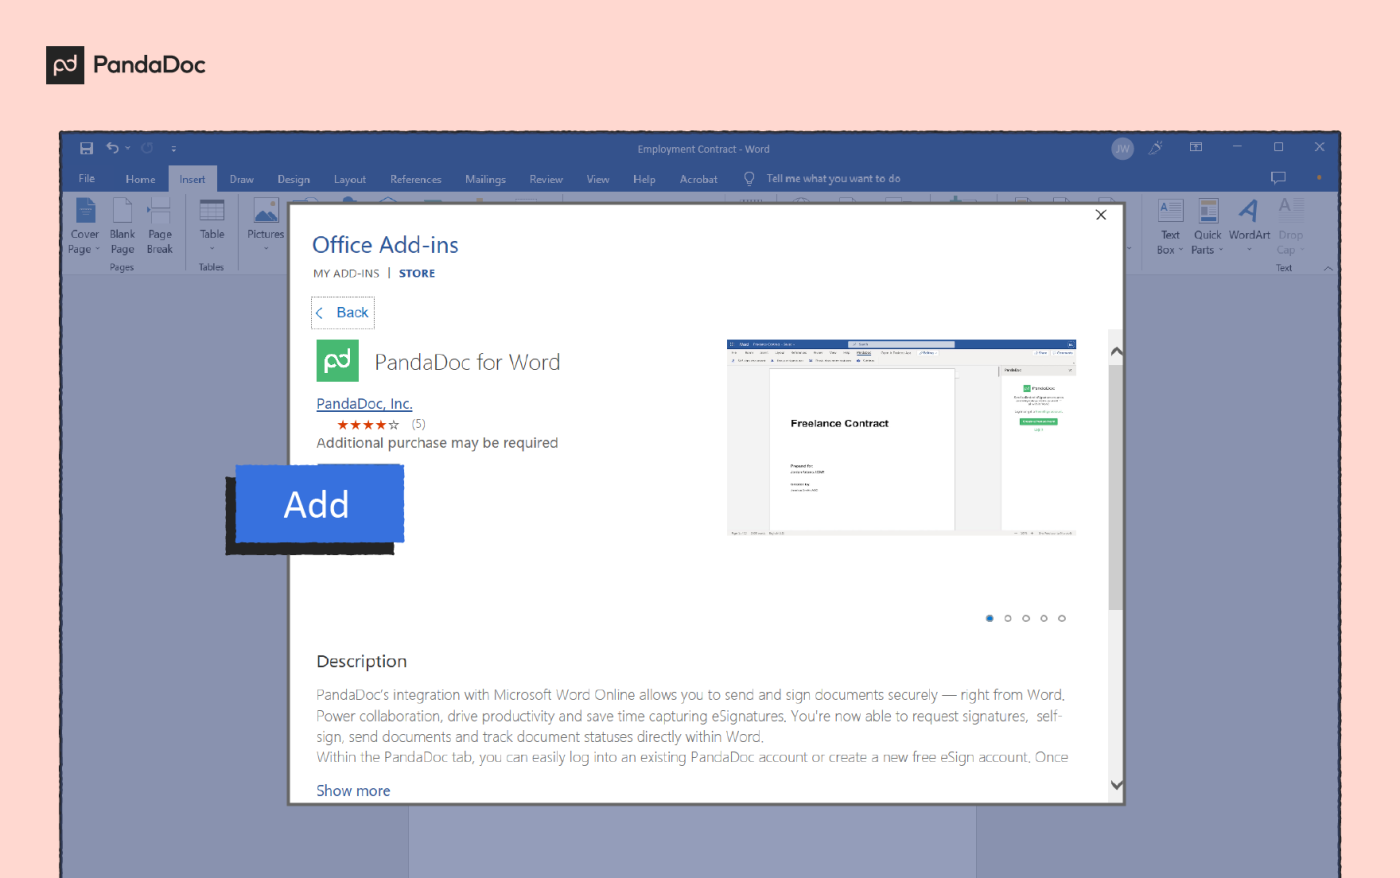
PandaDoc has integrated with Word and is available in the Microsoft Store, making eSign easier than ever before! With this integration, you are now able to securely send and sign documents directly from Word.
To use the PandaDoc integration, follow these steps:
1. Install the add-in from Microsoft Marketplace or open any document, click Insert>Add-ins, find PandaDoc, and click Install.
2. Click on any action beneath the PandaDoc tab. A panel will open to the right to either log into your account or create a new Free eSign account. Follow the instructions.
3. Once logged in, select the required action (self-sign document, request signatures, or check document status).
4. Add your signature or send this document for a signature request to other recipients.

5. When the document is signed by all parties, download a legally binding document right from Word that includes a signature certificate confirming the signature’s authenticity.
Step-by-step directions for using PandaDoc with Word Online can be found here.
How to add a signature to a Word document with the PandaDoc application
Here’s how to add an electronic signature to a Microsoft Word document using PandaDoc electronic signature software:
1. Log into PandaDoc and select the “New Document” button.

2. Click the “Upload” tab and either drag-and-drop the Word file or click “Select Files.”

3. Select the “Display As Is” button. The document will convert into a native PandaDoc document if you select “Yes, convert” or appear as a non-editable document if you select “No, thanks.”

4. Click the Signature tab in the right-hand menu to drag and drop a signature field into the document.
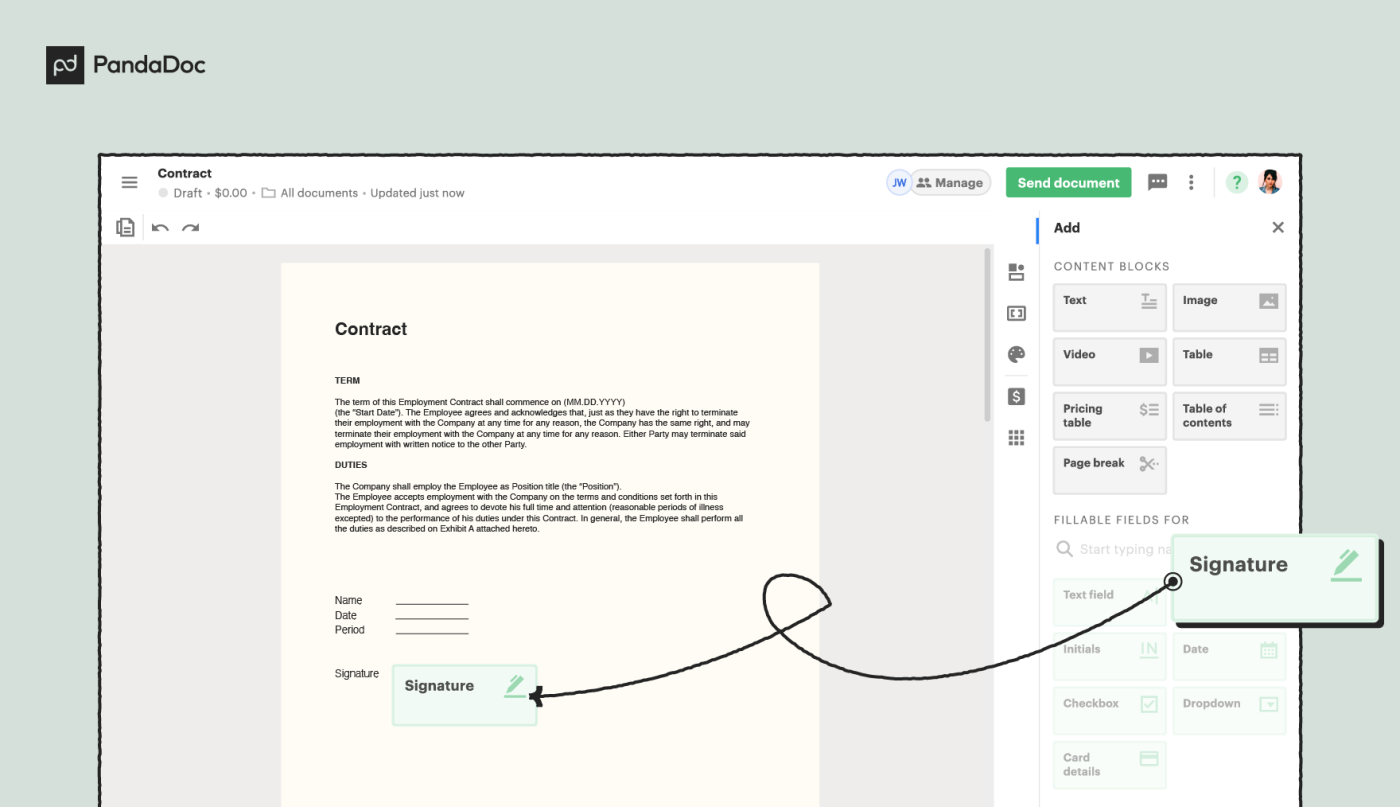
5. Select the signature box and assign yourself as a recipient or add a new contact.
6. Make the signature by double-clicking on the box. You can upload an image, draw the signature, or enter it manually.

7. Finish the document and download the file in your preferred format.

In sum
Electronic signatures have changed the way that companies and individuals do business.
The big question is whether or not the built-in tools available with Word are sufficient for your needs.
If all you want to do is add simple images to the end of documents, or provide basic digital signature functionality, then these tools will likely work for you.
But if you need a more comprehensive set of features, then a “smart” signature app may be the way to go.
Not to toot our own horn, but tools like PandaDoc allow you to track and store signatures, while also providing an added layer of security and integrating with your existing tech stack.
That’s just one part of it — the insights you get will help you take your business to a new level.
Are you ready to take PandDoc for a spin?
How to Insert Signature Line in Word
If you are old school and would like to print out the document, with a line for the recipient to know where to sign, rather than to place an electronic signature in word, follow the steps below to create a signature line:
-
Have the Word doc opened, of course.
-
Click Insert > Signature Line > Microsoft Office Signature Line.
-
On the pop-up, type in the signer’s name and title, so they know where to sign.
How to Insert Signature in Word — via PDF
You should never share a document to be signed in Word, as the content of your document could be easily altered and tampered with. This is not only detrimental to the security of you, as the user, but also the signee.
The best way to sign digital documents is actually to sign a PDF file. There are many tools to electronically sign PDF documents, and ensure that your content is secured; from being copied, analyzed and altered.
Smallpdf has a method to create or import your own signature via our online platform and signs your document! Here are the instructions:
-
Save your Word file as a PDF by clicking ‘Save As’ (you can always change the file back to Word) or use the free Word to PDF converter on our site.
-
Access our eSign tool. If you had used the Smallpdf Word to PDF tool, you can simply hit ‘to eSign’ on the result page.
-
Click ‘Place Signature’ to either create your own signature or import your scanned signature via the ‘Upload’ option.
-
Click ‘Place Signature’ again afterward and drag the signature onto where it needs to be signed. You can also change the color and size of the signature, as you wish.
-
If you are requesting a signature, click ‘Ask Others to Sign’ to send the file to them. Otherwise, click ‘Apply’ to insert signature to Word (in PDF format).
-
Download your file.
Do you want to add a signature to a contract, a lease agreement, or any other document in MS Word but aren’t sure how to do it?
In this article, I have all the answers for you.
Like most of its other features, MS Word makes adding a signature to any document pretty simple. You don’t even need to manually add a signature line to your documents.
In just a few clicks, Word will add a professional predesigned signature section to your document that is acceptable worldwide.
Let me show you how.
3 Ways To Add A Signature To A Word Doc
We’re living in the digital age where most contracts, agreements, and signed documents change hands over the internet.
This is why businesses use multiple types of signatures in their legal documents depending on the nature of the transaction.
With MS Word you can sign your documents using three different methods.
- Electronic Signatures
- Digital Signatures
- Add A Signature Lines
These are authentic and secure signature types that are not only accepted as your legal signatures but are also good for the environment since they minimize the need for using printed documents.
Let me describe each method in more detail and how you can use it for signing documents in Microsoft Word.
Method#1: Adding An Electronic Signature To MS Word
Adding an electronic signature to your Word document gives it a personal touch and makes it authentic at the same time.
It is also the most common method for singing documents in MS Word and doesn’t take much time once you set it up on your computer.
But what exactly is an electronic signature?
What Is An Electronic Signature?
An electronic signature is an image file of your handwritten signatures that you can add to any document you want.
It is different from digital signatures that I’ll cover later in this article.
To create an electronic signature, you’ll need to physically sign a document and use a scanner to convert it into an image file that can be used in different documents.
Once you have a scanned version of your signatures, you can use it as many times as you want.
Using electronic signatures is a popular practice because of its ease of use and flexibility.
Here’s how you can add an electronic signature to your documents in MS Word.
How To Add An Electronic Signature To A Word Doc
You can add an electronic signature to any Word document by following the steps below.
Step#1: Take a clean piece of white paper and handwrite your signatures with a black pointer or pen. Before signing the paper sheet, I recommend practicing your signature on a separate piece of paper a few times to avoid any mistakes. Using black ink is preferable because of better visibility after scanning.
Step#2: Scan your signature using a scanner machine or mobile phone with a good camera and a scanner app. Scan the document at 600dpi and then save the image in the .PNG format. You’ll need to crop the scanned image to only focus on your signatures.
Step#3 (optional): Open the scanned signature in Adobe Photoshop and copy it using the Magic Wand feature. Now create a new file in Photoshop with a transparent background and paste the signatures to it. This is an optional step but it’s useful because it’ll allow you to use your signatures on documents with colored backgrounds as well.
Step#4: Open MS Word and insert the scanned signature int oy our document by click on Insert–>Pictures–>This Device
Step#5: If you haven’t already cropped the image, you can do it in Word as well by clicking on it and using the Crop feature. You can also modify the size and dimensions of the image from this section.
Step#6: You can now simply drag the image with your mouse to the signature section of the document.
Step#7: If you want to add additional information below your signature like your name, designation, etc. type the text you want to show under the signature image. Then select both the image and the text content, and click on Insert–>Quick Parts (in the Text section)–>Auto Text–>Save Selection to Auto Text Gallery.
Step#8: In the Auto text pop up, add your name to the Name field, select Auto Text in the Gallery Field, and click Ok.
Step#9: Now whenever you want to add your electronic signatures to a Word document, take your pointer to the right place and click on Insert→ Quick Parts→ Auto Text and choose the name with which you saved your signatures.
That’s it, you can now add your electronic signatures to any Word document you want.
Method#2: Adding A Digital Signature To Word Doc
Another popular way to securely sign your documents in MS Word is to use a digital signature. It’s an encrypted signature method that allows the secure transfer of documents that can only be accessed by authorized persons.
They are based on a unique ID which means there’s no chance of any impersonation or identity theft.
What Is A Digital Signature?
Digital signatures are highly secure encrypted digital IDs that require a valid digital certificate from both the sender and the receiver of the signed document.
Every digital signature has a private key that can only be validated with a public key that comes with a valid digital certificate. When you have a valid digital certificate, you can use it as an authentication method for digital information (including Word documents)
What Is The Difference Between A Digital And An Electronic Signature?
An electronic signature, as I’ve already mentioned, is simply a scanned image of your real-world signatures. Most people mistakenly refer to it as a digital signature.
A digital signature is a technical term used for encrypted signatures backed by a valid digital certificate issued by a reliable third-party certification authority. They’re used to secure Word documents, provide authentication, and protect them from any unauthorized changes.
How To Create A Digital Certificate For Free
You can only get a valid digital certificate from a trusted third-party certification authority (CA). Many independent certificate authorities offer limited time (usually one year) digital certificates for a fee. But you can also get digital certificates from trusted third-party entities for free.
To get a free digital certificate to sign your documents in MS Word, follow these steps (for Windows 10).
- Go to C:Program Files (x86)Microsoft Officeroot (or C:Program FilesMicrosoft OfficerootOffice16 if you’re running the 64-bit version of Office)
- Run the application file SelfCert.exe to open the Create Digital Certificate box.
- Give your certificate a descriptive name and click OK.
That’s it, you have a valid digital certificate that you can use to digitally sign documents in MS Word. However, this is not verified by a trusted third-party and therefore some organizations might not accept it as a valid certificate.
You can view your certificate in Chrome→ Settings→ Privacy and Security→ Security→ Manage Certificates→ Personal
Let’s now see how you can add a digital signature to Word documents.
How To Add A Digital Signature To A Word Doc
Follow these steps to add a secure digital signature to your documents.
Step#1: Open MS Word and place your cursor where you want to add the digital signature.
Step#2: Click on Insert→ Text→ Signature Line to open the Signature Setup box.
Step#3: Enter the relevant details of the signer in this box (name, designation, email). You can add an instruction note for the signer (or use the default note) along with a comments section, and the signing date.
Step#4: Click OK to add a digital signature box to your document.
Step#5: To sign this document, double-click the signature box or right-click and select Sign.
Step#6: You can digitally sign a Word document either by typing your name or by uploading an image of your handwritten signatures. Both options are backed by your digital certificate.
Step#7: You’ll need to save the document before signing it.
Step#8: This will add a digital signature to your document using the certificate you created earlier. The signatures will remain valid as long as no other changes are made to the document.
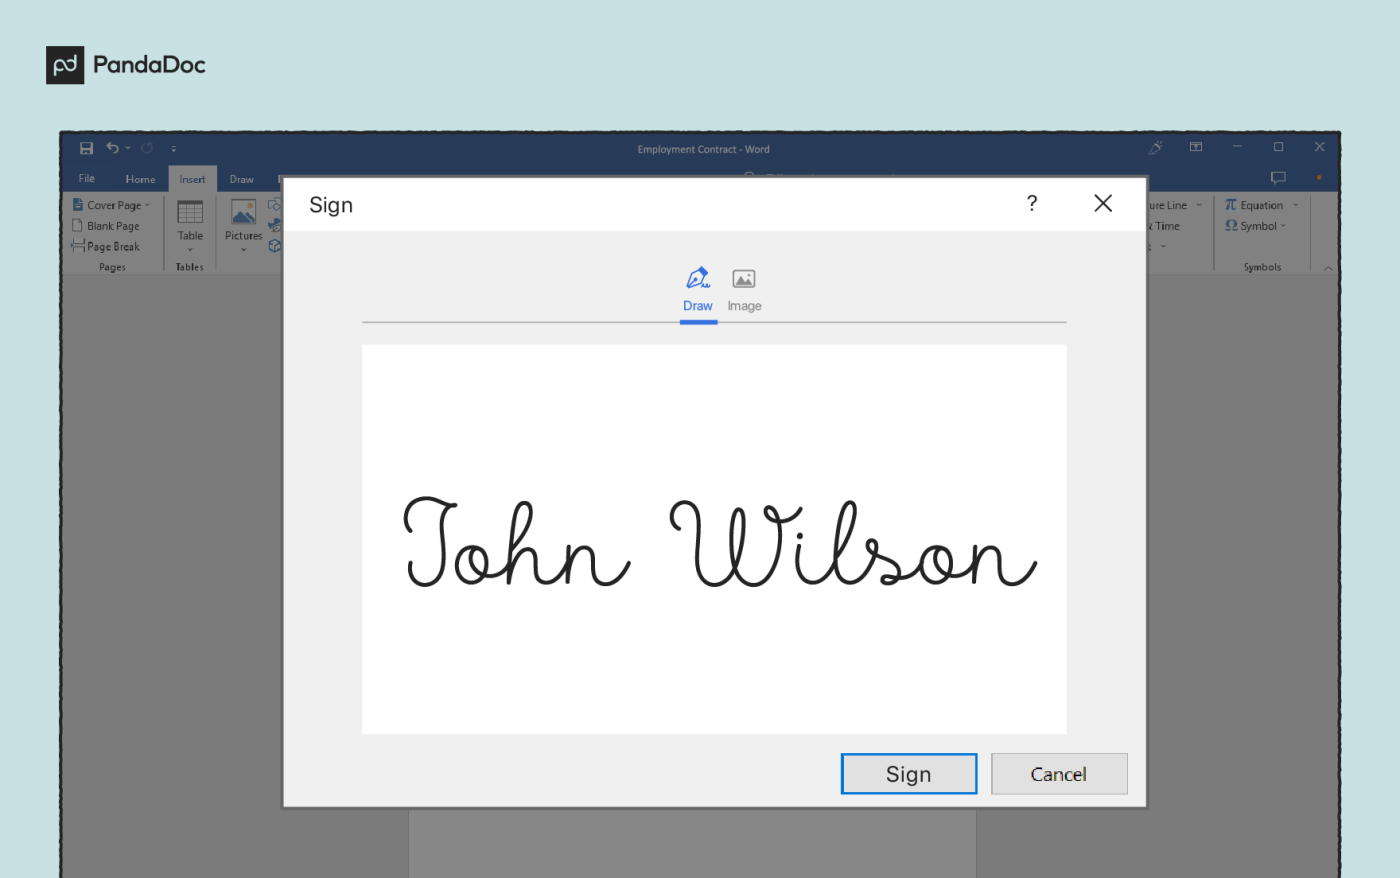
How to Draw Your Signature
If you have a touch-enabled device, you can draw your signature using your finger, a pen, or a regular mouse.
Here’s how it works.
Step#1: Switch to Print Layout in Word from the View section.
Step#2: Click on Draw and choose your pen type.
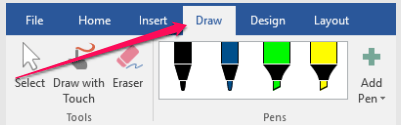
Step#3:Use your pen, finger, or mouse to draw your signature in the appropriate section of the document.
Method#3: Adding A Signature Line To A Word Doc
Sometimes you need to get your documents signed the old fashioned way. You can simply present a document to the signer and ask them to sign wherever they want.
Or you can be a bit more professional and add a signature line to your document so that the signer knows where to sign even if you’re not personally there to guide them.
Unlike the previous two methods, you don’t need a digital certificate or a scanned copy of your signatures for this method to work.
How To Add A Signature Line To A Word Doc
To add a signature line to your Word documents, follow these steps.
Step#1: Take your cursor to the section of the document where you want to add a signature line
Step#2: Click on Insert→ Add A Signature Line to open the Signature Settings box.
Step#3: If you want the signer’s name and designation below the signature line, fill this information in the Signature Settings box. Otherwise, leave it black to display a plain signature line.

You can now print the document and send it to the relevant person for their signatures.
Why It’s Important to Save Your Word Doc as a PDF
No matter what signature method you’re using, make sure you save your Word documents as PDF files once they’re ready to be sent to the signer.
This is important because PDF is a secure document format that does not allow users to make any changes to it. When you send a legal document or a contract that needs to be signed as a PDF file, you can rest assured that no one can edit its content.
Saving a Word document as PDF is really easy in Microsoft Word.
Simply click on File→ Save As and choose .PDF from the file type dropdown.

Keep the original Word document separately so that you can make changes to it in case there’s a need. If that happens, you’ll need to save the Word document in PDF format again before sending it to the relevant person.
How to Change Your Signature in Word
The process for changing your signature in MS Word depends on the type of signature you’re using.
Electronic Signature: If you’re using a scanned image of your handwritten signature for electronically signing documents in MS Word, you’ll need to upload an image file with your new signatures using the same process I described earlier in the Electronic Signature section of this article.
Digital Signature: If you’re using a digital signature, you’ll need to create a new digital certificate using the same process I described in the Digital Signature section. Once you have the new certificate, you’ll need to create a new signature in Word from Insert→ Text→ Add A Signature section.
Signature Line: If there’s a change in the signer’s name or designation, you can change it from the Add a Signature section. Otherwise, leave the signature line untouched.
Are You Ready To Add Your Signature To Word Documents?
As you can see, adding a signature to MS Word documents is quite simple. However, it gives authenticity to your documents, makes them more secure, and adds a professional touch as well. Let me know if you have any questions about the different signature methods I’ve described in this article.