
Word for Microsoft 365 Word for Microsoft 365 for Mac Word for the web Word 2021 Word 2021 for Mac Word 2019 Word 2019 for Mac Word 2016 Word 2016 for Mac Word 2013 Word 2010 Word 2007 Word Starter 2010 More…Less
Use sections breaks to divide and format documents of all sizes. For example, you can break down sections into chapters, and add formatting such as columns, headers and footers, page borders, to each.
Add a section break
-
Select where you want a new section to begin.
-
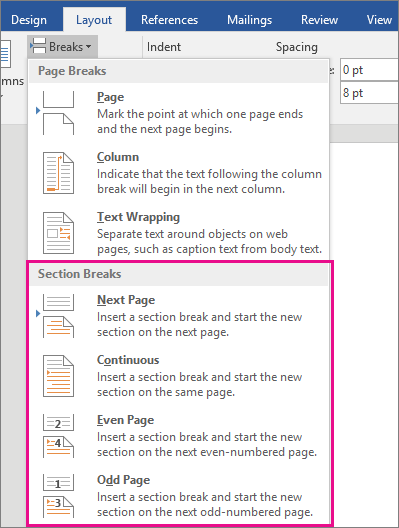
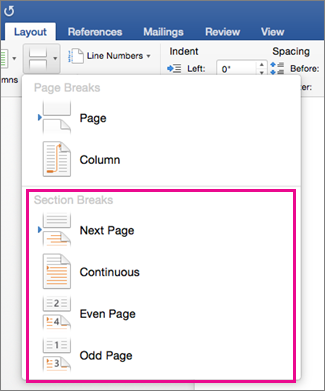
Go to Layout > Breaks.

-
Choose the type of section break you want:
-
Next Page Section break starts the new section on the following page.
-
Continuous Section break starts the new section on the same page. This type of section break is often used to change the number of columns without starting a new page.
-
Even Page Section break starts a new section on the next even-numbered page.
-
Odd Page Section break starts a new section on the next odd-numbered page.
-


Important:
Office 2010 is no longer supported. Upgrade to Microsoft 365 to work anywhere from any device and continue to receive support.
Upgrade now
Insert a section break
-
Select where you want a new section to begin.
-
Go to Page Layout > Breaks.
-
Section break that you want to add:
-
A Next Page section break starts the new section on the next page
-
A Continuous section break starts the new section on the same page.
Tip: You can use Continuous section breaks to create pages with different number of columns.
-
An Even Page or an Odd Page section break starts the new section on the next even-numbered or odd-numbered page.
-

Insert a section break
-
Select where you want a new section to begin.
-
Go to Layout > Breaks, and then choose the type of section break you want.
-
Next Page Starts the new section on the following page.
-
Continuous Starts the new section on the same page. This section break is particularly useful for documents that have columns. You can use it to change the number of columns without starting a new page.
-
Even Page Starts the new section on the next even-numbered page. For example, if you insert an Even Page Break at the end of page 3, the next section will start on page 4.
-
Odd Page Starts the new section on the next odd-numbered page. For example, if you insert an Odd Page Section Break at the end of page 3, the next section will start on page 5.
-
You can add page breaks, but Word for the web can’t add section breaks yet.
If you have the Word desktop application, use the Open in Word command to open the document and add section breaks there. When you’re done and you save the document, it will continue to be stored where you opened it in Word for the web.
See also
Use section breaks to change the layout or formatting in a section of your document
Insert a page break
Need more help?
When you’re working on a long document, separating it into different parts makes it much easier to navigate. Microsoft Word eases your workflow by letting you insert document breaks, namely section and page breaks.


As you’ll see in this article by defining section and page breaks you can apply specific formatting elements in different parts of your document. You’ll also have better control over pagination.
Read on to learn how to use section and page breaks in Word to make your document more visually appealing and easier for readers to make their way around. Finally, we’ll show you some great sources for professionally designed Word templates.
How to Add Breaks in MS Word (Quick Start Video)
Are you ready to learn how how to insert breaks in MS Word? The short video below will give you a head start on inserting, viewing, and deleting MS Word section and page breaks:
To learn even more about breaks in Word (including the difference betwen section breaks and page breaks), study the written tutorial below.
Understanding Section and Page Breaks
Section and page breaks are types of breaks or partitions in a Word document. In this section, you’ll learn some basics:
1. Microsoft Word Section Break vs Page Break
A page break is a partition in the text of the document. At a page break, the succeeding text is automatically placed on top of a new page.


But, with a section break for Word the text is partitioned — along with the formatting associated with it:
- page numbers
- margins
- headers and footers
- paper size and/or orientation
Also, a Microsoft Word section break may or may not begin on a new page (more on that below).
2. Why Use Microsoft Section and Page Breaks?
Section and page breaks are useful for partitioning different parts of a document, especially a long one.
In a book, you’d use section breaks to divide it into chapters as well as delineate the front matter from the back matter. The title page, copyright page, table of contents, individual chapters, index, etc., would be separate sections.
For example, you usually want a new chapter of a book (or similar) document to begin on a new page. This is when a page break is most useful.
A section break for MS Word is useful for visually distinguishing parts of a document. An example of where you might use a section break is in a proposal where you want the summary to have a different layout. In this case, the summary section could have its own header, footer, and margins that are different from the rest of the document.
By using section breaks, each chapter can have a different running header, including the chapter title.


Microsoft Word Section breaks also let you use lower case numbers for page numbers on the introduction of the book and Arabic numerals on the rest of the pages.
Similarly, a section break in Microsoft Word lets you use a two-column format in the index section and a single column everywhere else.
You’ll also want to use section and page breaks when you want to control the pagination of your document. For example, the first page of your document may be a cover page. But you don’t want the cover page to be page 1 of your document. By inserting a section break after the cover page, you can make the next page be page 1.
You accomplish these results by inserting different types of section and page breaks in Word.
3. Types of Microsoft Word Section Breaks
There are four types of section breaks in MS Word:
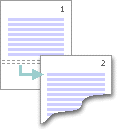
- Next Page. This type of section break forces the text to the right of the cursor to a new section on the following page. All the formatting associated with the text is carried through to the new section as well.
- Continuous. A continuous section break creates a new section but keeps the text on the same page. This means two different sections can have their own formatting yet remain on the same page.
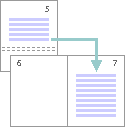
- Odd Page. This kind of section break moves the text to the right of the cursor to the top of the next odd-numbered page. If you’re on page 3, for example, and you insert an Odd Page Section Break, the next section will start on top of page 5 (page 4 will be blank). Book chapters usually begin on the next odd page of the book.
- Even Page. An Even Page section break moves the text to the right of the cursor to the top of the next even-numbered page. So, if you’re on page 6 and you insert an Even Page Section Break, the new section will begin on page 8 (leaving page 7 blank).
4. Types of Page Breaks
As for Microsoft Word page breaks, there are two kinds:


- Simple Page Breaks. A simple page break moves text to the right of the cursor to the top of the next page.
- Column Breaks. If your document is broken up into columns, a column break moves text to the right of the cursor to the top of the next column.
How to View Existing Breaks in an MS Word Doc
By default, section and page breaks are invisible in Word. You can only see their effects. You’ll see changes in formatting and pagination for each section. That’s because these breaks don’t appear when the document is printed.
As you’re editing and formatting your document, you may need to see page and section breaks. To view existing page and section breaks in Word, on the Home tab, then click on the Paragraph button.


How to Insert Section Breaks in Your Word Docs
To insert a page or section break, place the cursor where you want one section/page to end and the next section/page to begin.
Go to Insert > Break, then choose the specific type of page break or section break you want to insert.


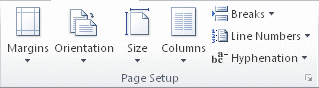
Or, click on the Layout tab. Then click on the Breaks button on the ribbon and select the type of page or section break you wish to insert.


How to Remove/Delete Section and Page Breaks in Word
To remove a section or page break in Word, first display all the breaks.
Select the section or page break you want to remove by highlighting it. Click on either the Delete or Backspace key on your keyboard.


When you delete a section break, the text in the section adopts the formatting of the next section.
Tips for Using Section and Page Breaks in MS Word
Are you just getting comfortable with using Microsoft Word section and page breaks? Here are some extra tips to help you use them effectively:
1. Keep Your Section Breaks to a Minimum
Insert a section break in Word only when you have to (see above for when it’s a good idea to do so). Having more sections than necessary makes it more difficult to make global changes to your document, because you’d have to manually make those changes in each section.
2. Pay Attention to Which Section You’re In
If you’ve divided your document into sections, always be aware of what section you’re in when you make formatting changes. That’s because these changes will apply only to the section you’re currently in — that’s the section where your cursor is. If you want to make a formatting change to apply to the whole document, select the entire document first before making your changes.
3. Microsoft Word May Change a Continuous Section Break to the Other Section Break Types
You may be surprised that your continuous section break has been converted into a different type of section break. This happens when you’ve got a continuous section break. Then, in the next section, you try to apply a different header/footer, pagination, margins, or page size and orientation. Those formatting changes require a page break. And so, Word will automatically change the section break type to one that results in a page break.
Streamline Your Microsoft Word Workflow With Templates


There are other ways to streamline your MS Word workflow. One of them is using premium Word templates, like the ones you’ll find at Envato. Premium templates for Microsoft Word are created by professional designers to provide impressive layouts. These templates are customizable with your content, images, and branding. You can also adjust the design and layout as you please.
Envato Elements gives you unlimited downloads of Word templates as well as other inputs you need to complete your projects — fonts, graphics, stock photos, and more — all for one flat monthly subscription fee.


Or, go to GraphicRiver for Microsoft Word templates and other creative elements on a pay-per-use basis. It’s a terrific source for one-off projects.
Make Your Document Easier to Read and Navigate
Now you know how to use section and page breaks in Microsoft Word to better organize your document. Section breaks also let you have more granular control over the formatting of specific parts of your document. These make your document look better as well as easier to read and navigate through.
Use the steps you learned in this article to properly use section and page breaks. Also, use Word templates to make it much easier and faster to create impressive documents. Envato Elements provides unlimited downloads of templates for Word for one monthly subscription. For occasional projects, GraphicRiver is an excellent source of Word templates where you pay for each use.
Editorial Note: This tutorial has been updated to add a video by Andrew Childress.
On the View tab, click Arrange, and then click Split. If the window is wide enough, Word displays Split directly on the View tab. To adjust the relative sizes of the panes, move the mouse pointer to the dividing line, and when you see the split pointer, click and drag the dividing line to a new position.
Contents
- 1 How do I divide a page into sections?
- 2 How do I split a page in Word 2020?
- 3 How do I divide my Word document into 4 sections?
- 4 How do I split a Word document into 3 sections?
- 5 How do I make 2 pages into 1 page in Word?
- 6 How do I make 4 page invites in Word?
- 7 How do I split a Word document into 8 sections?
- 8 How do I make 4 columns in Word?
- 9 What are the 4 types of section breaks?
- 10 How do I split a Word document into two?
- 11 Is there a fit to page option in Word?
- 12 How do I fit to one page in Word?
- 13 How do I make 1/4 size in Word?
- 14 How do you Print quarter page flyers?
- 15 How do I Print 4 flyers on one page PDF?
- 16 How do I split a page into 6 sections in Word?
- 17 How do I fix columns in Word?
- 18 How do I type in different columns in Word?
- 19 How do I edit sections in Word?
- 20 What’s a section break on word?
How do I divide a page into sections?
Insert a section break
- Select where you want a new section to begin.
- Go to Page Layout > Breaks.
- Section break that you want to add: A Next Page section break starts the new section on the next page. A Continuous section break starts the new section on the same page.
How do I split a page in Word 2020?
Go to Layout > Breaks > Page.
- Click or tap in the document where you want a page break.
- Go to Insert > Page Break.
How do I divide my Word document into 4 sections?
To split a page to 4 parts, you can insert a table to deal with the job.
- Place the cursor at left-top of the page, then click Insert > Table, select 2×2 Table.
- The table has been inserted, then drag right-corner of the table to resize it as you need.
- Insert texts into the columns and rows separately.
How do I split a Word document into 3 sections?
Follow the steps outlined in this tutorial.
- Highlight the text you wish to split into columns.
- Select the “Page Layout” tab.
- Choose “Columns” then select the type of columns you wish to apply. One. Two. Three. Left. Right.
How do I make 2 pages into 1 page in Word?
Click the “1 Page Per Sheet” button to open a drop-down menu with more options. Click “2 Pages Per Sheet.”
How do I make 4 page invites in Word?
the following may answer your question: if you have a Word document with more than 4 pages, click File > Print and then in the lower right corner of the print dialog, under “Zoom,” select 4 pages per sheet.
How do I split a Word document into 8 sections?
Divide a Document into Sections
- Place the insertion point where you want the section break.
- Choose the Page Layout tab.
- Click the down-arrow next to the Breaks button. A menu appears.
- Click the type of section break you want. Word inserts the section break.
How do I make 4 columns in Word?
On the Layout tab, click Columns, then click the layout you want.
- To apply columns to only part of your document, with your cursor, select the text that you want to format.
- On the Layout tab, click Columns, then click More Columns.
- Click Selected text from the Apply to box.
What are the 4 types of section breaks?
The different kinds of section breaks include next page, continuous, even page, and odd page breaks.
How do I split a Word document into two?
How to Split a Word Document Into Two Columns
- Open a Word document that you want to format into columns. Video of the Day.
- Click the “Page Layout” tab.
- Select “Two.”
- Click “Columns” again, then “More Columns” to customize the columns further.
- Click the “Microsoft Office Button” or “File” tab.
Is there a fit to page option in Word?
“Shrink to Fit” changes the font size and margins to make the document fit on one page. In Microsoft Word 2007 and 2010, go to “Print,” “Print Preview” and then “Shrink to Fit” under the “Preview” option.
How do I fit to one page in Word?
How to Make a Word Document Fit on One Page
- Click the top, left “Office” button, point to “Print” and select “Print Preview.”
- Click “Shrink One Page” in the Preview group.
- Click the “Close Print Preview” button in the Preview group to exit print preview and retain your changes.
How do I make 1/4 size in Word?
Firstly open up a new Word document, go into Mailings on the ribbon and click on Labels in the Create section… This opens up a new dialogue box – click on Options… Select Microsoft as the Label vendor, and scroll down to 1/4 Letter, then click OK.
How do you Print quarter page flyers?
Click the “Properties” button when the Print dialog box pops up on your screen. Select “4 pages” from the “Pages per Sheet” drop-down box. Click the “OK” button. The printer produces a sheet with four copies of your party flyer.
How do I Print 4 flyers on one page PDF?
Choose File > Print. From the Page Scaling pop-up menu, select Multiple Pages Per Sheet. From the Pages Per Sheet pop-up menu, select a value. Click OK or Print.
How do I split a page into 6 sections in Word?
Follow these general steps:
- Open a new document and set the paper orientation and margins the way you want.
- Insert a three-column, single-row table in your document.
- Remove the borders around the table, if desired.
- Format the second (center) column to be rather narrow.
- Adjust the width of the other columns as desired.
How do I fix columns in Word?
To fit the columns to the text (or page margins if cells are empty), click [AutoFit] > select “AutoFit Contents.” To fit the table to the text, click [AutoFit] > select “AutoFit Window.” To keep Word from automatically adjusting your column size, click [AutoFit] > select “Fixed Column Width.”
How do I type in different columns in Word?
To add columns to a document:
- Select the text you want to format.
- Click the Page Layout tab.
- Click the Columns command. A drop-down menu will appear. Adding columns.
- Select the number of columns you want to insert. The text will then format into columns.
How do I edit sections in Word?
Change a section break
- Click or tap in the section break you want to change.
- Go to Layout and select the Page Setup launcher button .
- Select the Layout tab.
- Select a new section type from the Section Start drop down list.
- Select OK.
What’s a section break on word?
Section breaks are used to divide the document into sections. Once section breaks are inserted, you can format each section separately. For example, format a section as a single column for the introduction of a report, and then format the next section as two columns for the report’s body text.
Hello, my fellow Word users/combatants!
In an attempt to provide a service to humanity, I thought I’d start writing out some of the tricks I’ve learned over the years about using Microsoft Word for reports and other business documents.
Don’t get me wrong. Word is a powerful tool. I use Word daily because it is capable of decent desktop publishing in a way that Google Docs doesn’t yet come close to. But like any tool, Word can be dangerous if you don’t know how to use it properly.
To start this ongoing series, I thought I’d address one of those most common frustrations I hear from clients: section breaks that mess up the headers/footers.
Section breaks are a major nemesis for anyone who works with long and/or complicated documents in Word. They are great for inserting landscape figures or tables or just to help readers know exactly where they are in the document. But expect the wrath of Word if you are not extremely careful with your breaks, because your file can be transformed instantly from a document so organized that Martha Stewart would approve to something more of a dog’s dinner.
[For those of you who prefer an over-the-shoulder-style tutorial, now’s a good time to click Play in the video above. For those who prefer written explanations, keep reading.]
The key to header/footer happiness is deceptively simple-sounding: the Link to Previous feature. This nasty little default (and no, you can’t turn off its default-ness) is great if your pages are all oriented the same and all use the same header/footer text and images. But what fun is that?
After many painful experiences in Word, I have learned how to insert sections the hard way. Let me save you some stress.
- Insert two next-page section breaks, one after the other. (This is assuming that you want to insert a section between other content. If you are just creating the next new section, then just put in one break.)
- IMMEDIATELY turn off the Same as Previous/Link to Previous feature in the ribbon (i.e., the command area underneath the main menu dropdowns). Make sure this feature is off for both the section you just created and any other sections in the doc, either after or before the new one. I cannot underscore how important it is to do this right away!
- Adjust the header/footer of the new section to what you want and you’re on your merry way.
[Author’s note: The principles about headers/footers are the same if you use continuous-page section breaks. I just don’t use those as often.]
I know what you’re thinking. That’s too easy. This can’t be that big of a deal.
Sadly, neglecting this little default for any length of time will cause ripple effects that can mess up headers and footers all over your document, particularly if you are using an older version of Word. I once had to create an entirely new document comprised of many, many sections, and then copy all the content from the very large old file section by section to the new file, all because the footers got so messed up and then they froze that way. That’s two hours of my life I will never get back, and I’m still peeved about it.
I will grant you that my new version of Word 365 for Mac seems smarter about section breaks than older versions were, particularly in that it doesn’t seem to turn on the Same as Previous feature for sections that occur before the inserted section. But it still affects anything that comes after it. Half of chaos is still more chaos than I’m willing to deal with. We all have better things to do with our time.
Once you get used to how the Same as Previous feature works, you can try linking sections together if you feel like skirting the Word event horizon. But don’t expect that to save you any time if your document has any complexity to it at all, or if it has multiple authors. Generally speaking, it is far easier to manually adjust your headers and footers for each section than it is to untangle the knots that will result from leaving this feature on and «dealing with it later.» The difference is that the manual adjustment only needs to happen once, and the «later» option may require large donations to your family or company swear jar. I can’t predict what kind of footer black hole you’ll end up in if you leave Same as Previous on; I can only be sure you’ll be happier if you don’t.
Was this post helpful? Email me your burning writing and Word questions. If I can answer your question, I’ll craft a new post that addresses your issue and email you when your answer goes live.

Inserting a Section Break in a Word document gives you a number of ways to split up large walls of text. This feature is useful not just for breaking up text by pages but also for multi-column layouts.
Click anywhere on the page. This is where your new section will begin, so it’s a good idea to avoid breaking up words or sentences and instead look for opportunities to break the page at the end of a paragraph or at least a sentence.

Click the “Layout” tab on the ribbon at the top of the Word window.
Click “Breaks” under “Page Setup” to open a new drop-down menu with multiple options for both Page and Section Breaks.
Under “Section Breaks,” select the type of break you want to insert on the page. If you’re unsure, there’s a description of each below.
- Next Page: Breaks the text at the cursor. Anything to its right (or below it) will move to its own page.
- Continuous: Starts a new section on the same page. This is often used on documents with multiple columns.
- Even Page: Starts a new section at the next even-numbered page.
- Odd Page: Starts a new section at the next odd-numbered page.
Delete a Section Break
To remove a section break from your Word document, first click the “Home” tab.
Click the “non-printing characters” icon. It looks a bit like a backwards “P.”
Click the space to the left of the break you want to delete and then press the “Delete” key on the keyboard.
Change to a Different Type of Section Break
To change a section break to a different type of break, first find the Section Break you want to change and click just to the left of it.
Switch to the “Layout” tab on the ribbon.
Click “Breaks” to open the “Page and Section Breaks” menu.
Choose the new type of section break you want by clicking on any of the options. It will automatically change the type of Section Break based on what you choose.
Your document will now be broken up into whatever type of sections you selected.
READ NEXT
- › 8 Microsoft Word Tips for Professional Looking Documents
- › How to Make Only One Page Landscape in a Word Document
- › How to Cross-Reference in Microsoft Word
- › How to Remove Section and Page Breaks in Microsoft Word
- › How to Organize a Microsoft PowerPoint Slideshow Using Sections
- › How to Add and Link to Bookmarks in Microsoft Word
- › Google Chrome Is Getting Faster
- › The New NVIDIA GeForce RTX 4070 Is Like an RTX 3080 for $599
How-To Geek is where you turn when you want experts to explain technology. Since we launched in 2006, our articles have been read billions of times. Want to know more?
By default, the entire Word document uses the same page
layout (size, margins and orientation). However, we can use sections when we
want some pages (even one page) to have a different page layout.
For example, you are creating a report and have a large image or table that is to be displayed in the landscape mode.
To change the page layout of document using sections, we
have to:
- Define where the section starts and ends by inserting
section breaks.For example: if we want pages 3 to 5 to have a different page layout, then we
add section breaks at the end of page 2 and at the end of page 5. - Click anywhere in pages 3 to 5 and use the Page
Setup options to change the page layout.
Enabling Section Numbers in the Status Bar
When a document is divided into sections, each section is
numbered sequentially from the start of the document, with the section 1 being
at the start of the document, followed by section 2 and so on.
By default, when we create a document, it will have one
section. As long as we do not create any other sections, all content will be in
this Section 1.
Once we have created sections, we may want to know which
section we are working in at any point in time. We can display the section
numbers in the status bar of Microsoft Word.
To view the section numbers:
- Right-click the status bar.
- From the menu displayed, select Section.


Section numbers are now displayed in the status bar. By default, it displays Section: 1. Scroll through the document and wherever you click in the document, the section number remains unchanged.

Creating Sections
We have created a sample document that will be used to demonstrate using sections to change the page layout for a part of a Word document. Do download and extract the contents of the Sample_Documents_Sections_Page_Layout.ZIP file that contains 3 files:
● Sample_Document_Changing_Page_Layout.docx
● Sample_Document_Changing_Page_Layout_Solution.docx
● Sample_Image.png
- Open Sample_Document_Changing_Page_Layout.docx. This is a sample document with 4 pages.
- Scroll to the start of page 3. There is a placeholder for an image here.
- Click at the start of this line, delete the placeholder text and insert the Sample_Image.png.


As the content in the image is not readable, we will place it on a landscape page.
Only this image will be on a landscape page and so we need to create a separate section just for the page containing the image.
To create a section containing only the page with the image:
- Click at the end of the second page.
- On the Layout tab, in the Page Setup group, click Breaks, and in the displayed list, click Next Page.

This inserts a section break at the end of the second page indicating that the new section begins from the next page. You can see the section break indicator at the point where your cursor was. Now the document has 2 sections.- Click anywhere before the section break, that is in pages 1 and 2, and the indicator in the status bar will be Section: 1.
- Click anywhere after the section break, that anywhere from page 3 onwards, and the indicator in the status bar will be Section: 2.
- Since only the image is to be in the landscape page, we need to end the section after the image. Click at the start of the paragraph that begins with “When you click Online Video….” and repeat step 2 to insert another section break.
This inserts a section break at this point and moves the paragraph to the start of the next page. Now the document has 3 sections.
- Click anywhere in pages 1 and 2, and the indicator in the status bar will be Section: 1.
- Click anywhere in page 3, and the indicator in the status bar will be Section: 2.
- Click anywhere in pages 4 and 5, and the indicator in the status bar will be Section: 3.

To change the page layout for section 2 which contains the image:
-
- Click anywhere in Section 2 (page 3).
- On the Layout tab, in the Page Setup group, click Orientation, and in the displayed list, click Landscape. The page with the image changes to a landscape orientation.

- Resize and position the image as required.

- Scroll to pages 1 and 2 or pages 4 and 5. They will still be in the portrait orientation.


Microsoft Word предлагает множество функций, в том числе инструменты, облегчающие форматирование и настройку страницы. Длинные документы Word могут быть трудночитаемыми, если они неправильно отформатированы. Один из способов их форматирования и облегчения чтения текста — разрывы разделов.
В этой статье вы узнаете, как использовать разрывы разделов для изменения порядка страниц Word и улучшения читабельности документа. Мы также рассмотрим несколько типов разрывов разделов и покажем, как их удалить.
Что такое разрыв раздела?
Как следует из названия, разрывы разделов — это элементы форматирования, которые делят документ на разделы.
Существуют различные типы разрывов разделов; каждая из них даст вам лучший контроль над документом, делая его более удобным для чтения и более привлекательным. Например, они могут помочь вам структурировать документ, оставить место или разделить страницу на столбцы.
Разница между разделом и разрывом страницы
Когда вы вставляете разрыв страницы в документ Word, последующий текст всегда начинается на следующей странице. Разрыв страницы — это фантастический инструмент для начала новых глав в книге или нового раздела в статье.

Разрывы разделов отличаются от разрывов страниц. Последующий текст не обязательно начинается на новой странице. Вместо этого текст может продолжаться на той же странице, что делает его аккуратным и хорошо организованным.
Типы разрывов разделов
В Microsoft Word существует четыре типа разрывов разделов.

1. Разрыв раздела следующей страницы
Весь текст справа от курсора (который вы размещаете там, где считаете нужным) будет перемещен в новый раздел на следующей странице. Все форматирование, которое вы произвели с переданным текстом, будет перенесено в новый раздел.
2. Непрерывный разрыв раздела
Непрерывный разрыв раздела создаст новый раздел на той же странице. Это означает, что вы можете иметь два разных текста с другим форматированием на одной странице.
3. Нечетный разрыв раздела страницы
Подобно следующей странице, нечетная страница переместит текст справа от курсора, но на этот раз на следующую страницу с нечетным номером. Это означает, что если вы работаете над текстом на странице 5 и вставляете разрыв раздела нечетной страницы, ваш текст будет перемещен в начало страницы 7, а страница 6 останется пустой. Это очень удобно для создания новых глав книги, так как обычно они начинаются с нечетных страниц.
4. Разрыв раздела четной страницы
Разрыв раздела на четной странице делает то же самое, что и предыдущий разрыв раздела, но с четными номерами страниц. Если вы работаете со страницей 6, вы можете автоматически продолжить документ на странице 8, оставив страницу 7 пустой.
Типы разрывов страниц
Очень важно понимать разницу между разрывами разделов и страниц и когда их использовать. В Microsoft Word есть только два типа разрыва страницы, но они дадут вам очень разные результаты форматирования.

1. Простой разрыв страницы
Простой разрыв страницы переместит весь текст справа от курсора на следующую страницу. Неважно, четная это страница или нечетная.
2. Разрыв столбца
Разрыв столбца разбивает документ на столбцы. Word переместит весь текст справа от курсора в начало следующего столбца. У вас может быть любое количество столбцов, но вы можете захотеть, чтобы ваш документ выглядел красиво и упорядоченно. Более трех столбцов может быть очень неудобно читать.
Как вставить разрывы разделов в документ Word
Как только вы узнаете, какой тип разрыва раздела вам нужен, вставить его в документ MS Word очень просто. Поместите курсор именно туда, где вы планируете разделить документ, затем перейдите в «Макет», нажмите «Разрывы» и выберите нужный тип раздела или разрыва страницы в раскрывающемся меню.

Существует также сочетание клавиш для быстрой вставки разрыва страницы в документ. Как только ваш курсор окажется в том месте, где вы хотите добавить разрыв страницы, просто нажмите Ctrl + Enter.
Как просмотреть существующие разрывы разделов
Разрывы разделов и страниц невидимы в документах Word. Вы можете видеть их эффект, но не можете видеть их по умолчанию как символы. Это связано с тем, что в представлении по умолчанию отображается только то, что будет напечатано.

Когда вы пишете, редактируете и форматируете свой документ, вам нужно будет видеть различные элементы, такие как знаки абзаца, пробелы, разделы и разрывы страниц. Чтобы увидеть все эти элементы, перейдите на вкладку «Главная» и нажмите кнопку «Абзац», чтобы отобразить все метки абзаца.
Как удалить разрывы разделов и страниц
Отображение всех разрывов разделов и страниц — это еще один шаг к их удалению. Однако, чтобы удалить их, вам нужно будет их увидеть.
Удалить разрывы разделов так же просто, как выбрать их и нажать клавишу возврата или удаления на клавиатуре. Чтобы сделать выбор, нажмите три раза непосредственно на разрыв страницы или раздела или поместите курсор после него.

Имейте в виду, что как только вы удалите раздел или разрыв страницы, текст этого раздела также потеряет свое форматирование и примет формат следующего раздела.