
Excel for Microsoft 365 for Mac Excel 2021 for Mac Excel 2019 for Mac Excel 2016 for Mac Excel for Mac 2011 More…Less
You can insert rows above a selected row and columns to the left of a selected column. Similarly, you can insert blank cells above or to the left of the active cell on a worksheet. Cell references automatically adjust to match the location of the shifted cells.
Insert rows
-
Select the heading of the row above where you want to insert additional rows.
Tip: Select the same number of rows as you want to insert. For example, to insert five blank rows, select five rows. It’s okay if the rows contain data, because it will insert the rows above these rows.
-
Hold down CONTROL, click the selected rows, and then on the pop-up menu, click Insert.
Insert columns
-
Select the heading of the column to the right of which you want to insert additional columns.
Tip: Select the same number of columns as you want to insert. For example, to insert five blank columns, select five columns. It’s okay if the columns contain data, because it will insert the columns to the left of these rows.
-
Hold down CONTROL, click the selected columns, and then on the pop-up menu, click Insert.
Insert cells
When you insert blank cells, you can choose whether to shift other cells down or to the right to accommodate the new cells. Cell references automatically adjust to match the location of the shifted cells.
-
Select the cell, or the range of cells, to the right or above where you want to insert additional cells.
Tip: Select the same number of cells as you want to insert. For example, to insert five blank cells, select five cells.
-
Hold down CONTROL, click the selected cells, then on the pop-up menu, click Insert.
-
On the Insert menu, select whether to shift the selected cells down or to the right of the newly inserted cells.
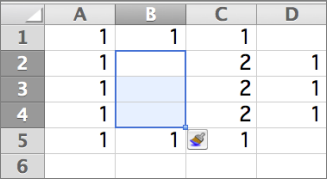
Here’s what happens when you shift cells left:

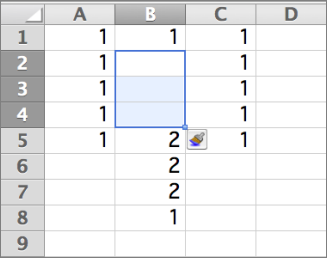
Here’s what happens when you shift cells down:
Need more help?
Want more options?
Explore subscription benefits, browse training courses, learn how to secure your device, and more.
Communities help you ask and answer questions, give feedback, and hear from experts with rich knowledge.
![]()
Download Article
![]()
Download Article
This wikiHow teaches you how to insert rows in Excel using shortcuts on a Windows or Mac computer. There are keyboard shortcuts as well as custom shortcuts that you can use in Excel spreadsheets.
Things You Should Know
- On a Mac, highlight the number of rows you want to add. Then, hit Control+⇧ Shift++. The new rows will appear above the highlighted ones.
- On Windows, highlight the number of rows you want to insert and press Control+⇧ Shift++ .
- Use the toolbar by selecting a row and clicking Insert.
-
1
Open an excel spreadsheet. You may use an old one or create a new one.
-
2
Select a row by clicking on the row number. You should see the row number on the far left of the sheet. The new row will appear above the selected row or rows.
- Highlight the same number of rows as you want to add. So to add one row, highlight just one row, to add 2, highlight 2 rows, etc.
Advertisement
-
3
Type the Control+⇧ Shift++ keys at the same time to insert a row. Your new row should appear above the selected one.
- If you have no rows selected and press Control+⇧ Shift++ then it will not work.


Advertisement
-
1
Open an excel spreadsheet. You can use an old or new one.
-
2
Select a row. The new row will be inserted above the selected one. This happens only if you have one row selected.
- Highlight the same number of rows as you want to add. So to add one row, highlight just one row, to add 2, highlight 2 rows, etc.
-
3
Type Control+⇧ Shift++ at the same time to insert a row. The new row will appear above the selected one.
- This shortcut only works if you have a row selected.


Advertisement
-
1
Open Excel. The icon is green with a white “X” in it.
-
2
Open an excel document. It can be an old or new document.
-
3
Click on the Home tab.
-
4
Select a row by clicking on the row number. You should see the row number on the far left of the sheet.
-
5
Click on Insert. It is located near the top right of the Excel window. This should automatically insert a new row above the row you selected. To save the insert row command as a shortcut, do the following:
- Right-click on Insert Row to open up an additional drop-down menu.
- Select Add to Quick Access Toolbar. If you have nothing added to your toolbar then the next key will be assigned to F4. Press F4 whenever you want to add a new row.


Advertisement
Ask a Question
200 characters left
Include your email address to get a message when this question is answered.
Submit
Advertisement
Thanks for submitting a tip for review!
About This Article
Article SummaryX
1. Open an excel sheet.
2. Select a row.
3. Type Control+⇧ Shift++ to insert a row above the one you selected.
Did this summary help you?
Thanks to all authors for creating a page that has been read 78,647 times.
Is this article up to date?
| Windows | Mac |
|---|---|
| CtrlShift+ | ⌘⇧+ |
About This Shortcut
This shortcut will insert rows as long as at least one rows is selected. In a table, this shortcut will insert a row above the active selection when only one cell is selected. If you use the shortcut without a row selected, you’ll see the the Insert Cells dialog box displayed.
- With a laptop keyboard, use Control Shift +.
- With a full keyboard, use Control +
Note: In Mac 2016, this shortcut was changed to Command Shift +, and now Control + I changes text to italic. In previous Mac Excel versions, Control + I inserts a row (when a row is selected) or brings up the Insert Cells dialog when the selection does not include an entire row.
Related videos
The videos below demonstrate this shortcut.

Author![]()
Dave Bruns
Hi — I’m Dave Bruns, and I run Exceljet with my wife, Lisa. Our goal is to help you work faster in Excel. We create short videos, and clear examples of formulas, functions, pivot tables, conditional formatting, and charts.
There are hundreds and hundreds of Excel sites out there. I’ve been to many and most are an exercise in frustration. Found yours today and wanted to let you know that it might be the simplest and easiest site that will get me where I want to go.
Get Training
Quick, clean, and to the point training
Learn Excel with high quality video training. Our videos are quick, clean, and to the point, so you can learn Excel in less time, and easily review key topics when needed. Each video comes with its own practice worksheet.
View Paid Training & Bundles
Insert one or more rows, columns, or cells in Excel for Mac
- Select the heading of the row above where you want to insert additional rows. Tip: Select the same number of rows as you want to insert.
- Hold down CONTROL, click the selected rows, and then on the pop-up menu, click Insert.
Contents
- 1 How do I add multiple rows in Excel?
- 2 What is the shortcut to insert a row in Excel on a Mac?
- 3 How do I insert multiple rows to each row in Excel?
- 4 How do I copy every 5th row in Excel?
- 5 How do I paste every nth row in Excel?
- 6 How do you automatically insert rows in Excel?
- 7 Can you select every other row in Excel?
- 8 How do I select every 7th row in Excel?
- 9 How do I select every 10th row in Excel?
- 10 How do you insert multiple rows in Excel without overwriting?
- 11 How do you automatically insert rows based on cell values in Excel?
- 12 How do you select alternate rows in Excel for Mac?
- 13 How do you select multiple alternate rows in Excel?
- 14 How do you select interval rows in Excel?
5 steps to better looking data
- Click on the cell where you need to enter multiple lines of text.
- Type the first line.
- Press Alt + Enter to add another line to the cell. Tip.
- Type the next line of text you would like in the cell.
- Press Enter to finish up.
What is the shortcut to insert a row in Excel on a Mac?
Control + I
To start off, if you first select an entire row or column, you can use a single shortcut to insert new rows or columns. You can select an entire row with shift and the spacebar. Then, to insert a row, use Control shift + in Windows, Control + I on a Mac.
How do I insert multiple rows to each row in Excel?
Please see the steps below.
- Select the cells where the empty rows need to appear and press Shift + Space.
- When you pick the correct number of rows, right-click within the selection and choose the Insert option from the menu list. Tip. If your cells contain any formatting, use the Insert Options icon to match the format.
How do I copy every 5th row in Excel?
Copy every 5th row, starting with 1st row
- Select cell E3.
- Enter the formula: =OFFSET($C$3,(ROW(C1)-1)*5,0)
- Press ENTER.
- Copy and paste the formula to the succeeding cells E4 and E5.
- Select cell E9.
- Enter the formula: =OFFSET($C$3,(ROW(C1)*5-1),0)
- Press ENTER.
- Copy and paste the formula to the succeeding cells E10 and E11.
How do I paste every nth row in Excel?
Here’s a quick way to do this by inserting a blank row into your data after every Nth record.
- Left click on one of the selected cells.
- Select Insert in from the menu.
- Select Entire row.
- Press the OK button.
How do you automatically insert rows in Excel?
Fortunately, there are shortcuts that can quickly insert blank row in Excel. Select the entire row which you want to insert a blank row above, and press Shift + Ctrl + + keys together, then a blank row is inserted.
Can you select every other row in Excel?
The simplest way to select every other row in Excel is to hold down down the CTRL button on your keyboard (⌘ on MAC) and then the number of the rows you want to select.You can very quickly select the rows you want to alter and then apply the change to all of them in one go.
How do I select every 7th row in Excel?
to select every 7th row there is an EASIER WAY: in the first 7 rows of your column but one (the first) you write something inside. Then you select this 7 rows and copy them on the entire column. Now what you need it is just to go to SELECT->GO TO SPECIAL->select BLANKS->OK You have each 7 rows a selection.
How do I select every 10th row in Excel?
You can quickly do this by typing 0 in the first cell and 1 in the second cell, then paste down to the last data row. Then autofilter to either 0 or 1, depending on which rows you wish to select. Once filtered, select all visible rows, which will be every other row.
How do you insert multiple rows in Excel without overwriting?
7 Answers
- Copy the cells from Sheet B to the clipboard.
- Highlight the row where you want your data to be inserted (ex. if you want it inserted at the top, highlight row 1)
- Right click and select “Insert Copied Cells”
How do you automatically insert rows based on cell values in Excel?
Press Alt + F11 keys simultaneously, and a Microsoft Visual Basic for Applications window pops out. 2. Click Insert > Module, then paste below VBA code to the popping Module window. VBA: Insert row below based on cell value.
How do you select alternate rows in Excel for Mac?
Apply shading or highlighting to alternate rows in Excel for Mac
- On the sheet, select the range of cells that you want to shade.
- On the Insert tab, select Table.
- On the Table tab, select the style that you want.
- To remove the sort and filter arrows, on the Table tab, select Convert to Range, and then select Yes.
How do you select multiple alternate rows in Excel?
How to select every Nth row (alternate rows)
- Select the first 3rd row in your shading pattern, e.g. “Name C”.
- Use the keyboard shortcut combination Ctrl + Shift + R.
- Define the range where you want to repeat the shading pattern, e.g. range A2:K15.
- Click OK.
- Now you can delete, copy, color, etc.
How do you select interval rows in Excel?
Quickly select every other rows
- Select the range that you want to select every other rows.
- Go to the Select Interval Rows & Columns dialog box, and check Rows option, then enter the specified number into the Interval of box, and enter the number into Rows box.
- Then click Ok.
Shortcut Keys to Insert Rows in Excel:
In this article, you will learn the shortcut keys to insert rows in Excel 365.
Jump To:
- Shortcut Keys
- Shortcut Description
- Verdict
Shortcut Keys:
The below-given tables contain the shortcut keys to insert rows in Excel 365 for both the Windows and MAC devices.Sponsored LinksWindows ShortcutCtrlShift+MAC Shortcut+
Shortcut Description:
- This shortcut key is used to insert rows in an Excel spreadsheet.
- To do this, you need to select a single cell or multiple cells. After that, you have to pressthe ( CTRL + SHIFT + + )keys to display the insert dialog box.
- In the insert box, you have to choose the entire row option, and it will insert a new row above the selected cell.
- Refer to the following example.

Insert rows in the spreadsheet
Verdict:
This Article clearly understands theshortcut keys to insert rowsin Excel 365 for Windows and MAC Systems. Share yourfeedbackin the below comment section. Thanks for visitingGeek Excel.Keep Learning!!
Find more Excel shortcuts on the following Article!
Excelis one of the most famous software used by many peoples, users & many corporate all around the world. Knowing Excel shortcuts will help you to useExcel softwaremore efficiently. This article lists the222+ Keyboard shortcutsof Excel software on theWindows system.
Download 220+ Excel Shortcuts PDF:Excel Shortcut PDF Download
Or you can directly download from our LBRY Network.Sponsored Links
File Options Excel Shortcuts:OptionsWindowsMacHow to Create a new workbookctrl n NHow to open a workbookctrl o oHow to save a workbookctrl s SSave as WorkbookF12 SHow to print a file in Excelctrl p PHow to open a print preview window in Excelctrl F12Not AvailableHow to Close the current workbookctrl F4WHow to Close ExcelALT F4 Q
Ribbon Options Excel Shortcuts:OptionsWindowsMacHow to Expand or collapse the ribbonctrl F1RHow to Activate access keysALTNot AvailableHow to Move to next ribbon controlTabTabHow to Activate or open selected controlSpaceSpaceHow to Confirm control changeEnterReturnHow to Get help on the selected controlF1Not Available
General Options Excel Shortcuts:OptionsWindowsMacHow to open options in ExcelALTFT ,How to undo the last action in Excelctrl z ZHow to redo the last action in Excelctrl yYHow to copy selected cells in Excelctrl c CHow to repeat the last action in Excelf4 YHow to cut selected cells in Excelctrl X XHow to paste content from clipboard in Excelctrl v VHow to display the paste special dialog box in Excelctrl ALTV VHow to display find and replace in Excelctrlf FHow to display find and replace, replace selected in Excelctrlh HHow to Find the previous match in Excelctrlshiftf4 GHow to Find the next match in ExcelShiftf4 GHow to Create an embedded chart in ExcelAlt f1Fn F1How to Create a chart in a new worksheet in Excelf11Fn F11
Table & Filters Options Excel Shortcuts:OptionsWindowsMacHow to insert a table in Excelctrl t THow to toggle auto filter in Excelctrlshiftl FHow to activate filter in ExcelAlt How to select a table row in ExcelshiftspaceSpaceHow to select the table column in ExcelctrlSpace SpaceHow to select a table in Excelctrl a AHow to clear the slicer filter in Excelaltc CHow to toggle table total row in Excelctrlshiftt T
Drag & Drop Options Excel Shortcut:OptionsWindowsMacHow to Drag and cut in ExceldragDragHow to Drag and copy in Excelctrldrag DragHow to Drag & Insert in Excelshiftdrag DragHow to Drag and insert copy in Excelctrlshiftdrag DragHow to Drag to a worksheet in ExcelctrldragDragHow to Drag to duplicate worksheet in Excelaltdrag Drag
Navigation Options Excel Shortcuts:OptionsWindowsMacHow to Move one cell right in ExcelHow to Move one cell left in ExcelHow to Move one cell up in ExcelHow to Move one cell down in ExcelHow to Move one screen right in Excelalt Pg.DnFn How to Move one screen left in Excelalt Pg.upFn How to Move one screen up in ExcelPG.UpFn How to Move one screen down in ExcelPG.DnFn How to Move to the right edge of the data region in ExcelCtrl How to Move to the left edge of the data region in ExcelCtrl How to Move to the top edge of the data region in ExcelCtrl How to Move to the bottom edge of the data region in ExcelCtrl How to Move to the beginning of a row in ExcelHomeFn How to Move to the last cell in a worksheet in ExcelctrlendFn How to Move to the first cell in a worksheet in ExcelctrlHomeFn How to Turn End mode on in ExcelEndFn How to Go back to hyperlink in ExcelctrlGEnter GReturn
Selection Options Excel Shortcut:OptionsWindowsMacHow to Select an entire row in Excelshift space SpaceHow to Select an entire column in Excelctrlspace SpaceHow to Select entire worksheet in Excelctrla AHow to Add adjacent cells to selection in ExcelShiftClick ClickHow to Add non-adjacent cells to selection in ExcelctrlClick ClickHow to Same selection in next column in ExcelNil TabHow to Same selection in the previous column in ExcelNil TabHow to Move right between non-adjacent selections in Excelctrlalt How to Move left between non-adjacent selections in Excelctrlalt How to Toggle add to selection mode in Excelshiftf8Fn F8How to Cancel selection in ExcelEscEsc
Active Cell Options Excel Shortcuts:How to Select an active cell only in Excelshift Backspace
DeleteHow to Show the active cell on a worksheet in ExcelctrlBackspace DeleteHow to Move active cell clockwise in selection in Excelctrl. .How to Move active cell down in selection in ExcelEnterReturnHow to Move active cell up in selection in Excelshiftenter ReturnHow to Move active cell right in a selection in ExceltabTabHow to Move active cell left in a selection in Excelshifttab Tab
Extend Selection Options Excel Shortcut:OptionsWindowsMacHow to Extend selection by one cell right in Excelshift How to Extend selection by one cell left in Excelshift How to Extend selection by one cell up in Excelshift How to Extend selection by one cell down in Excelshift How to Extend the selection to the last cell right in Excelctrlshift How to Extend the selection to the last cell left in Excelctrlshift How to Extend the selection to the last cell up in Excelctrlshift How to Extend the selection to the last cell down in Excelctrlshift How to Extend selection up one screen in Excelshiftpg.upFnHow to Extend selection down one screen in Excelshiftpg.dnFnHow to Extend selection right one screen in Excelaltshiftpg.dnFnHow to Extend selection left one screen in Excelaltshiftpg.upFnHow to Extend selection to start of the row in ExcelshifthomeFn How to Extend selection to the first cell in a worksheet in ExcelctrlshifthomeFnHow to Extend selection to last cell in the worksheet in ExcelctrlshiftendFnHow to Toggle extend selection mode in Excelf8Fn F8
Entering data Options Excel Shortcuts:OptionsWindowsMacHow to Enter and move down in ExcelEnterReturnHow to Enter and move right in ExceltabTabHow to Enter and move left in Excelshift tab TabHow to Complete entry and stay in the same cell in ExcelctrlEnter ReturnHow to Enter the same data in multiple cells in Excelctrl Enter ReturnHow to Insert a current date in Excelctrl ; ;How to Insert current time in Excelctrl shift : :How to Fill down from cell above in Excelctrl D DHow to Fill right from cell left in Excelctrl r RHow to Copy a formula from the cell above in Excelctrl How to Copy value from the cell above in Excelctrlshift How to Add hyperlink in Excelctrl kKHow to Display AutoComplete list in Excelalt How to Flash fill in Excelctrl eNot Available
Formatting Options Excel Shortcuts:OptionsWindowsMacHow to Format anything in Excelctrl 1 1How to Display Format Cells with Font tab selected in Excelctrl shift F FHow to Apply or remove bold formatting in Excelctrlb BHow to Apply or remove italic formatting in Excelctrl I IHow to Apply or remove underscoring in Excelctrl u UHow to Apply or remove strikethrough formatting in Excelctrl 5 XHow to Add or remove the shadow font style in ExcelNil WHow to Add or remove the outline font style in ExcelNil DHow to Align center in Excel
alt
h
a
c
EHow to Align left in Excel
alt
h
a
l
LHow to Align right in Excel
alt
h
a
r
RHow to Indent in Excel
alt
h
6
TabHow to Remove indent in Excel
alt
h
5
TabHow to Increase font size one step in Excel
alt
h
FG
>How to Decrease font size one step in Excel
alt
h
Fk
<
Number Formatting Options Excel Shortcuts:How to Apply general format in Excelctrl shift ~ ~How to Apply currency format in Excelctrl shift $ $How to Apply percentage format in Excelctrl shift % %How to Apply scientific format in Excelctrl shift ^ ^How to Apply date format in Excelctrl shift # #How to Apply time format in Excelctrl shift @ @How to Apply number format in Excelctrl shift ! !How to Show the active cell on a worksheet in Excelctrl Backspace DeleteHow to Move active cell clockwise in selection in Excelctrl . .How to Move active cell down in selection in ExcelEnterReturnHow to Move active cell up in selection in Excelshift enter ReturnHow to Move active cell right in a selection in ExceltabTabHow to Move active cell left in a selection in Excelshift tab Tab
Border Options Excel Shortcuts:OptionsWindowsMacHow to Add border outline in Excelctrl shift & 0How to Add or remove border right in Excelalt r How to Add or remove border-left in Excelalt l How to Add or remove border-top in Excelalt t How to Add or remove border-bottom in Excelalt bHow to Add or remove border upward diagonal in ExcelaltdNot AvailableHow to Add or remove border horizontal interior in Excelalt hNot AvailableHow to Add or remove border vertical interior in Excelalt vNot AvailableHow to Remove borders in Excelctrl shift __
Formula Options Excel Shortcuts:OptionsWindowsMacHow to Toggle absolute and relative references in Excelf4 THow to Open the Insert Function Dialog Box in Excelshift f3Fn F3How to Autosum selected cells in Excelalt = THow to Toggle formulas on and off in Excelctrl ` `How to Insert function arguments in Excel
ctrl
shift
a
AHow to Enter array formula in Excel
ctrl
shift
Enter
ReturnHow to Calculate worksheets in Excel
f9Fn F9How to Calculate active worksheet in Excel
shift
f9
Fn F9How to Force calculate all worksheets in Excel
ctrl
alt
f9
Not AvailableHow to Evaluate part of a formula in Excel
f9
Fn F9How to Expand or collapse the formula bar in Excel
ctrl
shift
u
UHow to Display function arguments dialog box in Excel
ctrl
a
AHow to Define a name in Excel
ctrl
f3
Fn F3How to Define name using row and column labels in Excel
ctrl
shift
f3
FnF3How to Paste name into a formula in Excel
f3
Not AvailableHow to Accept function with autocomplete in Excel
tab
Tab
Grid Options Excel Shortcuts:OptionsWindowsMacHow to Display Insert Dialog box in Excelctrlshift+ +How to Insert rows in Excelctrlshift+ +How to Insert columns in Excelctrlshift+ +How to Display Delete dialog box in Excelctrl How to Delete rows in Excelctrl How to Delete columns in Excelctrl How to Delete cells in Excelctrl How to Delete the contents of selected cells in ExcelDeleteFn DeleteHow to Hide columns in Excelctrl 0 0How to Hide rows in Excelctrl 9 9How to Unhide rows in Excelctrl shift 9 9How to Unhide Columns in Excelctrl shift 0 0How to Group rows or columns in Excelalt shift KHow to Ungroup rows or columns in Excelalt shift JHow to Open Group Dialog Box in Excelalt shift KHow to Open Ungroup Dialog Box in Excelalt shift JHow to Hide or Show outline symbols in Excelctrl 8 8How to Zoom in in Excelctrl alt + +How to Zoom out in Excelctrl alt
Pivot Tables Options Excel Shortcuts:OptionsWindowsMacHow to Select the entire pivot table in Excelctrl a AHow to Toggle pivot table field checkbox in ExcelspaceSpaceHow to Group pivot table items in Excelalt shift KHow to Ungroup pivot table items in Excelalt shift JHow to Hide pivot table item in Excelctrl Ctrl How to Create a pivot chart on the same worksheet in Excelalt f1Not AvailableHow to Create a pivot chart on a new worksheet in Excelf11Fn F11How to Create a pivot chart on a new worksheet in Excelalt d p P
Dialog Boxes Options Excel Shortcuts:OptionsWindowsMacHow to Move to the next control in ExceltabTabHow to Move to the previous control in Excelshift tab TabHow to Move to the next tab in Excelctrl tab TabHow to Move to the previous tab in Excelctrl shift tab TabHow to Accept and apply in ExcelEnterRetrnHow to Check and uncheck the box in ExcelspaceSpaceHow to Cancel and close the dialog box in ExcelEscEsc
Video liên quan
The adding of a new (blank) row to the worksheet is all it takes to insert an excel row. The use of shortcuts simplifies the insertion of a row. A shortcut shortens the time it takes to complete an activity. This is due to the fact that tapping a single key or a combination of keys might assist speed up a lengthy procedure. A bank executive, for example, observed that a row holding the totals of the columns was missing while working on certain financial entries. The shortcut buttons Ctrl+Shift+plus sign (+) are used to quickly insert a blank row into a table. Shortcuts significantly increase Excel users’ productivity. It is not necessary to learn these shortcuts. This is due to the fact that with continuous use, one starts to memorise them.
The main shortcuts for adding a row in Excel are covered in this article. All strategies have been discussed with examples for greater understanding.
Insert a row using ctrl + plus sign or ctrl + shift + plus sign in excel online, 2016 and 2019
1. Choose any cell in row 6. Combine the shortcut keys Shift+spacebar. As indicated in the figure below, the full row 6 is picked.
2. Press the keys Ctrl+plus sign (+) or Ctrl+Shift+plus sign (+) once the full row has been chosen. Each shortcut’s keys must be pushed together.
3. With both of the previous shortcuts, a blank row 6 is inserted (entered in step 2). The following graphic depicts the new row.
4. Hover the mouse over the paintbrush icon to format the new row 6. Then, as indicated in the following image, click the drop-down arrow.
Insert a row using the insert dialogue box in excel
1. Choose any cell in row 6. Ctrl+plus sign (+) or Ctrl+Shift+plus sign (+) are the keys to press. Each shortcut’s keys must be pushed together.
2. The following choices are available in the insert dialogue box:
Shift cells right: This moves the content of the selected cell (from step 1) to the cell immediately to the right.
Shift cells down: This moves the content of the selected cell (from step 1) to the cell directly after it.
Entire row: This adds a new row to the left of the specified cell’s row (selected in step 1).
Entire column: This adds a new column to the left of the currently selected cell (selected in step 1).
We choose entire row because we want to insert excel row 6. As seen in the accompanying figure, a new, blank row 6 is inserted. The entries from the first row 6 are shifted to row 7 as a result of this insertion.
How to insert a row using ALT+I+R in excel
1. Choose any cell in row 6. As indicated in the figure below, we’ve chosen cell A6. Alternatively, Shift+spacebar can be used to select the full row 6.
2. To insert a new row, press the keys ALT+I+R. As illustrated in the figure below, a blank row 6 is added. The entries from the first row 6 are shifted to row 7 as a result of this insertion.
Note: This article was an attempt to make you understand how to add a row using shortcuts in excel online, 2016 and 2019, in both windows and mac.
You just need to have a little understanding of how and which way things work and you are good to go. With having this basic knowledge or information of how to use it, you can also access and use different other options on excel or spreadsheet. Also, it is very similar to Word or Document. So, in a way, if you learn one thing, like Excel, you can automatically learn how to use Word as well because both of them are very similar in so many ways. If you want to know more about WPS Office, you can download WPS Office to access, Word, Excel, PowerPoint for free.
Bottom Line: Learn mouse and keyboard shortcuts to save time when working with Excel Tables. These shortcuts are for both Windows and Mac versions of Excel.
Skill Level: Beginner
Watch the Tutorial
Download the Excel File
If you’d like to use the example Excel workbook from the video, you can download it here:
Master Excel Tables With These 10 Shortcuts
If you work with Excel Tables often, you’re going to want to memorize several of the following shortcuts to make your life easier. These shortcuts are for both mouse and keyboard and can be used on Windows or Mac.
1. Selecting Rows and Columns
To select a column in an Excel Table, hover over the top half of column’s header cell, until your cursor becomes a down arrow. Then left-click and it will select all of the cells in that column. (If you left-click a second time, it will include the header cell in your selection.)
The keyboard shortcut for selecting a column in Excel tables is Ctrl + Space.

In the video above I mention a small nuance with Ctrl + Space. If you have the cell in the first row of the body of the table selected, Ctrl + Space will scroll down to the bottom of the table. You can press Ctrl + Backspace to scroll up and activate the first cell in the selection/column. If you have a cell in any subsequent row selected, Ctrl + Space will NOT scroll down. Another weird but possibly useful quirk of Excel tables…
To select a row, hover your cursor near the left border of the table until it becomes a right-pointing arrow; then left-click.
The keyboard shortcut is Shift + Space.

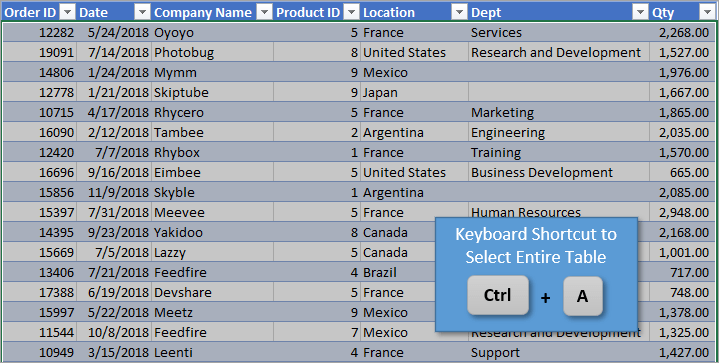
2. Selecting the Entire Table
To select the data for the entire table, you can press Ctrl + A. This highlights everything except the header and total rows. If you’d like to include those rows as well, simply press Ctrl + A a second time.
3. Moving Columns
To move a column, select the header cell in the column that you want to move. Then hover your cursor over the border of that cell until the cursor becomes a crosshairs.
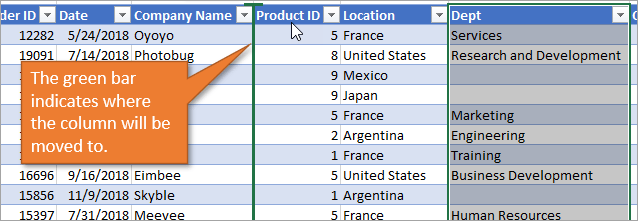
Then drag it to where you want it to go, keeping the cursor in the header row. A vertical green bar will appear between columns as you drag the cursor to indicate where the column will end up when you release the mouse.
Moving rows is similar. Essentially, you follow the same process, but you drag your row (or rows) up or down instead of left/right.
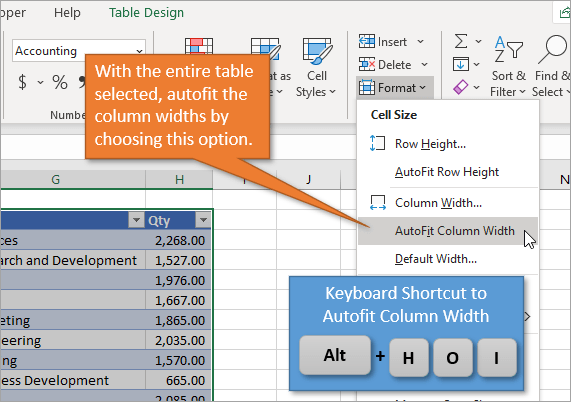
4. Autofitting Column Widths
To resize the widths of the columns so that the cells in the table display all of the contents, use this shortcut. First select all of the table contents (see Shortcut 2 above), including the header and total rows. Then select Autofit Column Width in the Format drop-down menu on the Home tab.
The keyboard shortcut for this is Alt + H O I.
Autofitting is a great technique to use after you have inserted, deleted, or moved columns in a table, since the column widths do not automatically resize.
I don’t know of a Mac equivalent for this keyboard shortcut, so you’ll have to use the Format menu option on the Home tab.
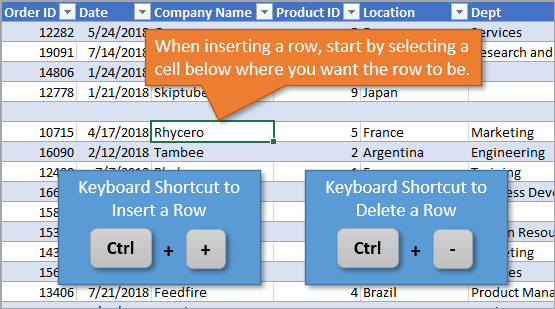
5. Inserting/Deleting Rows and Columns
To insert a row, start by selecting any cell in the table. The inserted row will be above that cell. Then type Ctrl + +. (If you are using a laptop, you may need to hit Ctrl + Shift + +.)
Deleting a row is similar. Start by selecting any cell in the row you want to delete and then hit Ctrl + -.
For inserting or deleting columns, the commands are the same. However, you first start by selecting two or more cells in the same column, then press Ctrl + + or Ctrl + -.
You can also select the entire row or column before pressing the shortcuts, but it is not required.
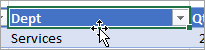
6. Open the Filter Drop-Down Menu
To open the filter drop-down menu, press Alt + ↓ if your cursor is on the header cell.

If you have a cell selected further down the column, just hit Shift + Alt + ↓. This will open the filter drop-down menu without having to scroll back up to the header cell.
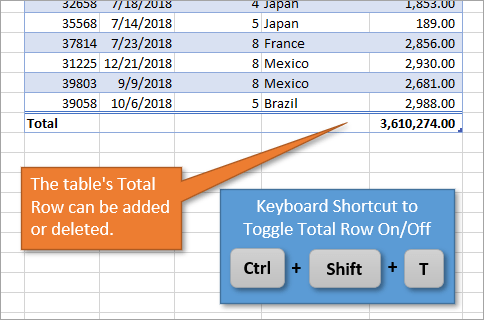
7. Toggle the Total Row
On an Excel Table, you can add or delete a Total Row at the bottom really easily. To toggle the row on and off, just hit Ctrl + Shift + T.
8. Renaming a Table
To rename a table, just use keyboard shortcut Alt + J T A. That will set the focus on the Table Name box in the ribbon so that you can update the name.
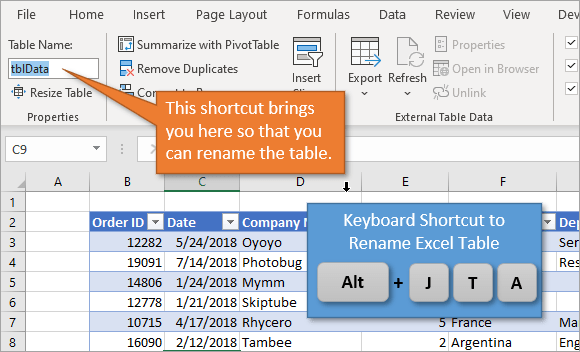
This shortcut is only available on Windows.
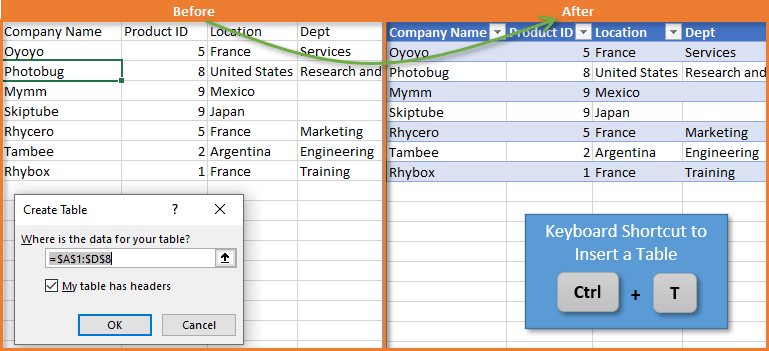
9. Insert a Table
Turning your data into an Excel Table is really easy when you use the shortcut Ctrl + T. This will bring up the Create Table window, including what Excel assumes the boundaries for your table should be. If those look right, you can just hit OK, and it will format your data as a table.
If you’d like to select different formatting for your table when inserting it, you can instead use the shortcut Alt + H T. (This shortcut is only for Windows.) This brings up a menu of formatting options and you can select whichever you like best.
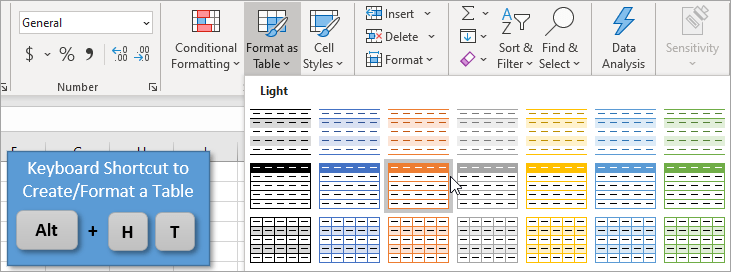
Checkout this post & video on Tips & Shortcuts for Inserting Excel Tables to learn more.
10. Refresh a Query
If your table is connected to a query through Power Query, you can refresh it by hitting Alt + F5.
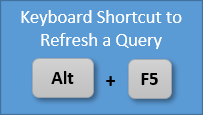
You can also right-click the table and select Refresh.
Related Posts
Want to see more shortcuts? Check out these tutorials!
- 7 Keyboard Shortcuts for the Filter Drop Down Menus
- Excel Keyboard Shortcuts List
Conclusion
I hope these shortcuts help to save you time and add to your reputation of Excel wizard in your workplace. Let me know if you have any questions or if you find these types of post helpful by leaving a comment below. See you next time!
I’m looking for a shortcut to add a row above the current cell in Microsoft Excel 2016. I hate using the mouse.
I saw Ctrl + Space then Ctrl + I but it makes the contained text italic.
![]()
clhy
6,2238 gold badges33 silver badges66 bronze badges
asked May 1, 2016 at 17:00
![]()
In Windows, there are a few possibilities, for example
- hit Shift + Space to select the row, then Control + Shift + + (Plus Sign) to insert a row above
I don’t do Mac, but as far as I know most keyboard shortcuts should work the same if you replace Ctrl with Command on a Mac.
Edit: a quick Google search shows the keyboard shortcut you mention in your question, i.e.
Insert a row: Ctrl + spacebar, then Ctrl + i
You need to first select a whole row with Ctrl + space, then, with the row selected hit Ctrl + i.
source: https://exceljet.net/keyboard-shortcuts/insert-rows
answered May 2, 2016 at 0:30
![]()
teylynteylyn
22.3k2 gold badges38 silver badges54 bronze badges
With Excel 2016 on Windows 10, you can hit Ctrl + (+ key on the number pad) and then you are given the option of inserting a cell only and shifting right or down or inserting a row or column.
You can use the underlined letter to specify without having to use the mouse.
![]()
clhy
6,2238 gold badges33 silver badges66 bronze badges
answered May 2, 2016 at 21:33
![]()
1
Another option for Mac users: Ctrl+Shift++ from the top row of keys seems to work as well (I’m using version Excel for Mac v.15.31). I personally prefer this option as my keyboard requires me to toggle the Numpad on/off using Num Lock.
![]()
answered Jan 21, 2018 at 4:10
![]()
PavanPavan
1011 bronze badge
2