
Skip to main content
Support
Support
Sign in
Sign in with Microsoft
Sign in or create an account.
Hello,
Select a different account.
You have multiple accounts
Choose the account you want to sign in with.
Word for Microsoft 365 Word for Microsoft 365 for Mac Word for the web Word 2021 Word 2021 for Mac Word 2019 Word 2019 for Mac Word 2016 Word 2016 for Mac Word 2013 Word 2010 Word for Mac 2011 More…Less
Word automatically adds a break at the end of each page. You can also insert a manual page break anytime you want to start a new page in your document.
WindowsmacOSWeb
-
Put your cursor where you want one page to end and the next to begin.
-
Go to Insert > Page Break.

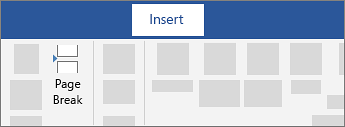
Insert a manual page break
-
Click or tap in the document where you want to insert a page break.
-
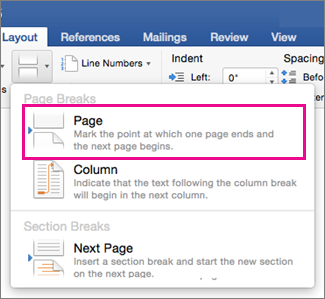
Go to Layout > Breaks > Page.
-
Click or tap in the document where you want a page break.
-
Go to Insert > Page Break.
See Also
Insert a section break
Remove a page break from a Word document


Need more help?
Want more options?
Discover
Community
Explore subscription benefits, browse training courses, learn how to secure your device, and more.

Microsoft 365 subscription benefits

Microsoft 365 training

Microsoft security

Accessibility center
Communities help you ask and answer questions, give feedback, and hear from experts with rich knowledge.

Ask the Microsoft Community

Microsoft Tech Community

Windows Insiders
Microsoft 365 Insiders
Was this information helpful?
(The more you tell us the more we can help.)
(The more you tell us the more we can help.)
What affected your experience?
Resolved my issue
Clear instructions
Easy to follow
No jargon
Pictures helped
Other
Didn’t match my screen
Incorrect instructions
Too technical
Not enough information
Not enough pictures
Other
Any additional feedback? (Optional)
Thank you for your feedback!
×
Содержание
- Зачем нужны разрывы страниц?
- Добавление принудительного разрыва страницы
- Управление автоматическим разбиением на страницы
- Запрет разрыва страницы в середине абзаца
- Запрет разрыва страницы между абзацами
- Добавление разрыва страницы перед абзацем
- Как разместить не менее двух строк абзаца вверху или внизу одной страницы?
- Как запретить разрыв строк таблицы при переносе на следующую страницу?
- Вопросы и ответы

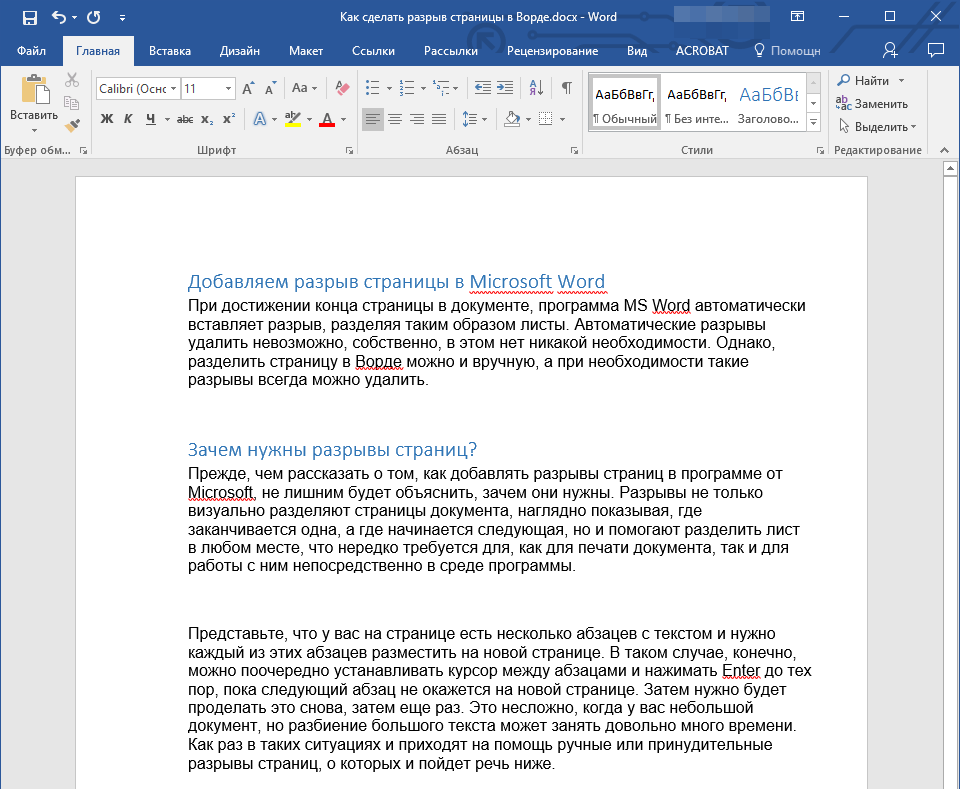
При достижении конца страницы в документе программа MS Word вставляет разрыв автоматически, разделяя таким образом листы. Автоматические разрывы удалить невозможно, собственно, в этом нет никакой необходимости. Однако, разделить страницу в Ворде можно и вручную, а при необходимости такие разрывы всегда можно удалить.
Урок: Как убрать разрыв страницы в Word
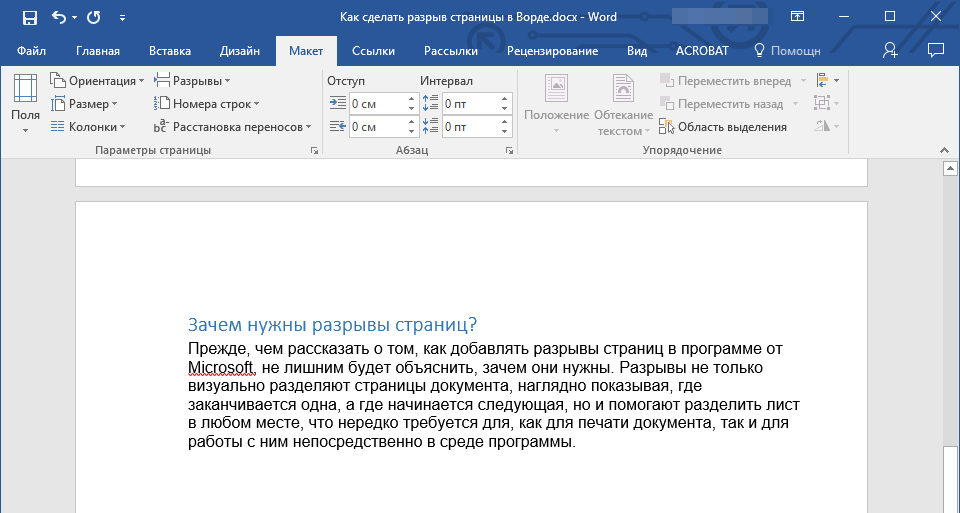
Зачем нужны разрывы страниц?
Прежде, чем рассказать о том, как добавлять разрывы страниц в программе от Microsoft, не лишним будет объяснить, зачем они нужны. Разрывы не только визуально разделяют страницы документа, наглядно показывая, где заканчивается одна, а где начинается следующая, но и помогают разделить лист в любом месте, что нередко требуется, как для печати документа, так и для работы с ним непосредственно в среде программы.
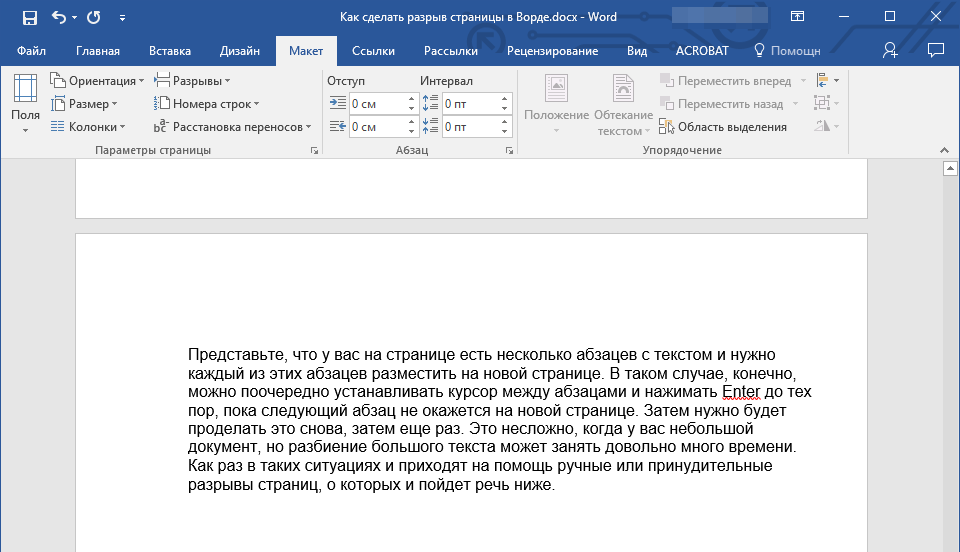
Представьте, что у вас на странице есть несколько абзацев с текстом и нужно каждый из этих абзацев разместить на новой странице. В таком случае, конечно, можно поочередно устанавливать курсор между абзацами и нажимать Enter пока следующий абзац не окажется на новой странице. Затем нужно будет проделать это снова, затем еще раз.
Сделать все это несложно, когда у вас небольшой документ, но разбиение большого текста может занять довольно много времени. Как раз в таких ситуациях и приходят на помощь ручные или, как их еще называют, принудительные разрывы страниц. Именно о них и пойдет речь ниже.
Примечание: Помимо всего вышеперечисленного, разрыв страницы — это еще и быстрый и удобный способ перейти на новую, пустую страницу документа Word, если вы точно закончили работы на предыдущей и уверенны в то, что хотите перейти к новой.
Добавление принудительного разрыва страницы
Принудительный разрыв — это то разделение страницы, которое можно добавить вручную. Чтобы добавить его в документе, нужно выполнить следующие действия:
1. Кликните левой кнопкой мышки по месту, в котором необходимо разделить страницу, то есть, начать новый лист.
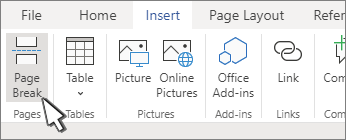
2. Перейдите во вкладку “Вставка” и нажмите на кнопку “Разрыв страницы”, расположенную в группе “Страницы”.
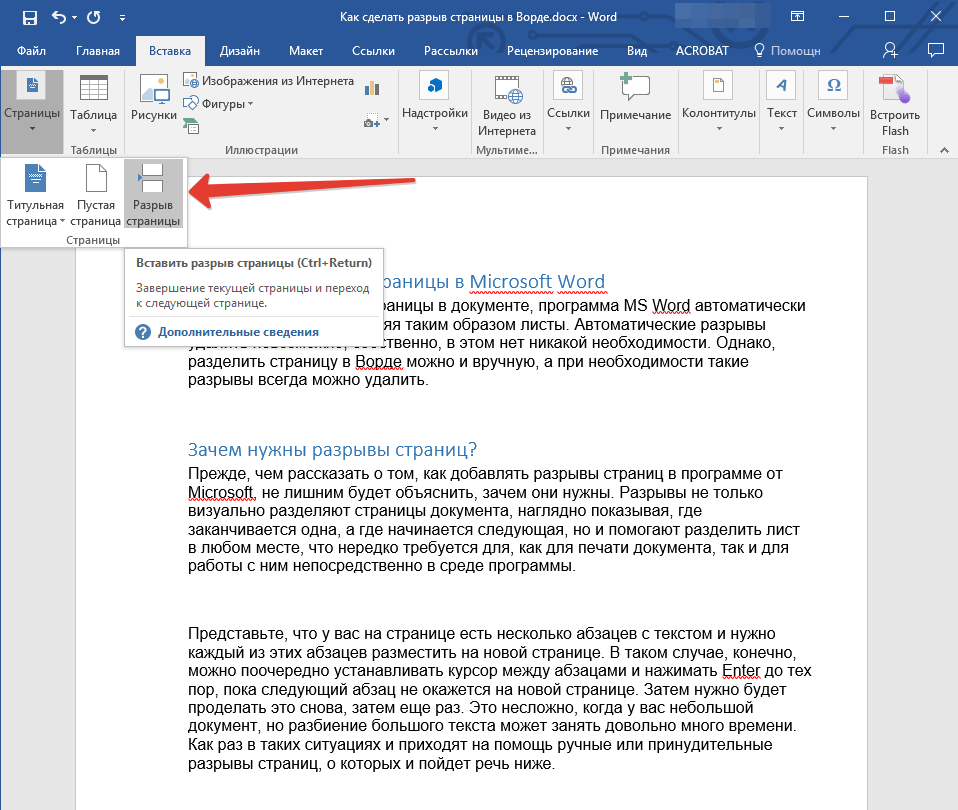
3. Разрыв страницы будет добавлен в выбранном месте. Текст, следующий за разрывом, будет перемещен на следующую страницу.
Примечание: Добавить разрыв страницы можно и с помощью комбинации клавиш — для этого просто нажмите “Ctrl+Enter”.

Существует еще один вариант добавления разрывов страницы.
1. Установите курсор в том месте, где нужно добавить разрыв.
2. Переключитесь на вкладку “Макет” и нажмите кнопку “Разрывы” (группа “Параметры страницы”), где в развернувшемся меню нужно выбрать пункт “Страницы”.
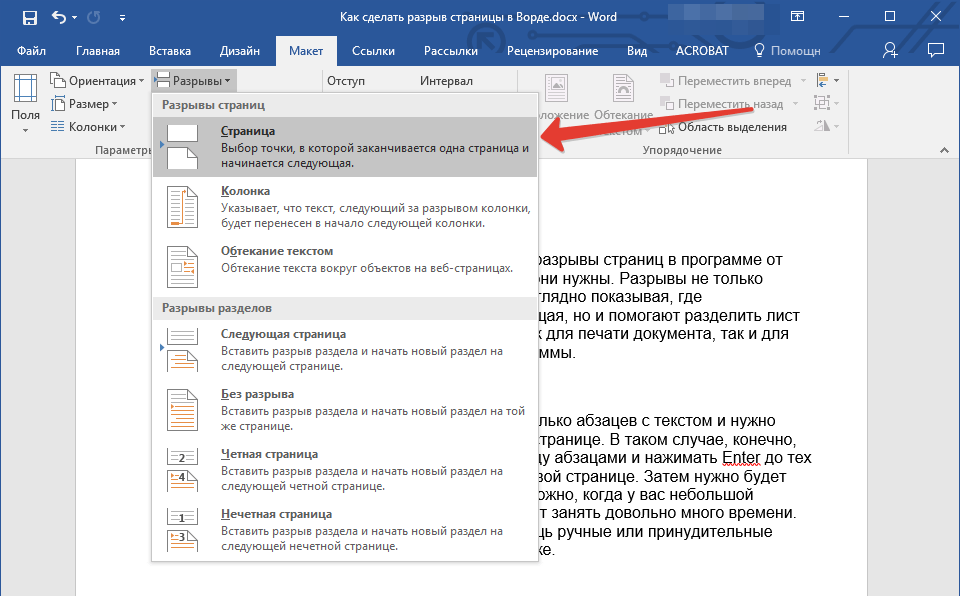
3. Разрыв будет добавлен в нужном месте.
Часть текста после разрыва переедет на следующую страницу.
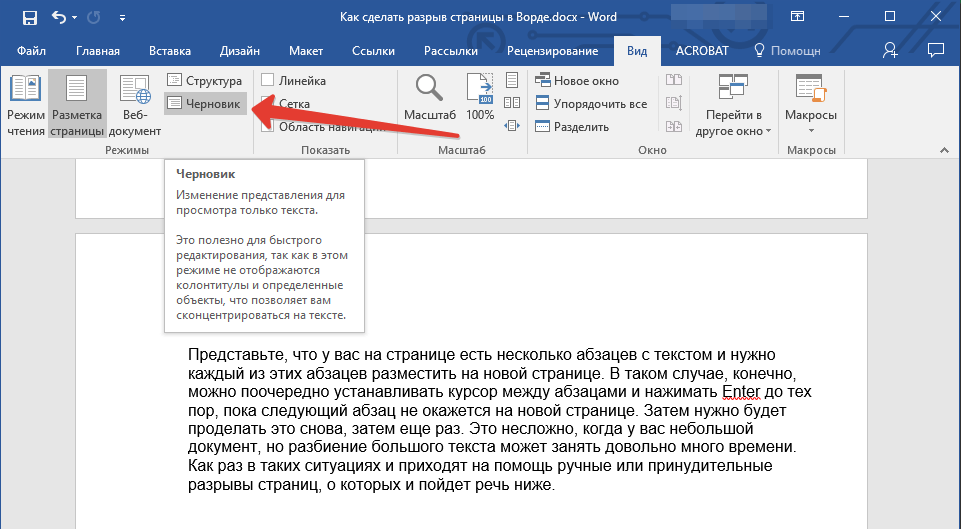
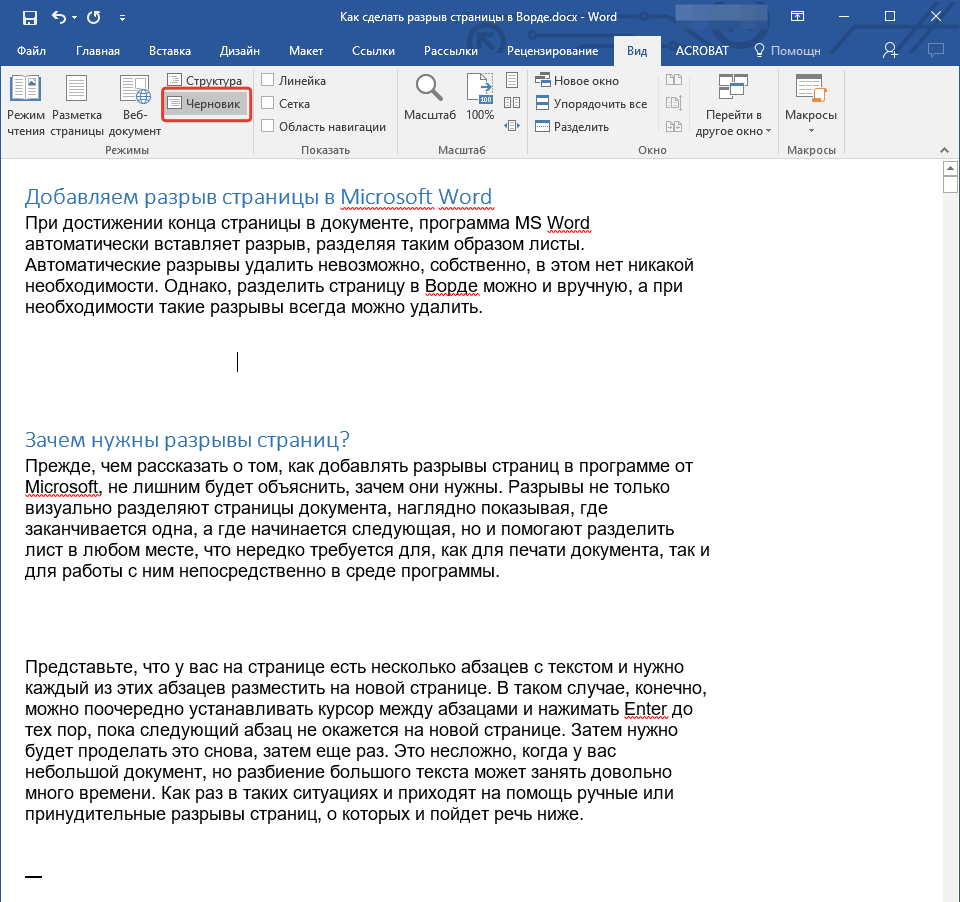
Совет: Чтобы увидеть все разрывы страниц в документе, из стандартного режима просмотра (“Разметка страницы”) необходимо переключиться в режим черновика.
Сделать это можно во вкладке “Вид”, нажав на кнопку “Черновик”, расположенную в группе “Режимы”. Каждая страница текста будет показана отдельным блоком.
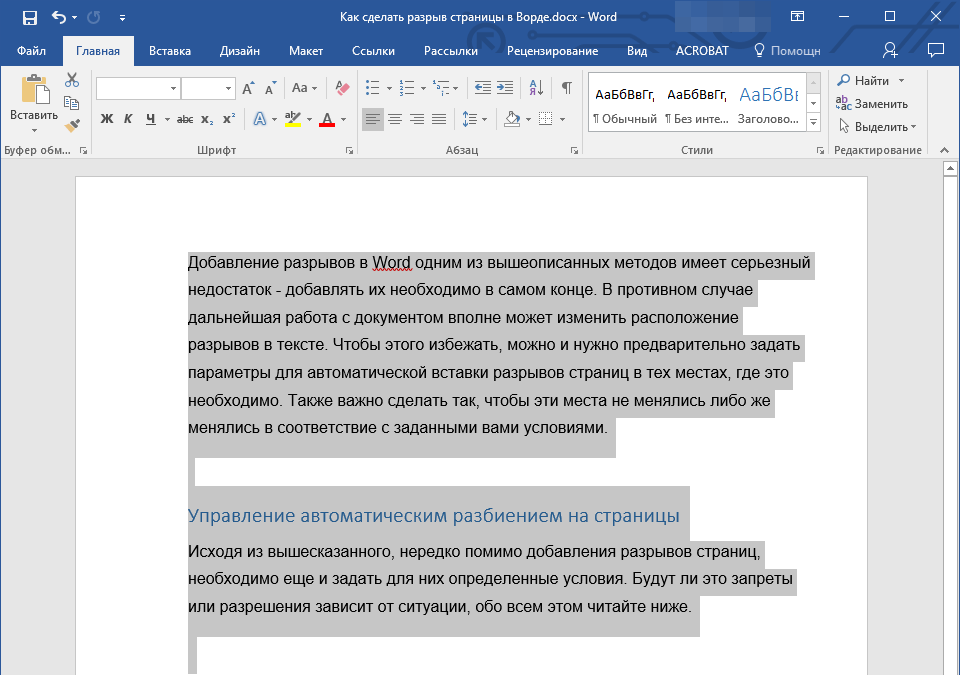
Добавление разрывов в Word одним из вышеописанных методов имеет серьезный недостаток — крайне желательно добавлять их на финальной стадии работы с документом. В противном случае дальнейшие действия вполне могут изменить расположение разрывов в тексте, добавить новые и/или убрать те, что были необходимы. Чтобы этого избежать, можно и нужно предварительно задать параметры для автоматической вставки разрывов страниц в тех местах, где это требуется. Также важно сделать так, чтобы эти места не менялись либо же менялись только в строгом соответствие с заданными вами условиями.
Управление автоматическим разбиением на страницы
Исходя из вышесказанного, нередко помимо добавления разрывов страниц, необходимо еще и задать для них определенные условия. Будут ли это запреты или разрешения зависит от ситуации, обо всем этом читайте ниже.
Запрет разрыва страницы в середине абзаца
1. Выделите абзац, для которого вы хотите запретить добавление разрыва страницы.
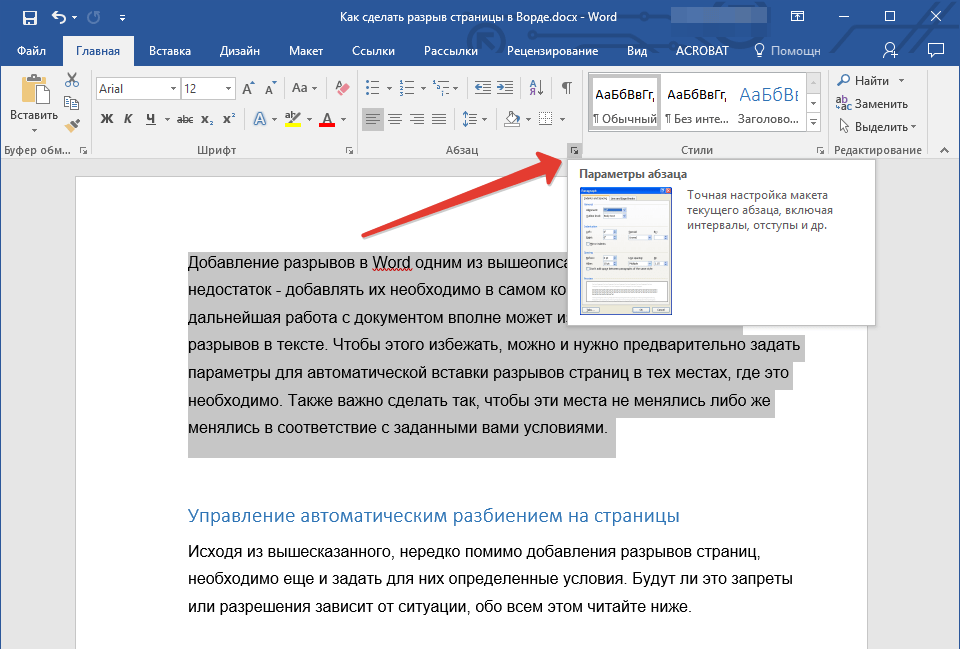
2. В группе “Абзац”, расположенной во вкладке “Главная”, разверните диалоговое окно.
3. В появившемся окне перейдите во вкладку “Положение на странице”.
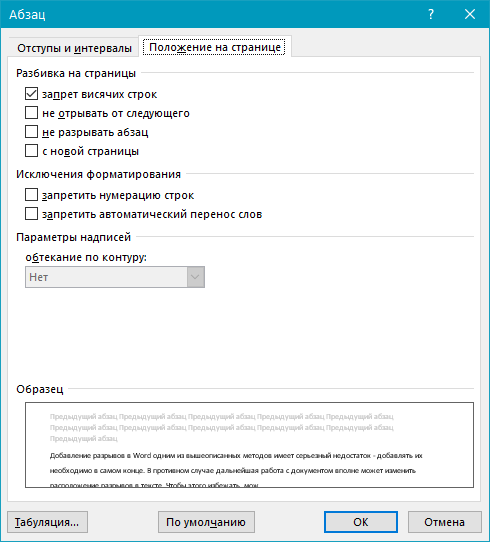
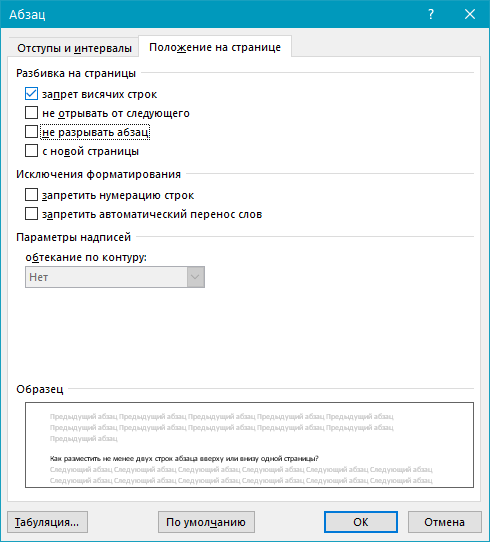
4. Установите галочку напротив пункта “Не разбивать абзац” и нажмите “ОК”.

5. В середине абзаца разрыв страницы больше не появится.
Запрет разрыва страницы между абзацами
1. Выделите те абзацы, которые в вашем тексте обязательно должны находиться на одной странице.
2. Раскройте диалоговое окно группы “Абзац”, расположенной во вкладке “Главная”.
3. Установите галочку напротив пункта “Не отрывать от следующего” (вкладка “Положение на странице”). Для подтверждения нажмите “ОК”.

4. Разрыв между этими абзацами будет запрещен.
Добавление разрыва страницы перед абзацем
1. Кликните левой кнопкой мышки на абзаце, перед которым требуется добавить разрыв страницы.
2. Откройте диалоговое окно группы “Абзац” (вкладка “Главная”).
3. Установите галочку напротив пункта “С новой страницы”, расположенного во вкладке “Положение на странице”. Нажмите “ОК”.
4. Разрыв будет добавлен, абзац перейдет на следующую страницу документа.

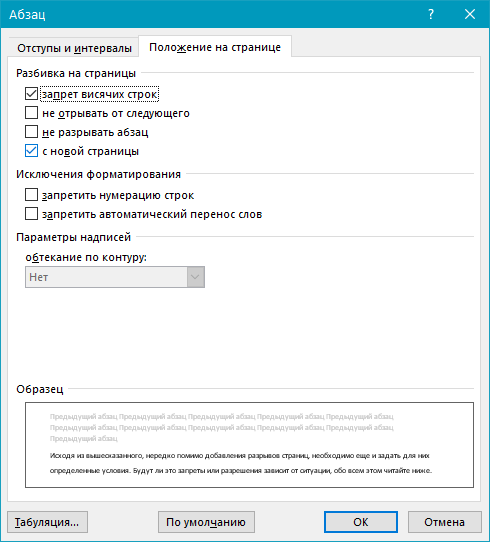
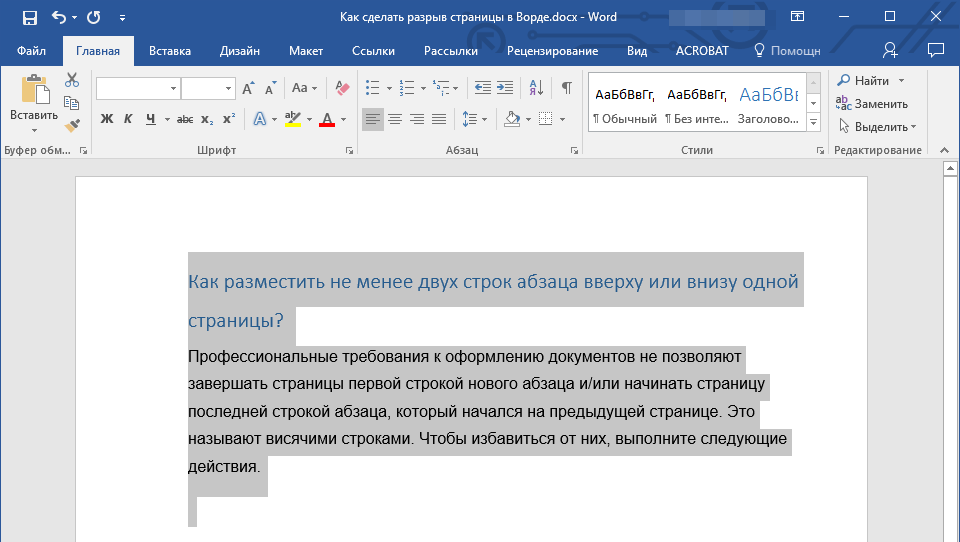
Как разместить не менее двух строк абзаца вверху или внизу одной страницы?
Профессиональные требования к оформлению документов не позволяют завершать страницы первой строкой нового абзаца и/или начинать страницу последней строкой абзаца, который начался на предыдущей странице. Это называют висячими строками. Чтобы избавиться от них, нужно проделать следующие действия.
1. Выделите абзацы, в которых нужно установить запрет висячих строк.
2. Откройте диалоговое окно группы “Абзац” и переключитесь на вкладку “Положение на странице”.
3. Установите галочку напротив пункта “Запрет висячих строк” и нажмите “ОК”.
Примечание: Этот режим включен по умолчанию, что предотвращает разделение листов в Ворде в первых и/или последних строках абзацев.
Как запретить разрыв строк таблицы при переносе на следующую страницу?
В статье, представленной по ссылке ниже, вы можете прочитать о том, как разделить таблицу в Word. Уместно также упомянуть и о том, как запретить разрыв или перенос таблицы на новую страницу.
Урок: Как разорвать таблицу в Ворде
Примечание: Если размер таблицы превышает одну страницу, запретить ее перенос невозможно.
1. Кликните по строке таблицы, разрыв которой необходимо запретить. В случае, если требуется уместить всю таблицу на одной странице, выделите ее полностью, нажав “Ctrl+A”.
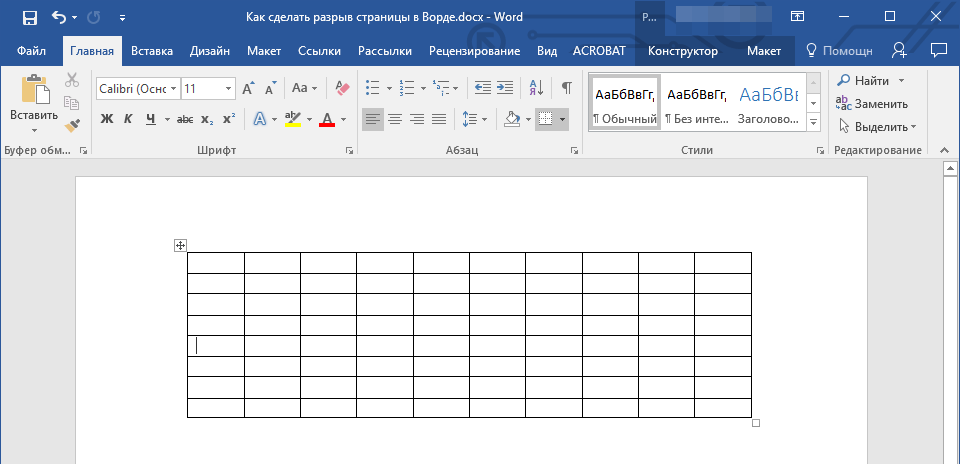
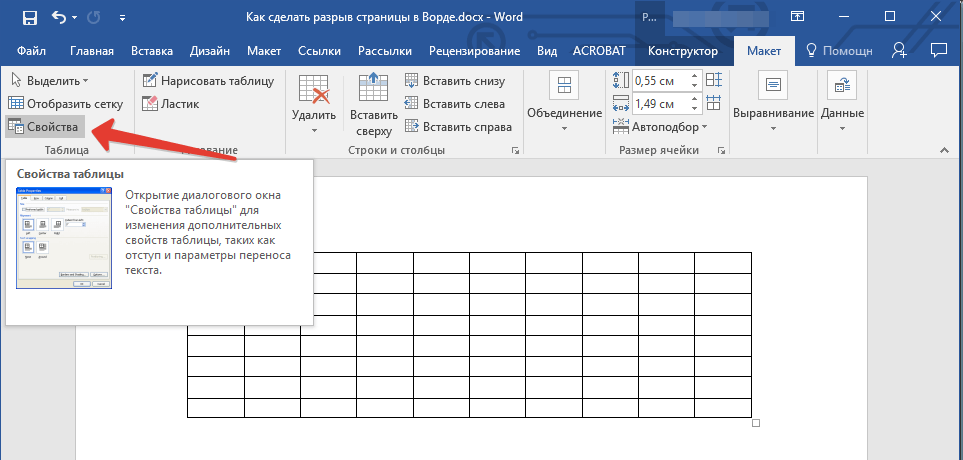
2. Перейдите в раздел “Работа с таблицами” и выберите вкладку “Макет”.
3. Вызовите меню “Свойства”, расположенное в группе “Таблица”.
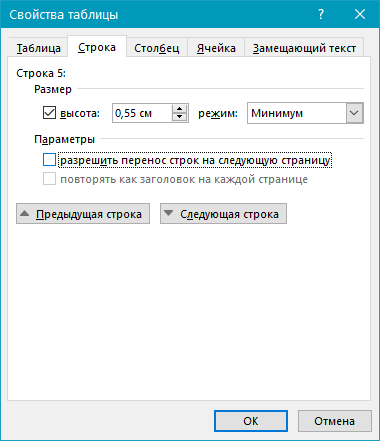
4. Откройте вкладку “Строка” и уберите галочку с пункта “Разрешить перенос строк на следующую страницу”, нажмите “ОК”.
5. Разрыв таблицы или отдельной ее части будет запрещен.
На этом все, теперь вы знаете, как сделать разрыв страницы в Ворде 2010 — 2016, а также в его более ранних версиях. Также мы рассказали вам о том, как изменять разрывы страниц и задавать условия для их появления или, наоборот, запрещать таковое. Продуктивной вам работы и достижения в ней только положительных результатов.
 A page break moves the content after the break to the next page in your document. This tutorial shows three ways to insert page breaks in Microsoft Word. We’ll also look at how to delete page breaks.
Quick Links:
- How to Insert Page Breaks
- How to Delete Page Breaks
Looking for information about section breaks? Please check out my other tutorial “How to Insert Section Breaks in Microsoft Word.”
This tutorial is also available as a YouTube video showing all the steps in real time.
Watch more than 100 other videos about Microsoft Word and Adobe Acrobat on my YouTube channel.
The images below are from Word for Microsoft 365. These steps will also work in Word 2019, Word 2016, Word 2013, and Word for Mac.
There are three ways to insert page breaks in Microsoft Word: (1) the Insert tab, (2) the Layout tab, and (3) the keyboard shortcut.
Recommended First Step: Select the Show/Hide button in the Home tab to show the formatting marks in your document, including page breaks.

Insert a Page Break through the Insert Tab
- Place your cursor where you want to insert the break.

- Select the Insert tab in the ribbon.

- Select Page Break in the Pages group.

The content after the break should move to the next page in your document.
Insert a Page Break through the Layout Tab
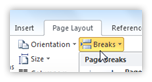
- Place your cursor where you want to insert the break (see figure 2).
- Select the Layout tab in the ribbon.

- Select Breaks in the Page Setup group.

- Select Page in the drop-down menu.

The content after the break should move to the next page in your document.
Insert a Page Break with a Keyboard Shortcut
- Place your cursor where you want to insert the break (see figure 2).
- Press the shortcut Ctrl + Enter (PC) or Command + Return (Mac) on your keyboard.
The content after the break should move to the next page in your document.
How to Delete Page Breaks
You can skip to step 2 if your formatting marks are already visible.
- Select the Show/Hide button in the Home tab to reveal the formatting marks (see figure 1).
- Place your cursor at the start of the page break.

- Select the Delete key on your keyboard.
- Reselect the Show/Hide button to hide the formatting marks (see figure 1).
The page break should be deleted.
Related Resources
How to Insert and Delete a Blank Page in Microsoft Word
How to Insert Headers and Footers in Microsoft Word
How to Adjust Page Margins in Microsoft Word
How to Add Page Numbers in Microsoft Word
Updated May 23, 2021

Have you ever wanted to format a document into different sections? If so, the page breaks in Word allow you to personalize your documents better and faster.
With Word’s many styles and themes, it can be quite hard to only stick to one thing throughout your entire document. When using page breaks, you can break your documents up into sections. This allows for more efficient formatting throughout your file.
Quick Answers on How to Insert or Delete Page Breaks
In newer versions of Word, you can find page breaks in two locations. One is by navigating to the Insert tab. From here, choose the Page Break button.
More breaks are available if you go to the Layout tab, then click on the Breaks button. A menu with all available page breaks opens up. When you insert them, they’ll break the page wherever your blinking cursor is in your document.
For older versions of Word, such as Office 2007 or 2010, simply click on Page Break from the Insert tab. Other breaks are available in the Page Layout tab. Locate the Breaks button, similar to new Word editions.
To remove a page break, go to the Home tab and click on the icon to show section and page breaks. Find the page break in your document which you want to remove. Double click on it then press the Delete button on your keyboard.
Types of Breaks in Word
- Page Break
- Column Break
- Text Wrapping
- Next Page, Section Break, and Even/Odd Page Breaks
How to Insert a page break in Word
Newer versions of Word
- Open your document in Word and find the part where you want to insert a page break.
- Click into your document where you want the break to happen.
- Navigate to the Layout tab.

- Choose Breaks and pick the type of break you want to insert.

- Click on the break to insert it into your document.


Older versions of Word
- Open your document in Word and find the part where you want to insert a page break.
- Click into your document where you want the break to happen.
- Navigate to the Page Layout tab.

- Click on Breaks to open a list of available page breaks.
- Choose your desired break and insert it into your document by clicking on it once.
How to Delete a Page Break
- Click on the icon in your Home tab. This will show all nonprinting characters, including page breaks.
- Locate the page break you want to remove then double click on it.

- Press the Delete key on your keyboard.

If you’re looking for a software company you can trust for its integrity and honest business practices, look no further than SoftwareKeep. We are a Microsoft Certified Partner and a BBB Accredited Business that cares about bringing our customers a reliable, satisfying experience on the software products they need. We will be with you before, during, and after all the sales.
Insert or Delete Page Breaks in a Word Document
by Avantix Learning Team | Updated January 10, 2021
Applies to: Microsoft® Word® 2010, 2013, 2016, 2019 or 365 (Windows)
You can add or remove page breaks in Microsoft Word in a number of ways. It’s important to understand that there are both manual page breaks and automatic page breaks in Word. Automatic page breaks are inserted by Word based on settings in the file (such as font size, paragraph spacing, page size and margins). You can delete manual page breaks by selecting them and deleting them. However, if page breaks are automatic, you can’t remove them, you can only adjust where they occur by editing the document (such as changing margins, paragraph spacing and font size).
If you are a keyboard only user, check out our article No Mouse? Using Keyboard Only Navigation in Microsoft Office.
Recommended article: How to Quickly Remove All Page Breaks in a Word Document
Do you want to learn more about Microsoft Word? Check out our virtual classroom or live classroom Word courses >
Viewing page breaks
To view manual page breaks, paragraph marks and other non-printing characters in Microsoft Word:
- Click the Home tab in the Ribbon.
- Click Show/Hide ¶ in the Paragraph group Paragraph marks, tabs, spacing and manual page breaks will display but will not print.
Removing unnecessary blank paragraphs
If a user has pressed Enter multiple times to create a new page (which is not good practice), you should delete the extra blank paragraphs or hard returns. Word will then create automatic page breaks or you can insert a manual page break if necessary.
To delete unnecessary blank paragraphs:
- If necessary, click the Home tab in the Ribbon and then click Show/Hide ¶.
- Select the blank paragraphs (hard returns).
- Press Backspace or Delete to delete blank paragraphs.
Inserting a manual page break
To insert a manual page break using the Ribbon:
- If necessary, click the Home tab in the Ribbon and then click Show/Hide ¶.
- Place the insertion point where you want the manual break to appear.
- Click the Page Layout or Layout tab in the Ribbon.
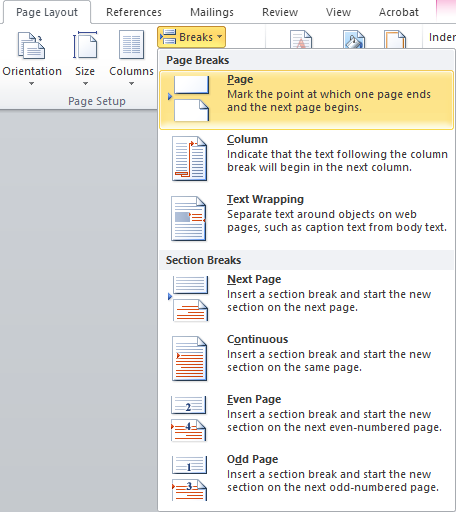
- In the Page Setup group, click Breaks. A drop-down menu appears.
- Click Page under Page Breaks. A page break will appear with a dotted line and the word Page Break.
Below is the Breaks drop-down menu:

To insert a manual page break using a keyboard:
- If necessary, click the Home tab in the Ribbon and then click Show/Hide ¶.
- Place the insertion point where you want the break to appear.
- Press Ctrl + Enter. A page break will appear with a dotted line and the word Page Break.
Ensuring Track Changes is off
You can’t delete manual page breaks when Track Changes is turned on.
To turn off Track Changes:
- Click the Review tab in the Ribbon.
- Click Track Changes in the Tracking group.
- From the drop-down menu, select Track Changes to turn tracking off.
You can also press Ctrl + Shift + E to turn off Track Changes.
Deleting a manual page break
Manual page breaks are hidden by default. If you want to delete a manual page break easily, turn on Show/Hide ¶.
To delete a break:
- If necessary, click the Home tab and then click Show/Hide ¶.
- Double-click the break to select it or drag over it.
- Press Backspace or Delete to delete the break.
Removing page breaks created with paragraph formatting
Page breaks may have been created by a user where specific paragraph settings have been selected.
If a page break is occurring and you do not see a manual page break with Show/Hide ¶ on, check the paragraph options:
- Select the first paragraph on the page following the page break.
- Click the Home tab in the Ribbon.
- Click the Paragraph dialog box launcher on the bottom right corner in the Paragraph group. A dialog box appears.
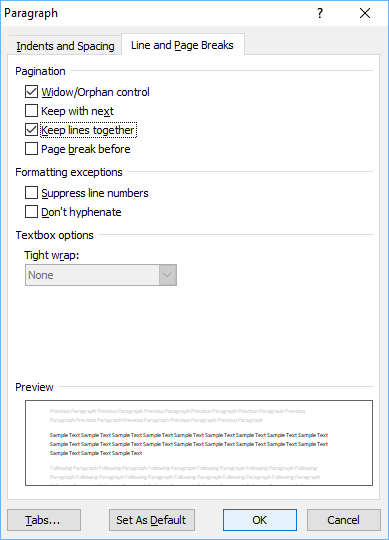
- Click the Line and Page Breaks tab.
- Check to see whether one of the following three pagination options is selected:
Page break before – inserts a page break before a paragraph.
Keep with next – prevents a page break between the current and following paragraphs.
Keep lines together – prevents a page break within a paragraph. - Select the desired pagination option.
- Click OK.
Below is the Paragraph dialog box:
Note: The above paragraph formatting options may have been included in a style such as Heading 1. If that is the case, you will need to edit the style and change the pagination options in the style.
Page breaks can be troublesome and learning how they are created will help in removing them.
Subscribe to get more articles like this one
Did you find this article helpful? If you would like to receive new articles, join our email list.
More resources
How to Create a Table of Contents in Word
3 Strikethrough Shortcuts in Microsoft Word
How to Add Page Numbers in Word (Step by Step)
14+ Word Selection Shortcuts to Quickly Select Text
How to Find and Replace in Word (and Use Wildcards)
Related courses
Microsoft Word: Intermediate / Advanced
Microsoft Word: Designing Dynamic Word Documents Using Fields
Microsoft Word: Long Documents Master Class
Microsoft Word: Accessible Word Documents
Microsoft Excel: Intermediate / Advanced
Microsoft PowerPoint: Intermediate / Advanced
VIEW MORE COURSES >
Our instructor-led courses are delivered in virtual classroom format or at our downtown Toronto location at 18 King Street East, Suite 1400, Toronto, Ontario, Canada (some in-person classroom courses may also be delivered at an alternate downtown Toronto location). Contact us at info@avantixlearning.ca if you’d like to arrange custom instructor-led virtual classroom or onsite training on a date that’s convenient for you.
Copyright 2023 Avantix® Learning
Microsoft, the Microsoft logo, Microsoft Office and related Microsoft applications and logos are registered trademarks of Microsoft Corporation in Canada, US and other countries. All other trademarks are the property of the registered owners.
Avantix Learning |18 King Street East, Suite 1400, Toronto, Ontario, Canada M5C 1C4 | Contact us at info@avantixlearning.ca