
![]()
Download Article
![]()
Download Article
Do you find yourself often using a variety of unrelated commands when creating and editing documents in Microsoft Word? If so, you’ve probably worn out your mouse by clicking through all of the different menus and ribbons. Give your mouse a break and speed up your productivity by creating a menu specifically for your needs. This guide will show you how.
-

1
Access the customization options.
- In Word 2013, click the File Tab, then from the blue strip on the left side, click “Options” at the bottom. Click the “Customize Ribbon” at the left side of the dialog box. You can also right-click any ribbon tab and select “Customize the Ribbon” from the pop-up menu.
- In Word 2010, click the File tab, and then select “Options” under “Help” from the File menu. Click the “Customize Ribbon” at the left side of the dialog box. You can also right-click any ribbon tab and select “Customize the Ribbon” from the pop-up menu.
- In Word 2003, select “Customize” from the Tools menu, then click the Commands tab.
-
2
Add the new ribbon/tab.
- In Word 2010 and 2013, click the “New Tab” button located beneath the Customize the Ribbon list.
- In Word 2003, select “New Menu” from the Categories list, then select “New Menu” again from the Commands list.
Advertisement
-
3
Position the new menu/tab in the list.
- In Word 2010 and 2013, click the arrow buttons to the right of the Customize the Ribbon list to move your new menu up or down in the list until it is in the position you want.
- In Word 2003, drag “New Menu” from the Commands list to the menu bar. When you see a vertical bar showing the position of the new menu, and the bar is where you want the new menu to be, release your mouse button.
-
4
Give your new menu/tab a meaningful name.
- In Word 2010 and 2013, click the “Rename” button beneath the Customize the Ribbon list to display the Name dialog box. Enter the new name in the “Display name” field and click OK.
- In Word 2003, right click “New Menu” on the menu bar to display the Name field. Type in the new name for your menu and press the Enter key.


Advertisement
-
1
Select the name of the tab you’ve created in the Customize the Ribbon list. You must create a group for your new commands before you can add them to the tab.
-
2
Click the New Group button beneath the Customize the Ribbon list. This adds an item named “New Group” underneath the name of your new tab in the list.
-
3
Give your new group a meaningful name. Click the Rename button to display the Name dialog box, type in the new name, and click OK. You can then add commands to this group.
- You can add a custom group to one of the default tabs as well as to your custom tab. One use of this feature is to create a custom group that includes only the commands in a default tab’s group that you use most frequently and then delete the original group.[1]
- You can add a custom group to one of the default tabs as well as to your custom tab. One use of this feature is to create a custom group that includes only the commands in a default tab’s group that you use most frequently and then delete the original group.[1]


Advertisement
-
1
Select the menu/group that you want to add items to.
- In Word 2010 and 2013, select the group you want to add items to from the Customize the Ribbon list. You can add menu items only to groups you created, which are identified in the list with the label “(Custom)” after the group’s name.
- In Word 2003, select the menu you want to customize from the Categories list.
-
2
Select the command you want to add to the menu/group.
- In Word 2010 and 2013, select one of the options from the “Choose commands from” dropdown list, then select the command from the scrolling list beneath it.
- In Word 2003, select the command from the Commands box list.
-
3
Add the command to the menu/group.
- In Word 2010 and 2013, click the “Add>>” button to the right of the scrolling list. Use the buttons to the right of the Customize the Ribbon list to position the new command within the group as you wish.
- In Word 2003, drag the selected command to the menu you want to add the command to. When you see a vertical bar showing the position of the new command, and the bar is where you want the new command to be, release your mouse button.
-
4
Exit from the customization feature when you’re finished.
- In Word 2010 and 2013, click OK.
- In Word 2003, click Close.


Advertisement
-
1
Access the customization options if you haven’t done so already. See the first section of this tutorial for how to do this for your version of Word.
-
2
Select the command you wish to remove.
-
3
Remove the command from the menu or group.
- In Word 2010 and 2013, click the “<< Remove” button to move the command back to the “Choose commands from” list.
- In Word 2003, drag the unwanted command off the menu into the document window.
-
4
Exit from the customization feature when you’re finished.
- In Word 2010 and 2013, click OK.
- In Word 2003, click Close.


Advertisement
Ask a Question
200 characters left
Include your email address to get a message when this question is answered.
Submit
Advertisement
-
Before adding custom menus or groups, take the time to consider which commands and menus you use most frequently, and also explore the use of the Toolbar/Quick Access Toolbar and shortcut keys. You may find these features more useful than adding a custom menu.
-
It is possible to customize the menu ribbon in Word 2007, but doing so requires custom programming in XML to accomplish this, and the existing tabs cannot be modified in any way. Providing a user interface to modify the menu ribbon was not accomplished until Word 2010.
Thanks for submitting a tip for review!
Advertisement
About This Article
Thanks to all authors for creating a page that has been read 58,370 times.
Is this article up to date?
Want to create a Restaurant Menu in Microsoft Word? This guide will help you to create beautiful restaurant menu designs in Microsoft Word without much hassle. Here, we will be mentioning two different methods to do that. Let’s check out these methods now!.

Here are the methods to create a restaurant menu in Word:
- Manually create a restaurant menu from scratch.
- Search for a menu template from Word’s online library to create your own restaurant menu.
Check out the detailed procedure below!
1] Manually create a Restaurant menu from scratch in Word
You can create a completely new restaurant menu from scratch in Microsoft Word. Although, it can be a bit challenging. To help you out, we are mentioning some basic steps to create a simple restaurant menu in Word. These are the steps:
- Launch Microsoft Word and create a blank document.
- Set up the document layout as per your requirement.
- Add a table to insert dishes’ names and respective prices.
- Configure cell margins.
- Remove border from the table.
- Add logo and restaurant name to the title of the document.
- Add a table for restaurant details at the bottom.
- Save or Print the restaurant menu.
Let us check out these steps in detail now!
Firstly, open the Word application and create a blank document. You now have to set up the document layout according to your requirement and specification. For example, you can change document orientation to landscape or portrait, set up margins, etc.
Now, you need to enter a table that will contain the main food menu of your restaurant. Go to the Insert menu and click on the Table drop-down option and tap on the Insert Table option.
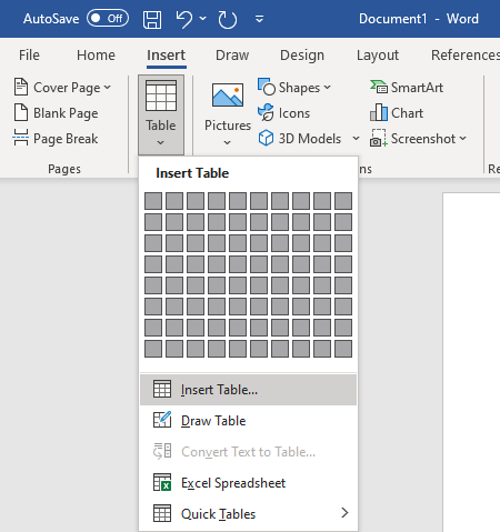
You have to insert the number of rows and columns according to the number of items you want to display on one page of a restaurant menu. For example, if you want to display two different kinds of cuisines with 4 different dishes in each, you can enter a table of size “4×5”. Extra columns and rows are added to leave gaps between the columns and to add menu categories, respectively. In this manner, you can choose the correct size of the table.
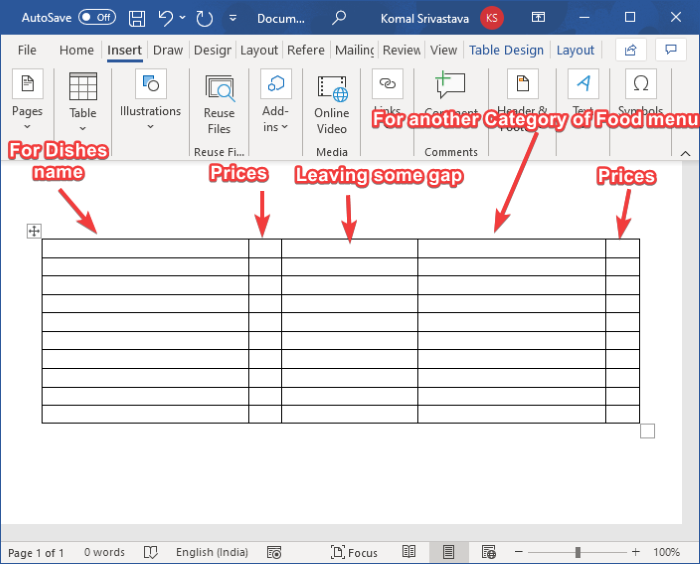
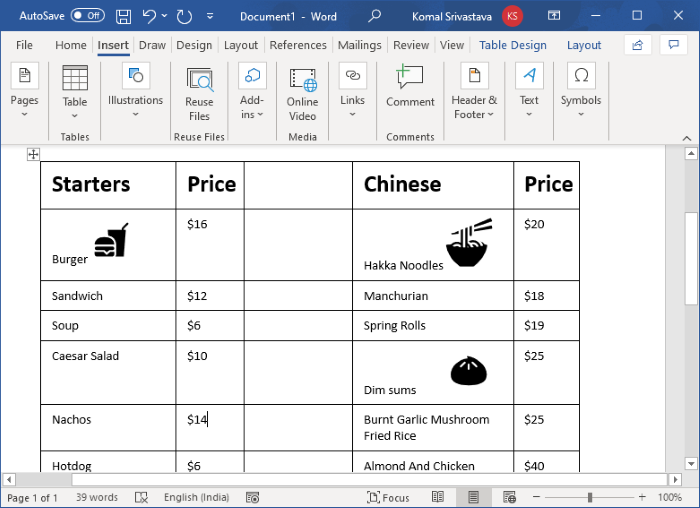
Now, name the first column as Category name (e.g., Starter, Cuisine Name, etc.), then name the next column as Price. Leave the third column to leave some gap between two categories of the menu. Then, again write the category name and price. See the below screenshot for your reference.
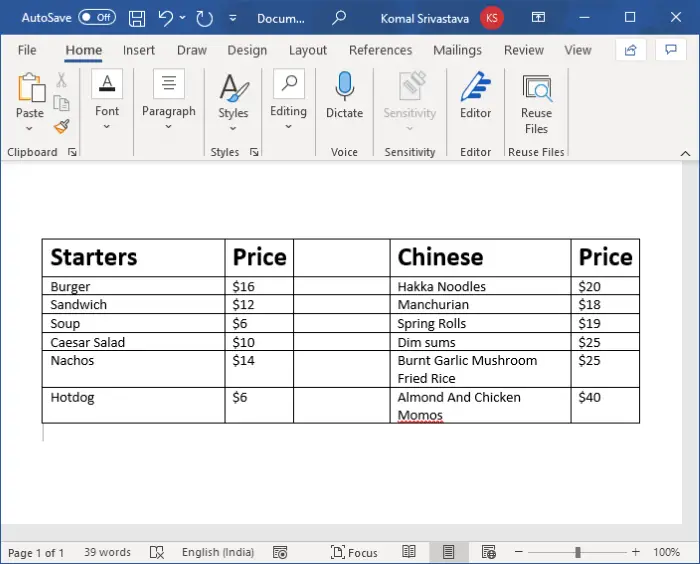
After that, enter the dishes’ names and respective prices in the rows. Your document will look something like the one shown in the below screenshot.
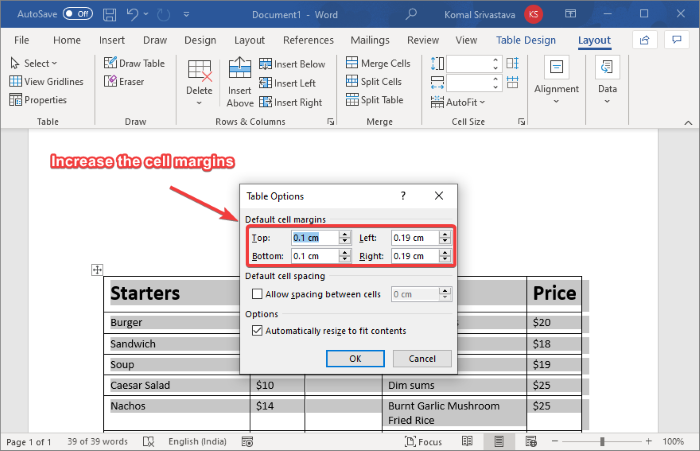
Next, you have to enlarge the cell margin so that the menu items don’t overlap and appear clearly in the final menu design. For that, select the table and go to the Layout tab. From the Alignment section, click on the Cell Margin option and then increase the top, bottom, left, and right cell margins.
You can also add related icons to the dishes by using the built-in icon library, or you can import custom images too. Simply go to the Insert tab and click on the Icon option to browse and import related food icons.
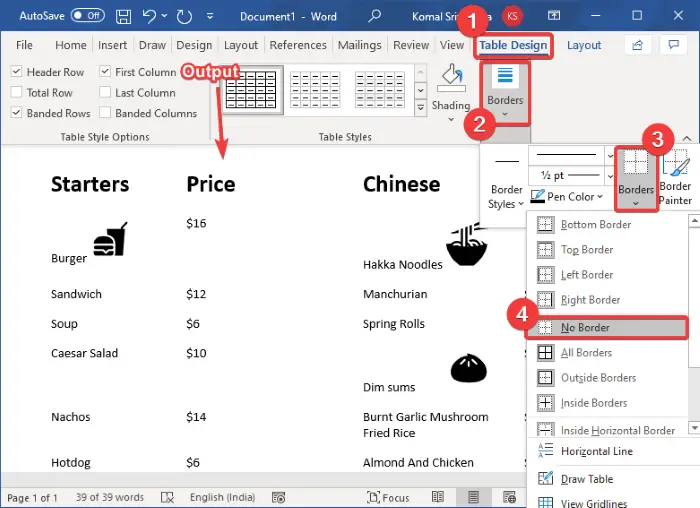
Now, select the whole table and go to the Table Design tab. Then, click on the Borders drop-down button, and from the borders, select the No Border option.
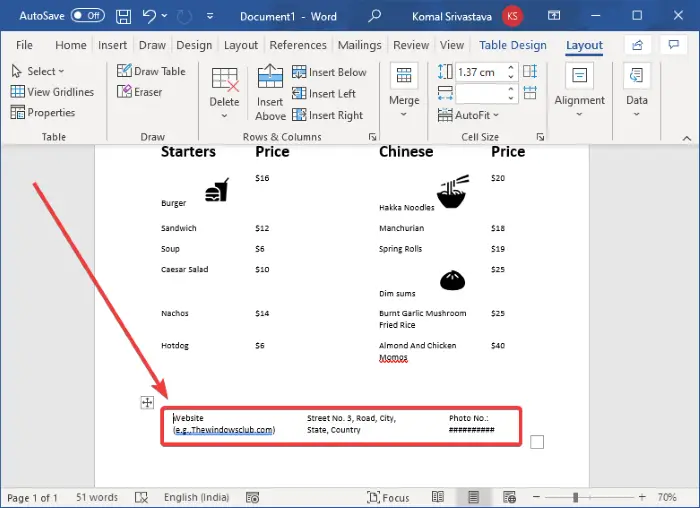
To enter some basic details about the restaurant, insert a table with multiple columns but 1 row. Move this table to the bottom of the page and enter the website, phone number, address, and other details that you want to add.
After that, select the No Border option for this table by going to the Table Design tab (as mentioned in the previous step).
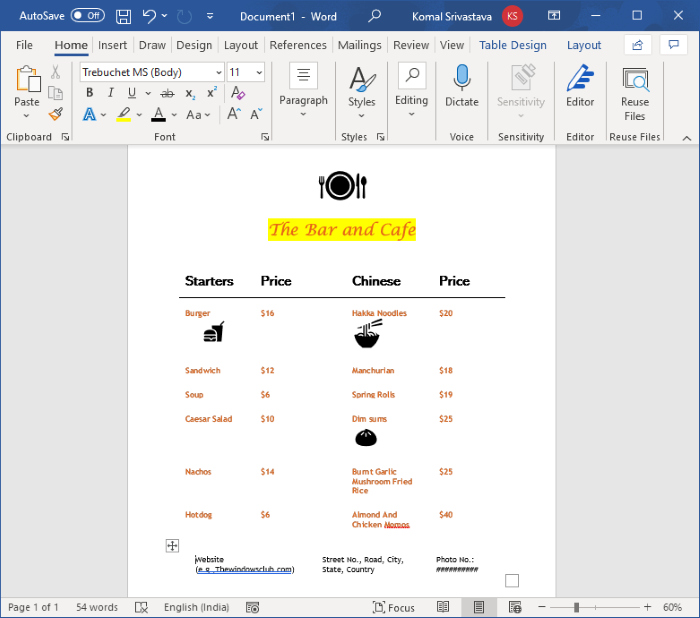
You can now add your logo image (Insert > Illustrations > Pictures) and restaurant name to the top of the menu. Use a fancy font to add the restaurant name so that it looks more appealing.

Now, customize the text and appearance as per your requirement. Word provides a lot of good styling options to do that, so you can play around to make a beautiful restaurant menu.
Finally, when you’re done, you can save the restaurant menu in Word, PDF, XPS, Web Page, and other formats. And, you can also print the created restaurant menu directly on the paper.
2] Search for a menu template from Word’s online library to create your own restaurant menu
You can find a lot of handy templates in Word and other Office applications to create a specific design. It also offers some restaurant menu templates that you can explore and customize. Here are the steps to use to create a restaurant menu in Word using a predesigned template:
Open Word and go to the File > New option. Type “menu” in the search box and press Enter button. You will see various restaurant templates.
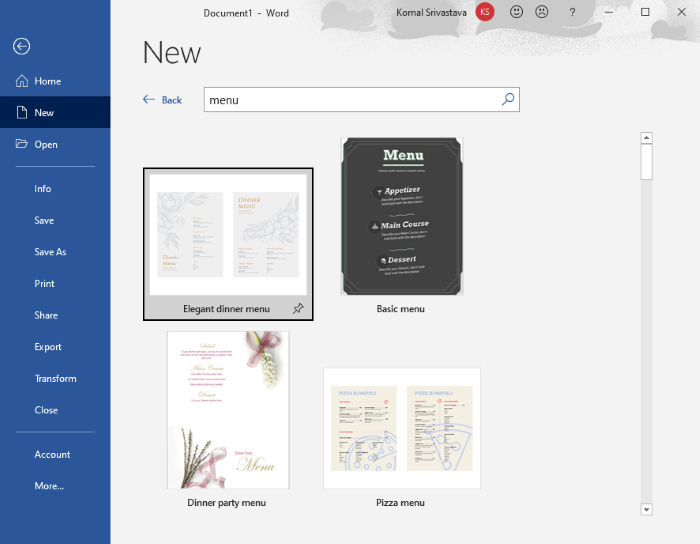
Select the one that you like and then click on the Create button to import it.
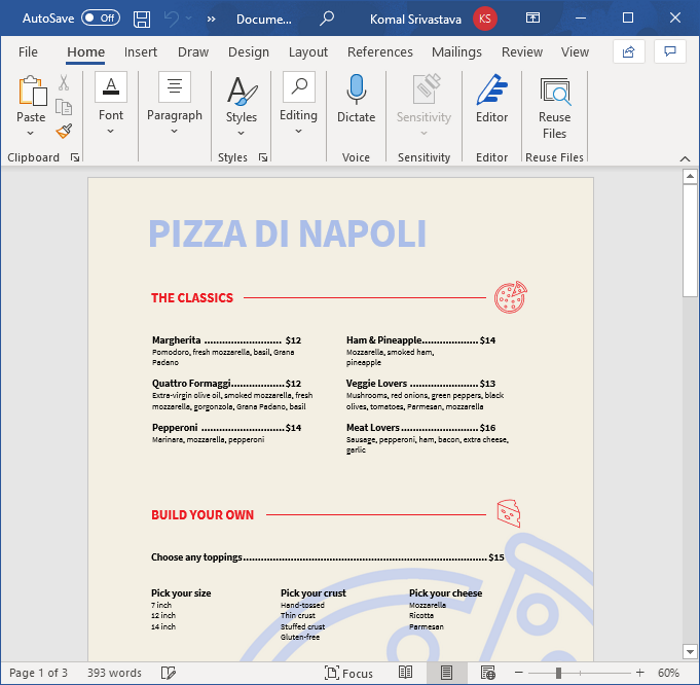
You can then customize the menu as per your requirement and when done, save or print it.
So, this is how you can create some really nice restaurant menu designs in Word.
Now read: How to create a flyer in Microsoft Word
Sometimes we have trouble finding a menu on Microsoft Word,
because we forget the menu.
The following is the location of the menu and commands in
Microsoft Word 2003 and Word 2007 in the section insert
 |
| Insert Menu and Their Location |
The insert menu is a quick way to add features like page
number,table, graphic, picture, symbol, equation, Hyperlink, smart art, text
box, word art date etc. to your document. If you click on the Insert, you will
get Ribbon like this option
|
Word 2003 Location |
Word 2007 Location |
|
|
Break |
> |
Insert | Pages | Page Break |
|
Page Numbers |
> |
Insert | Header & Footer | Page |
|
Page Numbers |
> |
Header & Footer Tools | Design | |
|
Date and Time |
> |
Insert | Text | Date & Time |
|
Date and Time |
> |
Header & Footer Tools | Design | |
|
AutoText (AutoText) |
> |
Insert | Text | Quick Parts |
|
AutoText (New) |
> |
Office Button | Word Options | |
|
AutoText (List of AutoText Entries) |
> |
Insert | Text | Quick Parts |
|
Field |
> |
Insert | Text | Quick Parts | Field |
|
Field |
> |
Header & Footer Tools | Design | |
|
Symbol |
> |
Insert | Symbols | Symbol |
|
Comment |
> |
Review | Comments | New Comment |
|
Ink Comment |
> |
Review | Ink | Start Inking |
|
Ink Annotations |
> |
Review | Ink | Start Inking |
|
* Number |
> |
Insert | Symbols | Number |
|
Reference (Footnote) |
> |
References | Footnotes | Footnote and |
|
Reference (Caption) |
> |
References | Captions | Insert Caption |
|
Reference (Cross-reference) |
> |
Insert | Links | Cross-reference |
|
Reference (Cross-reference) |
> |
References | Captions | |
|
Reference (Index and Tables) |
> |
Office Button | Word Options | |
|
Reference (Index and Tables) |
> |
References | Table of Contents | Table |
|
Reference (Index and Tables) |
> |
References | Index | Insert Index |
|
Reference (Index and Tables) |
> |
References Table of Authorities | |
|
Web Component |
> |
Office Button | Word Options | |
|
Picture (Clip Art) |
> |
Insert | Illustrations | Clip Art |
|
Picture (Clip Art) |
> |
Header & Footer Tools | Design | |
|
Picture (From File) |
> |
Insert | Illustrations | Picture |
|
Picture (From File) |
> |
Header & Footer Tools | Design | |
|
Picture (From File) |
> |
Chart Tools | Layout | Insert | |
|
Picture (From Scanner or Camera) |
> |
Removed from product |
|
Picture (Ink Drawing and Writing) |
> |
Review | Inking | Start Inking |
|
Picture (New Drawing) |
> |
Insert | Illustrations | Shapes | New |
|
Picture (AutoShapes) |
> |
Insert | Illustrations | Shapes |
|
Picture (AutoShapes) |
> |
Drawing Tools | Format | Insert Shapes |
|
Picture (WordArt) |
> |
Insert | Text | WordArt |
|
Picture (Organization Chart) |
> |
Insert | Illustrations | SmartArt |
|
Picture (Chart) |
> |
Insert | Illustrations | Chart |
|
Diagram |
> |
Insert | Illustrations | SmartArt |
|
Text Box |
> |
Insert | Text | Text Box | Text Box |
|
Text Box |
> |
Chart Tools | Layout | Insert | Draw |
|
Text Box |
> |
Text Box Tools | Format | Text | Draw |
|
File |
> |
Insert | Text | Object | Text from |
|
Object |
> |
Insert | Text | Object |
|
Bookmark |
> |
Insert | Links | Bookmark |
|
Hyperlink |
> |
Insert | Links | Hyperlink |
The Insert tab is used to insert and format images, shapes, tables, headers and footers, 3D models, page numbers, equations, etc. in a Word document. As said in the above line, Only this menu adds strengths to the text in a Word document.
Table of Contents
- Groups of Insert Tab in MS Word
- Pages Group in Insert Menu in Microsoft Word
- The table in Insert Ribbon Tab
- Illustrations Group:
- Add-ins:
- Online Video:
- Links Group:

Groups of Insert Tab in MS Word
The Insert menu has 10 groups. These are pages, tables, illustrations, add-ins, media, links, comments, text, and symbols.

The Page Group has 3 commands. These are Cover Page, Blank Page, and Page Break.

Cover Page: The cover page is a beautiful design on top of thick paper that protects the inside content. Its complete information is crafted in a short and compelling title.
Blank Page: This is very useful for adding as many blank pages as you want in a Word document.
How to Add Blank Page in a Word Document: Put a cursor wherever you want to add a blank page in a word document. then click on Blank Page on the Insert Tab.
Page Break: Section break means completing the work of the current page to start a new page, stopping that section there, and starting the next page for the new section.
The table in Insert Ribbon Tab

Using the table, we can organize the information we want as we like. For example, text can be arranged in columns or rows in a beautiful and meaningful way.
Illustrations Group:

The action of illustrating something such as a picture, a diagram, a shape, 3d-models, and a chart helps make something clear or attractive.
Add-ins:
The Add-ins group has 3 commands. These are Get Add-ins, My Add-ins, and Wikipedia.
Get Add-ins: You can get add-ins by finding them here to add new functionality to your word document, excel, and ppt.
My Add-ins: After installing add-ins, you can use and add new features to your work.
Wikipedia: You can easily access Wikipedia content directly from your office applications such as MS Word.
Online Video:
Find and insert online videos to your document from a variety of online websites such as YouTube, and Vimeo.
Links Group:
The links group in Insert Tab has 3 commands. These are Links or Hyperlinks, bookmarks, and Cross-reference.
Link or Hyperlink: Quickly create links from one document to another, one section to another, one page to another, document content to websites, etc. to quickly access and jump to links of the contents and bookmarks.
Bookmark: Bookmark the specific and important document work that you want to access in the future. This functionality enables you to jump to the bookmark location.
What the Insert tab is used for?
An Insert tab is used to insert pictures, shapes, tables, 3D models, etc. into the Word document and to format them.

Welcome to our guide to the menus in Microsoft Word.
We cover all of the menus individually, with explanations of what the various commands do. We include the File, Edit, View, Insert, Format, Tools and Table menus.
Note: These menus disappeared in Word versions 2007 and 2010.
The File Menu
The file menu is one you will find yourself using extensively. It is used to create new documents, open existing documents and saving your new/updated documents. It also includes the page setup, print preview, and other important functions relating to your document and its properties.

New: This creates a new Microsoft Word document. The page setup of the new document, ie, the size, margins, etc, will depend on your page settings.
Open: This opens an existing Microsoft Word document, it will open a file explorer window allowing you to navigate to the file you want to open.
Close: This will close the current word document. Microsoft Word may prompt you to save the file, if you have made changes to the document since the last save.
Save: Saves the current document, replacing the existing file (if previously saved).
Save As: This allows you to save the document as a different file. This is very useful, imagine you open your letterhead template and write a letter that you want to save, if you just saved it (using the option above), it would replace your letterhead template. When you click on Save As you will be able to choose the new filename and location for your document.
Save As Web Page: This option will save the current document with the HTM(L) extension, allowing it to be viewed by a web browser.
Search: Clicking Search will open the basic search window, allowing you to search your computer for documents containing certain text.
Versions: This feature allows you to save different versions of the current Microsoft Word document. For example, if you changed your letterhead and wanted to keep the older version too.
Web Page Preview: Clicking on this option will display your current document as it would look in a web browser. When you click, Microsoft Word will open the document in your default web browser.
Page Setup: This opens the page setup options dialogue box. It allows you to set the properties (dimensions, margins, etc) of the current document and change the default for new Microsoft Word documents.
Print Preview: Selecting this option opens the print preview window, allowing you to preview how your document will look when printed.
Print: Opens the print dialogue box allowing you to print the current document.
Send To: Hovering your mouse over this option will allow you to send your document via email, or export it to Microsoft Powerpoint (if installed).
Properties: This will open the Microsoft Word document properties dialogue box, allowing you to view/edit various properties of the document. Including author information, statistics, type, location and filesize of the document.
![]()
The A symbol in fig 1.1 above shows where a list of recently opened documents are listed. This is a very handy feature of Microsoft Word, it saves using the normal opening procedure.
Exit: Clicking this will exit Microsoft Word, it may prompt you to save any unsaved documents.
The Edit Menu
The edit menu, as its name suggests, includes commands relating to the editing of your document. It includes important editing features such as undo, repeat, cut, copy, paste, select all, find, replace and more.

Undo (last task): This option allows you to undo the last thing you did in your Microsoft Word document, in our example (fig 1.1) you can see our last action was to type some text. This is a handy command, especially if you delete something by accident.
Repeat (last task): This repeats your last action. In our example clicking on the Repeat Typing will repeatedly insert the same piece of text into the document.
Cut: This command will cut (delete) the currently selected element. For example if you highlight (select) some text and then click on cut, it will be deleted.
Copy: The Copy command will copy the curently selected element (text, image, etc) into the office clipboard. It can then be inserted (pasted) into a document using the Paste command (see below), which will appear in the edit menu once you have copied something to the office clipboard.
Office Clipboard: This command will display the current contents of the office clipboard, allowing you to click on the stored elements to insert (paste) them directly into the current document. Elements (text, images, etc) can be added to the clipboard using the Copy command (see above), this clipboard will also show any elements stored in the Windows Clipboard.
Paste: This will paste (insert) into the current document the last element to be stored in the Office Clipboard.
Paste Special: Clicking on this command will bring up the Microsoft Word Paste Special dialogue box, it allows you to control the format of the text that will be inserted (pasted) from the Office/Windows clipboard.
Paste as Hyperlink: This command allows you to link (create a hyperlink) to a certain place in another Microsoft Word document, Excel worksheet, PowerPoint slide, or Access database. To achieve this, first copy the element that you want to link to into the clipboard, and then select the Paste as Hyperlink command.
note: The target file must have been saved previously, likewise if you are linking to an element in the current document, it must be saved first.
Clear: This command allows you to remove any formatting from the currently selected (highlighted) element (text/image). It also allows you to delete the selected element.
Select All: This will select (highlight) every element in the current document.
Find: Find allows you to search the current document for a certain word or phrase.
Replace: Replace allows you to replace a given text with a substitute of your choice.
Goto: Goto allows you to go directly to a certain page, section, line, bookmark, comment, footnote, endnote, field, table, graphic, equation, object, or heading.
Links: This allows you to manage any linked objects in the current document. A linked object is information (data) that is stored in another file, for example a Microsoft Excel spreadsheet, Microsoft Access database, or other compatible source. We will be covering linked objects in a future Microsoft Word tutorial.
Objects: This command allows you to manage any embedded objects within the current document.
The View Menu
This menu is used to control not only the visual layout of your Word document but also the printing configuration. It is also used to select which toolbars are visible in the Word environment. Commands include web layout, print layout, outline, task pane, toolbars, ruler, header and footer, footnotes, full screen view and zoom.

Normal: Selecting this will show your current document in a layout without the document margins.
Web Layout: The Web Layout view will show you how the current document will look on a web browser, a full-screen layout.
Print Layout: This view will show the document in a layout including all margins and page breaks.
Outline: The Outline view allows you to change the structure of your document, when selected it will open the Outline Toolbar. The Outline Toolbar allows you to, amongst other things, move headings up or down and/or change the heading types.
Task Pane: This command toggles (shows/hides) the Task Pane. The task pane is designed to give you quick access to frequently used commands, including Document Commands, The Office Clipboard, Basic Search, Style and Formatting and more.
Toolbars: When you hover your mouse pointer over Toolbars you will be presented with a submenu, this includes all of the different toolbars that are available. You can toggle (hide/show) the different toolbars by simply clicking on them within the submenu.
Ruler: Clicking on this will toggle (hide/show) the document ruler which appears across the top and down the side of the Microsoft Word document.
Document Map: The document map is a handy feature which allows you to navigate the current document, it will list the headings (heading 1, heading 2, etc) in the current document. To go directly to a certain paragraph heading, simply click on it in the left hand pane that opens.
Header and Footer: This allows you to edit the header and footer of the current document. We show you how to edit the header and footer in our letterhead tutorial here.
Footnotes: This command will show all footnotes and endnotes (you will be promoted for which) within the current document. Footnotes and Endnotes will be covered in a future Microsoft Word tutorial.
Markup: This will toggle (hide/show) any Markup (comments and tracked alterations/additions) in the current document.
Full Screen: This will show the current Microsoft Word document in full screen mode.
Zoom: This will open the zoom dialogue box, enabling you to change the percentage of zoom for the current view.
The Insert Menu
The insert menu is used to place various objects into your document, such as page numbers, pictures, symbols, comments and other objects. Commands include break, date and time, field, symbol, reference, web component, text box, file and hyperlink.

Break: This command opens the Break dialogue box, allowing you to insert page breaks and section breaks into the current document.
Page Numbers: Clicking on Page Numbers will open a dialogue box, which allows you to insert page numbers into the document using various options.
Date and Time: This command will open the Date and Time dialogue box. You can choose from many different date and time formats, you may also have different languages to choose from.
Autotext: Choosing this option will open the Microsoft Word Autotext dialogue box. We will cover Autotext in a future tutorial.
Field: This command allows you to enter specified fields into your document. The available fields include Date & Time, Document Automation, Document Information, Equations and Formulas, Index and Tables, Links and References, Mail Merge, Numbering and User Information.
Symbol: This allows you to insert symbols and special characters into your document. For example, if you wanted to include a copyright symbol or a trademark symbol, then you would use this feature. Other symbols (special characters) include currency symbols, mathematical symbols and foreign language alphabet characters.
Comment: This command will place a comment into the document at the location of the cursor. You will be able to type your comment into the comment box, once done, simply click anywhere outside of the comment box.
Reference: The Reference command will allow you to insert a footnote, caption, cross-reference, index, and tables.
Web Component: This command is used to insert any web components into your Microsoft Word document.
Picture: Allows you to insert a picture into your document. You will be offered various locations to locate the image, including clip art, the file system on your computer, and a digital camera or scanner.
Diagram: The Diagram command will open the diagram gallery dialogue box. You can choose from a selection of diagrams to insert into your document, including an organization chart, cycle diagram, radial diagram, pyramid diagram, venn diagram and a target diagram. You may have less or more diagrams available to insert, depending on your Microsoft Word installation.
Text Box: This allows you to insert text boxes, we will be covering text boxes in a future tutorial.
File: Enables you to insert part or all of a file into the current document.
Object: This command will insert an object of your choice, including media clips, Microsoft Excel charts and worksheets, Microsoft Powerpoint slides and presentations.
Bookmark: This handy feature allows you to bookmark a certain element (text, image, etc). You can name the bookmark and then return to it at any time by using the goto command in the edit menu.
Hyperlink: The Insert Hyperlink dialogue box allows you to add a hyperlink to an existing file, web page, certain place in the current document, a new document, or an email address.
The Format Menu
A guide to the format menu which controls your font’s properties along with the borders and shading options. Commands include paragraph, bullets and numbering, columns, tabs, text direction, background, autoformat, reveal formatting and more.

Font: This will change the font attributes of either the currently selected text, or any subsequent text, using the font dialogue box.
Paragraph: This command will open the Paragraph dialogue box, allowing you to make changes to either existing text or subsequent text. To change an existing paragraph, select the text you wish to change and then use this command to make the alterations, such as alignment, indentation, and spacing.
Bullets and Numbering: This is a handy command, it creates indented lists with various formats. You can either click the command and then start typing your list (pressing enter for the next line), or you can select some existing text to convert to a list. The listing format options include bulleted, numbered, outline numbered, and other styles.
Borders and Shading: This command allows you to create borders and shading on elements within your Microsoft Word document. The borders and shading can be applied to text, paragraphs, pictures, and more.
Columns: The Columns command will split the current document into the number of columns you specify. You can either split the whole page, or just from that point onwards.
Tabs: This command allows you to manage tabs, including the alignment, spacing, and whether the tab has a leader or not.
Drop Cap: A drop cap is a letter at the start of a paragraph of text that spans 2 or more rows of text, you will often see a drop cap in a book at the start of a chapter. This tool allows you to either add a drop cap character to your document or change an existing letter (at the start of a sentence) to a drop cap.
Text Direction: This allows you to change the text direction of a text object, for example a text box.
Change Case: The Change case tool allows you to alter the case of existing text. Options include sentence case, lowercase, uppercase, title case, and toggle case.
Background: This changes the background colour (color) of your Microsoft Word document. It also allows you to add watermarks and use different gradient effects.
Theme: The themes command will open the theme dialogue box, allowing you to change the theme of your document, including heading style, hyperlinks and background colour (color).
Frames: This command opens the Frames dialogue box.
AutoFormat: The AutoFormat feature will format a whole document with preset attributes.
Styles and Formatting: This will open the Styles and Formatting toolbar, allowing you create headings, lists and more.
Reveal Formatting: Clicking on this will show a dialogue box detailing the format attributes of the selected element.
Object: Allows you to make changes to any existing objects within the current document.
The Tools Menu
The tools menu will also be one you may use regularly, it includes the options command which controls spelling and grammar, security and more. Commands include language, word count, speech, letters and mailing, macro, customize and more.

Spelling and Grammar: This command will check the spelling and grammar of the current Microsoft Word document. It also allows you to add words to the dictionary, as well as changing the dictionary language (if available).
Language: The language tool has various options, including setting the language of the document, translating text, open the thesaurus and manage hyphenation.
Word Count: This will open the Word Count dialogue box, enabling you to count the amount of words in the whole document, or the currently selected text.
AutoSummarize: This can be a handy feature of Microsoft Word, depending on the type and format of your document. It will summarize a document using the attributes you give it, for example, you can choose the percentage of the document to be used for the summary, as well as the format of the summary.
Speech: This will open the Speech Recognition feature of Microsoft Word (if installed/available).
Track Changes: Clicking on this command will cause Microsoft Word to track any subsequent changes to the document. These changes can then be viewed by turning on the Markup option on the Edit menu.
Compare and Merge Documents: This feature enables you to easily compare and/or merge 2 documents.
Protect Document: This command allows you to control the protection of the document, including tracked changes, comments and forms.
Online Collaboration: Enables NetMeeting allowing you to communicate with others in real time via the internet or local network.
Letters and Mailing: Gives you access to various features, including the Mail Merge Wizard, the Letter Wizard, the Envelopes and Labels tool, and the Mail Merge Toolbar.
Macro: This opens the Macro Dialogue box, allowing you to manage subsequent and existing macros. We will be covering Microsoft Word macros in a future tutorial.
Templates and Add-Ins: Opens the Templates and Add-Ins Dialogue box, allowing you to add, remove or update styles and template.
AutoCorrect Options: Opens the AutoCorrect dialogue box, enabling you to manage capitalisation, and also the replace text as you type settings.
Customize: Allows you to customize the Microsoft Word toolbars, commands, and other options.
Options: This opens the main options dialogue box in Microsoft Word. It allows you to change many aspects of the current document and Microsoft Word environment.
The Table Menu
Tables are a great way of laying out content within your document. The table menu provides all you need to manage your tables and cells. Includes draw table, insert, delete, merge cells, split cells, split table, autoformat, convert, sort and more.

Draw Table: This command opens the Tables and Borders dialogue box with the draw table tool active. First you draw the outline of your table, then using the same tool, you can create cells by vertical or horizontal movements within the table.
Insert: Allows you to insert a whole table or just columns, rows and cells into the current document.
Delete: Delete complete tables, columns, rows and selected cells.
Select: This command allows you to select the current table, column, row or cell.
Merge Cells: This tool will merge the currently selected cells into one.
Split Cells: This will split the selected cell/s into your chosen amount of columns and rows, it will also offer (if more than one cell selected) to merge the selected cells before the split.
Split Table: This command will split the current table, making the split at the currently selected cells.
Table AutoFormat: This command will open the Microsoft Word Table AutoFormat dialogue box, where you can choose from a number of different table templates, including preset fonts and cell background colours (colors).
AutoFit: This tools gives you several options for resizing the selected table in relation with the contents or window. It also allows you to automate the distribution between columns and rows.
Heading Rows Repeat: This handy tool will repeat the currently selected row at the top of every page for the length of the table.
Convert: This command will convert existing text into a table format. The text will have to have a common separator to indicate the different columns, it will also needs new paragraphs where you would like each row.
Sort: This opens the Sort Table dialogue box. You can choose which column you would like to sort and by what order.
Formula: This tool allows you to apply a formula to the selected cell. For example, if you wanted to add up the contents of several rows in a specific column, you could use the SUM formula in the Formla dialogue box.
Hide Gridlines: This simply hides the gridlines of the selected table.
Table Properties: This will display the various properties of the selected table.