
Advanced mail merge sends customized messages to large numbers of people, with formulas and conditional statements to make the contents look exactly how you want.
Want more?
Field codes in Word
Mail merge
Take mail merge to the next level
So far, we have focused primarily on the MERGEFIELD field code. But you can go a lot farther.
First, let’s add a formula.
In the current email, we ask recipients to add 6000 miles to the mileage they had, when their car was last serviced.
It may not seem like much, but asking customers to do math is a good way to lose their attention.
However, we can give them a hand by doing the math for them.
First let’s rewrite the line, so recipients only have to check their mileage.
Next, select the placeholder, delete it, and press Ctrl+F9. This adds a blank field code.
To add a formula, start by typing the equal sign. Go to the MAILINGS tab and insert the Mileage merge field.
You could also press Ctrl +F9, and type it manually. After the merge field, type +6000, and finally, add the switch to format the number with a comma.
The formula adds 6000 to the Mileage at the customers’ last service.
Press Alt+F9, and then F9 to update the field code and preview the result.
Now customers won’t have to do any math. Down here, we are offering a discount to customers with cars older than 2005.
Pretty straightforward, but we can eliminate any potential for confusion by only showing the offer to customers who qualify. And to do that, we’ll use a conditional statement — the IF field code.
First, delete the text, press Alt+F9, and then, press Ctrl+F9 to add a blank field code.
Type IF and a space, click Insert Merge Field, and select Year.
Next, type space, the less than and equals symbols, and space, and in quotation marks, type 2005.
So that takes care of the condition.
Type a space, and then set off by quotation marks, type the text that you want customers to see if the condition is true – their car is older than 2005.
Type another space, and then inside quotation marks, type the text that you want customers to see if the condition is false – their car is 2005 or newer.
We don’t have any offer for these customers, but we can put in a plug for the service department.
Press Alt+F9, and F9 to update the field code and preview the result.
Now as you click through the recipients, the text changes depending on the year of the customer’s car.
To see more about how to use formulas and conditional statements, check out the links in the course summary.
If you don’t like all the typing, there is another way to add field codes.
Click the INSERT tab, click Quick Parts, and Field.
The list on the left shows all the field codes available in Word.
Click one of them, then fill in the properties and options. When you click OK, Word inserts the field code.
However, as you can see, Word doesn’t provide an option or switch to format the number.
If you run into a situation like this, click Field Codes to view the code before Word inserts it.
Now, you can add the switch to format the number with commas, and click OK.
Up next, we’ll use field code to target the recipients.
Conditional Mail Merge in MS Word
Microsoft Word provides basic personalization options for mail merges using merge fields. What if you want to apply more advanced personalization in a Word mail merge (beyond the basic first name/last name changes) or include conditionally formatted content in the merge fields? You can accomplish that with conditional mail merge rules in Microsoft Word.
Unlike Excel, there is no conditional formatting button in Microsoft Word. In addition, when sending out emails, MS Word does not preserve the formatting of MS Excel data files. However, you may employ an IF…THEN…ELSE rule to modify formatting and replace text/paragraphs depending on the conditions you define. Conditional mail merge allows you to change the content of your emails based on specific criteria or variable data in your excel data file, such as gender, client sector, purchase date, and so on.
Conditional mail merge capabilities in Microsoft Word are limited and need strong software expertise to set up. In addition, if you make a small error, you’ll run into a slew of formatting issues.
In this article, we’ll show you how to set up a conditional mail merge in MS Word correctly, as well as the most common mistakes to avoid. We’ll also go through a simple method for hyper-personalizing your emails using GMass.
How to Insert Conditional Content (If…Then…Else) in Word Mail Merge Fields
In Microsoft Word, the IF function is enclosed in curly braces. It begins with a condition and then contains the action to perform if true, as well as the action to take if false, as shown below:
{ IF Condition “Truetext” “Falsetext”}
Examples:
{ IF { MERGEFIELD Gender } = “Male” “Mr.” “Ms. }
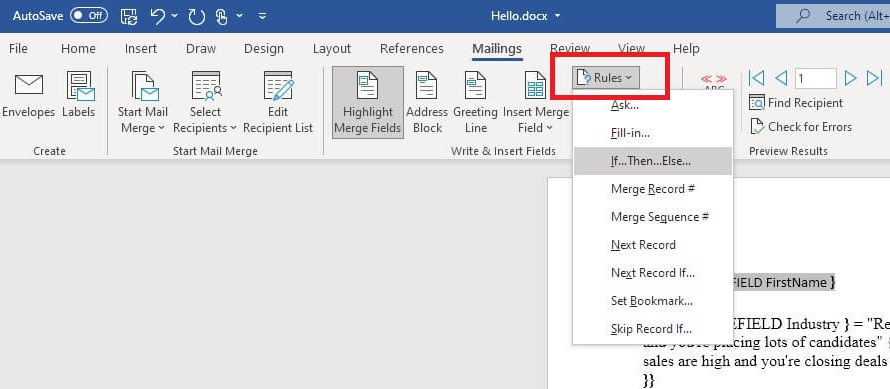
{ IF { MERGEFIELD Industry } = “Recruiting” “hope the recruiting business is going well, and you’re placing lots of candidates!” “hope things are going well for you.”}
Note: In Microsoft Word, these curly braces must be placed using an If…then…else rule as shown below. Alternatively, you may use the Ctrl+F9 key combination to add them. The conditional formatting will not work if the curly braces are entered manually.
Here’s how to implement conditional mail merge in MS Word:
1. Open MS Word > Go to Mailings tab
2. Click Start mail merge and choose Letters
3. Select the Insert Merge Field option from the dropdown menu to insert merge fields.
4. Select where you want the conditional text to be placed.
5. Press Alt + F9 so you can see the field codes
6. To apply conditional formatting, Go to Mailings > Rules > If…Then…Else and a pop-up box will open
7. In the Field name dropdown select the desired field from the data source (MS Excel File) you want to use for conditional text

8. In the Comparison box, choose a method for comparing the data value.
9. In the Compare to box, type in the comparison value
10. In the Insert this text box, enter the content that appears in the document when the comparison criteria is met.
11. In the Otherwise insert this text box, type in the words that would be included in the document when the comparison criteria is not met
12. Select OK.
13. If you want to apply conditional formatting manually, you need to use Ctrl+F9 to add the curly braces and the field codes.
Note: Don’t use spaces in your field names.
Formatting the Conditional Text in Word Mail Merge
When you perform a merge mail in Microsoft Word, the formatting of an MS Excel data file is lost. You must edit the field code if you want to change the color of the conditional text. For example, if you want to change the color of “Truetext” to blue, modify the field code as follows:
{ IF { MERGEFIELD Industry } = “Recruiting” “hope the recruiting business is going well and you’re placing lots of candidates!” “hope things are going well for you.”}
Nesting Conditional Statements / Multiple If- Else Conditions in Word Mail Merge
If you want to use multiple IF statements, simply add more IF functions in the field code, as shown below:
{ IF Condition1 “Truetext” { IF Condition2 “Truetext” “Falsetext” }}
{ IF { MERGEFIELD Industry } = “Recruiting” “hope the recruiting business is going well and you’re placing lots of candidates!” { IF { MERGEFIELD Industry } = “Sales” hope your sales are high and you’re closing deals left and right! “hope things are going well for you.”}}
Problems with Conditional Formatting in Word Mail Merge
- If you have more than one condition or wish to perform more complex mail merge personalization, the procedure gets considerably more difficult.
- You can not simply type the curly braces {}; MS Word must add these. You can only create a blank field by pressing Ctrl+F9. If you type the curly braces manually, the conditional formatting won’t work.
- The text you use for your TrueText or FalseText should not include any special characters, such as slashes (/), Inverted Commas, Quotation Marks, brackets ([]), or braces ({). This is because MS Word will not output them during the mail merge.
- If any of the “IF” fields are blank during mail merge, MS word won’t be able to suppress them. As a result, you will see additional blank lines or inconsistent output in your mail merge letters. To eliminate them, you need to add a “b” after the merge field.
- If you have any hyperlinks in the conditional text, those will not be outputted by the simple If…Then…Else… rule.
Conditional Text Automation with GMass and Gmail
GMass has created a simple solution to send personalized mail merges using Gmail that eliminates the typical conditional formatting and other mail merge issues associated with MS Word. With GMass, you can use If/Then and other statements in your Subject and Message to hyper-personalize content based on any criteria you have associated with each email address. Read our full guide on conditional content for personalized emails.
Along with this, you can also:
Personalize links and URLs for each recipient, including anchor links without link breakage that can otherwise occur in the Compose window.
Personalize attachments by sending individual images, invoices, or documents to each recipient in a mass email.
Personalize images for each recipient to include a different team logo, pet breed, or astrological sign, etc.
Personalize large blocks of text according to the needs of each recipient, such as a different promotional offer for different levels of customers, or for customers in different zip codes.
Send your campaign to a personalized CC or BCC address for each recipient to keep the associated salesperson or distributor in the loop according to their respective territories or accounts.
Personalize the To header of each individual email so that your contact’s First and Last name appear as part of the To line instead of just their email address.
For our full set of personalization documentation see the personalization category page on this blog.
We’ve tried to make GMass as simple to use as possible. It is simple to double-check your personalization before sending your email to all of your recipients. You may use the Send Test button with the Create Drafts option to see instantly what personalization to everyone on your list will look like. Simply select the “Send Test” option and check your Gmail DRAFTS folder. When you’re ready to send your campaign with the red GMass button, don’t forget to switch the Action back to “Send email.”
Conclusion
The Microsoft Word mail merge tool is powerful, but it has certain limits. For example, it isn’t well-equipped to handle complex mail merges or conditional content, resulting in errors and formatting issues that are difficult to troubleshoot. You can use GMass to create hyper-personalized bulk email campaigns using Gmail. With in-depth analytics and automation, you’ll have all you need to easily send, manage, and follow up on your emails. Why not download the GMass Chrome extension today and try it yourself?
See why GMass has 300k+ users and 6,600+ 5-star reviews
Email marketing. Cold email. Mail merge. Avoid the spam folder. Easy to learn and use. All inside Gmail.
TRY GMASS FOR FREE
Download Chrome extension — 30 second intall!
No credit card required
Love what you’re reading? Get the latest email strategy and tips & stay in touch.

If someone asked you to add a conditional header or footer to a document in Microsoft Word, would you panic? Some users might because the interface offers no such option. You can use the Different Odd & Even Pages option, but that’s not the same thing.
A conditional header or footer will display, or not, depending on whether an expression returns TRUE or FALSE. In this article, I’ll show you three ways to use fields to generate a conditional header or footer, although the examples will all be in the footer.
SEE: 83 Excel tips every user should master (TechRepublic)
I’m using Microsoft 365 on a Windows 10 64-bit system, but you can use earlier versions. Word fields have been around for a long time. This article assumes you have basic Word skills, but even a beginner should be able to follow the instructions to success. You can download the demonstration .docx and .doc files, but I encourage you to practice entering the fields yourself. Word Online doesn’t display headers and footers; nor can you manipulate them. However, they are still there, and they will print.
What’s a field in Word?
If you’re familiar with Word fields, you’re a step ahead. If not, they’re not difficult to use, but the process might feel a bit odd at first. Fields are little programs that complete a specific task, similar to a macro, but you don’t need to write any code. Everything the field needs to do its job is already there, except for the information you supply.
You use fields almost every time you use Word, but you just don’t realize it. For instance, when you use the interface to display a page number in the header or footer, you’re using a field! If you’d like to see that at work, open a new document and enter a page number in the header. Then, select the page number and press Alt + F9. Word converts the page number to its underlying { PAGE } field. In this mode, you can modify the field. Press Alt + F9, which acts as a toggle, again to see the page number.
The expression to display on last page of the Word doc
It’s common to display a different header or footer on the first or last page of a document. You can use the built-in Different First Page option to display a different header on the first page. There’s no such option for the last page; determining the last page requires a simple field expression in the form
{ IF {PAGE} = { NUMPAGES }, “true text” “false text”}
It’s easy to decipher: If the current page number, { PAGE } equals the total number of pages, { NUMPAGES } print “true text”. If the two page numbers don’t match, the expression prints “false text”.
Let’s look at a quick example using a three-page document:
- Open the header or footer by double-clicking in the top or bottom margin.
- Word will position the cursor at the left margin, which is fine.
- In this next part, we’ll be entering the fields manually, which I think is the easiest way to enter nested fields. To insert a blank field, press Ctrl + F9 and type IF. (Case doesn’t really matter.)
- While still inside the If field, press Ctrl + F9 a second time to enter a blank field and enter PAGE.
- Move the cursor to the right of the closing } character in the { PAGE } field and enter =.
- Press Ctrl + F9 a third time and enter NUMPAGES.
- Move the cursor to the right of the closing } character in the NUMPAGES field and enter “Last page” “Not the last page”.
Figure A shows the nested fields. Do not enter the {} characters from the keypad; it won’t work. You must enter the blank fields using Ctrl + F9 and enter the content inside those brackets. Now, select the entire nested field expression and press Alt + F9 to evaluate the results (Figure A). As you can see, the last page is the current page.
Figure A

I’ve shown you only one way to enter fields, but there are other methods. Before we continue, I want to share another way to enter nested fields that you might find easier. You can type the field name, such as IF or NAME, select that name and press Ctrl + F9. Doing so will convert IF or NAME to a field and insert the brackets.
This simple expression works fine until you have unnumbered pages in your document. For instance, the document might have a table of contents or a title page that you don’t want in the page count. When this happens, you must find a way to accommodate those pages.
SEE: Windows 10: Lists of vocal commands for speech recognition and dictation (free PDF) (TechRepublic)
If you’re excluding only the first page, use the Different First Page option. Doing so will inhibit a page number, and Word won’t include that page in the final page count. Excluding other pages might require a section break or an expression that evaluates those pages. The following expression excludes a two-page section at the beginning of the document that’s not included in the total page count:
{ IF {PAGE} = { NUMPAGES – 2 } , “Last page” “Not the last page”}
The expression is almost the same as the first, but the -2 component subtracts 2, the total number of pages you want to exclude from the page count.
If you want the expression to return nothing, use the empty string character, “”. For example, the following nested field expression will return a string on the last page and return nothing on all other pages:
{ IF {PAGE} = { NUMPAGES } , “” “Not the last page” }
Now let’s look at a condition that seems a bit more complex.
How to specify page numbers in a footer in Word
What happens when you have a footer that you want to print only on specific pages? You use the same fields to express the specific page numbers and use the appropriate true and false text. Let’s suppose that you want to print a page number only on pages 5 and 6?
The problem only seems more complex, but in truth, it’s simpler. Instead of a nested expression, use two expressions:
{ If {Page } = “5” “Page 5” “” }
{ If {Page } = “6” “Page 6” “” }
Figure B shows the page number on page 6.
Figure B

Both conditions are simple to satisfy using two different expressions instead of a nested expression. Now, let’s look at something you might think impossible using fields.
How to display an image in a header or footer in Word
If asked if you can display a conditional image in the header or footer, you might reply, “No.” That’s not correct. You treat an image the same as any other text or value. First, you need to insert the image file into the document and save it as AutoText. Then, you insert the AutoText into the footer or header.
First, let’s add TechRepublic’s logo to the document as an AutoText element:
- Insert the picture into the body of the document (not a header or footer) as you would any other image file.
- Select the image and click the Explore Quick Parts dropdown.
- Choose Save Selection to Quick Parts Gallery.
- In the resulting dialog, give the image a name, such as TRLogo (see Figure C).
- Click OK.
Figure C

Now that you have the image as an AutoText item in the document, you can insert it into the header as follows:
- Position the cursor in the header or footer where you want it to appear.
- Using Figure D as a guide, enter the { IF } field up to the first ” character.
- Click the Insert tab.
- From the Explore Quick Parts dropdown (Text group), choose AutoText.
- Select the image (Figure E) and click OK.
Figure F shows the TechRepublic.com logo in the footer, conditionally; it appears only on the last page thanks to the conditional field expression shown in Figure D.
Figure D

Figure E

Figure F

This introduction to displaying conditional content, including images, in a document’s header or footer is just the beginning. You can use the following comparison operators: =, <>, <=, and >=. You’ve learned how to nest fields, which is extremely useful. However, even when you could use a nested expression, you don’t always have to, as shown in the second example. Remember to always use F9 to insert and modify fields.
Stay tuned
I mentioned earlier that there are more ways to enter fields than the one I worked you through in the first example. A future article will include all of the ways to enter Word fields.
Home/ Mail Merge/ Conditional Formatting with Mail Merge Fields in Word
You may be familiar with Conditional Formatting in Excel. Well, Conditional Formatting can also be applied to fields in Word.
Now, Word does not have a Conditional Formatting button like in Excel, but you can write an IF function in the field and format the true and false responses. This will create the perfect Conditional Formatting behaviour.
In this example, Mail Merge is being used to inform members of how many points they have earned this week. If the number of points is greater than 20, I want the number formatted in red, and if not formatted in black.
The name of the Mail Merge field we need to edit is number.
Inserting an IF Function to a Word Field
To write the IF function, we first need to see the field code. To do this, press Alt + F9 on the keyboard. This will toggle the field codes of your document.
The document will look like below with field codes shown instead of the field enclosed in chevrons such as <<number>>.

Click inside the field code to edit it.
The structure of the IF function is shown below. It is enclosed in curly braces and begins with the expression or condition, then the action to take if true and then the action to take if false.
{ IF Expression Truetext Falsetext }
To get the IF function to conditionally format the number in our Mail Merge we need to edit the field code to the below.
You do not type the curly braces. It will not work if they are typed. They must be entered by pressing Ctrl + F9.
{ IF { MERGEFIELD number } > "20" { MERGEFIELD number } { MERGEFIELD number } }
When entering the IF function, format the true text and false text as you want them to appear. This could be a different colour, bold, underlined, larger. Whatever you need.
The end result of our document is shown below with field codes visible. The true text is red, with the false text left with the automatic black.

Watch the Video
More Awesome Word Tutorials
- 10 Great Word Productivity Hacks
- Change the Default Font in Word
- 5 Awesome Time Saving Word Tricks
- Mail Merge to Labels in Word
Reader Interactions
If Statements / If Fields / Comparison Statements
IF statements (also called IF fields) allow you to compare two values and display document content based on the result of the comparison. When used in a Word template, IF statements are especially useful for comparing the values of Composer merge fields and then displaying the appropriate content.
Example use cases:
- If an Account’s billing country is not in the United States, display information about international shipping terms. Otherwise, show domestic shipping terms.
- If a Contact’s mailing address is blank, show the billing address from his related Account. If it’s not blank, show the Contact’s mailing address.
- If an Opportunity’s amount is greater than $10,000, show information about a complimentary service package. If not, show nothing.
![]()
Nested IF statements in Word, where the else value is another IF statement, will work with Conga Composer but are not recommended. Conga Technical Support will not assist with nested IF statements. Conga highly recommends evaluating nested IF statement logic using Salesforce formula fields and then merging the formula field values into the document.
Watch this video on How to Add IF Statements to Templates.
Create IF Statements in a Word Template
![]()
IF statements can use Word merge fields or text-based merge fields, with one exception: the IF statement itself must be a Word merge field. This means that all the fields inside or around the IF statement can be either Word or text-based merge fields, but again, the IF statement itself must be a Word merge field. Following are examples of both types of syntax.
Syntax
{IF "Expression 1" Operator "Expression 2" "TrueValue" "FalseValue"}
Below is a very basic example using Word merge fields as Expressions. The single braces ({ }) on either end of the IF statement indicate the beginning and end of a Word merge field when the field codes have been toggled open.
{IF "{{Opportunity_Amount}}" > "100000 "Big Deal Opptye" "Normal Oppty"}
Components of an IF Field
Expression1 & Expression2:
- Both Expression1 and Expression2 represent fields and values that you want to compare.
- Expressions are usually Word or text-based merge fields, text strings, or numbers. Expression1 and Expression2 should be surrounded with quotation marks («»).
Operator
- A comparison operator. There is always a space before and after the operator.
- Supported operators:


TrueValue & FalseValue
- Content that is shown when the comparison is true (TrueValue) or false (FalseValue). Each must be surrounded with quotation marks.
![]()
If the content of your TrueValue or FalseValue contains quotation marks ( “ or ” ), you need to replace those quotes with two pairs of single quotation marks (‘’ ‘’ instead of “ ”). Otherwise, Word will consider the first quotation mark from your merged data as the end of your text string and the IF statement will not work.
Creating an IF Field — Conga Best Practices
It is important to follow best practices to ensure the stability and sustainability of your IF statements. In the example below, we will show in detail the best practice method for creating IF statements. We will also show the syntax for both Word merge field and text-based merge fields.
Example scenario: If the Opportunity Amount is greater than $10,000, show information about a complimentary service package. If it’s not, do not show anything.
We recommend the following approach:
| Procedure Step | Result |
|---|---|
| Create a traditional merge field with a placeholder name. | «IF_Amount>10000» |
| Open the merge field by toggling field codes. | {MERGEFIELD IF_Amount>10000 * MERGEFORMAT} |
| Delete the contents of the field, entering IF instead. | {IF} |
| Add Expression1 to the IF field. In our example, Expression1 is the Opportunity Amount field. |
Word
Text-based
|
| Insert your Operator. We’re using greater than (>). |
Word
Text-based
|
| Insert Expression2. Our example is $10,000. |
Word
Text-based
|
| Insert TrueValue. Our example is a merge field that displays the details of a complimentary service package. |
Word
Text-based
|
| Insert FalseValue. In our example, we don’t want to display anything if the Opportunity Amount is less than $10,000, so our FalseValue is null. This is represented by a pair of quotation marks. |
Word
Text-based
|
Our finished IF field looks like this:
Word{IF “«OPPORTUNITY_AMOUNT»” > “10000” “«OPPORTUNITY_SERVICE_PACKAGE»” “”}
Text-based{IF “{{OPPORTUNITY_AMOUNT}}” > “10000” “{{OPPORTUNITY_SERVICE_PACKAGE}}” “”}
![]()
An IF statement that is toggled open should look exactly like the examples above when it is completed. When initially creating the IF statement, Word will include the following text at the end: * MERGEFORMAT. This text needs to be removed to ensure the IF statement renders consistently.
When we toggle the field codes closed, the IF statement will revert to the Word merge field with the placeholder name:
«IF_Amount > 10000»
Using the IF statement we just created, let’s consider an example:
The Merge Nation Opportunity has an amount of $25,000. Once we merge the Composer template that uses our IF statement, our merged document will look like this:

We are showing the value of the OPPORTUNITY_SERVICE_PACKAGE field since that is our TrueValue.
Now let’s say we use a different Opportunity called Merge Republic, which only has an amount of $8,000. Our merged document will show nothing («»), since that is our FalseValue.
Warnings
- Checkbox fields: Although the Composer View Data Workbook and the Template Builder show the values of checkbox fields as TRUE and FALSE, those values do not work in an IF statement. Change your value from TRUE to True.
Example:{IF "<<Checkbox_MergeField>>" = "True" "Yes" "No"} - Tables: IF statements placed inside a table row cannot hide the table row when the statement evaluates to show nothing. You will instead have a blank table row. Word IF statements cannot be used to hide rows within a table.
- IF statements do not work in a Conga Email template.