
Word for Microsoft 365 Outlook for Microsoft 365 Project Online Desktop Client Word 2021 Outlook 2021 Project Professional 2021 Project Standard 2021 Word 2019 Outlook 2019 Project Professional 2019 Project Standard 2019 Word 2016 Outlook 2016 Project Professional 2016 Project Standard 2016 Office 2016 Word 2013 Outlook 2013 Project Professional 2013 Project Standard 2013 Office 2013 Word 2010 Outlook 2010 Office 2010 Word 2007 Outlook 2007 Office 2007 InfoPath 2013 InfoPath Edit Mode 2010 InfoPath Filler 2013 Word Starter 2010 More…Less
The fastest way to create a basic hyperlink in a Microsoft 365 document is to press ENTER or the SPACEBAR after you type the address of an existing webpage, such as http://www.contoso.com. Microsoft 365 automatically converts the address into a link.
In addition to webpages, you can create links to existing or new files on your computer, to email addresses, and to specific locations in a document. You can also edit the address, display text, and font style or color of a hyperlink.
Notes:
-
If you want to remove links or stop Microsoft 365 from automatically adding hyperlinks, see Remove or turn off hyperlinks.
-
This article applies to desktop versions of Word, Excel, Outlook, and PowerPoint. A simplified set of hyperlink features is offered on Microsoft 365 Online. If you have a desktop version of Microsoft 365, you can edit your document there for more advanced hyperlink features, or you can try or buy the latest version of Microsoft 365.
-
Select the text or picture that you want to display as a hyperlink.
-
On ribbon, on the Insert tab, select Link.
You can also right-click the text or picture and click Link on the shortcut menu.
-
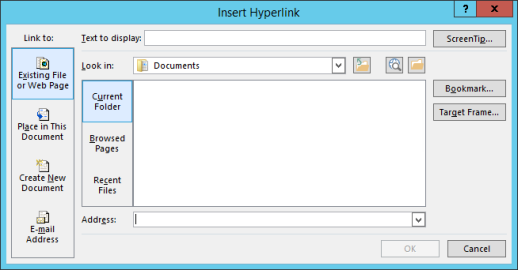
In the Insert Hyperlink box, type or paste your link in the Address box.
Note: If you don’t see the Address box, make sure Existing File or Web Page is selected under Link to.
Optionally, type different display text for your link in the Text to display box.
Note: If you don’t know the address for your hyperlink, click Browse the Web
 to locate the URL on the Internet and copy it.
 to locate the URL on the Internet and copy it.
Optional: To customize the ScreenTip that appears when you rest the pointer over the hyperlink, click ScreenTip in the top-right corner of the Insert Hyperlink dialog box and enter the text you want.
You can add a hyperlink to a file on your computer, or to a new file that you want to create on your computer.
-
Select the text or picture that you want to display as a hyperlink.
-
Press Ctrl+K.
-
Under Link to, do one of the following:
-
To link to an existing file, click Existing File or Web Page under Link to, and then find the file in the Look in list or the Current Folder list.
-
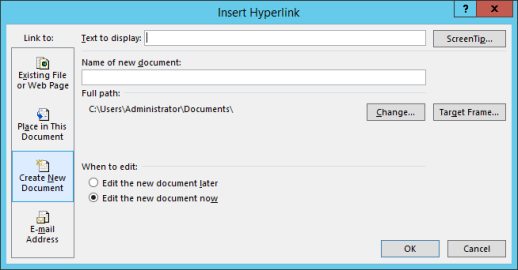
To create a new, blank file and link to it, click Create New Document under Link to, type a name for the new file, and either use the location shown under Full path or browse to a different save location by clicking Change. You can also choose whether to Edit the new document later or open and Edit the new document now.
-
Optional: To customize the ScreenTip that appears when you rest the pointer over the hyperlink, click ScreenTip in the top-right corner of the Insert Hyperlink dialog box and enter the text you want.
-
Select the text or picture that you want to display as a hyperlink.
-
Press Ctrl+K.
You can also right-click the text or picture and click Link on the shortcut menu.
-
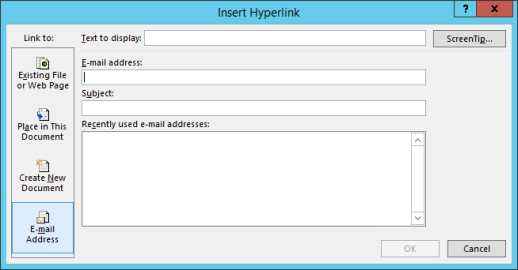
Under Link to, click E-mail Address.
-
Either type the email address that you want in the E-mail address box, or select an address in the Recently used e-mail addresses list.
-
In the Subject box, type the subject of the message.
Note: Some web browsers and email programs might not recognize the subject line.
Optional: To customize the ScreenTip that appears when you rest the pointer over the hyperlink, click ScreenTip in the top-right corner of the Insert Hyperlink dialog box and enter the text you want.
You can also create a hyperlink to a blank email message by simply typing the address in the document. For example, type someone@example.com, and Microsoft 365 creates the hyperlink for you (unless you turned off automatic formatting of hyperlinks).
You can create hyperlinks that link to a Word document or Outlook email message that includes heading styles or bookmarks. You can also link to slides or custom shows in PowerPoint presentations and specific cells and sheets in Excel spreadsheets.
Tips:
-
Learn about adding bookmarks.
-
To add a heading style, select your heading text, click the Home tab in Word or the Format Text tab in Outlook, and select a style in the Styles group.
Create a hyperlink to a location in the current document
-
Select the text or picture that you want to display as a hyperlink.
-
Press Ctrl+K.
You can also right-click the text or picture and click Link on the shortcut menu.
-
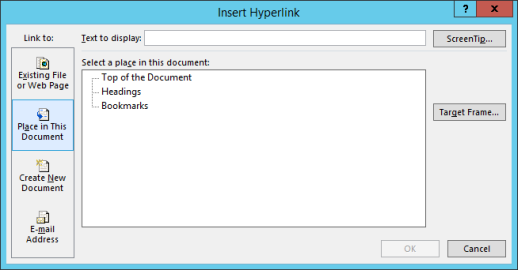
Under Link to, click Place in This Document.
-
In the list, select the heading (current document only), bookmark, slide, custom show, or cell reference that you want to link to.
Optional: To customize the ScreenTip that appears when you rest the pointer over the hyperlink, click ScreenTip in the top-right corner of the Insert Hyperlink dialog box and enter the text you want.
Create a hyperlink to a location in another document
-
Select the text or picture that you want to display as a hyperlink.
-
Press Ctrl+K.
You can also right-click the text or picture and click Link on the shortcut menu.
-
Under Link to, click Existing File or Web Page.
-
In the Look in box, click the down arrow, and find and select the file that you want to link to.
-
Click Bookmark, select the heading, bookmark, slide, custom show, or cell reference that you want, and then click OK.
Optional: To customize the ScreenTip that appears when you rest the pointer over the hyperlink, click ScreenTip in the top-right corner of the Insert Hyperlink dialog box and enter the text you want.
-
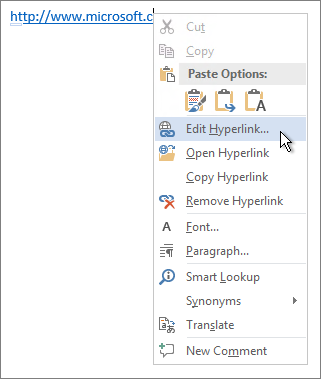
To change the address or display text of a hyperlink you added, right-click the link and click Edit Hyperlink.
-
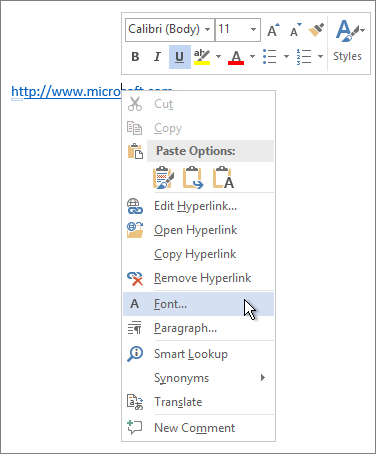
To change the appearance of a hyperlink, such as font style, size, or color, right-click the link and click Font on the shortcut menu, or click a style option on the mini toolbar that appears.
-
To customize the ScreenTip that appears when you rest the pointer over the hyperlink, right-click the link, click Edit Hyperlink, click ScreenTip in the top-right corner of the dialog box, and enter the text you want.
See also
Remove or turn off hyperlinks
Create a hyperlink in Publisher
Create a hyperlink in OneNote
Hyperlinks in Word for the web
Need more help?
Want more options?
Explore subscription benefits, browse training courses, learn how to secure your device, and more.
Communities help you ask and answer questions, give feedback, and hear from experts with rich knowledge.
![]()
Download Article
A user-friendly guide to creating interactive links in Microsoft Word
![]()
Download Article
- Linking to Another Document or Website
- Linking to a Blank Email Message
- Linking to a Place in the Same Document
- Video
- Q&A
- Tips
|
|
|
|
|
Do you want to add a clickable link in your Microsoft Word document? You can easily turn any text or image in your document into a hyperlink. When clicked, a hyperlink can bring readers to another place in the document, an external website, a different file, and even a pre-addressed email message. This wikiHow article will walk you through creating different types of hyperlinks in your Word document.
Things You Should Know
- To link to a website or document, highlight the text. Click the «Insert» tab, then «Link». Find your file or paste your website link. Click «OK».
- Click «E-mail Address» in the Hyperlink menu. Enter an email address and subject, then click «OK».
- Click «Insert», then «Bookmark» to save a position in the document. Click «Place in This Document» in the Hyperlink menu, then click the bookmark.
-
1
-
2
Select the text or image that you want to turn into a link. You can turn any text or image in your document into a link. Highlight the text or click the image that you want to convert into a hyperlink.
- To insert an image into your document, click the Insert tab and select «Pictures.» You’ll be able to browse your computer for an image file to add. You can also insert clip art to use as a link.
Advertisement
-
3
Press ⌘ Command+K (Mac) or Ctrl+K (Windows). This opens the Insert Hyperlink window. You can also get to this menu by clicking the Insert tab and then clicking the Link button in the toolbar.
-
4
Select Existing File or Web Page from the left panel. More options will appear in the right panel.
-
5
Select a file or enter a web address. You can choose to link to an existing document, a new document, or a website.
- To link to a website or a file that’s accessible on the web, type or paste the full address (including the «https://» at the beginning) into the «Address» field near the bottom of the window.
- To link to a file on your computer or local network, select that file in the center panel. If it’s in the current folder, click Current folder to open its contents. If you opened it recently, click Recent Files to browse those. You can also use the menus at the top to navigate to the correct folder and select the file.
- To create a new blank document instead of opening a certain file, click Create a new document in the left menu, then choose a location for the document.
-
6
Set a ScreenTip (optional). You can change the text that appears when the user hovers the cursor over the link by clicking the ScreenTip button at the top-right corner and specifying your text.
- If you don’t change it, the screen tip will display the website address or file path.
-
7
Click OK to save your link. To open the link within the Word document, hold Command (Mac) or CTRL (Windows) and click the link.
- If you want to remove the hyperlink, right-click the hyperlink and select Remove Hyperlink.[2]
- If you want to remove the hyperlink, right-click the hyperlink and select Remove Hyperlink.[2]


Advertisement
-
1
Open a project in Microsoft Word. This looks like a W on top of a blue square.
- You must have a subscription to use Office 365.
-
2
Select the text or click the image you want to turn into an email link. You can use any text or image in your document. When you’re finished with this method, clicking the selected text or image will bring up a new email message to the address of your choice.
-
3
Press ⌘ Command+K (Mac) or Ctrl+K (Windows). This opens the Insert Hyperlink window. You can also get to this menu by clicking the Insert tab and then clicking the Link button in the toolbar.
-
4
Click E-Mail Address in the left panel. This allows you to set up the blank message.
-
5
Enter the e-mail address and subject. This will be the address that the reader will be sending the email to. What you enter into the «Subject» field will be automatically filled in for the reader, but they will be able to change it if they want.
- If you use Outlook, you’ll see recently used email addresses in the field at the bottom of the window. Feel free to select one of those.
- Some mail apps, especially web-based email apps, may not recognize the subject line.
-
6
Set a ScreenTip (optional). You can change the text that appears when the user hovers the cursor over the link by clicking the ScreenTip button at the top-right corner and specifying your text. If you don’t change it, the screen tip will show the email address.
-
7
Click OK to save your link. To open the link within the Word document, hold Command (Mac) or CTRL (Windows) and click the link.
- If you want to remove the hyperlink, right-click the hyperlink and select Remove Hyperlink.


Advertisement
-
1
Open a project in Microsoft Word. This looks like a W on top of a blue square.
- You must have a subscription to use Office 365.
-
2
Place your cursor at the location you want to link to. You can use the Bookmark tool to create links to specific spots in your document. This is great for tables of contents, glossaries, and citations. You can highlight a portion of text, select an image, or just place your cursor in the spot you want.
-
3
Click the Insert tab. It’s in the menu bar at the top of Word, between Home and Draw.
-
4
Click the Bookmark icon. It’s in the toolbar at the top of Word in the «Links» section.
-
5
Enter a name for the bookmark. Make sure the name is descriptive enough that you’ll be able to recognize it. This is especially important if you are using a lot of bookmarks or more than one person is editing the document.
- Bookmark names have to start with letters but can also contain numbers. You can’t use spaces, but you can use underscores instead (e.g. «Chapter_1»).
-
6
Click Add to insert the bookmark. Bookmarks will appear on the page surrounded by brackets. You won’t see the bookmark on the page if you’re using the current version of Word, but in earlier versions, it may be surrounded by brackets.
- If you want to see brackets around the bookmark so you don’t forget where you placed it, click the File menu, select Options, and click Advanced in the left panel. Then, scroll down the right panel and check the box next to «Show bookmarks» under the «Show document content» header.
-
7
Select the text or image you want to create the link from. Highlight the text or click the image that you want to turn into a link to your bookmark.
-
8
Press ⌘ Command+K (Mac) or Ctrl+K (Windows). This opens the Insert Hyperlink window. You can also get to this menu by clicking the Insert tab and then clicking the Link button in the toolbar.
-
9
Click Place in This Document in the left panel. This displays a navigation tree with your heading styles and bookmarks.
-
10
Select the bookmark you want to link to. Expand the «Bookmarks» tree if it isn’t already and select the bookmark you created. You can also select from heading styles you’ve applied throughout the document.
-
11
Set a ScreenTip (optional). To change the text that appears when the user rests the cursor over the link, click the Screen Tip button at the top-right corner. If you don’t change the text, the screen tip will display the website address or file path.
-
12
Click OK to save your link. To test the hyperlink, hold Command (Mac) or CTRL (Windows) and click the link.
- This will recenter the view to the line on which you placed the bookmark.
- If you want to remove the hyperlink, right-click the hyperlink and select Remove Hyperlink.


Advertisement
Add New Question
-
Question
What hyperlinks are inserted into a document by default?

A link to any website or a file with a url will become a hyperlink automatically after you press the space bar, tab key, or return/enter key.
-
Question
How can I add hyperlinks to Microsoft Word?
Edit>Add Hyperlink>add the link. To test the link, Ctrl+Click and it should get you there.
-
Question
How can I embed a hyperlink into a word or phrase in a Word document?
Highlight the word/phrase you want to embed a link into, got into the insert tab, press link. A box that says «insert hyperlink» on the top should pop up, copy/type the link you want into the box at the bottom that says «address» and then press «ok» and you are done!
Ask a Question
200 characters left
Include your email address to get a message when this question is answered.
Submit
Advertisement
-
If you type a URL into a document (e.g., https://www.wikihow.com), Word will automatically make that text a clickable link.
-
You can remove a hyperlink by right-clicking it and selecting Remove Hyperlink.
-
Looking for money-saving deals on Microsoft Office products? Check out our coupon site for tons of coupons and promo codes on your next subscription.
Thanks for submitting a tip for review!
Advertisement
About This Article
Article SummaryX
1. Select the text or object you want to turn into a hyperlink.
2. Click the Insert tab.
3. Click the Link button in the toolbar.
4. Click Existing File or Web Page in the left and enter the URL.
5. To link to another file instead of a website, leave the «»Address»» bar blank and select the file instead.
6. Click OK.
Did this summary help you?
Thanks to all authors for creating a page that has been read 675,210 times.
Is this article up to date?
Add, Edit or Remove Links or Hyperlinks in Word Documents
by Avantix Learning Team | Updated October 14, 2022
Applies to: Microsoft® Word® 2010, 2013, 2016, 2019, 2021 and 365 (Windows)
You can easily add links or hyperlinks in Microsoft Word documents to add interactivity and make it easy for users to click a link to jump to another location in your document, to another file or web page or even to an email. You can also edit hyperlinks and remove individual hyperlinks or all hyperlinks.
Hyperlinks are often used to:
- Take the user to an external website.
- Take the user to another document or file on the same network or another place in the same document.
- Add a layer of text information over a word or phrase.
Hyperlinks can be displayed as full source URLs or internet addresses such as http://abccompany.ca, as descriptive text, as an image or as a drawing object.
Text as a hyperlink appears underlined and in a color (normally blue) and coordinates with the color theme in your document. In Word, the text color changes automatically after you Ctrl – click hyperlink text. Hyperlink objects do not change color.
Recommended article: 3 Microsoft Word Tricks to Keep Text Together
Do you want to learn more about Word? Check out our virtual classroom or live classroom Word courses >
Insert a hyperlink automatically
You can insert hyperlinks to web sites by typing the address of an existing web page (such as https://abccompany.com) and then pressing Enter or Spacebar. Word will automatically convert the text to a hyperlink using AutoCorrect.
Insert a hyperlink to an existing web page
To insert a hyperlink to an existing file or web page:
- Click where you want to insert a hyperlink or select the text, shape or image you want to use as a hyperlink.
- Click the Insert tab in the Ribbon.
- In the Links group, click Link or Hyperlink. The Insert Hyperlink dialog box appears.
- Under Link to, select Existing File or Web Page.
- If you are using a text hyperlink, enter the descriptive text that will become the link text in the Text to display field.
- In the Address field, enter or choose the address or location where the link should lead. For external references, enter or copy the URL in the Address field.
- Click OK.
You can also press Ctrl + K to insert or edit a hyperlink.
Below is the Hyperlink dialog box:

Insert a hyperlink to an existing file
To insert a hyperlink to an existing file:
- Click where you want to insert a hyperlink or select the text, shape or image you want to use as a hyperlink.
- Click the Insert tab in the Ribbon.
- In the Links group, click Link or Hyperlink. The Insert Hyperlink dialog box appears.
- Under Link to, select Existing File or Web Page.
- If you are using a text hyperlink, enter the descriptive text that will become the link text in the Text to display field.
- In the Look in field, click the down arrow and select the desired location. Navigate to the appropriate drive and folder and then double-click the file.
- Click OK.
Use relative or absolute hyperlink addresses to external files
If you are creating hyperlinks to external files, it’s important to understand the difference between a relative and absolute address. A relative hyperlink uses the address relative to the address of the containing document whereas an absolute hyperlink uses the full address of the destination document including the drive location.
The following example uses an absolute hyperlink address (full path address):
C:DocumentsJanuaryBudget.docx
The following relative hyperlink contains only the relative address or path to a Budget document.
JanuaryBudget.docx
You may want to use a relative hyperlink address or path if you want to move or to copy your files to another location such as another server.
Create a hyperlink using the context menu
Another method of creating or editing hyperlinks is to right-click and use the context menu (you can also press Shift + F10 to display the context menu).
To insert a hyperlink using the context menu:
- Click where you want to insert a hyperlink or select the text, shape or image you want to use as a hyperlink.
- Right-click and choose Link or Hyperlink from the menu. The Insert Hyperlink dialog box appears.
- Select the appropriate button under Link to. If you are creating an external link to a webpage or another document, select Existing File or Web Page. If you are creating an internal link within the document, select Place in This Document.
- If you are using a text hyperlink, enter the descriptive text that will become the link text in the Text to display field.
- In the address field, enter or choose the address or location where the link should lead. For external references, enter or copy the URL in the Address field. For place in the same document, select the appropriate item.
- Click OK.
Insert a hyperlink to a location in the same document
To create a hyperlink to a bookmarked location in the same Word document:
- Select the location, text, image or shape that you want to use as the destination for the hyperlink.
- Click the Insert tab in the Ribbon and in the Links group, click Bookmark. A dialog box appears.
- In the Bookmark name box, type a unique name for the bookmark and then click Add. You may not use spaces in the name of a bookmark.
- Click where you wish to insert a hyperlink or select the text, shape or image you wish to use as a hyperlink.
- Right-click and choose Link or Hyperlink from the menu. The Insert Hyperlink dialog box appears.
- Under Link to, select Place in This Document.
- Select the bookmark that you want to use as the destination hyperlink. Microsoft Word has a default bookmark to jump to the top of the document.
- Click OK.
Below is the Bookmark dialog box in Microsoft Word:

To create a hyperlink to a built-in heading style in the same document:
- Click where you want to insert a hyperlink or select the text, shape or image you want to use as a hyperlink.
- Right-click and choose Link or Hyperlink from the menu. The Insert Hyperlink dialog appears.
- Under Link to, select Place in This Document.
- Select the heading that you want to use as the destination hyperlink. You must have applied built-in heading styles such as Heading 1, Heading 2, etc. in your document (normally through the Styles gallery in the Home tab in the Ribbon).
- If you are using a text hyperlink, enter the descriptive text that will become the link text in the Text to display field.
- Click OK.
In the following example, note both the headings and bookmarks that appear in the Hyperlink dialog box in a Word file that uses the built-in heading styles:

If you create a table of contents in Word using built-in heading styles, it normally contains hyperlinks to headings in the document. For more information, check out this article on Creating a Table of Contents in Microsoft Word.
Edit a hyperlink
To edit a hyperlink:
- Right-click the hyperlink.
- In the context menu, select Edit Hyperlink or Edit Link. The Edit Hyperlink dialog box appears.
- Select the desired options.
- Click OK.
You can also select a hyperlink and press Ctrl + K to edit it.
Add screen tips
You can include screen tip text that appears when you hover your cursor over a hyperlink.
To add screen tip text:
- Place your cursor over the hyperlink to which you want to add a screen tip.
- Right-click and select Edit Hyperlink or Edit Link from the drop-down menu. The Edit Hyperlink dialog appears.
- Click ScreenTip on the top right.
- Type your text in the ScreenTip text box.
- Click OK twice.
Below is the Hyperlink ScreenTip dialog box:

Jump to a hyperlink
Hyperlinks become active when you save your document as a PDF (portable document format) or web page (HTML) file and users will be able to simply click them. However, in Microsoft Word, to jump to a hyperlink, you will need to point to the hyperlink then Ctrl-click the link.
Remove a single hyperlink
To remove a hyperlink:
- Right-click the hyperlink you want to remove.
- In the context menu, select Remove Hyperlink or Remove Link.
Removing all hyperlinks
To remove all hyperlinks:
- Press Ctrl + A to select all.
- Press Ctrl + Shift + F9. All hyperlinks (and other fields) will be converted to text.
Hyperlinks can add a new dimension of interactivity to your Microsoft Word documents and when the files are saved in other formats such as PDF, they become active hyperlinks.
Subscribe to get more articles like this one
Did you find this article helpful? If you would like to receive new articles, JOIN our email list.
More resources
How to Hide Comments in Word (or Display Them)
How to Compress Images in Microsoft Word
3 Strikethrough Shortcuts in Microsoft Word
Related courses
Microsoft Word: Intermediate / Advanced
Microsoft Word: Designing Dynamic Word Documents Using Fields
Microsoft Word: Long Documents Master Class
Microsoft Word: Accessible Word Documents
Microsoft PowerPoint: Intermediate / Advanced
VIEW MORE COURSES >
Our instructor-led courses are delivered in virtual classroom format or at our downtown Toronto location at 18 King Street East, Suite 1400, Toronto, Ontario, Canada (some in-person classroom courses may also be delivered at an alternate downtown Toronto location). Contact us at info@avantixlearning.ca if you’d like to arrange custom instructor-led virtual classroom or onsite training on a date that’s convenient for you.
Copyright 2023 Avantix® Learning
Microsoft, the Microsoft logo, Microsoft Office and related Microsoft applications and logos are registered trademarks of Microsoft Corporation in Canada, US and other countries. All other trademarks are the property of the registered owners.
Avantix Learning |18 King Street East, Suite 1400, Toronto, Ontario, Canada M5C 1C4 | Contact us at info@avantixlearning.ca
What to Know
- Highlight text or image > right-click text and select Link or Hyperlink > choose destination and enter info > OK.
- Next, select Existing File or Web Page and enter URL to link outside of document.
- Select Place in This Document > select location to link inside of document.
This article explains how to insert or remove a hyperlink in a Word document using Microsoft 365, Word 2019, Word 2016, Word 2013, Word 2010, and Word Starter 2010.
Insert and Remove a Hyperlink in Word
To add and delete hyperlinks in a Word document:
-
Highlight the text or image that you want to link.
-
Right-click the text and choose Link or Hyperlink (depending on the version of Microsoft Word).
-
Select the type of destination you want to link to, then fill in the appropriate information.
- Choose Existing File or Web Page, go to the Address text box, then enter a URL.
- Choose Place in This Document, then select a location within the document.
- Choose Create New Document, go to the Name of new document text box, then enter the name of a new document. If needed, in the Full path section, select Change to change the document folder. In the When to edit section, choose whether you want to edit the document now or later.
- Choose E-mail Address, go to the E-mail Address text box, then enter the email address you want readers to send email to. In the Subject text box, type the subject.
-
Select OK.
-
The text now shows up as a hyperlink in the document.
-
To remove a hyperlink, right-click the link text, then choose Remove Hyperlink.
Use the Right Kind of Hyperlink
There are different kinds of hyperlinks. Choose the one that points your readers to the most helpful information to supplement your document.
Existing File or Web Page Hyperlinks
When you choose this option, the hyperlink opens a website or file. For example, if you’re writing an article about your camping trip to Rocky Mountain National Park, provide a hyperlink to the appropriate section of the National Park Service so readers can quickly find the information they need to plan a similar trip.
Another use might be if you wrote an article about the National Park Service and the document is available to your readers, link to the Word file you created. When the reader selects the hyperlink, that file opens.
Place in This Document Hyperlinks
Another type of hyperlink jumps to a different place in the same document upon selection. Often called an anchor link, this type of link doesn’t take the reader away from the document.
When a document is long and includes sections or chapters that are formatted as headings, create a table of contents at the beginning of the document. Include hyperlinks in the table of contents so that readers can jump to a particular heading.
You could also use this type of hyperlink at the end of each section to return to the top of the document.
Create a New Document Hyperlink
A hyperlink can create a new document when selected. When adding this type of hyperlink, choose whether to make the document at the time you create the link or later. If you choose to make the new document when you create the hyperlink, a new document opens, which you can edit and save. After that, the hyperlink points to that document, exactly like the Existing File or Web Page option.
If you choose to make the document later, you’re prompted to create the new document when you select the hyperlink after the hyperlink has been created. This type of hyperlink is useful if you want to link new content to the current document but don’t want to create the new content yet. Instead, provide the hyperlink to it so you’ll remember to work on the document later. When you do create the document, it will be linked in the main document.
Email Address Hyperlinks
The last type of hyperlink you can make in Microsoft Word is one that points to an email address so that, when selected, the default email client opens and begins composing the message using the information from the hyperlink.
Choose a subject for the email and more than one email address that the message should be sent to. This information is pre-filled for readers when they select the hyperlink but they can change this information before they send the message.
This type of hyperlink is useful for situations when you want readers to contact you to set up a meeting or request additional information.
About Linking in a Word Document
A hyperlink in a Microsoft Word document enables readers to jump from the link to a different place in the document, to a different file or website, or to a new email message. In Word documents, hyperlink text is a different color than other text and is underlined. When you hover over a hyperlink, a preview shows where the link goes. When you select the link, you’re directed to the other content.
Thanks for letting us know!
Get the Latest Tech News Delivered Every Day
Subscribe
When you create a document, you may need to paste links to other documents, Excel spreadsheets, or even some websites with source information. Also, you can add hyperlinks to your profile or even e-mail address.
Word proposes several different ways to insert hyperlinks to the document:
The simplest way to insert a hyperlink in Word
Type the address starting from http:// or https://, www.; and Word automatically turns a web address into a link when you press Spacebar, Enter, or any punctuation sign.
Notes: If you don’t see the hyperlink after inserting the address, check it. If the address is correct, you probably have a problem with AutoCorrect options. See the note of the tip Insert an email hyperlink in a document.
Paste the link using the Clipboard
1. Copy the link to the Clipboard:
- Open the link that you would like to insert in the document the browser, select the link, and copy it to the Clipboard (for example, by clicking Ctrl+C),
- Type the URL in the document (or any other application such as Notepad), select the link, and copy or cut it to the Clipboard (for example, by clicking Ctrl+X).
2. Type the text for the link in your document and select it. For example, select the name of the company:

3. Right-click on the selected text, and select the copied link from the Link list in the popup menu:

Note: If you paste link copied from the Microsoft Edge, you can see the page title instead of the URL:
![]()
Instead of ![]() .
.
Pasting formatted links instead of URLs is a new feature of Microsoft Edge that is improved the copy and paste of web URLs. This feature copies and pastes a URL as a hyperlinked title instead of as a web address. Please don’t confuse the article title on the webpage and the web page title — they can be different!
To paste the URL copied from Microsoft Edge, do one of the following:
- On the Home tab, in the Clipboard group, click the Paste drop-down list and then select Keep Text Only:

- Right-click where you want to paste the link and choose the Link option in the popup menu:

- Turn this feature off in Microsoft Edge:
- In Microsoft Edge, click the Settings and More (Alt+F) button, then select Settings:

- Under Settings, select Share, Copy & Paste:
- Under Share, Copy & Paste, select the default option you want:
- Link to paste the URL as a hyperlinked title,
- Plain text to paste the URL as a web address.


Insert the link using the Hyperlink dialog box
1. Type the text for the link in your document and select it. For example, select the name of the company.
2. On the Insert tab, in the Links group, click the Link button (or click Ctrl+K on the keyboard):

3. In the Insert Hyperlink dialog box:
3.1. Make sure that the Text to display text box contains the correct text for the link,
3.2. Type the hyperlink address in the Address field:

3.3. Click OK to insert the hyperlink in the document:

Notes:
- If you want to change the link, the text of the link, or the link’s screen tip, right-click it and choose Edit Hyperlink… in the popup menu:

- If you want to delete the link, you can delete all the text of the hyperlink or right-click it and choose Remove Hyperlink in the popup menu (it removes hyperlink and leave the text).
