
Create Calculations in Word Tables Using Formulas
by Avantix Learning Team | Updated October 9, 2021
Applies to: Microsoft® Word® 2013, 2016, 2019 or 365 (Windows)
You can insert formulas in Word tables to perform calculations. These formulas can include functions such as SUM or AVERAGE or basic operators. When you insert formulas in Word tables, you are really inserting fields so the fields will need to be updated if the data in the table changes. For more complex calculations, it’s usually best to create formulas in Excel where they will update automatically.
Formulas and functions in Word tables only work with numbers. You can’t perform text calculations or output text.
Recommended article: 3 Simple Ways to Copy or Import Excel Data into Word (Linked or Unlinked)
Note: Buttons and Ribbon tabs may display in a different way (with or without text) depending on your version of Word, the size of your screen and your Control Panel settings. For Word 365 users, Ribbon tabs may appear with different names. For example, the Table Tools Design tab may appear as Table Design.
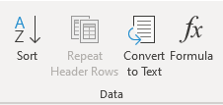
To insert a formula in a cell in a Word table, you’ll need to use the Function command on the Table Tools Layout or Table Layout tab in the Ribbon:
Do you want to learn more about Microsoft Word? Check out our virtual classroom or live classroom Word courses >
Understanding formula syntax
When you insert a table in Word, each column and row are identified like cells in Excel worksheets and each cell is assigned a cell reference. In a Word table, the first column would be column A and the first row would be row 1 so the first cell would be identified as A1. Therefore, you can create calculations that refer to cells (such as =A1+A2).
In Word and Excel, you can use the same basic operators:
- addition (+)
- subtraction (-)
- multiplication (*)
- division (/)
Typically, formulas in Word tables are created using common functions such as SUM, AVERAGE, MIN, MAX or COUNT and refer to a range. They must start with an equal sign (=).
You can refer to ranges of cells using ABOVE, LEFT, RIGHT or BELOW as the arguments for functions. If you’re trying to sum the cells at the bottom of a column, the formula would be =SUM(ABOVE). You can also combine these arguments. For example, you could enter a formula =SUM(ABOVE,LEFT) and it would sum all cells that are above and to the left of that cell. Functions can also refer to cell references such as =SUM(C1:C10). You can also refer to individual cells such =SUM(B1,C1,D5).
Word tables can also perform more complex calculations using the IF function with the syntax =IF(test,true,false). For example, =IF(A5>=1000,0,50) could be used to calculate a shipping cost of 50 if orders are less than 1000. You can also use the AND and OR functions with the IF function.
Inserting a formula in a table
To insert a formula in a table:
- Click in the cell where you want to enter a formula.
- Click the Table Tools Layout or Table Layout tab in the Ribbon.
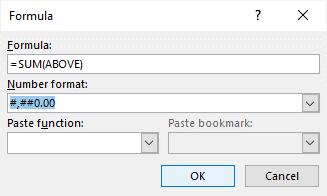
- Select Function (fx) in the Data group. A dialog box appears. Word will typically insert a function and arguments in the Formula box.
- If you want to accept the suggested formula, click OK. If you want to change the formula, click in the Formula box and enter a formula (starting with =). You can also choose other functions from the Paste Function drop-down menu.
- If necessary, select a format from the Format drop-down menu.
- Click OK. Word inserts the formula as a field and displays the results.
The Function dialog box appears as follows with a formula and a format selected:
Updating a formula
If the original data changes, you can right-click the Formula field and select Update from the drop-down menu or press F9. If you want to update all formulas in a table, select all of the cells in the table and press F9. To select the entire table, click the four arrows on the top left of the table.
Changing a formula
To change a formula in a table:
- Right-click the formula or error. A drop-down menu appears.
- Select Edit field.
- Make the desired changes.
- Click OK.
Updating all fields
To update all fields in all tables:
- Press Ctrl + A to select all.
- Press F9.
Formula fields are just one type of field you can use in Word. There are many other fields that can insert variable information in Word documents.
Subscribe to get more articles like this one
Did you find this article helpful? If you would like to receive new articles, join our email list.
More resources
4 Ways to Create a Table in Word
How to Insert Fields in Word (Built-in or Custom)
5 Ways to Insert the Division Symbol in Word (Type or Insert ÷)
How to Insert Reusable Text Snippets in Word with Quick Parts
10 Microsoft Word Tips, Tricks and Shortcuts for Selecting in Tables
Related courses
Microsoft Word: Intermediate / Advanced
Microsoft Excel: Intermediate / Advanced
Microsoft PowerPoint: Intermediate / Advanced
Microsoft Word: Long Documents Master Class
Microsoft Word: Styles, Templates and Tables of Contents
Microsoft Word: Designing Dynamic Word Documents Using Fields
VIEW MORE COURSES >
Our instructor-led courses are delivered in virtual classroom format or at our downtown Toronto location at 18 King Street East, Suite 1400, Toronto, Ontario, Canada (some in-person classroom courses may also be delivered at an alternate downtown Toronto location). Contact us at info@avantixlearning.ca if you’d like to arrange custom instructor-led virtual classroom or onsite training on a date that’s convenient for you.
Copyright 2023 Avantix® Learning
Microsoft, the Microsoft logo, Microsoft Office and related Microsoft applications and logos are registered trademarks of Microsoft Corporation in Canada, US and other countries. All other trademarks are the property of the registered owners.
Avantix Learning |18 King Street East, Suite 1400, Toronto, Ontario, Canada M5C 1C4 | Contact us at info@avantixlearning.ca
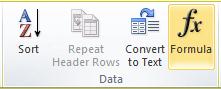
You can perform calculations and logical comparisons in a table by using formulas. The Formula command is found on the Table Tools, Layout tab, in the Data group.
A formula in Word automatically updates when you open the document that contains the formula. You can also update a formula result manually. For more information, see the section Update formula results.
Note: Formulas in Word or Outlook tables are a type of field code. For more information about field codes, see the See Also section.
In this article
-
Insert a formula in a table cell
-
Update formula results
-
Update the result of specific formulas
-
Update all the formula results in a table
-
Update all the formulas in a document
-
-
Examples: Sum numbers in a table by using positional arguments
-
Available functions
-
Use bookmarknames or cell references in a formula
-
RnCn references
-
A1 references
-
Insert a formula in a table cell
-
Select the table cell where you want your result. If the cell is not empty, delete its contents.
-
On the Table Tools, Layout tab, in the Data group, click Formula.
-
Use the Formula dialog box to create your formula. You can type in the Formula box, select a number format from the Number Format list, and paste in functions and bookmarks using the Paste Function and Paste Bookmark lists.
Update formula results
In Word, the result of a formula is calculated when it is inserted, and when the document containing the formula opens. In Outlook, the result of a formula is only calculated when it is inserted and won’t be available for the recipient of the email to edit.
You can also manually update:
-
The result of one or more specific formulas
-
The results of all formulas in a specific table
-
All the field codes in a document, including formulas
Update the result of specific formulas
-
Select the formulas that you want to update. You can select multiple formulas by holding down the CTRL key while you make selections.
-
Do one of the following:
-
Right-click the formula, then click Update field.
-
Press F9.
-
Update all the formula results in a table
-
Select the table that contains formula results that you want to update, and then press F9.
Update all the formulas in a document
Important: This procedure updates all the field codes in a document, not just formulas.
-
Press CTRL+A.
-
Press F9.
Examples: Sum numbers in a table by using positional arguments
You can use positional arguments (LEFT, RIGHT, ABOVE, BELOW) with these functions:
-
AVERAGE
-
COUNT
-
MAX
-
MIN
-
PRODUCT
-
SUM
As an example, consider the following procedure for adding numbers by using the SUM function and positional arguments.
Important: To avoid an error while summing in a table by using positional arguments, type a zero (0) in any empty cell that will be included in the calculation.
-
Select the table cell where you want your result. If the cell is not empty, delete its contents.
-
On the Table Tools, Layout tab, in the Data group, click Formula.
-
In the Formula dialog box, do one of the following:
|
To add the numbers… |
Type this in the Formula box |
|---|---|
|
Above the cell |
=SUM(ABOVE) |
|
Below the cell |
=SUM(BELOW) |
|
Above and below the cell |
=SUM(ABOVE,BELOW) |
|
Left of the cell |
=SUM(LEFT) |
|
Right of the cell |
=SUM(RIGHT) |
|
Left and right of the cell |
=SUM(LEFT,RIGHT) |
|
Left of and above the cell |
=SUM(LEFT,ABOVE) |
|
Right of and above the cell |
=SUM(RIGHT,ABOVE) |
|
Left of and below the cell |
=SUM(LEFT,BELOW) |
|
Right of and below the cell |
=SUM(RIGHT,BELOW) |
-
Click OK.
Available functions
Note: Formulas that use positional arguments (e.g., LEFT) do not include values in header rows.
The following functions are available for use in Word and Outlook table formulas:
|
Function |
What it does |
Example |
Returns |
|---|---|---|---|
|
ABS() |
Calculates the absolute value of the value inside the parentheses |
=ABS(-22) |
22 |
|
AND() |
Evaluates whether the arguments inside the parentheses are all TRUE. |
=AND(SUM(LEFT)<10,SUM(ABOVE)>=5) |
1, if the sum of the values to the left of the formula (in the same row) is less than 10 and the sum of the values above the formula (in the same column, excluding any header cell) is greater than or equal to 5; 0 otherwise. |
|
AVERAGE() |
Calculates the average of items identified inside the parentheses. |
=AVERAGE(RIGHT) |
The average of all values to the right of the formula cell, in the same row. |
|
COUNT() |
Calculates the count of items identified inside the parentheses. |
=COUNT(LEFT) |
The number of values to the left of the formula cell, in the same row. |
|
DEFINED() |
Evaluates whether the argument inside the parentheses is defined. Returns 1 if the argument has been defined and evaluates without error, 0 if the argument has not been defined or returns an error. |
=DEFINED(gross_income) |
1, if gross_income has been defined and evaluates without error; 0 otherwise. |
|
FALSE |
Takes no arguments. Always returns 0. |
=FALSE |
0 |
|
IF() |
Evaluates the first argument. Returns the second argument if the first argument is true; returns the third argument if the first argument is false. Note: Requires exactly three arguments. |
=IF(SUM(LEFT)>=10,10,0) |
10, if the sum of values to the left of the formula is at least 10; 0 otherwise. |
|
INT() |
Rounds the value inside the parentheses down to the nearest integer. |
=INT(5.67) |
5 |
|
MAX() |
Returns the maximum value of the items identified inside the parentheses. |
=MAX(ABOVE) |
The maximum value found in the cells above the formula (excluding any header rows). |
|
MIN() |
Returns the minimum value of the items identified inside the parentheses. |
=MIN(ABOVE) |
The minimum value found in the cells above the formula (excluding any header rows). |
|
MOD() |
Takes two arguments (must be numbers or evaluate to numbers). Returns the remainder after the second argument is divided by the first. If the remainder is 0 (zero), returns 0.0 |
=MOD(4,2) |
0.0 |
|
NOT() |
Takes one argument. Evaluates whether the argument is true. Returns 0 if the argument is true, 1 if the argument is false. Mostly used inside an IF formula. |
=NOT(1=1) |
0 |
|
OR() |
Takes two arguments. If either is true, returns 1. If both are false, returns 0. Mostly used inside an IF formula. |
=OR(1=1,1=5) |
1 |
|
PRODUCT() |
Calculates the product of items identified inside the parentheses. |
=PRODUCT(LEFT) |
The product of multiplying all the values found in the cells to the left of the formula. |
|
ROUND() |
Takes two arguments (first argument must be a number or evaluate to a number; second argument must be an integer or evaluate to an integer). Rounds the first argument to the number of digits specified by the second argument. If the second argument is greater than zero (0), first argument is rounded down to the specified number of digits. If second argument is zero (0), first argument is rounded down to the nearest integer. If second argument is negative, first argument is rounded down to the left of the decimal. |
=ROUND(123.456, 2) =ROUND(123.456, 0) =ROUND(123.456, -2) |
123.46 123 100 |
|
SIGN() |
Takes one argument that must either be a number or evaluate to a number. Evaluates whether the item identified inside the parentheses if greater than, equal to, or less than zero (0). Returns 1 if greater than zero, 0 if zero, -1 if less than zero. |
=SIGN(-11) |
-1 |
|
SUM() |
Calculates the sum of items identified inside the parentheses. |
=SUM(RIGHT) |
The sum of the values of the cells to the right of the formula. |
|
TRUE() |
Takes one argument. Evaluates whether the argument is true. Returns 1 if the argument is true, 0 if the argument is false. Mostly used inside an IF formula. |
=TRUE(1=0) |
0 |
Use bookmarknames or cell references in a formula
You can refer to a bookmarked cell by using its bookmarkname in a formula. For example, if you have bookmarked a cell that contains or evaluates to a number with the bookmarkname gross_income, the formula =ROUND(gross_income,0) rounds the value of that cell down to the nearest integer.
You can also use column and row references in a formula. There are two reference styles: RnCn and A1.
Note: The cell that contains the formula is not included in a calculation that uses a reference. If the cell is part of the reference, it is ignored.
RnCn references
You can refer to a table row, column, or cell in a formula by using the RnCn reference convention. In this convention, Rn refers to the nth row, and Cn refers to the nth column. For example, R1C2 refers to the cell that is in first row and the second column. The following table contains examples of this reference style.
|
To refer to… |
…use this reference style |
|---|---|
|
An entire column |
Cn |
|
An entire row |
Rn |
|
A specific cell |
RnCn |
|
The row that contains the formula |
R |
|
The column that contains the formula |
C |
|
All the cells between two specified cells |
RnCn:RnCn |
|
A cell in a bookmarked table |
Bookmarkname RnCn |
|
A range of cells in a bookmarked table |
Bookmarkname RnCn:RnCn |
A1 references
You can refer to a cell, a set of cells, or a range of cells by using the A1 reference convention. In this convention, the letter refers to the cell’s column and the number refers to the cell’s row. The first column in a table is column A; the first row is row 1. The following table contains examples of this reference style.
|
To refer to… |
…use this reference |
|---|---|
|
The cell in the first column and the second row |
A2 |
|
The first two cells in the first row |
A1,B1 |
|
All the cells in the first column and the first two cells in the second column |
A1:B2 |
Last updated 2015-8-29
See Also
Field codes in Word and Outlook

Почему в MS Word не включается режим замены кнопкой Insert?
Во всех версиях текстового процессора MS Word есть два основных режима ввода текста. Это режим вставки и режим замены. В большинстве случае по умолчанию активирован режим вставки. Это значит, что при вводе текста с клавиатуры, символы, уже имеющиеся справа от курсора, не будут удалены, а вводимый текст будет вставлен перед ними.

Различия режимов редактирования текста в Word
При активации режима замены, который активируется единоразовым нажатием клавиши Insert на клавиатуре, при вводе новых символов уже имеющиеся знаки справа от курсора будут заменены на вновь введенные.
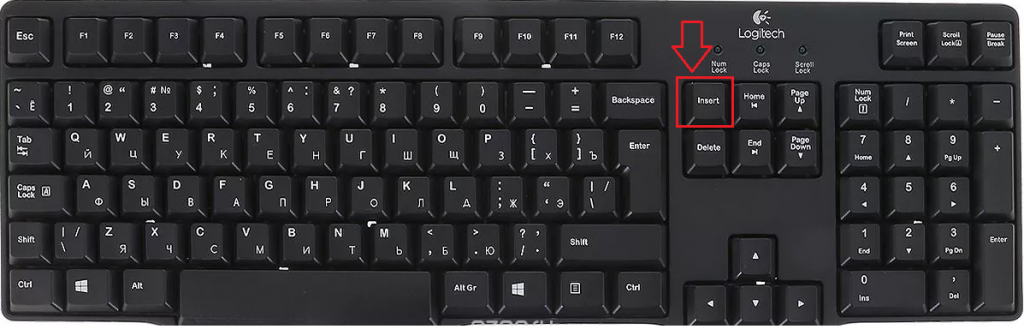
Расположение кнопки Insert на стандартной клавиатуре компьютера
Данный режим весьма полезен при редактировании и исправлении уже имеющегося текста, когда некоторые слова и фразы в нем нужно заменить на новые.
Но далеко не всегда в Microsoft Word включена функция переключения режимов замены/вставки кнопкой Insert, к которой многие пользователи так привыкли. Из-за чего некоторые ошибочно полагают, что у них не работает эта самая кнопка Insert.
На самом деле проблема в том, что в настройках MS Word отключен режим использования кнопки insert для переключения режимов вставки и замены.
О том, как его включить вы узнаете в этой статье.
Активация переключения режимов вставки и замены кнопкой Insert в Ворде
Для начала заходим в настройки Word. Делается это нажатием на кнопку в верхнем левом углу (кнопка “Файл”) и в появившемся меню выбором пункта “параметры (параметры word)”.
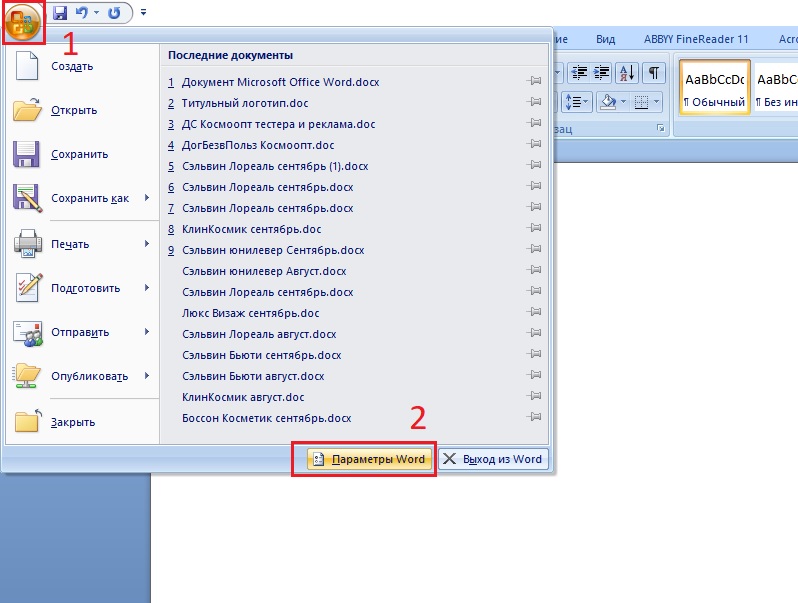
Вход в параметры Word 2007

Вход в параметры Word 2013

Вход в параметры Word 2013
В открывшемся окне настроек нужно перейти на вкладку “Дополнительно”.
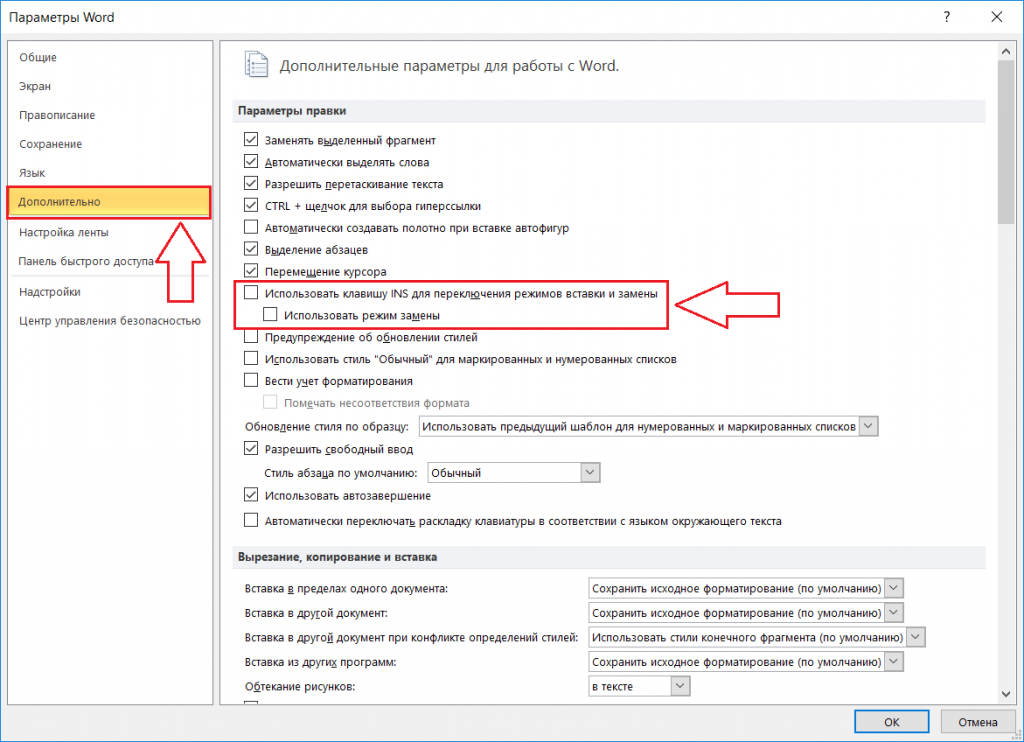
Включение смены режимов замены и вставки кнопкой insert в ворде
В правой части окна появятся различные пункты настроек. Среди них нужно найти “Использовать клавишу INS для переключения режимов вставки и замены”. Включаем его установкой галочки напротив.
Остается лишь нажать “ок” в низу окна для применения настроек.
Теперь клавишей Insert на клавиатуре вы можете включать и отключать режим замены в Microsoft Word.
Лучшая благодарность автору — репост к себе на страничку:
Замена текста при вводе в Word для Windows
Нажав клавишу INSERT, вы можете начать вводить новый текст на месте старого. Вы можете настроить функцию в Word Параметры.
Включение режима замены
При редактировании текста в режиме overtype введите текст справа от точки вставки.
В Word откройте меню Файл и выберите пункт Параметры.
В диалоговом окне Параметры Word выберите пункт Дополнительно.
В разделе Параметры правки выполните требуемое действие.
Чтобы использовать клавишу INSERT для управления режимом замены, установите флажок Использовать клавишу INS для переключения режимов вставки и замены.
Чтобы включить режим замены на постоянной основе, установите флажок Использовать режим замены.
Как включить Insert в Word 2010?
В диалоговом окне Параметры Word выберите пункт Дополнительно. В разделе Параметры правки выполните требуемое действие. Чтобы использовать клавишу INSERT для управления режимом замены, установите флажок Использовать клавишу INS для переключения режимов вставки и замены.
Как включить кнопку Insert?
Как активировать кнопку insert на ноутбуке
- В верхнем левом углу окна программы щелкните по кнопке
- В меню типичных команд щелкните по кнопке «Параметры
- В окне «Параметры Word» перейдите к вкладке «Дополни тельно» и группе «Вырезание, копирование и вставка» вклю чите пункт «Использовать клавишу Ins для вставки».
- Закройте окно кнопкой «ОК».
Как сделать так чтобы буквы не удалялись?
Отключение режима «Замены»
Если вы вдруг столкнулись с подобной ситуацией, когда при наборе текста выделяется следующая буква и удаляется, то все что необходимо сделать чтобы убрать это – повторно нажать кнопку Insert, что позволит отключить режим «Замены» и буквы перестанут съедаться.
Как отключить Insert в ворде?
Как “отключить” случайное нажатие клавиши INSERT
- Выбираем в меню Сервис (Tools) => Макросы (Macros) => Начать запись (Record New Macro), далее указываем имя макроса (например, DisableInsertButton), жмём ОК.
- Теперь сразу же нажимаем «Остановить запись» на появившейся небольшой панельке.
Как сделать замену текста в ворде?
Поиск и замена текста
- Выберите Главная > Заменить или нажмите клавиши CTRL+H.
- В поле Найти введите искомое слово или фразу.
- В поле Заменить введите новый текст.
- Нажимайте кнопку Найти далее, пока не перейдете к слову, которое нужно изменить.
- Нажмите кнопку Заменить. Чтобы обновить все вхождения одновременно, нажмите кнопку Заменить все.
Как настроить кнопку Insert?
Чтобы использовать клавишу INSERT для управления режимом замены, установите флажок Использовать клавишу INS для переключения режимов вставки и замены. Чтобы включить режим замены на постоянной основе, установите флажок Использовать режим замены.
Где находится кнопка Insert?
Клавиша Insert (Ins) – это клавиша, которая переключает режим «вставки» (когда текст вводиться по правую сторону от курсора) на режим «замены» (когда вводимый текст будет заменять напечатанный до того текст). Эта клавиша находится в блоке клавиш управления курсором и расположена слева от Home и выше Delete.
Как отменить замену символов?
Чтобы отключить этот режим, достаточно еще раз нажать клавишу Insert. Когда режим включен, в строке состояния отображается индикатор ЗАМ (OVR). А если мышкой дважды щелкнуть по этому индикатору, то режим замены символов будет выключен.
Что делать если в ворде при нажатии пробела стираются буквы?
Если вы вдруг столкнулись с подобной ситуацией, когда при наборе текста выделяется следующая буква и удаляется, то все что необходимо сделать чтобы убрать это – повторно нажать кнопку Insert, что позволит отключить режим «Замены» и буквы перестанут съедаться.
Что делать если в ворде пробел стирает буквы?
Все дело во включенном режиме замены (не путать с автозаменой), именно из-за него Ворд и съедает буквы. Как вы могли включить этот режим? Случайно, не иначе, так как включается он нажатием клавиши «INSERT» , которая на большинстве клавиатур находится около клавиши «BACKSPACE» .
Как убрать автоматическую замену букв?
Как отключить автоматическую замену строчной буквы на заглавную в таблицах Word? «Файл» — «Параметры» — «Правописание» -«Параметры автозамены» — «Автозамена». Снимаете галочку «Делать первые буквы ячеек таблиц прописными».
Как отключить функцию замены на клавиатуре?
Откройте раздел «Язык и ввод».
- Нажмите на кнопку настроек напротив вашей клавиатуры.
- Найдите пункт «Автоисправление». Он также может называться «Автозамена». Нажмите на него.
- Поставьте галочку напротив «Отключить».
- Всё, теперь автозамена текста будет отключена. Автор статьи:
Как отключить автозамену в ворде?
Включение и отключение автозамены в Word
- Перейдите в раздел > Параметры > Правописание и нажмите кнопку Параметры автозамены.
- На вкладке Автозамена установите или снимите флажок заменять текст при вводе.
Как изменить одно слово во всем документе?
Для замены слов в тексте используется функция «Найти и заменить», которая во всех версиях программы вызывается с помощью горячих клавиш «Ctrl+H».
Как сделать многоуровневый список в ворде?
Определение нового многоуровневого списка
- Выделите текст или нумерованный список, который вы хотите изменить.
- На вкладке Главная в группе Абзац щелкните стрелку рядом с кнопкой Многоуровневый список …
- Разверните диалоговое окно «Многоуровневый список», щелкнув Дополнительно в левом нижнем углу.
Как в ворде изменить вид кавычек?
Парные кавычки в Word
- На вкладке Файл нажмите кнопку Параметры.
- Выберите пункт Правописание и нажмите кнопку Параметры автозамены.
- В диалоговом окне Параметры автозамены выполните указанные ниже действия. На вкладке Автоформат при вводе в разделе Заменять при вводе установите или снимите флажок «Прямые» кавычки «парными». …
- Нажмите кнопку ОК.
При наборе текста удаляется следующая буква (а раньше она просто добавлялась к уже имеющимся). Что делать?
Доброго времени суток!
В офисной работе некоторые пользователи случайно включают спец. режим печати — при наборе текста удаляется следующая буква (т.е. каждый новый символ заменяет старый). Разумеется, при редактировании обычных документов — это очень не удобно и сильно раздражает! 👀
Собственно, после очередного случая, когда меня побеспокоили по «этому» вопросу — решил подобную статью с «лечением» проблемы выложить не только в локальной сети, но и здесь, у себя в «офисных» заметках. Думаю, она будет весьма полезна всем неискушенным пользователям!
👉 ШАГ 1: включаем режим «обычной» печати
Дело в том, что в Windows есть два режима набора текста:
- «вставка» — самый обычный режим, к которому все привыкли (текст при печати появляется сразу после курсора, а всё, что было справа автоматически смещается);
- «замена» — спец. режим, при котором новый добавленный символ появляется вместо старого, который был перед курсором (этим удобно пользоваться только в определенных случаях).
👉 Важно!
1) Для переключения между режимами «вставка» и «замена» в Windows используется клавиша Insert (или «ins» на ноутбуках). Обратите внимание, что на тех же ноутбуках её нужно нажимать вместе с клавишей Fn!
2) Чтобы вернуть в первоначальный вид стёртые символы и слова — нужно нажать сочетание Ctrl+Z (можно несколько раз. ).
Разумеется, пользователи чаще всего задействуют этот режим при нажатии кнопки «0» на цифровой клавиатуре (при выключенном режиме «num lock») .

Клавиша «Insert» (или «ins» на ноутбуках)
Собственно, как только вы столкнулись с неправильным режимом печати — просто используйте эту клавишу, и смените его. 👌
Однако, тем, кто хочет вообще отключить подобный режим — порекомендую ниже пару способов.
👉 ШАГ 2: как программе MS Word запретить переводить редактор в режим «замена»
Если вы сравнительно часто «натыкаетесь» на этот не очень удобный режим работы редактора (и стираете нужные слова ☝) — то, как один из вариантов решения, можно предложить вообще отключить эту «замену» (т.е. при нажатии на клавишу Insert — в Word ничего происходить не будет!).
Делается это достаточно просто: сначала нужно открыть меню «Файл/параметры» , а после во вкладке «Дополнительно» снять галочку с пункта «Использовать клавишу INS для переключения режимов вставки и замена» (см. скриншот ниже 👇) .

Использовать клавишу INS для переключения режимов вставки и замена
👉 ШАГ 3: еще один радикальный вариант решения — отключение клавиши Insert
Этот вариант больше подойдет пользователям с классической клавиатурой (на ноутбуках такой «фокус» проходит реже).
Суть метода заключается в том, чтобы ОС Windows «указать», что при нажатии кнопки Insert ничего не происходило (т.е. «обнулить» ее). Сделать это можно 👉 через редактор реестра, всего три действия:
- сначала открыть ветку: HKEY_LOCAL_MACHINESystemCurrentControlSetControlKeyboard Layout ;
- создать в этой ветке параметр (Binary) с именем «Value Scancode Map» (без кавычек) ;
- ну и задать в значение параметра нижеприведенную строку (см. скрин ниже 👇, более подробно об этом тут).

👉 Кстати!
Для более простого отключения клавиши Insert — можно воспользоваться спец. утилитой MapKeyboard . Пользоваться ей очень просто: достаточно один раз запустить и установить вместо Insert что-нибудь «безобидное» (Shift, например, см. скрин ниже 👇).

MapKeyboard: всего три действия для замены клавиши.
👉 В помощь!
Как переназначить одну клавишу на другую (тем, у кого не срабатывает нажатие кнопки на клавиатуре)
A piecewise function is a special function that is defined using multiple sub-functions where each sub-function applies to a different interval in the domain. Typing it in Microsoft Word document it can become a painful task. This blog covers the trick by which you can type beautifully arranged piecewise function in Ms Word.
Steps to insert piecewise function
1. Place the cursor at the location you need piecewise function.
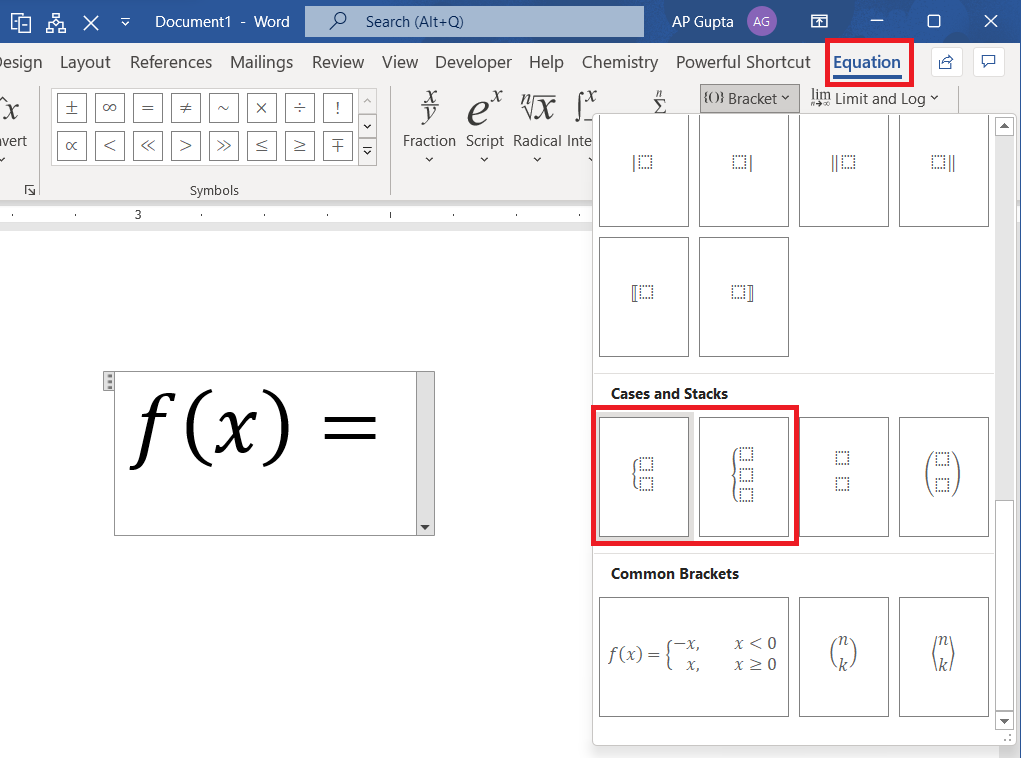
2. Go to Insert > Equation to get equation editor. You can use shortcut “Alt+=”
3. Type the normal part of equation & to get piece wise function go to Equation > Brackets > Cases and Stacks and insert column of desired size with left curly braces only. You can add or delete rows later on.
Add or delete row: Right click on any of the row & select “Insert equation before / after” to add or click “Delete equation” to remove one.
4. To insert an additional column for condition, place the cursor immediately after column and insert empty column by going to Equation > Matrix > Empty Matrices.
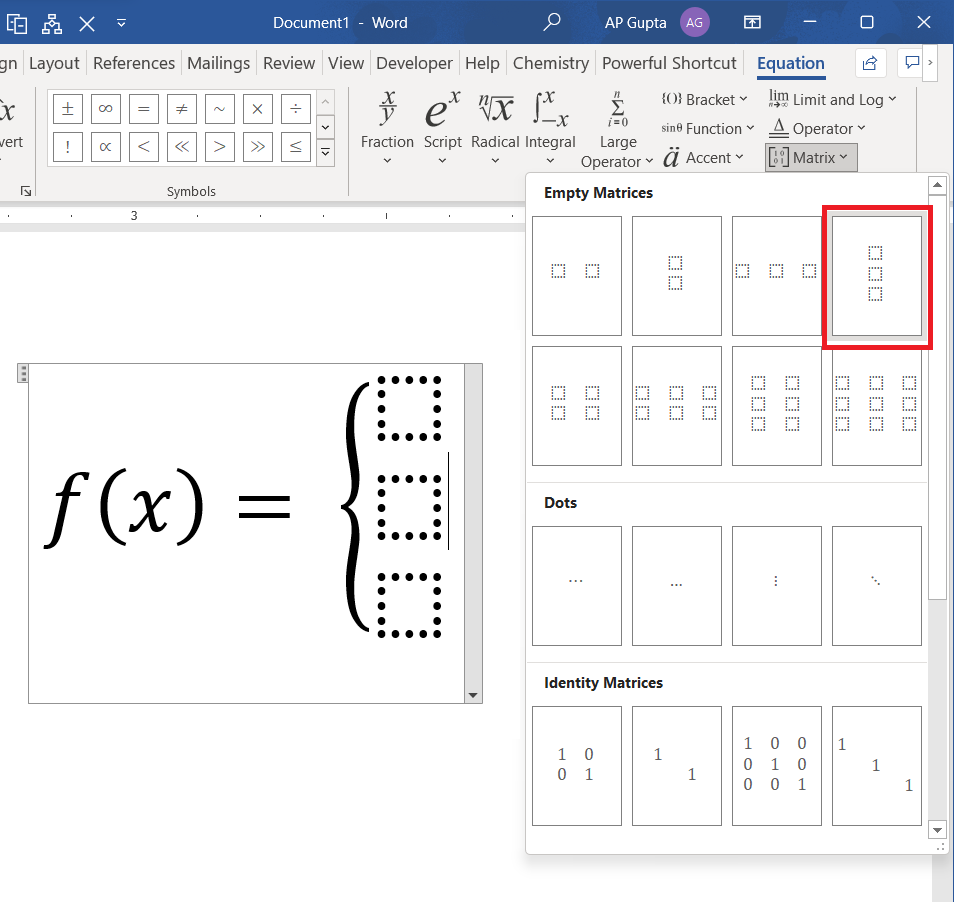
5. Fill the piece wise function as desired.