Содержание
- Импорт данных из Excel в SQL Server или базу данных Azure
- Список методов
- Мастер импорта и экспорта
- Службы Integration Services (SSIS)
- OPENROWSET и связанные серверы
- Распределенные запросы
- Связанные серверы
- Предварительное требование — сохранение данных Excel как текст
- Мастер импорта неструктурированных файлов
- Команда BULK INSERT
- Средство BCP
- Мастер копирования (ADF)
- Фабрика данных Azure
- Распространенные ошибки
- «Microsoft.ACE.OLEDB.12.0» не зарегистрирован
- Не удалось создать экземпляр поставщика OLE DB «Microsoft.ACE.OLEDB.12.0» для связанного сервера «(null)».
- 32-разрядный поставщик OLE DB «Microsoft.ACE.OLEDB.12.0» не может быть загружен в процессе на 64-разрядной версии SQL Server.
- Поставщик OLE DB «Microsoft.ACE.OLEDB.12.0» для связанного сервера «(null)» сообщил об ошибке.
- Не удалось проинициализировать объект источника данных поставщика OLE DB «Microsoft.ACE.OLEDB.12.0» для связанного сервера «(null)».
- Tutorial: Import Data into Excel, and Create a Data Model
- The sections in this tutorial are the following:
- Import data from a database
- Import data from a spreadsheet
- Import data using copy and paste
Импорт данных из Excel в SQL Server или базу данных Azure
Применимо к: база данных SQL ServerAzure SQL
Импортировать данные из файлов Excel в SQL Server или базу данных SQL Azure можно несколькими способами. Некоторые методы позволяют импортировать данные за один шаг непосредственно из файлов Excel. Для других методов необходимо экспортировать данные Excel в виде текста (CSV-файла), прежде чем их можно будет импортировать.
В этой статье перечислены часто используемые методы и содержатся ссылки для получения дополнительных сведений. Однако в ней не указано полное описание таких сложных инструментов и служб, как SSIS или Фабрика данных Azure. Дополнительные сведения об интересующем вас решении доступны по ссылкам ниже.
Список методов
Существует несколько способов импортировать данные из Excel. Для использования некоторых из этих инструментов может понадобиться установка SQL Server Management Studio (SSMS).
Для импорта данных из Excel можно использовать следующие средства:
| Сначала экспортировать в текст (SQL Server и база данных SQL) | Непосредственно из Excel (только в локальной среде SQL Server) |
|---|---|
| Мастер импорта неструктурированных файлов | мастер импорта и экспорта SQL Server |
| Инструкция BULK INSERT | Службы SQL Server Integration Services |
| BCP | Функция OPENROWSET |
| Мастер копирования (Фабрика данных Azure) | |
| Фабрика данных Azure. |
Если вы хотите импортировать несколько листов из книги Excel, обычно нужно запускать каждое из этих средств отдельно для каждого листа.
Дополнительные сведения см. в разделе Ограничения и известные проблемы загрузки данных в файлы Excel или из них.
Мастер импорта и экспорта
Импортируйте данные напрямую из файлов Excel с помощью мастера импорта и экспорта SQL Server. Также можно сохранить параметры в виде пакета SQL Server Integration Services (SSIS), который можно настроить и использовать повторно в будущем.
В SQL Server Management Studio подключитесь к экземпляру SQL Server Компонент Database Engine.
Разверните узел Базы данных.
Щелкните базу данных правой кнопкой мыши.
Наведите указатель мыши на пункт Задачи.
Выберите Импортировать данные или Экспортировать данные:


Дополнительные сведения см. в следующих статьях:
Службы Integration Services (SSIS)
Если вы работали с SQL Server Integration Services (SSIS) и не хотите запускать мастер импорта и экспорта SQL Server, создайте пакет SSIS, который использует в потоке данных источник «Excel» и назначение «SQL Server».
Дополнительные сведения см. в следующих статьях:
Чтобы научиться создавать пакеты SSIS, см. руководство How to Create an ETL Package (Как создать пакет ETL).

OPENROWSET и связанные серверы
В базе данных SQL Azure невозможно импортировать данные непосредственно из Excel. Сначала необходимо экспортировать данные в текстовый файл (CSV).
Поставщик ACE (прежнее название — поставщик Jet), который подключается к источникам данных Excel, предназначен для интерактивного клиентского использования. Если поставщик ACE используется на сервере SQL Server, особенно в автоматизированных процессах или процессах, выполняющихся параллельно, вы можете получить непредвиденные результаты.
Распределенные запросы
Импортируйте данные напрямую из файлов Excel в SQL Server с помощью функции Transact-SQL OPENROWSET или OPENDATASOURCE . Такая операция называется распределенный запрос.
В базе данных SQL Azure невозможно импортировать данные непосредственно из Excel. Сначала необходимо экспортировать данные в текстовый файл (CSV).
Перед выполнением распределенного запроса необходимо включить параметр ad hoc distributed queries в конфигурации сервера, как показано в примере ниже. Дополнительные сведения см. в статье ad hoc distributed queries Server Configuration Option (Параметр конфигурации сервера «ad hoc distributed queries»).
В приведенном ниже примере кода данные импортируются из листа Excel Sheet1 в новую таблицу базы данных с помощью OPENROWSET .
Ниже приведен тот же пример с OPENDATASOURCE .
Чтобы добавить импортированные данные в существующую таблицу, а не создавать новую, используйте синтаксис INSERT INTO . SELECT . FROM . вместо синтаксиса SELECT . INTO . FROM . из предыдущих примеров.
Для обращения к данным Excel без импорта используйте стандартный синтаксис SELECT . FROM . .
Дополнительные сведения о распределенных запросах см. в указанных ниже разделах.
- Распределенные запросы (Распределенные запросы по-прежнему поддерживаются в SQL Server 2019, но документация по этой функции не обновляется.)
- OPENROWSET
- OPENDATASOURCE
Связанные серверы
Кроме того, можно настроить постоянное подключение от SQL Server к файлу Excel как к связанному серверу. В примере ниже данные импортируются из листа Excel Data на существующем связанном сервере EXCELLINK в новую таблицу базы данных SQL Server с именем Data_ls .
Вы можете создать связанный сервер в SQL Server Management Studio или запустить системную хранимую процедуру sp_addlinkedserver , как показано в примере ниже.
Дополнительные сведения о связанных серверах см. в указанных ниже разделах.
Дополнительные примеры и сведения о связанных серверах и распределенных запросах см. в следующем разделе:
Предварительное требование — сохранение данных Excel как текст
Чтобы использовать другие методы, описанные на этой странице (инструкцию BULK INSERT, средство BCP или фабрику данных Azure), сначала экспортируйте данные Excel в текстовый файл.
В Excel выберите Файл | Сохранить как , а затем выберите текст (с разделителями табуляции) (*.txt) или CSV (с разделителями-запятыми) (*.csv) в качестве целевого типа файла.
Если вы хотите экспортировать несколько листов из книги, выполните эту процедуру для каждого листа. Команда Сохранить как экспортирует только активный лист.
Чтобы оптимизировать использование средств импорта, сохраняйте листы, которые содержат только заголовки столбцов и строки данных. Если сохраненные данные содержат заголовки страниц, пустые строки, заметки и пр., позже при импорте данных вы можете получить непредвиденные результаты.
Мастер импорта неструктурированных файлов
Импортируйте данные, сохраненные как текстовые файлы, выполнив инструкции на страницах мастера импорта неструктурированных файлов.
Как было описано выше в разделе Предварительное требование, необходимо экспортировать данные Excel в виде текста, прежде чем вы сможете импортировать их с помощью мастера импорта неструктурированных файлов.
Дополнительные сведения о мастере импорта неструктурированных файлов см. в разделе Мастер импорта неструктурированных файлов в SQL.
Команда BULK INSERT
BULK INSERT — это команда Transact-SQL, которую можно выполнить в SQL Server Management Studio. В приведенном ниже примере данные загружаются из файла Data.csv с разделителями-запятыми в существующую таблицу базы данных.
Как было описано выше в разделе Предварительное требование, необходимо экспортировать данные Excel в виде текста, прежде чем вы сможете использовать BULK INSERT для их импорта. BULK INSERT не может считывать файлы Excel напрямую. С помощью команды BULK INSERT можно импортировать CSV-файл, который хранится локально или в хранилище BLOB-объектов Azure.
Дополнительные сведения и примеры для SQL Server и базы данных SQL см. в следующих разделах:
Средство BCP
BCP — это программа, которая запускается из командной строки. В приведенном ниже примере данные загружаются из файла Data.csv с разделителями-запятыми в существующую таблицу базы данных Data_bcp .
Как было описано выше в разделе Предварительное требование, необходимо экспортировать данные Excel в виде текста, прежде чем вы сможете использовать BCP для их импорта. BCP не может считывать файлы Excel напрямую. Используется для импорта в SQL Server или базу данных SQL из текстового файла (CSV), сохраненного в локальном хранилище.
Для текстового файла (CSV), хранящегося в хранилище BLOB-объектов Azure, используйте BULK INSERT или OPENROWSET. Примеры см. в разделе Пример.
Дополнительные сведения о программе BCP см. в указанных ниже разделах.
Мастер копирования (ADF)
Импортируйте данные, сохраненные как текстовые файлы, с помощью пошаговой инструкции мастера копирования Фабрики данных Azure (ADF).
Как было описано выше в разделе Предварительное требование, необходимо экспортировать данные Excel в виде текста, прежде чем вы сможете использовать фабрику данных Azure для их импорта. Фабрика данных не может считывать файлы Excel напрямую.
Дополнительные сведения о мастере копирования см. в указанных ниже разделах.
Фабрика данных Azure
Если вы уже работали с фабрикой данных Azure и не хотите запускать мастер копирования, создайте конвейер с действием копирования из текстового файла в SQL Server или Базу данных SQL Azure.
Как было описано выше в разделе Предварительное требование, необходимо экспортировать данные Excel в виде текста, прежде чем вы сможете использовать фабрику данных Azure для их импорта. Фабрика данных не может считывать файлы Excel напрямую.
Дополнительные сведения об использовании этих источников и приемников фабрики данных см. в указанных ниже разделах.
Чтобы научиться копировать данные с помощью фабрики данных Azure, см. указанные ниже разделы.
Распространенные ошибки
«Microsoft.ACE.OLEDB.12.0» не зарегистрирован
Эта ошибка возникает, так как не установлен поставщик OLE DB. Установите его через Распространяемый пакет ядра СУБД Microsoft Access 2010. Не забудьте установить 64-разрядную версию, если Windows и SQL Server — 64-разрядные.
Полный текст ошибки.
Не удалось создать экземпляр поставщика OLE DB «Microsoft.ACE.OLEDB.12.0» для связанного сервера «(null)».
Это означает, что Microsoft OLEDB не был настроен должным образом. Чтобы устранить проблему, выполните приведенный ниже код Transact-SQL.
Полный текст ошибки.
32-разрядный поставщик OLE DB «Microsoft.ACE.OLEDB.12.0» не может быть загружен в процессе на 64-разрядной версии SQL Server.
Это происходит, когда 32-разрядная версия поставщика OLD DB устанавливается вместе с 64-разрядной версией SQL Server. Чтобы устранить эту проблему, удалите 32-разрядную версию и вместо нее установите 64-разрядную версию поставщика OLE DB.
Полный текст ошибки.
Поставщик OLE DB «Microsoft.ACE.OLEDB.12.0» для связанного сервера «(null)» сообщил об ошибке.
Не удалось проинициализировать объект источника данных поставщика OLE DB «Microsoft.ACE.OLEDB.12.0» для связанного сервера «(null)».
Обе эти ошибки обычно указывают на ошибку разрешений между процессом SQL Server и файлом. Убедитесь, что учетная запись, с которой выполняется служба SQL Server, имеет разрешение на полный доступ к файлу. Мы не рекомендуем импортировать файлы с настольного компьютера.
Источник
Tutorial: Import Data into Excel, and Create a Data Model
Abstract: This is the first tutorial in a series designed to get you acquainted and comfortable using Excel and its built-in data mash-up and analysis features. These tutorials build and refine an Excel workbook from scratch, build a data model, then create amazing interactive reports using Power View. The tutorials are designed to demonstrate Microsoft Business Intelligence features and capabilities in Excel, PivotTables, Power Pivot, and Power View.
Note: This article describes data models in Excel 2013. However, the same data modeling and Power Pivot features introduced in Excel 2013 also apply to Excel 2016.
In these tutorials you learn how to import and explore data in Excel, build and refine a data model using Power Pivot, and create interactive reports with Power View that you can publish, protect, and share.
The tutorials in this series are the following:
Import Data into Excel 2013, and Create a Data Model
In this tutorial, you start with a blank Excel workbook.
The sections in this tutorial are the following:
At the end of this tutorial is a quiz you can take to test your learning.
This tutorial series uses data describing Olympic Medals, hosting countries, and various Olympic sporting events. We suggest you go through each tutorial in order. Also, tutorials use Excel 2013 with Power Pivot enabled. For more information on Excel 2013, click here. For guidance on enabling Power Pivot, click here.
Import data from a database
We start this tutorial with a blank workbook. The goal in this section is to connect to an external data source, and import that data into Excel for further analysis.
Let’s start by downloading some data from the Internet. The data describes Olympic Medals, and is a Microsoft Access database.
Click the following links to download files we use during this tutorial series. Download each of the four files to a location that’s easily accessible, such as Downloads or My Documents, or to a new folder you create:
> OlympicMedals.accdb Access database
> OlympicSports.xlsx Excel workbook
> Population.xlsx Excel workbook
> DiscImage_table.xlsx Excel workbook
In Excel 2013, open a blank workbook.
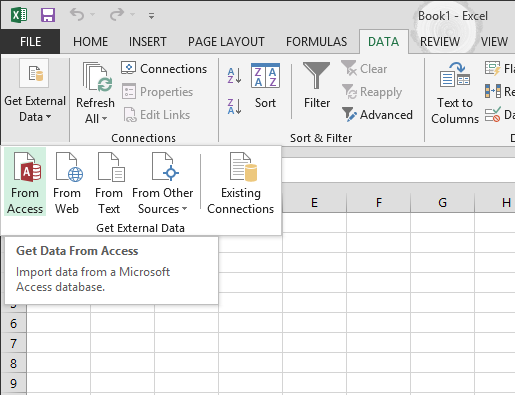
Click DATA > Get External Data > From Access. The ribbon adjusts dynamically based on the width of your workbook, so the commands on your ribbon may look slightly different from the following screens. The first screen shows the ribbon when a workbook is wide, the second image shows a workbook that has been resized to take up only a portion of the screen.
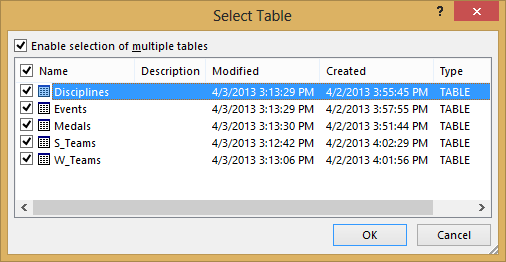
Select the OlympicMedals.accdb file you downloaded and click Open. The following Select Table window appears, displaying the tables found in the database. Tables in a database are similar to worksheets or tables in Excel. Check the Enable selection of multiple tables box, and select all the tables. Then click OK.
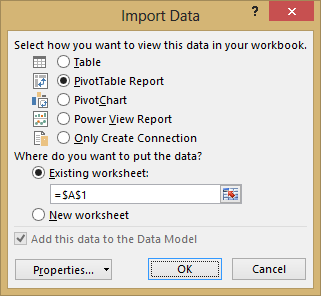
The Import Data window appears.
Note: Notice the checkbox at the bottom of the window that allows you to Add this data to the Data Model, shown in the following screen. A Data Model is created automatically when you import or work with two or more tables simultaneously. A Data Model integrates the tables, enabling extensive analysis using PivotTables, Power Pivot, and Power View. When you import tables from a database, the existing database relationships between those tables is used to create the Data Model in Excel. The Data Model is transparent in Excel, but you can view and modify it directly using the Power Pivot add-in. The Data Model is discussed in more detail later in this tutorial.
Select the PivotTable Report option, which imports the tables into Excel and prepares a PivotTable for analyzing the imported tables, and click OK.
Once the data is imported, a PivotTable is created using the imported tables.
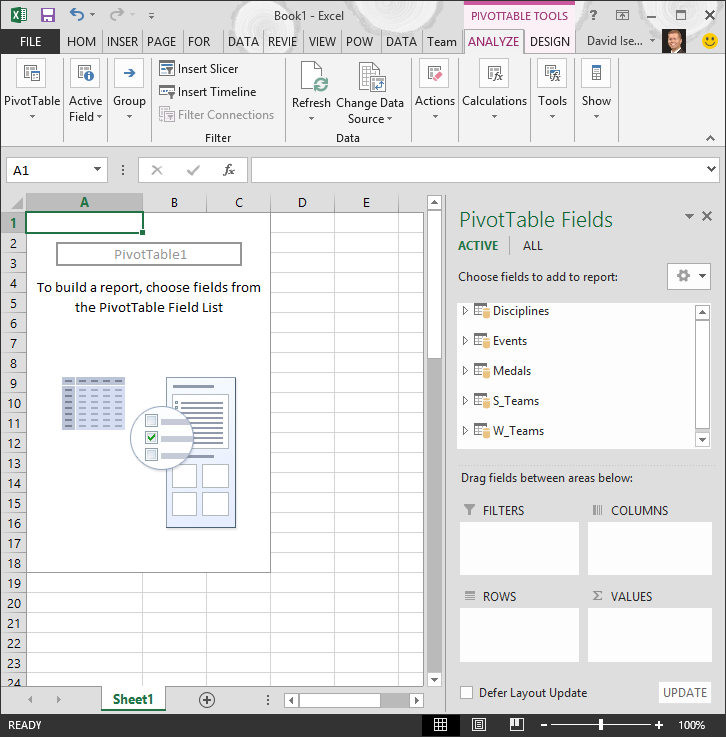
With the data imported into Excel, and the Data Model automatically created, you’re ready to explore the data.
Explore data using a PivotTable
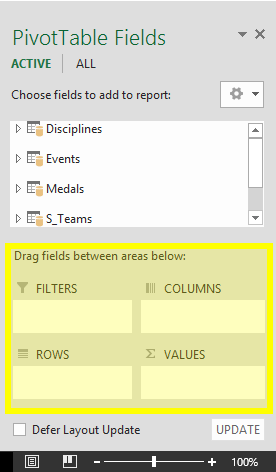
Exploring imported data is easy using a PivotTable. In a PivotTable, you drag fields (similar to columns in Excel) from tables (like the tables you just imported from the Access database) into different areas of the PivotTable to adjust how it presents your data. A PivotTable has four areas: FILTERS, COLUMNS, ROWS, and VALUES.
It might take some experimenting to determine which area a field should be dragged to. You can drag as many or few fields from your tables as you like, until the PivotTable presents your data how you want to see it. Feel free to explore by dragging fields into different areas of the PivotTable; the underlying data is not affected when you arrange fields in a PivotTable.
Let’s explore the Olympic Medals data in the PivotTable, starting with Olympic medalists organized by discipline, medal type, and the athlete’s country or region.
In PivotTable Fields, expand the Medals table by clicking the arrow beside it. Find the NOC_CountryRegion field in the expanded Medals table, and drag it to the COLUMNS area. NOC stands for National Olympic Committees, which is the organizational unit for a country or region.
Next, from the Disciplines table, drag Discipline to the ROWS area.
Let’s filter Disciplines to display only five sports: Archery, Diving, Fencing, Figure Skating, and Speed Skating. You can do this from within the PivotTable Fields area, or from the Row Labels filter in the PivotTable itself.
Click anywhere in the PivotTable to ensure the Excel PivotTable is selected. In the PivotTable Fields list, where the Disciplines table is expanded, hover over its Discipline field and a dropdown arrow appears to the right of the field. Click the dropdown, click (Select All)to remove all selections, then scroll down and select Archery, Diving, Fencing, Figure Skating, and Speed Skating. Click OK.
Or, in the Row Labels section of the PivotTable, click the dropdown next to Row Labels in the PivotTable, click (Select All) to remove all selections, then scroll down and select Archery, Diving, Fencing, Figure Skating, and Speed Skating. Click OK.
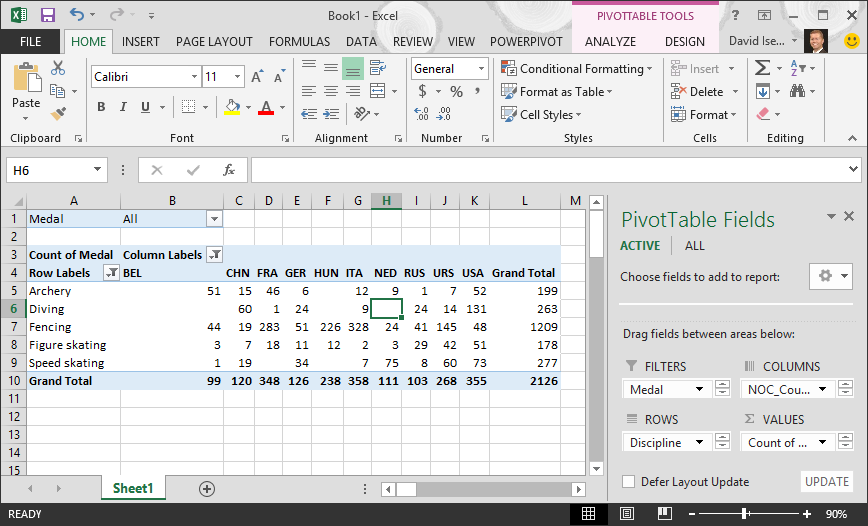
In PivotTable Fields, from the Medals table, drag Medal to the VALUES area. Since Values must be numeric, Excel automatically changes Medal to Count of Medal.
From the Medals table, select Medal again and drag it into the FILTERS area.
Let’s filter the PivotTable to display only those countries or regions with more than 90 total medals. Here’s how.
In the PivotTable, click the dropdown to the right of Column Labels.
Select Value Filters and select Greater Than….
Type 90 in the last field (on the right). Click OK.
Your PivotTable looks like the following screen.
With little effort, you now have a basic PivotTable that includes fields from three different tables. What made this task so simple were the pre-existing relationships among the tables. Because table relationships existed in the source database, and because you imported all the tables in a single operation, Excel could recreate those table relationships in its Data Model.
But what if your data originates from different sources, or is imported at a later time? Typically, you can create relationships with new data based on matching columns. In the next step, you import additional tables, and learn how to create new relationships.
Import data from a spreadsheet
Now let’s import data from another source, this time from an existing workbook, then specify the relationships between our existing data and the new data. Relationships let you analyze collections of data in Excel, and create interesting and immersive visualizations from the data you import.
Let’s start by creating a blank worksheet, then import data from an Excel workbook.
Insert a new Excel worksheet, and name it Sports.
Browse to the folder that contains the downloaded sample data files, and open OlympicSports.xlsx.
Select and copy the data in Sheet1. If you select a cell with data, such as cell A1, you can press Ctrl + A to select all adjacent data. Close the OlympicSports.xlsx workbook.
On the Sports worksheet, place your cursor in cell A1 and paste the data.
With the data still highlighted, press Ctrl + T to format the data as a table. You can also format the data as a table from the ribbon by selecting HOME > Format as Table. Since the data has headers, select My table has headers in the Create Table window that appears, as shown here.

Formatting the data as a table has many advantages. You can assign a name to a table, which makes it easy to identify. You can also establish relationships between tables, enabling exploration and analysis in PivotTables, Power Pivot, and Power View.
Name the table. In TABLE TOOLS > DESIGN > Properties, locate the Table Name field and type Sports. The workbook looks like the following screen.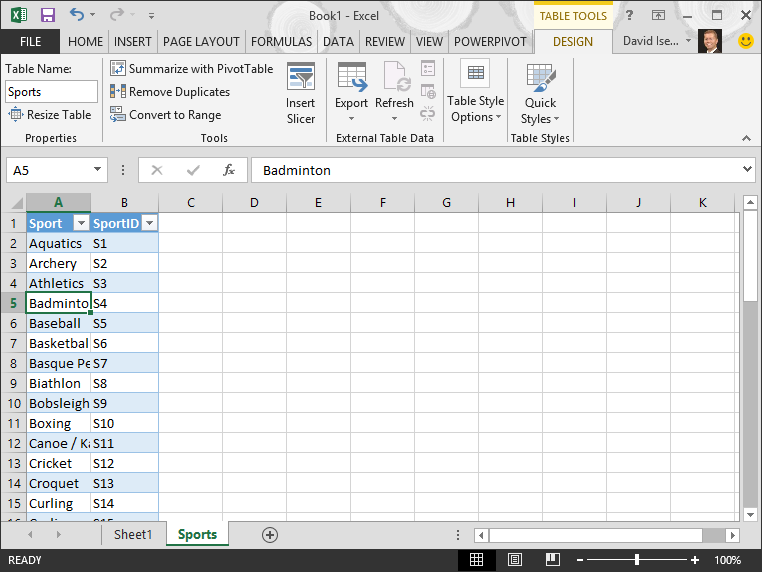
Save the workbook.
Import data using copy and paste
Now that we’ve imported data from an Excel workbook, let’s import data from a table we find on a web page, or any other source from which we can copy and paste into Excel. In the following steps, you add the Olympic host cities from a table.
Insert a new Excel worksheet, and name it Hosts.
Select and copy the following table, including the table headers.
Источник
I have a large excel worksheet that I want to add to my database.
Can I generate an SQL insert script from this excel worksheet?
asked May 29, 2013 at 16:04
![]()
2
I think importing using one of the methods mentioned is ideal if it truly is a large file, but you can use Excel to create insert statements:
="INSERT INTO table_name VALUES('"&A1&"','"&B1&"','"&C1&"')"
In MS SQL you can use:
SET NOCOUNT ON
To forego showing all the ‘1 row affected’ comments. And if you are doing a lot of rows and it errors out, put a GO between statements every once in a while
answered May 29, 2013 at 16:45
![]()
Hart COHart CO
33.8k5 gold badges46 silver badges62 bronze badges
10
You can create an appropriate table through management studio interface and insert data into the table like it’s shown below. It may take some time depending on the amount of data, but it is very handy.
answered May 29, 2013 at 16:54
![]()
Andrey MorozovAndrey Morozov
7,7505 gold badges52 silver badges75 bronze badges
8
There is a handy tool which saves a lot of time at
http://tools.perceptus.ca/text-wiz.php?ops=7
You just have to feed in the table name, field names and the data — tab separated and hit Go!
![]()
Bhargav Rao
49.1k28 gold badges124 silver badges139 bronze badges
answered Aug 27, 2014 at 8:09
![]()
mhnmhn
2,6404 gold badges30 silver badges50 bronze badges
1
You can use the following excel statement:
="INSERT INTO table_name(`"&$A$1&"`,`"&$B$1&"`,`"&$C$1&"`, `"&$D$1&"`) VALUES('"&SUBSTITUTE(A2, "'", "'")&"','"&SUBSTITUTE(B2, "'", "'")&"','"&SUBSTITUTE(C2, "'", "'")&"', "&D2&");"
This improves upon Hart CO’s answer as it takes into account column names and gets rid of compile errors due to quotes in the column. The final column is an example of a numeric value column, without quotes.
![]()
Dharman♦
29.9k22 gold badges82 silver badges132 bronze badges
answered Jul 7, 2017 at 10:23
![]()
Simon BaarsSimon Baars
1,82721 silver badges37 bronze badges
0
answered May 29, 2013 at 16:06
![]()
2
Use the ConvertFrom-ExcelToSQLInsert from the ImportExcel in the PowerShell Gallery
NAME
    ConvertFrom-ExcelToSQLInsert
SYNTAX
    ConvertFrom-ExcelToSQLInsert [-TableName] <Object> [-Path] <Object>
      [[-WorkSheetname] <Object>] [[-HeaderRow] <int>]
      [[-Header] <string[]>] [-NoHeader] [-DataOnly]  [<CommonParameters>]
PARAMETERS
    -DataOnly
    -Header <string[]>
    -HeaderRow <int>
    -NoHeader
    -Path <Object>
    -TableName <Object>
    -WorkSheetname <Object>
    <CommonParameters>
        This cmdlet supports the common parameters: Verbose, Debug,
        ErrorAction, ErrorVariable, WarningAction, WarningVariable,
        OutBuffer, PipelineVariable, and OutVariable. For more information, see
        about_CommonParameters (http://go.microsoft.com/fwlink/?LinkID=113216).
ALIASES
    None
REMARKS
    None
EXAMPLE
    ConvertFrom-ExcelToSQLInsert MyTable .testSQLGen.xlsx
![]()
philu
7631 gold badge8 silver badges17 bronze badges
answered Mar 23, 2018 at 11:07
![]()
SteveCSteveC
15.4k23 gold badges99 silver badges173 bronze badges
0
You could use VB to write something that will output to a file row by row adding in the appropriate sql statements around your data. I have done this before.
answered May 29, 2013 at 16:26
![]()
JoshJosh
4146 silver badges14 bronze badges
Here is another tool that works very well…
http://www.convertcsv.com/csv-to-sql.htm
It can take tab separated values and generate an INSERT script. Just copy and paste and in the options under step 2 check the box «First row is column names»
Then scroll down and under step 3, enter your table name in the box «Schema.Table or View Name:»
Pay attention to the delete and create table check boxes as well, and make sure you examine the generated script before running it.
This is the quickest and most reliable way I’ve found.
answered Jun 22, 2016 at 19:41
![]()
Steven MaysSteven Mays
3651 silver badge12 bronze badges
You can use the below C# Method to generate the insert scripts using Excel sheet just you need import OfficeOpenXml Package from NuGet Package Manager before executing the method.
public string GenerateSQLInsertScripts() {

        var outputQuery = new StringBuilder();
        var tableName = "Your Table Name";
        if (file != null)
        {
            var filePath = @"D:FileName.xsls";

            using (OfficeOpenXml.ExcelPackage xlPackage = new OfficeOpenXml.ExcelPackage(new FileInfo(filePath)))
            {
                var myWorksheet = xlPackage.Workbook.Worksheets.First(); //select the first sheet here
                var totalRows = myWorksheet.Dimension.End.Row;
                var totalColumns = myWorksheet.Dimension.End.Column;

                var columns = new StringBuilder(); //this is your columns

                var columnRows = myWorksheet.Cells[1, 1, 1, totalColumns].Select(c => c.Value == null ? string.Empty : c.Value.ToString());

                columns.Append("INSERT INTO["+ tableName +"] (");
                foreach (var colrow in columnRows)
                {
                    columns.Append("[");
                    columns.Append(colrow);
                    columns.Append("]");
                    columns.Append(",");
                }
                columns.Length--;
                columns.Append(") VALUES (");
                for (int rowNum = 2; rowNum <= totalRows; rowNum++) //selet starting row here
                {
                    var dataRows = myWorksheet.Cells[rowNum, 1, rowNum, totalColumns].Select(c => c.Value == null ? string.Empty : c.Value.ToString());

                    var finalQuery = new StringBuilder();
                    finalQuery.Append(columns);

                    foreach (var dataRow in dataRows)
                    {
                        finalQuery.Append("'");
                        finalQuery.Append(dataRow);
                        finalQuery.Append("'");
                        finalQuery.Append(",");
                    }
                    finalQuery.Length--;

                    finalQuery.Append(");");

                    outputQuery.Append(finalQuery);

                  }

            }
        }

return outputQuery.ToString();}
answered May 25, 2018 at 11:24
![]()
Here is a link to an Online automator to convert CSV files to SQL Insert Into statements:
CSV-to-SQL
answered Sep 16, 2016 at 4:49
![]()
This query i have generated for inserting the Excel file data into database
In this id and price are numeric values and date field as well. This query summarized all the type which I require It may useful to you as well
="insert into  product (product_id,name,date,price) values("&A1&",'" &B1& "','" &C1& "'," &D1& ");"


    Id    Name           Date           price
    7   Product 7   2017-01-05 15:28:37 200
    8   Product 8   2017-01-05 15:28:37 40
    9   Product 9   2017-01-05 15:32:31 500
    10  Product 10  2017-01-05 15:32:31 30
    11  Product 11  2017-01-05 15:32:31 99
    12  Product 12  2017-01-05 15:32:31 25
answered Jan 10, 2017 at 6:38
![]()
I had to make SQL scripts often and add them to source control and send them to DBA.
I used this ExcelIntoSQL App from windows store https://www.microsoft.com/store/apps/9NH0W51XXQRM
It creates complete script with «CREATE TABLE» and INSERTS.
answered May 9, 2017 at 13:40
![]()
I have a reliable way to generate SQL inserts batly,and you can modify partial parameters in processing.It helps me a lot in my work, for example, copy one hundreds data to database with incompatible structure and fields count.
IntellIJ DataGrip , the powerful tool i use.
DG can batly receive data from WPS office or MS Excel by column or line.
after copying, DG can export data as SQL inserts.
answered May 31, 2019 at 7:43
![]()
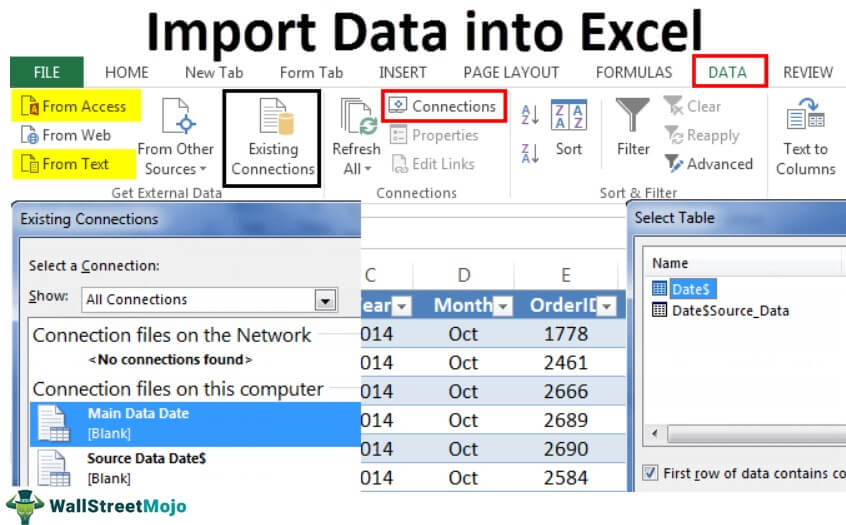
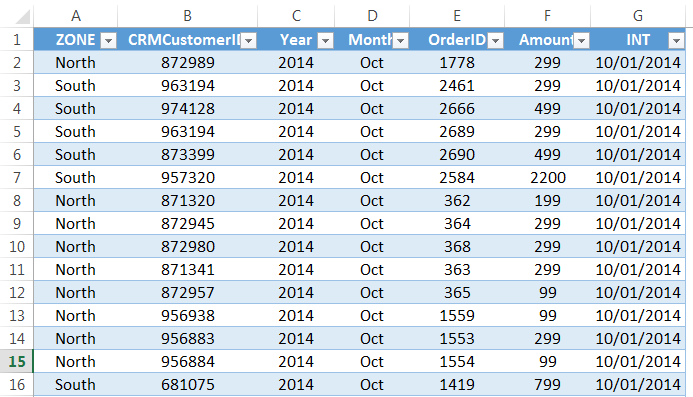
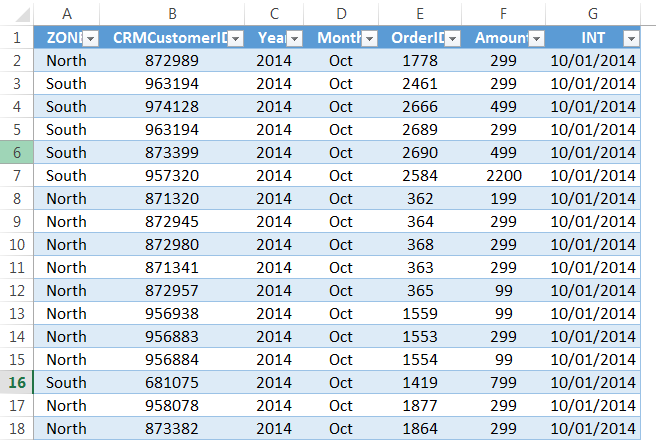
How to Import Data in Excel?
Importing the data from another file or another source file is often required in Excel. For example, sometimes people need data directly from very complicated servers, and sometimes we may need to import data from a text file or even from an Excel workbook.
If you are new to Excel data importing, then in this article, we will take a tour of importing data from text files, different Excel workbooks, and MS Access. Follow this article to learn the process involved in importing the data.
Table of contents
- How to Import Data in Excel?
- #1 – Import Data from Another Excel Workbook
- #2 – Import Data from MS Access to Excel
- #3 – Import Data from Text File to Excel
- Things to Remember
- Recommended Articles
#1 – Import Data from Another Excel Workbook
You can download this Import Data Excel Template here – Import Data Excel Template
Let us start.
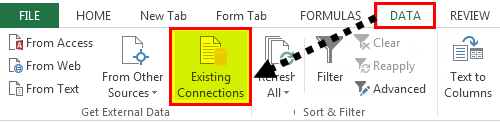
- First, we must go to the DATA tab. Then, under the DATA tab, click on Connections.

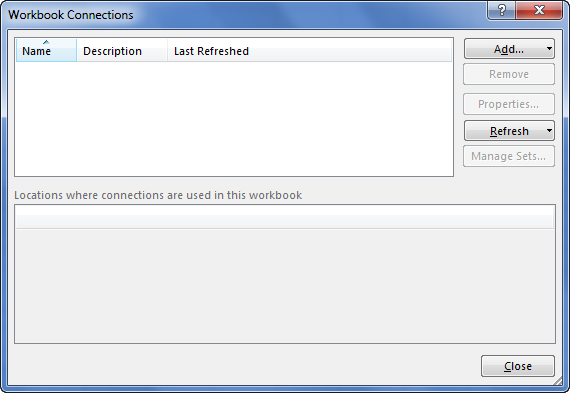
- As soon as we click on Connections, we may see the below window separately.

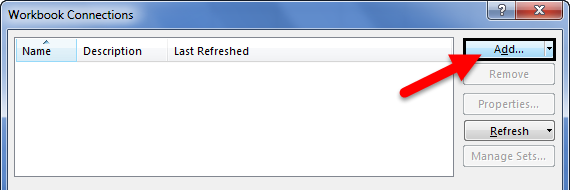
- Now, click on Add.

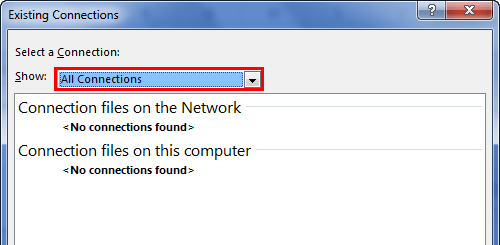
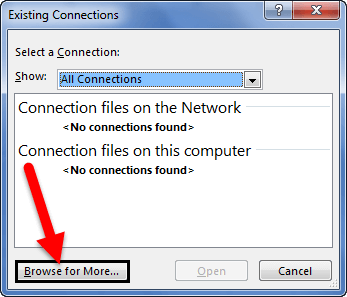
- It will open up a new window. In the below window, select All Connections.

- If there are any connections in this workbook, it will show what those connections are here.

- Since we are connecting to a new workbook, click on Browse for more.

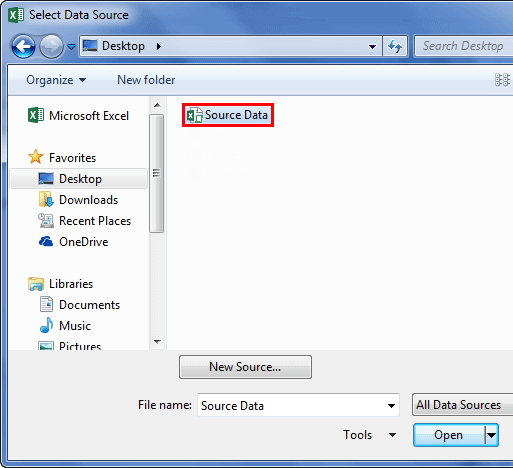
- In the below window, browse the file location. Then, click on Open.

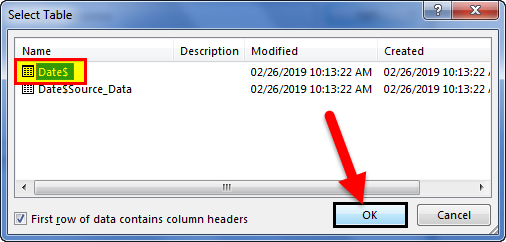
- After clicking on Open, it shows the below window.

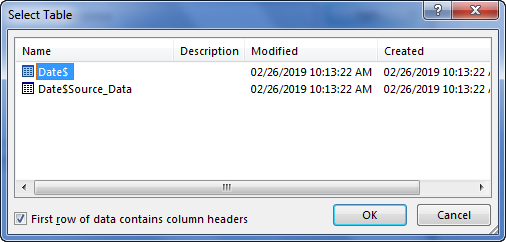
- Here, we need to select the required table to be imported to this workbook. Select the table and click on OK.
After clicking on OK, close the Workbook Connection window.
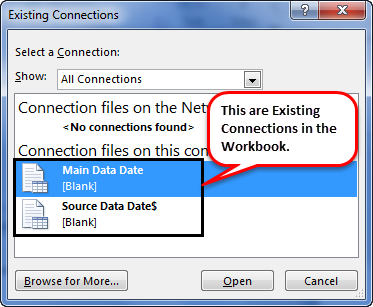
- Then, go to Existing Connections under the DATA tab.

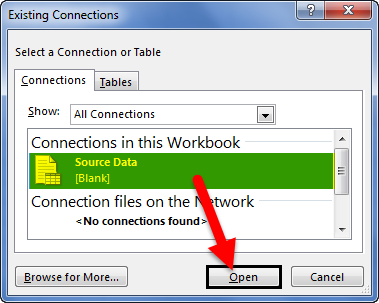
- Here, we will see all the existing connections. Select the connection we have just made and click on Open.

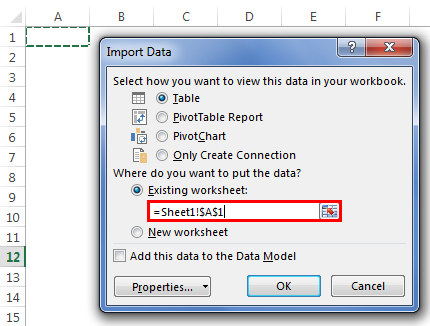
- Once we click on Open, it will ask us where to import the data. First, we need to select the cell reference here. Then, click on the OK button.

- It will import the data from the selected or connected workbook.


Like this, we can connect to the other workbook and import the data.
#2 – Import Data from MS Access to Excel
MS Access is the main platform to store the data safely. We can import the data directly from the MS Access File itself whenever the data is required.
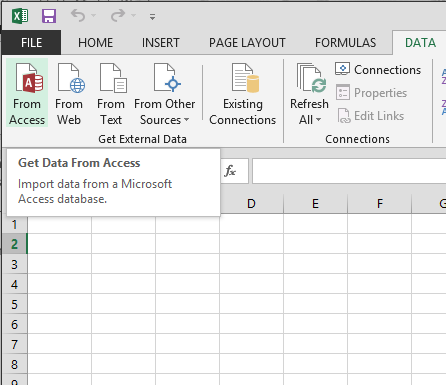
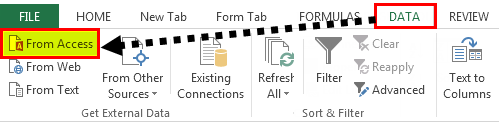
Step 1: Go to the “DATA” ribbon in excelThe ribbon is an element of the UI (User Interface) which is seen as a strip that consists of buttons or tabs; it is available at the top of the excel sheet. This option was first introduced in the Microsoft Excel 2007.read more and select “From Access.“
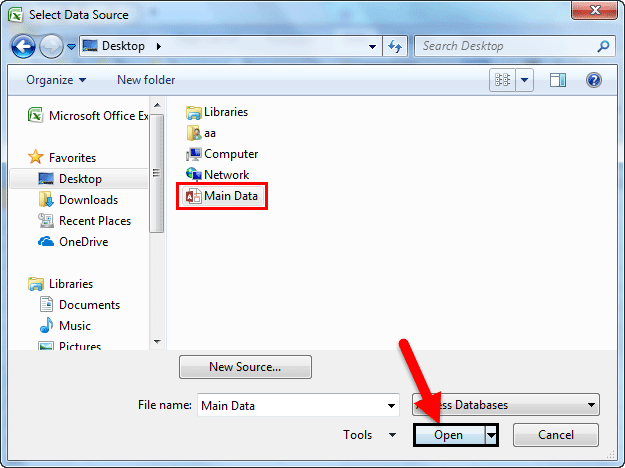
Step 2: Now, it will ask us to locate the desired file. Select the desired file path. Then, click on “Open.”
Step 3: Now, it will ask us to select the desired destination cell where we want to import the data. Then, click on “OK.”
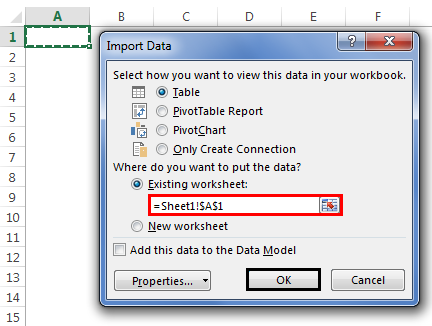
Step 4: It will import the data from access to the A1 cell in Excel.
#3 – Import Data from Text File to Excel
In almost all the corporations, whenever we ask for the data from the IT team, they will write a query and get the file in TEXT format. But unfortunately, TEXT file data is not the ready format to use in Excel; we need to make some modifications to work on it.
Step 1: Go to the “DATA” tab and click on “From Text.”

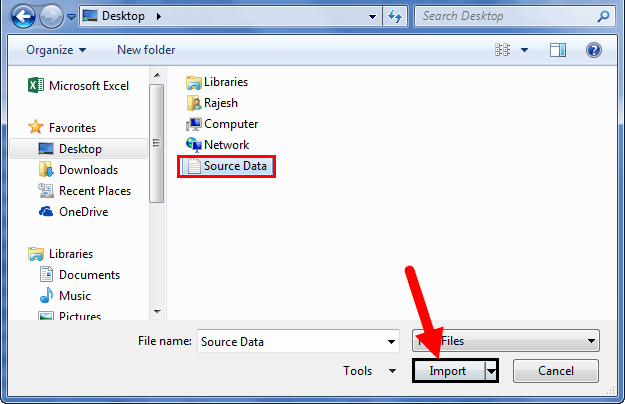
Step 2: Now, it will ask us to choose the file location on the computer or laptop. Select the targeted file, then click on “Import.”
Step 3: It will open up a “Text Import Wizard.”
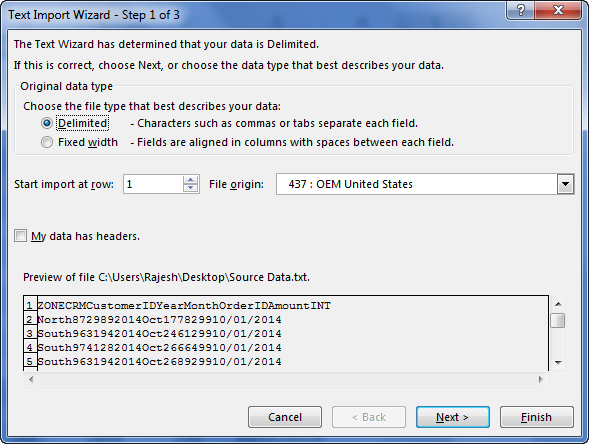
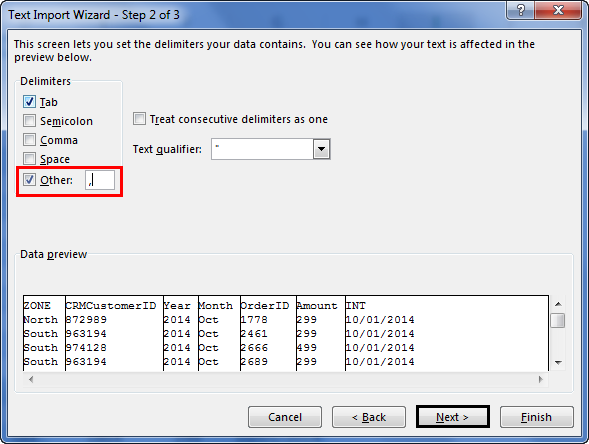
Step 4: By selecting the “Delimited,” click on “Next.”
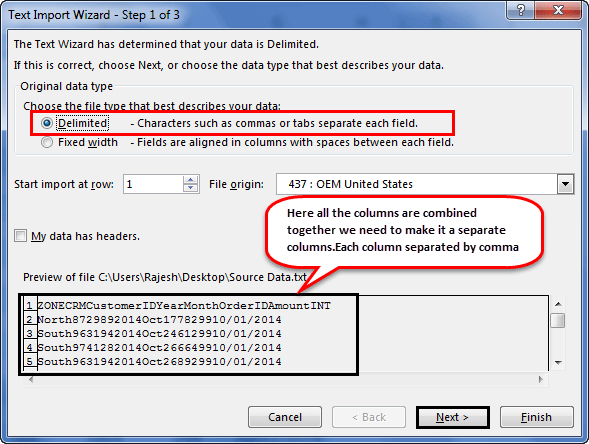
Step 5: In the next window, select the other and mention comma (,) because, in the text file, each column is separated by a comma (,). Then click on “Next.”
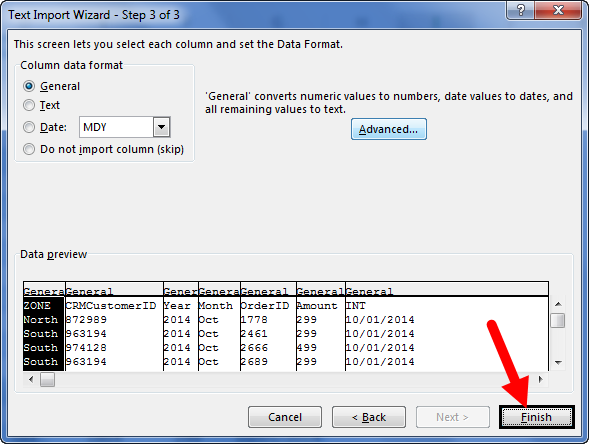
Step 6: In the next window, click on “Finish.”
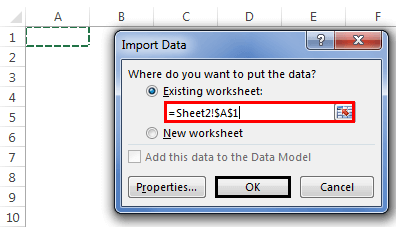
Step 7: Now, it will ask us to select the desired destination cell where we want to import the data. Select the cell and click on “OK.”
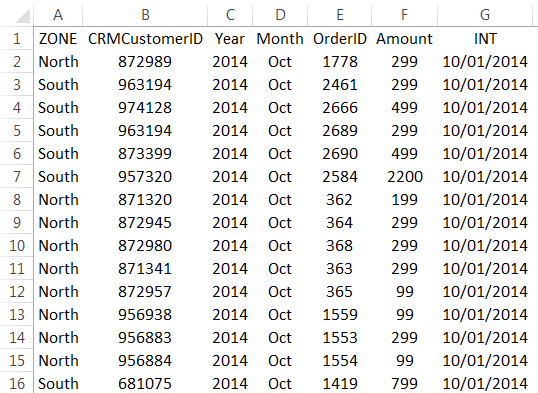
Step 8: It will import the data from the text file to the A1 cell in Excel.
Things to Remember
- If there are many tables, we must specify which table data we need to import.
- If we want the data in the current worksheet, we need to select the desired cell. Else, if we need data in a new worksheet, we must choose the new worksheet as the option.
- We need to separate the column in the TEXT file by identifying the common column separators.
Recommended Articles
This article is a guide to Import Data in Excel. Here, we discuss how to import data from 1) Excel Workbook, 2) MS Access, 3) Text File, practical examples, and a downloadable Excel template. You may learn more about Excel from the following articles: –
- KPI Dashboard in Excel
- Insert Image in Excel Cell
- How to Insert New Worksheet In Excel?
- Create a Dashboard in Excel
- Page Numbers in Excel
Import Linked or Unlinked Excel Worksheet Data into Word Files
by Avantix Learning Team | Updated February 1, 2021
Applies to: Microsoft® Excel® and Word® 2010, 2013, 2016, 2019 or 365 (Windows)
You can easily copy or import Excel worksheet data into Word documents. When you import from an Excel file, you can choose to import linked or unlinked data. If it’s linked, you will be able to update, change and remove the links.
The following are three easy ways to import Excel data into Word by copying and pasting:
- Copy the data in the Excel file, switch to the Word document and then paste the data where you want it to appear as a static copy.
- Import the Excel data into the Word document as a linked OLE (Object Linking and Embedding) object so that when the Excel file changes, the Word document will update as well.
- Create links to the Excel data in a Word table so that when the Excel file changes, the table will update.
If you choose the second or third method, you will need to ensure that the Excel file remains in the same location with the same name or manage the link(s) using Edit Links.
Recommended article: How to Create a Table of Contents in Word
Do you want to learn more about Microsoft Word? Check out our virtual classroom or live classroom Word courses >
Inserting unlinked Excel data
You can easily copy data from Excel and paste it into a Word document. Use this method if you do not need to update the Word file when the Excel data changes.
To insert unlinked Excel data into Word:
- Open the Excel file.
- Select the data you want to copy into the Word file.
- Press Ctrl + C or right-click and select Copy from the drop-down menu.
- Open the Word file.
- Position the insertion point where you want the Excel data to appear.
- Press Ctrl + V or right-click and choose Paste Values from the drop-down menu.
With this method, the Excel data will be copied into Word as a table and the Word file will not update when the Excel file changes. Because the data is pasted into a table, you can use Word’s table tools to format it and the file will be smaller because the data is not linked.
Inserting Excel data as a linked OLE object
You can insert an OLE (Object Linking and Embedding) object when you want to insert a linked copy of Excel data. However, one of the problems with this method is that the OLE object is like a picture of the cells and you would need to format the data in Excel to appear the way you want in the Word file.
To insert Excel data into Word as a linked OLE object:
- Open the Excel source workbook.
- Select the data you want to place in the Word file.
- Press Ctrl + C or right-click and choose Copy from the drop-down menu.
- Open the Word destination document.
- Position the insertion point where you want the linked Excel data to appear.
- Click the Home tab in the Ribbon and select the arrow below Paste. A drop-down menu appears.
- Select Paste Special. A dialog box will appear.
- Click Paste Link.
- Under As, select Microsoft Excel Worksheet Object.
- Click OK.
Note the Paste link option on the left of the Paste Special dialog box:

You can double-click an OLE object to jump to the source Excel file.
Inserting linked Excel data into a Word table
You can insert Excel data as a table in Word where each cell is linked to the Excel data source. This is a great method because you can maintain links but format the data the way you want in Word.
To insert linked Excel data into a Word table:
- Open the Excel source workbook.
- Select the data you want to place in the Word file.
- Press Ctrl + C or right-click and choose Copy from the drop-down menu.
- Open the Word destination document.
- Position the insertion point where you want the linked Excel data to appear.
- Click the Home tab in the Ribbon and select the arrow below Paste. A drop-down menu appears.
- Select Paste Special. A dialog box will appear.
- Click Paste Link.
- Under As, select HTML Format.
- Click OK.
HTML format is selected by default in the Paste Special dialog box:

Click in the table in the Word document. As long as Field Shading When Selected is set in Word Options, each cell will appear with gray shading indicating that it is a field linked to Excel. You can format the table in Word.
Updating or managing links
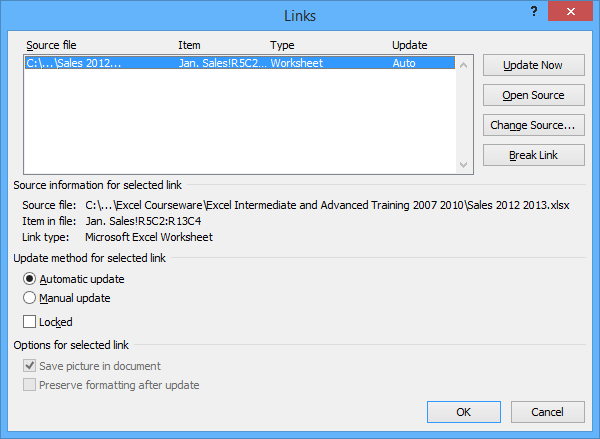
One of the benefits of linking data is that information in a destination document updates when you change information in the source document. This typically occurs automatically if both documents are open. However, if you open a Word document with links and the Excel file is not open, Word should prompt you to update the links. You may also need to update links yourself or re-establish a link if the original Excel file has been moved or renamed.
To update or manage links:
- Right-click a linked object or HTML table. A drop-down menu appears.
- Choose Linked Worksheet Object and then Edit Links. A dialog box appears.
- Under Update method for selected link, Automatic update is selected by default. You can choose Manual update if you do not want the data to update automatically. You would then need to click the link and click Update Now to update.
- Make any other changes (such as breaking a link of changing the source for a link).
- Click OK.
The Links dialog box below displays one link:
It’s not difficult to import Excel data into Word. Typically, the biggest issue occurs when other users move or rename the source Excel file but this can be managed using Edit Links and changing the source.
This article was first published on March 13, 2016 and has been updated for clarity and content.
Subscribe to get more articles like this one
Did you find this article helpful? If you would like to receive new articles, join our email list.
More resources
How to View Word Count in Word (4 Ways)
14+ Word Selection Shortcuts to Quickly Select Text
How to Superscipt or Subscript in Word (with Shortcuts)
How to Format Microsoft Word Tables Using Table Styles
How to Insert a Check Mark or Tick Mark in Word (5 Ways)
Related courses
Microsoft Word: Intermediate / Advanced
Microsoft Excel: Intermediate / Advanced
Microsoft PowerPoint: Intermediate / Advanced
Microsoft Word: Long Documents Master Class
Microsoft Word: Styles, Templates and Tables of Contents
Microsoft Word: Designing Dynamic Word Documents Using Fields
VIEW MORE COURSES >
Our instructor-led courses are delivered in virtual classroom format or at our downtown Toronto location at 18 King Street East, Suite 1400, Toronto, Ontario, Canada (some in-person classroom courses may also be delivered at an alternate downtown Toronto location). Contact us at info@avantixlearning.ca if you’d like to arrange custom instructor-led virtual classroom or onsite training on a date that’s convenient for you.
Copyright 2023 Avantix® Learning
Microsoft, the Microsoft logo, Microsoft Office and related Microsoft applications and logos are registered trademarks of Microsoft Corporation in Canada, US and other countries. All other trademarks are the property of the registered owners.
Avantix Learning |18 King Street East, Suite 1400, Toronto, Ontario, Canada M5C 1C4 | Contact us at info@avantixlearning.ca
This article will show you how to easily add/attach file like PDF, Word or any other to Excel spreadsheet.
Applies to: Excel, Excel 2013, Excel 2016, Excel 2019, Excel 365, Office 365
-
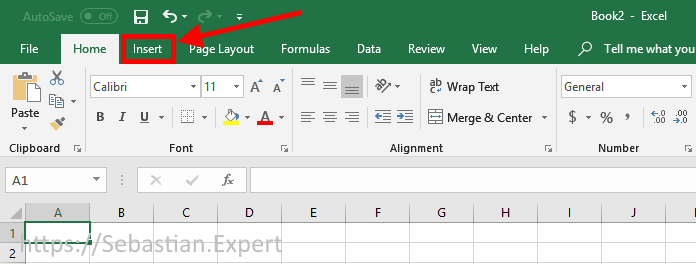
Go to Insert tab

Excel 2016/2019/365 — Home tab
-
Click Object button placed in Text group.
Narrow window

Insert Object button — narrow window
Medium width window

Insert Object button — medium width window
Maximum width window
Insert Object button — max width window
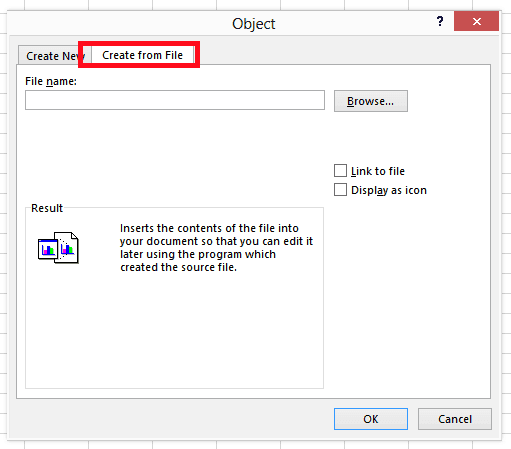
-
Click Create from file and browse for the file.

Click to enlarge