
![]()
Download Article
Multiple easy-to-follow ways to add footnotes in Word
![]()
Download Article
Footnotes allow you to cite sources or explain a concept in detail without sidetracking the main text. Word makes managing footnotes easy, as new footnotes are numbered automatically, and the footnotes area expands and shrinks dynamically based on the amount of text. Give your document a professional feel by strategically using footnotes to clarify information and credit your sources.
-

1
Click the «References» tab. This is located at the top of the window, typically between «Page Layout» and «Mailings». This tab lets you insert various reference tools, such as a table of contents, footnotes and endnotes, citations, captions and more.
-
2
Place your cursor where you want the footnote to appear. By default, footnotes will be designated by increasing superscript numbers. Place the cursor where you want the number to appear.
Advertisement
-
3
Click the «Insert Footnote» button. This is located in the «Footnotes» section of the «References» tab. The footnote number will be inserted, and a separator bar will be added to the bottom of the page. Your cursor will automatically be taken to the footnote at the bottom of the page so that you can fill it out.
- An endnote is like a footnote except the reference occurs at the end of the document. By default, endnotes are numbered with Roman numerals (i, ii, iii, etc.).
- Alternatively, you can press Ctrl + Alt + F to create a footnote, or Ctrl + Alt + D to create an endnote.
-
4
Change when your footnotes numbering resets. By default, your footnotes will increase in number throughout your whole document. You can change this so that the numbers restart every page or at section breaks in the document.[1]
- Click the Menu button in the bottom-right corner of the «Footnotes» section. This will open the «Footnote and Endnote» window. In the «Format» section, use the «Numbering» drop-down menu to select when you want the footnote numbers to restart.
- You can insert section breaks into your document by clicking the «Page Layout» tab, clicking the «Breaks» button in the «Page Setup» section, and then selecting the type of break you’d like to insert. Besides changing the way footnotes are numbered, section breaks are great for making layout changing to specific portions of a document.
-
5
Change your footnote formatting. If you’d rather have symbols instead of numbers, want the footnotes to appear below the text instead of at the bottom of the page, or want the numbering to start at a different number, you can change this from the «Footnote and Endnote» window. Click the Menu button in the bottom right-corner of the «Footnotes» section to open it.
- Click Symbol… to choose a symbol from the Symbol menu. You can choose any character from any font, though the «Symbols» font will open by default.


Advertisement
-
1
Switch to Print Layout view. Click View and select Print Layout.
-
2
Place your cursor where you want the footnote to appear. Your footnote will appear at the cursor, so place the cursor at the end of the text that you want to create a footnote reference for.
-
3
Insert the footnote. Click the «Document Elements» tab, and then click the «Footnote» button in the «Citations» section. A footnote will be inserted at your cursor and you will be taken to the footnote text section to enter the contents of the footnote. The footnote text will be at the bottom of the same page as the footnote, separated by a line.
- Alternatively, you can press Command + Option + F to create a footnote, or Command + Option + E to create an endnote.
-
4
Change your footnote formatting. If you’d rather have symbols instead of numbers, want the footnotes to appear below the text instead of at the bottom of the page, or want the numbering to start at a different number, you can change this from the «Footnote and Endnote» window. Click Insert and select Footnote.
- Click Symbol… to choose a symbol from the Symbol menu. You can choose any character from any font, though the «Symbols» font will open by default.
- By default, your footnotes will increase in number throughout your whole document. You can change this so that the numbers restart every page or at section breaks in the document. In the «Format» section, use the «Numbering» drop-down menu to select when you want the footnote numbers to restart.
- You can apply your formatting changes to just your selected text, the current section, or your entire document.
- Click Symbol… to choose a symbol from the Symbol menu. You can choose any character from any font, though the «Symbols» font will open by default.


Advertisement
-
1
Switch to Print Layout view. Click View and select Print Layout.
-
2
Place your cursor where you want the footnote to appear. Your footnote will appear at the cursor, so place the cursor at the end of the text that you want to create a footnote reference for.
-
3
Insert the footnote. Click Insert → Reference → Footnote… to open the «Footnote and Endnote» window. Select «Footnote», and then choose your numbering option. You can have Word number your footnotes automatically, or you can choose a custom symbol to insert.
- In Word 2004/2008, click Insert → Footnote….
- Alternatively, you can press Ctrl + Alt + F to create a footnote, or Ctrl + Alt + D to create an endnote in Windows. On a Mac, press Command + Option + F to create a footnote, or Command + Option + E to create an endnote.
-
4
Enter your footnote text. Your footnote will be created and you will be taken to the footnote text section at the bottom of the page. You can enter the text you want for the footnote, and then click back in your document when you are finished.


Advertisement
Add New Question
-
Question
Why is my first footnote printing on the next page?

A header or footnote is applied to all pages when put in a document. Unless it is a page number generated by the document (which you select). Otherwise, the header and footnote follows you through all of your pages.
-
Question
How do I insert more information into a footnote that already exists?
You can double click on an existing footnote to edit it.
-
Question
When I create a footnote for a word, does it appear each time I use the word?
No, it doesn’t. Footnotes are bound to locations in the document, not to words. This means that, even if you change the word or the text around the footnote, the footnote remains where it is.
Ask a Question
200 characters left
Include your email address to get a message when this question is answered.
Submit
Advertisement
Video
Thanks for submitting a tip for review!
About This Article
Article SummaryX
1. Click References.
2. Click the desired location.
3. Click Insert Footnote.
4. Select a number format.
5. Select a symbol.
6. Click Insert.
Did this summary help you?
Thanks to all authors for creating a page that has been read 808,644 times.
Is this article up to date?
Footnotes are short notes at the bottom of the page that provide explanations, additional comments, or an understanding of a particular word or phrase in the document content. Endnotes are the same as footnotes but appear at the end of an entire section or document.

Footnotes or endnotes in the document must be formatted according to the requirements accepted by your college, university, company, established on the project, etc.
The number or symbol inserted in the document content to refer to a footnote or endnote is called a reference mark. Footnotes appear on the same page as their reference marks, and endnotes appear at the end of the document or section (see more about their customization below). In most views, footnotes or endnotes are separated from the body text by a note separator line (see how to change a note separator line).
The numbering is always correct if you insert footnotes or endnotes using the Word’s Footnote and Endnote functionality. Even after changes are made to the document, Word automatically moves the footnotes to the correct page and renumbers them accordingly.
Note: You can use footnotes and endnotes in the same document.
Insert a Footnote or Endnote
Word offers several useful features to insert footnotes and endnotes. You can:
- Insert the Footnote with the default format using the Insert Footnote button
- Insert the Endnote with the default format using the Insert Endnote button
- Insert the Footnote and Endnote using shortcut keys
- Insert the Footnote and Endnote using the custom format
Note: To reference a single footnote or endnote multiple times in the document text with the automatic numbering, you can use cross-references.
Insert the Footnote using the Insert Footnote button
To insert the Footnote with the format used by default (Word’s default format or last saved format for the footnotes in the document), do the following:
1. Place the cursor where you want to insert the reference to the footnote.
2. On the References tab, in the Footnotes group, click the Insert Footnote button:

Word inserts the footnote at the bottom of the current page with the format used by default (superscript number of the 1, 2, 3, … numbered list). The cursor is positioned next to the inserted footnote. E.g.:
3. Enter what you need in the footnote. You can modify text style, size, color as you want using the same features as for the regular text:

Note: See how to format footnotes and endnotes for more details.
4. Double-click the number or symbol at the beginning of the footnote to return to the place in the document where you inserted a reference mark.
Insert the Endnote using the Insert Endnote button
To insert the Endnote with the format used by default (Word’s default format or last saved format for the endnotes in the document), do the following:
1. Place the cursor where you want to insert the reference to the endnote.
2. On the References tab, in the Footnotes group, click the Insert Endnote button:

Word inserts the endnote at the end of the document with the format used by default (superscript number of the i, ii, iii, … numbered list). The cursor is positioned next to the inserted endnote. E.g.:

3. Enter what you need in the endnote.
Note: See how to format footnotes and endnotes for more details.
4. Double-click the number or symbol at the beginning of the endnote to return to the place in the document where you inserted a reference mark.
Insert the Footnote and Endnote using shortcut keys
You can use the following keyboard shortcuts to insert footnotes and endnotes in a Microsoft Word document:
- Press Alt+Ctrl+F to insert a footnote.
- Press Alt+Ctrl+D to insert an endnote.
Insert the Footnote and Endnote with custom format
To insert the Footnote and Endnote in the document with the custom format, do the following:
1. Place the cursor where you want to insert the reference to the footnote or endnote.
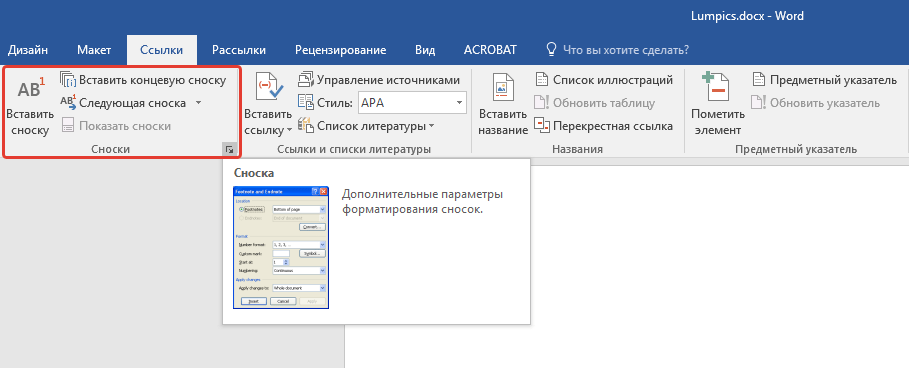
2. On the References tab, in the Footnotes group, click the dialog box launcher:

3. In the Footnote and Endnote dialog box:

- In the Location section:
- Select Footnotes and the location:
- Bottom of page (used by default)
- Below text – if there is a space between text and a bottom margin on the page, it can be placed right after text. For example:

- Select Endnotes and the location:
- End of section
- End of document (used by default)
To insert endnotes at the end of each chapter or other parts in the document, add a section break (see how to work with breaks in Word) for each chapter or part and select the End of section option.
- Click the Convert… button to convert all footnotes to endnotes, or vice versa (see converting footnotes and endnotes below).
- Select Footnotes and the location:
- In the Footnote layout section (available only if the Footnote is selected in the Location section), select the layout from the Columns dropdown list.
As for the regular text, Word offers to create columns for the footnotes and endnotes.
- Match section layout – use the same number of columns as the document text
- 1 column
- 2 column
- 3 column
- 4 column
For example:
- Match section layout:

- 1 column:
- In the Format section:
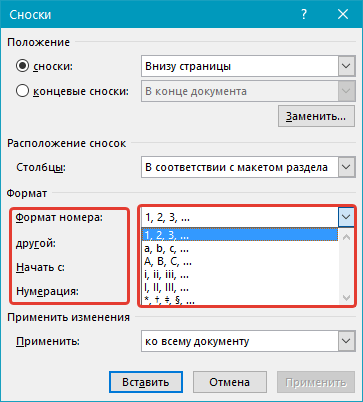
- Choose the format you need from the Number format dropdown list:

- 1, 2, 3, … (used by default for footnotes)
- a, b, c, …
- A, B, C, …
- i, ii, iii, … (used by default for endnotes)
- I, II, III, …
- *, †, ‡, §, …
- Type the Custom mark or select it by clicking the Symbol… button to open the Symbol dialog box:

Select the symbol you need in the Symbol dialog box and click the OK button.
In English, a footnote or endnote is usually indicated by a superscript number immediately following the text or phrase to which the note refers. For some requirements, a superscript number should be placed between parentheses, for example: [1].
Note: We strongly recommend checking the requirements you need to follow. For example:
- The Chicago style allows using symbols, such as the asterisk (*) or the dagger (†), instead of numbers if there are a few footnotes in the document (see how to add different reference marks for more details).
- The American Psychological Association (APA) style and Modern Language Association (MLA) style don’t recommend using symbols as footnote identifiers.
- Optionally, select the number you need to start numbering in the Start at field.
For example, if you have several documents containing different chapters or parts of the voluminous project, you can start footnotes from a specific number in the current document.
- From the Numbering dropdown list, select one of the options:
- Continuous (used by default)
- Restart each section
- Restart each page
- Choose the format you need from the Number format dropdown list:
- In the Apply changes section, from the Apply changes to dropdown list, select one of the options:
- This section
- Whole document


4. Enter the text you need in the footnote or endnote:
5. Double-click the number or symbol at the beginning of the note to return to the document content.
Converting Footnotes and Endnotes
Word can convert footnotes to endnotes, and vice versa:
- To convert one footnote to an endnote, right-click the footnote, then click Convert to Endnote in the popup menu:

- To convert one endnote to a footnote, right-click the endnote, then click Convert to Footnote in the popup menu.
- To convert all footnotes to endnotes or convert all endnotes to footnotes, do the following:
1) Right-click any of the footnotes or endnotes, then select Note Options… in the popup menu:
2) In the Footnotes and Endnotes dialog box, click the Convert… button:

3) In the Convert Notes dialog box, choose the option you need:

- Convert all footnotes to endnotes (is active if there is at least one footnote in the document)
- Convert all endnotes to footnotes (is active if there is at least one endnote in the document)
- Swap footnotes and endnotes (is active if there are at least one footnote and one endnote in the document)


Select all footnotes in the document
To select all footnotes in the document, click inside any footnote, then press Ctrl+A.
To select all endnotes in the document, click inside any endnote, then press Ctrl+A:

Edit and move footnotes and endnotes
To edit a footnote or endnote, click inside the note and make corrections.
To move a footnote or endnote from one location in the document to another, do the following:
1. Select the reference mark in the document.
2. Do one of the following to cut the selection:
- On the Home tab, in the Clipboard group, click the Cut button:

- Right-click the selection and choose Cut in the popup menu.
- Press Ctrl+X.

3. Place the cursor in the new location.
4. Do one of the following to paste selection:
- On the Home tab, in the Clipboard group, click the Paste button.
- Right-click and choose Paste in the popup menu.
- Press Ctrl+V.
Word moves the reference mark and the note to the correct place; also, it renumbers footnotes and endnotes.
Move among footnotes and endnotes
To move among footnotes and endnotes, on the References tab, in the Footnotes group, click the Next Footnote button, then select one of the options:

- Next Footnote,
- Previous Footnote,
- Next Endnote,
- Previous Endnote.
Notes:
- To move to the next footnote, you can just click the Next Footnote button in the Footnotes group on the Reference tab.
- See more about navigating in the document.
Display footnotes or endnotes
To display the note’s content in the Word document, do one of the following:
- On the References tab, in the Footnotes group, click the Show Notes button to display the list of footnotes or endnotes:

If there are footnotes and endnotes in the document, Word asks which type of notes you want to see:

- Double-click a reference mark in the document’s body to display its corresponding footnote or endnote.


Note: If you hover the mouse over a reference mark in the document text, a tooltip appears with a full footnote or endnote text, so you don’t need to scroll up and down to check footnotes and endnotes as you read or write:

Remove the Footnote and Endnote
To delete the footnote or endnote in the Word document, select its reference mark (number or symbol that refers to the footnote or endnote), and press the Delete key.
Note: If you delete the text and the number from the footnote or endnote pane, it does not delete the number in the document text itself. Word still thinks the deleted footnote or endnote is still active. You need to delete the original reference mark in the document.
After removing any note, Microsoft Word automatically renumbers the footnotes and endnotes.
Add a footnote
- Click where you want to add a footnote.
- Click References > Insert Footnote. Word inserts a reference mark in the text and adds the footnote mark at the bottom of the page.
- Type the footnote text. Tip: To return to your place in your document, double-click the footnote mark.
Contents
- 1 How do I insert a footnote below text in Word?
- 2 How do you insert a footnote example?
- 3 How do I insert a footnote and number in Word?
- 4 How do you do footnotes?
- 5 What is the shortcut for inserting a footnote in Word?
- 6 Is endnote and footnote same?
- 7 How do you insert a footnote in Word 2016?
- 8 Where do you put footnotes in text?
- 9 What is endnote in Word?
- 10 How do you copy and paste footnotes in Word?
- 11 How do you reference the same footnote in Word?
- 12 What are footnotes example?
- 13 What citation uses footnotes?
- 14 What is the symbol for footnote?
- 15 How do you do footnotes on a keyboard?
- 16 How do you footnote on a laptop?
- 17 What is the function of Ctrl B in MS Word?
- 18 How do you footnote in APA?
- 19 How do you do Chicago style footnotes?
- 20 Can you mix footnotes and endnotes?
How do I insert a footnote below text in Word?
Click Insert → Reference → Footnote… to open the “Footnote and Endnote” window. Select “Footnote”, and then choose your numbering option. You can have Word number your footnotes automatically, or you can choose a custom symbol to insert.
How do you insert a footnote example?
How to insert footnotes
- Place the cursor where you would like the superscript number to appear.
- Click on “Insert Footnote” in the “References” tab.
- The corresponding number will be automatically inserted in the footer ready for you to add the footnote citation.
- Type in your footnote citation.
How do I insert a footnote and number in Word?
Inserting Duplicate Footnotes using Same Sequence Number.
- Insert the first footnote: On the Reference tab, in the Footnotes group, click Insert Footnote.
- Enter the footnote text.
- Click insertion point in the body of the document where duplicate footnote number is to appear.
How do you do footnotes?
How do I Create a Footnote or Endnote? Using footnotes or endnotes involves placing a superscript number at the end of a sentence with information (paraphrase, quotation or data) that you wish to cite. The superscript numbers should generally be placed at the end of the sentence to which they refer.
What is the shortcut for inserting a footnote in Word?
Keyboard Shortcuts for Footnotes and Endnotes
- Alt+Ctrl+F to insert a footnote.
- Alt+Ctrl+D to insert an endnote.
Is endnote and footnote same?
Footnotes are found at the bottom of a page (i.e. in the footer) and endnotes are located at the end of a complete document, or sometimes at the end of a chapter or section.Footnotes are used as a citation vehicle for a short citation, while endnotes can contain more text without compromising the format of the paper.
How do you insert a footnote in Word 2016?
Insert footnotes and endnotes
- Click where you want to reference to the footnote or endnote.
- On the References tab, select Insert Footnote or Insert Endnote.
- Enter what you want in the footnote or endnote.
- Return to your place in the document by double-clicking the number or symbol at the beginning of the note.
Where do you put footnotes in text?
Footnote or endnote numbers in the text should follow punctuation, and preferably be placed at the end of a sentence. When citing the source for a quotation, the number should be placed at the end of the quotation and not after the author’s name if that appears first in the text.
What is endnote in Word?
EndNote works with Microsoft Word and Open Office Writer to insert citations into documents. EndNote will format citations and bibliographies into a nominated style. Styles can include footnotes and numbering. Setting the Style. In Word, select the EndNote tab.
How do you copy and paste footnotes in Word?
Copying and Moving Footnotes
- Highlight the footnote reference mark in your document.
- Press Ctrl+C. The footnote reference mark and the associated footnote are copied to the Clipboard.
- Position the insertion point at the location where you want to copy the footnote.
- Press Ctrl+V.
How do you reference the same footnote in Word?
Use Multiple References to the Same Footnote: MS Word
- Insert your first (primary) footnote as normal.
- Position the insertion point in the document where you want the secondary reference to the footnote.
- Choose Insert | Reference | Cross-reference.
- Using the Reference Type drop-down list, choose Footnote.
What are footnotes example?
Footnotes are notes placed at the bottom of a page. They cite references or comment on a designated part of the text above it. For example, say you want to add an interesting comment to a sentence you have written, but the comment is not directly related to the argument of your paragraph.
What citation uses footnotes?
Chicago
Typically, Oxford, Chicago and Turabian will use footnotes for in-text citations. MLA and APA will also use footnotes but to provide content or copyright information, and not typically for attribution.
What is the symbol for footnote?
A dagger, obelisk, or obelus † is a typographical mark that usually indicates a footnote if an asterisk has already been used. The symbol is also used to indicate death or extinction.
How do you do footnotes on a keyboard?
Keyboard Shortcut is Ctrl + Alt + F for footnote and Ctrl + Alt + D for endnote.
How do you footnote on a laptop?
How to Insert Footnotes in Microsoft Word
- Place the cursor in the text where you want the footnote mark located.
- Select the References tab.
- In the Footnotes group, choose Insert Footnote.
- Type the footnote and add any formatting.
What is the function of Ctrl B in MS Word?
Ctrl+B in Word and other word processors
In Microsoft Word and other word processor programs, highlighting text and pressing Ctrl+B makes the text bold. If the text is already bold, highlighting the bold text and pressing Ctrl+B un-bolds the text.
How do you footnote in APA?
To create a footnote in APA style, you’ll add a superscript number after the punctuation. The exceptions are dashes and parentheses. Place footnote numbers before dashes and inside parentheses. See how this works in the example.
How do you do Chicago style footnotes?
How Do I Format Footnotes in Turabian/Chicago Style?
- Each footnote should appear at the bottom of the page that includes its numbered in-text reference.
- For note numbers in the text, use superscript.
- Indent the first line of each note half an inch like a paragraph in the main text.
Can you mix footnotes and endnotes?
Although it is unlikely you will need to include both footnotes and endnotes in your Chicago style format essay, it is acceptable, if needed.
Содержание
- Добавление обычных и концевых сносок
- Как изменить начальное значение сносок?
- Как создать уведомление о продолжение сноски?
- Как изменить или удалить разделитель сноски?
- Как удалить сноску?
- Вопросы и ответы

Сноски в Майкросотф Ворд — это что-то вроде комментариев или примечаний, которые можно размещать в текстовом документе, как на любых его страницах (обычные сноски), так и в самом конце (концевые сноски). Зачем это нужно? В первую очередь, для совместной работы и/или проверки заданий либо же при написании книги, когда автору или редактору нужно внести пояснение того или иного слова, термина, фразы.
Представьте, кто-то вам сбросил текстовый документ MS Word, который вы должны просмотреть, проверить и, при необходимости что-то изменить. Но как быть, если вы хотите, чтобы это «что-то» изменил автор документа или какой-нибудь другой человек? Как быть в случаях, когда нужно просто оставить какое-то примечание или пояснение, к примеру, в научной работе или книге, не захламляя при этом содержимое всего документа? Именно для этого и нужны сноски, и в этой статье мы расскажем о том, как вставлять сноски в Ворде 2010 — 2016, а также в более ранних версиях продукта.
Примечание: Инструкция в данной статье будет показана на примере Microsoft Word 2016, но она применима и к предыдущим версиям программы. Некоторые пункты могут отличаться визуально, у них может быть немного другое название, но смысл и содержание каждого шага практически идентичны.
Добавление обычных и концевых сносок
Используя сноски в Ворде, можно не только предоставлять разъяснения и оставлять комментарии, но и добавлять ссылки для текста в печатном документе (зачастую, для ссылок используются концевые сноски).
Примечание: Желая добавить к текстовому документу список литературы, воспользуйтесь командами для создания источников и ссылок. Найти их можно во вкладке «Ссылки» на панели инструментов, группа «Ссылки и списки литературы».
Обычные и концевые сноски в MS Word нумеруются автоматически. Для всего документа можно использовать общую схему нумерации либо же можно создавать разные схемы для каждого отдельного раздела.
Команды, необходимые для добавления обычных и концевых сносок, а также для их редактирования, расположены во вкладке «Ссылки», группа «Сноски».
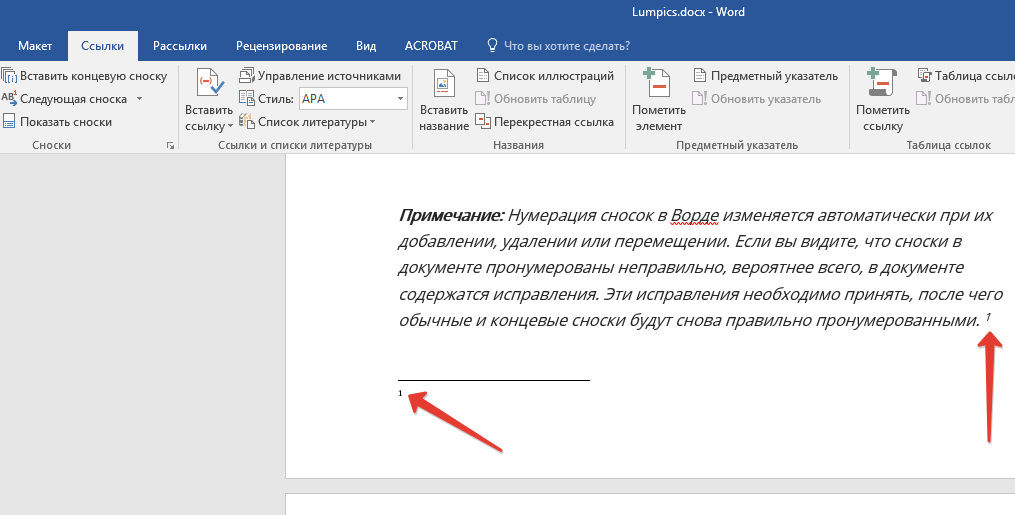
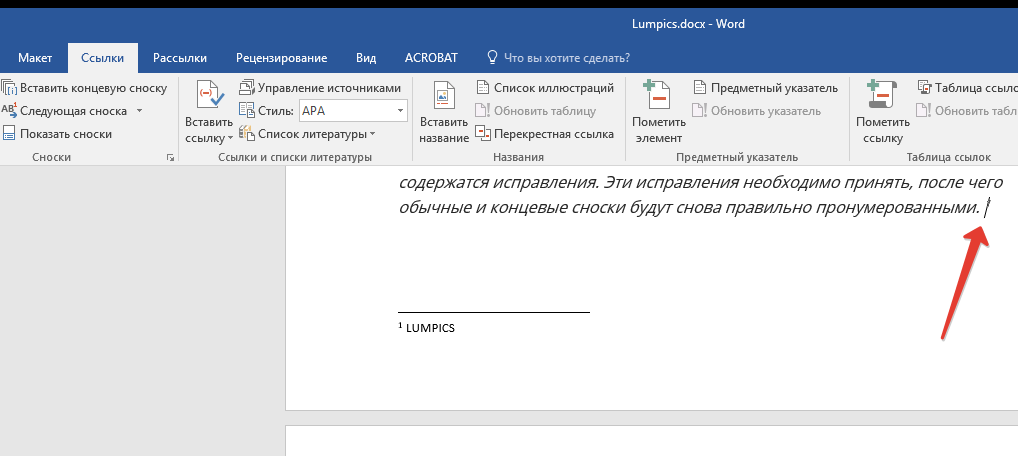
Примечание: Нумерация сносок в Ворде изменяется автоматически при их добавлении, удалении или перемещении. Если вы видите, что сноски в документе пронумерованы неправильно, вероятнее всего, в документе содержатся исправления. Эти исправления необходимо принять, после чего обычные и концевые сноски будут снова правильно пронумерованными.
1. Кликните левой кнопкой мышки в том месте, куда вы желаете добавить сноску.
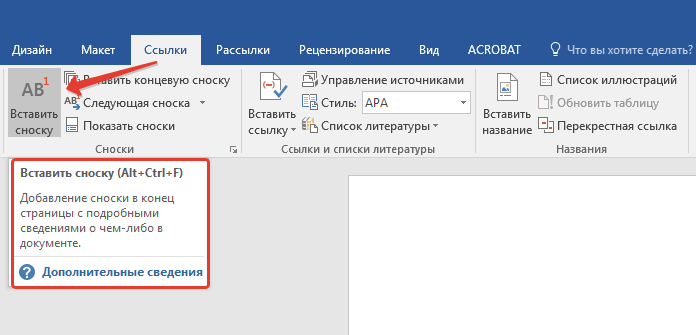
2. Перейдите во вкладку «Ссылки», группа «Сноски» и добавьте обычную или концевую сноску, нажав на соответствующий пункт. Знак сноски будет расположен в необходимом месте. Сама же сноска будет находиться внизу страницы, если она обычная. Концевая сноска будет расположена в конце документа.
Для большего удобства используйте сочетания клавиш: «Ctrl+Alt+F» — добавление обычной сноски , «Ctrl+Alt+D» — добавление концевой.

3. Введите необходимый текст сноски.
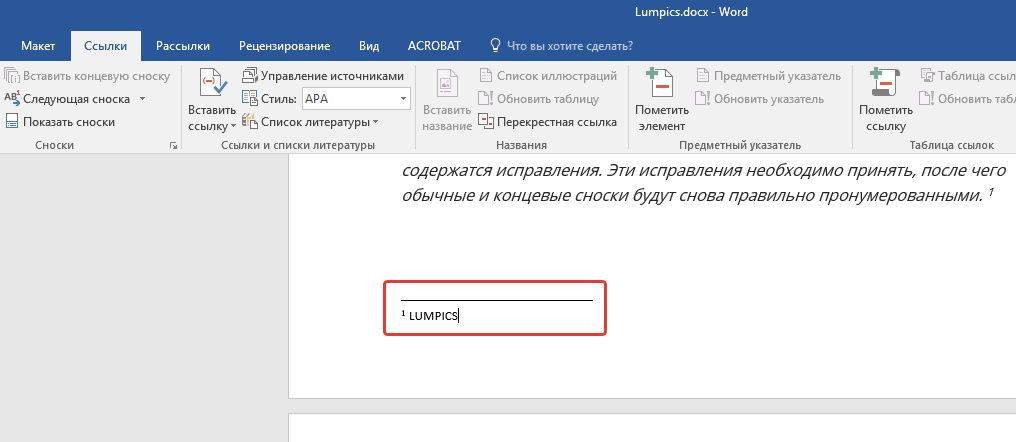
4. Кликните дважды по значку сноски (обычной или концевой), чтобы вернуться к ее знаку в тексте.
5. Если вы хотите изменить расположение сноски или ее формат, откройте диалоговое окно «Сноски» на панели управления MS Word и выполните необходимое действие:
- Для преобразования обычных сносок в концевые, как и наоборот, в группе «Положение» выберите необходимый тип: «Сноски» или «Концевые сноски», после чего нажмите кнопку «Заменить». Нажмите «ОК» для подтверждения.
- Для изменения формата нумерации выберите необходимое форматирование: «Формат номера» — «Применить».
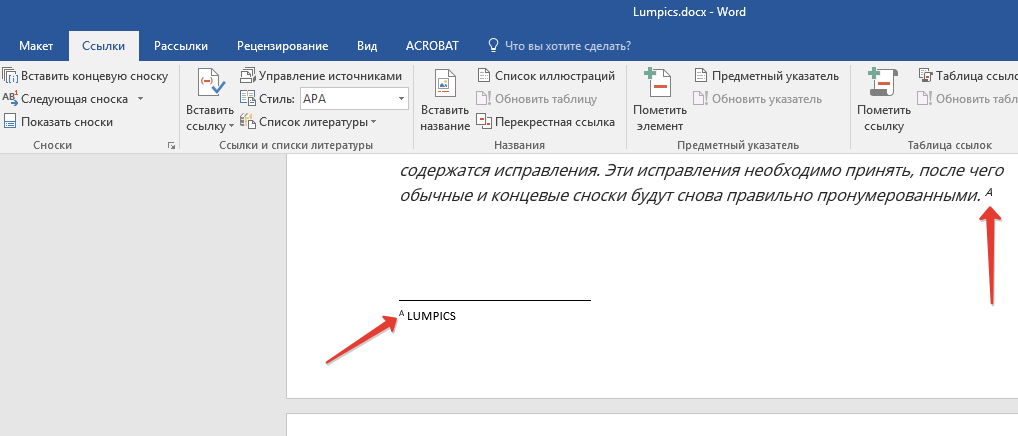
- Чтобы изменить стандартную нумерацию и установить вместо нее собственный знак для сноски, нажмите на «Символ», и выберите то, что вам необходимо. Существующие знаки сносок при этом останутся неизменными, а новый знак будет применяться исключительно к новым сноскам.
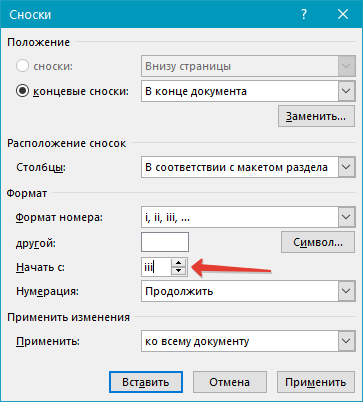
Как изменить начальное значение сносок?
Обычные сноски нумеруются автоматически, начиная с цифры «1», концевые — начиная с буквы «i», за которой следует «ii», затем «iii» и так далее. Кроме этого, желая сделать в Ворде сноску внизу страницы (обычную) или в конце документа (концевую), вы также можете задать и любое другое начальное значение, то есть, установить другую цифру или букву.
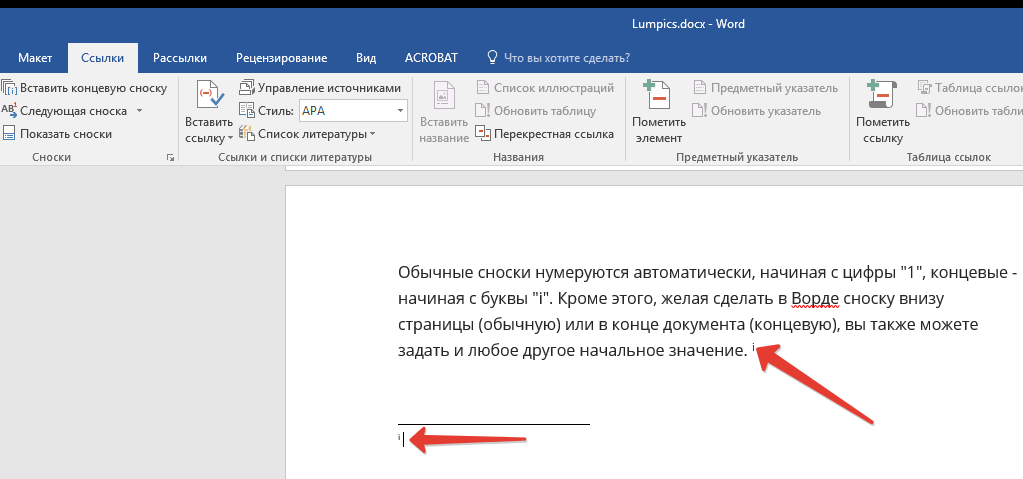
1. Вызовите диалоговое окно во вкладке «Ссылки», группа «Сноски».
2. Выберите необходимое начальное значение в поле «Начать с».
3. Примените изменения.
Как создать уведомление о продолжение сноски?
Иногда бывает так, что сноска не помещается на странице, в таком случае можно и нужно добавить уведомление о ее продолжение, чтобы человек, который будет читать документ, был в курсе того, что сноска не закончена.

1. Во вкладке «Вид» включите режим «Черновик».

2. Перейдите во вкладку «Ссылки» и в группе «Сноски» выберите «Показать сноски», а затем укажите тип сносок (обычные или концевые), которые вы хотите показать.
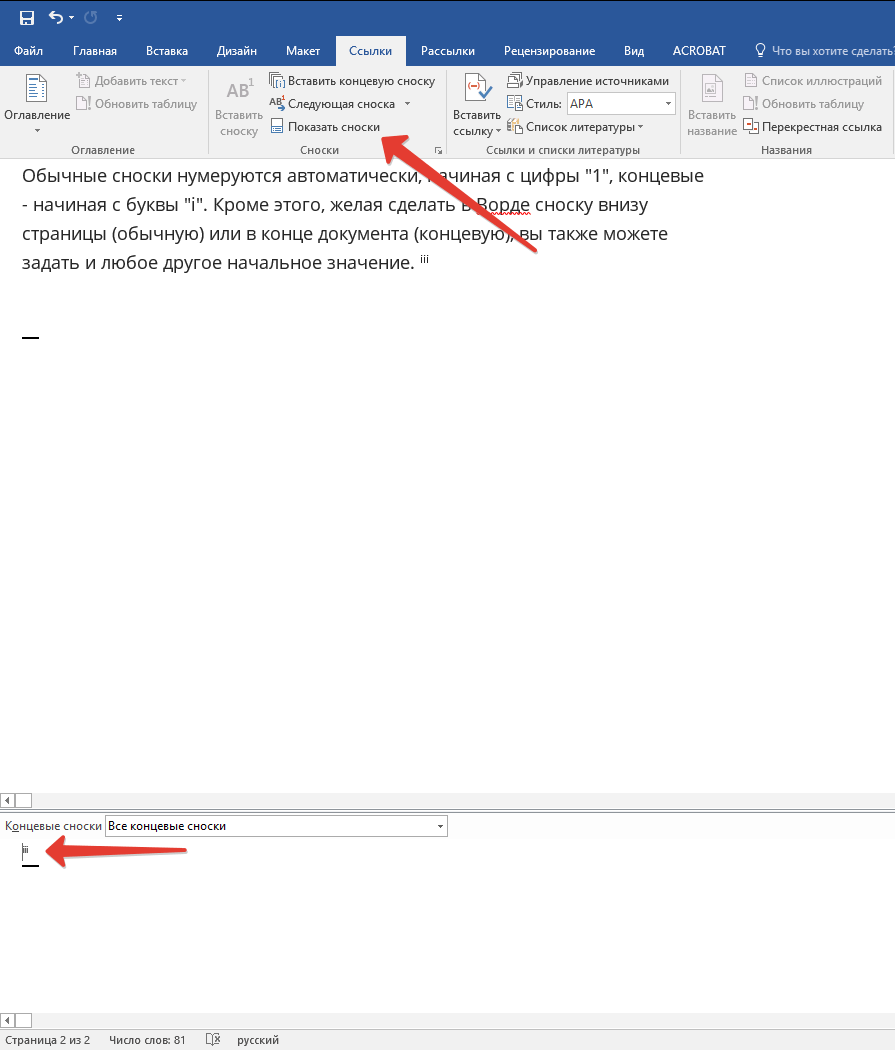
3. В появившемся списке области сносок кликните «Уведомление о продолжении сноски» («Уведомление о продолжении концевой сноски»).

4. Введите в области сносок текст, необходимый для уведомления о продолжение.
Как изменить или удалить разделитель сноски?
Текстовое содержимое документа отделяется от сносок, как обычных, так и концевых, горизонтальной линией (разделитель сносок). В случае, когда сноски переходят на другую страницу, линия становится более длинной (разделитель продолжения сноски). В Microsoft Word можно настраивать эти разделители, добавляя к ним рисунки или текст.
1. Включите режим черновика.

2. Вернитесь во вкладку «Ссылки» и нажмите «Показать сноски».
3. Выберите тип разделителя, который вы хотите изменить.
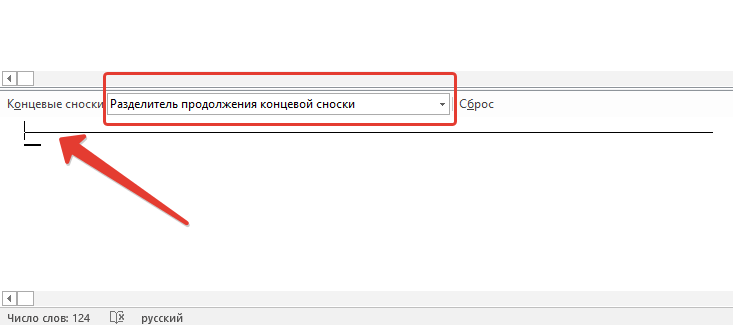
4. Выберите необходимый разделитель и внесите соответствующие изменения.
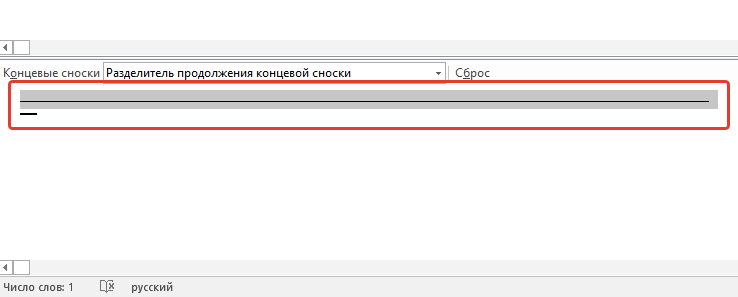
- Для удаления разделителя просто нажмите «DELETE».
- Для изменения разделителя выберите подходящую линию из коллекции картинок или просто введите желаемый текст.
- Для восстановления разделителя по умолчанию нажмите «Сброс».
Как удалить сноску?
Если сноска вам больше не нужна и вы хотите ее удалить, помните, что удалять нужно не текст сноски, а ее символ. После того, как знак сноски, а вместе с ним и сама сноска со всем содержимым будут удалены, автоматическая нумерация измениться, сместившись на отсутствующий пункт, то есть, станет корректной.
На этом все, теперь вы знаете, как вставить сноску в Ворде 2003, 2007, 2012 или 2016, а также в любой другой версии. Надеемся, эта статья для вас была полезной и поможет заметно упростить взаимодействие с документами в продукте от Microsoft, будь то работа, учеба или творчество.
This tutorial shows how to insert footnotes and endnotes in Microsoft Word using the tools in the ribbon.
Manually inserting individual footnotes and endnotes in Word is relatively straightforward: type a superscript number in the main text and then scroll to the bottom of the page, section, or document to type your note.
But manually inserting notes can get tricky if your document is more than a couple of pages long or has a lot of notes because you also have to manually update number sequencing and text placement as notes are added or deleted.
That’s when Word’s footnote and endnote tools really come in handy. These tools automatically maintain sequential note numbers, create space for endnotes at the end of the document or section, and make sure that your footnotes stay with their associated text—even if that text moves to a different page. Best of all, the tools are easy to use.
The images below are from Word for Microsoft 365. The steps also apply to Word 2021, Word 2019, Word 2016, Word 2013, and Word 2010. However, your interface may look slightly different in those older versions.
This tutorial is available as a YouTube video showing all the steps in real time.
Watch more than 150 other writing-related software tutorials on my YouTube channel.
Don’t miss the three benefits of using Word’s footnote and endnote tools explained at the end of this tutorial.
1. Place your cursor where the superscript number for the first note should appear.

2. Select the References tab in the ribbon.

3. Select the dialog box launcher in the Footnotes group.

4. Select Footnotes or Endnotes in the Footnote and Endnote dialog box.

5. Select the note’s location from the drop-down menu.

You can also choose additional options in the Footnote and Endnote dialog box such as number formatting and whether the numbering applies to the whole document or to a specific section.
6. Select the Insert button to create the first note.

After Word creates the superscript number, your cursor will automatically move to the note location selected in the Footnote and Endnote dialog box.
7. Write your note.

8. Double-click on the number before the note to return to the location of the corresponding superscript number in the main text.

9. Place your cursor where the superscript number for the next note should appear in the text and then select Insert Footnote or Insert Endnote in the Footnotes group in the ribbon to insert the next note.

The options you selected in the Footnote and Endnote dialog box during step 5 will be maintained.
10. Save your document to save your new footnotes or endnotes.
Here are three benefits to keep in mind when working with footnotes and endnotes in Word:
1. You can use footnotes and endnotes in the same document. If you choose to use both, the first type inserted will be assigned superscript numbers and the second type inserted will be assigned superscript letters. However, these options can be changed in the Footnote and Endnote dialog box (see figures 4 and 5).
2. If you move the text connected to footnotes or endnotes, the sequencing of the superscript numbers (or letters) and the notes themselves will be automatically updated. Additionally, if you add or delete footnotes or endnotes between existing notes, the sequencing of the superscript numbers (or letters) and the notes themselves will be automatically updated.
3. You can modify the style of all the footnotes or all the endnotes, plus the reference numbers and the separator lines that appear above the notes.
Related Resources
How to Convert Individual Footnotes to Endnotes in Microsoft Word (and Convert Individual Endnotes to Footnotes)
Three Ways to Insert Superscripts and Subscripts in Microsoft Word
How to Insert Citations in Microsoft Word
Updated March 15, 2022