
Click the shape or text box that you want to add a fill to. To add the same fill to multiple shapes or text boxes, click the first one, and then press and hold SHIFT while you click the others. To add or change a fill color, click the color that you want, or to choose no color, click No Fill.
Contents
- 1 How do I fill a textbox with color in Word 2016?
- 2 Where is fill effects in Word 2019?
- 3 How do I color the background of text in Word?
- 4 How do I fill a textbox in Word?
- 5 How do I fill in a fillable form in Word?
- 6 How do you apply text effects in Word?
- 7 How do you use fill effects?
- 8 How do I fill a shape with text in Word?
- 9 How do I insert a background into a Word document?
- 10 How do you highlight all text in Word?
- 11 How do I insert Greek text in Word?
- 12 How do I fix indentations in Word?
- 13 How do I make a Word document fillable and not editable?
- 14 How do I create a fillable form in Word with lines?
- 15 How do I create a fill in form?
- 16 How do I insert a GREY text field in Word 2016?
- 17 What is text effects in Microsoft Word?
- 18 What are effects applied to text?
- 19 Which of the following is a text effect?
- 20 What is used Fill option?
How do I fill a textbox with color in Word 2016?
Change the inside (fill) color
- Select the shape or text box.
- On the Drawing Tools Format tab, click Shape Fill > More Fill Colors.
- In the Colors box, either click the color you want on the Standard tab, or mix your own color on the Custom tab.
Where is fill effects in Word 2019?
To see the available effects, follow these steps:
- Select the drawing object you want to modify.
- Click on the down-arrow next to the Fill Color tool on the Drawing toolbar. Word displays a color menu.
- From the color menu, click your mouse on Fill Effects. Word displays the Fill Effects dialog box. (See Figure 1.)
How do I color the background of text in Word?
Change the Text Color in Microsoft Word
- Select the text you want to work with.
- Go to the Home tab.
- Select the Font Color drop-down arrow to open the Font Color menu.
- Hover over the colors to see a preview of the color on the selected text.
- To see additional colors, chose More Colors.
How do I fill a textbox in Word?
Click the shape or text box that you want to add a fill to. To add the same fill to multiple shapes or text boxes, click the first one, and then press and hold SHIFT while you click the others. To add or change a fill color, click the color that you want, or to choose no color, click No Fill.
How do I fill in a fillable form in Word?
Creating Fillable Forms Using Microsoft Word
- Enable Developer Tab. Open Microsoft Word, then go to the File Tab > Options > Customize Ribbon > check the Developer Tab in the right column > Click OK.
- Insert a Control.
- Edit Filler Text.
- Design Mode button again to exit the mode.
- Customize Content Controls.
How do you apply text effects in Word?
Add an effect to text
- Select the text that you want to add an effect to.
- On the Home tab, in the Font group, click Text Effect.
- Click the effect that you want. For more choices, point to Outline, Shadow, Reflection, or Glow, and then click the effect that you want to add.
How do you use fill effects?
Office gives you the option of filling your object with an image that you have downloaded or created.
- Access the Fill Effects dialog box.
- Select the Picture tab.
- Click Select Picture…
- Using the Look in pull-down list, navigate to and select the graphic file you want to use.
- Click Insert.
- Click OK.
- Click OK.
How do I fill a shape with text in Word?
How to Format Text to Fit a Shape in Microsoft Word
- Click on the shape you want, such as a square, circle or star.
- Right-click on the shape and select “Add Text.”
- Type or paste your text into the shape.
- Click outside the shape to finalize the text.
How do I insert a background into a Word document?
Add or change a background image or watermark
- Go to Design or Layout, and select Watermark.
- Select Picture > Select Picture, browse through your image files, and choose the image that you want to use.
- Select Insert.
- If you want the background image to show with full color intensity, clear the Washout check box.
How do you highlight all text in Word?
Select all text
- Click anywhere within the document.
- Press Ctrl+A on your keyboard to select all text in the document.
How do I insert Greek text in Word?
To insert a Greek character through the Symbols menu, select the “Insert” tab, click “Symbol,” and then select “More Symbols… .” All the Greek letters with no markings, capital and lowercase, are available with “(Normal Text)” selected on the Font drop-down menu.
How do I fix indentations in Word?
Adjust indents and spacing in Word
- Select one or more paragraphs that you want to adjust.
- Go to Home and then select the Paragraph dialog box launcher .
- Choose the Indents and Spacing tab.
- Choose your settings, and then select OK.
How do I make a Word document fillable and not editable?
Head on to the “Protect” section on the ribbon and click the button labeled “Protect Document.” You should then click the button named “Restrict Formatting and Editing.” On the options that appear, select the one that says “Allow only this type of editing in the document” and pick “Filling in forms.” Once you’re done,
How do I create a fillable form in Word with lines?
Firstly, click “Underline” under “Home” tab and choose one line style. Then press “Shift+ Underscore” to get a line. Then place cursor above the line and type the content. As you type, you will find the line gets longer and longer.
How do I create a fill in form?
How to create fillable PDF files:
- Open Acrobat: Click on the “Tools” tab and select “Prepare Form.”
- Select a file or scan a document: Acrobat will automatically analyze your document and add form fields.
- Add new form fields: Use the top toolbar and adjust the layout using tools in the right pane.
- Save your fillable PDF:
How do I insert a GREY text field in Word 2016?
Select and highlight the text box, and then select your preferred shape style for the text box. To apply a gray fill color, click the “Shape Fill” button and click on your preferred shade of gray in the color-picker tool.
What is text effects in Microsoft Word?
Text Effects and Typography in Microsoft word means applying special formats to the content such as an Outline, Shadow, Reflection or Glow is known as the Text Effects. Similarly, changing the Styles, Ligatures, and Stylistics Sets of the numbers is called Typography settings.
What are effects applied to text?
You can add shadows, bevels, reflections, and much more. The Text Effects button is in the Font group of the ribbon. The top options in the Text Effects menu have some pre-created styles to choose from. The Text Effects menu also has the options Outline, Shadow, Reflection, and Glow.
Which of the following is a text effect?
Adding additional features for text include background color, making text as blur, changing font color, outlining the text, changing font size, changing font style, and shadowing the text. Text effects can be added in word document as follows:Select the way the text needs to be changed.
What is used Fill option?
What’s this Fill Handle in Excel? ‘Fill Handle’ is a tool that you can use to autocomplete lists in Excel. For example, if you have to enter numbers 1 to 20 in cell A1:A20, instead of manually entering each number, you can simply enter the first two numbers and use the fill handle to do the rest.
![]()
Download Article
![]()
Download Article
- Using Windows
- Using a Mac
|
You know when you try to fill out forms in Word on the provided lines, but the text you type makes the lines move and ruins the formatting? There is a way to get rid of that. This wikiHow will teach you how to insert fillable fields on Word on PC or Mac. You’ll need to have Word set up on your computer before you can start.
-

1
Open Word. You can find this program on your Start Menu.
-
2
Open a document. You can either open a new document, create a new document from a template, or open an old document.
Advertisement
-
3
Click Options and Customize Ribbon in the File menu. You’ll find this along the top of your program window.
-
4
Check the “Developer” box in the Customize Ribbon panel.
-
5
Click Ok.
-
6
Click the icons next to Design Mode in the Developer tab. These look like “Aa”, check boxes, and tables.
- The first “Aa” icon on the right side of the panel says “Rich Text Content Control” when you hover over it. This inserts an empty field into the document that can be filled with images, videos, text, and more.
- The second “Aa” icon says “Plain Text Content Control”. This will insert a blank fillable field into your document that the user can fill with only text.
- The “Combo Box Content Control” icon is next to the check box icon, and this will insert a drop-down menu into your document. The Properties button will open options for you to add more items to the drop-down menu.
- The “Date-Picker” icon looks like a calendar and will insert an empty box that will launch a calendar so your form user can pick a specific date. The Properties button will open options for you to choose the box format and display.
- The check box icon adds a check box to your document.
-
7
Click Restrict Editing in the Developer tab. This will pull out a panel from the right of your program window.
-
8
Check the box next to “Editing Restrictions”. This will lock the document so no one can alter the text not in text boxes.
-
9
Click Yes, Start Enforcing Protection. A box will pop up asking for a password. You can enter a password if you want to allow other people with that password to be able to edit your document.


Advertisement
-
1
Open Word. You can find this program in your Applications folder.
-
2
Open a document. You can either open a new document, create a new document from a template, or open an old document.
-
3
Click the Preferences tab under Word at the top of your screen. You’ll see this next to the Apple icon
. A new window will pop up.
-
4
Click View under the “Authoring and Proofing Tools” header.
-
5
Check the “Show developer tab” box under “Ribbon”.
-
6
Click Ok.
-
7
Click “Text Box”, “Check Box”, or “Combo Box” in the Developer tab. This will insert a blank fillable field into your document.
- The Combo Box option creates something like a drop-down menu. Click the Options icon next to the Combo Box icon to access options to turn your combo box into a drop-down menu.
- The Check Box creates checkable boxes.
- The Text box adds fillable fields that control how text appears on a form. For example, instead of a document line with Name:_______ where the user can make a mess of the lines, you can use these fillable text fields to control where the text goes and how it appears. You can click the Options icon to open an options box where you can choose the input type. For example, you have a text box, but are looking for a date, you can pick Date under the “Type” heading for this.
-
8
Click Protect Form. This will prevent you from making any edits to your fields, but will activate them so they are usable.
- If you want to password protect your document, you can go to the Review tab and click Protect Document.


Advertisement
Ask a Question
200 characters left
Include your email address to get a message when this question is answered.
Submit
Advertisement
Thanks for submitting a tip for review!
About This Article
Article SummaryX
1. Open Word.
2. Click Preferences.
3. Click View.
4. Check Show developer tab.
5. Select to add a text box, check box, or combo box.
6. Click Protect.
Did this summary help you?
Thanks to all authors for creating a page that has been read 107,940 times.
Is this article up to date?
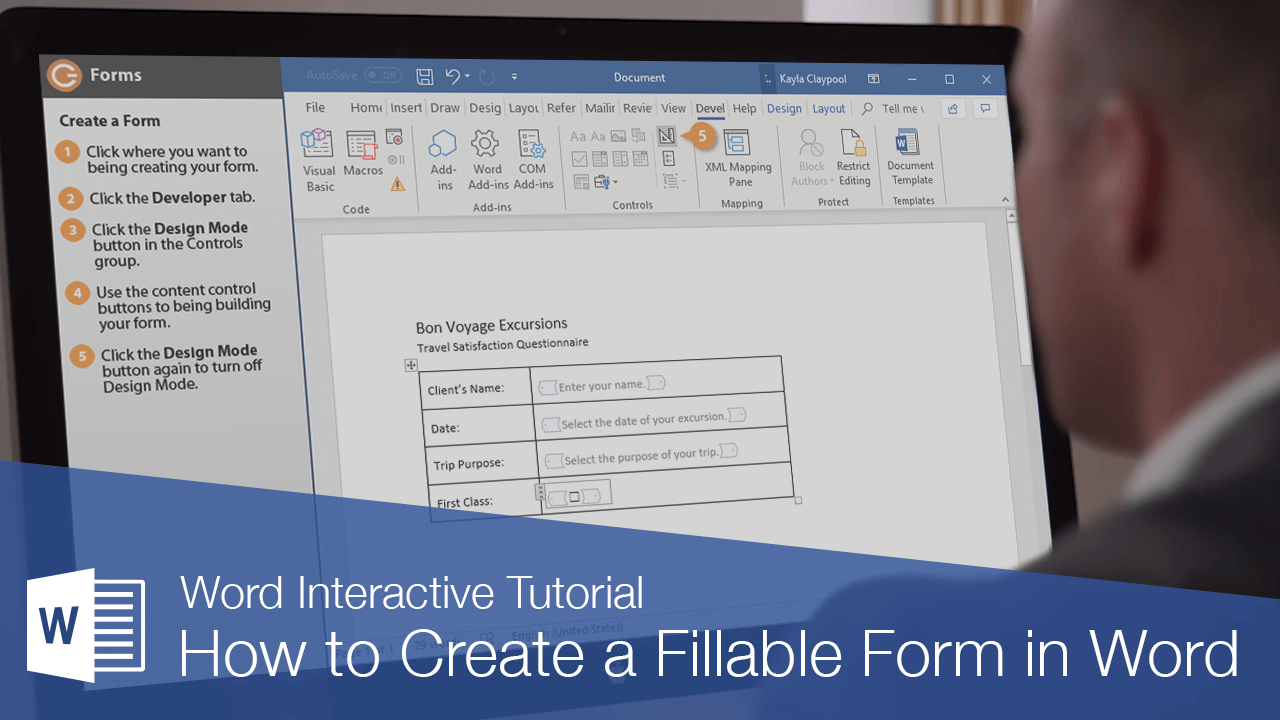
You can use Word to create interactive digital forms that other people can fill out on their computers before printing or sending them back to you. It takes a little preparation but keeps you from having to decipher messy handwriting! Some of the tools you will use when creating a form include:
- Templates: Forms are normally saved as templates so that they can be used again and again.
- Content controls: The areas where users input information in a form.
- Tables: Tables are often used in forms to align text and form fields, and to create borders and boxes.
- Protection: Users can complete the form fields without being able to change the form’s text and/or design.
Show the Developer Tab
Before you can create a form, you’ll need to turn on the Developer tab to get access to the advanced tools.
- Click the File tab.

- Select Options.

The Word Options window opens.
- Click the Customize Ribbon tab on the left.
The column on the right controls which ribbon tabs are enabled.
- Check the Developer check box.
- Click OK.
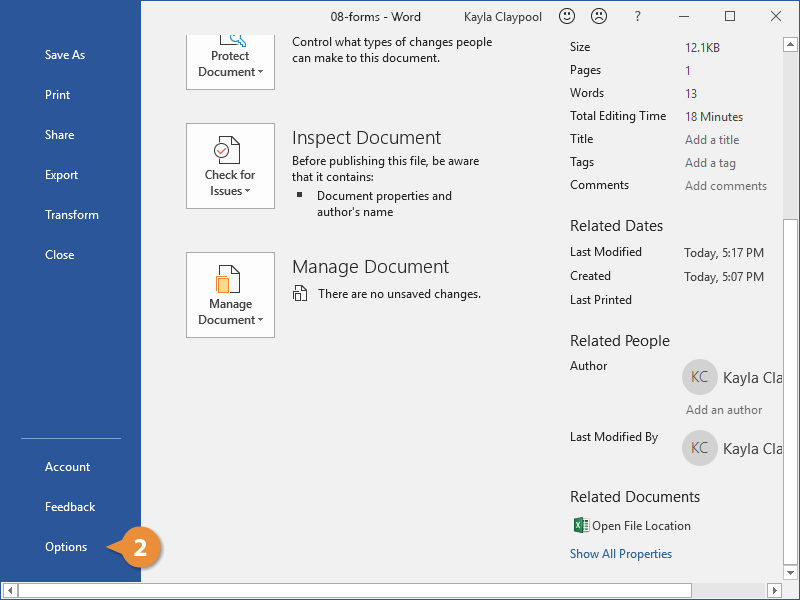
The Developer tab now appears on the ribbon. In addition to advanced tools for macro recording, add-ins, and document protection, we now have access to form controls.
Create a Form
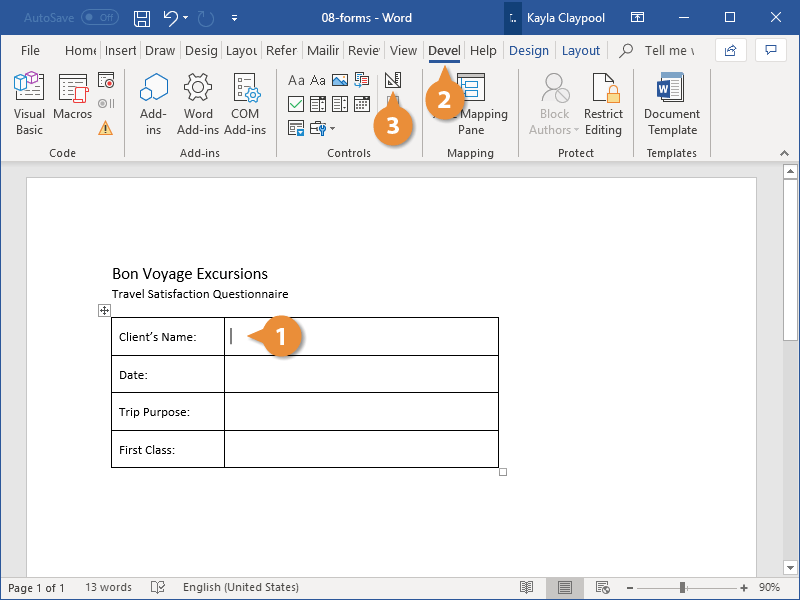
Once you’ve enabled the Developer tab, and created the layout and structure of the form, you can start adding form fields to your document with Content Controls.
- Place the text cursor where you want to insert the form field.
- Click the Developer tab on the ribbon.
The Controls group contains the different kinds of content controls you can add to a form, as well as the toggle button for Design Mode.
- Click the Design Mode button in the controls group.
While Design Mode is active, controls you insert won’t be active, so clicking a check box to move it around won’t also check it. You can also customize placeholder text for some controls.
- Click a Content Control buttons to insert the selected type of control.
The content control is inserted.
Select a form field and click the Properties button on the ribbon to edit a control’s options. Depending on the type of control you’ve inserted, you can change its appearance, set up the options in a list, or lock the control once edited.
- When you’re done, click the Design Mode button again to exit Design Mode.
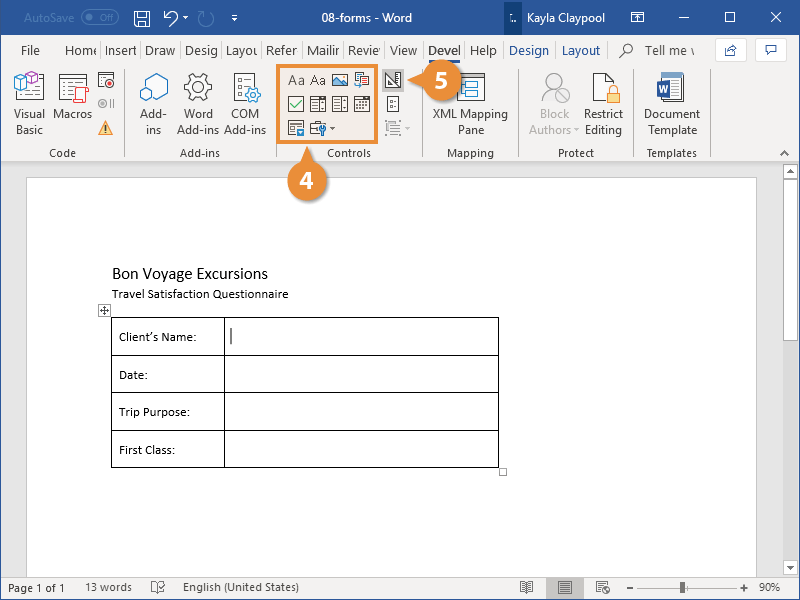
You leave Design Mode, and the content controls that you’ve inserted can now be used.
Types of Form Controls
There are many different types of form controls you can add to a form that will allow people to add different types of responses.
Finalize a Form
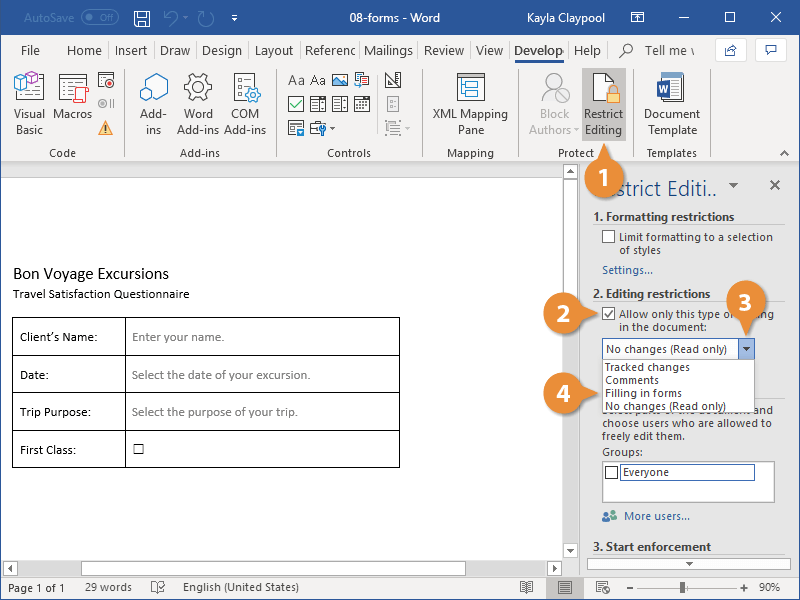
When you’re ready to distribute a form so others can fill it out, you can restrict the form so that content controls cannot be removed or changed by those filling it out.
- Click the Restrict Editing button on the Developer tab.
The Restrict Editing pane appears on the right.
- Check the Editing restrictions check box.
- Click the Editing restriction list arrow.
- Select Filling in forms.
When this option is enabled, the only change that anyone else can make to this document is the filling in of form fields. They won’t be able to move, delete, or edit the fields themselves until protection is turned off.
- Click the Yes, Start Enforcing Protection button.
A password is not required to start enforcing protection, but you can add one if you’d like to prevent just anyone from turning this protection off.
- Enter a password (optional), then click OK.
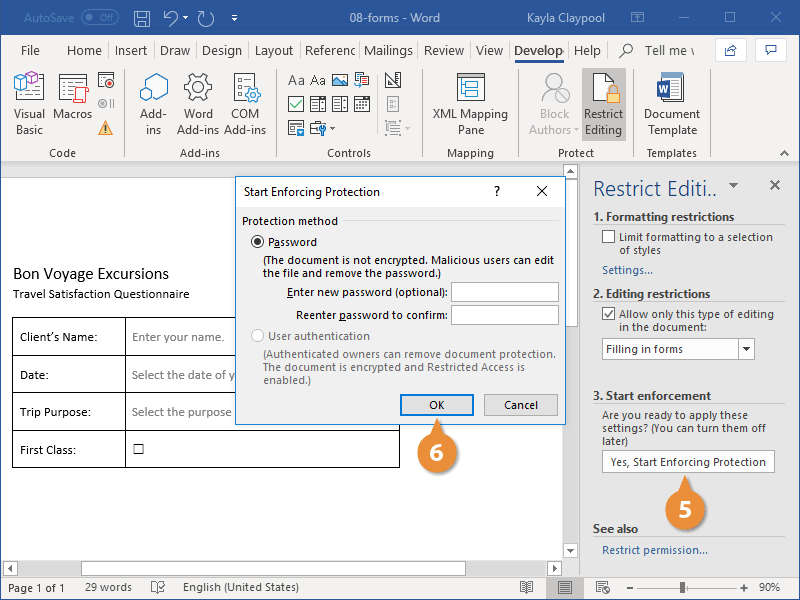
The document is now restricted, and anyone you send it to will only be able to fill in the forms.

FREE Quick Reference
Click to Download
Free to distribute with our compliments; we hope you will consider our paid training.
In this article, let’s talk about the 7 useful ways to create a fillable field with underline in your Word document.
Once in a while, we would need to create some questionnaires. Therefore, it would be a needy demand to create a fillable field with underline. In the following content, there are 7 effectual methods which shall meet your requirements.
Method 1: Manually Draw a Line
- First off, put cursor at the place where the line goes and click “Insert” tab.
- Then click “Shapes” in “Illustration” group.
- Choose “Line” in “Lines” group.


Now there shall be a colored line. You can click on it and change the color to black by choosing a shape style under “Format” tab.
Method 2: Add Underline for Font
- To start with, enter a series of space and select them.
- Then click the expand button under “Home” tab to open the “Font” dialog box.
- Next choose an underline style and click “OK”.

- Now type on the selection and the text shall be underlined.


Method 3: Enter Underscore
- Firstly, click “Underline” under “Home” tab and choose one line style.

- Then press “Shift+ Underscore” to get a line.
- Then place cursor above the line and type the content. As you type, you will find the line gets longer and longer. So you need to trim the length afterwards.

Method 4: Insert a Paragraph Border
- To begin with, click the border icon under “Home” tab in “Paragraph” group.
- Then choose “Bottom Border”.


Here is the effect:
Method 5: Use a Table Border
- Click “Insert” tab first.
- Then click “Table”.
- Next choose “Draw Table” on the list.

- Draw a table of one row and one column with approximate height and width.
- Then select the table.
- Click “Design” tab then “Borders” Icon.
- First choose “No Border” and then “Bottom Border”.


Method 6: Create a Horizontal Line
- Type dash three times.
- Then press “Enter”.
Method 7: Run a Macro
- First and foremost, press “Alt+ F11” to open Word VBA editor quickly.
- Then click “Normal” and then “Insert”.
- Next click “Insert”.
- Then choose “Module”.

- Double click on the new module to open the editing space.
- Paste these codes there:

Sub CreateAFillableField()
  Dim objParagraph As Paragraph
  Dim objTable As Table

  'Initialization
  Set objTable = ActiveDocument.Tables.Add(Range:=Selection.Range, NumRows:=1, NumColumns:= _
    1, DefaultTableBehavior:=wdWord9TableBehavior, AutoFitBehavior:= _
    wdAutoFitFixed)
  objTable.Cell(1, 1).SetWidth ColumnWidth:=InchesToPoints(1.1), RulerStyle:=wdAdjustNone

  'Set Table borders invisible.
  Selection.Borders.Enable = False

  'Apply bottom border only to table.
  With Selection.Borders(wdBorderBottom)
    .LineStyle = Options.DefaultBorderLineStyle
    .LineWidth = Options.DefaultBorderLineWidth
    .Color = Options.DefaultBorderColor
  End With

  'Remove table caption.
  For Each objParagraph In ActiveDocument.Paragraphs
    If objParagraph.Range.Style = "Caption" Then
      objParagraph.Range.Delete
    End If
  Next objParagraph
End Sub
- Click “Run” button.


For easy use in the future, you can assign a button for the macro. You can refer to this article: How to Remove the Formatting of Pasted Texts with Macro and VBA in Your Word
Comparison of 7 Methods
| Methods | Advantages | Disadvantages |
| Method 1: Manually Draw a Line | You can drag the line to adjust its location. | 1. You will have to change the color to black.
2. The line can’t get longer automatically even if there is no enough space for the text. |
| Method 2: Add Underline for Font | 1. There is no extra space left on the line.
2. The line can get longer automatically if there is no enough space for the text. |
1. You can’t see the line until you enter text over it.
2. You can’t move the line. |
| Method 3: Enter Underscore | You can view the line. | 1. You have to apply underline to the space before creating the line.
2. You will have to reduce the line length since it gets longer as you type. 3. You can’t move the line. |
| Method 4: Insert a Paragraph Border | You can view the line. | 1. You can’t change the line length.
2. You can’t move the line. |
| Method 5: Use a Table Border | 1. You can move the line.
2. You can alter the line length. |
1. You have to remove unnecessary borders.
2. You have to remove the table caption. |
| Method 6: Create a Horizontal Line | You can view the line. | 1. You can’t change the line length.
2. You can only have it on the next paragraph of existing text. 3. You can’t move the line. |
| Method 7: Run a Macro | 1. You can view the line.
2. You can move the line. 3. You can change the length. 4. No need to delete table caption. 5. The quickest way to get a fillable field with underline |
You will have to assign the macro to a button if you want to use it quickly in the future. |
Address File Corruption Predicament
In everyday use of digital devices, file loss or corruption due to all kinds of reasons happens all the time. However, these seeming broken files are highly recoverable, for there is a specialized damaged Word docx repair tool, the last-ditch effort you can make to save your data.
Author Introduction:
Vera Chen is a data recovery expert in DataNumen, Inc., which is the world leader in data recovery technologies, including xls data error recovery tool and pdf repair software products. For more information visit www.datanumen.com
Home
- May 18, 2012
![]()
Lorem Ipsum refers to a dummy block of text that is often used in publishing and graphic design to fill gaps in the page before the actual words are put into the finished product. Lorem ipsum resembles Latin but has no real meaning.
Insert Dummy Text in Microsoft Word
If you are working inside Microsoft Word and need some filler text to test the layout of fonts and other design elements of your document, there’s no need to hunt for an online generator as you can create “Lorem Ipsum” inside Word itself. Here’s how:
Just start a new paragraph in Word, type =lorem() and hit Enter.

This will fill three paragraphs of Lorem Ipsum characters in the document but if you also control the amount of text that is generated through the above function as shown below:
=lorem(Number of Paragraphs, Number of Lines)
For instance, =lorem(2,5) will create 2 paragraphs of Lorem Ipsum text and it will span across 5 lines (or sentences). The parameters are optional. If you omit the parameters the default number of paragraphs is three, and the default number of lines per paragraph is also three.
The lorem() function is available in Word 2007 but if you are using a previous version of Office, you may use the good old rand() function to insert any amount of random text in your Word Document.
If the lorem() generator is not working on your copy of Word, you probably have turned off the “Replace text as you type” option available under AutoCorrect.

0
Digital Inspiration has won several awards since it’s launch in 2004.
Google Developer Expert
Google awarded us the Google Developer Expert award recogizing our work in Google Workspace.
ProductHunt Golden Kitty
Our Gmail tool won the Lifehack of the Year award at ProductHunt Golden Kitty Awards in 2017.
Microsoft MVP Alumni
Microsoft awarded us the Most Valuable Professional (MVP) title for 5 years in a row.
Google Cloud Champion
Google awarded us the Champion Innovator title recognizing our technical skill and expertise.
Subscribe to our YouTube channel and get notified whenever we upload a new video tutorial.
-
Automate Document Workflow with Google Forms and Sheets
-
How to Sell Digital Goods with PayPal and Google Sheets
-
Google Apps Script — A Developer’s Guide
-
Convert Google Slides to Video and Animated GIFs
-
Mail Merge for Gmail with Attachments
-
File Upload Forms for Google Drive
-
Dictation — Type with your Voice
-
Email Google Sheets Automatically
-
YouTube Video Uploader for Teams
-
Limit Google Form Responses Automatically
-
Create PDF Documents from Google Forms
-
Email Notifications for Google Forms
-
How to Hide Files inside Google Drive
-
Create Merge Documents with Google Sheets or Google Forms
-
Create PDF Documents with Images and QR Codes
-
Send Unique File Attachments with Mail Merge for Gmail
-
Print Password Protected PDF Files
-
Embed Google Photos in your Website
-
Chrome Developer Tools — Video Tutorial
-
How to Reveal the Hidden Password on the Login Page
-
Secure Passwords
-
Save Gmail Emails to Google Drive
-
Send Confirmation Emails with Google Forms
-
Create Emoji Art with Google Sheets
-
Sender Icons for Gmail and Google Inbox


Sign up for our email newsletter to stay up to date.
We will never send any spam emails. Promise.