
This article will show you how to easily add/attach file like PDF, Word or any other to Excel spreadsheet.
Applies to: Excel, Excel 2013, Excel 2016, Excel 2019, Excel 365, Office 365
-
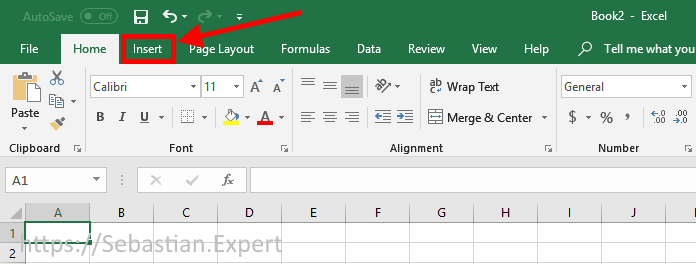
Go to Insert tab

Excel 2016/2019/365 — Home tab
-
Click Object button placed in Text group.
Narrow window

Insert Object button — narrow window
Medium width window

Insert Object button — medium width window
Maximum width window
Insert Object button — max width window
-
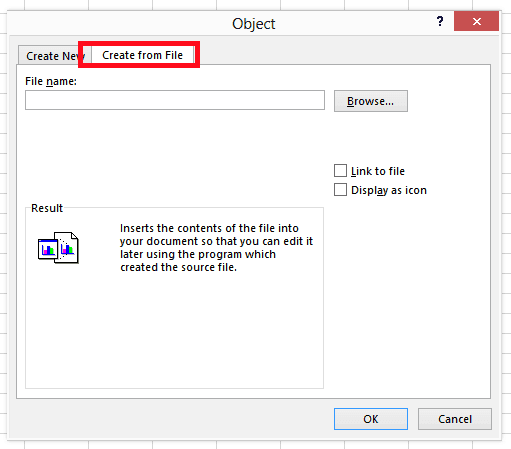
Click Create from file and browse for the file.

Click to enlarge


Skip to content
How to Insert Attachments in Excel?

Do you ever need to insert files into Excel, so you can share more comprehensive information with your colleagues? Either to insert PDF into Excel or to insert word documents into Excel, it’s just as simple as clicking on Insert, Text, Object, choosing your file, and voila!
Then, what happens after? Your file will float around your spreadsheet and not into a single cell. Yet, to be able to sort or move it with the rest of the content, what you really need is to put it into a single cell. How can you do this?
In this brief article, we will see how Excel can better handle your attachments, then we will look into an alternative that integrates with Excel: RowShare, an online table that offers a collaboration solution.
Insert Files into Excel Sheet
There are several ways to insert files into Excel sheet. You can either create from files, create new or add link to files. We will explore how to do it one by one.
If you want to create from an existing file, follow these steps:
- Select the cell into which you want to insert your file
- Click on the “Insert” tab
- Click on “Object” under the “Text” group
- Select “Create from File”
- Browse your file
- Select the “Display as icon” check box to if you want to insert an icon linking to the files
- Click on “OK”
Another possibility is to create a new file. You can do that by selecting “Create New” instead, and choose the type of object you want to attach. A new window will then pop up and you can create a new file you want to insert.
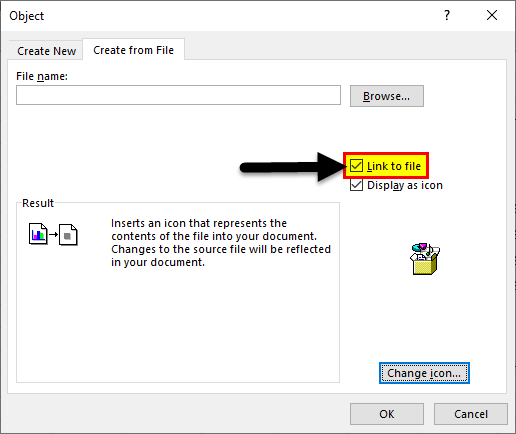
If you only want to add a link to the file instead of embedding the file, select the “Link to File” check box. The file should be stored in a location accessible to those with whom you want to share it. If the link to your file redirects to your computer, you will be the only one able to open it. Other than that, the location of the file should remain the same, if you move it to different location, the link won’t work anymore.
Attach Files in Excel, Within Excel Cells

Once you have made it to insert word documents into Excel or attach PDF to Excel, you probably realize that what you need is to insert your file into a single cell. To do this, follow these steps:
- Resize your file or cell until they fit each other
- Right click on your file and select “Format Object”
- Click on the “Properties” tab
- Select “Move and size with cells”
Since your Excel file size will be the size of the sheet itself plus the size of each other files attached, your Excel size will then be so huge. Also, as you can see here, there is no direct way to insert your file to an Excel cell automatically.
So, crunch time: Should I follow all these long endless steps or should I stick to the traditional way and exchange my files using email instead?
Attach Files Easily with RowShare
It’s time to say goodbye to complicated spreadsheet and endless email exchange. RowShare, an online table focusing in sharing and collaboration, offers a simpler solution. You can insert attachments within a click of a mouse! Start by creating a table from RowShare’s templates or from scratch.
Attach your files by following these super simple steps:
- Add a column of type “File” to your table
- Click on the cell, browse your file and attach it to your RowShare table
You can also control your table and files the way you want it, from sorting, filtering, setting columns as read only, you name it. It couldn’t be any simpler, here is a quick video if you need help:
When it comes to collecting, centralizing and sharing data with your coworkers, partners, suppliers, clients, RowShare is a real time-saver !
Discover all the things you could do :
Tip: If you already have your table in Excel, import it to RowShare and change the appropriate column type to File. Then, click on the cell and upload the file.
Once you have finished adjusting your table in RowShare, you can then synchronize it with Excel to access the best features of both tools. When synchronizing with Excel, instead of having the file itself, you will have the link of the file in your Excel sheet.
Happy RowSharing!


Collaborative, simple and reliable.
Rowshare is the first spreadsheet designed especially for managing projects and organizing administrative tasks.
Page load link
REJECT ALLACCEPT AND CONTINUE
Privacy Overview
Go to Top
![]()
Download Article
![]()
Download Article
- Inserting a File
- Inserting an Image
|
Microsoft Excel allows you to include other files, such as Word documents and PDFs, into a spreadsheet. This wikiHow will show you how to insert a file as an object into an Excel project using OLE (object linking and embedding).
-

1
Open your project in Excel. You can open your project within Excel by clicking Open from the File tab, or you can right-click on the file in a file browser and click Open With and Excel.
- This method works for newer versions of Excel on either PC or Mac.
-
2
Click the cell in which you want to insert the object. Whenever people view this cell, they will find the embedded document.
Advertisement
-
3
Click the Insert tab. You’ll find this in the ribbon above the document editor or at the top of your screen.
-
4
Click the icon that looks like a program window on a sheet of paper. This is the «Object» icon and can be found in the «Text» group. A box will pop up.
-
5
Click the Create from File tab. The tab will switch from «Create New.»
-
6
Click Browse. Your file browser will open.
-
7
Navigate to and double-click your file. Only compatible files will show up in the browser, like PowerPoints, PDFs, and Word documents.
-
8
Choose to select «Display as icon.« If you select «Display as icon,» you’ll see the icon of the document appear in the cell; if you don’t choose «Display as icon,» the full first page of the document will appear. Regardless of your choice, both embedded documents will link to the full document.
-
9
Click OK. You’ll see this at the bottom right of the pop-up window. The document you selected will appear in the cell either as the full first-page document or icon.[1]


Advertisement
-
1
Open your project in Excel. You can open your project within Excel by clicking Open from the File tab, or you can right-click on the file in a file browser and click Open With and Excel.
- This method works for newer versions of Excel on either PC or Mac.
-
2
Click the cell you want to insert the object.
-
3
Click the Insert tab. You’ll find this in the ribbon above the document editor or at the top of your screen.
-
4
Click the Pictures icon. You’ll find this in the «Illustrations» group. A file browser will pop up.
-
5
Navigate to and double-click on your image. The list of compatible file types is long, but all the common file types are accepted like GIF, JPG, and PNG.
- The image is inserted into your document. You can edit the image using the Picture Tools tab.[2]
- The image is inserted into your document. You can edit the image using the Picture Tools tab.[2]


Advertisement
Ask a Question
200 characters left
Include your email address to get a message when this question is answered.
Submit
Advertisement
Thanks for submitting a tip for review!
References
About This Article
Article SummaryX
1. Open your project in Excel.
2. Click the cell you want to insert the object.
3. Click the Object icon in the Insert tab.
4. Click the Create from File tab.
5. Click Browse and navigate to and double-click the file.
6. Choose to «Display as icon» or not.
7. Click OK.
Did this summary help you?
Thanks to all authors for creating a page that has been read 28,976 times.
Is this article up to date?
Содержание
- Insert an object in your Excel spreadsheet
- Insert an object in your Excel spreadsheet
- [Solved] Add, Attach or Insert a File in Excel in 3 Easy Steps
- 77 thoughts on “[Solved] Add, Attach or Insert a File in Excel in 3 Easy Steps”
Insert an object in your Excel spreadsheet
You can use Object Linking and Embedding (OLE) to include content from other programs, such as Word or Excel.
OLE is supported by many different programs, and OLE is used to make content that is created in one program available in another program. For example, you can insert an Office Word document in an Office Excel workbook. To see what types of content that you can insert, click Object in the Text group on the Insert tab. Only programs that are installed on your computer and that support OLE objects appear in the Object type box.
If you copy information between Excel or any program that supports OLE, such as Word, you can copy the information as either a linked object or an embedded object. The main differences between linked objects and embedded objects are where the data is stored and how the object is updated after you place it in the destination file. Embedded objects are stored in the workbook that they are inserted in, and they are not updated. Linked objects remain as separate files, and they can be updated.
Linked and embedded objects in a document
1. An embedded object has no connection to the source file.
2. A linked object is linked to the source file.
3. The source file updates the linked object.
When to use linked objects
If you want the information in your destination file to be updated when the data in the source file changes, use linked objects.
With a linked object, the original information remains stored in the source file. The destination file displays a representation of the linked information but stores only the location of the original data (and the size if the object is an Excel chart object). The source file must remain available on your computer or network to maintain the link to the original data.
The linked information can be updated automatically if you change the original data in the source file. For example, if you select a paragraph in a Word document and then paste the paragraph as a linked object in an Excel workbook, the information can be updated in Excel if you change the information in your Word document.
When to use embedded objects
If you don’t want to update the copied data when it changes in the source file, use an embedded object. The version of the source is embedded entirely in the workbook. If you copy information as an embedded object, the destination file requires more disk space than if you link the information.
When a user opens the file on another computer, he can view the embedded object without having access to the original data. Because an embedded object has no links to the source file, the object is not updated if you change the original data. To change an embedded object, double-click the object to open and edit it in the source program. The source program (or another program capable of editing the object) must be installed on your computer.
Changing the way that an OLE object is displayed
You can display a linked object or embedded object in a workbook exactly as it appears in the source program or as an icon. If the workbook will be viewed online, and you don’t intend to print the workbook, you can display the object as an icon. This minimizes the amount of display space that the object occupies. Viewers who want to display the information can double-click the icon.
Источник
[Solved] Add, Attach or Insert a File in Excel in 3 Easy Steps
This article will show you how to easily add/attach file like PDF, Word or any other to Excel spreadsheet.
Go to Insert tab
 Excel 2016/2019/365 — Home tab
Click Object button placed in Text group.
Depending on the size of the Excel window, Object button will be shown bit differently. Screenshots below show three ways how it can be shown.
Insert Object button — narrow window
Medium width window
Insert Object button — medium width window
Maximum width window
Insert Object button — max width window
Click Create from file and browse for the file.
Click to enlarge
Checking Link to file will cause file not to be attached to Excel file — only linked to a location on a local disk.
This means that link will be broken (it will not be possible to open attached file) if you delete attached file or send the Excel document to someone who does not have attached document at the same location on disk as you.
This method attaches whole object not only first page for example whole Word or multi page PDF document.
First page might be shown as a preview, but when you double click the attached object then entire document will be open and available to the user.
I recommend to add a text/information at the top of the spreadsheet like «Notice: Double-click attached documents to see full content.»
77 thoughts on “[Solved] Add, Attach or Insert a File in Excel in 3 Easy Steps”
I am having trouble inserting a PDF into Excel 365. I can find the Object Box in the text area but under the Object type it only list’s Word Documents not Adobe PDF. How do I get the Adobe into this list?
Look at step 3 – make sure you are on “Create from File” tab.
I attached a pdf into excel but there is a problem if i open the same excel file in another system .Please guide me
Make sure that you uncheck “Link to file” when attaching PDF file and that the other system has PDF viewer installed.
I have followed the steps outlined above and inserted a PDF document into the excel file. I made sure the ‘link to file’ option was NOT selected. I sent the excel file with the embedded PDF to my colleague and they cannot open it. My understanding is that you can embed multiple types of files (word, PDF e.t.c) in an excel and the entire document gets added to the excel as if it were attachment. If I were to send this excel to my colleague, shouldn’t they be able to open the PDF and word files embedded within the excel?
yes, they should be able to open those files. Please contact me using ‘contact me’ page and I will try to help you.
on inserting excel as an object, blank file open up
Thanks! Very useful your post.
In my work book I want only a link or word to show. I want the person i am sending the workbook to to click the link or word and open the document.
I have gone to “text” and “object” and linked my file. and not check the box that says “link to file”. I need this link to be placed in a specific cell on my spreadsheet.
“Link to file” does not make it to be shown as link. The note in the article says exactly what it does. What you can is to insert document as icon, then remove the icon. Excel does not allow to insert local file as link like internet link.
As for placing file in a cell – go to file ‘format object’ -> ‘properties’ tag. This is where you configure how it should be shown like moved with cells, resized etc.
Can I see if my steps are correct?
it is a little hard for me to try and explain but will do my best.
I already have my workbook with tabs at the bottom. I already have a hyperlink in a cell pointed to a document that can NOT be seen by anyone that i send it to. Should I go ahead and delete this hyperlink?
If so, what are my steps to accomplish being able to link different documents into different cells of my work book so the person I am sending it to can see it:
so you want to have a document attached to excel file and to link to that document from other cell? So attached document is in cell B10 and you want to have a link to this file in cell A1?
It was tricky not to see the full document at first but double click and there it appears. I had a multiple page PDF. Its there its just hidding!
It’s a pity you don’t have a donate button! I’d without
a doubt donate to this brilliant blog! I suppose for now i’ll settle for bookmarking and adding your
RSS feed to my Google account. I look forward to brand new updates and will share this site with my
Facebook group. Chat soon!
Hi! Thanks for the information, I did exactly and got it, the problem here is I’m sending the embedded file to an email unfortunately they can’t open it. How do I do it in such a way a third party can have access to the embedded file. Thanks
maybe security setting blocks it? you would have to tell me the error message they get or send me a screenshot where the file should be but is not there. You could use ‘contact me’ page.
Hi, I did it and it works, but my question is if I have to send the Excel file to another person. I tried but she was not able to open the file. Is there a way to do it? Thanks
hi, yes. You need to make sure that ‘Link to file’ checkbox is clear. Please see first note in point 3.
Which file she was not able to open? Excel file or the attached PDF? Maybe she doesn’t have any PDF reader.
Yes. Worked like a charm! Thanks!
Means, put all the details on master file and printthe entire details from another sheet already gets that details. ??
hi, every one
i m just trying to attach two different excel sheet.in one file is master file in which all vendors data (name address invoice no amount )mention. another hand the format of the vendor (challan /bills format which hand over to finance for processed ). i want to connect master file data throw V lookup or merger on another sheet so u can easily print without fill up the fomat.. how it will work ??
I can insert a PDF into my spreadsheet with no problems using the steps mentioned above. I found a way to embed it into a specific cell by resizing the cell so that the PDF icon fits inside then I right click on the PRD icon and chose format object – properties-move and size with cell. Then I can resize the cell and the PDF icon stays in it.
The only problem is when I open the pdf to review it and then close it when I am done the icon is no longer in the cell. Basically I am keeping a log of orders I place. Each row represents an order. There are cells for the order number, the requestor, required delivery date etc. I want to have a cell where I can embed the quote and another where I can embed the signed receipt so that they stay on the same line as the corresponding order. Can anyone help me out. Thanks.
methods of inserting word into excel worksheet
you do it the same way as inserting PDF. Just select Word file.
how to insert a word file into excel worksheet guide me to insert the word document
I inserted several pdf documents into a single spreadsheet and placed them side by side separated by one cell. Each pdf is about 20 pages long. The first one opens fine and the complete file is displayed. The second file also opens but the third page of the pdf is missing. I have tried it several times and even replaced the original file with a new copy but still the same result. I can open the file from the source in my documents without a problem. Any idea what is going on here and how to solve? Is there a limit to the size of the objects that can be inserted into Excel 2016?
Источник
In Microsoft Excel, the “Object Insert” option allows a user to insert an external object into a worksheet. Embedding generally means inserting an object from another software (Word, PDF, etc.) into an Excel worksheet. This option is useful for direct access to files related to your worksheet data from within your worksheet space. In addition, the inserted object works as a ready information source or reference for a dataset in an Excel worksheet.
Table of contents
- Insert and Embed an Object in Excel
- How to Insert (Embed) an Object in Excel?
- #1 – Insert (Embed) a New Object in Excel
- #2 – Embedding (inserting) an Existing Object in Excel
- #3 – Link to Object vs. Embedded Object
- Why we need Embedded Object in Excel?
- Things to Remember about Inserting Object in Excel
- Recommended Articles
- How to Insert (Embed) an Object in Excel?
How to Insert (Embed) an Object in Excel?
Here, we will discuss how to embed a new object in Excel.
You can download this Embed File Excel Template here – Embed File Excel Template
#1 – Insert (Embed) a New Object in Excel
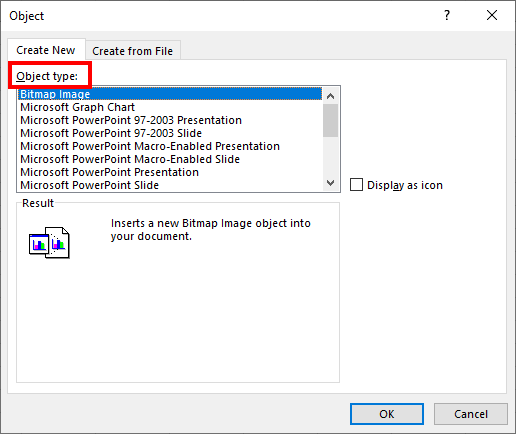
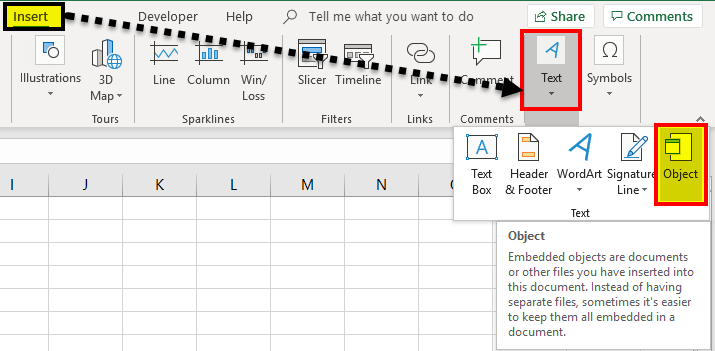
- We must first select “Text” from the “Insert” tab and then click “Object.”

- Then, select “Create New” to embed a new blank file. Remember, only file types are shown in “Object type” that can be embedded in the Excel worksheet.

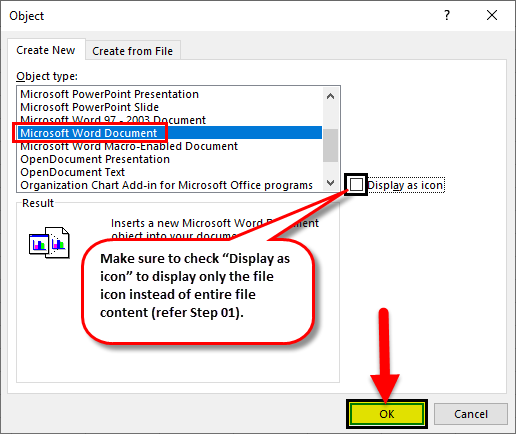
- Now, choose a file type to embed. For example, we have selected a “Microsoft Word Document,” now click “OK.”
#2 – Embedding (inserting) an Existing Object in Excel
Step 1: Select “Text” from the “Insert” tab and click “Object.”
Step 2: Select “Create from File” and click “Browse” to embed an existing file into the worksheet. Remember, only file types are shown in “Object Type” that can be embedded in the Excel worksheet.

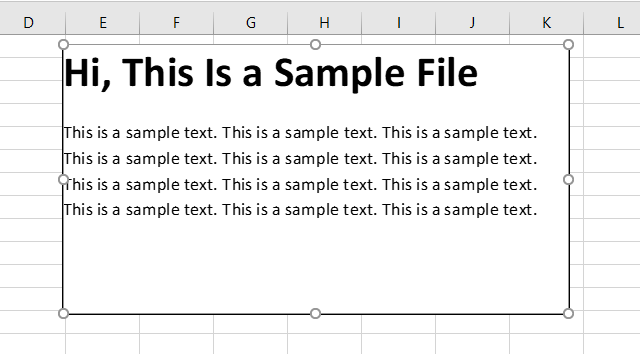
Step 3: Now click “OK.” The file icon will be displayed on the worksheet.
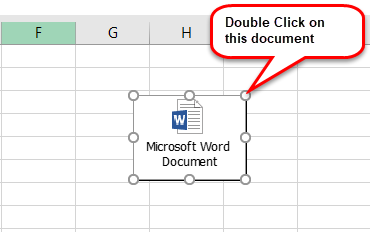
NOTE: If we do not check the “Display as icon” option, it will show the embedded file’s content instead of the icon. We can double-click on the embedded file icon or content to edit the content of the embedded file.
#3 – Link to Object vs. Embedded Object
When you insert an object into an Excel worksheet, the object becomes part of the Excel file. Therefore, any changes made to the source file do not impact the embedded file. However, we may want to keep the file separate from the Excel file. In that case, we need to check the “Link to file” option.
A linked file is just a link to the source file, which we can edit only by editing the source file. When we double-click the link, the source file will open.
NOTE: If we change the location/ path of the source file, the link to the file in the worksheet will not work.
Why do we need Embedded Objects in Excel?
- When we want to add large comments or notes to a dataset in Excel Worksheet, we can embed a Word or text file instead of writing text in worksheet cells.
- Excel is generally used for data tables/ charts. Suppose we want to use big text bodies to explain the data tables in a worksheet. In that case, we can create a separate embedded file within the worksheet instead of creating a particular file or writing a large amount of text in an Excel worksheet.
- Embedded files keep the worksheet presentation limited to required data only. We can keep any additional comments, notes, or information within the embedded file, allowing users to focus on the key information. Other data can be seen only by accessing the embedded file.
4. Embedded files are the preferred option compared to the link to file option when we need to send the worksheet to someone working on a different computer/ laptop since the link to file will only work if the source file is saved on the same device as the worksheet itself since embedded files are saved within the Excel file.
Things to Remember about Inserting Object in Excel
- We can only embed certain file types into an Excel worksheet. We can see the list of file types accepted by going to “Insert” > “Text” > “Object” > “Create New” > “Object type.”
- Select the “Display as icon” checkbox to display only the embedded file’s icon. Otherwise, it will show the file content in the worksheet, which takes more space and is not recommended for presentation purposes.
NOTE: If we intend to print the worksheet, then it is recommended to display the content of the embedded file as it will not publish the embedded file’s content if the only icon is displayed.
- As soon as we insert an object in Excel, its connection to the source file is lost, so make sure to make all required changes to the original file before embedding it. However, you can also update the embedded file’s content by double-clicking the file icon or embedded content.
- When sending an embedded file to someone else, ensure that the recipient’s computer/ laptop has the required software installed, supporting the embedded file type to view or change its content.
- Inserting an object in Excel increases the source Excel file size. If we do not want to make the Excel file heavy, we can use the “Link to file” option. However, the “Link to file” option only works if we use the same device where the linked source file is stored, and the source file’s location/ path is not changed.
Recommended Articles
This article is a guide to Embed and Insert Object in Excel. We discuss inserting an object in an Excel worksheet, practical examples, and a downloadable excel template. You may learn more about Excel from the following articles:-
- VBA Insert RowTo insert rows we use worksheet method with the insert command to insert a row, we also provide a row reference where we want to insert another row similar to the columns.read more
- Insert Button in ExcelButtons in excel are single-click commands inserted to perform specific tasks. Buttons are used in macros and can be inserted by enabling the developer’s tab; in the insert form, we can find a button to insert and draw it to the worksheet.read more
- Insert Comment in ExcelIn Excel, Insert Comment is a feature used to share tips or details with different users working within the same spreadsheet. You can either right-click on the required cell, click on “Insert Comment” & type the comment, use the shortcut key, i.e., Shift+F2, or click on the Review Tab & select “New Comment”. read more
- Insert Hyperlinks in ExcelTo insert a hyperlink, right-click on the cell, click on hyperlink, and then choose the last option, which will open a wizard box to insert a hyperlink. Then, in the field for an address, type the hyperlink’s URL.read more
- Themes in ExcelThemes in Excel are used to format the entire document or workbook; we can use the themes provided by Excel or customize it to our likingread more
Reader Interactions