
PowerPoint for Microsoft 365 PowerPoint 2021 PowerPoint 2019 PowerPoint 2016 PowerPoint 2013 PowerPoint 2010 More…Less
If you are using PowerPoint 2013 or a newer version, you can link data from a saved Excel worksheet to your PowerPoint presentation. That way, if data in the worksheet changes, you can easily update it in your PowerPoint presentation.
Link an entire Excel worksheet to PowerPoint
-
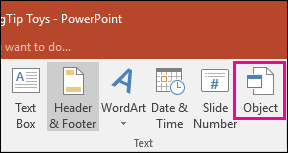
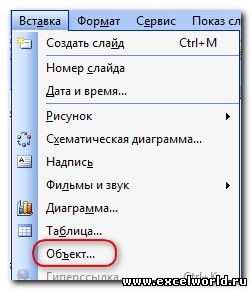
In PowerPoint, on the Insert tab, click or tap Object.

-
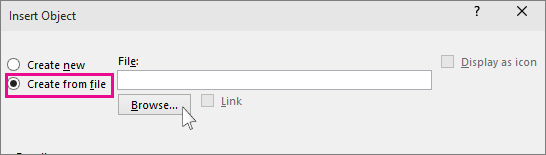
In the Insert Object dialog box, select Create from file.
-
Click or tap Browse, and in the Browse box, find the Excel workbook with the data you want to insert and link to.
-
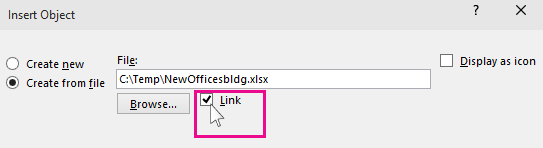
Before you close the Insert Object box, select Link, and click OK.
Important: The linked object in your presentation displays all the data from the active, top worksheet in the linked Excel workbook. When you save the Excel workbook, make sure the worksheet you want in your presentation is the one you see when you first open the workbook.
Link a section of data in Excel to PowerPoint
-
In Excel, open the saved workbook with the data you want to insert and link to.
-
Drag over the area of data you want to link to in PowerPoint, and on the Home tab, click or tap Copy.
-
In PowerPoint, click the slide where you want to paste the copied worksheet data.
-
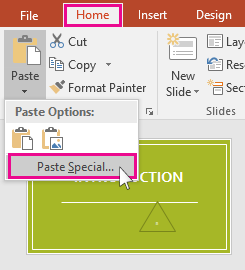
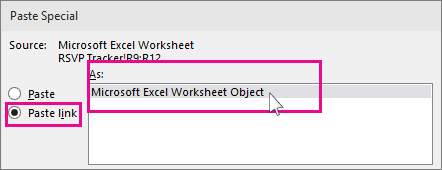
On the Home tab, click the arrow below Paste, and select Paste Special.
-
In the Paste Special box, click Paste link, and then, under As, select Microsoft Excel Worksheet Object.
Copy and paste (unlinked) Excel data in PowerPoint
In this case, the Excel data will not be linked to your PowerPoint presentation. You copy the data from an Excel worksheet and paste it into your presentation. The worksheet does not send automatic updates to PowerPoint.
-
In Excel, open the workbook with the data you want to copy.
-
Drag over the area of data you want to copy, and on the Home tab, click or tap Copy.
-
In PowerPoint, click the slide where you want to paste the copied worksheet data.
-
On the Home tab, in the Clipboard group, click the arrow below Paste.
-
Under Paste Options, pick one of the following. Move the mouse pointer over each Paste option to see a preview of what it would look like.
Use Destination Styles to copy the data as a PowerPoint table, using the format of the presentation
Keep Source Formatting to copy the Excel data as a PowerPoint table, using the format of the worksheet
Embed to copy the data as information that can be edited in Excel later
Picture to copy the data as a picture that can’t be edited in Excel
Keep Text Only to copy all the data as a single text box


See Also
Copy an Excel chart to another Office program
Insert a linked worksheet
To insert and link a saved Excel worksheet onto your PowerPoint slide, do the following:
Important: The linked object in your presentation displays all data from the active, top worksheet in the linked Excel workbook.
-
In PowerPoint 2010, on the Insert tab, in the Text group, click Object.
-
In the Insert Object dialog box, select Create from file.
-
Click Browse, and in the Browse dialog box, browse to and then select the Excel workbook that contains the information that you want to insert, and then click OK.
-
In the Insert Object dialog box, select Link and then click OK.
To edit a linked Excel worksheet, do one of the following:
-
To edit the data from within Excel, right-click the object on the slide, point to Linked Worksheet Object, and select Edit.
-
To update the data on the slide to match the data in the original Excel file, right-click the object on the slide, and click Update Link.
Insert a linked selection from a worksheet
To insert and link a selection of data from a saved Excel worksheet, do the following:
-
In Excel, open the workbook containing that data that you want to insert.
-
Select and copy the data that you want.
Keyboard shortcut You can press CTRL+C to copy the data.
-
In PowerPoint 2010, click the slide where you want to paste the copied worksheet data.
-
On the Home tab, in the Clipboard group, click the arrow below Paste, and select Paste Special.
-
In the Paste Special dialog box, under As, select a Microsoft Excel Worksheet Object.
-
Select the Paste link check box and click OK.
To edit a selection of cells from a linked Excel worksheet, do one of the following:
-
To edit the data from within Excel, right-click the object on the slide, point to Linked Worksheet Object, and select Edit.
-
To update the data on the slide to match the data in the original Excel file, right-click the object on the slide, and click Update Link.
Copy a selection of cells onto a slide
To paste a copy a selection of Excel data onto your PowerPoint slide, do the following:
Note: Data copied and pasted onto a PowerPoint slide does not automatically update when the data is changed in the Excel workbook. To link the data on the PowerPoint slide to the original Excel data source, see the «Insert a linked selection from a worksheet» section immediately above.
-
In Excel, open the workbook that contains the information that you want to copy.
-
Select and copy the data that you want.
Keyboard shortcut You can press CTRL+C to copy the data.
-
In PowerPoint 2010, click the slide where you want to paste the copied worksheet data.
-
On the Home tab, in the Clipboard group, click the arrow below Paste.
-
Under Paste Options, do one of the following:
-
Select Keep Source Formatting if you want to copy the data as a PowerPoint table, but want it keep the appearance of the original Excel worksheet.
-
Select Use Destination Styles if you want to copy the data as a PowerPoint table, but want it to assume the appearance of the PowerPoint presentation.
-
Select Embed if you want to copy the data as information that can be edited in PowerPoint.
-
Select Picture if you want to copy the data as an un-editable picture.
-
Select Keep Text Only if you want to copy all the data as a single text box.
-
See Also
Import content from other applications
Copy an Excel chart to another Office program
Need more help?

Try it!
In PowerPoint, you can embed tables and worksheets from Excel in your presentation slides.
-
In Excel, click and drag to highlight the cells you want to copy.
-
Right-click the copied cells and select Copy.
-
In your PowerPoint presentation, right-click and select the Paste Options you want:
-
Use Destination Styles – Choose to edit your copied cells like a PowerPoint table, but with PowerPoint’s color scheme and fonts.
-
Keep Source Formatting – Choose to keep your table editable in PowerPoint while maintaining the same source formatting from Excel.
-
Embed – Choose to keep a copy of your table in PowerPoint in case you want to edit the data, which will open in Excel.
Note: If you’re working with a large Excel file, it’ll inflate your PowerPoint presentation to a big size. You may also unintentionally be giving more access to your Excel file than you intend to.
-
Picture – Choose to paste your table as a picture to get the same benefits as embedding except you can format your cells like a picture and add effects to it. You won’t be able to edit data once it’s been pasted though.
-
Keep Text Only – Choose to paste your table as straight text and to do all formatting in PowerPoint.
-
-
If you pasted as a picture, on the Picture Tools Format tab, select the quick picture style you want to use. Adjust the table to your liking.
Want more?
Insert Excel data in PowerPoint
Copy an Excel chart to another Office program
Need more help?
In today’s tutorial, we learn how to insert Excel file data directly into PowerPoint.
This is a quick workflow to follow for pasting Excel spreadsheets over to PowerPoint. We review the various options you can work with, from pasting tables with existing styles, to inserting data as text, or placing them as an image.
We also have a helpful compliment to this tutorial. Download our FREE eBook: The Complete Guide to Making Great Presentations. Grab it now before you read on.


How to Insert or Embed Excel Files into PowerPoint (Quick Video)
Note: Watch this quick 60 second video or review the written tutorial instructions below.
1. Copy Your Excel Data to the Clipboard
I’m working in Excel here. I’m going to start off by copying and pasting this table over to PowerPoint.
First, I’ll hit Control C to grab my data and put it on the clipboard.


2. Switch to PowerPoint to Your Insert Excel Data
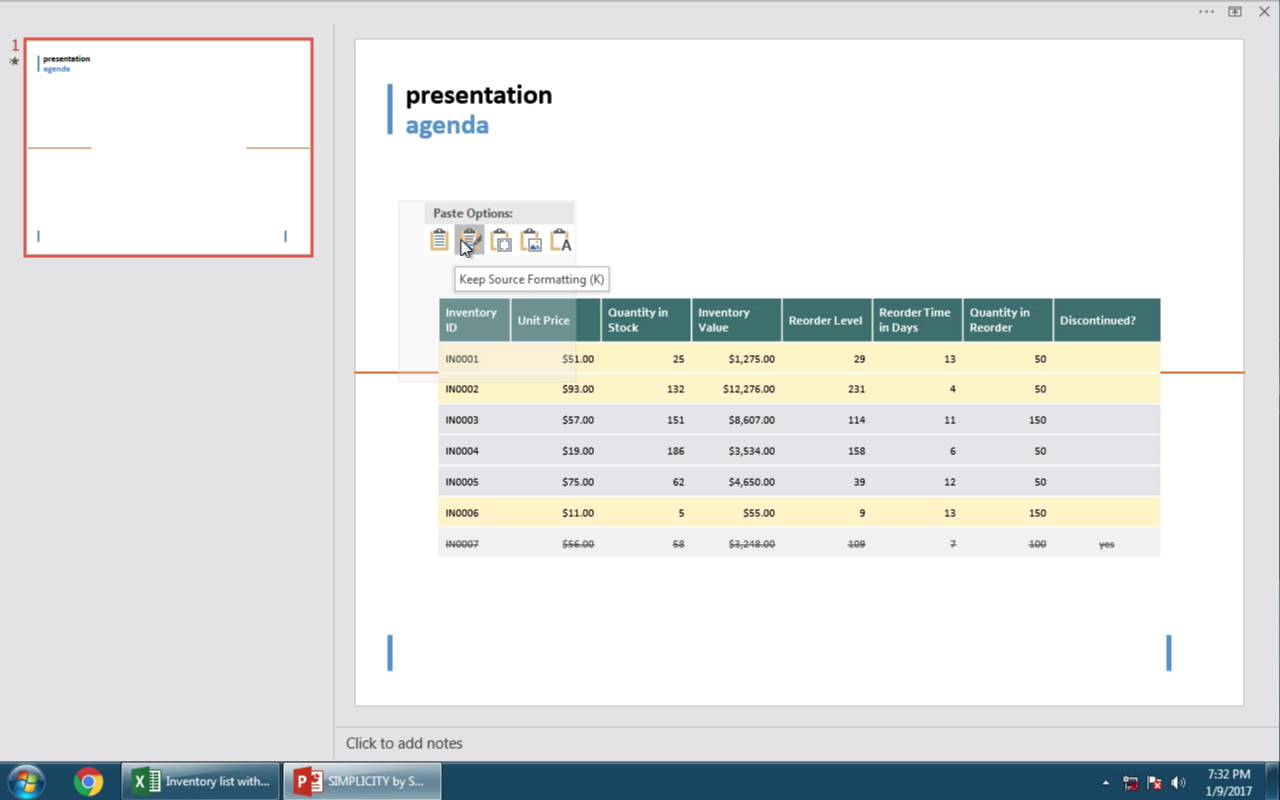
Once we switch over to PowerPoint, start by Right-clicking. There are several ways to paste a table in that we can select. Each one of these thumbnails is a different way to handle the Excel data.


3. Insert Your Data Into PowerPoint With Destination Styles
The first thumbnail allows us to paste the table and use Destination Styles. This basically means that the table will look exactly like what’s already in PowerPoint.


4. Work With More Options for Inserting Excel Files into PowerPoint
The second thumbnail is to keep source formatting which means that the table keeps the same style that I had in Excel.
The third thumbnail is the embed option which is similar but lets you double-click in the table to open up an embedded spreadsheet app.


The fourth option is pasting your table as a picture and finally the last thumbnail is to paste text only basically a plain tacks no style version.
5. Keep Source Formatting to Insert Your Excel Spreadsheet into PowerPoint
Let’s use source formatting in this case. I’ll go ahead and click on that thumbnail.


Note: In all of these cases, the data isn’t connected to the Excel workbook. So if you change the Excel workbook, you’ll need to replace the table.
More Quick PowerPoint Videos (60 Second Tutorials)
Learn more PowerPoint tools quickly and start stacking up your presentation knowledge. Here are additional PowerPoint tutorials here on Tuts+:
Make Great Presentations (Free PDF eBook Download)
We also have the perfect compliment to this tutorial, which will walk you through the complete presentation process. Learn how to write your presentation, design it like a pro, and prepare it to present powerfully.
Download our new eBook: The Complete Guide to Making Great Presentations. It’s available for free with a subscription to the Tuts+ Business Newsletter.


Note: In today’s tutorial, we used the popular Simplicity PowerPoint Template. Discover additional PowerPoint design options in our Ultimate Guide to PowerPoint Templates or browse through our best PPT themes on GraphicRiver.
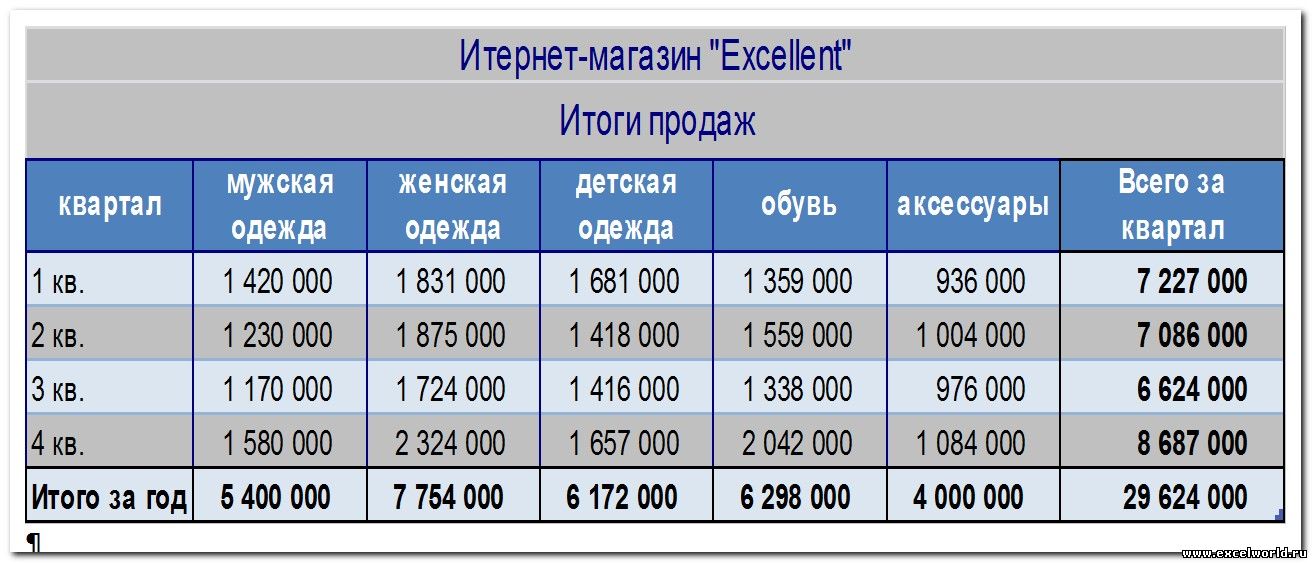
Любая презентация выглядит эффектнее и нагляднее, если в ней присутствуют такие элементы как таблицы и диаграммы. Но встроенные инструменты PowerPoint не имеют таких возможностей и не так удобны, как аналогичные инструменты Excel. Поэтому важно уметь вставить в слайды таблицы и диаграммы, созданные в Excel.
Сделать это можно с помощью внедрения или связывания.
Прежде всего нужно понимать, в чём различие между «связыванием» и «внедрением».
Если нам не требуется (а иногда и нежелательно) обновлять в презентации таблицу или диаграмму, полученную из Excel, то используем внедрение. При этом на слайд помещается статическая копия данных, т.е. внедрённый объект становится частью презентации и уже никак не связан с источником данных. Размер файла презентации при этом, естественно, увеличивается.
Если же нам нужно поддерживать данные, полученные из Excel, в актуальном состоянии, следует использовать связывание. При этом на слайд помещается ссылка на объект Excel, соответственно, при изменении исходной таблицы или диаграммы данные на слайде также изменятся.
Рассмотрим разные способы связывания и внедрения.
1. ЧЕРЕЗ БУФЕР ОБМЕНА
Все мы знаем, что работа с буфером обмена осуществляется с помощью команд Копировать/Вставить. Но следует отметить, что в презентациях действие команды Вставить различается для таблиц и диаграмм.
Если Вы в файле Excel выделили таблицу, выполнили команду Копировать, перешли на слайд и дали команду Вставить, то таблица вставится как таблица PowerPoint с возможностью редактирования средствами PowerPoint, но по умолчанию связь с источником установлена не будет. То есть произойдёт внедрение.
Если же Вы все те же действия выполните с диаграммой, то диаграмма вставится как диаграмма PowerPoint с возможностью редактирования средствами PowerPoint, и по умолчанию будет установлена связь с источником. То есть произойдёт связывание.
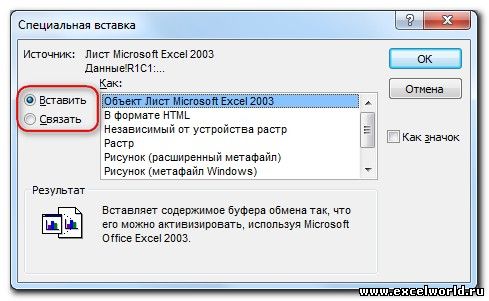
Если мы хотим изменить параметры вставки, принятые по умолчанию, нам придётся использовать Специальную вставку. Для этого выделяем на листе Excel диапазон ячеек или диаграмму, выполняем команду Копировать, переходим на слайд и даём команду Специальная вставка. Размещение этой команды зависит от версии PowerPoint.
В версиях до PowerPoint 2003 включительно она находится в меню Правка. Начиная с PowerPoint 2007 эту команду можно найти в раскрывающемся списке кнопки Вставить на вкладке Главная.
Диалоговое окно Специальная вставка выглядит следующим образом:
если вставляется таблица
если вставляется диаграмма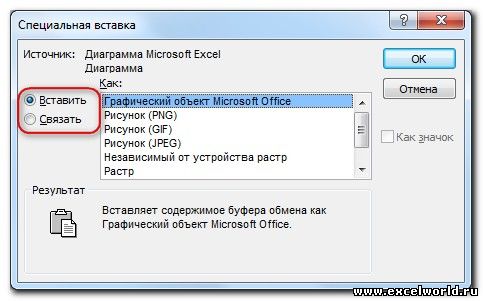
В обоих случаях в этом диалоговом окне можно установить переключатель Вставить/Связать, а также выбрать формат вставляемого объекта.
Кроме того, начиная с PowerPoint 2010 в контекстном меню присутствует команда Параметры вставки, с помощью которой можно выбрать варианты внедрения или связывания.
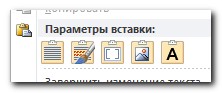
При вставке таблиц доступны только варианты внедрения
А при вставке диаграмм — как внедрения, так и связывания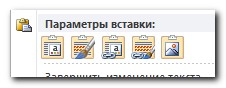
2. СОЗДАНИЕ НОВОГО ОБЪЕКТА
Чтобы создать на слайде таблицу или диаграмму средствами Excel, на вкладке Вставка в группе Текст нажимаем кнопку Объект,

для версий старше PowerPoint 2007 выполняем команду меню Вставка — Объект
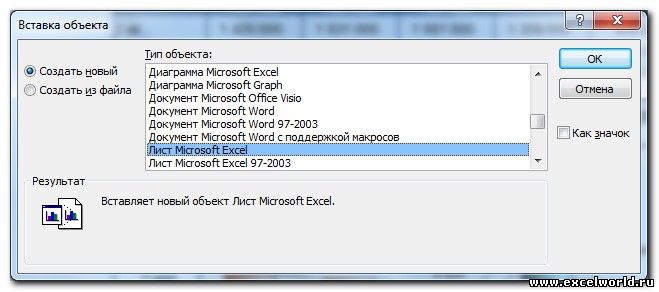
и в раскрывшемся диалоговом окне ищем в списке строчку Лист Microsoft Excel и нажимаем ОК
После этого на странице документа мы видим фрагмент листа Excel, а также ленту с вкладками (или меню) Excel.
Тот же результат получится, если на вкладке Вставка раскрыть список под кнопкой Таблица и выбрать вариант Таблица Excel.

Таким образом, мы можем внедрить таблицу Excel и работать с ней, используя все возможности этой программы, прямо на слайде.
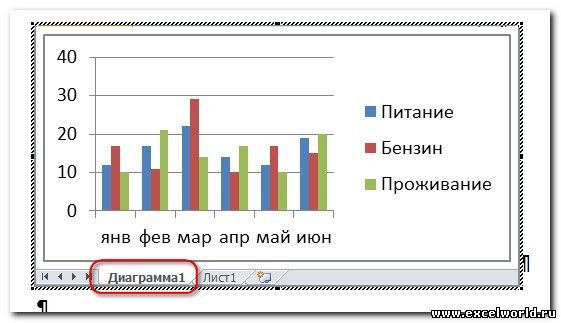
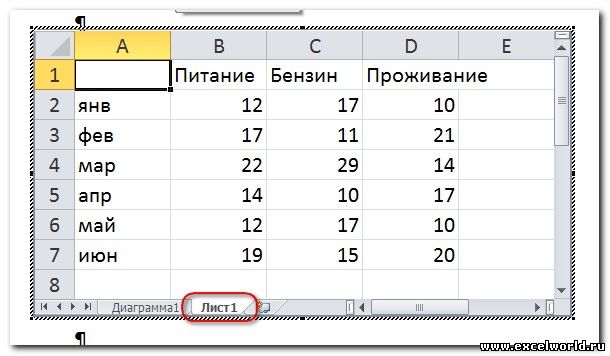
Если мы хотим создать внедрённую диаграмму, то в диалоговом окне Вставка объекта на вкладке Создание выбираем строчку Диаграмма Microsoft Excel. В этом случае будет создан не один лист Excel, а два: на первом будет пример диаграммы, а на втором — исходные данные для неё, которые следует заменить своими исходными данными.
После того как таблица/диаграмма создана, щелчок мыши вне рамки объекта возвращает нас в документ. Если требуется вернуться к редактированию объекта, достаточно сделать по нему двойной щелчок мышкой.
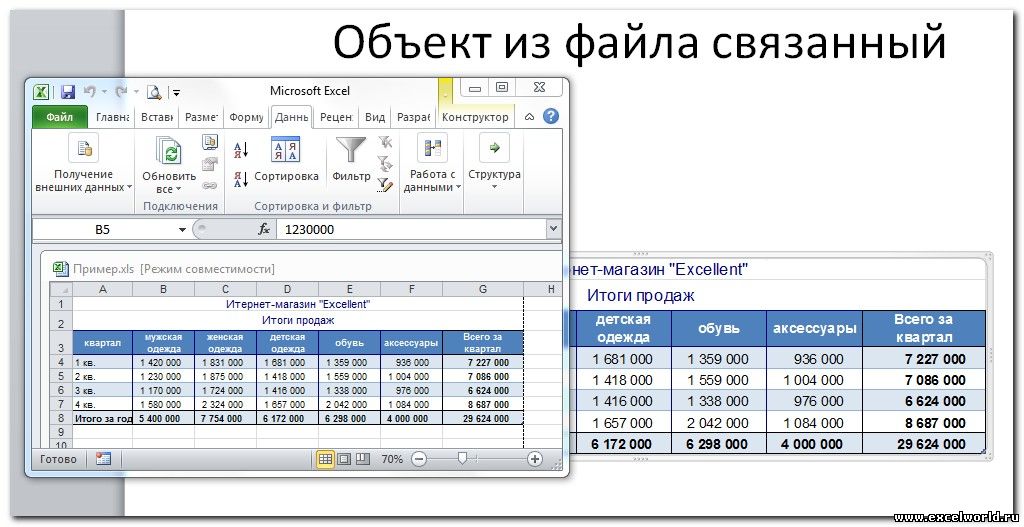
3. СОЗДАНИЕ ОБЪЕКТА ИЗ ФАЙЛА
Для этого на вкладке Вставка в группе Текст нажимаем кнопку Объект и в раскрывшемся диалоговом окне ставим переключатель Создать из файла. С помощью кнопки Обзор находим в Проводнике нужный файл Excel. При этом обращаем внимание на флажок Связать. Если он не установлен, то произойдет внедрение таблицы или диаграммы на слайд, если же флажок установить, то будет связывание. Нажимаем ОК.
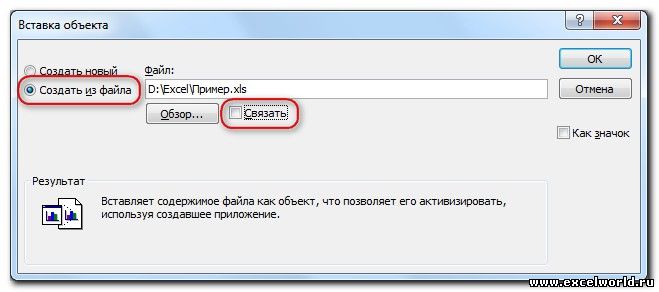
На слайд вставляется лист, который был активен при последнем сохранении книги.
Пожалуй, стоит несколько подробнее остановиться на различиях «в поведении» внедрённых и связанных таблиц и диаграмм, созданных из файла.
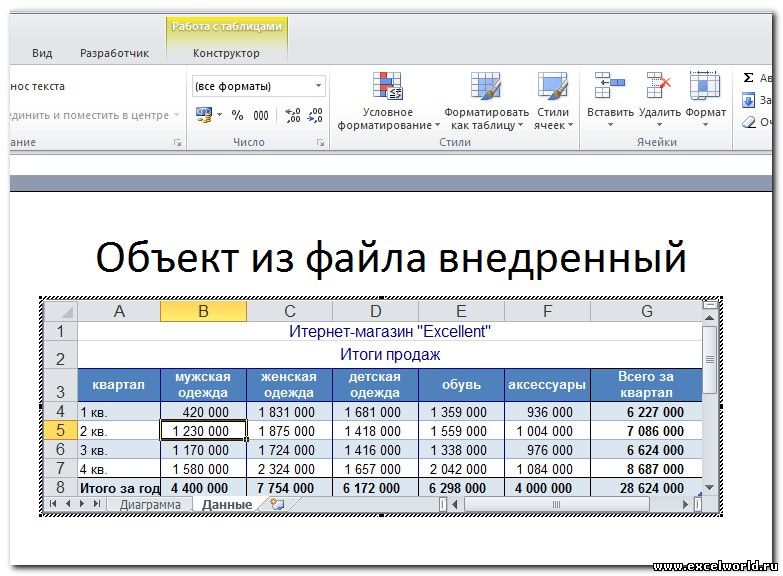
Если объект внедрён, т.е. связь с источником не установлена, то двойной щелчок мыши по объекту приведёт к переходу в режим редактирования. При этом лента (меню) PowerPoint заменится на ленту (меню) Excel со всеми инструментами, но сам внедрённый объект мы будем видеть на слайде в характерной штриховой рамке.
Если же таблица или диаграмма связана с источником, то при двойном щелчке мышкой для редактирования откроется файл-источник в отдельном окне Excel.
После изменений, внесенных в файл-источник, мы его сохраняем, и тогда эти изменения отражаются на слайде в связанной таблице или диаграмме.
Изначально PowerPoint подгоняет размеры вставляемой таблицы или диаграммы таким образом, чтобы они полностью разместились на слайде. Из-за этого большие таблицы могут быть настолько уменьшены, что окажутся нечитаемыми. Если мы хотим, например, чтобы на слайде отобразилась часть таблицы, то следует научиться изменять размеры отображаемого объекта. Размерами внедрённого объекта управляют с помощью размерных маркеров по углам и по серединам сторон рамки выделения. Кроме того, такие же размерные маркеры доступны, если войти в режим редактирования внедренного объекта.
В чём отличие? Если Вы перемещаете размерные маркеры, находясь в режиме редактирования внедренного объекта, то Вы увеличиваете/уменьшаете количество видимых строк/столбцов.
Было
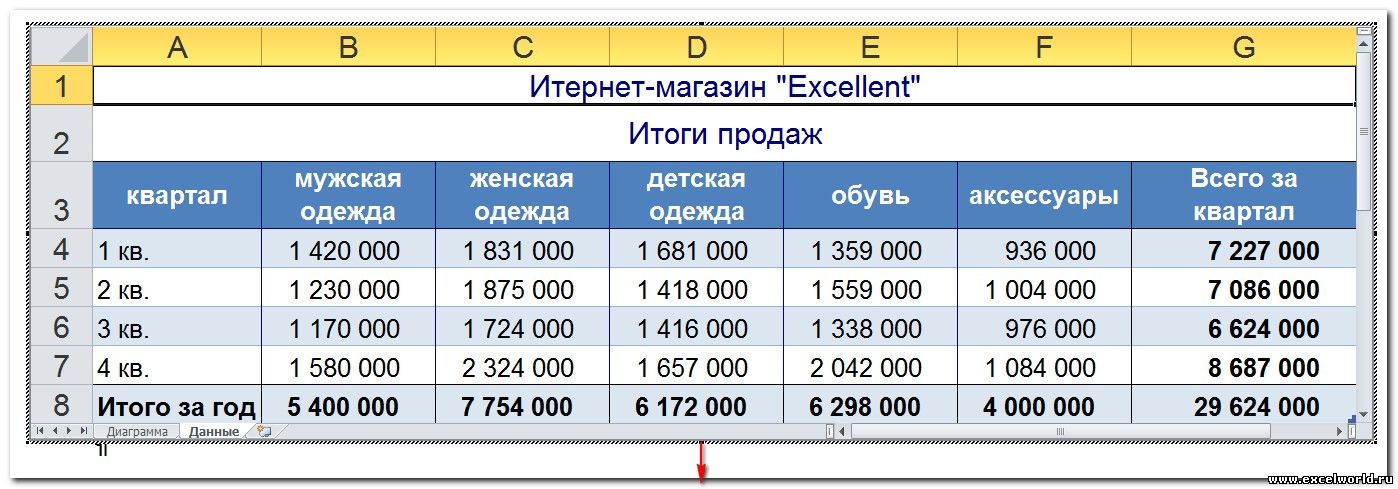
Стало
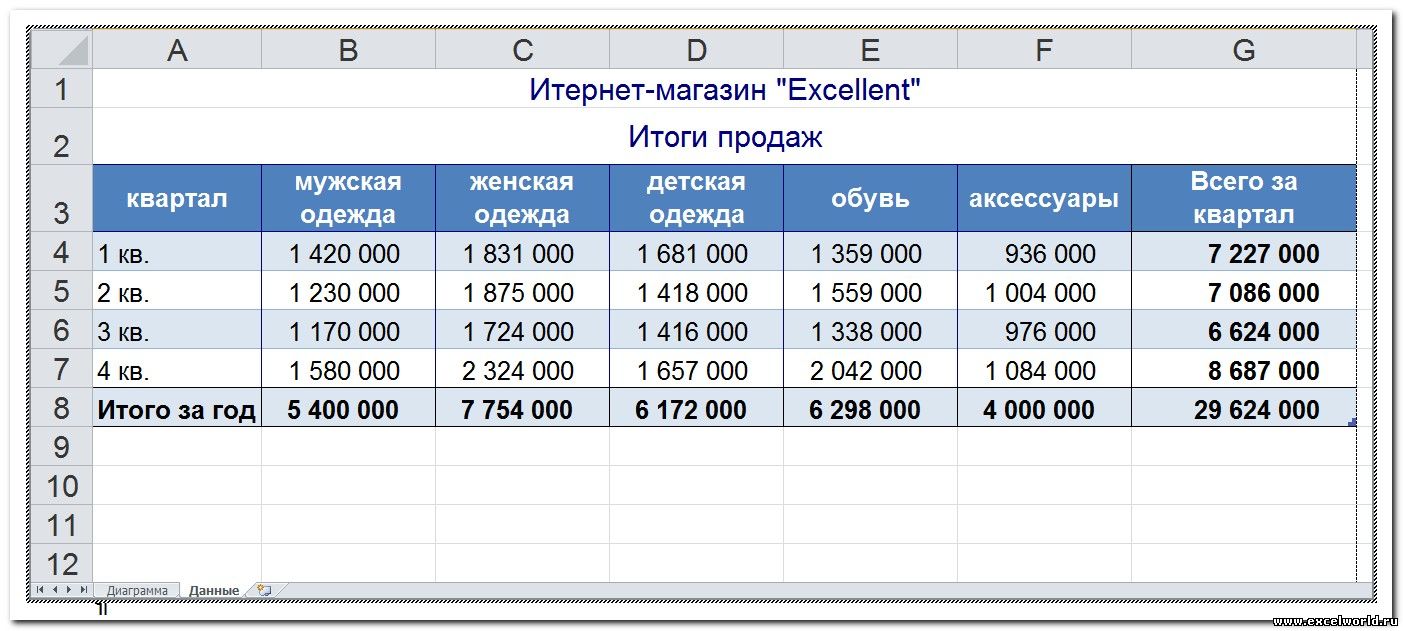
Если же Вы ту же самую операцию делаете, не входя в режим редактирования, то Вы просто растягиваете/сжимаете рисунок.
Было
Стало
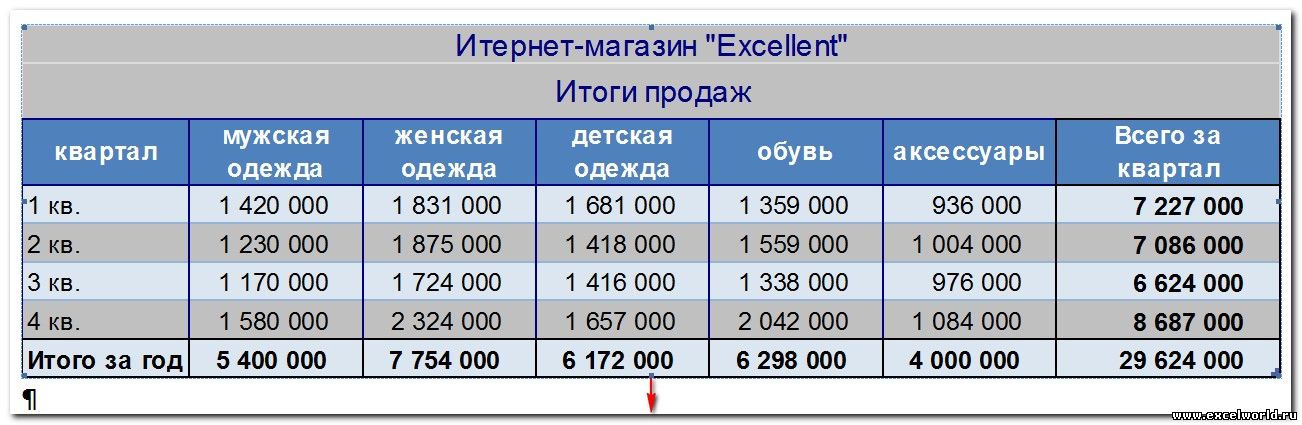
Совет. Если Вы планируете внедрять диаграмму в документ, то лучше расположить её на отдельном листе.

При открытии файла со связанными таблицами или диаграммами появляется диалоговое окно с предложением обновить связи.

Если вы не уверены в надёжности источника связанных файлов, нажмите Отмена.
Если выбран вариант Обновить связи, то данные в презентации обновятся в соответствии с последними изменениями в книге Excel.
Чтобы установленная связь работала, требуется, чтобы файл с электронной таблицей не переименовывался и не перемещался. Если всё же такое произошло, то чтобы заново прописать путь к источнику, можно воспользоваться диалоговым окном Связи.
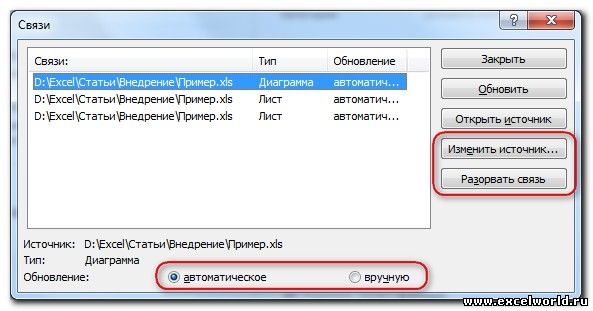
Как видим, в этом диалоговом окне есть возможность Изменить источник, а также Разорвать связь, если таковая больше не требуется. Кроме того, здесь же можно выбрать способ обновления связи: автоматически или вручную.
В версии до PowerPoint 2007 это диалоговое окно открывается при выполнении команды меню Правка — Связи.

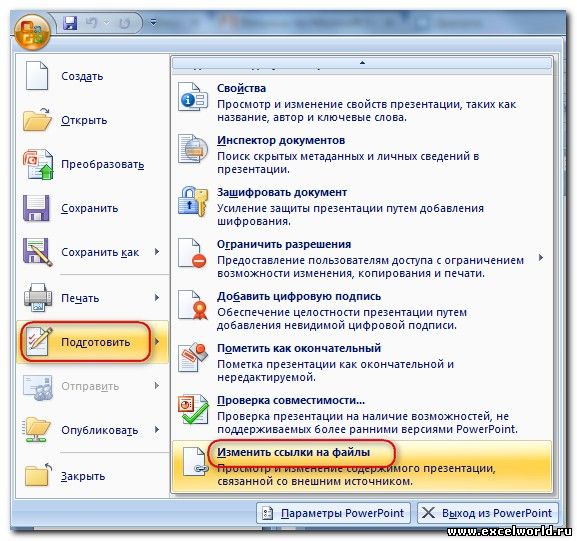
В PowerPoint 2007 его можно открыть, нажав кнопку Office и выбрав команду Подготовить — Изменить ссылки на файлы.
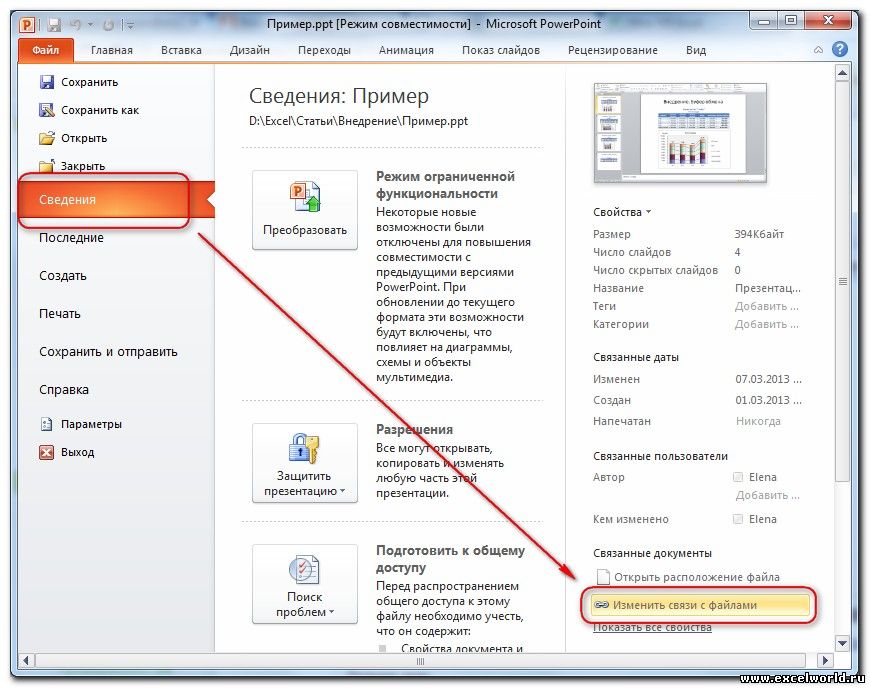
Начиная с PowerPoint 2010 для этого выбираем вкладку Файл — Сведения — Связанные документы — Изменить связи с файлами.
ПРИМЕРЫ

Существуют моменты, когда очень нужно вставить полную таблицу или ее часть из Excel. Сделать это можно на версии PowerPoint 2013 года и выше. Чтобы вставить лист Excel в PowerPoint, необходимо:
- Зайти в PowerPoint и кликнуть на вкладку Вставка.
- Далее необходимо выбрать Объект.
- В новом окне выбрать Вставка объекта и кликнуть на Создать из файла.
- Теперь необходимо выбрать кнопку Обзор.
- Выбрать таблицу Excel.
- Перед тем, как закрыть Вставка объекта, необходимо поставить галочку на пункте Связать.
- Теперь необходимо нажать на ОК.

Стоит отметить, что презентация будет отображать весь текст из листа Excel.
Также существует способ, который будет связывать Excel и PowerPoint. Для этого необходимо:
- Зайти в Excel и открыть файл, который необходимо будет открыть в презентации.
- Выделить необходимую область, которая будет связана с презентацией.
- В разделе Главная необходимо нажать на кнопку Копировать.
- В презентации выбрать необходимый слайд, где будет располагаться таблица.
- В разделе Главная необходимо нажать на стрелку рядом с Вставить.
- Выбрать пункт Специальная вставка.
- В новом окне необходимо установить параметр Связать.
- В окне «Как» выбрать файл с готовой таблицей.
После этого все необходимые данные будут располагаться на выбранном слайде.
Стоит отметить, что пользователь может использовать абсолютно все функции готовой таблице.
Если пользователь хочет вставить определенную часть таблицы, то он может пойти по более легкому пути. Необходимо лишь открыть файл с готовой таблицей и выделить необходимый элемент. Далее необходимо сохранить ее в буфер обмена с помощью сочетания горячих клавиш Ctrl+C. После этого необходимо открыть необходимый файл и вставить данные из буфера обмена. Для этого необходимо лишь нажать другую комбинацию горячих клавиш Ctrl+V. Готовую таблицу можно будет менять по размеру, а также вносить коррективы в данных на абсолютно любом этапе создания презентации.
Теперь пользователь знает, как можно вставить таблицу в презентацию и данный вопрос больше не будет создавать проблем или каких-то дополнительных вопросов. Перенести таблицу очень легко.