
Word for Microsoft 365 Word 2021 Word 2019 Word 2016 Word 2013 Word 2010 More…Less
Insert a symbol using the keyboard with ASCII or Unicode character codes
Symbols and special characters are either inserted using ASCII or Unicode codes. You can tell which is which when you look up the code for the character.
-
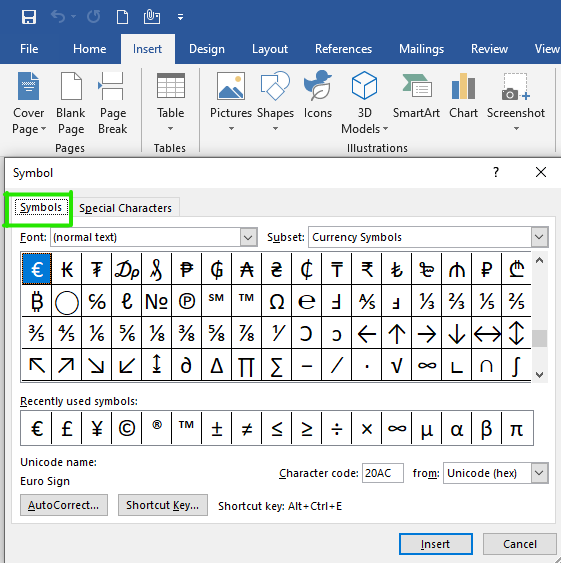
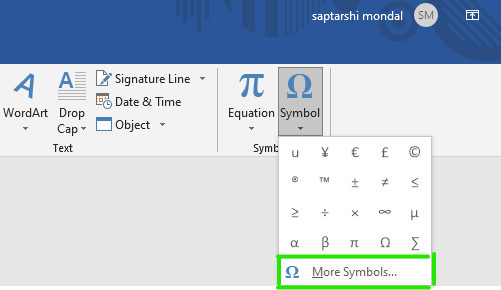
Go to Insert >Symbol > More Symbols.
-
Find the symbol you want.
Tip: The Segoe UI Symbol font has a very large collection of Unicode symbols to choose from.
-
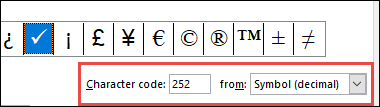
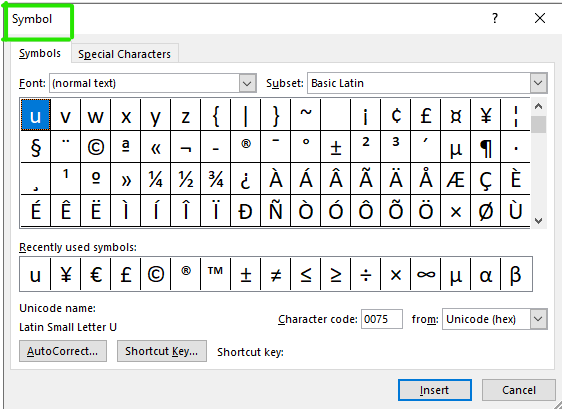
On the bottom right you’ll see Character code and from:. The Character code is what you’ll enter to insert this symbol from the keyboard. The from: field tells you if it’s a Unicode or an ASCII character.
 Unicode
 ASCII
ASCII
Inserting Unicode Characters
-
Type the character code where you want to insert the Unicode symbol.
-
Press ALT+X to convert the code to the symbol.
If you’re placing your Unicode character immediately after another character, select just the code before pressing ALT+X.
Tip: If you don’t get the character you expected, make sure you have the correct font selected.
Inserting ASCII Characters
Use the numeric keypad with Num Lock on to type the ASCII numbers, not the numbers across the top of your keyboard.
All ASCII character codes are four digits long. If the code for the character you want is shorter than four digits, add zeros to the beginning to get to 4 digits.
-
Go to Home tab, in the Font group, change the font to Wingdings (or other font set).
-
Press and hold the ALT key and type the character code on the numeric keypad.
-
Change the font back to your previous font after inserting the symbol.
For more character symbols, see the Character Map installed on your computer, ASCII character codes, or Unicode character code charts by script.
|
Glyph |
Code |
Glyph |
Code |
|---|---|---|---|
|
Currency symbols |
|||
|
£ |
ALT+0163 |
¥ |
ALT+0165 |
|
¢ |
ALT+0162 |
$ |
0024+ALT+X |
|
€ |
ALT+0128 |
¤ |
ALT+0164 |
|
Legal symbols |
|||
|
© |
ALT+0169 |
® |
ALT+0174 |
|
§ |
ALT+0167 |
™ |
ALT+0153 |
|
Mathematical symbols |
|||
|
° |
ALT+0176 |
º |
ALT+0186 |
|
√ |
221A+ALT+X |
+ |
ALT+43 |
|
# |
ALT+35 |
µ |
ALT+0181 |
|
< |
ALT+60 |
> |
ALT+62 |
|
% |
ALT+37 |
( |
ALT+40 |
|
[ |
ALT+91 |
) |
ALT+41 |
|
] |
ALT+93 |
∆ |
2206+ALT+X |
|
Fractions |
|||
|
¼ |
ALT+0188 |
½ |
ALT+0189 |
|
¾ |
ALT+0190 |
||
|
Punctuation and dialectic symbols |
|||
|
? |
ALT+63 |
¿ |
ALT+0191 |
|
! |
ALT+33 |
‼ |
203+ALT+X |
|
— |
ALT+45 |
‘ |
ALT+39 |
|
« |
ALT+34 |
, |
ALT+44 |
|
. |
ALT+46 |
| |
ALT+124 |
|
/ |
ALT+47 |
ALT+92 |
|
|
` |
ALT+96 |
^ |
ALT+94 |
|
« |
ALT+0171 |
» |
ALT+0187 |
|
« |
ALT+174 |
» |
ALT+175 |
|
~ |
ALT+126 |
& |
ALT+38 |
|
: |
ALT+58 |
{ |
ALT+123 |
|
; |
ALT+59 |
} |
ALT+125 |
|
Form symbols |
|||
|
□ |
25A1+ALT+X |
√ |
221A+ALT+X |
For a complete list of the glyphs and their character codes, see the Character Map.
|
Glyph |
Code |
Glyph |
Code |
|
|---|---|---|---|---|
|
à |
ALT+0195 |
å |
ALT+0229 |
|
|
Å |
ALT+143 |
å |
ALT+134 |
|
|
Ä |
ALT+142 |
ä |
ALT+132 |
|
|
À |
ALT+0192 |
à |
ALT+133 |
|
|
Á |
ALT+0193 |
á |
ALT+160 |
|
|
 |
ALT+0194 |
â |
ALT+131 |
|
|
Ç |
ALT+128 |
ç |
ALT+135 |
|
|
Č |
010C+ALT+X |
č |
010D+ALT+X |
|
|
É |
ALT+144 |
é |
ALT+130 |
|
|
È |
ALT+0200 |
è |
ALT+138 |
|
|
Ê |
ALT+202 |
ê |
ALT+136 |
|
|
Ë |
ALT+203 |
ë |
ALT+137 |
|
|
Ĕ |
0114+ALT+X |
ĕ |
0115+ALT+X |
|
|
Ğ |
011E+ALT+X |
ğ |
011F+ALT+X |
|
|
Ģ |
0122+ALT+X |
ģ |
0123+ALT+X |
|
|
Ï |
ALT+0207 |
ï |
ALT+139 |
|
|
Î |
ALT+0206 |
î |
ALT+140 |
|
|
Í |
ALT+0205 |
í |
ALT+161 |
|
|
Ì |
ALT+0204 |
ì |
ALT+141 |
|
|
Ñ |
ALT+165 |
ñ |
ALT+164 |
|
|
Ö |
ALT+153 |
ö |
ALT+148 |
|
|
Ô |
ALT+212 |
ô |
ALT+147 |
|
|
Ō |
014C+ALT+X |
ō |
014D+ALT+X |
|
|
Ò |
ALT+0210 |
ò |
ALT+149 |
|
|
Ó |
ALT+0211 |
ó |
ALT+162 |
|
|
Ø |
ALT+0216 |
ø |
00F8+ALT+X |
|
|
Ŝ |
015C+ALT+X |
ŝ |
015D+ALT+X |
|
|
Ş |
015E+ALT+X |
ş |
015F+ALT+X |
|
|
Ü |
ALT+154 |
ü |
ALT+129 |
|
|
Ū |
ALT+016A |
ū |
016B+ALT+X |
|
|
Û |
ALT+0219 |
û |
ALT+150 |
|
|
Ù |
ALT+0217 |
ù |
ALT+151 |
|
|
Ú |
00DA+ALT+X |
ú |
ALT+163 |
|
|
Ÿ |
0159+ALT+X |
ÿ |
ALT+152 |
For more information about typographic ligatures, see Typographic ligature. For more, see Character Map.
|
Glyph |
Code |
Glyph |
Code |
|
|---|---|---|---|---|
|
Æ |
ALT+0198 |
æ |
ALT+0230 |
|
|
ß |
ALT+0223 |
ß |
ALT+225 |
|
|
Π|
ALT+0140 |
œ |
ALT+0156 |
|
|
ʩ |
02A9+ALT+X |
|||
|
ʣ |
02A3+ALT+X |
ʥ |
02A5+ALT+X |
|
|
ʪ |
02AA+ALT+X |
ʫ |
02AB+ALT+X |
|
|
ʦ |
0246+ALT+X |
ʧ |
02A7+ALT+X |
|
|
Љ |
0409+ALT+X |
Ю |
042E+ALT+X |
|
|
Њ |
040A+ALT+X |
Ѿ |
047E+ALT+x |
|
|
Ы |
042B+ALT+X |
Ѩ |
0468+ALT+X |
|
|
Ѭ |
049C+ALT+X |
ﷲ |
FDF2+ALT+X |
ASCII table numbers 0–31 are assigned for control characters used to control some peripheral devices such as printers.
|
Decimal |
Character |
Decimal |
Character |
|
|---|---|---|---|---|
|
null |
0 |
data link escape |
16 |
|
|
start of heading |
1 |
device control 1 |
17 |
|
|
start of text |
2 |
device control 2 |
18 |
|
|
end of text |
3 |
device control 3 |
19 |
|
|
end of transmission |
4 |
device control 4 |
20 |
|
|
inquiry |
5 |
negative acknowledge |
21 |
|
|
acknowledge |
6 |
synchronous idle |
22 |
|
|
bell |
7 |
end of transmission block |
23 |
|
|
backspace |
8 |
cancel |
24 |
|
|
horizontal tab |
9 |
end of medium |
25 |
|
|
line feed/new line |
10 |
substitute |
26 |
|
|
vertical tab |
11 |
escape |
27 |
|
|
form feed/new page |
12 |
file separator |
28 |
|
|
carriage return |
13 |
group separator |
29 |
|
|
shift out |
14 |
record separator |
30 |
|
|
shift in |
15 |
unit separator |
31 |
|
|
space |
32 |
DEL |
127 |
Need more help?
Word for Microsoft 365 Word 2021 Word 2019 Word 2016 Word 2013 Word 2010 Word Starter 2010 More…Less
You can easily insert a special character, fraction, or other symbol in your Word documents.
The most important thing to understand when inserting symbols, fractions, special characters, or international characters is that the font you use is critical. Not all fonts have the same characters in them. For example, the Elephant font has no fraction characters in it, while Verdana does. As a result it’s important to use the right font to find the symbol or character you want.
These marks are static symbols. If you’re looking for an interactive check box that you can click on to check or uncheck, see Make a checklist in Word.
Symbol such as currency (¥), music (♫), or check marks (✔)
-
Place your cursor in the file at the spot where you want to insert the symbol.
-
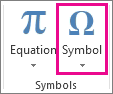
Go to Insert > Symbol.

-
Pick a symbol, or choose More Symbols.
-
Scroll up or down to find the symbol you want to insert.
Different font sets often have different symbols in them and the most commonly used symbols are in the Segoe UI Symbol font set. Use the Font selector above the symbol list to pick the font you want to browse through.
-
When you find the symbol you want, double-click it. The symbol will be inserted in your file.
-
Select Close.
Tip: If you want to make your symbol larger or smaller, select it and use the Font Size setting.
If you’re going to insert the same symbol often, consider setting up AutoCorrect to insert it for you. You can find more info about that here: Insert a check mark or other symbol using AutoCorrect.
-
Click or tap where you want to insert the special character.
-
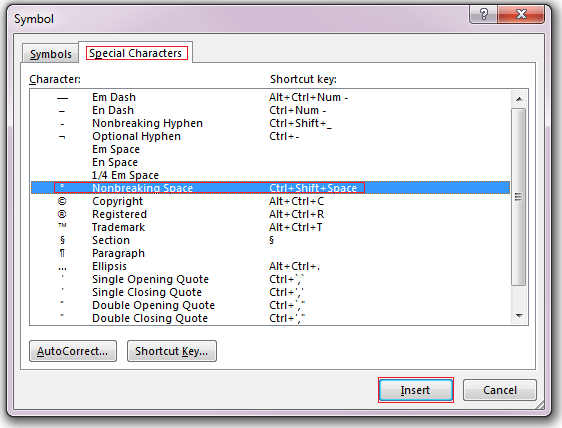
Go to Insert > Symbol > More Symbols.
-
Go to Special Characters.
-
Double-click the character that you want to insert.
Tip: Many of the special characters have shortcut keys associated with them. If you want to insert that special character again in the future, just press the shortcut key. ALT+CTRL+C inserts the Copyright symbol (©), for example.
-
Select Close.
Some fractions (1/4, 1/2, and 3/4) automatically switch to a fraction character (¼, ½, ¾) when you type them. But others do not (1/3, 2/3, 1/5, etc.) so if you want to insert those as symbols you’ll need to use the insert symbol process.
-
Click or tapwhere you want to insert the fraction.
-
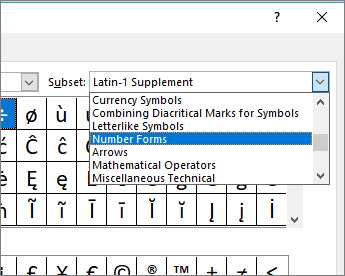
Go to Insert > Symbol > More Symbols.
-
In the Subset dropdown, choose Number Forms.
Note: Not all fonts have a number forms subset. If you don’t see the number forms subset available for your font you will have to use a different font, such as Calibri, to insert the fraction character.
-
Double-click the fraction that you want to insert.
-
Select Close.
Only a handful of common fractions have a symbol that you can substitute. For more unusual fractions, such as 8/9, you can approximate the symbol by setting the numerator as superscript and the denominator as subscript. For more information see Insert subscript or superscript text.
If you plan to type in other languages often you should consider switching your keyboard layout to that language. You can find more information about that at Enable or change a keyboard layout language.
For one-off characters there are almost always keyboard shortcuts in Office to do that. For example:
-
CTRL+SHIFT+ALT+? inserts a ¿
-
CTRL+SHIFT+~ followed immediately by «a» will insert ã.
-
CTRL+SHIFT+: followed immediately by «u» will insert ü.
For more info on international characters see: Keyboard shortcuts for international characters.
You can also use the character code of the symbol as a keyboard shortcut. Symbols and special characters are either inserted using ASCII or Unicode codes. You can tell which is which when you look up the code for the character.
-
Go to Insert >Symbol > More Symbols.
-
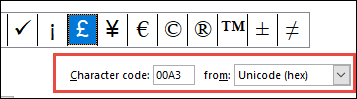
Scroll up or down the list to find the symbol you want. You might have to change the font or the subset to locate it.
Tip: The Segoe UI Symbol font has a very large collection of Unicode symbols to choose from.
-
Towards the bottom right you’ll see boxes for Character code and a from:. The character code is what you’ll enter to insert this symbol from the keyboard and the from: tells you what kind of character it is. If from: says «Unicode (hex)» it’s a Unicode character. If from: says «Symbol (Decimal)» then it’s an ASCII character.
Unicode
ASCII
ASCII and Unicode information and character tables
For more info about using ASCII or Unicode characters, see Insert ASCII or Unicode character codes.
Insert a check mark
For info on inserting a check mark, see Insert a check mark.
Need more help?
Want more options?
Explore subscription benefits, browse training courses, learn how to secure your device, and more.
Communities help you ask and answer questions, give feedback, and hear from experts with rich knowledge.
This tutorial shows three ways to insert special characters in Microsoft Word:
1. The Symbol dialog box
2. Keyboard shortcuts
3. AutoCorrect
Word’s special characters include twelve text characters, such as the en dash, that don’t appear on traditional keyboards and fifteen formatting characters, such as the nonbreaking hyphen, that affect text layout. The table below lists all twenty-seven special characters.
| 1. Em Dash | 10. Registered Symbol | 19. No-Width Optional Break |
| 2. En Dash | 11. Trademark | 20. No-Width Non Break |
| 3. Nonbreaking Hyphen | 12. Section Break | 21. Left-to-Right Mark |
| 4. Optional Hyphen | 13. Paragraph Break | 22. Right-to-Left Mark |
| 5. Em Space | 14. Ellipsis | 23. Left-to-Right Embedding |
| 6. En Space | 15. Single Opening Quote | 24. Right-to-Left Embedding |
| 7. 1/4 Em Space | 16. Single Closing Quote | 25. Left-to-Right Override |
| 8. Nonbreaking Space | 17. Double Opening Quote | 26. Right-to-Left Override |
| 9. Copyright Symbol | 18. Double Closing Quote | 27. Pop Directional Formatting |
For a description of each character, visit “What Are Special Characters in Microsoft Word?”
If you want to insert accent marks (the extra marks that appear above and below letters) instead of special characters, visit “Three Ways to Insert Accent Marks in Microsoft Word.”
This tutorial is also available as a YouTube video showing all the steps in real time.
Watch more than 100 writing-related software tutorials on my YouTube channel.
The images below are from Word for Microsoft 365. The steps are the same for Word 2021, Word 2019, and Word 2016, and are similar for Word 2013 and Word 2010.
Insert Special Characters Using the Symbol Dialog Box
All twenty-seven special characters can be inserted using the Symbol dialog box.
1. Place your cursor where the special character should be inserted in your text.
2. Select the Insert tab in the ribbon.

3. Select Symbols in the Symbols group.

4. Select More Symbols in the drop-down menu.

5. Select the Special Characters tab in the Symbol dialog box.

6. Select the special character that you need from the Character menu.

7. Select the Insert button to insert the special character.

8. Select the Close button to close the Symbol dialog box.

Pro Tip: If the Symbol dialog box blocks your view of your newly inserted special character, left-click your mouse arrow on the uppermost area of the dialog box to grab it and then move it to a different location on your screen.

Insert Special Characters Using Keyboard Shortcuts
Thirteen special characters can be inserted with preset keyboard shortcuts.
Please note that the shortcuts shown below for the Double Opening Quote and Double Closing Quote are different than those shown in Word’s Symbol dialog box (which may be typos because they don’t function as intended).
1. Place your cursor where the special character should be inserted.
2. Select the appropriate key combination on your keyboard.
Em Dash: Alt + Ctrl + Num –
(Alt plus Ctrl plus the minus sign on the number pad)
En Dash: Ctrl + Num –
(Ctrl plus the minus sign on the number pad)
Nonbreaking Hyphen: Ctrl + Shift + _
(Ctrl plus Shift plus underscore)
Optional Hyphen: Ctrl + –
(Ctrl plus hyphen)
Nonbreaking Space: Ctrl + Shift + Spacebar
Copyright: Alt + Ctrl + C
Registered: Alt + Ctrl + R
Trademark: Alt + Ctrl + T
Ellipsis: Alt + Ctrl + .
(Alt plus Ctrl plus period)
Single Opening Quote: Ctrl + `,`
(Ctrl plus two grave accents)
Single Closing Quote: Ctrl + ‘,’
(Ctrl plus two single quotation marks)
Double Opening Quote: Ctrl + ` , Shift + ‘
(Ctrl plus one grave accent followed by Shift plus one single quotation mark)
Double Closing Quote: Ctrl + ‘, Shift + ‘
(Ctrl plus one single quotation mark followed by Shift plus one single quotation mark)
Insert (a Few) Special Characters Using AutoCorrect
Word’s preset AutoCorrect feature lets you insert the copyright symbol, trademark symbol, registered mark, and en dash by typing specific character strings into your text.
Trademark: (tm)
Copyright: (c)
Registered: (r)
En Dash: --
The en dash won’t appear automatically until you complete the next word or character string and then press the spacebar.
Pro Tips: Select Ctrl + Z to reject an autocorrected character. You can also customize Word’s autocorrect options in the Proofing section of the Word Options dialog box.
Further Reading: How to Find and Replace Special Characters in Microsoft Word
Updated November 14, 2021
Microsoft Word is a software tool that allows us to create documents file like articles, office letters, projects files and many more in a very simplest and easy manner. MS Word makes our document more attractive as compared to paper or file work by providing different features like it has different sizes of pages, fonts, colors, design, bullets, tables, charts, page border/number, and many more.
It also provides various features like editing, texting, formatting, graphics designs, fonts color and styles, inserting images, videos, printing documents etc.
This MS Word software saves our articles/letters in a form of a document and saves them on the computer forever. Whenever it is required it can be shared or can access the document.

Features of MS Word
- Images- MS Word provides the inserting of various images in our document.
- Videos- We can insert videos in our document
- Fonts Styles- It has a wide range of font styles for our text.
- Colors- It also has different types of colors to make our document more attractive.
- Page number and size- You can set the size of the page of your document
- WordArt- It provides various writing styles for our documents.
- Tables- Tables in MS Word are used to represent data in Tabular form
- Graph and Charts- These are used to represent statistical data
- Animations and Designs- MS Word allows the creation of Animations and designs as per user needs
- Page border/color- MS Word allows adding borders and colors to pages.
What are Symbols in MS Word?
Microsoft Word has a special features called symbols in which user can insert many different types of symbols in the document.
MS Word has a variety of symbols, special characters, fractions, languages, etc. We can insert the symbols and special characters with the help of the Symbol dialog box present in MS Word.
Some pictures of symbols in MS Word are:


Steps to Add Symbols in MS Word
Step 1: On the navigation menu click on the insert option.

Step 2: On the right-hand side of the navigation menu select the Symbol option as shown in figure:

Step 3: Next select the symbol from the menu as per your need.

Step 4: You can also select more different types of symbols by just clicking on the More Symbols option as shown in the figure:

Step 5: A symbol dialog box will be pop up on the screen.

Step 6: Now click on the symbols option as shown in the figure:
Step 7: Next click on the drop-down arrow of the font box to change the font style of symbols.

Step 8: Select the font style from the style menu.

Step 9: Next click on the drop-down arrow of subset box to select the different categories of the symbols.

Step 10: Select the symbol category from the menu.

Step 11: Select the symbol as per your choice as shown in the figure:

Step 12: Then click on the insert option to insert the symbol on your current page of the document.

Note – You can also search for a particular symbol using its character code as shown in the figure:

Step 13: Enter the symbol character code in the character code box.

Step 14: Select the option (UNICODE, ASCII) as shown in the figure:

Step 15: Then click on the insert option.
Step 16: Close the symbol dialog box as shown in the figure:

Finally, the symbol is added to your document.
Steps to Insert Special Symbols in MS Word
Step 1: Click on the Symbol option from the navigation menu.

Step 2: Select the More Symbols option as shown in the figure:
Step 3: A symbol dialog box will open.
Step 4: Now select the special characters option as shown in the figure:

Step 5: Select the special character as per your choice from the menu.

Step 6: Click on the insert option to continue.

Step 7: Close the symbol dialog box.

Finally, special characters symbol is added to your document.


These are some of the steps to insert symbols and special characters in the document.
One of the advantages of working using Microsoft Word is that your text isn’t limited to just words and letters. You can add Microsoft Word symbols and characters to what you are typing. For example, characters such as ellipsis, accented letters, copyrighted symbols, trade symbols, math symbols, foreign language characters, and world currency symbols.
Because there is often limited space for keys and because many of the possible desired symbols are not common, you most likely won’t find them on a standard keyboard. You can still insert a special character, fraction, or symbol in your Microsoft Word document nonetheless.
The vital thing to remember when inserting symbols, fractions, special characters, or international characters is that the font you opt for matters. Not all the fonts have the same characters in them. One example is that the Elephant font does not have fraction characters in it while Verdana does. It is always important to use the appropriate font to find the symbol or character that you want.
To insert symbols and special characters in Word, you can use the following steps;
To insert a symbol:
- Open Microsoft Word and open the document in which you want to add a symbol.
- Put your cursor at the spot in the file where you want to insert.
- Select the Insert top menu icon or the Insert tab.
- Choose the Symbol option in the Insert menu or click the Symbol option on the Insert tab.
- If you can’t find the symbol you want, click More Symbols.
- Scroll to identify the symbol or character that you want. Different font sets have different symbols and the most commonly used symbols are in the Segoe UI Symbol font set. Use the Font selector above the symbol list to pick the font you want by browsing through.
- If you find the symbol you want, double-click it or click the Insert button. The symbol will be inserted into your file.
- Click Close.
To insert a special character:
- Put your cursor at the spot in the file where you want to insert a special character.
- When you can access the Insert tab, click Symbol.
- Select More Symbols.
- Then, click the Special Characters tab.
- Choose the character you want to insert, and select Insert.
Are you looking for an even better way to collaborate while using Microsoft Word?
Simul Docs is one of the best collaboration tools on the market right now. It knows that when a team is collaborating on a document, tracking changes is paramount. Without this, there is no way for multiple users to know who made what changes and at what point.
Word has a Tracked Changes feature and it is great when you remember to turn it on but sometimes we forget to do so and it gets frustrating. You go on making changes that you won’t be able to remember only to notice later on. You can try to re-read through the pages but often, not all of them can be identified.

Another user can also join the document editing process without your knowledge, make changes and they won’t be tracked because the Tracked Changes feature isn’t on. This can have grave consequences in case the changes go unnoticed or unreviewed.

Using Simul Docs, one can track and save changes automatically, every single time. It has an inbuilt automatic track changes feature that facilitates collaboration, live in the document at any time even when you forget that it is doing so. Thereafter, they can be reviewed and declined depending on one’s preference to perfect the text. There is no need to go back and forth trying to remember what has been changed.

Each change made and comment suggested will have an Accept or Decline button situated next to it, similar to what can be seen in Microsoft’s track changes feature.
The rest of the team working on the document can also leave comments and notes to provide additional information and give feedback. These notes can be exchanged in a comment thread. A conversation can be held to maintain updates on what is to be done and altered, live in the document.

Once you have finished collaborating and making changes, when you are ready to save and send the document, Simul offers all the features needed to share via whichever tool or source is preferable.
Save your document as a Word file or PDF, that’s easy. Share it via a direct link, email, or a cloud system such as GoogleDrive, OneDrive, Dropbox, and more.

Work with Simul Docs to enjoy cool features that truly make collaborating easy. Easy collaboration is addictive. Once you’ve tried it you’ll never look back.