
Add a border to a page
-
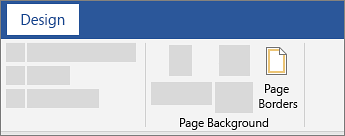
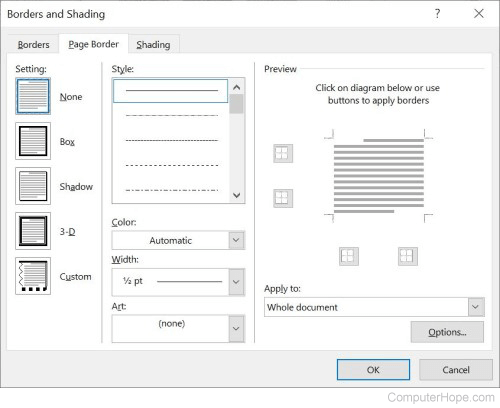
Go to Design > Page Borders.

-
Make selections for how you want the border to look.
-
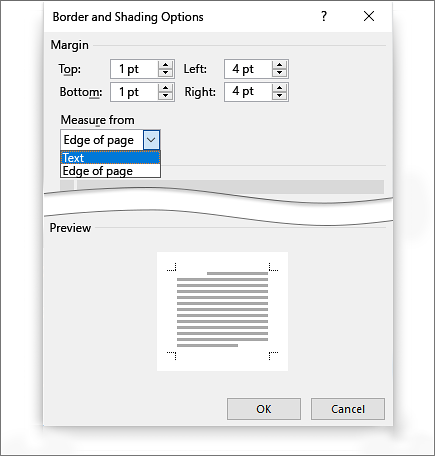
To adjust the distance between the border and the edge of the page, select Options. Make your changes and select OK.
-
Select OK.

If the page you want to add a border to is in the middle of your document, you must first add section breaks.
-
Go to Design > Page Borders.
-
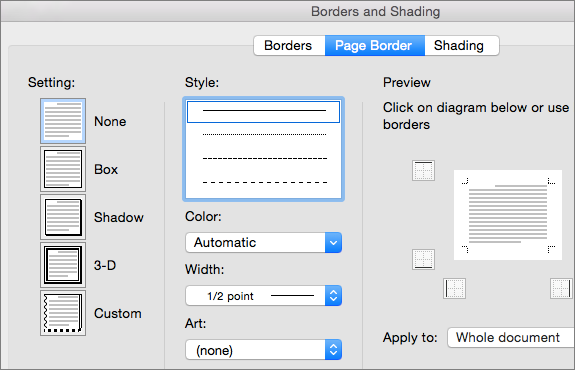
In the Borders and Shading box, design your border:
-
Under Setting on the left, choose the border style you want.
If you want to remove a border, select None.
-
Under Style, select the line style you want.
-
Select the arrow under Color and choose a border color.
-
Select the arrow under Width and choose the width you want.
Tip: If you want a clip-art border instead, select the arrow under Art and choose a border graphic.
-
-
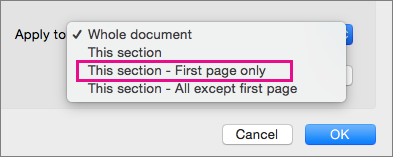
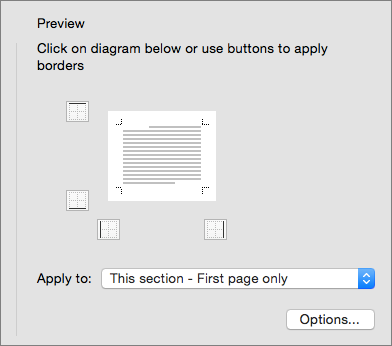
Next, select the arrow to the right of Apply to and choose This section — First page only.
This setting also works if you’re adding the border to the first page in your document.
-
The Preview box confirms your border styles. To remove the border from one side, select that line in the Preview box.
Tip: To change where the border appears on the page, select Options and adjust the margin settings.
When finished, Select OK.

Word for the web does not let you edit, delete, or add new borders to text.
If you’ve added borders around text in a document you created with the Word desktop app, Word for the web will preserve them.
A potential workaround is to insert a table that contains only one cell, then paste or type your text into that cell.
Need more help?
Want more options?
Explore subscription benefits, browse training courses, learn how to secure your device, and more.
Communities help you ask and answer questions, give feedback, and hear from experts with rich knowledge.
Word for Microsoft 365 Word for Microsoft 365 for Mac Word 2021 Word 2021 for Mac Word 2019 Word 2019 for Mac Word 2016 Word 2016 for Mac Word 2013 Word 2010 Word 2013 Developer Word Starter 2010 More…Less
Sometimes, putting a border around text will work better in your document than inserting a text box or a one-cell table, to achieve a similar look.
-
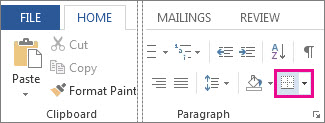
Select a word, line, or paragraph.
-
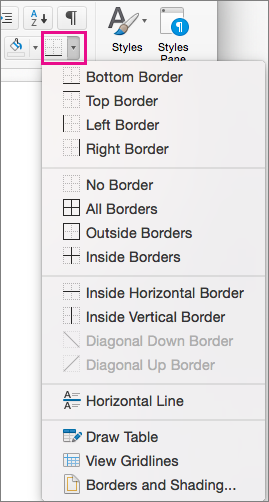
Go to Home > Borders, and then open the menu of border choices.
-
Choose the type of border you want:
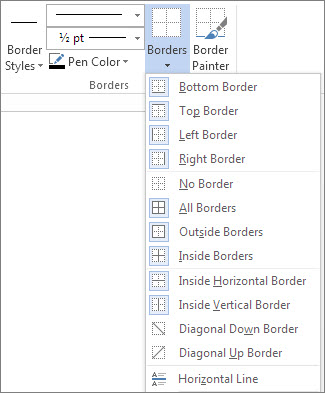
Customize the border
-
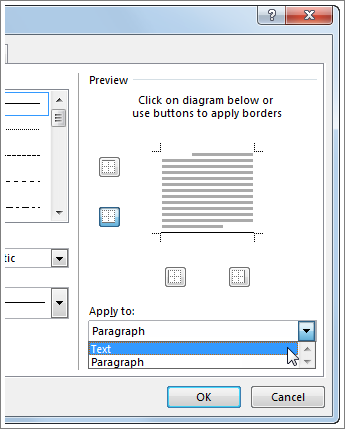
After you’ve selected your text and found the basic type of border you’d like, open the Borders menu again, and choose Borders and Shading.
-
Make your choices for style, color, and width, and then apply the choice with the buttons in the Preview section of the dialog box. When the preview is the way you want it, click OK.
Note: Make sure that the Apply to box has the correct setting: Text or Paragraph.
See Also
Add, change, or delete borders from documents or pictures
You can add a border to an individual word, a line of text, or an entire paragraph. You can make borders as plain or fancy as you want.
You can also add a border to a picture, put a border around a table, add a border to an individual page.
Add a border to selected text
-
Select a word, line, or paragraph.
-
On the Home tab, click the arrow next to the Borders button.
-
In the Borders gallery, click the border style that you want to apply.
Customize the text border
-
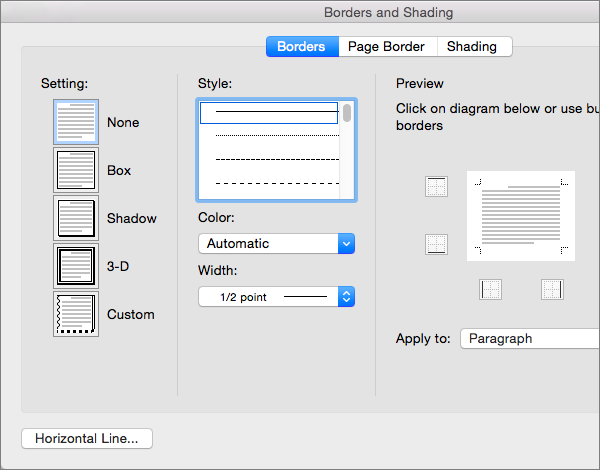
After you’ve selected your text and found the basic type of border you’d like, click the arrow next to the Borders button again, and then click Borders and Shading.
-
In the Borders and Shading dialog box, change Setting, Style, Color, and Width to create the border style that you want.
Note: To make sure the border style is correctly applied, set Apply to to Text or Paragraph. If you haven’t selected any text, you can only set Apply to to Paragraph.
-
Click OK to apply your selected border styles.
Tip: You can also fill the area of your selected text with color. In the Borders and Shading dialog box, click Shading to select a color and patterns. The color you pick in the Fill list fills the rectangular area; the color you select from the Color menu is applied to the rectangular area in a pattern you select from the Style list.
See Also
Add, change, or delete borders from documents or pictures
Add a border to a table
Need more help?
![]()
Download Article
Learn how to insert a lined or art border in Microsoft Word documents on desktop
![]()
Download Article
- Adding a Page Border (Windows)
- Adding a Page Border (Mac)
- Adding a Text Border
- Q&A
|
|
|
Do you want to make an outside border in your Microsoft Word documents? You can easily add a solid or dotted border to an entire page or selected content. You can also use Microsoft Word’s included designs to create an artistic border for themed event flyers. This wikiHow will show you how to create a border around text, images, or pages in Microsoft Word using your Windows or Mac computer.
Things You Should Know
- To add a page border, click «Design» → «Page Borders». Select a border setting, style, and page application. Click «OK».
- To add a border around text or images, select the content. Click the «Home» tab and click the arrow next to the border icon. Click «Borders and Shading…»
- Select a border setting, style, and page application. Click «OK».
-
1
Open a project in Microsoft Word. This looks like a W on top of a blue square. Microsoft Word is available to install for Windows.[1]
- You must have a subscription to use Office 365.
- Use this method to add a lined border around a Microsoft Word document. This is different from changing the margins.
-
2
Click Design. This will be in the top toolbar, between Draw and Layout.
Advertisement
-
3
Click Page Borders. You can find this at the left side of the Design section, next to Page Color. It will have an icon of a page with a yellow border.
- A new window will open.
-
4
Click Page Border. This is the middle tab on the Borders and Shading window. You may already be on this tab.
-
5
Select a border setting. In the left-most column, click the border option that you want to use. Select from: None, Box, Shadow, 3-D, and Custom.
- If you want a simple border to go all the way around your page, select Box.
- To add a border with fun images, click the Art drop-down menu and select from Word’s art gallery. This border can be used for themed flyers for holidays and events.
-
6
Select a border style. In the «Style» column, scroll down until you find the border style you want to use, then click the style. Select from the various solid and dotted line styles.
- If needed, you can also change the border’s color and width from the Color and Width drop-down menus, respectively.
-
7
Select pages to use. If you created a new section earlier in this method, click the «Apply to» drop-down box, then click the section to which you want to apply the border in the resulting drop-down menu.
- To apply the border to the first page of your section, click This section — first page only in the drop-down menu.
-
8
Click OK. It’s at the bottom of the page. This will apply the border to your document’s specified page(s).

Advertisement
-
1
Open a project in Microsoft Word. This looks like a W on top of a blue square. Microsoft Word is available to install for Mac.[2]
- You must have a subscription to use Office 365.
-
2
Click Design. This will be in the top toolbar, between Draw and Layout.
-
3
Click Page Borders. You can find this at the left side of the Design section, next to Page Color. It will have an icon of a page with a yellow border.
- The Borders and Shading window will open, set to the Page Border tab. If it isn’t already on the Page Border tab, click it now.
-
4
Select a border setting. In the left-most column, click the border option that you want to use. Select from: None, Box, Shadow, 3-D, and Custom.
- If you want a simple border to go all the way around your page, select Box.
- To add a border with fun images, click the Art drop-down menu and select from Word’s art gallery. This border can be used for themed flyers for holidays and events.
-
5
Select a border style. In the «Style» column, scroll down until you find the border style you want to use, then click the style. Select from the various solid and dotted line styles.
- If needed, you can also change the border’s color and width from the Color and Width drop-down menus, respectively.
-
6
Select pages to use. If you created a new section earlier in this method, click the «Apply to» drop-down box, then click the section to which you want to apply the border in the resulting drop-down menu.
- To apply the border to the first page of your section, click This section — first page only in the drop-down menu.
-
7
Click OK. This is the blue button. This will apply the border to your document’s specified page(s).
Advertisement
-
1
Open a project in Microsoft Word. This looks like a W on top of a blue square.
-
2
Click Home. This is in the top toolbar, between File and Insert.
-
3
Select content. Click and drag your mouse across the text or image(s) around which you want to place a border.
- This method will place a border around an entire selection of images and text together.
- If you want to place a border around a single image, double-click the image. Select a preset style from the Picture Styles section, or click Picture Border to set the color, weight, and design of the border.[3]
-
4
Click
next to the «Borders» button. The Borders button resembles a square divided into four smaller squares; you’ll find it in the «Paragraph» section of options in the toolbar, just right of the paint bucket icon. A drop-down menu will open.
- On a Mac, click the Format menu item at the top of the screen instead.
-
5
Click Borders and Shading…. It’s at the bottom of the drop-down menu. A new window will open.
- On a Mac, you’ll find this option in the middle of the Format drop-down menu.
-
6
Select a border setting. In the left-most column, click the border option that you want to use. Select from: None, Box, Shadow, 3-D, and Custom.
- If you want a simple border to go all the way around your text, select Box.
-
7
Select a border style. In the «Style» column, scroll down until you find the border style you want to use, then click the style. Select from the various solid and dotted line styles.
- If needed, you can also change the border’s color and width from the Color and Width drop-down menus, respectively.
- To add a border with images, click the Art drop-down menu and select a design.
-
8
Select pages to use. If you created a new section earlier in this method, click the «Apply to» drop-down box, then click the section to which you want to apply the border in the resulting drop-down menu.
- To apply the border to the first page of your section, click This section — first page only in the drop-down menu.
-
9
Click OK. This will apply the border to your document’s specified page(s).
- Be sure to save your document when you’re finished.
- You can also use Microsoft Word to create a booklet or another handout flyer.


Advertisement
Add New Question
-
Question
How can I place a border around a picture I’ve inserted into a document?

You do what is shown above, but instead, you click on the picture before you go through the steps.
-
Question
How do I put a border around a table in Microsoft Word?
Go into Format —> Borders and Shading. There you’ll find options for borders you can apply to the table.
-
Question
What three options can I set regarding a picture border?
The three option you can set are: small, medium and large.
Ask a Question
200 characters left
Include your email address to get a message when this question is answered.
Submit
Advertisement
Thanks for submitting a tip for review!
About This Article
Thanks to all authors for creating a page that has been read 971,313 times.
Is this article up to date?
Updated: 05/16/2020 by

Microsoft Word gives you hundreds of page border options, allowing you to surround a page with a clean or fancy border, like a frame for a picture. You can also set a border to provide a shadow or 3D effect.
Add a border
- Open Microsoft Word.
- Click the Page Layout tab. In Word 2013 and 2016, click the Design tab instead.
- In the Page Background group, click the Page Borders option.
- In the Borders and Shading window (shown below), if not already selected, click the Page Border tab.
- Select Box if you want a square border around your page.
- Select the Style of border you want on the page, which can be solid, dotted, or dashed. Select the Color and Width of the border. If you want to select artwork to use as the border, click the down arrow for the Art drop-down menu. In the example below, we’re using the hearts art as a border.

Tip
By default, the borders are applied to the whole document, which means every page has the same border. Clicking the down arrow on Apply to gives you the option to select the first page only, selected page, all pages but the first page, and other options.
- Once you’ve selected all the border options you want to use in your document, click the OK button to apply the border.
Modify a border
- Open Microsoft Word.
- Click the Page Layout tab. In Word 2013 and 2016, click the Design tab instead.
- In the Page Background group, click the Page Borders option.
- In the Borders and Shading window (shown below), if not already selected, click the Page Border tab.
- Make the desired changes to the border that is currently set for the document or page. You can change the type of border in the Settings section, choosing from Box, Shadow, 3-D, or Custom. You can also change the style, color, and width of the order, and add or change art used in the border.
- When you have finished making the desired changes to the border, click the OK button to apply the changes.
Remove a border
- Open Microsoft Word.
- Click the Page Layout tab. In Word 2013 and 2016, click the Design tab instead.
- In the Page Background group, click the Page Borders option.
- In the Borders and Shading window (shown below), if not already selected, click the Page Border tab.
- Select None to remove any border on the page.
- Click the OK button to remove the border.
Add a border
- Open Microsoft Word.
- Click the Page Layout tab.
- In the Page Background group, click the Page Borders option.
- In the Borders and Shading window (shown below), if not already selected, click the Page Border tab.
- Select Box if you want a square border around your page.
Contents
- 1 How do you add a border in Word?
- 2 Where is the border in Microsoft Word?
- 3 How do you put a decorative border around text in Word?
- 4 How do you add a border in Word 2019?
- 5 How do you add a border in Word 2013?
- 6 How do I create an outline in Word?
- 7 How do I insert a border in Word 2016?
- 8 Can you put a border around a text box?
- 9 How do I insert a double lined border in Word?
- 10 How do I make an outline?
- 11 What is 1.5 spacing word?
How do you add a border in Word?
Create a Page Border in Word
- Open Word and click on the Design tab. Under Page Layout, click Page Borders. Click Page Border in the Borders and Shading window.
- Select the Custom option from the list of choices. This is when the real fun begins.
- Click OK to create the border.
Where is the border in Microsoft Word?
Microsoft Word will usually apply border styles to each page, but you can apply a page border to an individual page or exclude certain pages like your front page. To do this, enter the “Page Border” settings menu (Layout/Design/Page Layout > Page Borders) and click the “Apply To” drop-down menu.
How do you put a decorative border around text in Word?
Go to Home > Borders, and then open the menu of border choices.
Add a border to selected text
- Select a word, line, or paragraph.
- On the Home tab, click the arrow next to the Borders button.
- In the Borders gallery, click the border style that you want to apply.
How do you add a border in Word 2019?
Putting borders around a paragraph in Word 2019
- Place the insertion pointer in a paragraph.
- Click the Home tab.
- In the Paragraphs group, click the triangle next to the Borders command button. The Borders menu appears.
- Choose a border style from the menu.
How do you add a border in Word 2013?
Step 1: Open your document in Word 2013. Step 2: Click the Design tab at the top of the window. Step 3: Click the Page Borders button in the Page Background section of the navigational ribbon. The button is near the top-right of the window.
How do I create an outline in Word?
From within Word:
- Click Home and, in the Paragraph group, click the arrow next to Multilevel List.
- Choose an outline style from the List Library.
- Start typing to begin the list.
- To start a new list level, press the Tab key and begin typing.
- Press Enter to return to the previous list level.
How do I insert a border in Word 2016?
How to Add a Border to a Page in Word 2016
- Go to the Design tab and click the Page Borders button.
- Under Setting, choose which kind of border you want.
- On the Apply To drop-down menu, tell Word which page or pages in the document get borders.
- Select options to construct the border you want and then click OK.
Can you put a border around a text box?
Add a custom border
Right-click the text box, AutoShape, picture, or object that you want to add the border to. Select the appropriate Format