
To create a form in Word that others can fill out, start with a template or document and add content controls. Content controls include things like check boxes, text boxes, date pickers, and drop-down lists. If you’re familiar with databases, these content controls can even be linked to data.
Show the Developer tab
If the developer tab isn’t displayed in the ribbon, see Show the Developer tab.
Open a template or a blank document on which to base the form
To save time, start with a form template or start from scratch with a blank template.
-
Go to File > New.
-
In Search online templates, type Forms or the type of form you want and press ENTER.
-
Choose a form template, and then select Create or Download.
-
Go to File > New.
-
Select Blank document.
Add content to the form
Go to Developer, and then choose the controls that you want to add to the document or form. To remove a content control, select the control and press Delete. You can set properties on controls once inserted.
Note: You can print a form that was created using content controls, but the boxes around the content controls will not print.
In a rich text content control, users can format text as bold or italic, and they can type multiple paragraphs. If you want to limit what users add, insert the plain text content control.
-
Click or tap where you want to insert the control.
-
Select Developer > Rich Text Content Control
 or Plain Text Content Control .
 or Plain Text Content Control
  .
.To set specific properties on the control, see Set or change properties for content controls.
A picture control is often used for templates, but you can also add a picture control to a form.
-
Click or tap where you want to insert the control.
-
Select Developer > Picture Content Control
.
 .
.To set specific properties on the control, see Set or change properties for content controls.
Use building block controls when you want people to choose a specific block of text. For example, building block controls are helpful when you need to add different boilerplate text depending on the contract’s specific requirements. You can create rich text content controls for each version of the boilerplate text, and then you can use a building block control as the container for the rich text content controls.
-
Click or tap where you want to insert the control.
-
Go to DeveloperBuilding Block Gallery Content Control
(or Building Block Content Control). -
Select Developer and content controls for the building block.
 (or Building Block Content Control).
-
Click or tap where you want to insert the control.
To set specific properties on the control, see Set or change properties for content controls.
In a combo box, users can select from a list of choices that you provide or they can type in their own information. In a drop-down list, users can only select from the list of choices.
-
Go to Developer > Combo Box Content Control
or Drop-Down List Content Control . -
Select the content control, and then select Properties.
-
To create a list of choices, select Add under Drop-Down List Properties.
-
Type a choice in Display Name, such as Yes, No, or Maybe.
Repeat this step until all of the choices are in the drop-down list.
-
Fill in any other properties that you want.
Note: If you select the Contents cannot be edited check box, users won’t be able to click a choice.
 or Drop-Down List Content Control
  .
.-
Click or tap where you want to insert the date picker control.
-
Select Developer > Date Picker Content Control
.
 .
.To set specific properties on the control, see Set or change properties for content controls.
-
Click or tap where you want to insert the check box control.
-
Select Developer > Check Box Content Control
.
 .
.To set specific properties on the control, see Set or change properties for content controls.
Legacy form controls are for compatibility with older versions of Word and consist of legacy form and Active X controls.
-
Click or tap where you want to insert a legacy control.
-
Go to Developer > Legacy Forms
drop-down. -
Select the Legacy Form control or Active X Control that you want to include.
 drop-down.
Set or change properties for content controls
Each content control has properties that you can set or change. For example, the Date Picker control offers options for the format you want to use to display the date.
-
Select the content control that you want to change.
-
Go to Developer > Properties.
-
Change the properties that you want.

Add protection to a form
If you want to limit how much others can edit or format a form, use the Restrict Editing command:
-
Open the form that you want to lock or protect.
-
Select Developer > Restrict Editing.
-
After selecting restrictions, select Yes, Start Enforcing Protection.


Advanced Tip:
If you want to protect only parts of the document, separate the document into sections and only protect the sections you want.
To do this, choose Select Sections in the Restrict Editing panel. For more info on sections, see Insert a section break.

Show the Developer tab
If the developer tab isn’t displayed in the ribbon, see Show the Developer tab.
Open a template or use a blank document
To create a form in Word that others can fill out, start with a template or document and add content controls. Content controls include things like check boxes, text boxes, and drop-down lists. If you’re familiar with databases, these content controls can even be linked to data.
-
Go to File > New from Template.
-
In Search, type form.
-
Double-click the template you want to use.
-
Select File > Save As, and pick a location to save the form.
-
In Save As, type a file name and then select Save.

-
Go to File > New Document.
-
Go to File > Save As.
-
In Save As, type a file name and then select Save.

Add content to the form
Go to Developer, and then choose the controls that you want to add to the document or form. To remove a content control, select the control and press Delete. You can set Options on controls once inserted. From Options, you can add entry and exit macros to run when users interact with the controls, as well as list items for combo boxes, .
-
In the document, click or tap where you want to add a content control.
-
On Developer, select Text Box, Check Box, or Combo Box.
-
To set specific properties for the control, select Options, and set .
-
Repeat steps 1 through 3 for each control that you want to add.

Options let you set common settings, as well as control specific settings. Select a control and then select Options to set up or make changes.
-
Set common properties.
-
Select Macro to Run on lets you choose a recorded or custom macro to run on Entry or Exit from the field.
-
Bookmark Set a unique name or bookmark for each control.
-
Calculate on exit This forces Word to run or refresh any calculations, such as total price when the user exits the field.
-
Add Help Text Give hints or instructions for each field.
-
OK Saves settings and exits the panel.
-
Cancel Forgets changes and exits the panel.
-
-
Set specific properties for a Text box
-
Type Select form Regular text, Number, Date, Current Date, Current Time, or Calculation.
-
Default text sets optional instructional text that’s displayed in the text box before the user types in the field. Set Text box enabled to allow the user to enter text into the field.
-
Maximum length sets the length of text that a user can enter. The default is Unlimited.
-
Text format can set whether text automatically formats to Uppercase, Lowercase, First capital, or Title case.
-
Text box enabled Lets the user enter text into a field. If there is default text, user text replaces it.
-
-
Set specific properties for a Check box.
-
Default Value Choose between Not checked or checked as default.
-
Checkbox size Set a size Exactly or Auto to change size as needed.
-
Check box enabled Lets the user check or clear the text box.
-
-
Set specific properties for a Combo box
-
Drop-down item Type in strings for the list box items. Press + or Enter to add an item to the list.
-
Items in drop-down list Shows your current list. Select an item and use the up or down arrows to change the order, Press — to remove a selected item.
-
Drop-down enabled Lets the user open the combo box and make selections.
-
-
Go to Developer > Protect Form.
Note: To unprotect the form and continue editing, select Protect Form again.
-
Save and close the form.

If you want, you can test the form before you distribute it.
-
Protect the form.
-
Reopen the form, fill it out as the user would, and then save a copy.
Show the Developer tab
-
On the right side of the ribbon, select
, and then select Ribbon Preferences. -
Under Customize, select Developer .
 , and then select Ribbon Preferences.
Open a template or a document on which to base the form
You can start with a blank document and create your own form. Or, to save time, you can start with a form template.
-
Go to File > New from Template.
-
In the left pane, expand Online Templates, and then select Forms.
-
Double-click the form template that you want to use.
Add content controls to the form
-
In the document, click where you want to add the control.
-
On the Developer tab, under Form Controls, select Text Box, Check Box, or Combo Box.
-
To set specific properties for the control, select Options, and then configure the properties that you want.
Note: To create a list of drop-down items in a combo box, select the combo box placeholder, click Options, and then add the items that you want to appear in the drop-down list.
-
Repeat steps 1 through 3 for each control that you want to add.
Add instructional text (optional)
Instructional text (for example, «Type First Name») in a text box can make your form easier to use. By default, no text appears in a text box, but you can add it.
-
Select the text box control that you want to add instructional text to.
-
On the Developer tab, under Form Controls, select Options.
-
In Default Text, type the instructional text.
-
Make sure that Fill-in enabled is selected, and then select OK.
Protect the form
-
On the Developer tab, under Form Controls, select Protect Form.
Note: To unprotect the form and continue editing, click Protect Form again.
-
Save and close the form.
Test the form (optional)
If you want, you can test the form before you distribute it.
-
Protect the form.
-
Reopen the form, fill it out as the user would, and then save a copy.
Creating fillable forms isn’t available in Word for the web.
You can create the form with the desktop version of Word with the instructions in Create a fillable form.
When you save the document and reopen it in Word for the web, you’ll see the changes you made.
In the previous post in this series, I talked about selecting a Word template to be analyzed and documented. I actually skipped a step—initiating the analysis and reporting process. If I were creating this template analysis macro just for myself, I could just put the code in the code module of a document and write the code to prompt me to select options during execution. If I gave the code for anyone else to use, they would open up a blank Word document and possibly spend a few minutes poking around in the Developer tab to figure out what’s there and how to use it. Or maybe they would just assume it’s an ordinary blank document and delete it.
Alternatives
What I’m imagining is a Word template analysis macro that:
- Asks the user to select a Word template (using the familiar Open Document dialog). This is the piece i provided in the previous post.
- Asks the user to select which template components to analyze and what level of detail to go to in analyzing each component.
- Generates an analysis report that the user can then use as the basis of a style guide or business continuation plan.
My typical approach would be to create a user form that is displayed when the document is opened. The form would provide initial instructions, collect some input from the user, and provide command buttons to start the process or cancel the operation. Since I’m developing this tool incrementally, that approach would probably involve creating multiple user forms that are displayed in succession as each component of the selected template is analyzed.
Another approach, one that I have never tried before, would be to turn the Word document that includes the macro code into a form that user fills out. The form would provide instructions, use content controls to enable the user to select options, and a button to initiate the analysis and report generation process. As I add procedures to the macro to analyze each template component, I could add a corresponding section to the form. And that’s what I’m going to do.
Creating a Form in Word
I’ve seen forms created in Word, I’ve just never had the need to create one. The first step is quite familiar, however: put a title at the top of the page and add an introductory paragraph. I’ll tell the user to select options in the sections below, then click a button to initiate the analysis and generate a report. So the next step is to insert the button. Interestingly, the current set of content controls that Word provides for creating forms doesn’t include a button control. Nor does the set of “legacy” form controls. If you want to put a button on your form to execute a macro to process user input, you need to use 1996-vintage ActiveX controls.
ActiveX Command Button Control

Apparently, the current paradigm for Word forms is that the form is distributed to users, who fill out the form. The form is then collected via email, saved to a shared folder, or compiled in a database. That’s not our paradigm.
So here’s what we have so far: a title, instructions, and a button.
Form Instructions

CheckBoxes
Next, we’ll have the user select options for the document properties part of the template analysis report. As you may recall from a previous post on document properties, Word documents and templates have built-in document properties and possibly some custom document properties. Each property has a name, type, and value. And, as you may recall from another previous post, there is a fairly useless type of custom document property called a content-linked property where the type is Number and the value (which Word calls the Source) is a bookmark in the document. The document property section of our Word template report will also document any content-linked properties included in the template under analysis, on the remote chance someone has found a use for them.
Our document properties report could just be one big table with all the built-in and custom document properties, with columns for the name, type, and value for each one. This would be a reasonable approach, since the user will presumably need to edit the generated report. But we can be a little more helpful than that. In some cases, the user may know that there is no interesting data stored in the built-in document properties, but there are some custom document properties used for a significant purpose in the template. Maybe they just want a minimal report that lists all document properties by name. Maybe they want a column where they can put a description of significant document properties.
We can let the user select options using checkboxes.
Checkbox, Checkbox, Checkbox
But which kind of checkbox? If you look at the ActiveX Command Button Control figure above, you’ll see that the current set of content controls includes a checkbox, the legacy form controls include a checkbox, and the ActiveX controls include a checkbox. As far as the user is concerned, they are all a box they can click in to select or decline an option. In terms of appearance, the current content control is more flexible, giving you lots of options for checked and unchecked symbols, colors, or fonts. You can also apply styles to format text associated with the checkbox. The legacy form checkbox looks like this  when the box is checked. The ActiveX checkbox looks like this:
  .
.
Programmatically, the different types of checkboxes behave differently, which will probably determine which type you select.
The Content Control Checkbox
The current content control checkbox has a title and tag associated with it.
Checkbox Content Control

When you want to get the checked or unchecked status of a checkbox in your code, you will use either Document.SelectContentControlsByTitle or Document.SelectContentControlsByTag to reference the checkbox, then get the value of its Checked attribute. Notice the use of the plural. Multiple content controls can have the same title or tag, and the Select functions return a collection of all the controls that meet the specified criteria. If you want to get the status of one particular checkbox, you will have to ensure that either the title or tag are unique.
The Legacy Form Checkbox
Legacy form controls have a bookmark associated with them that uniquely identifies each control.
Legacy Form Checkbox Properties

To get the checked status of a checkbox, you can reference it by the bookmark name: Document.FormFields("Check1").CheckBox.Value. As you can see above, you can associate macros with Entry and Exit events for the control. The Entry and Exit events are triggered when form fields get the focus or lose focus to other fields on the form. You can use these events to display instructions associated with a field or to validate input.
The ActiveX Checkbox
ActiveX checkboxes may look a little primitive, but they’re quite powerful and flexibile. Each ActiveX control has a set of 10-50 properties that modify the control’s appearance and about a dozen event handlers that can be used to modify the control’s behavior. In the case of a checkbox, the Change event handler (which is called whenever the user clicks the checkbox to change its state) is particularly useful. I considered giving the form some fancy behavior, like graying out a table column when the user unchecks its checkbox.
Using an ActiveX Checkbox to Change Document Appearance

Document Properties Section of the Form
Rather than trying something fancy, I opted for simplicity and decided to use the checkbox content control, instead of the legacy or ActiveX checkboxes. The Document Properties section of the Template Analysis document just has a couple tables, each with five checkboxes.
Document Property Option Selection

The Built-in Document Properties and Custom Document Properties checkboxes will be used to specify which set(s) of document properties will be included in the analysis report, and the checkboxes at the top of each column will specify which columns to include in the report tables.
We’ll need to set some properties for each checkbox to enable us to reference the checkbox from our macro code and to tweak its appearance and behavior. To set the properties for a checkbox, click on it to select it, then click Properties in the Controls group on the Developer tab. The properties we are interested in are Title, Tag, and Contents cannot be edited.
Checkbox Properties

We need to assure that either the Title or Tag are unique values, so we can query the status of each checkbox from our code. The Tag is the best choice for this, because the Title is displayed when the user is filling out the form, so it can be used like a tooltip.
Checkbox Title Displayed When Form is Filled Out

Here are the significant properties for each of the checkboxes in the Document Properties section.
| Checkbox Title | Tag | Contents cannot be edited |
|---|---|---|
| Show Built-in Document Properties | chkDocProps | False (unchecked) |
| Built-in Property Name | chkPropsName | True (checked) |
| Built-in Property Type | chkPropsType | False |
| Built-in Property Value | chkPropsValue | False |
| Built-in Property Description | chkPropsDescription | False |
| Show Custom Document Properties | chkCustomDocProps | False |
| Custom Property Name | chkCustomName | True |
| Custom Property Type | chkCustomType | False |
| Custom Property Value | chkCustomValue | False |
| Custom Property Description | chkCustomDescription | False |
We want to restrict editing of the Property Name controls, because they are required to be included in the analysis report.
Restricting Editing
The design of the Document Properties section of our Template Analysis form is done, so now we can test its behavior. The idea behind using a form is to have the user just make the relevant entries and not change other parts of the form in any way. You do that by clicking Restrict Editing on the Developer tab.
Restricting Editing of a Form Document

There are several restriction options in the drop-down menu, all the way to making the document read-only. The one we want is Filling in forms. When that option is selected and you click to start enforcing protection, the user can only edit content controls. In the current state of our template analysis form, all they will be able to do is click checkboxes and the Generate Report button. You can optionally enter a password to ensure that the user can’t make any changes to the form, or just restrict editing without entering a password, in which case the form would just be protected against accidental changes.
A Little Code
The template analysis document will eventually have a lot of code associated with it, but for now we just have a few short segments. The declarations segment declares Document objects for the three main documents we’ll be working with—the startup form document that provides instructions and gets user input to initiate the analysis, the template to be analyzed, and the analysis report that will be generated.
Declarations
Option Explicit
Public docStartup, docTemplate, docReport As Document
Word calls the btnGenerateReport_Click procedure when the user clicks the button in the form document to generate the report. We could put the code to start the analysis and reporting here, but we’ll move that code to a separate procedure and just have the Click procedure call it.
btnGenerateReport_Click Procedure
Private Sub btnGenerateReport_Click()
    Call DocumentWordTemplate
End Sub
And finally, the DocumentWordTemplate procedure, which:
- Creates the report document.
- Calls the
OpenTemplatefunction (which was provided in the previous post in this series) that allows the user to select the template to be analyzed. - Generates the title to go at the top of the report.
- Calls the procedure that executes the document properties phase of the analysis.
DocumentWordTemplate Procedure
Public Sub DocumentWordTemplate()
    'Save a reference to the Analysis document, where options were selected
    '    We could just use ThisDocument, but it could get confusing whether ThisDocument
    '    refers to the startup document, the template, or the generated report
    Set docStartup = ThisDocument

    'Create the report document
    Set docReport = Application.Documents.Add("Normal.dotm", vbFalse, wdNewBlankDocument)

    'Select the template to be analyzed
    Set docTemplate = OpenTemplate()

    If docTemplate Is Nothing Then
        MsgBox ("Canceled by user")
        Exit Sub
    End If

    docReport.Activate

    Selection.InsertBefore ("Documentation for Microsoft Word template: " & docTemplate.Name & vbCrLf & vbCrLf)
    With Selection.Font
        .Bold = True
        .Name = "Calibri"
        .Size = 18
    End With
    Selection.Collapse (wdCollapseEnd)

    Call DocumentPropertiesReport
End Sub
The End of the Beginning
All of this so far has just been preliminaries. The penultimate line in the code segment above gives away what comes next. We’ll actually start looking at the document properties in a Word template and reporting on what we find.
You can use Word to create interactive digital forms that other people can fill out on their computers before printing or sending them back to you. It takes a little preparation but keeps you from having to decipher messy handwriting! Some of the tools you will use when creating a form include:
- Templates: Forms are normally saved as templates so that they can be used again and again.
- Content controls: The areas where users input information in a form.
- Tables: Tables are often used in forms to align text and form fields, and to create borders and boxes.
- Protection: Users can complete the form fields without being able to change the form’s text and/or design.
Show the Developer Tab
Before you can create a form, you’ll need to turn on the Developer tab to get access to the advanced tools.
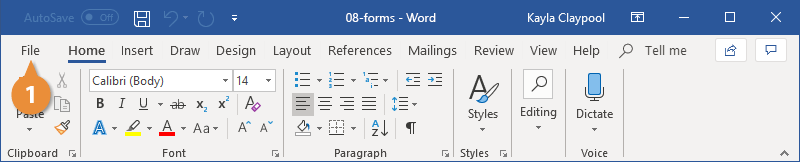
- Click the File tab.

- Select Options.

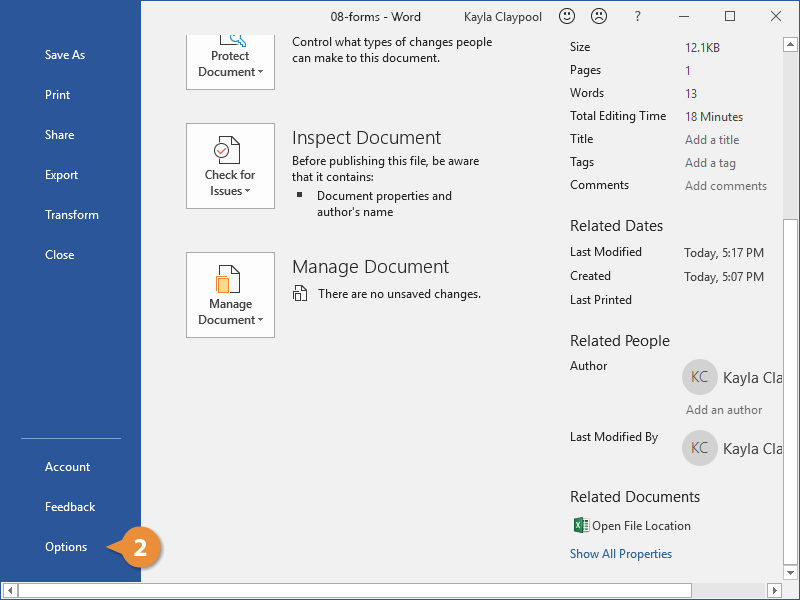
The Word Options window opens.
- Click the Customize Ribbon tab on the left.
The column on the right controls which ribbon tabs are enabled.
- Check the Developer check box.
- Click OK.
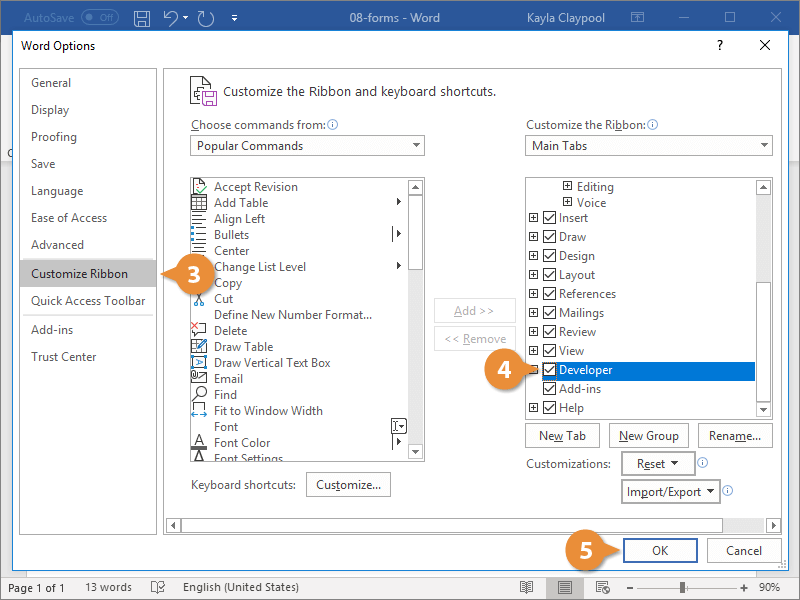
The Developer tab now appears on the ribbon. In addition to advanced tools for macro recording, add-ins, and document protection, we now have access to form controls.
Create a Form
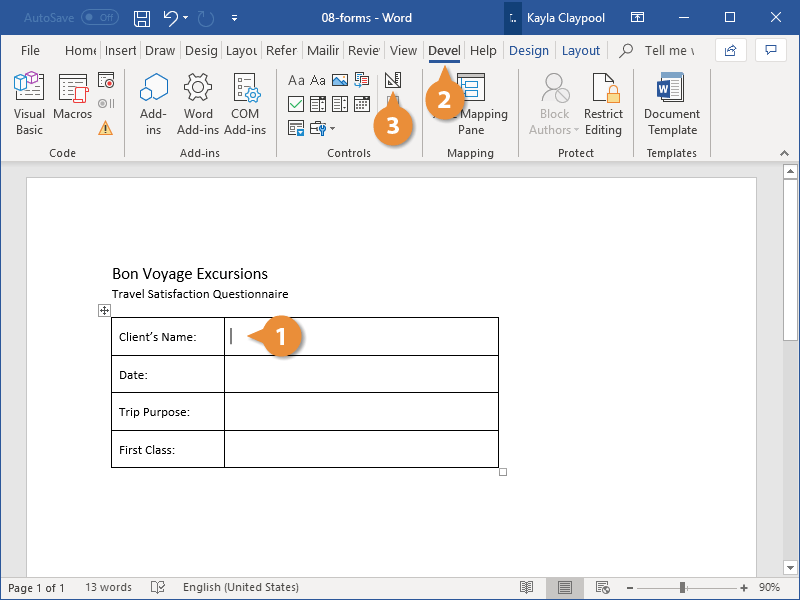
Once you’ve enabled the Developer tab, and created the layout and structure of the form, you can start adding form fields to your document with Content Controls.
- Place the text cursor where you want to insert the form field.
- Click the Developer tab on the ribbon.
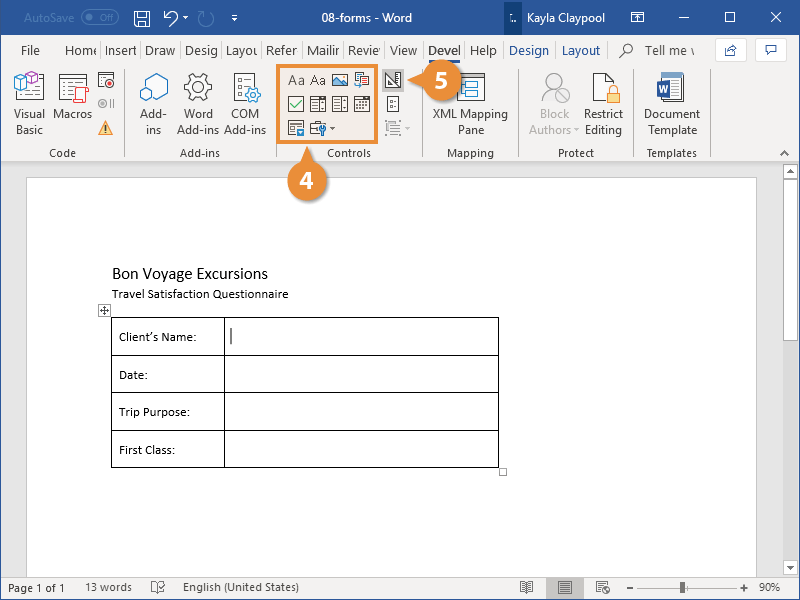
The Controls group contains the different kinds of content controls you can add to a form, as well as the toggle button for Design Mode.
- Click the Design Mode button in the controls group.
While Design Mode is active, controls you insert won’t be active, so clicking a check box to move it around won’t also check it. You can also customize placeholder text for some controls.
- Click a Content Control buttons to insert the selected type of control.
The content control is inserted.
Select a form field and click the Properties button on the ribbon to edit a control’s options. Depending on the type of control you’ve inserted, you can change its appearance, set up the options in a list, or lock the control once edited.
- When you’re done, click the Design Mode button again to exit Design Mode.
You leave Design Mode, and the content controls that you’ve inserted can now be used.
Types of Form Controls
There are many different types of form controls you can add to a form that will allow people to add different types of responses.
Finalize a Form
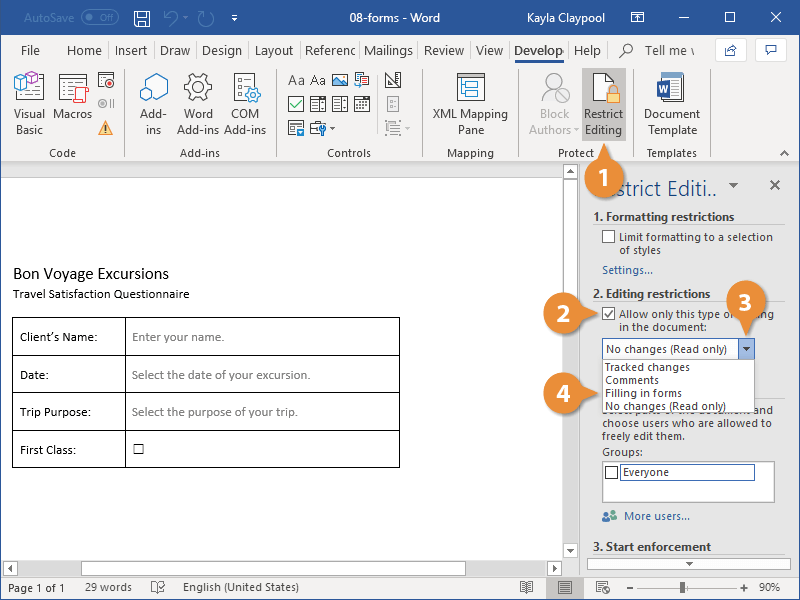
When you’re ready to distribute a form so others can fill it out, you can restrict the form so that content controls cannot be removed or changed by those filling it out.
- Click the Restrict Editing button on the Developer tab.
The Restrict Editing pane appears on the right.
- Check the Editing restrictions check box.
- Click the Editing restriction list arrow.
- Select Filling in forms.
When this option is enabled, the only change that anyone else can make to this document is the filling in of form fields. They won’t be able to move, delete, or edit the fields themselves until protection is turned off.
- Click the Yes, Start Enforcing Protection button.
A password is not required to start enforcing protection, but you can add one if you’d like to prevent just anyone from turning this protection off.
- Enter a password (optional), then click OK.
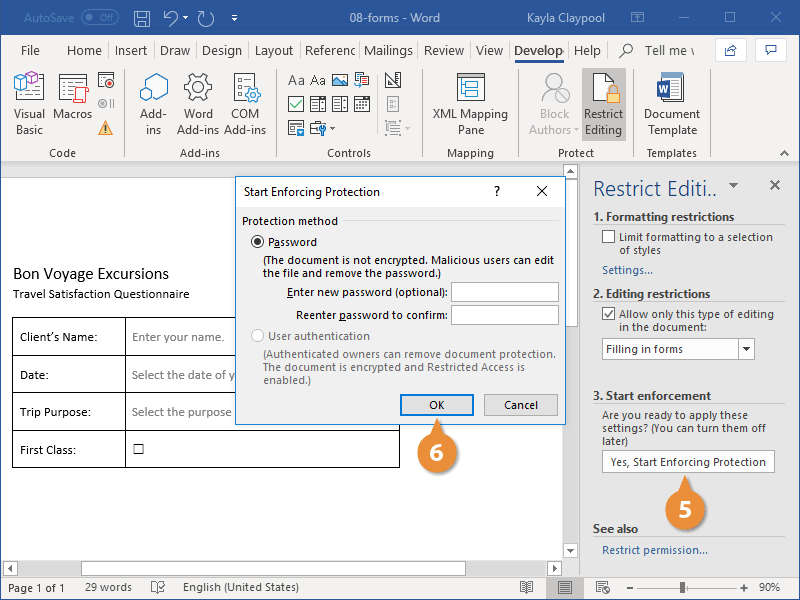
The document is now restricted, and anyone you send it to will only be able to fill in the forms.

FREE Quick Reference
Click to Download
Free to distribute with our compliments; we hope you will consider our paid training.
If you’re about to give out forms in digital format to your target audience in order get them filled, you should consider adding check-boxes, drop-down menus, combo boxes and other types of controlled input elements that may help users in filling out forms without any issues. The input controlled-powered forms save the time that users would’ve spent understanding the required syntax of the answers. Word 2013 offers a variety of such forms input controls for creating forms without the need of having to use any specialized tool set or knowledge in programming languages. In this post, we will guide you through the process of creating simple data entry forms in Word 2013.
Word 2013 supports numerous form controls and other complementary elements that are used to make one professional user data entry form, but all these controls are not visible in default UI setup. So, before you begin, enable the Developer tab on the ribbon to access the form controls. To do so, head over to File–>Options to open Word Options window. Now, choose Customize Ribbon option from left side, check the Developer box and then click OK to enable it on the ribbon.

You will see a newly added Developer tab on the ribbon. Navigate to the tab to access form controls and many other developer-related features.
Create a Simple Form
Type in the simple form details shown in the screenshot below.

Adding Rich Text Menu
For the name option, we will use the ‘Rich Text’ feature. Place your cursor besides the name text and click the Rich Text Content Control icon inside the Controls section. While having the tag selected, click the Design Mode button. This will let you change the text of the screen tip(tag) according to your liking. We entered the phrase “Please type your full name.”, as shown in the following screenshot.

Adding a Checkbox Menu
We will use the Checkbox Content Control feature for the gender option in our form. Type in ‘Male’ and while placing the cursor in front of it, click the checkbox icon on the developer panel. Repeat the same procedure with the Female gender option.

Adding a Drop Down List Menu
We will use Drop Down List control for the Profession option. Hit the drop down icon in the controls menu. Now keeping the tag selected, click the Properties option in the Controls menu. Under Drop Down List Properties, start adding your desired options. Select OK to confirm the changes. You will see new options in your drop down menu.

Adding a Date Picker Menu
In order to let users easily select the date, you can use the Date Picker Content Control option. Simply place your cursor in next to Date text and select ‘Date Picker Content Control’ option from the Controls menu. You can select the date picker tag and go to its properties section to select the type of date format you want.

Protect Your Form
What’s the point of creating a form if anyone having access to the file can easily modify it? To protect your template from unwanted changes, move to Protect section in the Developer tab and select Restrict Editing. A new menu will pop-up, letting you choose Filling in forms option from the drop down menu. Now click Yes, Start Enforcing Protection to protect your form from unauthorized access. You will be asked to type in a password. However, if you don’t want to password-protect the form, simply ignore it by clicking OK and you’re done!

Saving Your Form
It’s recommended to save your Form as a template (.dotx) rather than a normal Word document (.docx). In order to do that, Head over to FILE –>Save As and select Word Template (.dotx) from the Save as type drop down menu. Type in the name for the document and select Save to save the form at specified location.
While the above guide may only help you create simple user data entry forms, you can further explore the form controls and even make use of VB code editor to include more input restrictions and customize native form controls.
Author: Bilal Ibrar
A marketing graduate with a passion for writing on topics related to social media, technology and business in general. Hobbies include gaming, animation and motorsports
Продолжаем серию заметок по теме автоматизации документов.
Сегодня я расскажу, как добавить к вашим документам специальную форму, с помощью которой можно легко и просто вводить данные в документ. Введенные в форму данные адресата по нажатию кнопки на форме будут автоматически внесены в документ.
Предполагается, что у вас есть готовый шаблон документа, например, письма. В качестве образца можно использовать подготовленный мною шаблон официального письма вымышленной организации.
Использование шаблона необходимо, ведь на его основе вы в дальнейшем будете создавать свои документы.
Распакуйте файл из архива и поместите его в папку с шаблонами редактора Word. Как правило, эта папка находится по адресу: C:Documents and SettingsИМЯ_ПОЛЬЗОВАТЕЛЯApplication DataMicrosoftШаблоны.
Итак, шаблон документа у нас есть, открыт и готов к изменению. В первую очередь нам необходимо добавить закладки в те позиции в документе, куда вы собираетесь вставлять данные из формы. Как правило, письмо должно содержать фамилию, имя и отчество адресата, наименование организации адресата, полный почтовый адрес и приветствие.
Исходя из этого мы добавим в документ следующие закладки:
- name
- company
- address
- date
- salutation
Обратите внимание, реквизитов адресата, которые должно содержать письмо, на самом деле может быть много, а закладок мы определили всего пять. Это логично, так как в дальнейшем мы будем подставлять несколько реквизитов к одной закладке (например, адрес, который будет состоять из индекса, названия города, области, улицы).
После добавления закладок (и если у вас включен режим отображения меток закладок), наш документ будет выглядеть примерно как на рисунке ниже (щелкните по картинке для ее увеличения):

Эти метки закладок после нажатия кнопки «Внести данные» будут заменены на конкретные тексты.
Не забывайте сохранять сделанные вами изменения в шаблоне на всякий «пожарный» случай.
На втором шаге мы создадим специальную форму с текстовыми полями, которая будет открываться при создании каждого нового документа на основе вашего шаблона письма. Кратко расскажу, как добавить в шаблон форму.
- Откройте редактор Visual Basic с помощью сочетания клавиш «Alt»+«F11». Убедитесь, что в окне проектов выделен ваш шаблон:
- В меню Insert выберите команду UserForm. В окне проектов будет создан новый объект Forms с пустой формой или просто добавлен в проект модуль userForm.
- Разместите на форме необходимые элементы. Например, как на рисунке ниже:
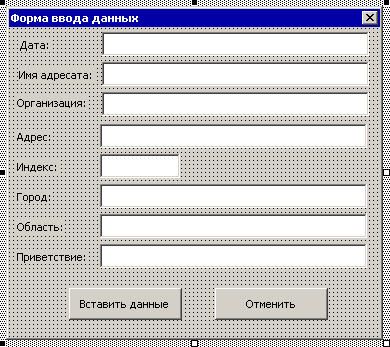
Текстовые поля (со стандартными именами TextBox1) были мною переименованы с учетом их назначения. Обратите внимание в нижеприведенном коде, как они теперь называются.
Третий шаг — написание кода для элементов нашей формы.
- В меню Insert выберите команду Module. В окне проектов будет создан новый модуль Module1. Дважды щелкните по модулю и перейдите в окно редактирования кода. Вставьте следующий код:
- Перейдите на модуль UserForm1. Переименуйте его в MyForm.
- Нажмите клавишу «F7» и в окне редактора кода вставьте следующий код (содержит процедуры для действий с элементами формы):
- Ниже этого кода вставьте следующий код:
- Сохраните проект и попробуйте создать на основе вашего шаблона новый документ. Введите необходимые данные в поля формы и нажмите кнопку «Внести данные».
Sub AutoNew()
Dim oF As MyForm
Set oF = New MyForm
oF.Show
Set oF = Nothing
End Sub
Этот код запускает форму каждый раз при создании нового документа на основе вашего шаблона.
Private Sub CommandButton1_Click()
'Действия формы по нажатию кнопки "Ввести данные"
Dim bm As Bookmarks
Dim rng As Word.Range
Dim addr As String
Dim sText As String
Dim sResult1 As String
Dim sResult2 As String
Dim arName() As String
Set bm = ActiveDocument.Bookmarks
sText = Me.tbName.Text  'присваиваем переменной текст из текстового поля "Имя адресата"
arName = Split(sText)   'создаем массив из отдельных слов, вместе составляющих ФИО адресата
'Действия с полем "Дата"
With Me.tbDate
   If Not IsDate(.Text) Then  'если данные введены не в формате даты, то
      MsgBox "В поле ""Дата"" неверно введены данные."   'выводим сообщение
      .Text = Format(Now, "dd MMMM yyyy") 'автоматически заполняем поле текущей датой
      .SetFocus   'фокус на поле "Дата"
      .SelStart = 0  '
      .SelLength = Len(.Text) 'выделяем весь текст в поле, начиная с левого края
      Exit Sub
   Else
      Set rng = bm("date").Range 'присваиваем переменной rng ссылку на закладку "date"
      rng.Text = .Text & " г."   'определяем новый текст закладки
      bm.Add "date", rng   'заменяем закладку
   End If
End With
Set rng = bm("name").Range 'присваиваем переменной rng ссылку на закладку "name"
sResult1 = arName(0) & " " 'присваиваем переменной значение первого слова из поля "Имя адресата" и добавляем пробел
sResult1 = sResult1 & Left(arName(1), 1) & ". " 'добавляем к первому слову первую букву Имени и точку
sResult1 = sResult1 & Left(arName(2), 1) & "."  'добавляем первую букву Отчества и точку
rng.Text = sResult1  'определяем новый текст закладки
bm.Add "name", rng   'заменяем закладку
Set rng = bm("company").Range 'присваиваем переменной rng ссылку на закладку "company"
rng.Text = Me.tbCompany  'определяем новый текст закладки
bm.Add "company", rng   'заменяем закладку
If Len(sText) > 0 Then  'если в поле "Имя адресата" есть какие-то символы, то
    sText = sResult1 & vbCr   'присваиваем переменной текст закладки "name" и переводим строку
End If
If Len(Me.tbCompany.Text) > 0 Then  'если в поле "Организация" есть какие-то символы, то
   Me.tbCompany.Text = Me.tbCompany.Text & vbCr   'присваиваем переменной текст из поля и переводим строку
End If
If Len(Me.tbAddress.Text) > 0 Then  'если в поле "Адрес" есть какие-то символы, то
   Me.tbAddress.Text = Me.tbAddress.Text   'присваиваем переменной текст из поля
End If
If Len(Me.tbIndex.Text) > 0 Then 'если в поле "Индекс" есть какие-то символы, то
   Me.tbIndex.Text = Me.tbIndex.Text & ","    'присваиваем переменной текст из поля и добавляем запятую
End If
If Len(Me.tbCity.Text) > 0 Then  'если в поле "Город" есть какие-то символы, то
   Me.tbCity.Text = Me.tbCity.Text & "," 'присваиваем переменной текст из поля и добавляем запятую
End If
If Len(Me.tbOblast.Text) > 0 Then   'если в поле "Область" есть какие-то символы, то
   Me.tbOblast.Text = Me.tbOblast.Text & "," 'присваиваем переменной текст из поля и добавляем запятую
End If
'присваиваем переменной фрагментов текста из полей "Индекс", "Город", "Область" и "Адрес"
addr = Me.tbIndex.Text & " " & Me.tbCity.Text & " " & Me.tbOblast.Text & " " & Me.tbAddress.Text
Set rng = bm("address").Range 'присваиваем переменной rng ссылку на закладку "address"
rng.Text = addr   'определяем новый текст закладки из переменной addr
bm.Add "address", rng   'заменяем закладку
Set rng = bm("salutation").Range 'присваиваем переменной rng ссылку на закладку "salutation"
rng.Text = Me.tbSalutation.Text  'определяем новый текст закладки
bm.Add "salutation", rng   'заменяем закладку
Unload Me   'Закрываем форму
ActiveDocument.Range.Fields.Update  'Обновляем все поля в документе
End Sub
Private Sub CommandButton2_Click()
'Выход из формы и закрытие окна документа при нажатии кнопки "Отменить"
On Error GoTo ErrLabel
Unload Me    'Закрываем форму
ActiveDocument.Close  'Закрываем текущий документ
ErrLabel:
End Sub
Private Sub tbIndex_Exit(ByVal Cancel As MSForms.ReturnBoolean)
'Устанавливаем правила заполнения поля "Индекс"
With Me.tbIndex
   If Not IsNumeric(.Text) Or Len(.Text) <> 6 Then 'если в поле "Индекс" данные не цифры и меньше 6, то
      MsgBox "Ошибка!" & " " & "Введите 6 цифр индекса города или района." 'выводим сообщение
      Cancel = True  'возвращаемся к полю
      .Text = ""  'очищаем поле
      .SetFocus
   End If
End With
End Sub
Private Sub tbName_Exit(ByVal Cancel As MSForms.ReturnBoolean)
'При выходе из поля "Имя адресата" его имя подставляется в поле "Приветствие"
sText = Me.tbName.Text
arName = Split(sText)
sResult2 = arName(1) & " "
sResult2 = sResult2 & arName(2)
Me.tbSalutation = "Уважаемый " & sResult2 & "!"
End Sub
Private Sub UserForm_Initialize()
Me.tbDate = Format(Now, "dd MMMM yyyy")
With Me.tbName
   .Text = "Фамилия Имя Отчество"
   .SetFocus
   .SelStart = 0
   .SelLength = Len(.Text)
End With
End Sub
Вы можете скачать уже готовый шаблон письма и подредактировать его под свои нужды.
В этом шаблоне есть небольшой недостаток: в текстовые поля нужно вводить информацию в правильном формате и регистре, иначе в итоговом письме придется вручную править недочеты.
Образцом для шапки шаблона послужила картинка из шаблона городского письма редактора Word 2007.
Образцом кода для данного макроса и формы послужила заметка Gregory Maxey Address a Letter Using as UserForm.