
In this Article
- VBA UserForms
- Built in VBA UserForms
- Message Box
- Input Box
- Get Open Filename
- Excel Default Dialogs
- Inserting a New User Form
- Using the Toolbox
- Adding an Exit Button to Your Form
- Adding a Label Control to a Form
- Adding a Text Control to the Form
- Initialize and Activate Events on a Form
- Saving Your Application and Forms
- Modal and Non-Modal Forms
- Closing a Form
- Enabling and Disabling Controls
This tutorial will discuss VBA UserForms.
VBA UserForms
The Userform is a very important part of programming in VBA. It allows you to build a professional looking user interface to communicate with the users of your VBA application. It also allows you to totally control the user in what they are doing to your workbook.
You can, of course, use worksheet cells to accept parameters from the user, but the userform produces a far better user experience.
By expanding the height and width of your userform to the size of the Excel window, you can make your application look like a normal Windows application, with the user being totally unaware that they are using Excel as the host.
All the normal Windows controls, such as drop downs, list boxes, tick boxes are available to you. You also have a huge range of methods, events and properties to use to enhance the user experience.
An important point is that when you display a userform that is built in or is modal, you cannot edit your code in the VBE nor access any Excel functionality. Only when the form is closed will the cursor appear in your code.
Built in VBA UserForms
Excel VBA as several built-in forms that can be used to communicate with the user.
Message Box
This is the most commonly used form in VBA. It simply displays a text message, possibly informing a user that they have entered invalid input or that a VBA process has finished running. In their simplest form, they display a text string, but you can also add an icon such as a question or exclamation mark, and give the message box a different title.
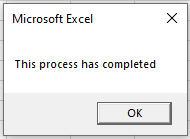
This is a basic example. There is only one button to click, and the title bar says ‘Microsoft Excel’
The code to produce this is very straightforward:
Sub TestMsgBox()
MsgBox "This process has completed"
End Sub
You can use different parameters to add buttons, icons, and change the title bar
Sub TestMsgBox()
Dim Ret As Variant
Ret = MsgBox("Are you sure?", vbYesNo Or vbQuestion, "My Application")
If Ret = vbYes Then
    'Your process here
Else
    Exit Sub
End If
End Sub
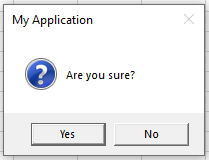
This code adds in a ‘Yes’ and ‘No’ button and a question mark icon, and sets the title bar. Note that you can combine the styles of the message box by using the ‘Or’ operator
Also, when you are returning a value from a message box, the return variable must be defined as a variant or vbMsgBoxResult, and the message box statement must use brackets,
Input Box
There is a very simple input box built into VBA, although it is quite restrictive in what you can do with it. If you can, it is better to design a custom userform
Sub TestInputBox()
Dim Ret As String
Ret = InputBox("Please enter your name", "Enter Name")
MsgBox Ret
End Sub
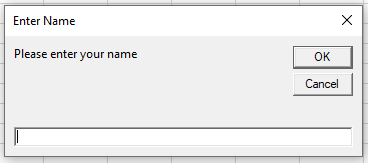
You can also add a default value for the input into the parameters.
Get Open Filename
This allows you to utilize the Windows file dialog within your VBA code. It looks very impressive to the user when it is running, but it is very simple to incorporate and you automatically get all the file dialog functionality with it.
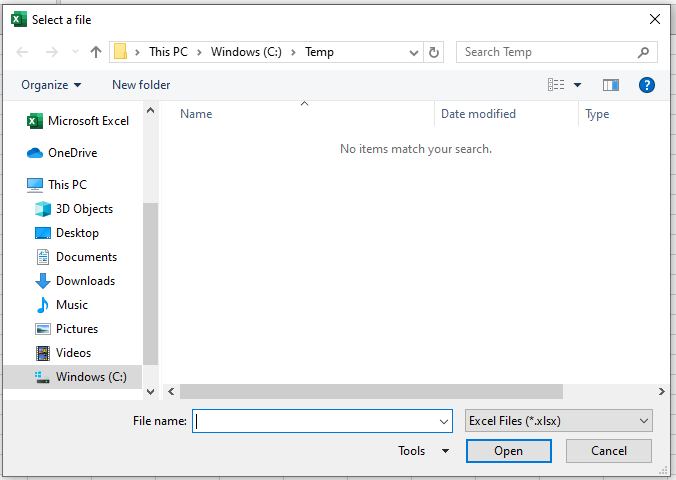
The code restricts the user to only see Excel files. Unfortunately, they could type in a non-Excel filename into the File name box, and click the open button, so you would need some code to ensure that an Excel file has been selected.
Use the ‘ChDir’ command to change the default directory to your own requirements before displaying the file dialog
Note the use of wildcards in the FileFilter parameter. The Excel files to display could be pre 2007, have macros, or be binary so the filter is ‘.xls*’.
Sub TestFileDialog()
Dim MyFile As String
ChDir "C:temp"
MyFile = Application.GetOpenFilename("Excel Files (*.xls*),*.xls*", , "Select a file")
MsgBox MyFile
End Sub
If required, you can allow the user to select several files at once by using the MultiSelect parameter. The default is False (single select only)
Sub TestFileDialog()
Dim MyFile As Variant
ChDir "C:temp"
MyFile = Application.GetOpenFilename("Excel Files (*.xls*),*.xls*", , "Select a file", , True)
For Each f In MyFile
    MsgBox f
Next f
End Sub
The user holds down the Shift key in the file dialog to select multiple files.
The For Each loop displays the full path and name of each file selected
Excel Default Dialogs
Within Excel VBA, there is a Dialogs collection which you can use to display any standard Excel dialog. The downside is that you cannot access the parameters that the user has chosen or change the appearance of the dialog, but these dialogs can be useful in directing the user to a standard Excel function, and allowing them to choose specific parameters within the dialog.
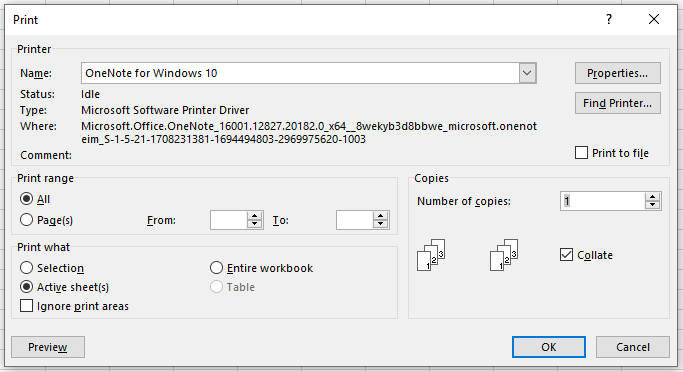
A good example of this is to display the ‘Print’ dialog from VBA:
Sub TestPrintDialog()
Application.Dialogs(xlDialogPrint).Show
End Sub
When you open the brackets in the Dialogs collection, you will see a list of a huge number of constants for built-in dialogs. It is worth experimenting with some of these options within your code
VBA Coding Made Easy
Stop searching for VBA code online. Learn more about AutoMacro — A VBA Code Builder that allows beginners to code procedures from scratch with minimal coding knowledge and with many time-saving features for all users!

Learn More
Inserting a New User Form
You can design your own custom user forms by inserting a userform into the Visual Basic Editor (VBE)
You do this by selecting Insert | UserForm on the VBE menu bar.
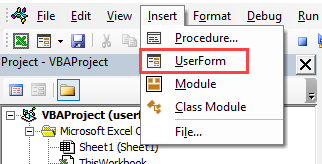
Click on ‘UserForm’ and a new blank form will appear ready for you to develop on
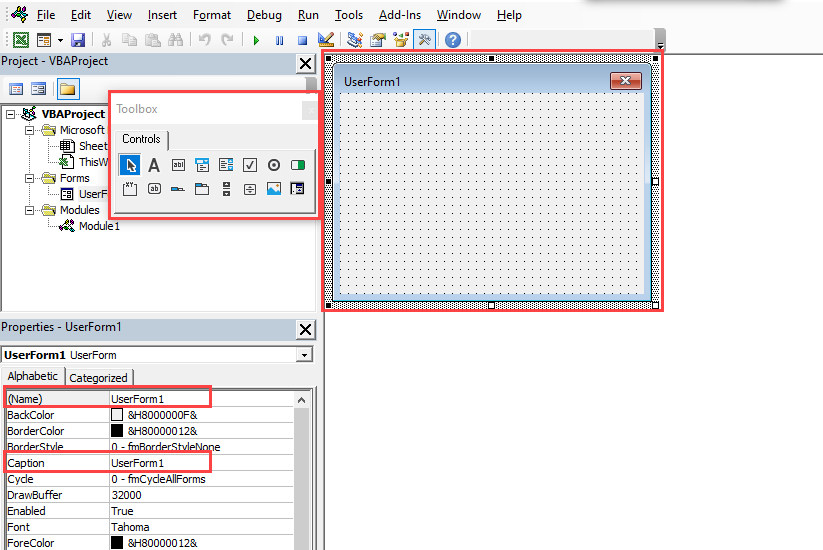
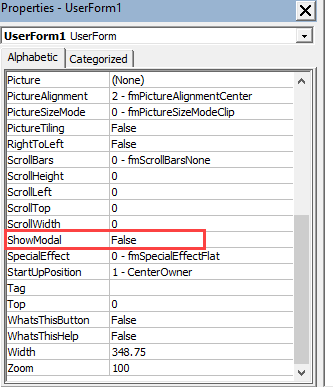
The actual form itself (shown as ‘UserForm1’) looks quite small, but you can use the handles around it to enlarge or make it even smaller by dragging the handles with your cursor.
There is a properties window in the bottom left-hand corner of the screen. As the focus is directly on the form itself, this contains all the properties for the form specific to that form.
Note that when you start adding controls such as combo boxes and command buttons, these controls all have their own set of properties, and they can be very different in what you can do with each of them.
The properties that you see currently only apply only to the form itself.
The ‘Name’ property is the name used to define your form object within the VBA code. You may want to use something more meaningful for the object name, so that when you are reviewing your code, it is obvious which form is being used.
The ‘Name’ property will also reflect through to the ‘Project Explorer’ window in the top left-hand corner of the screen
You will want to alter the title bar of your form to something different from ‘UserForm1’, and you can do this by typing in your new text at the ‘Caption’ property
You can make a huge number of changes to how your form is seen by the user. You can alter colours, add images e.g. a corporate logo, change the position using ‘Left’ and ‘Top’, change the size using ‘Height’ and ‘Width’, change the mouse pointer, and many more
All of these properties can also be changed programmatically for any control that you have added to your form. For example, a user may select from a list box control, and you may want to disable or hide other controls based on the user’s choice
Using the Toolbox
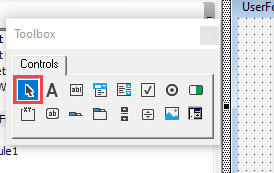
You will notice that when you click on the form itself, a toolbox pop-up appears. If you click anywhere else e.g. the properties pane, it will disappear, but re-appear when your click on the form.
The toolbox provides the real mechanics of the form design. This enables you to add the normal Windows controls that users are familiar with to your form.
You will have notice that on the form, there is a network of dots. This is a ‘snapgrid’ so that when you add a control to the form, it will automatically align the position to the rows and columns of dots. This helps enormously with aligning your controls so that your do not get a ragged appearance of the controls
Should you click on a control, and then decide not to use it, clicking on the ‘Arrow’ icon in the top-left corner of the toolbox will change your cursor back to normal.
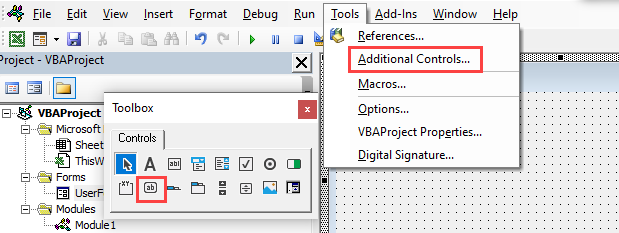
You can add additional controls to the toolbox by using Tools | Additional Controls on the VBE menu. There are a considerable number of these available, but depending on you Windows and Excel versions, they do not always work so some experimentation is often required.
Also, your users may not have access to some of these additional controls or be running older versions of Windows and Excel, which may cause problems. In large organizations, especially if they are global, there is no such thing as a standard build PC that you can rely on!
Adding an Exit Button to Your Form
A Command button is simple to add to the form. This looks the same way as buttons that you see in other Windows forms, usually as an ‘OK’ or ‘Cancel’ button.
Click on the Command Button icon in the toolbox. This is the second icon from the left on the bottom row of icons. See the image above. It has the letters ‘ab’ on it.
You can either hold your mouse button down and drag the control onto your form, or you can move the cursor to the form, where it will change to a ‘cross’ cursor and you can position and size your button
If you drag the control to the form, you will get the default sizing of the button. Moving the cursor to the form allows you to change the size of the button by dragging the ‘cross’ cursor across your form
Your form will now look like this:

The button will have default text as the caption, but you will want to change it to your own requirements. You can click on the text within the button (‘CommandButton1’) and this will allow you to edit the caption directly.
You can also change it in the properties window (bottom left-hand corner of screen). You will see a property called ‘Caption’ and you can edit the value for this. Change this to ‘Exit’
As with the form properties, the ‘Name’ property defines the name that will be used in your VBA code. You may want to use a name that is more meaningful and obvious within your code. You can enter this against the ‘Name’ property.
You can re-position the button by dragging it about on the form, and you can resize it by clicking on the button handles (white square boxes) and dragging the handles to make it larger or smaller
You can also re-size the button by changing the Height and Width values in the properties window
You can view your form in Excel by clicking on the green triangle in the VBE toolbar, or pressing F5

You can call your form from VBA code within a module by using the ‘Show’ method
Sub ShowForm()
UserForm1.Show
End Sub
Your user form is effectively a global object and can be called from anywhere within your code
Currently, your command button does nothing because there is no VBA code behind it. You have to write this yourself! All that can happen at the moment is that you can click on the ‘Close’ X in the top right-hand corner of your form.
To add VBA code, double click on the button on the form
This will take you to the normal VBA code window, and will show the default event of click.
You use the ‘Hide’ method to close the form, and you can also add in any other code, such as a message box to confirm to the user what has happened.
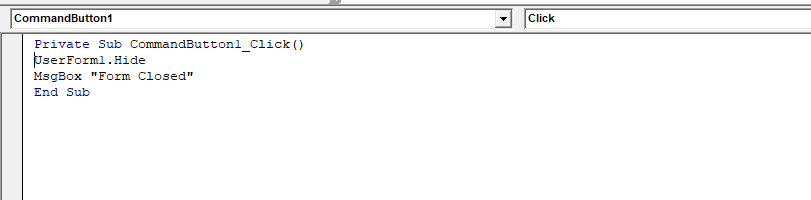
Note that the code window has two drop downs at the top. The first one allows you to select your form controls, and the second shows all the events that are available for you to add code. The obvious one for a button is the ‘Click’ event, but there are others such as ‘Double Click’ or ‘Mouse Move’
When you run your form now, the button actually does something. The form vanishes and a message box is displayed confirming that the form is closed
You can, of course, enlarge the exit code. You may wish to display another form, or take action on parameters that the user has entered on your form
VBA Programming | Code Generator does work for you!
Adding a Label Control to a Form
Label controls are for prompting the user as to what sort of data they need to input to a control on the form e.g. text box, drop down, etc. A label has no borders by default, but these can be added through the properties window if required.
As a control, they are read only to the user and are simply a way of putting text on the form, whether it is a bold heading, or an instruction of what to enter or choose.
To add a label, click on the ‘A’ icon in the toolbox (top row, second from left) and either double click on it or move your cursor to the form and select position and size.
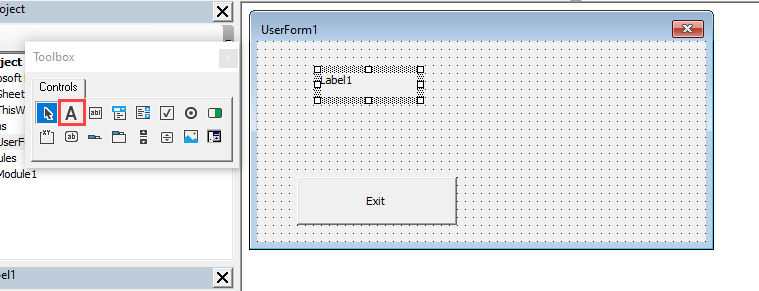
Using the ‘Caption’ property in the properties window, or clicking on the label control, you can enter the text for the label control.
Note that the text will wrap according to the size of the label control, and if the string of text is too long, it will not appear completely on the form, so you need to be careful of the sizing of the label control.
Using the properties window, you can change the appearance of the label control, with different colours, fonts, back style e.g. if it overlays an image and you want it to be transparent
No code needs to be created for a label control. The main purpose is to add text to the form so that the user can see how all the other controls work
Adding a Text Control to the Form
A text control is used to allow the user to input text e.g entering a name or comments
The text control is added from the toolbox by clicking on the text control icon (top row, third from left) and double clicking or dragging the control into position on your form.
The text control is often confused with the label control, but the text control is the one for user input
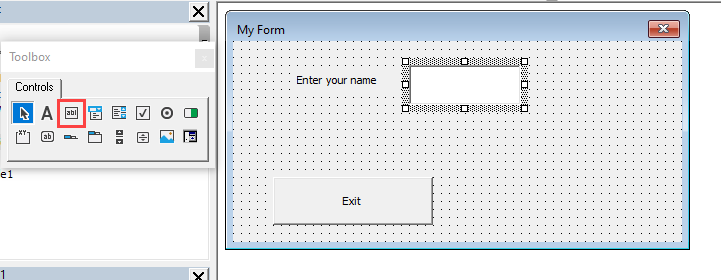
The ‘Enter your name’ text is a label control, as previously described, and we now have a white text box ready for the user to type something into
Using the properties window, you can change the colours, fonts, special effects, or use password characters for your text box. Enormous flexibility is available
One very important property for a text box is the ‘MultiLine’ property. If you want the user to enter a large amount of text into the text control e.g. comments, then the ‘MultiLine’ property must be set to True.
It is a default of False which means that however big you make your text box, the text entered will stay on one continuous line and will scroll out of the text box. It will not wrap around within the box.
There is no pop-up when you right click on your text box when it is running, but CTRL+V will work for Paste, and CTRL+C will work for Cut, should the user want to cut and paste text to and from other applications
Again, you have to write your own code to deal with text that the user has typed in. You may wish to transfer it to a cell in a worksheet
You can add this code into the ‘Change’ event for the text box
Private Sub TextBox1_Change()
Sheets("Sheet1").Range("A1").Value = TextBox1.Value
End Sub
You may also want to put some validation code in to check that the user is not entering rubbish which will have disastrous effects on your application
The change event is no good for this because it is called every time the user types in a new character. The user could start typing a string of text and instantly find that they have broken your validation rules before they have completed a valid text.
You use the ‘Exit’ event. This is triggered when the user moves the focus to another control on the form, which means that the user is no longer entering data.
Private Sub TextBox1_Exit(ByVal Cancel As MSForms.ReturnBoolean)
If IsNull(TextBox1.Value) Or Len(TextBox1.Value) < 4 Then
    MsgBox "Name is invalid", vbCritical
    TextBox1.SetFocus
End If
End Sub
When the user clicks on another control on the form, this code tests for either a null value in the text box, or less than 4 characters. If the test is true, then a message box with a critical icon appears to inform the user that the name is invalid, and the focus is moved back to the offending text box for the user to correct.
Note that even if the user clicks on the Exit button, the text box exit event will be performed first, so this prevents the user exiting without correcting the input
Initialize and Activate Events on a Form
When VBA first creates and builds a form it triggers an ‘Initialize’ event. However, because the form is also displayed at this point, it also triggers an ‘Activate’ event. From then onwards, every time the form appears using the ‘Show’ method or it appears as part of a hierarchy of forms, then the ‘Activate’ event is triggered, but not the ‘Initialize’ event
The ‘Initialize’ event only happens once, but the ‘Activate’ event can happen many times
On your form you may want to set up default values from the worksheet in the input controls e.g. text boxes, so that these appear on the first use of the form, but the user can overwrite the defaults and these new values will remain in place so long as the code is running
Private Sub UserForm_Initialize()
TextBox1.Value = Sheets("Sheet1").Range("A1").Value
If TextBox1.Value=”” Then
	TextBox1.Visible=False
Else
	TextBox1.Visible=True
End If
End Sub
You can find the ‘Initialize’ event in the second drop down in the code window, and the userform name in the first drop down.
This code will use the value at cell A1 on ‘Sheet1’ as the default value in the text box created earlier in this article. When the form appears for the first time, the default value will appear. The user can then overwrite the default value and this will be retained. If CellA1 is blank the text box will be hidden otherwise is will be visible
The default value could also be hard coded:
TextBox1.Value = “John Smith”You may also want to make sure that the values that the user has entered re-appear whenever the user fires up that form within that particular Excel session. VBA code can easily write the values back to cells within the workbook using the ‘Exit’ event on a control, and re-instate them using the ‘Activate’ event on the form
Private Sub TextBox1_Exit(ByVal Cancel as MSForms.ReturnBoolean)
Sheets("Sheet1").Range("A10").Value = TextBox1.Value
End Sub
Private Sub UserForm_Activate()
TextBox1.Value = Sheets("Sheet1").Range("A10").Value
End Sub
This code will make the user’s values persistent and also ensure that they are saved off with the rest of the workbook
Saving Your Application and Forms
When you save your Excel workbook containing your forms, all the forms and their VBA code get saved as well. However, any values that the forms hold whilst they are displayed will be lost.
It is important to write code so that when the user exits the workbook, or the form, the values are written back to cells within the workbook and so are preserved.
Modal and Non-Modal Forms
The form itself has a property ‘Show Modal’. This is set by default to True, but it can be changed to False (non-modal)
If a form is modal, it means that none of the Excel functionality can be accessed while the form is being displayed. This includes your code in the VBE window. You can view the code, but the cursor and keyboard are disabled.
In a non-modal form, you can access all the Excel functionality, including the VBE window, whilst the form is being displayed.
This is important from the point of view of controlling user behaviour
AutoMacro | Ultimate VBA Add-in | Click for Free Trial!
Closing a Form
However well you write your code to force the user down a certain route, they can easily circumvent it by clicking on the ‘Close’ X in the top right-hand corner of the form
You can prevent this happening by modifying the ‘QueryClose’ event of the form
Private Sub UserForm_QueryClose(Cancel As Integer, CloseMode As Integer)
Cancel = True
MsgBox "This action is disabled"
End Sub
The ‘QueryClose’ event is triggered when the user clicks the ‘Close’ X of the form. This code cancels the action, so the user is forced to use your ‘Exit’ button and the code that you have behind it.
Enabling and Disabling Controls
All controls on your form have a property called ‘Enabled’ which is set to True or False. If it is False, then the control is greyed out. It can be seen but cannot be used.
There is also a property called ‘Visible’ which again is set to True or False.
You can write code to either make a certain control unusable, or to make it totally invisible to the user. Using an ‘If’ statement, you can choose the circumstances when you need to do this
For example, you could disable the ‘Exit’ button initially, until the user has entered a value into the TextBox1 (name)
Private Sub UserForm_Initialize()
CommandButton1.Enabled = False
End Sub
Private Sub TextBox1_Change()
If Len(TextBox1.Value) > 0 Then
    CommandButton1.Enabled = True
Else
    CommandButton1.Enabled = False
End If
End Sub
This code uses the form ‘Initialize’ event to disable the exit button (Command Button 1) when the form first appears and then uses the ‘Change’ event on TextBox1 (name) to enable the Exit button if something has been typed in or disable it if the box is blank.
The ‘Change’ event is triggered every time a new character is typed in or deleted from the text box. If the user tries to enter text to make the button enabled, and then deletes all the text, the button will instantly be disabled

 In this VBA Tutorial, you learn how to create input boxes with both the InputBox function and the Application.InputBox method. This includes:
- How to create an InputBox.
- How to create an InputBox with multiple lines.
- How to create an InputBox that works with a specific type of data.
- How to handle the cases where the user clicks the Cancel button of the InputBox.
This VBA InputBox Tutorial is accompanied by an Excel workbook containing the macros I use in the examples below. You can get immediate access to this example workbook by clicking the button below.

Related VBA and Macro Tutorials
The following VBA and Macro Tutorials may help you better understand and implement the contents below:
- General VBA constructs and structures:
- Read a Macro Tutorial for beginners here.
- Learn the definitions of several basic and important VBA terms here.
- Learn how to specify macro security settings here.
- Learn how to work with the Visual Basic Editor here.
- Learn about the Excel VBA Object Model here.
- Learn how to refer to cell ranges here.
- Learn how to create Sub procedures here.
- Learn how to work with object properties here.
- Learn how to work with object methods here.
- Learn how to declare and work with variables here.
- Learn how to work with data types here.
- Learn how to work with functions here.
- Learn how to work with loops here.
- Learn how to work with arrays here.
- Practical VBA applications and macro examples:
- Learn how to work with worksheets here.
- Learn how to convert strings to numbers here.
- Learn how to create message boxes here.
- Learn how to create UserForms here.
You can find additional VBA and Macro Tutorials in the Archives.
#1: Create InputBox with InputBox function
VBA code to create InputBox with InputBox function
To create a basic InputBox with the VBA InputBox function, use a statement with the following structure:
InputBoxVariable = InputBox(Prompt:=PromptString, Title:=TitleString, Default:=DefaultInputString)
Process to create InputBox with InputBox function
To create a basic InputBox with the VBA InputBox function, follow these steps:
- Create an input box with the InputBox function (InputBox(…)).
- Assign the value returned by the InputBox function to a variable (InputBoxVariable = InputBox(…)).
VBA statement explanation
Item: InputBoxVariable
InputBoxVariable is the variable you want to hold the value returned by the InputBox function.
The InputBox function returns a String.
Item: =
The = operator assigns a value to a variable or property.
Use the = operator to assign the value returned by the InputBox function (InputBox(…)) to InputBoxVariable.
Item: InputBox(…)
The InputBox function:
- Displays an input box;
- Waits for the user to either (i) input text and click the OK button (or press the Enter key), or (ii) click the Cancel button (or press the Esc key); and
- Returns a string with the contents of the text box in the input box (when the user clicks OK or presses Enter).
If you want to handle the cases where the user clicks on the Cancel button or presses Esc, please refer to the appropriate section of this Tutorial.
Item: Prompt:=PromptString
The Prompt argument of the InputBox function is a string displayed as the message in the input box. Prompt is a required argument.
You generally specify PromptString as a string expression.
The maximum length of PromptString is roughly 1024 characters. However, this maximum length may vary slightly depending on the width of the characters within PromptString.
PromptString can be composed of multiple lines. To create an input box with multiple lines, please refer to the appropriate section of this Tutorial.
Item: Title:=TitleString
The Title argument of the InputBox function is a string expression displayed as the title in the title bar of the input box.
Title is an optional argument. If you omit the Title argument, the title of the input box is “Microsoft Excel”.
You generally specify TitleString as a string expression.
Item: Default:=DefaultInputString
The Default argument of the InputBox function is a string expression displayed inside the text box of the input box. DefaultInputString is, therefore, the default response.
Default is an optional argument. If you omit the Default argument, the text box is empty.
Macro example to create InputBox with InputBox function
The following macro example:
- Creates a basic input box with the InputBox function.
- Assigns the value returned by the InputBox function to a variable (myInputBoxVariable = inputBox(…)).
- Displays a message box with the value held by the variable.
Sub CreateInputBoxFunction()
    'source: https://powerspreadsheets.com/
    'creates an input box with the InputBox function
    'for further information: https://powerspreadsheets.com/excel-vba-inputbox/

    'declare variable to hold value returned by InputBox
    Dim myInputBoxVariable As String

    '(1) create InputBox, and (2) assign value returned by InputBox function to variable
    myInputBoxVariable = inputBox(Prompt:="Create Excel VBA InputBox", Title:="This is an Excel VBA InputBox", Default:="Enter VBA InputBox value here")

    'display message box with value held by variable
    MsgBox "Your input was: " & myInputBoxVariable

End Sub
Effects of executing macro example to create InputBox with InputBox function
The following GIF illustrates the results of executing the macro example. As expected, Excel displays a basic input box using the InputBox function.

#2: Create InputBox with Application.InputBox method
VBA code to create InputBox with Application.InputBox method
To create a basic InputBox with the VBA Application.InputBox method, use a statement with the following structure:
InputBoxVariable = Application.InputBox(Prompt:=PromptString, Title:=TitleString, Default:=DefaultInput)
Process to create InputBox with Application.InputBox method
To create a basic InputBox with the VBA Application.InputBox method, follow these steps:
- Create an input box with the Application.InputBox method (Application.InputBox(…)).
- Assign the value returned by the Application.InputBox method to a variable (InputBoxVariable = Application.InputBox(…)).
VBA statement explanation
Item: InputBoxVariable
InputBoxVariable is the variable you want to hold the value returned by the Application.InputBox method.
The Application.InputBox method returns a Variant.
Item: =
The = operator assigns a value to a variable or property.
Use the = operator to assign the value returned by the InputBox function (InputBox(…)) to InputBoxVariable.
Item: Application.InputBox(…)
The Application.InputBox method:
- Displays an input box’
- Waits for the user to either (i) input information and click the OK button (or press the Enter key), or (ii) click the Cancel button (or press the Esc key); and
- Returns the information entered in the dialog box (if the user clicks OK or presses Enter) or the False Boolean value (if the user clicks Cancel).
Item: Prompt:=PromptString
The Prompt parameter of the Application.InputBox method is a string displayed as the message in the input box. Prompt is a required parameter.
You generally specify PromptString as a string expression.
You can also specify PromptString as a number, a date or a Boolean. In such cases, Excel coerces the number, date or Boolean to a string.
PromptString can be composed of multiple lines. To create an input box with multiple lines, please refer to the appropriate section of this Tutorial.
Item: Title:=TitleString
The Title parameter of the Application.InputBox method is the title displayed in the title bar of the input box.
Title is an optional parameter. If you omit the Title parameter, the title of the input box is “Input”.
The Title parameter is of the Variant data type.
Item: Default:=DefaultInput
The Default parameter of the Application.InputBox method is the value displayed inside the text box of the input box. DefaultInput is, therefore, the default response.
Default is an optional parameter. If you omit the Default parameter, the text box is empty.
The Default parameter is of the Variant data type.
Macro example to create InputBox with Application.InputBox method
The following macro example:
- Creates a basic input box with the Application.InputBox method.
- Assigns the value returned by the Application.InputBox method to a variable (myInputBoxVariable = Application.inputBox(…)).
- Displays a message box with the value held by the variable.
Sub CreateInputBoxMethod()
    'source: https://powerspreadsheets.com/
    'creates an input box with the Application.InputBox method
    'for further information: https://powerspreadsheets.com/excel-vba-inputbox/

    'declare variable to hold value returned by InputBox
    Dim myInputBoxVariable As Variant

    '(1) create InputBox, and (2) assign value returned by Application.InputBox method to variable
    myInputBoxVariable = Application.inputBox(Prompt:="Create Excel VBA InputBox", Title:="This is an Excel VBA InputBox", Default:="Enter VBA InputBox value here")

    'display message box with value held by variable
    MsgBox "Your input was: " & myInputBoxVariable

End Sub
Effects of executing macro example to create InputBox with Application.InputBox method
The following GIF illustrates the results of executing the macro example. As expected, Excel displays a basic input box using the Application.InputBox method.

#3: Create InputBox with multiple lines using InputBox function
VBA code to create InputBox with multiple lines using InputBox function
To create an InputBox containing multiple lines with the VBA InputBox function, use a statement with the following structure:
InputBoxMultipleLinesVariable = inputBox(Prompt:=PromptString1 & NewLineCharacter & PromptString2 & ... & NewLineCharacter & PromptString#)
Process to create InputBox with multiple lines using InputBox function
To create an InputBox containing multiple lines with the VBA InputBox function, follow these steps:
- Create an input box with the InputBox function (InputBox(…)).
- Specify the message displayed in the message box (Prompt:=PromptString1 & NewLineCharacter & PromptString2 & … & NewLineCharacter & PromptString#) as an appropriately concatenated (with the & character) combination of:
- Strings (PromptString1, PromptString2, …, PromptString#); and
- Characters that create a new line or line break (NewLineCharacter).
- Assign the value returned by the InputBox function to a variable (InputBoxMultipleLinesVariable = InputBox(…)).
VBA statement explanation
Item: InputBoxMultipleLinesVariable
InputBoxMultipleLinesVariable is the variable you want to hold the value returned by the InputBox function.
The InputBox function returns a String.
Item: =
The = operator assigns a value to a variable or property.
Use the = operator to assign the value returned by the InputBox function (InputBox(…)) to InputBoxVariable.
Item: inputBox(…)
The InputBox function:
- Displays an input box;
- Waits for the user to either (i) input text and click the OK button (or press the Enter key), or (ii) click the Cancel button (or press the Esc key); and
- Returns a string with the contents of the text box in the input box (when the user clicks OK or presses Enter).
If you want to handle the cases where the user clicks on the Cancel button or presses Esc, please refer to the appropriate section of this Tutorial.
Item: Prompt:=PromptString1 & NewLineCharacter & PromptString2 & … & NewLineCharacter & PromptString#
The Prompt argument of the InputBox function is a string displayed as the message in the input box. Prompt is a required argument.
You generally specify Prompt as a string expression.
The maximum length of Prompt is roughly 1024 characters. However, this maximum length may vary slightly depending on the width of the characters you work with.
To create an input box with multiple lines, you build the string expression assigned to Prompt by concatenating as many strings (PromptString1, PromptString2, …, PromptString#) and new line characters (NewLineCharacter) as required. For these purposes:
- PromptString1, PromptString2, …, PromptString# are the strings (excluding the new line characters) that determine the message in the input box.
- The & operator carries out string concatenation. Therefore, & concatenates the different strings and new line characters.
- NewLineCharacter is a character or character combination returning 1 of the following:
- Carriage return.
- Linefeed.
- Carriage return linefeed combination.
- New line (which is platform specific).
Specify NewLineCharacter using any of the constants or character codes (with the Chr function) listed below:
| Constant | Equivalent Chr function | General description |
| vbLf | Chr(10) | Linefeed |
| vbCr | Chr(13) | Carriage return |
| vbCrLf | Chr(13) & Chr(10) | Carriage return linefeed combination |
| vbNewLine | Chr(13) & Chr(10) in Excel for Windows or Chr(13) in Excel for Mac | New line character, which is platform specific |
Macro example to create InputBox with multiple lines using InputBox function
The following macro example:
- Creates an input box containing multiple lines (Create Excel VBA InputBox” & vbNewLine & “with multiple lines) with the InputBox function.
- Assigns the value returned by the InputBox function to a variable (myInputBoxMultipleLinesVariable = inputBox(…)).
- Displays a message box with the value held by the variable.
Sub CreateInputBoxFunctionMultipleLines()
    'source: https://powerspreadsheets.com/
    'creates an input box with multiple lines using the InputBox function
    'for further information: https://powerspreadsheets.com/excel-vba-inputbox/

    'declare variable to hold value returned by InputBox
    Dim myInputBoxMultipleLinesVariable As String

    '(1) create InputBox with multiple lines, and (2) assign value returned by InputBox function to variable
    myInputBoxMultipleLinesVariable = inputBox(Prompt:="Create Excel VBA InputBox" & vbNewLine & "with multiple lines")

    'display message box with value held by variable
    MsgBox "Your input was: " & myInputBoxMultipleLinesVariable

End Sub
Effects of executing macro example to create InputBox with multiple lines using InputBox function
The following GIF illustrates the results of executing the macro example. As expected, Excel displays an input box containing multiple lines using the InputBox function.

#4: Create InputBox with multiple lines using Application.InputBox method
VBA code to create InputBox with multiple lines using Application.InputBox method
To create an InputBox containing multiple lines with the VBA Application.InputBox method, use a statement with the following structure:
InputBoxMultipleLinesVariable = Application.InputBox(Prompt:=PromptString1 & NewLineCharacter & PromptString2 & ... & NewLineCharacter & PromptString#)
Process to create InputBox with multiple lines using Application.InputBox method
To create an InputBox containing multiple lines with the VBA Application.InputBox method, follow these steps:
- Create an input box with the Application.InputBox method (Application.InputBox(…)).
- Specify the message displayed in the message box (Prompt:=PromptString1 & NewLineCharacter & PromptString2 & … & NewLineCharacter & PromptString#) as an appropriately concatenated (with the & character) combination of:
- Strings (PromptString1, PromptString2, …, PromptString#); and
- Characters that create a new line or line break (NewLineCharacter).
- Assign the value returned by the Application.InputBox method to a variable (InputBoxMultipleLinesVariable = Application.InputBox(…)).
VBA statement explanation
Item: InputBoxMultipleLinesVariable
InputBoxMultipleLinesVariable is the variable you want to hold the value returned by the Application.InputBox method.
The Application.InputBox method returns a Variant.
Item: =
The = operator assigns a value to a variable or property.
Use the = operator to assign the value returned by the InputBox function (InputBox(…)) to InputBoxVariable.
Item: Application.InputBox(…)
The Application.InputBox method:
- Displays an input box’
- Waits for the user to either (i) input information and click the OK button (or press the Enter key), or (ii) click the Cancel button (or press the Esc key); and
- Returns the information entered in the dialog box (if the user clicks OK or presses Enter) or the False Boolean value (if the user clicks Cancel).
Item: Prompt:=PromptString1 & NewLineCharacter & PromptString2 & … & NewLineCharacter & PromptString#
The Prompt parameter of the Application.InputBox method is a string displayed as the message in the input box. Prompt is a required parameter.
You generally specify Prompt as a string expression. You can also specify Prompt as a number, a date or a Boolean. In such cases, Excel coerces the number, date or Boolean to a string.
To create an input box with multiple lines, you build the expression assigned to Prompt by concatenating as many strings (PromptString1, PromptString2, …, PromptString#) and new line characters (NewLineCharacter) as required. For these purposes:
- PromptString1, PromptString2, …, PromptString# are the strings (excluding the new line characters) that determine the message in the input box.
- The & operator carries out string concatenation. Therefore, & concatenates the different strings and new line characters.
- NewLineCharacter is a character or character combination returning 1 of the following:
- Carriage return.
- Linefeed.
- Carriage return linefeed combination.
- New line (which is platform specific).
Specify NewLineCharacter using any of the constants or character codes (with the Chr function) listed below:
| Constant | Equivalent Chr function | General description |
| vbLf | Chr(10) | Linefeed |
| vbCr | Chr(13) | Carriage return |
| vbCrLf | Chr(13) & Chr(10) | Carriage return linefeed combination |
| vbNewLine | Chr(13) & Chr(10) in Excel for Windows or Chr(13) in Excel for Mac | New line character, which is platform specific |
Macro example to create InputBox with multiple lines using Application.InputBox method
The following macro example:
- Creates an input box containing multiple lines (Create Excel VBA InputBox” & vbNewLine & “with multiple lines) with the Application.InputBox method.
- Assigns the value returned by the Application.InputBox method to a variable (myInputBoxMultipleLinesVariable = Application.inputBox(…)).
- Displays a message box with the value held by the variable.
Sub CreateInputBoxMethodMultipleLines()
    'source: https://powerspreadsheets.com/
    'creates an input box with multiple lines using the Application.InputBox method
    'for further information: https://powerspreadsheets.com/excel-vba-inputbox/

    'declare variable to hold value returned by InputBox
    Dim myInputBoxMultipleLinesVariable As Variant

    '(1) create InputBox with multiple lines, and (2) assign value returned by Application.InputBox method to variable
    myInputBoxMultipleLinesVariable = Application.inputBox(Prompt:="Create Excel VBA InputBox" & vbNewLine & "with multiple lines")

    'display message box with value held by variable
    MsgBox "Your input was: " & myInputBoxMultipleLinesVariable

End Sub
Effects of executing macro example to create InputBox with multiple lines using Application.InputBox method
The following GIF illustrates the results of executing the macro example. As expected, Excel displays an input box containing multiple lines using the Application.InputBox method.

#5: Create InputBox that works with a specific data type using InputBox function
VBA code to create InputBox that works with a specific data type using InputBox function
To create an InputBox that works with a specific data type with the VBA InputBox function, use a macro with the following statement structure:
InputBoxTypeVariable = InputBox(Prompt:=PromptString)
If IsFunction(InputBoxTypeVariable) Then
    StatementsIfInputIsType
Else
    StatementsIfInputIsNotType
End If
Process to create InputBox that works with a specific data type using InputBox function
To create an InputBox that works with a specific data type with the VBA InputBox function, follow these steps:
- Create an input box with the InputBox function (InputBox(…)).
- Assign the value returned by the InputBox function to a variable (InputBoxTypeVariable = InputBox(…)).
- Use an If… Then… Else statement for the following:
- Testing whether the type of data held by the variable is the one you want to work with (IsFunction(InputBoxTypeVariable)).
- Executing the appropriate group of statements depending on whether the type of data held by the variable is the one you want to work with (StatementsIfInputIsType) or not (StatementsIfInputIsNotType).
VBA statement explanation
Line #1: InputBoxTypeVariable = InputBox(Prompt:=PromptString)
Item: InputBoxTypeVariable
InputBoxTypeVariable is the variable you want to hold the value returned by the InputBox function.
The InputBox function returns a String.
Item: =
The = operator assigns a value to a variable or property.
Use the = operator to assign the value returned by the InputBox function (InputBox(…)) to InputBoxVariable.
Item: InputBox(…)
The InputBox function:
- Displays an input box;
- Waits for the user to either (i) input text and click the OK button (or press the Enter key), or (ii) click the Cancel button (or press the Esc key); and
- Returns a string with the contents of the text box in the input box (when the user clicks OK or presses Enter).
If you want to handle the cases where the user clicks on the Cancel button or presses Esc, please refer to the appropriate section of this Tutorial.
Item: Prompt:=PromptString
The Prompt argument of the InputBox function is a string displayed as the message in the input box. Prompt is a required argument.
You generally specify PromptString as a string expression.
The maximum length of PromptString is roughly 1024 characters. However, this maximum length may vary slightly depending on the width of the characters within PromptString.
PromptString can be composed of multiple lines. To create an input box with multiple lines, please refer to the appropriate section of this Tutorial.
Lines #2, #4 and #6: If IsFunction(InputBoxTypeVariable) Then | Else | End If
Item: If… Then… Else… End If
The If… Then… Else statement conditionally executes a group of statements (StatementsIfInputIsType or StatementsIfInputIsNotType) depending on the value of an expression (Isfunction(InputBoxTypeVariable)).
Item: IsFunction(InputBoxTypeVariable)
The condition of the If… Then… Else statement is an expression returning True or False.
When you work with an input box and a specific data type using this macro structure, you can check the type of data held by InputBoxTypeVariable by working with certain VBA built-in functions (an IsFunction), as appropriate. These include the following functions:
| Function | Returns True if InputBoxTypeVariable… | Returns False if InputBoxTypeVariable… |
| IsDate | Is a date or recognizable as a valid date | Isn’t date or isn’t recognizable as a valid date |
| IsError | Is an error value | Isn’t an error value |
| IsNumeric | Can be evaluated/recognized as a number | Can’t be evaluated/recognized as a number |
Line #3: StatementsIfInputIsType
Statements executed if the tested condition (IsFunction(InputBoxTypeVariable)) returns True. In other words, these statements are executed if the input entered by the user in the input box is of the appropriate type.
Line #5: StatementsIfInputIsNotType
Statements executed if the tested condition (IsFunction(InputBoxTypeVariable)) returns False. In other words, these statements are executed if the input entered by the user in the input box isn’t of the appropriate type.
Macro example to create InputBox that works with a specific data type using InputBox function
The following macro example:
- Creates an input box with the InputBox function.
- Assigns the value returned by the InputBox function to a variable (myInputBoxTypeVariable = inputBox(…)).
- Checks whether the value held by the variable is numeric (IsNumeric(myInputBoxTypeVariable)).
- If the value is numeric, displays a message box with the value held by the variable.
- If the value isn’t numeric, displays a message box asking the user to try again and enter a number.
Sub CreateInputBoxFunctionDataType()
    'source: https://powerspreadsheets.com/
    'creates an input box that works with a number using the InputBox function
    'for further information: https://powerspreadsheets.com/excel-vba-inputbox/

    'declare variable to hold value returned by InputBox
    Dim myInputBoxTypeVariable As String

    '(1) create InputBox that works with a number, and (2) assign value returned by InputBox function to variable
    myInputBoxTypeVariable = inputBox(Prompt:="Create Excel VBA InputBox that works with a number")

    'check if user entered a number and, if appropriate, execute statements
    If IsNumeric(myInputBoxTypeVariable) Then

        'display message box with value held by variable
        MsgBox "Your input was: " & myInputBoxTypeVariable

    'if user didn't enter a number, execute statements
    Else

        'display message box confirming that user didn't enter a number
        MsgBox "Please try again and enter a number"

    End If

End Sub
Effects of executing macro example to create InputBox that works with a specific data type using InputBox function
The following GIF illustrates the results of executing the macro example. As expected:
- Excel identifies whether the input box created with the InputBox function contains a number; and
- Displays the appropriate message box.

#6: Create InputBox that works with a specific data type using Application.InputBox method
VBA code to create InputBox that works with a specific data type using Application.InputBox method
To create an InputBox that works with a specific data type with the VBA Application.InputBox method, use a statement with the following structure:
InputBoxTypeVariable = Application.InputBox(Prompt:=PromptString, Type:=TypeValue)
Process to create InputBox that works with a specific data type using Application.InputBox method
To create an InputBox that works with a specific data type with the VBA Application.InputBox method, follow these steps:
- Create an input box with the Application.InputBox method (Application.InputBox(…)).
- Specify the data type you want to work with by working with the Type parameter of the Application.InputBox method (Type:=TypeValue).
- Assign the value returned by the Application.InputBox method to a variable (InputBoxTypeVariable = Application.InputBox(…)).
VBA statement explanation
Item: InputBoxTypeVariable
InputBoxTypeVariable is the variable you want to hold the value returned by the Application.InputBox method.
The Application.InputBox method returns a Variant.
Item: =
The = operator assigns a value to a variable or property.
Use the = operator to assign the value returned by the InputBox function (InputBox(…)) to InputBoxVariable.
Item: Application.InputBox(…)
The Application.InputBox method:
- Displays an input box’
- Waits for the user to either (i) input information and click the OK button (or press the Enter key), or (ii) click the Cancel button (or press the Esc key); and
- Returns the information entered in the dialog box (if the user clicks OK or presses Enter) or the False Boolean value (if the user clicks Cancel).
Item: Prompt:=PromptString
The Prompt parameter of the Application.InputBox method is a string displayed as the message in the input box. Prompt is a required parameter.
You generally specify PromptString as a string expression.
You can also specify PromptString as a number, a date or a Boolean. In such cases, Excel coerces the number, date or Boolean to a string.
PromptString can be composed of multiple lines. To create an input box with multiple lines, please refer to the appropriate section of this Tutorial.
Item: Type:=TypeValue
The Type parameter of the Application.InputBox method specifies the data type returned.
Set the Type parameter using the values listed below. If required, you can set the Type parameter to be a sum of several of these values.
| Value | Basic description | Additional comments |
| 0 | Formula | Application.InputBox returns the formula in the form of text. Cell references inside the formula are returned as A1-style references. |
| 1 | Number | |
| 2 | Text | |
| 4 | Boolean | |
| 8 | Range object | Use the Set statement to assign the Range object returned by Application.InputBox to an object variable. |
| 16 | Error | |
| 64 | Array of values |
Type is an optional parameter. If you omit the Type parameter, the Application.InputBox method returns text.
Macro example to create InputBox that works with a specific data type using Application.InputBox method
The following macro example:
- Creates an input box that returns a number (Type:=1) with the Application.InputBox method.
- Assigns the value returned by the Application.InputBox method to a variable (myInputBoxTypeVariable = Application.inputBox(…)).
- Displays a message box with the value held by the variable.
Sub CreateInputBoxMethodDataType()
    'source: https://powerspreadsheets.com/
    'creates an input box that works with a number using the Application.InputBox method
    'for further information: https://powerspreadsheets.com/excel-vba-inputbox/

    'declare variable to hold value returned by InputBox
    Dim myInputBoxTypeVariable As Variant

    '(1) create InputBox that works with a number, and (2) assign value returned by Application.InputBox method to variable
    myInputBoxTypeVariable = Application.inputBox(Prompt:="Create Excel VBA InputBox that works with a number", Type:=1)

    'display message box with value held by variable
    MsgBox "Your input was: " & myInputBoxTypeVariable

End Sub
Effects of executing macro example to create InputBox that works with a specific data type using Application.InputBox method
The following GIF illustrates the results of executing the macro example. As expected:
- Excel identifies whether the input box created with the Application.InputBox method contains a number; and
- If the entered input isn’t a number, displays a warning.

#7: Create InputBox and check if user clicks Cancel button with InputBox function
VBA code to create InputBox and check if user clicks Cancel button with InputBox function
To create an InputBox with the VBA InputBox function and check if the user clicks Cancel, use a macro with the following statement structure:
InputBoxCancelVariable = InputBox(Prompt:=PromptString)
If StrPtr(InputBoxCancelVariable) = 0 Then
    StatementsIfCancel
ElseIf InputBoxCancelVariable = "" Then
    StatementsIfNoInput
Else
    StatementsIfInputAndOK
End If
Process to create InputBox and check if user clicks Cancel button with InputBox function
To create an InputBox that works with a specific data type with the VBA InputBox function, follow these steps:
- Create an input box with the InputBox function (InputBox(…)).
- Assign the value returned by the InputBox function to a variable (InputBoxCancelVariable = InputBox(…)).
- Use an If… Then… Else statement for the following:
- Testing whether the user clicked Cancel (StrPtr(InputBoxCancelVariable) = 0) or entered no input prior to clicking OK (InputBoxCancelVariable = “”).
- Executing the appropriate group of statements depending on whether the user clicked Cancel (StatementsIfCancel), entered no input prior to clicking OK (StatementsIfNoInput) or entered input and clicked OK (StatementsIfInputAndOK).
VBA statement explanation
Line #1: InputBoxCancelVariable = InputBox(Prompt:=PromptString)
Item: InputBoxCancelVariable
InputBoxCancelVariable is the variable you want to hold the value returned by the InputBox function.
The InputBox function returns a String.
Item: =
The = operator assigns a value to a variable or property.
Use the = operator to assign the value returned by the InputBox function (InputBox(…)) to InputBoxVariable.
Item: InputBox(…)
The InputBox function:
- Displays an input box;
- Waits for the user to either (i) input text and click the OK button (or press the Enter key), or (ii) click the Cancel button (or press the Esc key); and
- Returns a string with the contents of the text box in the input box (when the user clicks OK or presses Enter).
According to the Microsoft Developer Network, the InputBox function returns a zero-length string (“”) when the user clicks Cancel (or presses Esc). When checking if the user clicks Cancel using this macro structure, you rely on a quirk of the InputBox function which allows you to work with StrPtr.
Item: Prompt:=PromptString
The Prompt argument of the InputBox function is a string displayed as the message in the input box. Prompt is a required argument.
You generally specify PromptString as a string expression.
The maximum length of PromptString is roughly 1024 characters. However, this maximum length may vary slightly depending on the width of the characters within PromptString.
PromptString can be composed of multiple lines. To create an input box with multiple lines, please refer to the appropriate section of this Tutorial.
Lines #2, #6 and #8: If StrPtr(InputBoxCancelVariable) = 0 Then | Else | End If
Item: If… Then… Else… End If
The If… Then… Else statement conditionally executes a group of statements (StatementsIfCancel, StatementsIfNoInput or StatementsIfInputAndOK) depending on the value of an expression (StrPtr(InputBoxCancelVariable) = 0 or InputBoxCancelVariable = “”).
Item: StrPtr(InputBoxCancelVariable) = 0
The condition of the If… Then… Else statement is an expression returning True or False.
When you check if the user clicks the Cancel button using this macro structure, you can work with the StrPtr function. StrPtr is an undocumented function. You can usually work with the StrPtr function to obtain the address of a variable.
When the user clicks Cancel, no string is assigned to InputBoxCancelVariable. Therefore, if the user clicks Cancel, StrPtr(InputBoxCancelVariable) = 0 returns True.
Line #3: StatementsIfCancel
Statements executed if the tested condition (StrPtr(InputBoxCancelVariable) = 0) returns True. In other words, these statements are executed if the user clicks Cancel.
Line #4: ElseIf InputBoxCancelVariable = “” Then
Item: ElseIf… Then
The If… Then… Else statement conditionally executes a group of statements (StatementsIfCancel, StatementsIfNoInput or StatementsIfInputAndOK) depending on the value of an expression (StrPtr(InputBoxCancelVariable) = 0 or InputBoxCancelVariable = “”).
Item: InputBoxCancelVariable = “”
The condition-n of the If… Then… Else statement is an expression returning True or False.
You can check if the user didn’t enter any input prior to clicking OK by testing whether InputBoxCancelVariable holds a zero-length string (“”). In other words, if the user doesn’t enter any input and clicks the OK button, InputBoxCancelVariable = 0 returns True.
Line #5: StatementsIfNoInput
Statements executed if the tested condition (InputBoxCancelVariable = “”) returns True. In other words, these statements are executed if the user doesn’t enter any input and clicks the OK button.
Line #7: StatementsIfInputAndOK
Statements executed if none of the tested conditions (StrPtr(InputBoxCancelVariable) = 0 or InputBoxCancelVariable = “”) return True. In other words, these statements are executed if the user enters an input and clicks the OK button.
Macro example to create InputBox and check if user clicks Cancel button with InputBox function
The following macro example:
- Creates an input box with the InputBox function.
- Assigns the value returned by the InputBox function to a variable (myInputBoxCancelVariable = inputBox(…)).
- Checks whether user clicked Cancel (StrPtr(myInputBoxCancelVariable) = 0). If the user clicked Cancel, displays a message box confirming this.
- If the user didn’t click Cancel, checks whether the user entered no input prior to clicking OK (myInputBoxCancelVariable = “”). If the user entered no input prior to clicking OK, displays a message box confirming this.
- If the user entered input and clicked OK, displays a message box with the value held by the variable.
Sub CreateInputBoxFunctionCancel()
    'source: https://powerspreadsheets.com/
    '(1) creates an input box with the InputBox function, and (2) handles case where user clicks Cancel button
    'for further information: https://powerspreadsheets.com/excel-vba-inputbox/

    'declare variable to hold value returned by InputBox
    Dim myInputBoxCancelVariable As String

    '(1) create InputBox, and (2) assign value returned by InputBox function to variable
    myInputBoxCancelVariable = inputBox(Prompt:="Create Excel VBA InputBox and work with Cancel button")

    'check if user clicked Cancel button and, if appropriate, execute statements
    If StrPtr(myInputBoxCancelVariable) = 0 Then

        'display message box confirming that user clicked Cancel button
        MsgBox "You clicked the Cancel button"

    'check if user entered no input and, if appropriate, execute statements
    ElseIf myInputBoxCancelVariable = "" Then

        'display message box confirming that user entered no input
        MsgBox "You didn't enter an input"

    'if user didn't click Cancel button and entered input, execute statements
    Else

        'display message box with value held by variable
    MsgBox "Your input was: " & myInputBoxCancelVariable

    End If

End Sub
Effects of executing macro example to create InputBox and check if user clicks Cancel button with InputBox function
The following GIF illustrates the results of executing the macro example. As expected:
- Excel displays an input box created with the InputBox function.
- The macro identifies whether the user:
- Clicks the Cancel button;
- Enters no input prior to clicking OK; or
- Enters input and clicks OK.
- Excel displays the appropriate message box depending on the actions taken by the user.

#8: Create InputBox and check if user clicks Cancel button with Application.InputBox method
VBA code to create InputBox and check if user clicks Cancel button with Application.InputBox method
To create an InputBox with the VBA Application.InputBox method and check if the user clicks Cancel, use a macro with the following statement structure:
InputBoxCancelVariable = Application.InputBox(Prompt:=PromptString)
If (TypeName(InputBoxCancelVariable) = "Boolean") And (InputBoxCancelVariable = "False") Then
    StatementsIfCancel
ElseIf InputBoxCancelVariable = "" Then
    StatementsIfNoInput
Else
    StatementsIfInputAndOK
End If
Process to create InputBox and check if user clicks Cancel button with Application.InputBox method
To create an InputBox with the VBA Application.InputBox method and check if the user clicks Cancel, follow these steps:
- Create an input box with the Application.InputBox method (Application.InputBox(…)).
- Assign the value returned by the Application.InputBox method to a variable (InputBoxCancelVariable = Application.InputBox(…)).
- Use an If… Then… Else statement for the following:
- Testing whether the user clicked Cancel ((TypeName(InputBoxCancelVariable) = “Boolean”) And (InputBoxCancelVariable = “False”)) or entered no input prior to clicking OK (InputBoxCancelVariable = “”).
- Executing the appropriate group of statements depending on whether the user clicked Cancel (StatementsIfCancel), entered no input prior to clicking OK (StatementsIfNoInput) or entered input and clicked OK (StatementsIfInputAndOK).
VBA statement explanation
Line #1: InputBoxCancelVariable = Application.InputBox(Prompt:=PromptString)
Item: InputBoxCancelVariable
InputBoxCancelVariable is the variable you want to hold the value returned by the Application.InputBox method.
The Application.InputBox method returns a Variant.
Item: =
The = operator assigns a value to a variable or property.
Use the = operator to assign the value returned by the InputBox function (InputBox(…)) to InputBoxVariable.
Item: Application.InputBox(…)
The Application.InputBox method:
- Displays an input box’
- Waits for the user to either (i) input information and click the OK button (or press the Enter key), or (ii) click the Cancel button (or press the Esc key); and
- Returns the information entered in the dialog box (if the user clicks OK or presses Enter) or the False Boolean value (if the user clicks Cancel).
Item: Prompt:=PromptString
The Prompt parameter of the Application.InputBox method is a string displayed as the message in the input box. Prompt is a required parameter.
You generally specify PromptString as a string expression.
You can also specify PromptString as a number, a date or a Boolean. In such cases, Excel coerces the number, date or Boolean to a string.
PromptString can be composed of multiple lines. To create an input box with multiple lines, please refer to the appropriate section of this Tutorial.
Lines #2, #6 and #8: If (TypeName(InputBoxCancelVariable) = “Boolean”) And (InputBoxCancelVariable = “False”) Then | Else | End If
Item: If… Then… Else… End If
The If… Then… Else statement conditionally executes a group of statements (StatementsIfCancel, StatementsIfNoInput or StatementsIfInputAndOK) depending on the value of an expression (((TypeName(InputBoxCancelVariable) = “Boolean”) And (InputBoxCancelVariable = “False”)) or InputBoxCancelVariable = “”).
Item: TypeName(InputBoxCancelVariable) = “Boolean” And InputBoxCancelVariable = “False”
The condition of the If… Then… Else statement is an expression returning True or False.
The Application.InputBox method returns the False Boolean value when the user clicks Cancel. Therefore, when you check if the user clicks the Cancel button using this macro structure, you test whether 2 conditions are met.
Condition #1: TypeName(InputBoxCancelVariable) = “Boolean”
TypeName(InputBoxCancelVariable) = “Boolean” checks whether InputBoxCancelVariable is a Boolean value.
For these purposes, work with the TypeName function, which returns a string with information about the variable passed as argument (InputBoxCancelVariable). Therefore, TypeName(InputBoxCancelVariable) = “Boolean”:
- Returns True if InputBoxCancelVariable is a Boolean. This occurs, among others, when the user clicks Cancel.
- Returns False if InputBoxCancelVariable isn’t a Boolean.
Condition #2: InputBoxCancelVariable = “False”
InputBoxCancelVariable = “False” checks whether InputBoxCancelVariable holds the string “False”. Therefore, InputBoxCancelVariable = “False”:
- Returns True if InputBoxCancelVariable holds “False”. This occurs, among others, when the user clicks Cancel.
- Returns False if InputBoxCancelVariable doesn’t hold “False”.
Condition #1 And Condition #2
When you check if the user clicks the Cancel button using this macro structure, both conditions #1 (TypeName(InputBoxCancelVariable) = “Boolean”) and #2 (InputBoxCancelVariable = “False”) must be met.
The And operator performs a logical conjunction. Therefore, the condition of the If… Then… else statement returns True if the user clicks Cancel.
Line #3: StatementsIfCancel
Statements executed if the tested condition ((TypeName(InputBoxCancelVariable) = “Boolean”) And (InputBoxCancelVariable = “False”)) returns True. In other words, these statements are executed if the user clicks Cancel.
Line #4: ElseIf InputBoxCancelVariable = “” Then
Item: ElseIf… Then
The If… Then… Else statement conditionally executes a group of statements (StatementsIfCancel, StatementsIfNoInput or StatementsIfInputAndOK) depending on the value of an expression (((TypeName(InputBoxCancelVariable) = “Boolean”) And (InputBoxCancelVariable = “False”)) or InputBoxCancelVariable = “”).
Item: InputBoxCancelVariable = “”
The condition-n of the If… Then… Else statement is an expression returning True or False.
You can check if the user didn’t enter any input prior to clicking OK by testing whether InputBoxCancelVariable holds a zero-length string (“”). In other words, if the user doesn’t enter any input and clicks the OK button, InputBoxCancelVariable = 0 returns True.
Line #5: StatementsIfNoInput
Statements executed if the tested condition (InputBoxCancelVariable = “”) returns True. In other words, these statements are executed if the user doesn’t enter any input and clicks the OK button.
Line #7: StatementsIfInputAndOK
Statements executed if none of the tested conditions (((TypeName(InputBoxCancelVariable) = “Boolean”) And (InputBoxCancelVariable = “False”)) or InputBoxCancelVariable = “”) return True. In other words, these statements are executed if the user enters an input and clicks the OK button.
Macro example to create InputBox and check if user clicks Cancel button with Application.InputBox method
The following macro example:
- Creates an input box with the Application.InputBox method.
- Assigns the value returned by the Application.InputBox method to a variable (myInputBoxCancelVariable = Application.inputBox(…)).
- Checks whether user clicked Cancel ((TypeName(myInputBoxCancelVariable) = “Boolean”) And (myInputBoxCancelVariable = “False”)). If the user clicked Cancel, displays a message box confirming this.
- If the user didn’t click Cancel, checks whether the user entered no input prior to clicking OK (myInputBoxCancelVariable = “”). If the user entered no input prior to clicking OK, displays a message box confirming this.
- If the user entered input and clicked OK, displays a message box with the value held by the variable.
Sub CreateInputBoxMethodCancel()
    'source: https://powerspreadsheets.com/
    '(1) creates an input box with the Application.InputBox method, and (2) handles case where user clicks Cancel button
    'for further information: https://powerspreadsheets.com/excel-vba-inputbox/

    'declare variable to hold value returned by InputBox
    Dim myInputBoxCancelVariable As Variant

    '(1) create InputBox, and (2) assign value returned by Application.InputBox method to variable
    myInputBoxCancelVariable = Application.inputBox(Prompt:="Create Excel VBA InputBox and work with Cancel button")

    'check if user clicked Cancel button and, if appropriate, execute statements
    If (TypeName(myInputBoxCancelVariable) = "Boolean") And (myInputBoxCancelVariable = "False") Then

        'display message box confirming that user clicked Cancel button
        MsgBox "You clicked the Cancel button"

    'check if user entered no input and, if appropriate, execute statements
    ElseIf myInputBoxCancelVariable = "" Then

        'display message box confirming that user entered no input
        MsgBox "You didn't enter an input"

    'if user didn't click Cancel button and entered input, execute statements
    Else

        'display message box with value held by variable
        MsgBox "Your input was: " & myInputBoxCancelVariable

    End If

End Sub
Effects of executing macro example to create InputBox and check if user clicks Cancel button with Application.InputBox method
The following GIF illustrates the results of executing the macro example. As expected:
- Excel displays an input box created with the Application.InputBox function.
- The macro identifies whether the user:
- Clicks the Cancel button;
- Enters no input prior to clicking OK; or
- Enters input and clicks OK.
- Excel displays the appropriate message box depending on the actions taken by the user.

#9: Create InputBox and check if user clicks Cancel button when working with cell range and Application.InputBox method
VBA code to create InputBox and check if user clicks Cancel button when working with cell range and Application.InputBox method
To create an InputBox that works with a cell range using the VBA Application.InputBox method and check if the user clicks Cancel, use a macro with the following statement structure:
Dim InputBoxRangeCancelVariable As Range
On Error Resume Next
Set InputBoxRangeCancelVariable = Application.InputBox(Prompt:=PromptString, Type:=8)
On Error GoTo 0
If InputBoxRangeCancelVariable Is Nothing Then
    StatementsIfCancel
Else
    StatementsIfRangeInput
End If
Process to create InputBox and check if user clicks Cancel button when working with cell range and Application.InputBox method
To create an InputBox that works with a cell range using the VBA Application.InputBox method and check if the user clicks Cancel, follow these steps:
- Explicitly declare an object variable to hold a reference to the Range object representing the cell range (Dim InputBoxRangeCancelVariable As Range).
- Enable error-handling with the On Error Resume Next statement.
- Create an input box with the Application.InputBox method (Application.InputBox(…)).
- Set the Type parameter of the Application.InputBox method to 8 (Type:=8), which results in Application.InputBox returning a Range object.
- Assign the value returned by the Application.InputBox method to the object variable (InputBoxRangeCancelVariable = Application.InputBox(…)).
- Disable error-handling withe the On Error GoTo 0 statement.
- Use an If… Then… Else statement for the following:
- Testing whether the user clicked Cancel (InputBoxRangeCancelVariable Is Nothing).
- Executing the appropriate group of statements depending on whether the user clicked Cancel (StatementsIfCancel) or not (StatementsIfRangeInput).
VBA statement explanation
Line #1: Dim InputBoxRangeCancelVariable As Range
The Dim statement declares the InputBoxRangeCancelVariable object variable as of the Range object data type and allocates storage space.
When you check if the user clicks the Cancel button while working with a cell range using this macro structure, you explicitly declare the object variable that holds the reference to the cell range returned by the Application.InputBox method.
Line #2: On Error Resume Next
The On Error Resume Next statement enables an error-handling routine and specifies that, when a run-time error occurs, control goes to the statement following that where the error occurred.
When you check if the user clicks the Cancel button while working with a cell range using this macro structure, On Error Resume Next handles the error caused by line #3 (Set InputBoxRangeCancelVariable = Application.InputBox(Prompt:=PromptString, Type:=8)) if the user clicks Cancel. This error is usually run-time error 424 (object required).
If you don’t declare the InputBoxRangeCancelVariable object variable explicitly, the behavior of the macro and the error caused when the user clicks Cancel usually differs from what I describe in this VBA Tutorial.
Line #3: Set InputBoxRangeCancelVariable = Application.InputBox(Prompt:=PromptString, Type:=8)
Item: Set… =…
The Set statement assigns the object reference returned by the Application.InputBox method (Application.InputBox(…)) to InputBoxRangeCancelVariable.
Item: InputBoxRangeCancelVariable
InputBoxRangeCancelVariable is the object variable you want to hold the Range object returned by the Application.InputBox method.
When working with a cell range and the Application.InputBox method, Application.InputBox usually returns a Range object, unless the user clicks on the Cancel button. The cases where the user clicks on the Cancel button are handled by the On Error Resume Next statement.
Therefore, if you explicitly declare InputBoxRangeCancelVariable when working with this macro structure, you can usually declare it as of the Range object data type.
Item: Application.InputBox(…)
The Application.InputBox method:
- Displays an input box;
- Waits for the user to either (i) input information and click the OK button (or press the Enter key), or (ii) click the Cancel button (or press the Esc key); and
- Returns the information entered in the dialog box (if the user clicks OK or presses Enter).
Item: Prompt:=PromptString
The Prompt parameter of the Application.InputBox method is a string displayed as the message in the input box. Prompt is a required parameter.
You generally specify PromptString as a string expression.
You can also specify PromptString as a number, a date or a Boolean. In such cases, Excel coerces the number, date or Boolean to a string.
PromptString can be composed of multiple lines. To create an input box with multiple lines, please refer to the appropriate section of this Tutorial.
Item: Type:=8
The Type parameter of the Application.InputBox method specifies the data type returned.
When working with a cell range, set Type to 8. In such case, Application.InputBox returns a Range object.
Line #4: On Error GoTo 0
The On Error GoTo 0 statement disables the error-handler enabled in line #2.
Lines #5, #7 and #9: If InputBoxRangeCancelVariable Is Nothing Then | Else | End If
Item: If… Then… Else… End If
The If… Then… Else statement conditionally executes a group of statements (StatementsIfCancel or StatementsIfRangeInput) depending on the value of an expression (InputBoxRangeCancelVariable Is Nothing).
Item: InputBoxRangeCancelVariable Is Nothing
The condition of the If… Then… Else statement is an expression returning True or False.
The Is operator compares InputBoxRangeCancelVariable and Nothing. This expression returns True if both refer to the same.
Nothing is the default value for an object variable. Therefore, if the user clicks Cancel, InputBoxRangeCancelVariable Is Nothing returns True.
Line #6: StatementsIfCancel
Statements executed if the tested condition (InputBoxRangeCancelVariable Is Nothing) returns True. In other words, these statements are executed if the user clicks Cancel.
Line #8: StatementsIfRangeInput
Statements executed if the tested condition (InputBoxRangeCancelVariable Is Nothing) returns False. In other words, these statements are executed if the user enters/selects a cell range as input.
Macro example to create InputBox and check if user clicks Cancel button when working with cell range and Application.InputBox method
The following macro example:
- Enables error-handling (On Error Resume Next).
- Creates an input box that returns a Range object (Type:=8) with the Application.InputBox method.
- Assigns the object reference returned by the Application.InputBox method to an object variable (Set myInputBoxRangeCancelVariable = Application.inputBox(…)).
- Disables error-handling (On Error GoTo 0).
- Checks whether user clicked Cancel (myInputBoxRangeCancelVariable Is Nothing).
- If the user clicked Cancel, displays a message box confirming this.
- If the user didn’t click Cancel, displays a message box with the range reference of the cell range represented by the variable (myInputBoxRangeCancelVariable.Address).
Sub CreateInputBoxMethodCellRangeCancel()
    'source: https://powerspreadsheets.com/
    '(1) creates an input box that works with cell ranges using the Application.InputBox method, and (2) handles case where user clicks Cancel button
    'for further information: https://powerspreadsheets.com/excel-vba-inputbox/

    'declare object variable to hold reference to Range object (cell range) returned by InputBox
    Dim myInputBoxRangeCancelVariable As Range

    'enable error-handling
    On Error Resume Next

    '(1) create InputBox that works with cell range, and (2) assign value returned by Application.InputBox method to variable
    Set myInputBoxRangeCancelVariable = Application.inputBox(Prompt:="Create Excel VBA InputBox that works with cell range and handles Cancel button", Type:=8)

    'disable error-handling
    On Error GoTo 0

    'check if user clicked Cancel button and, if appropriate, execute statements
    If myInputBoxRangeCancelVariable Is Nothing Then

        'display message box confirming that user clicked Cancel button
        MsgBox "You clicked the Cancel button"

    'if user didn't click Cancel button, execute statements
    Else

        'display message box with address of cell range represented by object variable
        MsgBox "Your input was: " & myInputBoxRangeCancelVariable.Address

    End If

End Sub
Effects of executing macro example to create InputBox and check if user clicks Cancel button when working with cell range and Application.InputBox method
The following GIF illustrates the results of executing the macro example. As expected:
- Excel displays an input box created with the Application.InputBox function. The InputBox allows the user to select a cell range.
- The macro identifies whether the user:
- Clicks the Cancel button; or
- Selects or otherwise enters an appropriate cell range.
- Excel displays the appropriate message box depending on the actions taken by the user.

Пример создания пользовательской формы в редакторе VBA Excel для начинающих программировать с нуля. Добавление на форму текстового поля и кнопки.
Начинаем программировать с нуля
Часть 4. Первая форма
[Часть 1] [Часть 2] [Часть 3] [Часть 4]
Создание пользовательской формы
Создайте или откройте файл Excel с расширением .xlsm (Книга Excel с поддержкой макросов) или с расширением .xls в старых версиях приложения.
Перейдите в редактор VBA, нажав сочетание клавиш «Левая_клавиша_Alt+F11».
В открывшемся окне редактора VBA выберите вкладку «Insert» главного меню и нажмите кнопку «UserForm». То же подменю откроется при нажатии на вторую кнопку (после значка Excel) на панели инструментов.

На экране редактора VBA появится новая пользовательская форма с именем «UserForm1»:

Добавление элементов управления
Обычно вместе с пользовательской формой открывается панель инструментов «Toolbox», как на изображении выше, с набором элементов управления формы. Если панель инструментов «Toolbox» не отобразилась, ее можно вызвать, нажав кнопку «Toolbox» во вкладке «View»:

При наведении курсора на элементы управления появляются подсказки.
Найдите на панели инструментов «Toolbox» элемент управления с подсказкой «TextBox», кликните по нему и, затем, кликните в любом месте рабочего поля формы. Элемент управления «TextBox» (текстовое поле) будет добавлен на форму.
Найдите на панели инструментов «Toolbox» элемент управления с подсказкой «CommandButton», кликните по нему и, затем, кликните в любом месте рабочего поля формы. Элемент управления «CommandButton» (кнопка) будет добавлен на форму.
Кликнув по элементу управления на форме, вы можете изменять его размер, перетягивая границы за белые квадратики, и перетаскивать по форме, ухватив за одну из границ. Кликнув по заголовку формы или по ее рабочему полю, вы можете также изменять ее размер, перетягивая границы за белые квадратики.

Нажатием клавиши «F4» вызывается окно свойств, с помощью которого можно вручную задавать значения свойств пользовательской формы и элементов управления. В окне свойств отображаются свойства выбранного элемента управления или формы, если выбрана она. Также окно свойств можно вызвать, нажав кнопку «Properties Window» во вкладке «View».
Отображение формы на экране
Чтобы запустить пользовательскую форму для просмотра из редактора VBA, необходимо выбрать ее, кликнув по заголовку или свободному от элементов управления полю, и совершить одно из трех действий:
- нажать клавишу «F5»;
- нажать на треугольник на панели инструментов (на изображении выше треугольник находится под вкладкой «Debug»);
- нажать кнопку «Run Sub/UserForm» во вкладке «Run».
Для запуска пользовательской формы с рабочего листа Excel, можно использовать кнопки, описанные в этой статье. Например, чтобы отобразить форму с помощью «кнопки – элемента ActiveX», используйте в модуле рабочего листа следующий код:
|
Private Sub CommandButton1_Click() UserForm1.Show End Sub |

Для «кнопки – элемента управления формы» можно использовать следующий код, размещенный в стандартном программном модуле:
|
Sub ShowUserForm() UserForm1.Show End Sub |

В результате вышеперечисленных действий мы получаем на рабочем листе Excel пользовательскую форму с мигающим курсором в текстовом поле:

Добавление программного кода
Программный код для пользовательской формы и элементов управления формы записывается в модуль формы. Перейти в модуль формы можно через контекстное меню, кликнув правой кнопкой мыши на поле формы или на ссылке «UserForm1» в проводнике слева и нажав кнопку «View Code».
Переходить между открытыми окнами в редакторе VBA можно через вкладку «Window» главного меню.
Изменить название пользовательской формы и элементов управления, их размеры и другие свойства можно через окно свойств (Properties Window), которое можно отобразить клавишей «F4». Мы же это сделаем с помощью кода VBA Excel, записанного в модуль формы.
Откройте модуль формы, кликнув правой кнопкой мыши по форме и нажав кнопку «View Code» контекстного меню. Скопируйте следующий код VBA, который будет задавать значения свойств формы и элементов управления перед ее отображением на экране:
|
1 2 3 4 5 6 7 8 9 10 11 12 13 14 15 16 17 18 19 20 21 22 23 24 25 26 27 28 29 30 31 32 33 34 35 36 37 38 39 40 41 42 43 44 45 |
Private Sub UserForm_Initialize() ‘Me — это обращение к форме в ее модуле With Me ‘Присваиваем форме заголовок .Caption = «Новая форма» ‘Задаем ширину формы .Width = 300 ‘Задаем высоту формы .Height = 150 End With With TextBox1 ‘Задаем ширину текстового поля .Width = 200 ‘Задаем высоту текстового поля .Height = 20 ‘Задаем расстояние от внутреннего края ‘формы сверху до текстового поля .Top = 30 ‘Задаем расстояние от внутреннего края ‘формы слева до текстового поля, чтобы ‘текстовое поле оказалось по центру .Left = Me.Width / 2 — .Width / 2 — 6 ‘Задаем размер шрифта .Font.Size = 12 ‘Присваиваем текст по умолчанию .Text = «Напишите что-нибудь своё!» End With With CommandButton1 ‘Задаем ширину кнопки .Width = 70 ‘Задаем высоту кнопки .Height = 25 ‘Задаем расстояние от внутреннего края ‘формы сверху до кнопки .Top = 70 ‘Задаем расстояние от внутреннего края ‘формы слева до кнопки, чтобы ‘кнопка оказалось по центру .Left = Me.Width / 2 — .Width / 2 — 6 ‘Задаем размер шрифта .Font.Size = 12 ‘Присваиваем кнопке название .Caption = «OK» End With End Sub |
Вставьте скопированный код в модуль формы:

Познакомьтесь еще с одним способом отображения на экране пользовательской формы в процессе тестирования: установите курсор внутри процедуры UserForm_Initialize() и нажмите клавишу «F5» или треугольник на панели инструментов. Все предыдущие способы (с выбором формы в редакторе и кнопками на рабочем листе) тоже работают.
В результате мы получаем следующую форму:

Теперь перейдите в редактор VBA, откройте проект формы «UserForm1» и дважды кликните по кнопке «CommandButton1». В результате откроется модуль формы и будет создан шаблон процедуры CommandButton1_Click(), которая будет запускаться при нажатии кнопки:
|
Private Sub CommandButton1_Click() End Sub |
Вставьте внутрь шаблона процедуры CommandButton1_Click() следующую строку кода, которая будет копировать текст из текстового поля в ячейку «A1» активного рабочего листа:
|
Range(«A1») = TextBox1.Text |

Отобразите пользовательскую форму на экране и проверьте работоспособность кнопки «OK».
How to Create a VBA InputBox
That Collects User Data (2023)
Written by co-founder Kasper Langmann, Microsoft Office Specialist.
Most of the time, you write VBA code that uses values already present in your spreadsheet.
But what if you want to get information directly from the user?
Input boxes let you do just that!
Instead of just displaying a message (like a message box), they allow users to enter information – and then send that information directly to your macro.
Here’s how it works!
Creating an Excel input box with VBA
Making an input box with VBA in Excel is very easy. All you need to know is this construction:
InputBox("[text]")
So, for example, you could use this:
InputBox("What’s your favorite Spreadsheeto course?")
Here’s the full VBA module that we’ll use to create this box:
Sub ssFav()
 InputBox("What’s your favorite Spreadsheeto course?")
End Sub
When we run this module, we get this input box:

Simple, right?
 Kasper Langmann, Co-founder of Spreadsheeto
Storing input from user entries
In the previous example, when the user hits OK, the text that they put into the input box just disappears. It’s not stored anywhere.
We can fix that by combining the command for an input box with the command for assigning a value to a variable.
First we’ll create a String variable (we’re using String because we’re planning on collecting text entries):
Dim response As String
Then we’ll assign a value to it. Instead of just assigning a regular string, we’ll assign the entry from an input box:
response = InputBox("What’s your favorite Spreadsheeto course?")
Now that we’ve stored the data in a variable, let’s do something with it. We’ll put the text into a cell:
Range("B1").Value = response
The whole module looks like this:
Sub ssFav()
  Dim response As String
  response = InputBox("What’s your favorite Spreadsheeto course?")
  Range("B1").Value = response
End Sub
When we run the module, we see the input box just like last time. Now, however, when we enter an answer and hit OK, it’s stored in B1:
You can store all kinds of information from input boxes, but it’s important to remember to declare the right type of variable.
If we had a variable declared as an integer and someone enters text in the input box, it’s going to cause trouble.
Once the value is correctly stored, however, you can run operations on it, write it to a cell, or do any of the other great things you’ve learned to do with VBA.
Other input box options
Here’s the full syntax for an input box in VBA:
InputBox (Prompt, Title, Default, Left, Top, HelpFile, HelpContextID, Type)
In our previous example, we only used the Prompt argument.
In the following example, we’ll include the Title argument – which is an optional parameter.
By including an argument for Title, we can give the box a more descriptive title than the default title “Microsoft Excel.” Here’s the VBA code we used:
InputBox("What's your favorite Spreadsheeto course?", "Spreadsheeto Survey")
And the result:

You can also include a default value in the input box, so when it appears it already has an option available for the user.
This is especially useful if you’re asking for input from numerous people who are likely to have the same answer; just set the answer as default to save them some time.

The Left and Top arguments let you position the input box wherever you’d like it. The distance is measured in points from the upper-left corner of the user’s screen.
You’ll have to do some experimenting if you want to find the optimum position for your input box. Because points aren’t the same as pixels, it can be a bit unpredictable.
It might be best to just leave the default values for the position, as the input box is likely to come up somewhere visible.
HelpFile and HelpContextID are advanced parameters that let you display a link to a help file (don’t worry about these right now).
Finally, Type tells Excel the type of data to send from the input box. Here are the options:
- 0 A formula
- 1 A number
- 2 Text (a string)
- 4 A logical value (True or False)
- 8 A cell reference, as a Range object
- 16 An error value, such as #N/A
- 64 An array of values
As long as you declare the right variable type, you won’t have to worry about this much. Once you advanced your VBA skills and want to pass arguments like formulas and error codes, though, you’ll need to know these.
VBA inputbox pros and cons
Using an input box is a great way to collect information from the user that can then be used in a macro. Remember, though, that users are relatively unrestricted in what they can enter into an input box.
If you’re expecting a number and they give you text, it’s going to mess up your macro.
You may want to use something that lets you limit the choices, like a drop-down list. No matter which way you decide to go, remember that it’s best to make the choices as simple as possible.
That’s it – Now what?
Well, that was how to use the VBA inputbox function to prompt the user, via an inputbox dialog box, to add a value that’ll go into a variable.
Pretty cool, huh?💡
Gathering user input is useful – but it is a very small part of VBA programming.
If you want to learn more, click here to read more about (and enroll in) my free course on VBA.
Other resources
Playing around with inputboxes requires a good knowledge about the VBA editor in general.
If you’re not 100% confident using the visual basic editor (VBA/VB editor in short), read all about it here.
The inputbox function always comes with a variable, so if you’re going to use them extensively, you might wan’t to check out my full guide to declaring variables here.
Kasper Langmann2023-02-22T11:30:51+00:00
Page load link
The Input Box is a dialogue box that helps users to take a value and do later computations according to the entered value. The input box is similar to the message box, but the message box is used to display the data while the input box is used to enter the data. By default, a message box displays only the Ok button in its conversation box, whereas an input box displays both the Ok and Cancel buttons. You can specify the type of data to be returned.
In excel VBA Macro, Input Box is one of the most commonly used functions. In this example, we will learn how to create an input box using excel VBA which consumes multiple data from the end-user. For this, we will be creating a user form.
Step By Step Implementation
Step 1: Insert Visual Basic Editor
To insert Visual Basic Editor in excel please refer to How to Insert and Run VBA Code in Excel?
Step 2: Insert User Form
In this step, we need to add a user form to our VBA. For this, we need to go to the Developer tab on the top of the ribbon and then select Visual Basic.

Fig 1 – Open Visual Basic
Once we click on the Visual Basic option, excel will open Visual Basic Editor in a new window.

Fig 2 – Visual Basic Editor
In the Visual Basic Editor, we need to insert user form for this we just need to click on the Insert UserForm option.

Fig 3 – Insert UserForm
Once we click on Insert UserForm, excel will automatically insert a user form.

Fig 4 – User Form
If the Toolbox window doesn’t get open automatically, then Click on View and then Toolbox. It will open the toolbox window.
Step 3: Adding Labels to User Form
In this step, we will add the required labels we need in our user form. For this example, we will be using the following labels in our user form.
| Labels | Name | Caption |
| Frame | GeeksForGeeks | GeeksForGeeks |
| TextBox | Name | Name |
| TextBox | Age | Age |
| ComboBox | Branch | |
| CheckBox | Technical Content Writer |
First, we need to add Label to our User Form. In order to add a label, we go to Toolbox and then drag the Label to User Form.

Fig 5 – Adding Label to User Form
Once we add Label to our User Form, we need to format it using the Properties Window.
Note: If by default Properties Window is not visible, we can add it. For this Select Label then View and then Properties Window.
Now, we will format our label, for this, we need to Select Label then Properties Window, and then Caption & Text Align.

Fig 6 – Changing Caption & TextAlign
We will also change the background color for this Select Label then Properties Window then BackColor here we choose Palette from Choose Color.

Fig 7 – Changing BackColor
Now, we need to copy this Label for all of our User Form fields. For this Select Label and then copy with Ctrl+C and then paste it with Ctrl+V, all the labels below one another.

Fig 8 – Copying Labels For All Fields
Once, we have copied and pasted the required labels we need to change the field’s name according to our requirements. For changing fields name we will use the Properties Window as we have done above. Once we update all the labels as per our requirement, we will get the following output.

Fig 9 – Changing Labels
Before moving further, we can align our labels. For this Select Labels and then choose Format on the top of the ribbon then select Align and choose Left. This will align all the Labels to left in a straight line.
Note: To select all labels, we need to drag our cursor over all the labels.

Fig 10 – Align All Labels to Left
Step 4: Adding Input Box
In this step, we will add the required fields to take input from user. Here, we will use TextBox for Name and Age. For Branch we will be using ComboBox and for the Technical Content Writer field we will be using CheckBox.
First, we will add TextBox for Name Field. For this go to Toolbox and then drag the TextBox to UserForm.

Fig 11 – Adding TextBox
Similarly, we will add TextBox for Age Field. Also, we will add SpinButton along with TextBox for age field.

Fig 12 – Adding SpinButton
Now, For Branch Field we will add ComboBox. In order to add this we need to go to Toolbox and then drag the ComboBox to User Form beside branch field. ComboBox is used for adding list elements.

Fig 13 – Adding ComboBox
Finally, for our Technical Content Writer field we will be using CheckBox. For this go to Toolbox and then drag the CheckBox to UserForm.

Fig 14 – Adding CheckBox
We need to change the caption for our CheckBox. For this Select CheckBox and then in Properties Window click Caption. Here, we are changing it to “Yes”.

Fig 15 – Changing Caption
Step 5: Adding Frame
Now, we need to add our user form in a frame. For this, we need to go to Toolbox and then drag the Frame to User Form. But if we drag the frame over our user form, it gets overlapped on our fields and attributes. So, First We need to select all the fields and attributes by dragging over the user form and then copy it. After that we will delete everything and add frame to our user form and then paste the copied fields and attribute.
Note: Make sure you have copied everything from user form, before deleting it.

Fig 16 – Select Everything & Copy It
Once we have copied everything to clipboard, we need to delete all of them and add frame to our user form.

Fig 17 – Adding Frame
After we have added the frame, we need to paste all the clipboard items that we have copied and will get the following output.

Fig 18 – Output
Now, we have added frame to our user form. We can also format the Frame as per our requirement using the Properties Window. Here, we are changing the Captions for frame as “Fill the Form“ and for UserForm as “GeeksForGeeks“.

Fig 19 – Adding Caption To Frame & User Form
Step 6: Adding Button
In this step, we will add buttons to our user form. For adding button, we go to Toolbox and then drag the CommandButton to User Form.

Fig 20 – Adding Command Button
Now, we will change the text of button using Caption from Properties Window. We will change it as per requirement we will get following output.

Fig 20 – Output
Before moving ahead, we can run our VBA code. To run VBA code please refer How to Insert and Run VBA Code in Excel? For this Select User Form and then Run Button in Menu.

Fig 21 – To Run User Form
Once we run our user form, we will get the following output.

Fig 22 – Running User Form
In above user form, we can add text to our Name Field. But for Age and Branch we need to define their functionalities.
Step 7: Adding Age Functionality
In this step, we will add functions to our Age Fields. When we click on our age field textbox we will get the name of textbox that we need to link to SpinButton. So, that age gets updated whenever we click on spin button.

Fig 23 – Age Field Name
As above, we can see age field name is TextBox2. Similarly, we will check spin button name. After that we need to link the spin button with age field name. For this Double-click on Spin Button. It will open VBA code editor. Where we need to write the following code.
TextBox2.Value = SpinButton1.Value
We will also set min and max value for age field. Here, we are using min value as 18 and max as 62.

Fig 24 – Link Spin Button with Age Field
Once we have added the code in VBA Editor. We will run our user form and will use spin button to change the value.

Fig 25 – Age Field
Step 8: Adding Branch Functionality
In this step, we will add function to our Branch Field. For this, we need list of branches (CSE, Mech, IT, Electrical, Chemical). We will create a new sheet in excel and add list of the branches to it.

Fig 26 – Branch List
Now, we need to give a name to the Range of list. For this Select All Row and then Add Name in Name Box. Here, we are using range name as branch_list.

Fig 27 – Range Name
After this, we need to link the range name of our branch list to our branch field combobox. For this Select ComboBox (Branch Field) then in Properties Window select Row Source and add the range name there.

Fig 28 – Adding Range Name To RowSource
After this when we run our VBA Code, we will get the list of branch visible in the drop-down menu.

Fig 29 – Branch List
Before moving further, we need to add columns for our fields in the excel sheet. Which will store data entered by users in our user form.

Fig 30 – Adding Columns To Excel
Step 8: Adding Submit Button Functionalities
In this step, we will add function to our Submit Button. For this we need to do Double-Click on Submit Button then in VBA Code Editor click Add Code. We will be adding the following code in VBA code editor. Make sure that you have changed the cell & fields name according to your excel sheet.
Sheet1.Activate
Range(“A1”).End(xlDown).Offset(1, 0).Value = TextBox1.Value
Range(“B1”).End(xlDown).Offset(1, 0).Value = TextBox2.Value
Range(“C1”).End(xlDown).Offset(1, 0).Value = ComboBox1.Value
If CheckBox1.Value = True Then
Range(“D1”).End(xlDown).Offset(1, 0).Value = “Yes”
Else
Range(“D1”).End(xlDown).Offset(1, 0).Value = “No”
End If
Unload Me

Fig 31 – Submit Button Function
After we add function to our submit button. We will run our user form and enter the data. The data gets stored into the excel sheet.

Fig 32 – User Form Data Storing
Step 9: Adding Cancel Button Functionalities
In order to add cancel function. We will need to write the following code. It will remove our user form from the foreground.
Unload Me

Fig 33 – Cancel Button Function
Step 10: Adding Reset Button Functionalities
In this step, we will add function to our reset button. We will be using following code. It will make all fields to blank(empty).
TextBox1.Value = ""
TextBox2.Value = ""
ComboBox1.Value = ""
CheckBox1.Value = False

Fig 34 – Reset Button Function
Step 11: Adding Macros for User Form
In this step, we will add a macro to access our user form. Every time the end user need not to go to developer option and access our user form. We will add a control command button on clicking user will access user form. For this go to Excel Sheet and then in Developer tab on the top of the ribbon and then in Enable Design Mode group select Insert and then drag the Command Button (ActiveX Control) to Excel Sheet.

Fig 35 – Adding ActiveX Control: Command Button
After we inset the Command Button, we need to add function to it. So that, whenever any user clicks on the button, it will open our user form. To add functions, it we need to Double-Click Command Button and Add Functions. Here, we are also formatting our command button using Properties Window.

Fig 36 – Adding Function to Command Button
After this, we need to disable the Design Mode and Click Command Button (ActiveX Control). It will open our user form.
Step 12: Output