
How to make word inputs in Python
I want to be able to have the computer to ask a question to the user like
test = int(input('This only takes a number as an answer'))
I want to be able to have ‘test’ not be a number, rather a word, or letter.
![]()
Deduplicator
44.3k7 gold badges65 silver badges115 bronze badges
asked Mar 18, 2015 at 21:02
![]()
1
Just remove the int call! That is what makes the statement accept integer numbers only.
I.e, use:
test = input('This takes any string as an answer')
answered Mar 18, 2015 at 21:03
![]()
Alex MartelliAlex Martelli
844k167 gold badges1213 silver badges1391 bronze badges
Remove the type cast to int
test = input('This only takes a word as an answer :')
A demo
>>> test = input('This only takes a word as an answer :')
This only takes a word as an answer :word
>>> test
'word'
Note — From the docs
The function then reads a line from input, converts it to a string (stripping a trailing newline), and returns that
Therefore input automatically converts it to a str and there is no need of any explicit cast.
answered Mar 18, 2015 at 21:04
![]()
Bhargav RaoBhargav Rao
49.1k28 gold badges124 silver badges139 bronze badges
This should work:
test = str(input('This only takes a string as an answer: '))
BUT
Because Python works with String by default, actually you don’t need any casting like int or str
Also, if you were using version prior to 3.x, it would be raw_input instead of input. Since your solution seem to have been accepting input, I can be safe assuming that your Python is OK.
test = input(‘This only takes a string as an answer’)
answered Mar 18, 2015 at 21:04
![]()
0
 test = input("This only takes a number as an answer")
 test = raw_input("This only takes a number as an answer")
Either one should work
answered Mar 18, 2015 at 21:11
![]()
If you are using python 2.7, just use raw_input function.
test = raw_input('This only takes a string as an answer: ')
I.e.:
>>> test = raw_input('This only takes a string as an answer:  ')
This only takes a string as an answer:  2.5
>>> type (test)
<type 'str'>
If you use input, you can have only a number:
Right input:
>>> test = input('This only takes a number as an answer:  ')
This only takes a string as an answer:  2.5
>>> type (test)
<type 'float'>
Wrong input:
>>> test = input('This only takes a number as an answer:  ')
This only takes a number as an answer:  word
Traceback (most recent call last):
  File "<stdin>", line 1, in <module>
  File "<string>", line 1, in <module>
NameError: name 'word' is not defined
answered Mar 18, 2015 at 21:26
![]()
overcomerovercomer
2,1743 gold badges26 silver badges39 bronze badges
Получение и обработка информации — один из важнейших элементов любого языка программирования, особенно если речь идет о получении информации от пользователей.
Python, будучи медленным относительно таких языков, как C или Java, предлагает продвинутые инструменты для получения, анализа и обработки данных от конечного пользователя.
В этом материале речь пойдет о том, какие функции Python можно использовать для этих целей.
Для получения информации с клавиатуры в Python есть функции input() или raw_input() (о разнице между ними чуть позже). У них есть опциональный параметр prompt, который является выводимой строкой при вызове функции.
Когда input() или raw_input() вызываются, поток программы останавливается до тех пор, пока пользователь не введет данные через командную строку. Для ввода нужно нажать Enter после завершения набора текста. Обычно Enter добавляет символ новой строки (n), но не в этом случае. Введенная строка просто будет передана приложению.
Интересно, что кое-что поменялось в принципе работе функции между Python 2 и Python 3, что отразилось в разнице между input() и raw_input(). Об этом дальше.
Сравнение функций input и raw_input
Разница между этими функциями зависит от версии Python. Так, в Python 2 функция raw_input() используется для получения ввода от пользователя через командную строку, а input() оценивает ее и попробует запустить как код Python.
В Python 3 от raw_input() избавились, оставив только input(). Она используется для получения ввода пользователя с клавиатуры. Возможности input() из Python 2 в Python 3 работать не будут. Для той же операции нужно использовать инструкцию eval(input()).
Взгляните на пример функции raw_input в Python 2.
# Python 2

txt = raw_input("Введите что-нибудь, чтобы проверить это: ")
print "Это то, что вы только что ввели?", txt
Вывод
Введите что-нибудь, чтобы проверить это: Привет, мир!

Это то, что вы только что ввели? Привет, мир!
А вот как она работает в Python 3
# Python 3

txt = input("Введите что-нибудь, чтобы проверить это: ")
print("Это то, что вы только что ввели?", txt)
Вывод
Введите что-нибудь, чтобы проверить это: Привет, мир 3!

Это то, что вы только что ввели? Привет, мир 3!
Дальше в материале будет использоваться метод input из Python 3, если не указано другое.
Строковый и числовой ввод
По умолчанию функция input() конвертирует всю получаемую информацию в строку. Прошлый пример продемонстрировал это.
С числами нужно работать отдельно, поскольку они тоже изначально являются строками. Следующий пример показывает, как можно получить информацию числового типа:
# Ввод запрашивается и сохраняется в переменной
test_text = input ("Введите число: ")

# Преобразуем строку в целое число.
# функция float() используется вместо int(),
# для преобразования пользовательского ввода в десятичный формат,
test_number = int(test_text)

# Выводим в консоль переменную
print ("Введенное число: ", test_number)
Вывод
Введите число: 13
Введенное число: 13
Того же можно добиться и таким образом:
test_number = int(input("Введите число: "))
Здесь сразу после сохранения ввода происходит преобразование и присваивание значения переменной.
Нужно лишь отметить, что если пользователь ввел не целое число, то код вернет исключение (даже если это число с плавающей точкой).
Обработка исключений ввода
Есть несколько способов, как можно удостовериться в том, что пользователь ввел корректные данные. Один из них — перехватывать все возможные ошибки, которые могут возникнуть.
Вот такой код считается небезопасным:
test2word = input("Сколько вам лет? ")
test2num = int(test2word)
print("Ваш возраст ", test2num)
Запустим его и введем следующее:
Сколько вам лет? Пять
При вызове функции int() со строкой Пять появится исключение ValueError, и программа остановит работу.
Вот как можно сделать код безопаснее и обработать ввод:
test3word = input("Введите свое счастливое число: ")

try:
    test3num = int(test3word)
    print("Это правильный ввод! Ваше счастливое число: ", test3num)
except ValueError:
    print("Это не правильный ввод. Это не число вообще! Это строка, попробуйте еще раз.")
Этот блок оценит ввод. Если он является целым числом, представленным в виде строки, то функция input() конвертирует его в целое число. Если нет, то программа выдаст исключение, но вместо ошибки оно будет перехвачено. В результате вызовется вторая инструкция print.
Вот так будет выглядеть вывод с исключением.
Введите свое счастливое число: Семь
Это не правильный ввод. Это не число вообще! Это строка, попробуйте еще раз.
Такой код можно объединить с другой конструкцией, например, циклом for, чтобы убедиться, что код будет выполняться постоянно, до тех пор, пока пользователь не введет те данные, которые требуются.
Полный пример
# Создадим функцию для демонстрации примера
def example():

    # Бесконечный цикл, который продолжает выполняться
    # до возникновения исключения
    while True:
        test4word = input("Как вас зовут? ")

        try:
            test4num = int(input("Сколько часов вы играете на своем мобильном телефоне?" ))

        # Если полученный ввод не число, будет вызвано исключение
        except ValueError:
            # Цикл будет повторяться до правильного ввода
            print("Error! Это не число, попробуйте снова.")

        # При успешном преобразовании в целое число,
        # цикл закончится.
        else:
            print("Впечатляет, ", test4word, "! Вы тратите", test4num*60, "минут или", test4num*60*60, "секунд на игры в своем телефоне!")
            break

# Вызываем функцию
example()
Вывод:
Как вас зовут? Александр
Сколько часов вы играете на своем мобильном телефоне? 3
Впечетляет, Александр! Вы тратите 180 минут или 10800 секунд на игры в своем телефоне!
Выводы
В этой статье вы узнали, как встроенные инструменты Python используются для получения пользовательского ввода в разных форматах. Также научились обрабатывать исключения и ошибки, которые могут возникнуть в процессе.
Содержание:развернуть
- Чтение ввода с клавиатуры
- Преобразование вводимые данные
-
Input() → int
-
Input() → float
-
Input() → list (список)
- Ввод в несколько переменных
Обычно программа работает по такой схеме: получает входные данные → обрабатывает их → выдает результат. Ввод может поступать как непосредственно от пользователя через клавиатуру, так и через внешний источник (файл, база данных).
В стандартной библиотеке Python 3 есть встроенная функция input() (в Python 2 это raw_input()), которая отвечает за прием пользовательского ввода. Разберемся, как она работает.
Чтение ввода с клавиатуры
Функция input([prompt]) отвечает за ввод данных из потока ввода:
s = input()

print(f"Привет, {s}!")
> мир # тут мы с клавиатуры ввели слово "мир"
> Привет, мир!
👉 В этом примере:
- При вызове функции
input()выполнение программы приостанавливается до тех пор, пока пользователь не введет текст на клавиатуре (приложение может ждать бесконечно долго). - После нажатия на
Enter, функцияinput()считывает данные и передает их приложению (символ завершения новой строки не учитывается). - Полученные данные присваиваются переменной и используются дальше в программе.
input() всегда возвращает строку:
s = input()

print(type(s))
> 2
> <class 'str'>
Также у input есть необязательный параметр prompt – это подсказка пользователю перед вводом:
name = input("Введите имя: ")

print(f"Привет, {name}!")
> Введите имя: Вася
> Привет, Вася!
📃 Более подробное описание функции из документации:
def input([prompt]):

    """

    Read a string from standard input.  The trailing newline is stripped.
The prompt string, if given, is printed to standard output without a
trailing newline before reading input.
If the user hits EOF (*nix: Ctrl-D, Windows: Ctrl-Z+Return), raise EOFError.
On *nix systems, readline is used if available.
"""
pass
Преобразование вводимые данные
Данные, введенные пользователем, попадают в программу в виде строки, поэтому и работать с ними можно так же, как и со строкой. Если требуется организовать ввод цифр, то строку можно преобразовать в нужный формат с помощью функций явного преобразования типов.
☝️ Важно: если вы решили преобразовать строку в число, но при этом ввели строку (например: test), возникнет ошибка:
ValueError: invalid literal for int() with base 10: 'test'
На практике такие ошибки нужно обрабатывать через try except. В примере ниже пользователь будет вводить данные до тех пор, пока они успешно не преобразуются в число.
def get_room_number():

    while True:

        try:

            num = int(input("Введите номер комнаты: "))

            return num

        except ValueError:

            print("Вы ввели не число. Повторите ввод")
room_number = get_room_number()
print(f"Комната {room_number} успешно забронирована!")
> Введите номер комнаты: test
> Вы ввели не число. Повторите ввод
> Введите номер комнаты: 13
> Комната 13 успешно забронирована!
Input() → int
Для преобразования в целое число используйте функцию int(). В качестве аргумента передаются данные которые нужно преобразовать, а на выходе получаем целое число:
age_str = input("Введите ваш возраст: ")

age = int(age_str)
print(age)
print(type(age))
> Введите ваш возраст: 21
> 21
> <class 'int'>
То же самое можно сделать в одну строку: age = int(input("Введите ваш возраст: ")).
Input() → float
Если нужно получить число с плавающей точкой (не целое), то его можно получить с помощью функции float().
weight = float(input("Укажите вес (кг): "))
print(weight)
print(type(weight))
> Укажите вес (кг): 10.33
> 10.33
> <class 'float'>
Input() → list (список)
Если в программу вводится информация, которая разделяется пробелами, например, «1 word meow», то ее легко преобразовать в список с помощью метода split(). Он разбивает введенные строки по пробелам и создает список:
list = input().split()
print(list)
print(type(list))
> 1 word meow
> ['1', 'word', 'meow']
> <class 'list'>
💭 Обратите внимание, что каждый элемент списка является строкой. Для преобразования в число, можно использовать int() и цикл for. Например, так:
int_list = []

for element in input().split():

    int_list.append(int(element))
print([type(num) for num in int_list])
> 1 2 3
> [<class 'int'>, <class 'int'>, <class 'int'>]
Ввод в несколько переменных
Если необходимо заполнить одним вводом с клавиатуры сразу несколько переменных, воспользуйтесь распаковкой:
a, b, c = input().split()

print(f"a: {a}, b: {b}, c: {c}")
> test 13 100
> a: test, b: 13, c: 100
В этом примере строка из input() разбивается по пробелу функцией split(). Далее применяется синтаксис распаковки – каждый элемент списка попадает в соответствующую переменную.
Все переменные после распаковки будут строкового типа. Преобразовать их (например в int) можно так:
a, b = [int(s) for s in input().split()]

print(f"type a: {type(a)}, type b: {type(b)}")
> 13 100
> type a: <class 'int'>, type b: <class 'int'>
☝️ Важно: не забывайте обрабатывать ошибки:
- если введенных значений больше чем переменных, получите ошибку –
ValueError: too many values to unpack (expected 3); - если введенных значений меньше чем переменных, получите ошибку –
ValueError: not enough values to unpack (expected 3, got 2); - если преобразовываете в int, а вводите строку –
ValueError: invalid literal for int() with base 10: 'test'.
В этом руководстве вы узнали, как принимать данные от пользователя, введенные с клавиатуры, научились преобразовывать данные из input и обрабатывать исключения.
![]()
О выводе данных в Python читайте тут:
В данном учебном курсе мы будем писать программы без графического пользовательского интерфейса, то есть без кнопок, текстовых полей ввода и т. д. Программы будут принимать на вход данные от пользователя с клавиатуры (а чуть позже мы научимся работать с файловым вводом и выводом), а выводить результат будут на экран. Всё взаимодействие с программой будет происходить в командной строке, также называемой консолью или терминалом.
Во введении к курсу мы узнали, что командная строка в среде разработки Visual Studio Code находится внизу на вкладке «Терминал». Именно в ней мы будем вводить данные с клавиатуры, а программа будет выводить результаты. Как было сказано ранее, мы будем писать компьютерные программы, которые принимают на вход данные, работают с ними и выводят результат на экран.
Вспомним программу из введения:
print("Привет, мир!")
В этой программе мы вызываем встроенную функцию под названием print(). Как она устроена внутри, нам пока не столь важно. Главное — запомнить, что у неё есть имя, по которому к ней можно обратиться, плюс она принимает данные и обрабатывает их. О том, какими могут быть данные, мы тоже поговорим позже — в нашем примере мы передаём строку «Привет, мир!».
В Python строки заключены в кавычки — можно использовать одинарные, двойные и тройные (рекомендуется их составлять из трёх двойных). Внутри кавычек одного вида можно использовать другой вид кавычек как часть выводимой на экран строки.
Например:
print('Привет, мир!')print("Привет, мир!")print("""Привет, мир!""")print("Программа выводит фразу 'Привет, мир!'")
Данные в программу могут поступать различными способами. Самый простой и привычный для пользователя — это ввод с клавиатуры. Для этого в Python используется функция input(), которая возвращает в программу введённую пользователем строку. Но данные нужно куда-то сохранить, и в этом нам помогают переменные. Переменным назначаются имена, в них записываются значения, и затем они используются в программе по мере необходимости.
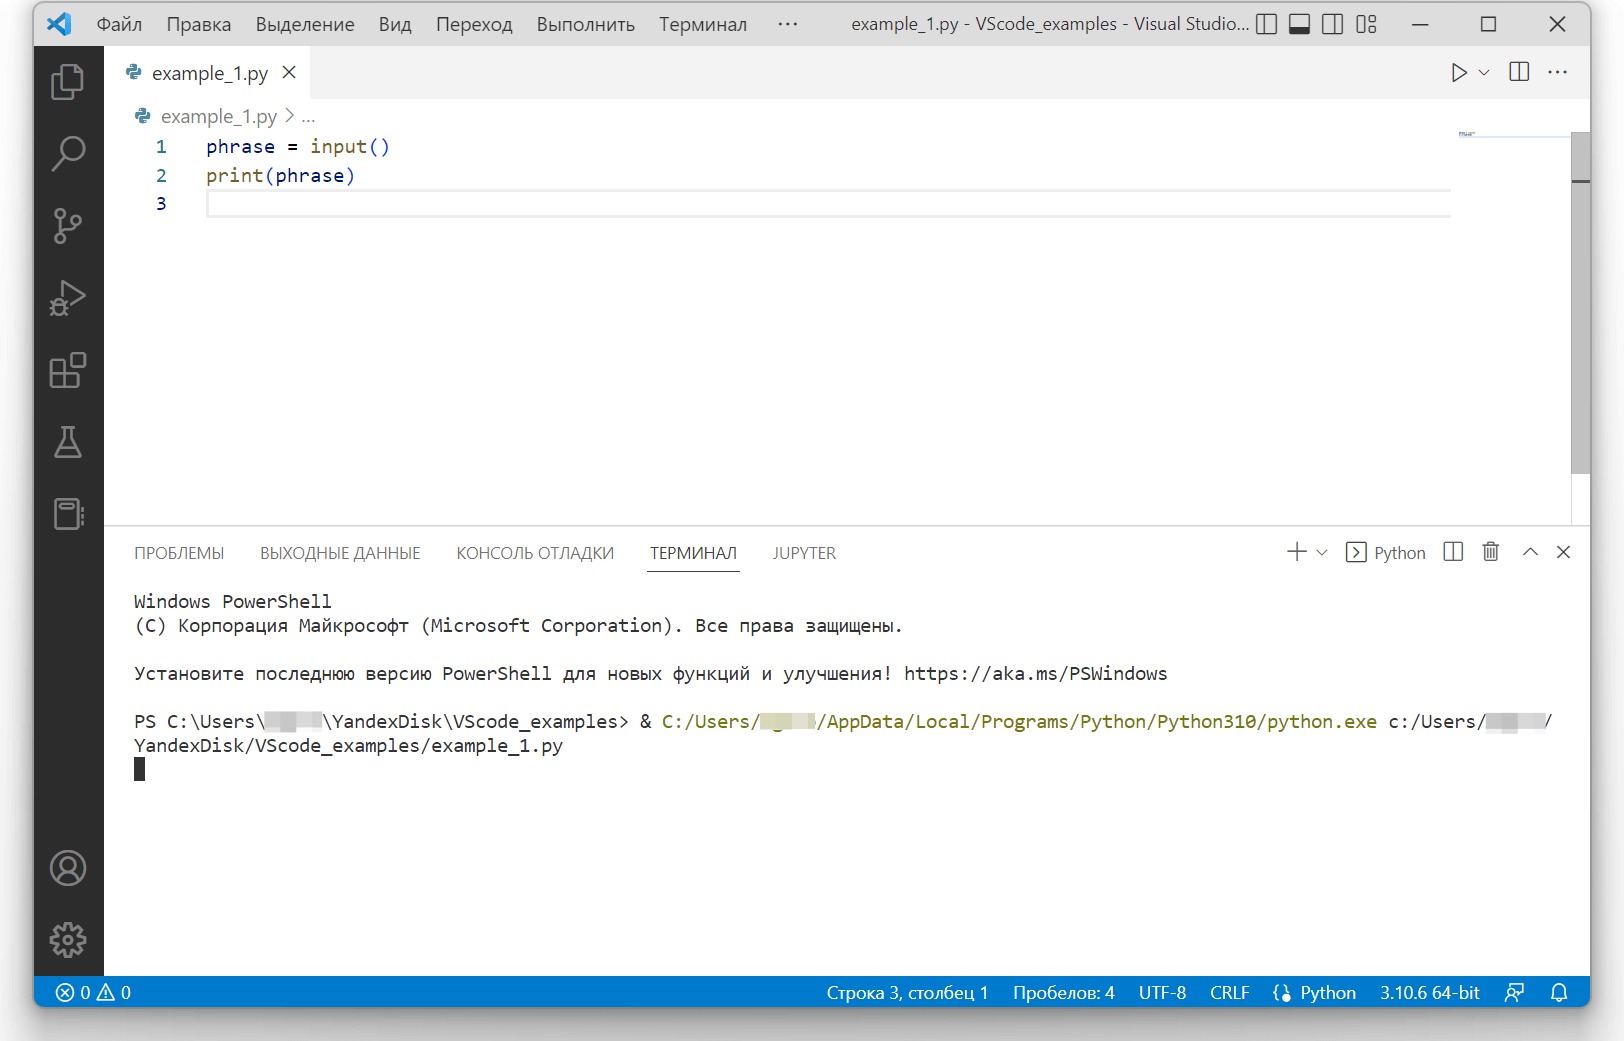
Напишем программу, которая получает от пользователя строку и выводит на экран:
phrase = input()
print(phrase)
После запуска программы происходит приостановка выполнения и в терминале появляется приглашение для ввода данных:
После ввода данных необходимо нажать клавишу Enter. Программа запишет введённые данные в переменную phrase и продолжит выполнение со следующей строчки. Переменная начинает существовать в программе, когда в неё записывается какое-то значение. В момент записи значения переменной назначается тип данных, определённый в соответствии со значением.
В нашем примере в переменную phrase записывается строка, введённая пользователем. Поэтому переменной phrase назначается встроенный в язык Python тип данных str. Тип данных str используется для хранения строк, а сами строки являются упорядоченной последовательностью символов.
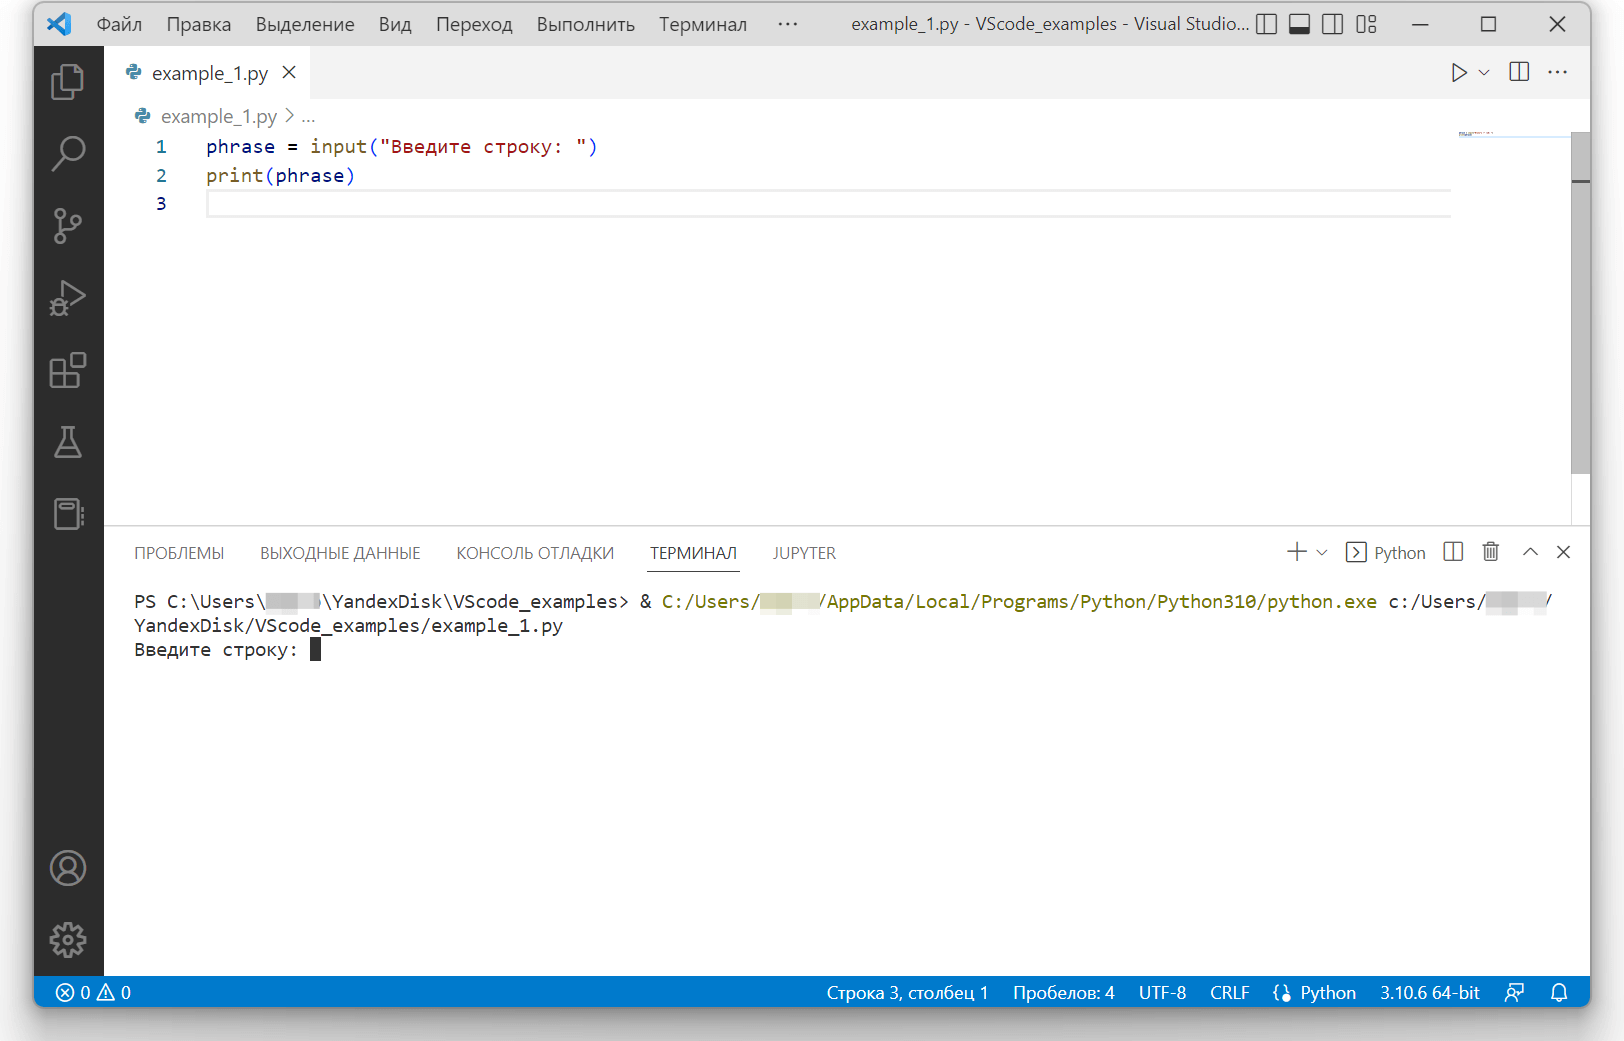
У функции input() можно задать параметр-строку перед вводом значения — и тогда указанный текст будет сопровождать приглашение к вводу данных:
phrase = input("Введите строку: ")
print(phrase)
Для именования переменных и правильного оформления кода существует стандарт PEP 8 (Python Enhancement Proposals), который следует соблюдать. Согласно стандарту PEP 8, имена переменных должны содержать маленькие буквы английского алфавита и символ «подчёркивание» для разделения слов в имени. Пример имён переменных по стандарту: value, first_value.
Нельзя использовать следующие однобуквенные имена переменных:
- I (большая английская i);
- l (маленькая английская L);
- O.
Эти однобуквенные имена усложнят читаемость кода, так как могут быть перепутаны между собой или с цифрами. Все стандарты PEP можно посмотреть на этой странице.
Но вернёмся к функции print(). С её помощью можно выводить сразу несколько значений. Для этого их нужно перечислить через запятую. Выведем, например, фразу Добрый день, %имя%.:
name = "Пользователь"
print("Добрый день,", name, ".")
В консоли отобразится:
Добрый день, Пользователь .
Как видим, результат работы программы не соответствует нашим ожиданиям, так как между словом «Пользователь» и точкой появился пробел. Данный пробел является символом, который по умолчанию ставится между выводимыми значениями. Вместо пробела можно указать любую другую строку, даже пустую. Для этого нужно передать в функцию print() именованный аргумент sep (англ. separator — «разделитель»). Сделаем так, чтобы вместо пробела в качестве разделителя использовалась пустая строка:
name = "Пользователь"
print("Добрый день, ", name, ".", sep="")
В консоли отобразится:
Добрый день, Пользователь.
Но в таком случае необходимые пробелы нам придётся ставить самим, а это неудобно. К счастью, в Python существует удобный и мощный инструмент для форматирования строк — f-строки. Чтобы задать f-строку, необходимо поставить букву f перед открывающей кавычкой строки. Далее f-строка записывается как единое целое, с учётом правил её форматирования, и закрывается соответствующей кавычкой:
name = "Пользователь"
print(f"Добрый день, {name}.")
Внутри f-строк можно обращаться к переменным, используя фигурные скобки, как в примере выше, а также производить операции, выполнять функции и подставлять их результаты в данную строку. И это только малая часть возможностей f-строк. Более подробно про них можно почитать в данном источнике.
Использование f-строк является приоритетным способом форматирования. Наряду с f-строками существует функция format(), которая также предназначена для удобного форматирования (мы рассмотрим её чуть позже). Также форматирование строк может производиться с помощью символа %. Однако данный способ форматирования является устаревшим (здесь можно почитать про него подробнее).
В строках можно применять управляющие символы, начинающиеся с символа «слеш» (). Например:
n— переход на новую строку;t— табуляция;r— возврат каретки в начало строки;b— возврат каретки на один символ.
Кроме того, с помощью слеша можно экранировать символы, то есть делать их частью выводимой строки. Например, для вывода символа необходимо его экранировать самим собой:
print("\")
Подробнее об экранировании можно почитать в этом источнике.
В функции print() кроме параметра sep существует параметр end, который определяет символ в конце строки. Значение по умолчанию для него — переход на новую строку, обозначаемый как n. Если вывести строки с помощью нескольких использований функции print(), то вывод каждой из них будет осуществлён с новой строки:
print("Привет, Пользователь!")
print("Как дела?")
Привет, Пользователь!
Как дела?
Над строками можно производить следующие операции:
- сложение (конкатенация строк);
- умножение строки на целое число.
Результатом сложения строк будет новая строка, представляющая собой записанные последовательно складываемые строки (строки как бы склеиваются друг с другом, образуя новую строку).
print("Сложно" + "подчинённый")
Сложноподчинённый
При умножении строки на целое число n получается новая строка, состоящая из n дублирований исходной строки. Например, выведем 10 символов - подряд:
print("-" * 10)
В одной из следующих глав мы познакомимся с другими возможностями Python по работе со строками. А сейчас перейдём к работе с числами. Для создания целочисленной переменной в программе достаточно назначить ей имя и присвоить целочисленное значение. Например:
n = 10
По аналогии создаются вещественные числовые переменные, только в качестве разделителя целой и дробной частей используется десятичный разделитель «точка»:
pi = 3.14
Для преобразования строк в числа и наоборот используются следующие функции:
int()— преобразует строку (или вещественное число) в целое число. Дополнительно можно указать, в какой системе счисления было записано исходное число. По умолчанию используется десятичная система. При конвертации вещественного числа в целое отбрасывается дробная часть;float()— преобразует строку (или целое число) в вещественное число;str()— преобразует значения (в общем случае не только числовые) в строки.
Рассмотрим несколько примеров применения этих функций.
n_1 = "1"
n_2 = "2"
print(n_1 + n_2)
n_1 = int(n_1)
n_2 = int(n_2)
print(n_1 + n_2)
В результате выполнения программы получим:
12
3
Первый результат — результат сложения (конкатенации) двух строк. Второй — результат сложения целых чисел, которые были преобразованы из строк функцией int().
x = 3.89
x = int(x)
print(x)
Здесь программа выведет в консоли результат 3. Дробная часть после десятичного разделителя была отброшена при преобразовании в целое число.
width = "3.7"
height = "2.5"
s = float(width) * float(height)
print(s)
Программа выведет: 9.25.
А чтобы вводить целые или вещественные числа с клавиатуры, можно использовать уже знакомую нам функцию input() в сочетании с функциями int() и float():
int_number = int(input())
float_number = float(input())
Для работы с числовыми переменными доступны следующие математические операции:
- сложение —
x + y; - вычитание —
x - y; - умножение —
x * y; - деление —
x / y; - возведение в степень
x ** y.
Используем все эти операции в следующей программе:
n = 25
x = 0.5

print(n + x)
print(n - x)
print(n * x)
print(n / x)
print(n ** x)
Вывод программы будет таким:
25.5
24.5
12.5
50.0
5.0
Необходимо учитывать, что если выполняется операция деления или хотя бы один из операндов является вещественным числом, то результат также будет вещественным.
Например, выполнение следующего кода выведет на экран 2.0:
print(4 / 2)
Для целых чисел дополнительно доступны операции:
- целочисленное деление —
x // y; - остаток от деления —
x % y.
Эти операции можно использовать, например, для получения определённых цифр числа. Получим последнюю цифру числа 1234 (то есть остаток от деления на 10):
last_digit = 1234 % 10
Для получения предпоследней цифры нужно «отрезать» последнюю цифру целочисленным делением на 10, а затем у нового числа найти последнюю цифру — уже известным нам способом:
penultimate_digit = 1234 // 10 % 10
Чтобы закрепить новые знания, рекомендуем вам прорешать задачи для этой главы. А в следующей вы узнаете, как создавать программы, способные учитывать несколько вариантов развития событий.
In Python, Using the input() function, we take input from a user, and using the print() function, we display output on the screen. Using the input() function, users can give any information to the application in the strings or numbers format.
After reading this article, you will learn:
- Input and output in Python
- How to get input from the user, files, and display output on the screen, console, or write it into the file.
- Take integer, float, character, and string input from a user.
- Convert the user input to a different data type.
- Command-line input
- How to format output.
Table of contents
- Python Input() function
- What is the input?
- Python Example to Accept Input From a User
- How input() Function Works
- Take an Integer Number as input from User
- Take Float Number as a Input from User
- Practice Problem
- Get Multiple inputs From a User in One Line
- Accept Multiline input From a User
- Python Input() vs raw_input()
- Command Line input
- Python sys module
- Output in Python
- Output Formatting
- str.format() to format output
- Format Output String by its positions
- Accessing Output String Arguments by name
- Output Alignment by Specifying a Width
- Specifying a Sign While Displaying Output Numbers
- Display Output Number in Various Format
- Display Numbers as a float type
- Output String Alignment
- Next Steps
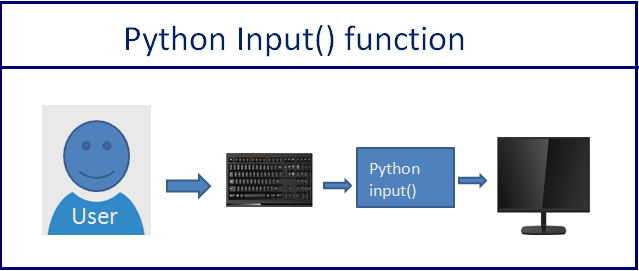
Python Input() function
In Python 3, we have the following two built-in functions to handle input from a user and system.
input(prompt): To accept input from a user.print(): To display output on the console/screen.
In Python 2,we can use the following two functions:
input([prompt])raw_input([prompt])
The input() function reads a line entered on a console or screen by an input device such as a keyboard, converts it into a string. As a new developer, It is essential to understand what is input in Python.
What is the input?
The input is a value provided by the system or user. For example, suppose you want to calculate the addition of two numbers on the calculator, you need to provide two numbers to the calculator. In that case, those two number is nothing but an input provided by the user to a calculator program.
There are different types of input devices we can use to provide data to application. For example: –
- Stems from the keyboard: User entered some value using a keyboard.
- Using mouse click or movement: The user clicked on the radio button or some drop-down list and chosen an option from it using mouse.
In Python, there are various ways for reading input from the user from the command line environment or through the user interface. In both cases, the user is sending information using the keyboard or mouse.
Python Example to Accept Input From a User
Let see how to accept employee information from a user.
- First, ask employee name, salary, and company name from the user
- Next, we will assign the input provided by the user to the variables
- Finally, we will use the
print()function to display those variables on the screen.
# take three values from user
name = input("Enter Employee Name: ")
salary = input("Enter salary: ")
company = input("Enter Company name: ")

# Display all values on screen
print("n")
print("Printing Employee Details")
print("Name", "Salary", "Company")
print(name, salary, company)Output:
Enter Employee Name: Jessa
Enter salary: 8000
Enter Company name: Google

Printing Employee Details
Name Salary Company
Jessa 8000 Google
How input() Function Works
syntax
input([prompt])- The
promptargument is optional. Thepromptargument is used to display a message to the user. For example, the prompt is, “Please enter your name.” - When the
input()function executes, the program waits until a user enters some value. - Next, the user enters some value on the screen using a keyboard.
- Finally, The
input()function reads a value from the screen, converts it into a string, and returns it to the calling program.
Note: If you enter an integer or float number, still, it will convert it into a string. If you want to number input or input in other data types, you need to perform type conversion on the input value.
Let’s understand this with an example.
Example to check data type of input value
number = input("Enter roll number ")
name = input("Enter age ")

print("n")
print('Roll number:', number, 'Name:', name)
print("Printing type of a input values")
print("type of number", type(number))
print("type of name", type(name))Output:
Enter roll number 22
Enter age Jessa

Roll number: 22 Name: Jessa
Printing type of a input values
type of number <class 'str'>
type of name <class 'str'>
As you know whatever you enter as input, the input() function always converts it into a string.
Read How to check if user input is a number or string.
Take an Integer Number as input from User
Let’s see how to accept an integer value from a user in Python. We need to convert an input string value into an integer using an int() function.
Example:
# program to calculate addition of two input integer numbers

# convert inout into int
first_number = int(input("Enter first number "))
second_number = int(input("Enter second number "))

print("n")
print("First Number:", first_number)
print("Second Number:", second_number)
sum1 = first_number + second_number
print("Addition of two number is: ", sum1)Output:
Enter first number 28
Enter second number 12

First Number: 28
Second Number: 12
Addition of two number is:  40
Note: As you can see, we explicitly added a cast of an integer type to an input function to convert an input value to the integer type.
Now if you print the type of first_number you should get integer type. type(first_number ) will return <class 'int'>
Take Float Number as a Input from User
Same as integer, we need to convert user input to the float number using the float() function
marks = float(input("Enter marks "))
print("n")
print("Student marks is: ", marks)
print("type is:", type(marks))Output:
Enter marks 74.65

Student marks is:  74.65
type is: <class 'float'>
Practice Problem
Accept one integer and one float number from the user and calculate the multiplication of both the numbers.
num1 = int(input("Enter integer number "))
num2 = float(input("Enter float number "))
print("n")
product = num1 * num2
print("Multiplication is:", product)
Get Multiple inputs From a User in One Line
In Python, It is possible to get multiple values from the user in one line. We can accept two or three values from the user.
For example, in a single execution of the input() function, we can ask the user his/her name, age, and phone number and store it in three different variables.
Let’ see how to do this.
- Take each input separated by space
- Split input string using
split()get the value of individual input
name, age, marks = input("Enter your Name, Age, Percentage separated by space ").split()
print("n")
print("User Details: ", name, age, marks)Output:
Enter your name, Age, Percentage separated by space Jessa 18 72.50
User Details:  Jessa 18 72.50
Also, you can take the list as input from the user to get and store multiple values at a time.
Read: How to take a list as an input from a user.
Accept Multiline input From a User
As you know, the input() function does not allow the user to provide values separated by a new line.
If the user tries to enter multiline input, it reads only the first line. Because whenever the user presses the enter key, the input function reads information provided by the user and stops execution.
Let’s see how to gets multiple line input.
We can use a loop. In each iteration of the loop, we can get input strings from the user and join them. You can also concatenate each input string using the + operator separated by newline (n).
Example:
# list to store multi line input
# press enter two times to exit
data = []
print("Tell me about yourself")
while True:
    line = input()
    if line:
        data.append(line)
    else:
        break
finalText = 'n'.join(data)
print("n")
print("Final text input")
print(finalText)Output:
Tell me about yourself
My Name is Jessa
I am a software engineer

Final text input
My Name is Jessa
I am a software engineer
Python Input() vs raw_input()
- The
input()function works differently between Python 3 and Python 2. - In Python 2, we can use both the
input()andraw_input()function to accept user input. - In Python 3, the
raw_input()function of Python 2 is renamed toinput()and the originalinput()function is removed.
The difference between the input() and raw_input() functions is relevant only when using Python 2.
- The main difference between those two functions is
input()function automatically converts user input to the appropriate type. i.e., If a user-entered string input() function converts it into a string, and if a user entered a number, it converts to an integer. - The
raw_input()convert every user input to a string.
Let’s see how to use raw_input() in Python 2.
Example 1: Python 2 raw_input() function to take input from a user
# Python 2 code
# raw_input() function
name = raw_input("Enter your name ")
print "Student Name is: ", name
print type(name)

age = raw_input("Enter your age ")
print "Student age is: ", age
print type(age)Output:
Enter your name Jessa
Student Name is:  Jessa
<type 'str'>

Enter your age 18
Student age is:  18
<type 'str'>
Note: As you can see, raw_input() converted all user values to string type.
Example 2: Python 2 input() function to take input from a user
# Python 2 code
# input() function

name = input("Enter your Name ")
print "Student Name is: ", name
print type(name)

age = input("Enter your age ")
print "Student age is: ", age
print type(age)Output:
Enter your Name Jessa
Student Name is:  Jessa
<type 'str'>

Enter your age 18
Student age is:  18
<type 'int'>
Note: As you can see, input() converted all user values to appropriate data type.
Note: To get the this behavior of input() in Python 3, use eval(input('Enter Value'))
Command Line input
A command line interface (CLI) is a command screen or text interface called a shell that allows users to interact with a program.
For example, On windows, we use the Command Prompt and Bash on Linux. command line or command-line interface is a text-based application for viewing, handling, and manipulating files on our computer. The command line also called cmd, CLI, prompt, console, or terminal.
On command-line, we execute program or command by providing input/arguments to it. Also, output and error are displayed A command line.
We can run Python programs on the command line. The command line input is an argument that we pass to the program at runtime.
Python provides following modules to work with command-line arguments.
sysmodulegetoptm oduleargsparsemodulefiremoduledocotpmodule
Python sys module
The Python sys module is the basic module that implements command-line arguments in a simple list structure named sys.argv.
sys.argv[0]: The first argument is always the program/script name.sys.argv: Returns the list of command line arguments.len(sys.argv): Count of command line arguments.
Steps:
Write the below code in a file and save it as a sample.py
from sys import argv

print("Total argument passed :", len(argv))
Run the below command on the command line
python sample.py 20 30 40Output
Total argument passed : 4
Here 10, 20, 30 are command-line arguments passed to the program. Each input represents a single argument.
- The first argument, i.e.,
sys.argv[0], always represents the Python program name (.py) file - The other list elements i.e.,
sys.argv[1]tosys.argv[n]are command-line arguments. Space is used to separate each argument.
Note: argv is not an array. It is a list. This is a straightforward way to read command-line arguments as a string. See the following example to check the type of argv
Example
from sys import argv

print(type(argv))
# Output <class 'list'>
Now let’s see another example where we display all command-line arguments passed to the program.
Example : To Display command line argumnets
from sys import argv

print("All command line inputs")
for value in argv:
    print(value)
Run the below command on the command line
python sample.py 20 30 40Output
C:Anaconda3>python sample.py 20 30 40
All command line inputs
sample.py
20
30
40
Note : The space is separator between command line arguments.
In Python, by default, command-line arguments are available in string format. Based on our requirement, we can convert it into the corresponding type by using the typecasting method.
See the following example where we change the data type of arguments using the int() method.
Example
from sys import argv

# calculate the addition of two command line input
print('Argument one:')
print('Argument Two:')
add = int(argv[1]) + int(argv[2])
print('Addition is:', add)
Output
C:Anaconda3>python sample.py 20 30
Argument one:
Argument Two:
Addition is: 50
If we try to access arguments with out of the range index on the command line, we will get an error.
from sys import argv

print(argv[2])
print(argv[3])
Output
C:Anaconda3>python sample.py 20
Traceback (most recent call last):
  File "sample.py", line 3, in <module>
    print(argv[2])
IndexError: list index out of range
Output in Python
Python has a built-in print() function to display output to the standard output device like screen and console.
Example 1: Display output on screen
# take input
name = input("Enter Name: ")

# Display output
print('User Name:', name)Output:
Enter Name: Jessa
User Name: Jessa
Example 2: Display Output by separating each value
name = input('Enter Name ')
zip_code = int(input('Enter zip code '))
street = input('Enter street name ')
house_number = int(input('Enter house number '))

# Display all values separated by hyphen
print(name, zip_code, street, house_number, sep="-")Output:
name = input('Enter Name ')
Enter Name Jessa
Enter zip code 412365
Enter street name abc street
Enter house number 234

Jessa-412365-abc street-234
Output Formatting
Most of the time, we need to format output instead of merely printing space-separated values. For example, we want to display the string left-justified or in the center. We want to show the number in various formats.
You can display output in various styles and formats using the following functions.
str.format()repr()str.rjust(),str.ljust(), andstr.center().str.zfill()- The
%operator can also use for output formatting
Now, Let see each one by one.
str.format() to format output
str.format(*args, **kwargs)- The
stris the string on which the format method is called. It can contain text or replacement fields delimited by braces {}. - Each replacement field contains either the numeric index of a positional argument present in the format method or the name of a keyword argument.
- The format method returns a formatted string as an output. Each replacement field gets replaced with the actual string value of the corresponding argument present in the format method. i.e., args.
Let see this with an example:
print('FirstName - {0}, LastName - {1}'.format('Ault', 'Kelly'))Note: Here {0} and {1} is the numeric index of a positional argument present in the format method. i.e., {0} = Ault and {1} = Kelly. Anything that not enclosed in braces {} is considered a plain literal text.
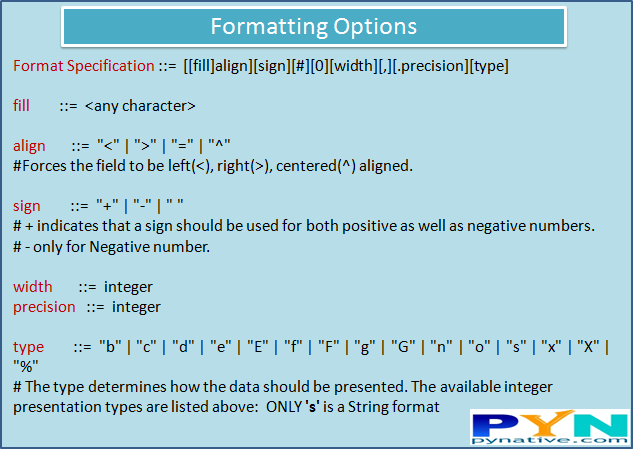
Let see different ways to display output using a format() method. You can find various Formatting options here.
Format Output String by its positions
firstName = input("Enter First Name ")
lastName = input("Enter Last Name ")
organization = input("Enter Organization Name ")

print("n")
print('{0}, {1} works at {2}'.format(firstName, lastName, organization))
print('{1}, {0} works at {2}'.format(firstName, lastName, organization))
print('FirstName {0}, LastName {1} works at {2}'.format(firstName, lastName, organization))
print('{0}, {1} {0}, {1} works at {2}'.format(firstName, lastName, organization))Output:
Enter First Name Ault
Enter Last Name Kelly
Enter Organization Name Google


Ault, Kelly works at Google
Kelly, Ault works at Google
FirstName Ault, LastName Kelly works at Google
Ault, Kelly Ault, Kelly works at Google
Accessing Output String Arguments by name
name = input("Enter Name ")
marks = input("Enter marks ")

print("n")
print('Student: Name: {firstName}, Marks: {percentage}%'.format(firstName=name, percentage=marks))Output:
Enter Name Jhon
Enter marks 74

Student: Name:  Jhon, Marks: 74%
Output Alignment by Specifying a Width
text = input("Enter text ")

print("n")
# left aligned
print('{:<25}'.format(text))  # Right aligned print('{:>25}'.format(text))
# centered
print('{:^25}'.format(text))
Output:
Enter text This is a sample text

This is a sample text
    This is a sample text
  This is a sample text
Specifying a Sign While Displaying Output Numbers
positive_number = float(input("Enter Positive Number "))
negative_number = float(input("Enter Negative Number "))

print("n")
# sign '+' is for both positive and negative number
print('{:+f}; {:+f}'.format(positive_number, negative_number))

# sign '-' is only for negative number
print('{:f}; {:-f}'.format(positive_number, negative_number))Output:
Enter Positive Number 25.25
Enter Negative Number -15.50

+25.250000; -15.500000
25.250000; -15.500000
Display Output Number in Various Format
number = int(input("Enter number "))

print("n")
# 'd' is for integer number formatting
print("The number is:{:d}".format(number))

# 'o' is for octal number formatting, binary and hexadecimal format
print('Output number in octal format : {0:o}'.format(number))

# 'b' is for binary number formatting
print('Output number in binary format: {0:b}'.format(number))

# 'x' is for hexadecimal format
print('Output number in hexadecimal format: {0:x}'.format(number))

# 'X' is for hexadecimal format
print('Output number in HEXADECIMAL: {0:X}'.format(number))
Output:
Enter number 356

The number is:356
Output number in octal format : 544
Output number in binary format: 101100100
Output number in hexadecimal format: 164
Output number in HEXADECIMAL: 164
Display Numbers as a float type
number = float(input("Enter float Number "))

print("n")
# 'f' is for float number arguments
print("Output Number in The float type :{:f}".format(number))

# padding for float numbers
print('padding for output float number{:5.2f}'.format(number))

# 'e' is for Exponent notation
print('Output Exponent notation{:e}'.format(number))

# 'E' is for Exponent notation in UPPER CASE
print('Output Exponent notation{:E}'.format(number))Output:
Enter float Number 234.567

Output Number in The float type :234.567000
padding for output float number234.57
Output Exponent notation2.345670e+02
Output Exponent notation2.345670E+02
Output String Alignment
Let’s see how to use str.rjust(), str.ljust() and str.center() to justify text output on screen and console.
text = input("Enter String ")

print("n")
print("Left justification", text.ljust(60, "*"))
print("Right justification", text.rjust(60, "*"))
print("Center justification", text.center(60, "*"))Output:
Enter String Jessa

Left justification Jessa*******************************************************
Right justification *******************************************************Jessa
Center justification ***************************Jessa****************************
Next Steps
To practice what you learned in this article, I have created a Quiz and Exercise.
- Python Input and Output Exercise
- Python Input and Output Quiz
References:
- Input and Output Documentation
- Python input() function