
Содержание
- Create an Index of Sheets in Your Workbook
- INDEX function
- Array form
- Description
- Syntax
- Remarks
- Examples
- Example 1
- Example 2
- Reference form
- Description
- Syntax
- Remarks
- Examples
- Функция INDEX (ИНДЕКС) в Excel. Как использовать?
- Что возвращает функция
- Синтаксис
- Аргументы функции
- Дополнительная информация
- Примеры использования функции ИНДЕКС в Excel
- Пример 1. Ищем результаты экзамена по физике для Алексея
- Пример 2. Создаем динамический поиск значений с использованием функций ИНДЕКС и ПОИСКПОЗ
- Пример 3. Создаем динамический поиск значений с использованием функций INDEX (ИНДЕКС) и MATCH (ПОИСКПОЗ) и выпадающего списка
- Пример 4. Использование трехстороннего поиска с помощью INDEX (ИНДЕКС) / MATCH (ПОИСКПОЗ)
Create an Index of Sheets in Your Workbook
If you’ve spent much time in a workbook with many worksheets, you know how painful it can be to find a particular worksheet. An index sheet available to every worksheet is a navigational must-have.
Using an index sheet will enable you to quickly and easily navigate throughout your workbook so that with one click of the mouse, you will be taken exactly where you want to go, without fuss. You can create an index in a couple of ways.
You might be tempted to simply create the index by hand. Create a new worksheet, call it Index or the like, enter a list of all your worksheet’s names, and hyperlink each to the appropriate sheet by selecting Insert » Hyperlink. or by pressing Ctrl/ -K. Although this method is probably sufficient for limited instances in which you don’t have too many sheets and they won’t change often, you’ll be stuck maintaining your index by hand.
The following code will automatically create a clickable, hyperlinked index of all the sheets you have in the workbook. The index is re-created each time the sheet that houses the code is activated.
This code should live in the private module for the Sheet object. Insert a new worksheet into your workbook and name it something appropriate- Index , for instance. Right-click the index sheet’s tab and select View Code from the context menu. Enter the following Visual Basic code (Tools » Macro » Visual Basic Editor or Alt/Option-F11):
Press Alt/-Q to get back to your workbook and then save your changes. Notice that the code names (such as when you name a cell or range of cells in Excel) cell A1 on each sheet Start , plus a unique whole number representing the index number of the sheet . This ensures that A1 on each sheet has a different name. If A1 on your worksheet already has a name, you should consider changing any mention of A1 in the code to something more suitable-an unused cell anywhere on the sheet, for instance.
You should be aware that if you select File » Properties » Summary and enter a URL as a hyperlink base, the index created from the preceding code possibly will not work. A hyperlink base is a path or URL that you want to use for all hyperlinks with the same base address that are inserted in the current document.
Another, more user-friendly, way of constructing an index is to add a link to the list of sheets as a context-menu item, keeping it just a right-click away. We’ll have that link open the standard workbook tabs command bar. You generally get to this command bar by right-clicking any of the sheet tab scroll arrows on the bottom left of any worksheet, as shown in figure.
Figure. Tabs command bar displayed by right-clicking the sheet scroll tabs

To link that tab’s command bar to a right-click in any cell, enter the following code in the VBE:
Next, you’ll need to insert a standard module to house the IndexCode macro, called by the preceding code whenever the user right-clicks in a cell. It is vital that you use a standard module next, as placing the code in the same module as Workbook_SheetBeforeRightClick will mean Excel will not know where to find the macro called IndexCode .
Select Insert » Module and enter the following code:
Press Alt/-Q to get back to the Excel interface.
Now, right-click within any cell on any worksheet and you should see a new menu item called Sheet Index that will take you right to a list of sheets in the workbook.
Источник
INDEX function
The INDEX function returns a value or the reference to a value from within a table or range.

There are two ways to use the INDEX function:
If you want to return the value of a specified cell or array of cells, see Array form.
If you want to return a reference to specified cells, see Reference form.
Array form
Description
Returns the value of an element in a table or an array, selected by the row and column number indexes.
Use the array form if the first argument to INDEX is an array constant.
Syntax
INDEX(array, row_num, [column_num])
The array form of the INDEX function has the following arguments:
array Required. A range of cells or an array constant.
If array contains only one row or column, the corresponding row_num or column_num argument is optional.
If array has more than one row and more than one column, and only row_num or column_num is used, INDEX returns an array of the entire row or column in array.
row_num Required, unless column_num is present. Selects the row in array from which to return a value. If row_num is omitted, column_num is required.
column_num Optional. Selects the column in array from which to return a value. If column_num is omitted, row_num is required.
If both the row_num and column_num arguments are used, INDEX returns the value in the cell at the intersection of row_num and column_num.
row_num and column_num must point to a cell within array; otherwise, INDEX returns a #REF! error.
If you set row_num or column_num to 0 (zero), INDEX returns the array of values for the entire column or row, respectively. To use values returned as an array, enter the INDEX function as an array formula.
Note: If you have a current version of Microsoft 365, then you can input the formula in the top-left-cell of the output range, then press ENTER to confirm the formula as a dynamic array formula. Otherwise, the formula must be entered as a legacy array formula by first selecting the output range, input the formula in the top-left-cell of the output range, then press CTRL+SHIFT+ENTER to confirm it. Excel inserts curly brackets at the beginning and end of the formula for you. For more information on array formulas, see Guidelines and examples of array formulas.
Examples
Example 1
These examples use the INDEX function to find the value in the intersecting cell where a row and a column meet.
Copy the example data in the following table, and paste it in cell A1 of a new Excel worksheet. For formulas to show results, select them, press F2, and then press Enter.
Value at the intersection of the second row and second column in the range A2:B3.
Value at the intersection of the second row and first column in the range A2:B3.
Example 2
This example uses the INDEX function in an array formula to find the values in two cells specified in a 2×2 array.
Note: If you have a current version of Microsoft 365, then you can input the formula in the top-left-cell of the output range, then press ENTER to confirm the formula as a dynamic array formula. Otherwise, the formula must be entered as a legacy array formula by first selecting two blank cells, input the formula in the top-left-cell of the output range, then press CTRL+SHIFT+ENTER to confirm it. Excel inserts curly brackets at the beginning and end of the formula for you. For more information on array formulas, see Guidelines and examples of array formulas.
Value found in the first row, second column in the array. The array contains 1 and 2 in the first row and 3 and 4 in the second row.
Value found in the second row, second column in the array (same array as above).
Reference form
Description
Returns the reference of the cell at the intersection of a particular row and column. If the reference is made up of non-adjacent selections, you can pick the selection to look in.
Syntax
INDEX(reference, row_num, [column_num], [area_num])
The reference form of the INDEX function has the following arguments:
reference Required. A reference to one or more cell ranges.
If you are entering a non-adjacent range for the reference, enclose reference in parentheses.
If each area in reference contains only one row or column, the row_num or column_num argument, respectively, is optional. For example, for a single row reference, use INDEX(reference,,column_num).
row_num Required. The number of the row in reference from which to return a reference.
column_num Optional. The number of the column in reference from which to return a reference.
area_num Optional. Selects a range in reference from which to return the intersection of row_num and column_num. The first area selected or entered is numbered 1, the second is 2, and so on. If area_num is omitted, INDEX uses area 1. The areas listed here must all be located on one sheet. If you specify areas that are not on the same sheet as each other, it will cause a #VALUE! error. If you need to use ranges that are located on different sheets from each other, it is recommended that you use the array form of the INDEX function, and use another function to calculate the range that makes up the array. For example, you could use the CHOOSE function to calculate which range will be used.
For example, if Reference describes the cells (A1:B4,D1:E4,G1:H4), area_num 1 is the range A1:B4, area_num 2 is the range D1:E4, and area_num 3 is the range G1:H4.
After reference and area_num have selected a particular range, row_num and column_num select a particular cell: row_num 1 is the first row in the range, column_num 1 is the first column, and so on. The reference returned by INDEX is the intersection of row_num and column_num.
If you set row_num or column_num to 0 (zero), INDEX returns the reference for the entire column or row, respectively.
row_num, column_num, and area_num must point to a cell within reference; otherwise, INDEX returns a #REF! error. If row_num and column_num are omitted, INDEX returns the area in reference specified by area_num.
The result of the INDEX function is a reference and is interpreted as such by other formulas. Depending on the formula, the return value of INDEX may be used as a reference or as a value. For example, the formula CELL(«width»,INDEX(A1:B2,1,2)) is equivalent to CELL(«width»,B1). The CELL function uses the return value of INDEX as a cell reference. On the other hand, a formula such as 2*INDEX(A1:B2,1,2) translates the return value of INDEX into the number in cell B1.
Examples
Copy the example data in the following table, and paste it in cell A1 of a new Excel worksheet. For formulas to show results, select them, press F2, and then press Enter.
Источник
Функция INDEX (ИНДЕКС) в Excel. Как использовать?
Функция INDEX (ИНДЕКС) в Excel используется для получения данных из таблицы, при условии что вы знаете номер строки и столбца, в котором эти данные находятся.
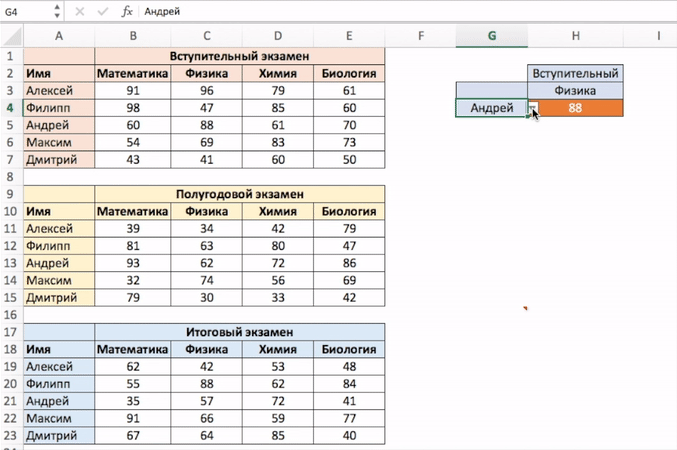
Например, в таблице ниже, вы можете использовать эту функцию для того, чтобы получить результаты экзамена по Физике у Андрея, зная номер строки и столбца, в которых эти данные находятся.
![]()
Что возвращает функция
Возвращает данные из конкретной строки и столбца табличных данных.
Синтаксис
=INDEX (array, row_num, [col_num]) — английская версия
=INDEX (array, row_num, [col_num], [area_num]) — английская версия
=ИНДЕКС(массив; номер_строки; [номер_столбца]) — русская версия
=ИНДЕКС(ссылка; номер_строки; [номер_столбца]; [номер_области]) — русская версия
Аргументы функции
- array (массив) — диапазон ячеек или массив данных для поиска;
- row_num (номер_строки) — номер строки, в которой находятся искомые данные;
- [col_num] ([номер_столбца])(необязательный аргумент) — номер колонки, в которой находятся искомые данные. Этот аргумент необязательный. Но если в аргументах функции не указаны критерии для row_num (номер_строки), необходимо указать аргумент col_num (номер_столбца);
- [area_num] ([номер_области]) — (необязательный аргумент) — если аргумент массива состоит из нескольких диапазонов, то это число будет использоваться для выбора всех диапазонов.
Дополнительная информация
- Если номер строки или колонки равен “0”, то функция возвращает данные всей строки или колонки;
- Если функция используется перед ссылкой на ячейку (например, A1), она возвращает ссылку на ячейку вместо значения (см. примеры ниже);
- Чаще всего INDEX (ИНДЕКС) используется совместно с функцией MATCH (ПОИСКПОЗ);
- В отличие от функции VLOOKUP (ВПР), функция INDEX (ИНДЕКС) может возвращать данные как справа от искомого значения, так и слева;
- Функция используется в двух формах — Массива данных и Формы ссылки на данные:
— Форма «Массива» используется когда вы хотите найти значения, основанные на конкретных номерах строк и столбцов таблицы;
— Форма «Ссылок на данные» используется при поиске значений в нескольких таблицах (используете аргумент [area_num] ([номер_области]) для выбора таблицы и только потом сориентируете функцию по номеру строки и столбца.
Примеры использования функции ИНДЕКС в Excel
Пример 1. Ищем результаты экзамена по физике для Алексея
Предположим, у вас есть результаты экзаменов в табличном виде по нескольким студентам:
![]()
Для того, чтобы найти результаты экзамена по физике для Андрея нам нужна формула:
=INDEX($B$3:$E$9,3,2) — английская версия
=ИНДЕКС($B$3:$E$9;3;2) — русская версия
В формуле мы определили аргумент диапазона данных, где мы будем искать данные $B$3:$E$9. Затем, указали номер строки “3”, в которой находятся результаты экзамена для Андрея, и номер колонки “2”, где находятся результаты экзамена именно по физике.
Пример 2. Создаем динамический поиск значений с использованием функций ИНДЕКС и ПОИСКПОЗ
Не всегда есть возможность указать номера строки и столбца вручную. У вас может быть огромная таблица данных, отображение данных которой вы можете сделать динамическим, чтобы функция автоматически идентифицировала имя или экзамен, указанные в ячейках, и дала правильный результат.
Пример динамического отображения данных ниже:

Для динамического отображения данных мы используем комбинацию функций INDEX (ИНДЕКС) и MATCH (ПОИСКПОЗ).
Вот такая формула поможет нам добиться результата:
=INDEX($B$3:$E$9,MATCH($G$4,$A$3:$A$9,0),MATCH($H$3,$B$2:$E$2,0)) — английская версия
=ИНДЕКС($B$3:$E$9;ПОИСКПОЗ($G$4;$A$3:$A$9;0);ПОИСКПОЗ($H$3;$B$2:$E$2;0)) — русская версия
В формуле выше, не используя сложного программирования, мы с помощью функции MATCH (ПОИСКПОЗ) сделали отображение данных динамическим.
Динамический отображение строки задается следующей частью формулы —
MATCH($G$4,$A$3:$A$9,0) — английская версия
ПОИСКПОЗ($G$4;$A$3:$A$9;0) — русская версия
Она сканирует имена студентов и определяет значение поиска ($G$4 в нашем случае). Затем она возвращает номер строки для поиска в наборе данных. Например, если значение поиска равно Алексей, функция вернет “1”, если это Максим, оно вернет “4” и так далее.
Динамическое отображение данных столбца задается следующей частью формулы —
MATCH($H$3,$B$2:$E$2,0) — английская версия
ПОИСКПОЗ($H$3;$B$2:$E$2;0) — русская версия
Она сканирует имена объектов и определяет значение поиска ($H$3 в нашем случае). Затем она возвращает номер столбца для поиска в наборе данных. Например, если значение поиска Математика, функция вернет “1”, если это Физика, функция вернет “2” и так далее.
Пример 3. Создаем динамический поиск значений с использованием функций INDEX (ИНДЕКС) и MATCH (ПОИСКПОЗ) и выпадающего списка
На примере выше мы вручную вводили имена студентов и названия предметов. Вы можете сэкономить время на вводе данных, используя выпадающие списки. Это актуально, когда количество данных огромное.
Используя выпадающие списки, вам нужно просто выбрать из списка имя студента и функция автоматически найдет и подставит необходимые данные.

Используя такой подход, вы можете создать удобный дашборд, например для учителя. Ему не придется заниматься фильтрацией данных или прокруткой листа со студентами, для того чтобы найти результаты экзамена конкретного студента, достаточно просто выбрать имя и результаты динамически отразятся в лаконичной и удобной форме.
Для того, чтобы осуществить динамическую подстановку данных с использованием функций INDEX (ИНДЕКС) и MATCH (ПОИСКПОЗ) и выпадающего списка, мы используем ту же формулу, что в Примере 2:
=INDEX($B$3:$E$9,MATCH($G$4,$A$3:$A$9,0),MATCH($H$3,$B$2:$E$2,0)) — английская версия
=ИНДЕКС($B$3:$E$9;ПОИСКПОЗ($G$4;$A$3:$A$9;0);ПОИСКПОЗ($H$3;$B$2:$E$2;0)) — русская версия
Единственное отличие, от Примера 2, мы на месте ввода имени и предмета создадим выпадающие списки:
- Выбираем ячейку, в которой мы хотим отобразить выпадающий список с именами студентов;
- Кликаем на вкладку “Data” => Data Tools => Data Validation;
- В окне Data Validation на вкладке “Settings” в подразделе Allow выбираем “List”;
- В качестве Source нам нужно выбрать диапазон ячеек, в котором указаны имена студентов;
- Кликаем ОК
Теперь у вас есть выпадающий список с именами студентов в ячейке G5. Таким же образом вы можете создать выпадающий список с предметами.
Пример 4. Использование трехстороннего поиска с помощью INDEX (ИНДЕКС) / MATCH (ПОИСКПОЗ)
Функция INDEX (ИНДЕКС) может быть использована для обработки трехсторонних запросов.
Что такое трехсторонний поиск?
В приведенных выше примерах мы использовали одну таблицу с оценками для студентов по разным предметам. Это пример двунаправленного поиска, поскольку мы используем две переменные для получения оценки (имя студента и предмет).
Теперь предположим, что к концу года студент прошел три уровня экзаменов: «Вступительный», «Полугодовой» и «Итоговый экзамен».
Трехсторонний поиск — это возможность получить отметки студента по заданному предмету с указанным уровнем экзамена.
Вот пример трехстороннего поиска:
В приведенном выше примере, кроме выбора имени студента и названия предмета, вы также можете выбрать уровень экзамена. Основываясь на уровне экзамена, формула возвращает соответствующее значение из одной из трех таблиц.
Для таких расчетов нам поможет формула:
=INDEX(($B$3:$E$7,$B$11:$E$15,$B$19:$E$23),MATCH($G$4,$A$3:$A$7,0),MATCH($H$3,$B$2:$E$2,0),IF($H$2=»Вступительный»,1,IF($H$2=»Полугодовой»,2,3))) — английская версия
=ИНДЕКС(($B$3:$E$7;$B$11:$E$15;$B$19:$E$23);ПОИСКПОЗ($G$4;$A$3:$A$7;0);ПОИСКПОЗ($H$3;$B$2:$E$2;0); ЕСЛИ($H$2=»Вступительный»;1;ЕСЛИ($H$2=»Полугодовой»;2;3))) — русская версия
Давайте разберем эту формулу, чтобы понять, как она работает.
Эта формула принимает четыре аргумента. Функция INDEX (ИНДЕКС) — одна из тех функций в Excel, которая имеет более одного синтаксиса.
=INDEX (array, row_num, [col_num]) — английская версия
=INDEX (array, row_num, [col_num], [area_num]) — английская версия
=ИНДЕКС(массив; номер_строки; [номер_столбца]) — русская версия
=ИНДЕКС(ссылка; номер_строки; [номер_столбца]; [номер_области]) — русская версия
По всем вышеприведенным примерам мы использовали первый синтаксис, но для трехстороннего поиска нам нужно использовать второй синтаксис.
Рассмотрим каждую часть формулы на основе второго синтаксиса.
- array(массив) – ($B$3:$E$7,$B$11:$E$15,$B$19:$E$23):Вместо использования одного массива, в данном случае мы использовали три массива в круглых скобках.
- row_num (номер_строки) – MATCH($G$4,$A$3:$A$7,0): функция MATCH (ПОИСКПОЗ) используется для поиска имени студента для ячейки $G$4 из списка всех студентов.
- col_num (номер_столбца) – MATCH($H$3,$B$2:$E$2,0): функция MATCH (ПОИСКПОЗ) используется для поиска названия предмета для ячейки $H$3 из списка всех предметов.
- [area_num] ([номер_области]) – IF($H$2=”Вступительный”,1,IF($H$2=”Полугодовой”,2,3)): Значение номера области сообщает функции INDEX (ИНДЕКС) , какой массив с данными выбрать. В этом примере у нас есть три массива в первом аргументе. Если вы выберете «Вступительный» из раскрывающегося меню, функция IF (ЕСЛИ) вернет значение “1”, а функция INDEX (ИНДЕКС) выберут 1-й массив из трех массивов ($B$3:$E$7).
Уверен, что теперь вы подробно изучили работу функции INDEX (ИНДЕКС) в Excel!
Источник

We all deal with multiple sheets in a single workbook, don’t we? Here is a smart way to create an Index of all your Sheets. You can click on the sheet name to navigate to that sheet.
Here is how we do it
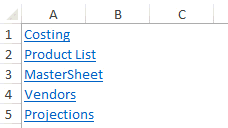
Assume that we have 5 Sheets
![]()
And we would like to have an Index placed (in a new sheet) with the sheet names hyperlinked to the respective sheet.
It can be done with a simple VBA Code
Here comes a Code
Sub CreateIndex()
Dim sheetnum As Integer
Sheets.Add before:=Sheets(1)
For sheetnum = 2 To Worksheets.Count
 ActiveSheet.Hyperlinks.Add _
 Anchor:=Cells(sheetnum - 1, 1), _
 Address:='', _
 SubAddress:=''' & Worksheets(sheetnum).Name & ''!A1', _
 TextToDisplay:=Worksheets(sheetnum).Name
Next sheetnum
ActiveWindow.DisplayGridlines = False
End Sub
Follow the steps
- Copy this Code
- Open the excel workbook where you want to create a Sheet Index
- Press the shortcut Alt + F11 to open the Visual Basic Window
- In the Insert Menu, click on Module or use the shortcut Alt i m to add a Module. Module is the place where the code is written
- In the blank module paste the code and close the Visual Basic Editor
- Then use the shortcut Alt + F8 to open the Macro Box. You would have the list of all the macros here
- You would see the Macro that you have just pasted in the Module as ‘CreateIndex’
- Run it. You would see an Index with all the sheet names hyperlinked to the respective sheet.
Other Useful Macros
- Automated Filter with Macro
- Unhiding Multiple Sheets at Once
- Covert Numbers into Indian Currency Words
Topics that I write about…

goodly
![]()
Download Article
![]()
Download Article
If your Excel workbook contains numerous worksheets, you can add a table of contents that indexes all of your sheets with clickable hyperlinks. This tutorial will teach you how to make an index of sheet names with page numbers in your Excel workbook without complicated VBA scripting, and how to add helpful «back to index» buttons to each sheet to improve navigation.
-

1
Create an index sheet in your workbook. This sheet can be anywhere in your workbook, but you’ll usually want to place the tab at the beginning like a traditional table of contents.
- To create a new sheet, click the + at the bottom of the active worksheet. Then, right-click the new tab, select Rename, and type a name for your sheet like Index or Worksheets.
- You can rearrange sheets by dragging their tabs left or right at the bottom of your workbook.
-
2
Type Page Number into cell A1 of your index sheet. Column A is where you’ll be placing the page numbers for each sheet.
Advertisement
-
3
Type Sheet Name into cell B1 of your index sheet. This will be the column header above your list of worksheets.
-
4
Type Link into cell C1 of your index sheet. This is the column header that will appear above hyperlinks to each worksheet.
-
5
Click the Formulas tab. It’s at the top of Excel.
-
6
Click Define Name. It’s on the «Defined Names» tab at the top of Excel.
-
7
Type SheetList into the «Name» field. This names the formula you’ll be using with the INDEX function.[1]
-
8
Type the formula into the «Refers to» field and click OK. The formula is =REPLACE(GET.WORKBOOK(1),1,FIND("]",GET.WORKBOOK(1)),"").
-
9
Enter page numbers in column A. This is the only part you’ll have to do manually. For example, if your workbook has 20 pages, you’ll type 1 into A2, 2 into A3, etc., and continue numbering down until you’ve entered all 20 page numbers.
- To quickly populate the page numbers, type the first two page numbers into A2 and A3, click A3 to select it, and then drag the square at A3’s bottom-right corner down until you’ve reached the number of pages in your workbook. Then, click the small icon with a + that appears at the bottom-right corner of the column and select Fill Series.
-
10
Type this formula into cell B2 of your index sheet. The formula is =INDEX(SheetList,A2). When you press Enter or Return, you’ll see the name of the first sheet in your workbook.
-
11
Fill the rest of column B with the formula. To do this, just click B2 to select it, and then double-click the square at its bottom-right corner. This adds the name of each worksheet corresponding to the page numbers you typed into column A.
-
12
Type this formula into C2 of your worksheet. The formula is =HYPERLINK("#'"&B2&"'!A1","Go to Sheet"). When you press Enter or Return, you’ll see a hyperlink to the first page in your index called «Go to Sheet.»
-
13
Fill the rest of column C with the formula. To do this, click C2 to select it, and then double-click the square at its bottom-right corner. Now each sheet in your workbook has a clickable hyperlink that takes you right to that page.
-
14
Save your workbook in the macro-enabled format. Because you created a named range, you’ll need to save your workbook in this format.[2]
Here’s how:- Go to File > Save.
- On the pop-up message that warns you about saving a macro-free workbook, click No.
- In the «Save as type» or file format menu, select Excel Macro-Enabled Workbook (*.xlsm) and click Save.


Advertisement
-
1
Click your index or table of contents sheet. If you have a lot of pages in your workbook, it’ll be helpful to readers to add quick «Back to Index» or «Back to Table of Contents» links to each sheet so they don’t have to scroll through lots of worksheet tabs after clicking to that page. Start by opening your index sheet.
-
2
Name the index. To do this, just click the field directly above cell A1, type Index, and then press Enter or Return.
- Don’t worry if the field already contains a cell address.
-
3
Click any of the sheets in your workbook. Now you’ll create your back button. Once you create a back button on one sheet, you can just copy and paste it onto other sheets.
-
4
Click the Insert tab. It’s at the top of the screen.
-
5
Click the Illustrations menu and select Shapes. This option will be in the upper-left area of Excel.
-
6
Click a shape for your button. For example, if you want to create a back-arrow icon sort of like your web browser’s back button, you can click the left-pointing arrow under the «Block Arrows» header.
-
7
Click the location where you want to place the button. Once you click, the shape will appear. If you want, you can change the color and look using the options at the top, and/or resize the shape by dragging any of its corners.
-
8
Type some text onto the shape. The text you type should be something like «Back to Index.» You can double-click the shape to place the cursor and start typing right onto the actual shape
- You might need to drag the corner of the shape to resize it so the text fits.
- To place a text box on or near the shape before typing, just click the Shape Format menu at the top (while the shape is selected), click Text Box in the toolbar, and then click and drag a text box.
- You can stylize the text using the options in Text on the toolbar while the shape is selected.
-
9
Right-click the shape and select Link. This opens the Insert Hyperlink dialog.[3]
-
10
Click the Place in This Document icon. It’s in the left panel.
-
11
Select your index under «Defined Names» and click OK. You might have to click the + next to the column header to see the Index option. This makes the text in the shape a clickable hyperlink that takes you right to the index.
-
12
Copy and paste the hyperlink to other sheets. To do this, just right-click the shape and select Copy. Then, you can paste it onto any other page by right-clicking the desired location and selecting the first icon under «Paste Options» (the one that says «Use Destination Theme» when you hover the mouse over it).


Advertisement
Ask a Question
200 characters left
Include your email address to get a message when this question is answered.
Submit
Advertisement
Thanks for submitting a tip for review!
About This Article
Article SummaryX
To create a table of contents in Excel, you can use the «Defined Name» option to create a formula that indexes all sheet names on a single page. Then, you can use the INDEX function to list the sheet names, as well as the HYPERLINK function to create quick links to each sheet.
Did this summary help you?
Thanks to all authors for creating a page that has been read 55,649 times.
Is this article up to date?
The INDEX function returns a value or the reference to a value from within a table or range.
There are two ways to use the INDEX function:
-
If you want to return the value of a specified cell or array of cells, see Array form.
-
If you want to return a reference to specified cells, see Reference form.
Array form
Description
Returns the value of an element in a table or an array, selected by the row and column number indexes.
Use the array form if the first argument to INDEX is an array constant.
Syntax
INDEX(array, row_num, [column_num])
The array form of the INDEX function has the following arguments:
-
array Required. A range of cells or an array constant.
-
If array contains only one row or column, the corresponding row_num or column_num argument is optional.
-
If array has more than one row and more than one column, and only row_num or column_num is used, INDEX returns an array of the entire row or column in array.
-
-
row_num Required, unless column_num is present. Selects the row in array from which to return a value. If row_num is omitted, column_num is required.
-
column_num Optional. Selects the column in array from which to return a value. If column_num is omitted, row_num is required.
Remarks
-
If both the row_num and column_num arguments are used, INDEX returns the value in the cell at the intersection of row_num and column_num.
-
row_num and column_num must point to a cell within array; otherwise, INDEX returns a #REF! error.
-
If you set row_num or column_num to 0 (zero), INDEX returns the array of values for the entire column or row, respectively. To use values returned as an array, enter the INDEX function as an array formula.
Note: If you have a current version of Microsoft 365, then you can input the formula in the top-left-cell of the output range, then press ENTER to confirm the formula as a dynamic array formula. Otherwise, the formula must be entered as a legacy array formula by first selecting the output range, input the formula in the top-left-cell of the output range, then press CTRL+SHIFT+ENTER to confirm it. Excel inserts curly brackets at the beginning and end of the formula for you. For more information on array formulas, see Guidelines and examples of array formulas.
Examples
Example 1
These examples use the INDEX function to find the value in the intersecting cell where a row and a column meet.
Copy the example data in the following table, and paste it in cell A1 of a new Excel worksheet. For formulas to show results, select them, press F2, and then press Enter.
|
Data |
Data |
|
|---|---|---|
|
Apples |
Lemons |
|
|
Bananas |
Pears |
|
|
Formula |
Description |
Result |
|
=INDEX(A2:B3,2,2) |
Value at the intersection of the second row and second column in the range A2:B3. |
Pears |
|
=INDEX(A2:B3,2,1) |
Value at the intersection of the second row and first column in the range A2:B3. |
Bananas |
Example 2
This example uses the INDEX function in an array formula to find the values in two cells specified in a 2×2 array.
Note: If you have a current version of Microsoft 365, then you can input the formula in the top-left-cell of the output range, then press ENTER to confirm the formula as a dynamic array formula. Otherwise, the formula must be entered as a legacy array formula by first selecting two blank cells, input the formula in the top-left-cell of the output range, then press CTRL+SHIFT+ENTER to confirm it. Excel inserts curly brackets at the beginning and end of the formula for you. For more information on array formulas, see Guidelines and examples of array formulas.
|
Formula |
Description |
Result |
|---|---|---|
|
=INDEX({1,2;3,4},0,2) |
Value found in the first row, second column in the array. The array contains 1 and 2 in the first row and 3 and 4 in the second row. |
2 |
|
Value found in the second row, second column in the array (same array as above). |
4 |
|
Top of Page
Reference form
Description
Returns the reference of the cell at the intersection of a particular row and column. If the reference is made up of non-adjacent selections, you can pick the selection to look in.
Syntax
INDEX(reference, row_num, [column_num], [area_num])
The reference form of the INDEX function has the following arguments:
-
reference Required. A reference to one or more cell ranges.
-
If you are entering a non-adjacent range for the reference, enclose reference in parentheses.
-
If each area in reference contains only one row or column, the row_num or column_num argument, respectively, is optional. For example, for a single row reference, use INDEX(reference,,column_num).
-
-
row_num Required. The number of the row in reference from which to return a reference.
-
column_num Optional. The number of the column in reference from which to return a reference.
-
area_num Optional. Selects a range in reference from which to return the intersection of row_num and column_num. The first area selected or entered is numbered 1, the second is 2, and so on. If area_num is omitted, INDEX uses area 1. The areas listed here must all be located on one sheet. If you specify areas that are not on the same sheet as each other, it will cause a #VALUE! error. If you need to use ranges that are located on different sheets from each other, it is recommended that you use the array form of the INDEX function, and use another function to calculate the range that makes up the array. For example, you could use the CHOOSE function to calculate which range will be used.
For example, if Reference describes the cells (A1:B4,D1:E4,G1:H4), area_num 1 is the range A1:B4, area_num 2 is the range D1:E4, and area_num 3 is the range G1:H4.
Remarks
-
After reference and area_num have selected a particular range, row_num and column_num select a particular cell: row_num 1 is the first row in the range, column_num 1 is the first column, and so on. The reference returned by INDEX is the intersection of row_num and column_num.
-
If you set row_num or column_num to 0 (zero), INDEX returns the reference for the entire column or row, respectively.
-
row_num, column_num, and area_num must point to a cell within reference; otherwise, INDEX returns a #REF! error. If row_num and column_num are omitted, INDEX returns the area in reference specified by area_num.
-
The result of the INDEX function is a reference and is interpreted as such by other formulas. Depending on the formula, the return value of INDEX may be used as a reference or as a value. For example, the formula CELL(«width»,INDEX(A1:B2,1,2)) is equivalent to CELL(«width»,B1). The CELL function uses the return value of INDEX as a cell reference. On the other hand, a formula such as 2*INDEX(A1:B2,1,2) translates the return value of INDEX into the number in cell B1.
Examples
Copy the example data in the following table, and paste it in cell A1 of a new Excel worksheet. For formulas to show results, select them, press F2, and then press Enter.
|
Fruit |
Price |
Count |
|---|---|---|
|
Apples |
$0.69 |
40 |
|
Bananas |
$0.34 |
38 |
|
Lemons |
$0.55 |
15 |
|
Oranges |
$0.25 |
25 |
|
Pears |
$0.59 |
40 |
|
Almonds |
$2.80 |
10 |
|
Cashews |
$3.55 |
16 |
|
Peanuts |
$1.25 |
20 |
|
Walnuts |
$1.75 |
12 |
|
Formula |
Description |
Result |
|
=INDEX(A2:C6, 2, 3) |
The intersection of the second row and third column in the range A2:C6, which is the contents of cell C3. |
38 |
|
=INDEX((A1:C6, A8:C11), 2, 2, 2) |
The intersection of the second row and second column in the second area of A8:C11, which is the contents of cell B9. |
1.25 |
|
=SUM(INDEX(A1:C11, 0, 3, 1)) |
The sum of the third column in the first area of the range A1:C11, which is the sum of C1:C11. |
216 |
|
=SUM(B2:INDEX(A2:C6, 5, 2)) |
The sum of the range starting at B2, and ending at the intersection of the fifth row and the second column of the range A2:A6, which is the sum of B2:B6. |
2.42 |
Top of Page
See Also
VLOOKUP function
MATCH function
INDIRECT function
Guidelines and examples of array formulas
Lookup and reference functions (reference)
In this guide, we’re going to show you how to create index page of worksheets in Excel with hyperlinks. Using VBA, you can automatically update the hyperlinks after adding or removing sheets.
Download Workbook
First, you need to create a new sheet for the index.
- Create a new sheet.
- Right-click on its tab.
- Select View Code option to open VBA editor for the corresponding sheet.


Alternatively, you can press the Alt + F11 key combination to open the VBA window and select the index sheet from the left pane.
Copy the following code and paste into the editor. Once you pasted the code, it will run every time you open that worksheet.
Code for creating an index of sheets
Private Sub Worksheet_Activate()
    'Define variables
    Dim ws As Worksheet
    Dim row As Long
    row = 1
    'Clear the previous list and add "INDEX" title
    With Me
        .Columns(1).ClearContents
        .Cells(1, 1) = "INDEX"
    End With
    'Loop through each sheet to add a corresponding hyperlink by using the name of the worksheet
    For Each ws In Worksheets
        If ws.Name <> Me.Name And ws.Visible = xlSheetVisible Then
            row = row + 1
            Me.Hyperlinks.Add Anchor:=Me.Cells(row, 1), _
             Address:="", _
             SubAddress:="'" & ws.Name & "'!A1", _
             ScreenTip:="Click to go to sheet " & ws.Name, _
             TextToDisplay:=ws.Name
        End If
    Next ws
    'Adjust the width of first column by the longest worksheet name
    Me.Columns(1).AutoFit
End Sub

You can close the VBA window now and test by opening another sheet other than the index sheet and then go back to the index sheet. The code automatically updates the worksheets that are not hidden.

Remember to save your file as a macro-enabled workbook (xlsm).

Tweaks
The code creates hyperlinks for visible sheets only. We added this check to hide sheets used for calculations or static data which should not be accessible to the end users.
To remove this condition you can remove the And ws.Visible = xlSheetVisible part on the 13th row.
Also, the last line in the subroutine adjusts the width of the first column based on the length of the longest worksheet name. Remove the entire 23rd line, Me.Columns(1).AutoFit, to remove this when creating index of sheets.
|February 21, 2013||Hyperlink
Have you ever worked in a workbook with only a few worksheets…say three or four sheets? Navigating to the correct sheet is fast and easy, and you spend very little time getting to the spot you need to be to do your work.
Have you ever worked in a workbook with more sheets? Say, 10, 20 , 100 or even 200 sheets? In these large workbooks, it takes a long time to get to the right sheet, doesn’t it? You waste time just trying to get to the right spot so that you can begin your work.
In these large workbooks, it may be useful to have a worksheet up front named Index or something similar. The index sheet simply has a hyperlink to each sheet in the workbook, and each sheet has a link back to the Index. This means that any sheet is only two clicks away. This technique can dramatically speed up your work, making you more productive, since you spend more of your time working and less time just getting to the right spot.
If you have never played with the hyperlink feature of Excel, it is a marvelous feature with many different applications. This post focuses on one narrow application, the Index worksheet. Other applications of this feature include digital reporting, creating a collection of related electronic files, documenting the source of numbers, and making it easier for users to navigate within workbooks.
The screenshot below illustrates the Index worksheet idea:

From the Index sheet, any worksheet is just a click away. Similar hyperlinks that return to the Index sheet make any sheet only two clicks away from any other sheet (one click to the Index, and one click to the other sheet). I like the way that the sheets can be organized as well. In the above screenshot, I organized them by function, input sheets, support sheets, and report sheets. However, they could just as easily be organized by year, quarter, department, region, or anything else that makes sense.
Adding a hyperlink is easy. Simply select the cell, and then Insert > Hyperlink. This brings up the Insert Hyperlink dialog box, pictured below.

To set up a link to another sheet or named reference within the workbook, simply click Place in This Document from the Link to panel. (To set up a link to another workbook, folder, or webpage, click Existing File or Web Page instead.) The existing cell value should appear in the Text to display field, but you can change it if desired. Then, pick the destination worksheet and optionally enter a specific cell or range reference, and click OK. You should see that Excel changed the font color to blue and added an underline. This is now a clickable link that should take you to the desired destination.
Navigation Pane
Some versions of Excel include a Navigation Pane, which is an alternative to creating links to specific sheets or references of interest manually. You can quickly determine if your version of Excel has the Navigation Pane feature by heading to View > Navigation. When you toggle it on, you will see a list of sheets and many additional objects. Clicking on one will navigate you there immediately.
Additional Notes
It is important to note that with Excel, there seem to be about 3 different ways to accomplish any task. An alternative approach is to use the right-click shortcut. You can right-click the sheet navigation toolbar (little back and next arrows to the left of the sheet tabs) and then click the desired sheet to jump to it. In Excel 2010 and earlier, this shortcut was great when there were only a few worksheets because it displayed the first 15 sheets. Two limitations of this technique were (a) only the first 15 sheets were displayed in the pop up and (b) you couldn’t navigate to the sheet by typing the sheet’s name with your keyboard. Starting with Excel 2013 things have changed, and now the right-click shortcut opens the Activate dialog box, which includes all sheets and allows you to navigate to a specific sheet by typing the name with your keyboard. This was a great 2013 enhancement! Thank you Microsoft!
In addition to the hyperlink feature, Excel offers a hyperlink worksheet function. Using the function rather than the feature affords more flexibility and portability, since you can get creative with the link location and use values stored in cells to define the full path and file name. I’ve created a macro that can assist in generating a hyperlink for each worksheet in the active workbook, and it uses the hyperlink function. Running the macro cycles through the active workbook and creates one hyperlink back to each worksheet. Feel free to check it out if you think it can save you some time.
Create Index With Hyperlinks
The ability to set up hyperlinks inside of an Excel worksheet that point to other cells, ranges, worksheets, workbooks, web pages, or any other digital file has been handy for me other the years, and I hope you find it as useful as I have. Excel rules!
If you’ve spent much time in a workbook with many worksheets, you know how painful it can be to find a particular worksheet. An index sheet available to every worksheet is a navigational must-have.
Using an index sheet will enable you to quickly and easily navigate throughout your workbook so that with one click of the mouse, you will be taken exactly where you want to go, without fuss. You can create an index in a couple of ways.
You might be tempted to simply create the index by hand. Create a new worksheet, call it Index or the like, enter a list of all your worksheet’s names, and hyperlink each to the appropriate sheet by selecting Insert » Hyperlink… or by pressing Ctrl/-K. Although this method is probably sufficient for limited instances in which you don’t have too many sheets and they won’t change often, you’ll be stuck maintaining your index by hand.
The following code will automatically create a clickable, hyperlinked index of all the sheets you have in the workbook. The index is re-created each time the sheet that houses the code is activated.
This code should live in the private module for the Sheet object. Insert a new worksheet into your workbook and name it something appropriate-Index, for instance. Right-click the index sheet’s tab and select View Code from the context menu. Enter the following Visual Basic code (Tools » Macro » Visual Basic Editor or Alt/Option-F11):
Private Sub Worksheet_Activate( )
Dim wSheet As Worksheet
Dim l As Long
l = 1
    With Me
        .Columns(1).ClearContents
        .Cells(1, 1) = "INDEX"
        .Cells(1, 1).Name = "Index"
    End With
    For Each wSheet In Worksheets
     If wSheet.Name <> Me.Name Then
      l = l + 1
      With wSheet
          .Range("A1").Name = "Start" & wSheet.Index
          .Hyperlinks.Add Anchor:=.Range("A1"), Address:="", SubAddress:= _
            "Index", TextToDisplay:="Back to Index"
      End With
         Me.Hyperlinks.Add Anchor:=Me.Cells(l, 1), Address:="",_
            SubAddress:="Start" & wSheet.Index, TextToDisplay:=wSheet.Name
     End If
    Next wSheet
End Sub
Press Alt/-Q to get back to your workbook and then save your changes. Notice that the code names (such as when you name a cell or range of cells in Excel) cell
A1 on each sheet Start, plus a unique whole number representing the index number of the sheet . This ensures that A1 on each sheet has a different name. If A1 on your worksheet already has a name, you should consider changing any mention of A1 in the code to something more suitable-an unused cell anywhere on the sheet, for instance.
You should be aware that if you select File » Properties » Summary and enter a URL as a hyperlink base, the index created from the preceding code possibly will not work. A hyperlink base is a path or URL that you want to use for all hyperlinks with the same base address that are inserted in the current document.
Another, more user-friendly, way of constructing an index is to add a link to the list of sheets as a context-menu item, keeping it just a right-click away. We’ll have that link open the standard workbook tabs command bar. You generally get to this command bar by right-clicking any of the sheet tab scroll arrows on the bottom left of any worksheet, as shown in figure.
Figure. Tabs command bar displayed by right-clicking the sheet scroll tabs
To link that tab’s command bar to a right-click in any cell, enter the following code in the VBE:
Private Sub Workbook_SheetBeforeRightClick(ByVal Sh As Object, ByVal Target
As Range, Cancel As Boolean)
Dim cCont As CommandBarButton
    On Error Resume Next
    Application.CommandBars("Cell").Controls("Sheet Index").Delete
    On Error GoTo 0
        Set cCont = Application.CommandBars("Cell").Controls.Add _
                        (Type:=msoControlButton, Temporary:=True)
        With cCont
                  .Caption = "Sheet Index"
             .OnAction = "IndexCode"
            End With
End Sub
Next, you’ll need to insert a standard module to house the IndexCode macro, called by the preceding code whenever the user right-clicks in a cell. It is vital that you use a standard module next, as placing the code in the same module as Workbook_SheetBeforeRightClick will mean Excel will not know where to find the macro called IndexCode.
Select Insert » Module and enter the following code:
Sub IndexCode( )
 Application.CommandBars("workbook Tabs").ShowPopup
End Sub
Press Alt/-Q to get back to the Excel interface.
Now, right-click within any cell on any worksheet and you should see a new menu item called Sheet Index that will take you right to a list of sheets in the workbook.
by updated Aug 01, 2016

on
March 22, 2005, 8:40 AM PST
Use index sheets to quickly navigate in an Excel workbook
Navigating through dozens of sheet name tabs in Microsoft Excel to find the one you need can be quite time consuming. Cut your navigation time in half by creating index sheets that contain a list of hyperlinks to every worksheet in the workbook.
We may be compensated by vendors who appear on this page through methods such as affiliate links or sponsored partnerships. This may influence how and where their products appear on our site, but vendors cannot pay to influence the content of our reviews. For more info, visit our Terms of Use page.
Help users increase productivity by automatically signing up for TechRepublic’s free Microsoft Office Suite newsletter, featuring Word, Excel, and Access tips, delivered each Wednesday.
When working with large workbooks in Microsoft Excel, you
can spend a good deal of time navigating through dozens of sheet name tabs to
find the one you need. One method for making this task easier is to build an
index sheet that contains hyperlinks to every worksheet in your workbook.
To create the index, follow these steps:
- Insert a new worksheet at the beginning of your
workbook and rename it Index. - Right-click on the sheet tab and select View
Code. - Enter the following code in Listing A.
- Press
[Alt][Q] and save the workbook.
The next time you open the workbook, the Index sheet will
contain a list of hyperlinks to each worksheet in the workbook. Each worksheet
also contains a hyperlink back to the Index sheet. In this example, the link
back to the Index is contained in cell H1, but it can be in any cell that is
blank for all worksheets.
-
Software
Бывает у вас такое: смотришь на человека и думаешь «что за @#$%)(*?» А потом при близком знакомстве оказывается, что он знает пять языков, прыгает с парашютом, имеет семеро детей и черный пояс в шахматах, да и, вообще, добрейшей души человек и умница?
Так и в Microsoft Excel: есть несколько похожих функций, про которых фраза «внешность обманчива» работает на 100%. Одна из наиболее многогранных и полезных — функция ИНДЕКС (INDEX). Далеко не все пользователи Excel про нее знают, и еще меньше используют все её возможности. Давайте разберем варианты ее применения, ибо их аж целых пять.
Вариант 1. Извлечение данных из столбца по номеру ячейки
Самый простой случай использования функции ИНДЕКС – это ситуация, когда нам нужно извлечь данные из одномерного диапазона-столбца, если мы знаем порядковый номер ячейки. Синтаксис в этом случае будет:
=ИНДЕКС(Диапазон_столбец; Порядковый_номер_ячейки)

Этот вариант известен большинству продвинутых пользователей Excel. В таком виде функция ИНДЕКС часто используется в связке с функцией ПОИСКПОЗ (MATCH), которая выдает номер искомого значения в диапазоне. Таким образом, эта пара заменяет легендарную ВПР (VLOOKUP):

… но, в отличие от ВПР, могут извлекать значения левее поискового столбца и номер столбца-результата высчитывать не нужно.
Вариант 2. Извлечение данных из двумерного диапазона
Если диапазон двумерный, т.е. состоит из нескольких строк и столбцов, то наша функция будет использоваться немного в другом формате:
=ИНДЕКС(Диапазон; Номер_строки; Номер_столбца)

Т.е. функция извлекает значение из ячейки диапазона с пересечения строки и столбца с заданными номерами.
Легко сообразить, что с помощью такой вариации ИНДЕКС и двух функций ПОИСКПОЗ можно легко реализовать двумерный поиск:

Вариант 3. Несколько таблиц
Если таблица не одна, а их несколько, то функция ИНДЕКС может извлечь данные из нужной строки и столбца именно заданной таблицы. В этом случае используется следующий синтаксис:
=ИНДЕКС((Диапазон1;Диапазон2;Диапазон3); Номер_строки; Номер_столбца; Номер_диапазона)

Обратите особое внимание, что в этом случае первый аргумент – список диапазонов — заключается в скобки, а сами диапазоны перечисляются через точку с запятой.
Вариант 4. Ссылка на столбец / строку
Если во втором варианте использования функции ИНДЕКС номер строки или столбца задать равным нулю (или просто не указать), то функция будет выдавать уже не значение, а ссылку на диапазон-столбец или диапазон-строку соответственно:

Обратите внимание, что поскольку ИНДЕКС выдает в этом варианте не конкретное значение ячейки, а ссылку на диапазон, то для подсчета потребуется заключить ее в дополнительную функцию, например СУММ (SUM), СРЗНАЧ (AVERAGE) и т.п.
Вариант 5. Ссылка на ячейку
Общеизвестно, что стандартная ссылка на любой диапазон ячеек в Excel выглядит как Начало-Двоеточие-Конец, например A2:B5. Хитрость в том, что если взять функцию ИНДЕКС в первом или втором варианте и подставить ее после двоеточия, то наша функция будет выдавать уже не значение, а адрес, и на выходе мы получим полноценную ссылку на диапазон от начальной ячейки до той, которую нашла ИНДЕКС:

Нечто похожее можно реализовать функцией СМЕЩ (OFFSET), но она, в отличие от ИНДЕКС, является волатильной, т.е. пересчитывается каждый раз при изменении любой ячейки листа. ИНДЕКС же работает более тонко и запускает пересчет только при изменении своих аргументов, что ощутимо ускоряет расчет в тяжелых книгах по сравнению со СМЕЩ.
Один из весьма распространенных на практике сценариев применения ИНДЕКС в таком варианте — это сочетание с функцией СЧЁТЗ (COUNTA), чтобы получить автоматически растягивающиеся диапазоны для выпадающих списков, сводных таблиц и т.д.
Ссылки по теме
- Трехмерный поиск данных по нескольким листам (ВПР 3D)
- Поиск и подстановка по нескольким условиям (ВПР по нескольким столбцам)
- Подстановка данных из одной таблицы в другую с помощью функции ВПР (VLOOKUP)