
Indent the first line of a paragraph

To indent the first line of a paragraph, put your cursor at the beginning of the paragraph and press the tab key. When you press Enter to start the next paragraph, its first line will be indented.
Tip: If you want to change indentation for paragraphs that have already been written, use the tab-key method on the first paragraph, as described above. Then put your cursor at the beginning of the next paragraph. Press Backspace and then Enter. Repeat the process for subsequent paragraphs.
First-line indent by default
If you always want first-line indentation, modify the Normal style:
-
Put the cursor anywhere in the paragraph.
-
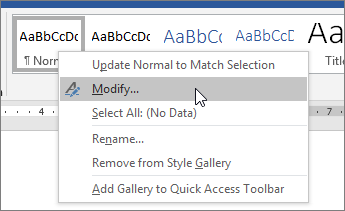
On the Home tab, right-click the Normal style, and choose Modify.

-
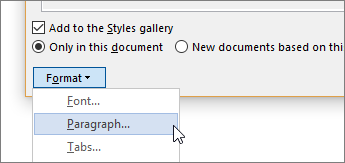
Select Format, and then choose Paragraph.
-
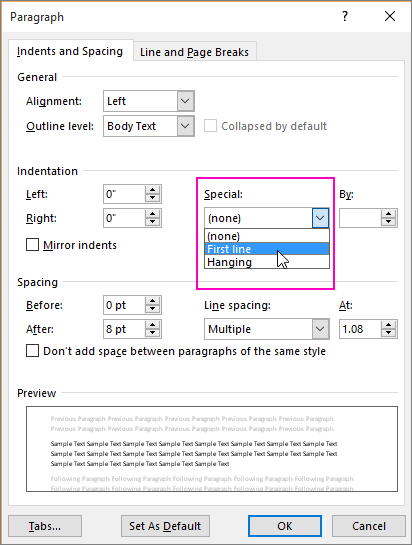
On the Indents and Spacing tab, under Indentation, select First line.
-
Select OK.
-
Select OK again.
Note: If you always want first-line indentation whenever you start a new document, choose the New documents based on this template option before you select OK.

Need more help?
 Block paragraphs are the default in Microsoft Word. Block paragraphs are aligned with the left margin with no indentation and are visually separated by line spaces. Although block paragraphs are popular online, traditionally indented paragraphs are more common in print publishing, business writing, and academic research. Today’s tutorial shows three ways to indent paragraphs in Microsoft Word:
1. Indent single paragraphs with the tab key
2. Indent all paragraphs with the ruler
3. Indent all paragraphs with the Paragraph dialog box
This tutorial is also available as a YouTube video showing all the steps in real time.
Watch more than 200 other writing-related software tutorials on my YouTube channel.
The images below are from Word for Microsoft 365. These steps also apply to Word 2021, Word 2019, Word 2016, Word 2013, and Word 2010.
Indent Individual Paragraphs in Word
If you want to indent single, existing paragraphs, the quickest method is the Tab key.
The Tab Key Method
1. Insert your cursor at the start of the paragraph.
2. Press the Tab key on your keyboard.
See “How to Create, Change, and Delete Tabs in Microsoft Word” for more information about using tab stops.
If you want to indent all existing paragraphs, the quickest method is the ruler.
However, you can also use the Paragraph dialog box if you would like to make additional adjustments to alignments and line spacing simultaneously.
The Ruler Method
If your document is blank, skip to step 5.
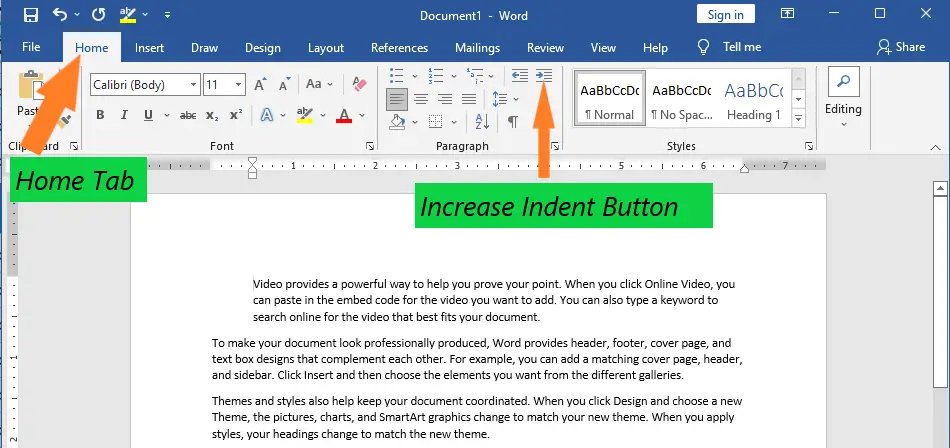
1. Select the Home tab in the ribbon.

2. Insert your cursor into a paragraph.
3. Select Select in the Editing group.

4. Select Select Text with Similar Formatting in the drop-down menu. Note that older versions of Word will say “Select All Text With Similar Formatting,” instead.
This option will select all the paragraphs in the document.
Caution: Other text with paragraph formatting (such as a title formatted with a large font size rather than with one of Word’s preset heading styles) will also be selected.

If your ruler is already visible, skip to step 7.
5. Select the View tab in the ribbon.

6. Select Ruler in the Show group.

7. Move the top ruler marker to the right to the desired indent length.

Your paragraphs should be indented as you move the ruler marker.
The Paragraph Dialog Box Method
1. Select the Home tab in the ribbon (see figure 1).
If your document is blank, skip to step 5.
2. Insert your cursor into a paragraph.
3. Select Select in the Editing group (see figure 2).
4. Select Select Text with Similar Formatting in the drop-down menu (see figure 3). Note that older versions of Word will say “Select All Text With Similar Formatting,” instead.
This option will select all the paragraphs in the document.
Caution: Other text with paragraph formatting (such as a title formatted with a large font size rather than with one of Word’s preset heading styles) will also be selected.
5. Select the Paragraph group’s dialog box launcher.

6. Select the Special menu arrow in the Paragraph dialog box.
![]()
7. Select First line in the Special drop-down menu.

8. Use the increment arrows to adjust the length of the indent.

9. Make any additional adjustments to alignment or line spacing.
10. Select the OK button to save your selection(s) and close the Paragraph dialog box.

Related Resources
How to Create and Customize Headings in Microsoft Word
How to Insert Copyright, Trademark, and Registered Symbols in Microsoft Word
How to View the Word Count in Microsoft Word
How to Adjust Page Margins in Microsoft Word
How to Create Hanging Indents in Microsoft Word
Updated January 14, 2023
Select the paragraph to be indented; From the Home tab, Paragraph group, select the dialog box launcher; Check that the Indents and Spacing tab is selected; In the Indentation section set the indent value you require.
Contents
- 1 How do you indent 0.5 in Word?
- 2 How do I indent the second line in Word?
- 3 What is the shortcut key for 1.5 line spacing?
- 4 How will you use indent commands?
- 5 How do I put spaces before paragraphs in Word?
- 6 How do I do 1.5 spacing on Word?
- 7 How do you do 1.5 spacing on Microsoft Word?
- 8 What is L Ctrl?
- 9 How do I indent tab in Word?
- 10 How do you make a 0.2 hanging indent?
- 11 What is indent example?
- 12 How do I add a space between words in Word?
- 13 How do I make no space between lines in Word?
- 14 Is 1.0 single-spacing?
- 15 Where is the spacing in Microsoft Word?
- 16 How do you set 1 inch margins on Microsoft Word?
- 17 What does Ctrl Shift E?
- 18 What is Ctrl E in word?
- 19 What does Ctrl k do in word?
- 20 Why can I not indent on word?
How do you indent 0.5 in Word?
One simple way to indent text is to place the cursor at the start of a paragraph and hit the tab key on your keyboard. In Microsoft Word, this adds a 0.5” (1.27cm) indent at the left margin. It also automatically formats the text so that subsequent paragraphs have a first-line indent.
How do I indent the second line in Word?
Select OK.
- Select the paragraph where you want to add a hanging indent.
- Go to Format > Paragraph.
- Under Special, select one of the following indent styles: Hanging. First Line. None. On Hanging and First Line indents, you can adjust the depth of the indent with the By field.
- Select OK.
What is the shortcut key for 1.5 line spacing?
Ctrl+5
Pressing Ctrl+5 changes to 1.5 line spacing.
How will you use indent commands?
To use the Indent commands:
- Select the text you want to indent.
- Make sure you are on the Home tab.
- Click the Increase Indent command to increase the indent by increments of 1/2 inch. Increasing the indent.
- Click the Decrease Indent command to decrease the indent by increments of 1/2 inch.
How do I put spaces before paragraphs in Word?
To format paragraph spacing:
- Select the paragraph or paragraphs you want to format.
- On the Home tab, click the Line and Paragraph Spacing command. Click Add Space Before Paragraph or Remove Space After Paragraph from the drop-down menu.
- The paragraph spacing will change in the document.
How do I do 1.5 spacing on Word?
To format line spacing:
- Click Format on the menu bar.
- Select Paragraph. The Paragraph dialog box appears.
- Click the Indents and Spacing tab.
- In the line spacing drop-down menu, you can select single, 1.5, or double spacing. The default is single spacing.
- Click OK.
How do you do 1.5 spacing on Microsoft Word?
Change the line spacing in a portion of the document
- Select one or more paragraphs to update.
- Go to Home > Line and Paragraph Spacing.
- Select Line Spacing Options and choose an option in the Line spacing box.
- Adjust the Before and After settings to change spacing between paragraphs.
- Select OK.
What is L Ctrl?
Alternatively referred to as Control+L and C-l, Ctrl+L is a keyboard shortcut whose function differs depending on the program being. For example, in Microsoft Word, Ctrl+L is used to align text with the left edge of a document (margin).Ctrl+L in Excel and other spreadsheet programs.
How do I indent tab in Word?
To indent using the Tab key:
- Place the insertion point at the very beginning of the paragraph you want to indent.
- Press the Tab key. On the Ruler, you should see the first-line indent marker move to the right by 1/2 inch.
- The first line of the paragraph will be indented.
How do you make a 0.2 hanging indent?
Create a hanging indent
- Select the text where you want to add a hanging indent.
- Go to Home > Paragraph dialog launcher. > Indents and Spacing.
- Under Special, select Hanging. You can adjust the depth of the indent using the By field.
- Select OK.
What is indent example?
When you press the “Tab” button in a word processing program so the first line of your text starts further inward than the second, this is an example of indent.A space left when you “tab” to move text inward in a word processing program is an example of an indent.
How do I add a space between words in Word?
Change the spacing between characters
- Select the text that you want to change.
- On the Home tab, click the Font Dialog Box Launcher, and then click the Advanced tab.
- In the Spacing box, click Expanded or Condensed, and then specify how much space you want in the By box.
How do I make no space between lines in Word?
Change the line spacing in Word
- Select Design > Paragraph Spacing.
- Hover the cursor over each option to see a preview, and then select the option you want. For single spacing, select No Paragraph Space.
Is 1.0 single-spacing?
Line spacing is the distance between lines. In earlier versions of Word, the default line spacing distance is “1.0,” or single-spacing, which stacks lines closely together with minimal space between. The amount of that space varies depending on the font used.
Where is the spacing in Microsoft Word?
Go to Home > Line and Paragraph Spacing. Select Line Spacing Options, and then choose the options you want under Spacing. To change the spacing before or after the selected paragraphs, select the arrow next to Before or After and enter the amount of space that you want. Select Set as Default.
How do you set 1 inch margins on Microsoft Word?
To set the top margin of all other pages to 1 inch:
- At least one line down from the top of Page 1, place cursor before or after any text in the order.
- Click Page Layout > Margins > Custom Margins.
- In the Page Setup Window, change the top margin to 1 inch.
- Select “This point forward” from the Apply to selection box.
- Click Ok.
What does Ctrl Shift E?
Ctrl-Shift-E. Turn revision tracking on or off. Ctrl-A. Select everything in the document.
What is Ctrl E in word?
Ctrl+E. Align the text to the left. Ctrl+L. Align the text to the right. Ctrl+R.
What does Ctrl k do in word?
In Microsoft Word and other word processors, pressing Ctrl + K inserts a hyperlink at the text cursor’s current location.
Why can I not indent on word?
To fix this, click the Microsoft Office button, select Word Options . Under Proofing , click AutoCorrect Options… . Under AutoFormat As You Type tab (in the Automatically as you type section), make sure that the “Set left- and first-indent with tabs and backspaces” option is checked.
![]()
Download Article
![]()
Download Article
While writing, it is important to use indents before the start of a new paragraph. This keeps it looking nicely formatted. This wikiHow teaches you different ways to indent paragraphs in Microsoft Word.
-
1
Open your document in Microsoft Word. You can do this by double-clicking the file on your computer.
-
2
Press Tab ↹ on the keyboard. This inserts a standard indent, which is 0.5” wide.[1]
Advertisement
-
3
Type your sentence. Once you reach the end of the line, Word will automatically arrange your text so that only the first line contains that 0.5” space.


Advertisement
-
1
Open your document in Microsoft Word. You can do this by double-clicking the file on your computer.
-
2
Highlight an entire paragraph. To do this, click the mouse before the first word, then drag the cursor (don’t let go of the button!) all the way to the end. When you lift your finger from the button, the paragraph should appear highlighted in blue.
-
3
Press Tab ↹ on the keyboard. The entire selected paragraph will move 0.5” to the right.
- To move the paragraph another 0.5”, press Tab ↹ again.


Advertisement
-
1
Open your document in Microsoft Word. You can do this by double-clicking the file on your computer.
- A hanging indent indents the second line of a paragraph instead of the first. This type of indent is most often used in bibliographies and reference pages.
-
2
Highlight an entire paragraph. To do this, click the mouse before the first word, then drag the cursor (don’t let go of the button!) all the way to the end. When you lift your finger from the button, the paragraph should appear highlighted in blue.
-
3
Right-click the highlighted area. A pop-up will appear.
-
4
Click Paragraph….
-
5
Click the drop-down menu under “Special.” It’s in the “Indentation” section.
-
6
Select Hanging.
-
7
Click OK. The second line in the paragraph will move 0.5” inward.


Advertisement
Ask a Question
200 characters left
Include your email address to get a message when this question is answered.
Submit
Advertisement
Thanks for submitting a tip for review!
About This Article
Article SummaryX
Press the Tab key before the first word of a sentence to indent the line.
To indent an entire paragraph, highlight the text, then press Tab.
Did this summary help you?
Thanks to all authors for creating a page that has been read 91,036 times.
Is this article up to date?
In this course, we will learn the ways on how to indent paragraph in Microsoft Word. Meanwhile, this is the continuation of the previous tutorial on how to align text and their font cases, color and sizes in Microsoft Word which still part of formatting text in your documents. You can browse those guide if you having a hard time in exploring your documents.
Furthermore, we’ll learn how to indent paragraphs and available indentation we can used.
Table of contents
- What is paragraph indent in MS Word?
- What are the 4 types of indent paragraph in Word?
- 1. First line indent
- 2. Hanging indent
- 3. Right indent
- 4. Left indent
- Indent Paragraph in MS Word: Why indent paragraphs?
- What is the default indent spacing in word?
- How to Indent Paragraph in Word
- Quick way to Indent Paragraphs in Word
- Shortcut Keys for Formatting Paragraphs
- Summary
What is paragraph indent in MS Word?
Paragraph Indenting is a function that gives you the ability to move line breaks within paragraphs further away from the text’s margins. This function is located in the formatting section of the document.
What are the 4 types of indent paragraph in Word?
There are four types of indents: first line indent, hanging indent, right indent and left indent that can be applied to a paragraph.
1. First line indent
The first-line indent is the most common way to indicate the beginning of a new paragraph. In addition, the other common method is to leave space between paragraphs. Moreover, first-line indentation means indenting only the first line of a paragraph by a specified amount, leaving all other lines unaltered.
2. Hanging indent
A hanging indent, also called a second line indent, makes the first line of a paragraph stand out by putting it at the edge of the page. Each line after that is indented.
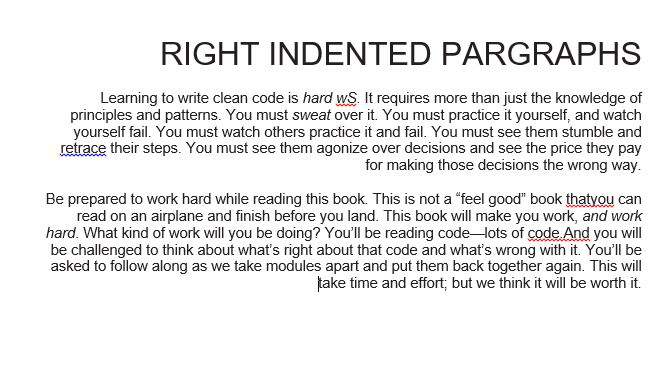
3. Right indent
The right line indent moves all the lines of a paragraph away from the right margin by a certain amount.
4. Left indent
The left indent is the space between the paragraph and the left margin. To change it, click on the rectangle at the bottom of the indentation marker and drag it to a different place. Moreover, a left-line indent moves all the lines of a paragraph away from the left margin by a certain amount.
Indent Paragraph in MS Word: Why indent paragraphs?
We need to indent paragraphs because it is often criticized as a way to format and gives readers a sense of continuity. When a reader sees an indentation, they know she’s about to start on a new topic or a new part of a book. It helps present information in a way that makes sense.
What is the default indent spacing in word?
The default indent spacing of Microsoft Word is 1.08 line spacing between lines. It gives each paragraph an extra 8 points of space after a hard return. Moreover, it is standard size which is 1/2 in inches.
Here are the ways on How to Indent Paragraph in Word.
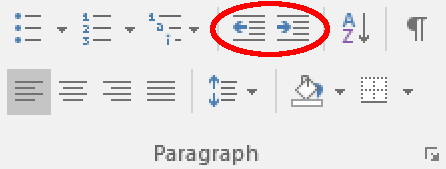
- Step 1 − Click anywhere on the paragraph to indent left and then click the Increase Indent button on the Home tab, or simply press the Ctrl + M keys.
You can click more than once to make a deeper indentation.

- Step 2 −Click the Decrease Indent button on the Home tab or by pressing Ctrl + Shift + M to remove the left indentation. Clicking multiple times will remove the deeper indentation.

You can also use the Paragraph Dialog Box to set left-and right-indentation. We will see this dialog box in the last section of this chapter. - Step 3 − Click anywhere on the paragraph you want to indent, then click the Page Layout tab’s Increase Right Indent spinner.
 To make a deeper indentation, click on the spinner several times. You can also use the Left Indent spinners to set left indentation from the same location.
 - Step 4−Turn the Decrease Right Indent spinner in the opposite direction. Then, you will get rid of the right indentation.
You can also set the left and right indents with the Paragraph Dialog Box. In the next section, we’ll look at this box.
- Step 5− Switch Decrease Right Indent. The right indentation will disappear. Click Before Text to set the left indentation and First Line Option to move the first line of a paragraph to the middle.
Set the Indentation Unit to change how the movement works. A preview box will only show the main idea, not how the text is set up.
- Step 6−Choose Hanging Option from the Before Text spinner to move the initial line of a paragraph to the left.
Set the Indentation Unit to change how the movement works. A preview box will only show the main idea, not how the text is set up.

You can set the right indentation with the After Text spinner. You can give it a try.
 To make a deeper indentation, click on the spinner several times. You can also use the Left Indent spinners to set left indentation from the same location.
 You can also set the left and right indents with the Paragraph Dialog Box. In the next section, we’ll look at this box.
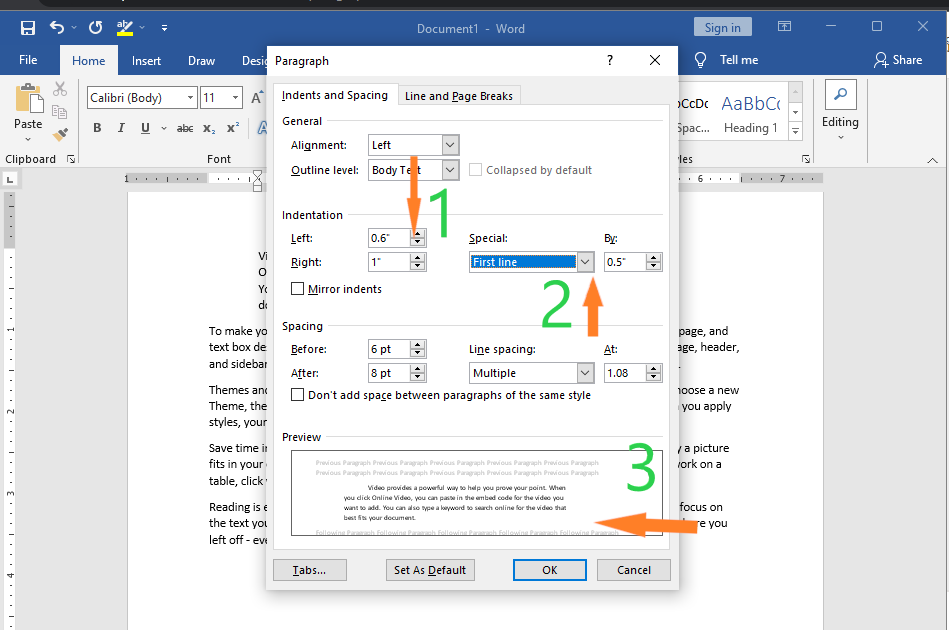
Quick way to Indent Paragraphs in Word
To quickly indent paragraphs Use the Tab key to make a line break. Moreover, this will leave a 1/2-inch space before the first line. Just put the insertion point at the start of the paragraph you want to move to the side. Then hit the Tab button.
Shortcut Keys for Formatting Paragraphs
| Shortcut Keys for Formatting Paragraphs | Controls |
|---|---|
| Hanging indent | CTRL+T |
| Increase paragraph indent | CTRL+M |
| Justify paragraph | CTRL+J |
| Left-align paragraph | CTRL+L |
| Indent the paragraph. | Ctrl+M |
| Remove a paragraph indent. | Ctrl+Shift+M |
| Create a hanging indent. | Ctrl+T |
| Remove a hanging indent. | Ctrl+Shift+T |
- To increase indent of the selected paragraph, press Ctrl + M. To decrease indent, press Ctrl + Shift + M.
- A complete paragraph can be indented with the keyboard shortcut Ctrl + M and pressing the keyboard shortcut more than once will indent the paragraph further. To reverse the indent, you can also press Ctrl + Shift + M .
Summary
In summary, we’ve talked about how to indent paragraphs in Microsoft Word, as well as how to apply those indentation in a document and what those terms mean. In addition, we know the available indentation in Microsoft Word. We also know how to use shortcuts that will make our formatting documents easy.
We hope this tutorial helps you as you format your documents in MS Word.
PREVIOUS
NEXT
Formatting text in MS Word is both pleasingly simple and annoyingly complicated. Take text indentation, for example. The basics are very easy to grasp. But there are many extra options that you may miss if you’re not already a confident Microsoft Word user. To help out, then, we’ve prepared this complete guide on how to indent text in a document.
The Tab Key
One simple way to indent text is to place the cursor at the start of a paragraph and hit the tab key on your keyboard. In Microsoft Word, this adds a 0.5” (1.27cm) indent at the left margin. It also automatically formats the text so that subsequent paragraphs have a first-line indent.
If all you want to do is begin each paragraph with a half-inch indent, this is fine. But for more control over text indentation in your document, read on.
How to Indent Text
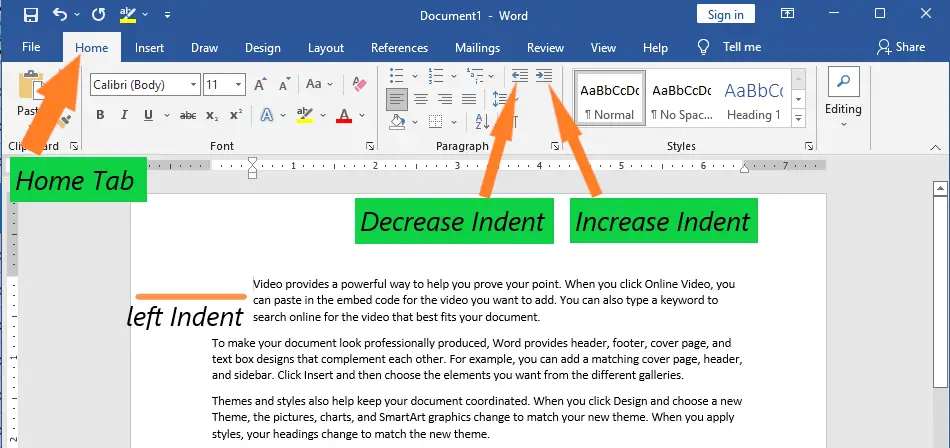
You can find the basic indentation options in Microsoft Word on the main ribbon. This includes the Paragraph section of the Home tab, where you will find Increase Indent and Decrease Indent buttons.
The Increase Indent button adds a 0.5” (1.27cm) indent at the left margin for the entire paragraph (not just the first line). The Decrease Indent button, meanwhile, does the exact opposite.
Alternatively, go to Layout > Paragraph on the ribbon and adjust the values in the left and right indent boxes as required. This has the added bonus of letting you indent text by a custom amount.
Find this useful?
Subscribe to our newsletter and get writing tips from our editors straight to your inbox.

Special Indentations
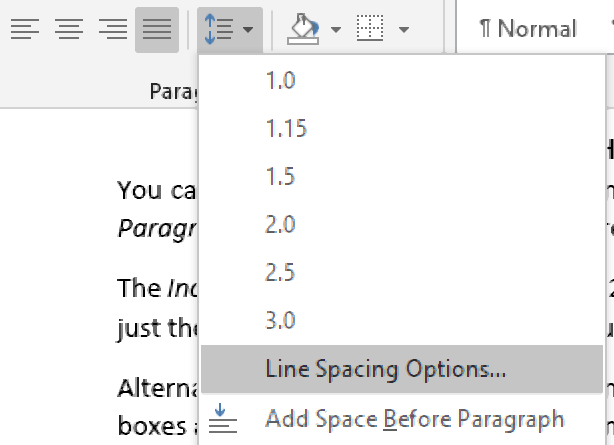
For even more control over the indentation in your document, you can open the main Paragraph menu. This can be accessed by going to Home > Paragraph, clicking the Line and Paragraph Spacing button, and then selecting Line Spacing Options… from the dropdown menu.
In the new window, you will find an Indentation section. The left and right indent options here work the same as in the Layout tab on the ribbon.
The other settings here can be used to add special indentations to your document. These include:
- First line – This option indents the first line of each paragraph to a custom value. Typically, this type of indent would be used as an alternative to paragraph spacing.
- Hanging – This will indent each line after the first in a paragraph. The most common use for this is to add a hanging indent in a reference list (e.g., as required in APA referencing).
- Mirror indents – Clicking this will change the left and right indent options to say Inside and Outside This will mean that indents are “mirrored” on odd and even pages, which helps ensure consistent formatting when printing something in a book format.
To use these options, simply select the text you want to format with the cursor, open the paragraph menu, choose the type and size of indent you want to apply, and click OK to change the indentation for the selected text.
Microsoft provides us with some powerful office-related tools which provide us functionality to resolve all needs related to documents, spreadsheet PowerPoint, and much more. The whole package of these is collectively known as MS OFFICE or Microsoft Office. In this article, we will only be discussing about one application from the MS Office package, i.e, MS Word. Microsoft Word is a very powerful word processor(It is a device or computer program that provides input, editing, formatting, and output of text, often with some additional features.) that allows users to create any text-related document. MS Word offers its user some unique features which allow users, most primarily recognized to perform certain tasks such as:
- It allows users to choose from numerous fonts.
- It allows the user to change the font color and the background.
- It also provides tools for highlighting important information. Grammar, spelling check, searching for words, and word count in the document.
- It comes with a built-in dictionary.
- Since Microsoft Word 2010, it comes with features to provide user to insert images, sound files into the document.
It also provides its user with beautiful page formatting. It is achieved through functionality and one of it is Paragraph Indenting. Paragraph Indenting is a function that allows you to position your lines in paragraphs further from the margins of the document in the formatting area of the document.
There are three ways to achieve paragraph indenting in MS WORD.
Method 1:
Step 1: Select the paragraph by click on the right cursor at the start and click on the left cursor and start selecting all the lines in the paragraph.
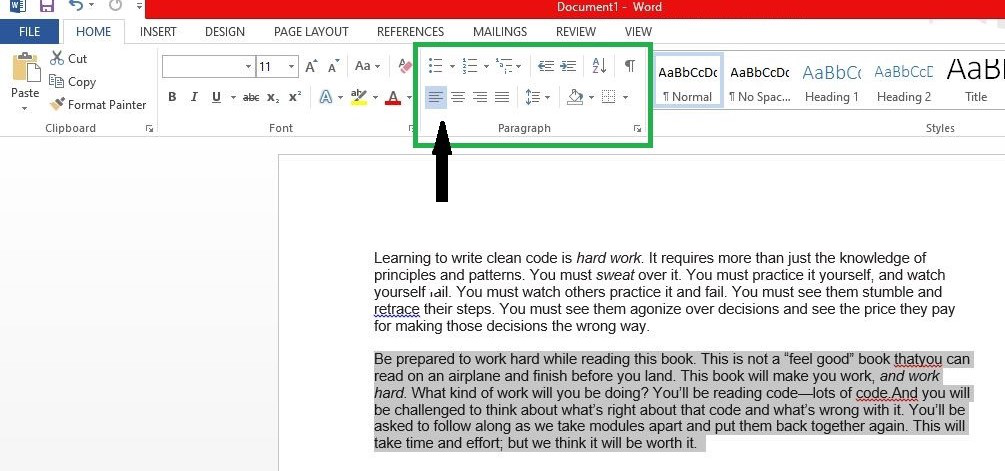
Step 2: Then click on the symbol as shown in the picture above, in the Paragraph section of the Home tab.
Method 2:
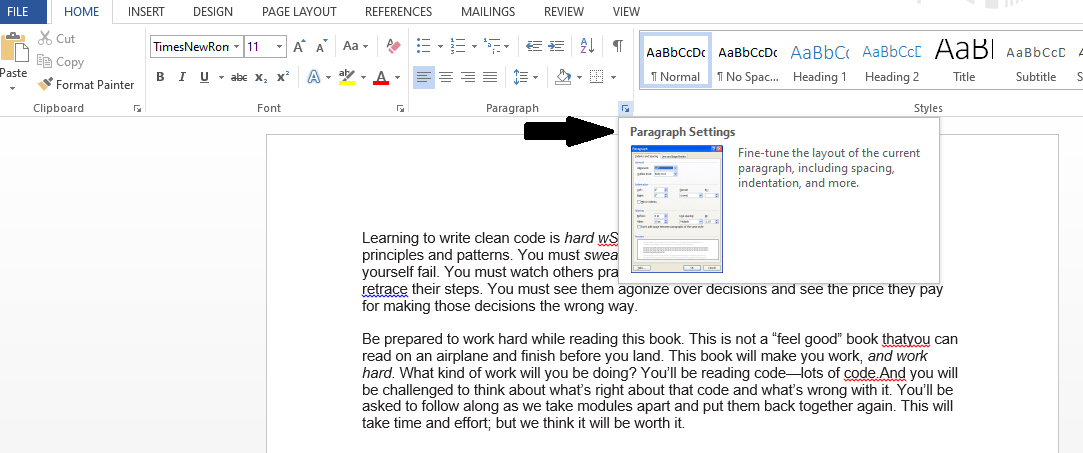
Step 1: Click on the arrow on the bottom right corner of the paragraph section of the Home tab to access paragraph settings, as shown in the figure above to enter space formatting manually or to perform manual indentation of the paragraph.
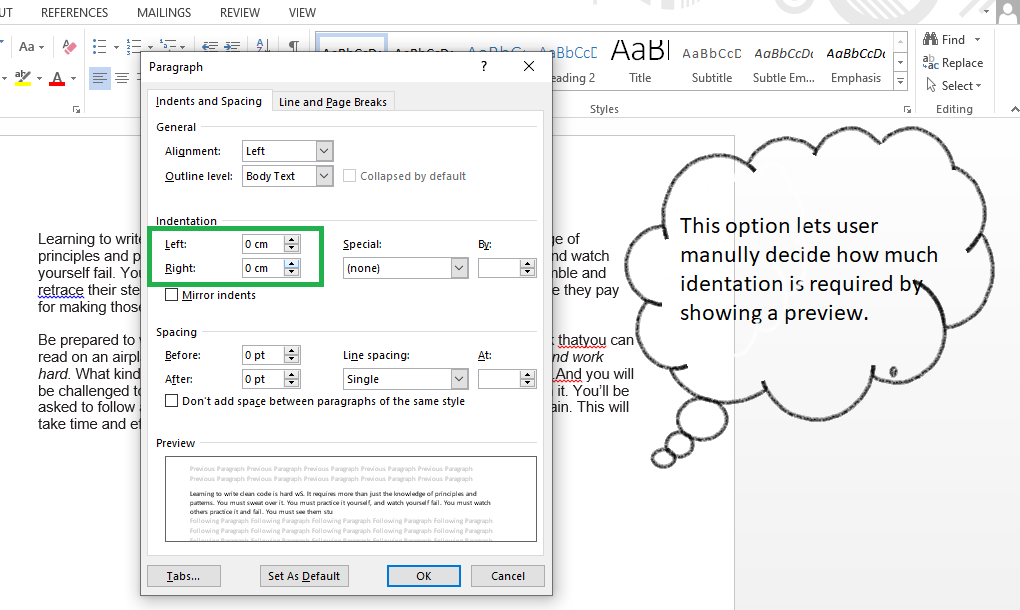
Step 2: A paragraph settings window pops up as shown in the figure above. Now select the Indents and Spacing tab and under the indentation section, enter the about of spacing you would like to provide in terms of centimeters to the paragraph.
Step 3: A Preview pane at the end displays how the formatting looks in the document. Then after being satisfied with the desired indentation, one has to click the OK button to save the paragraph settings
Method 3:
Step 1: After selecting the paragraph use the following command for indenting your paragraph
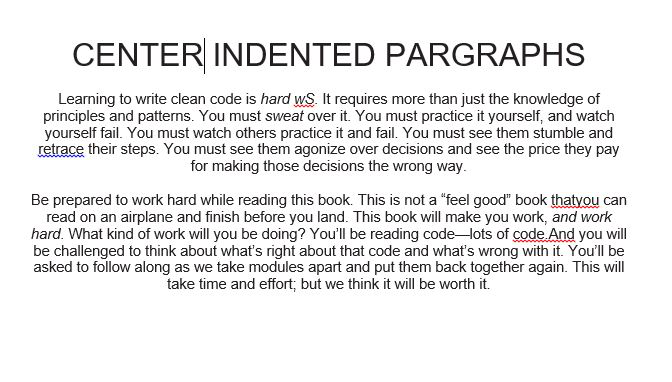
- Ctrl + E: for Center Indenting
- Ctrl + R: for Right Indenting
- Ctrl + L: for Left Indenting
Step 2: After indenting, we get the following results:
- Left indented Paragraph:

- Right Indented Paragraph:
- Center Indented Paragraph:
Note: One can also indent only one line, just we need to select a line instead of a paragraph.
An indentation or indent is an empty space at the beginning of a line of
written or printed text. There are several types of indents that can be used in the Word
document:
- The First Line Indent indicates the first line of the paragraph.
Instead of using the first-line indents, a
space between paragraphs
or even an empty line is often used. In modern word-processing, it is not
recommended to use the first-line indents and the
spaces between paragraphs in the same document.Notes:
- The first-line indent in the first paragraph of any text
is optional, since it is obvious where the paragraph begins.
However, the
Drop caps
may apply for such paragraphs. - Do not use spaces or tabs to indent the first line — when you
change the style of different paragraphs, it will be difficult
to reconcile them.

- The first-line indent in the first paragraph of any text
- Professionally printed material in English typically does not indent the first
paragraph, but indents those that follow. So, a negative indent or
hanging indent is used, as an indent that indents all text except the
first line:
The hanging indents used in Bibliographies, References pages, and
sometimes in scripts, dictionary entries, and footnotes. - Another common modern English style is the lack of indentation, and the addition
of vertical white space to create «block paragraphs»:
The block paragraphs commonly used for block quotations.


Customize the paragraph format
1. Click the paragraph you want to format or select
multiple paragraphs.
2. Do one of the following:
- On the Home tab, in the Paragraph group, click the dialog box
launcher:
- Choose Paragraph… from the shortcut menu (right-click or press
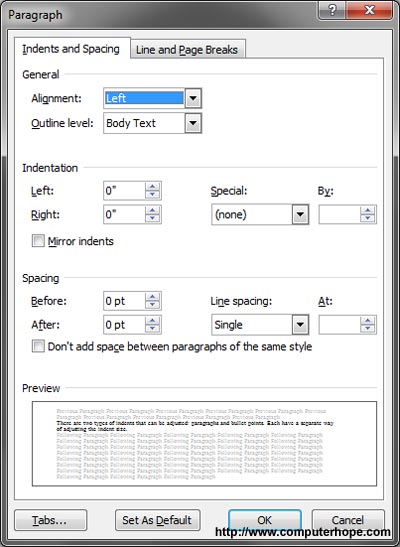
Shift+F10), to display the Paragraph dialog box:


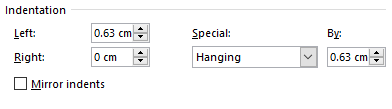
3. In the Paragraph dialog box, choose or
type the appropriate values for Left, Right or Special
(First line or Hanging) indents:

Use the ruler
To do so, click in the paragraph you want to format or select multiple paragraphs, and
then drag the First Line Indent marker left or right to the desired location.
Use shortcuts
You can press Ctrl+T to create a hanging indent that aligns body text with the
first tab marker. (By default, tabs are set every 0.5 inch.)
You can press Ctrl+Shift+T to «unhang» an indent, regardless of how the hanging
indent was created.
Press Ctrl+Shift+M to decrease a paragraph’s indent by one tab stop. By default,
tab stops are set every 0.5 inch.
Press Ctrl+M to increase a paragraph’s indent by one tab stop. By default, tab
stops are set every 0.5 inch.
You can instantly add a full line space before a paragraph by selecting the paragraph(s)
you want to format and pressing Ctrl+0 (zero). If you select multiple paragraphs,
pressing Ctrl+0 adds a blank line space before each paragraph in the selection.
See also this tip in French:
Comment créer un retrait négatif de première ligne.
Updated: 03/05/2023 by
There are two types of indents that can be adjusted: paragraphs and bullet points. Each has a separate way of adjusting (increasing and decreasing) the indent size. Below are the different ways you can move the indentation in Microsoft Word.
First line indent with tab
The first line indent can always be created using the Tab on the keyboard. To change the first line indent size or indent the full paragraph, continue reading the below suggestions.
Tip
Pressing Tab multiple times increases the indent each time it’s pressed.
Indent paragraph with shortcut key
A complete paragraph can be indented with the keyboard shortcut Ctrl+M and pressing the keyboard shortcut more than once will indent the paragraph further.
Tip
To reverse the indent, you can also press Ctrl+Shift+M.
Adjusting indents using the ruler
To adjust a paragraph indent size, use the Ruler, which is below the menu bar and resembles the picture below. If this feature is not visible, see our document on how to enable the Ruler.
- How to enable and disable the Ruler in Microsoft Word.
Towards the left side of the Ruler, look for indent markers that resemble an hourglass, like the image below.
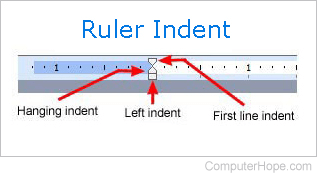
The top marker (down arrow) controls the first line indent, and the middle marker (up arrow) controls the hanging indent (the indent for lines after the first line in each paragraph). The bottom marker (small box) controls the left indent. To adjust these indents, you can click-and-drag each marker to the right or left.
Tip
To change the indentation for an entire document, select all text in the document (press Ctrl+A), then adjust the indent spacing in the ruler as detailed above.
Note
If a large indent is created when pressing the Tab and adjusting the indent on the Ruler doesn’t work, adjust the Left Tab Stop in the Ruler.
Changing indents in the Paragraph window
- Microsoft Word Online.
- Microsoft Word desktop application.
Microsoft Word Online
In Microsoft Word Online, the web version, you can adjust the indents through the Paragraph settings. To view these settings, right-click with your mouse anywhere in the document and select Paragraph Options.
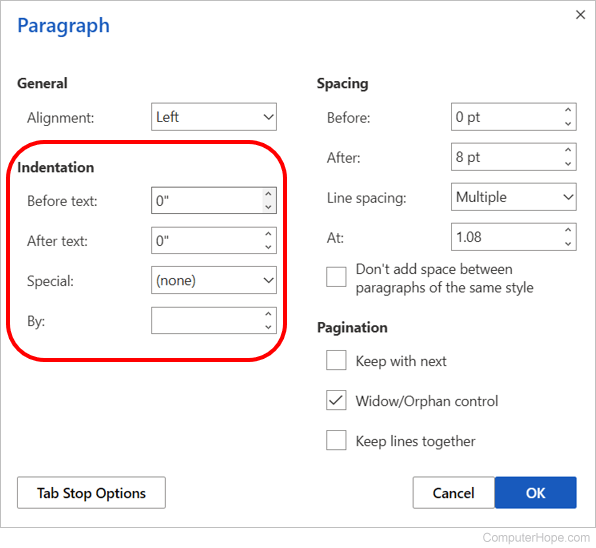
The Paragraph settings window is displayed. In the Indentation section, the left and right indent settings can be adjusted. You can also adjust the first line indent and hanging indent size with the Special drop-down list and By option.
Microsoft Word desktop application
In the Microsoft Word desktop application, another way to adjust the indents is through the Paragraph settings. To view this window, double-click the markers in the ruler, click Format and then Paragraph. You can also place the cursor in the paragraph, right-click with your mouse, and chose Paragraph.
As seen below in the Paragraph window, under the Indentation section, the left and right indent settings can be adjusted. You can also adjust the first line indent and hanging indent size under the Special option in the Indentation section.
At the bottom of the Paragraph settings window, you can preview the look of the indent sizes you are setting and make changes accordingly until you get it the way you want.
Adjust the indent on the Ribbon in Word 2007 and later
If you’re using a newer version of Microsoft Word that uses the Ribbon, such as Word 2007 or 2013, Word 365, or Word Online (the web version), do the following.
- Click the Layout or Page Layout tab.
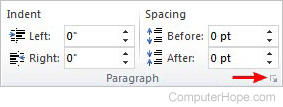
- Adjust the indent settings in the Paragraph section.
To view the Paragraph window mentioned in the above section, click the small down arrow indicated by the red arrow in the picture below.
Adjusting the bullet and numbering indentation
Tip
The easiest method of adjusting the bullets and number list in all versions of Word is to adjust the left indent through the Microsoft Word ruler bar.
Note
To adjust the spacing between the bullet and the text in a list, you may need to adjust the Left Tab Stop in the Ruler.
Microsoft Word Online
In Word Online, the web version, the only way to adjust bullet list indentation is to adjust the left indent spacing through the horizontal ruler.
Microsoft Word 2007 and later
In Word 2007 and later versions of the Word desktop application, follow the steps below.
- Click one of the bullets at the level you want to change in the document.
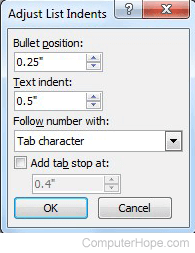
- Right-click the bullet and select Adjust List Indents in the pop-up menu.
- In the Adjust List Indents window, change the Bullet position to adjust the bullet indent size or change the Text indent to adjust the text indent size after a bullet. As shown, the Bullet position is at .25 inches and the Text indent is at .5 inches (or one-half inch).
Microsoft Word 2000 and earlier
- Place your cursor in a bulleted or numbered line in the document.
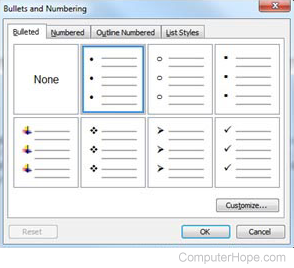
- Click the Format menu at the top of the Word program and select the Bullets and Numbering option.
- In the Bullets and Numbering window, click the Customize button on one of the first three tabs, depending on the type of list you are changing.
- In the window that opens, adjust the indent size for the bullet position and the text position. At the bottom of the window, you can preview how the indentation sizing looks and make changes accordingly until you get it the way you want.
You can also access the Bullet and Numbering window by placing your text cursor on a bulleted or numbered line and right-clicking in the Word document. In the pop-up menu, select the Bullets and Numbering option.
Microsoft Word is a graphical word processing program used to create text-based documents. It’s included in all of the Microsoft Office application suites and is one of the most widely-used word processors.
The importance of indenting
When creating a body of text in a Word document, indenting the first line adds structure and is the most common way to signal the start of a new paragraph or topic.
Block paragraphs are the default in Word, meaning that each line within a paragraph is aligned with the left margin, and the paragraphs only visually separated by line spaces. As a general rule, block paragraphs are more common when writing for an online platform, and indented paragraphs are more common in print publishing and academic research.
The images featured in this article are from Microsoft 365 (formerly Office 365), which is the same as Word 2019. The steps are the same for Word 2016, Word 2013, and Word 2010.

Aside from indenting the first line, it’s also possible to indent every line except for the first line, known as a hanging indent or second line indent. Hanging indents are typically used in bibliography or reference sections.

6 ways to indent in Microsoft Word
There are multiple ways to indent in Microsoft Word depending on the style of document you’re creating and your preferences. But first, ensure the Ruler feature is displayed. This allows you to better position and customize your text spacing. To display the Ruler:
- Click the View tab
- Click the checkbox next to Ruler in the left hand corner

-
Indent using the tab key
The quickest way to indent is to use the Tab key. This will create a first-line indent of ½ inch.
1. Place your cursor at the very beginning of the paragraph you want to indent.
2. Press the Tab key. On the Ruler at the top of the screen, the first-line indent marker (the marker pointing down toward the text) will move to the right by ½ inch.
3. Continue placing the cursor at the beginning of paragraphs and repeat. If there is nothing yet written on the document, press Tab before beginning a new paragraph. -
Indent using Microsoft’s indent markers
If you want a customized indent (an indention more or less than ½ inch), Word provides indent markers that allows users to indent paragraphs to the measurement of their choosing. The markers look like this on the Ruler at the top of the screen:

There are several indenting options with these markers:
– First line indent marker adjusts the first-line indent
– Hanging indent makeradjusts the second line indent
– Left indent marker moves both the first-line indent and hanging indent markers at
the same time (moving the margins of the text).1. Place the cursor anywhere in the paragraph you want to indent, or select one or more paragraphs.

2. Click and drag the indent marker, whether the first, hanging, or left indent marker, and drag it to the desired location. For this example, we’ve dragged the first-line indent marker to ¾ inch.
-
Indent using indent commands
Microsoft Word features indent command buttons, moving every line in a paragraph left or right in ½ inch increments.
1. Place your cursor on the text you want to indent. If multiple paragraphs need indenting, highlight them all.
2. On the Home tab, click the Increase Indent or Decrease Indent button
3. The entire paragraph will indent ½ inch. To return to the original margins or decrease the indent by ½ inch, click Decrease Indent.*To customize the spacing of the indent for the buttons, click the Layout tab and enter your desired values in the boxes under Indent in the middle of the ribbon.

-
Indent using tab stops
A tab stop describes the location the cursor stops at after the Tab key is pressed. The left side of the screen shows the Tab Selector.

When clicked, it will cycle through all the possible options of tab stops that determine whether the text is left aligned, centered, etc. Types of tab stops include:
– Left Tab left-aligns the text at the tab stop
– Center Tab centers the text around the tab stop
– Right Tab right-aligns the text at the tab stop
– Decimal Tab aligns decimal numbers using the decimal point
– Bar Tab draws a vertical line on the document1. To add a tab stop, select the paragraph(s) you want to add tab stops to.
2. Click the Tab Selector until the tab stop you want to use appears. For this example, we’ve selected the Right Tab.
3. Click the location on the horizontal ruler at the top where you want your text to appear. More than one tab stop can be added.
4. Place your cursor in front of the text you want to tab, the press Tab. The text will jump to the closest tab stop you’ve created.
-
Set the indent by default
To set the a first-line indentation as a default, modify the normal style:
1. Move your cursor to anywhere in the paragraph.
2. On the Home tab, right click the Normal style box and select Modify.
3. In the drop-down menu in the bottom left of the pop-up window, click on Format, then choose Paragraph.
4. On the Indents and Spacing tab, under Indentation, select First line under the Special drop-down menu.
5. Type in the amount of spacing you want the indent to be next to the By box, and click OK, and then click OK again. 4. -
Create a hanging indent
1. Select the paragraph where you want to add a hanging indent.
2. Go to Format and then Paragraph. This can also be done by right clicking on the Normal style box as mentioned above.
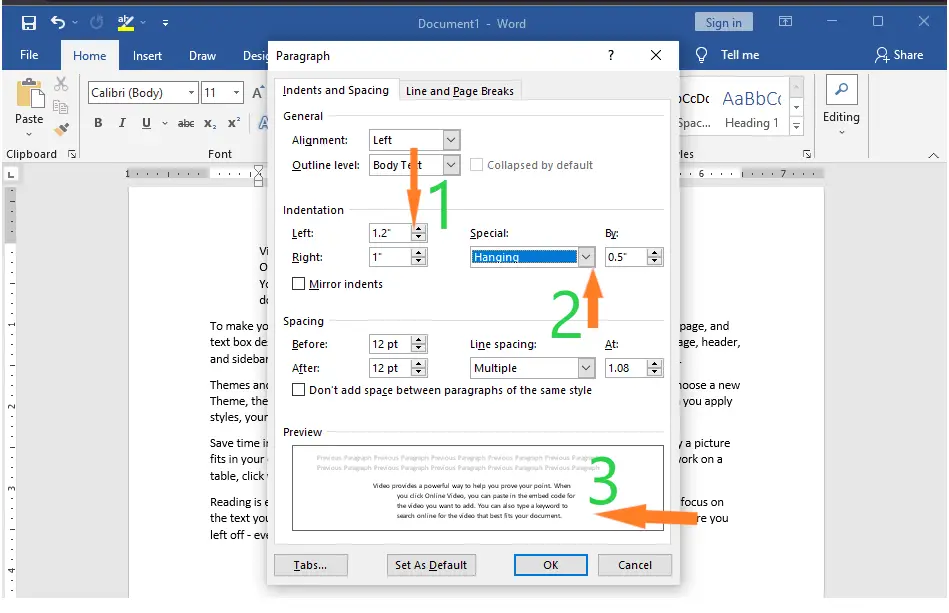
3. On the Indents and Spacing tab, under Indentation, select Hanging under the Special drop-down menu and enter in your spacing requirements
4. Select OK. The outcome should look like this:


Abby Braden
Abby Braden is an award-winning writer and editor for websites such as TechnologyAdvice.com, Webopedia.com, and Project-Management.com, where she covers technology trends and enterprise and SMB project management platforms. When she’s not writing about technology, she enjoys giving too many treats to her dog and coaching part-time at her local gym.