Word for Microsoft 365 Word 2021 Word 2019 Word 2016 More…Less
In Word, you can easily add citations when writing a document where you need to cite your sources, such as a research paper. Citations can be added in various formats, including APA, Chicago-style, GOST, IEEE, ISO 690, and MLA. Afterwards, you can create a bibliography of the sources you used to write your paper.
To add a citation to your document, you first add the source that you used.
Add a new citation and source to a document
-
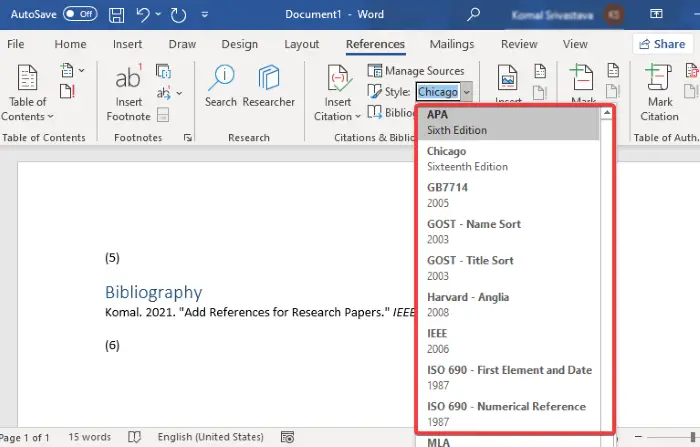
On the References tab, in the Citations & Bibliography group, click the arrow next to Style and click the style that you want to use for the citation and source. For example, social sciences documents usually use the MLA or APA styles for citations and sources.
-
Click at the end of the sentence or phrase that you want to cite.
-
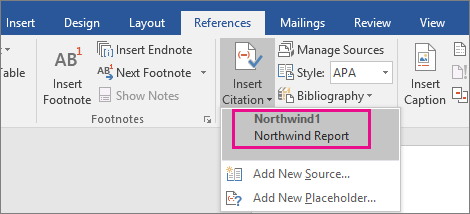
On the Reference tab, click Insert Citation and then do one of the following:
-
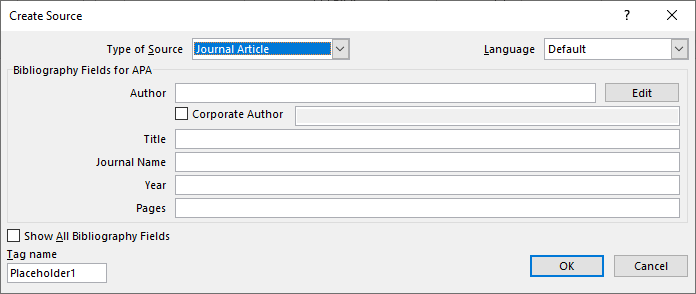
To add the source information, click Add New Source, and then, in the Create Source dialog box, click the arrow next to Type of Source, and select the type of source you want to use (for example, a book section or a website).
-
To add a placeholder, so that you can create a citation and fill in the source information later, click Add New Placeholder. A question mark appears next to placeholder sources in Source Manager.
-
-
If you chose to add a source, enter the details for the source. To add more information about a source, click the Show All Bibliography Fields check box.
-
Click OK when finished. The source is added as a citation at the place you selected in your document.
When you’ve completed these steps, the citation is added to the list of available citations. The next time you quote this reference, you don’t have to type it all out again. You just add the citation to your document. After you’ve added a source, you may find you need to make changes to it at a later time. To do this, see Edit a source.
Notes:
-
If you’ve added a placeholder and want to replace it with citation information, see Edit a source.
-
If you choose a GOST or ISO 690 style for your sources and a citation is not unique, append an alphabetic character to the year. For example, a citation would appear as [Pasteur, 1848a].
-
If you choose ISO 690-Numerical Reference and your citations still don’t appear consecutively, you must click the ISO 690 style again, and then press ENTER to correctly order the citations.
Add citations to your document
-
Click at the end of the sentence or phrase that you want to cite, and then on the References tab, in the Citations & Bibliography group, click Insert Citations.
-
From the list of citations under Insert Citation, select the citation you want to use.
Find a source
The list of sources that you use can become quite long. At times, you might need to search for a source that you cited in another document.
-
On the References tab, in the Citations & Bibliography group, click Manage Sources.
If you open a new document that does not yet contain citations, all of the sources that you used in previous documents appear under Master List.
If you open a document that includes citations, the sources for those citations appear under Current List. All the sources that you have cited, either in previous documents or in the current document, appear under Master List.
-
To find a specific source, do one of the following:
-
In the sorting box, sort by author, title, citation tag name, or year, and then look for the source that you want in the resulting list.
-
In the Search box, type the title or author for the source that you want to find. The list dynamically narrows to match your search term.
-
Note: You can click the Browse button in Source Manager to select another master list from which you can import new sources into your document. For example, you might connect to a file on a shared server, on a research colleague’s computer or server, or on a Web site that is hosted by a university or research institution.
Edit a source
-
On the References tab, in the Citations & Bibliography group, click Manage Sources.
-
In the Source Manager dialog box, under Master List or Current List, select the source you want to edit, and then click Edit.
Note: To edit a placeholder to add citation information, select the placeholder from Current List and click Edit.
-
In the Edit Source dialog box, make the changes you want and click OK.
Need more help?
Want more options?
Explore subscription benefits, browse training courses, learn how to secure your device, and more.
Communities help you ask and answer questions, give feedback, and hear from experts with rich knowledge.
Add citations to your document Click at the end of the sentence or phrase that you want to cite, and then on the References tab, in the Citations & Bibliography group, click Insert Citations. From the list of citations under Insert Citation, select the citation you want to use.
Contents
- 1 How do you add References manually?
- 2 Can I add a referencing style to Word?
- 3 How do I turn on References in Word?
- 4 How do you add more references?
- 5 How do you do apa style referencing?
- 6 How do I add Oxford Referencing to Microsoft Word?
- 7 How do I insert references in Word 2010?
- 8 How do you put references in a research paper?
- 9 Is APA the same as Harvard?
- 10 How do you write references?
- 11 How do I reference a website in APA?
- 12 How do I install Oscola in Word?
- 13 How do you reference in-text Harvard style?
- 14 How do you reference a website Harvard style?
- 15 How do you copy and paste references in Word?
- 16 How do I insert a reference in Word 2016?
- 17 How do you add references to a research paper in Word?
- 18 How do you incorporate references in an essay?
- 19 Which referencing style is the best?
- 20 Is APA 6th Harvard?
How do you add References manually?
Select “References” and then “New Reference”, or press “Ctrl+N” on your keyboard or click the “New Reference” button (a clipboard with a plus sign). Choose the appropriate reference type from the “Reference Type” drop-down menu.
Can I add a referencing style to Word?
In your Word document, click on the References tab in the Ribbon. In the Citations & Bibliography group, click the arrow next to Style. Click the style that you want to use for the citation and source. Click at the end of the sentence or phrase that you want to cite.
How do I turn on References in Word?
Go to Add-In tab -> Reference Manager -> Instant Formatting. Click the Enable Instant Formatting box to toggle Instant Formatting. Click OK to save changes to the Instant Formatting settings. Click OK to format all citations and build the bibliography.
How do you add more references?
Put your cursor at the end of the text you want to cite. Go to References > Style, and choose a citation style. Select Insert Citation. Choose Add New Source and fill out the information about your source.
How do you do apa style referencing?
About APA Style
The APA referencing style is an “author-date” style, so the citation in the text consists of the author(s) and the year of publication given wholly or partly in round brackets. Use only the surname of the author(s) followed by a comma and the year of publication.
How do I add Oxford Referencing to Microsoft Word?
The Oxford referencing system
On any Microsoft Word document, simply click on the ‘Insert’ menu and select ‘Footnote’ (or ‘Reference’ and then choose ‘Footnote’ from the drop-down list).
How do I insert references in Word 2010?
- On the References tab, in the Citation & Bibliography group, choose the style of citation you want to use.
- Position the cursor where you want the citation to appear, and then click Insert Citation, Add New Source.
- In the Create Source dialog box, select the type of source and then fill in the fields shown.
How do you put references in a research paper?
Book: online / electronic
- Author/Editor (if it is an editor always put (ed.)
- Title (this should be in italics)
- Series title and number (if part of series)
- Edition (if not the first edition)
- [Online]
- Place of publication (if there is more than one place listed, use the first named)
- Publisher.
- Year of publication.
Is APA the same as Harvard?
APA (American Psychological Association)
APA referencing is a variant on Harvard style. Many of the conventions are the same, with brief author-date citations in brackets in the body of the text and full citations in the reference list.
How do you write references?
References
- author(s) name and initials.
- title of the article (between single quotation marks)
- title of journal (in italics)
- any publication information (volume, number etc.)
- page range.
- accessed day month year (the date you accessed the article)
- from name of database.
- item number (if given).
How do I reference a website in APA?
When citing a web page or online article in APA Style, the in-text citation consists of the author’s last name and year of publication. For example: (Worland & Williams, 2015). Note that the author can also be an organization. For example: (American Psychological Association, 2019).
How do I install Oscola in Word?
To create a footnote in Microsoft Word, click your mouse on the place you want it to refer to. Click on ‘References’ at the top and then on ‘Insert Footnote‘. A number will appear in the text, and also at the bottom of the page, where you write your citation.
How do you reference in-text Harvard style?
An in-text citation should appear wherever you quote or paraphrase a source in your writing, pointing your reader to the full reference. In Harvard style, citations appear in brackets in the text. An in-text citation consists of the last name of the author, the year of publication, and a page number if relevant.
How do you reference a website Harvard style?
To reference a website in Harvard style, include the name of the author or organization, the year of publication, the title of the page, the URL, and the date on which you accessed the website. Author surname, initial. (Year) Page Title. Available at: URL (Accessed: Day Month Year).
How do you copy and paste references in Word?
Use the keyboard shortcut CTRL+C (CMD+C for Mac) to copy. Alternatively you can use the menu “Edit > Copy”. In your email, IM, Google Docs or any other text editing field, paste the content you just copied. Do so by pressing CTRL+V (CMD+V for Mac) or the menu “Edit > Paste”.
How do I insert a reference in Word 2016?
To add a citation to your document, first add the source you used.
- On the References tab, click the arrow next to Bibliography Style, and click the style that you want to use for the citation and source.
- Click at the end of the sentence or phrase that you want to cite.
- On the References tab, click Insert Citation.
How do you add references to a research paper in Word?
Add citations to your document
- Click at the end of the sentence or phrase that you want to cite, and then on the References tab, in the Citations & Bibliography group, click Insert Citations.
- From the list of citations under Insert Citation, select the citation you want to use.
How do you incorporate references in an essay?
You must cite all information used in your paper, whenever and wherever you use it. When citing sources in the body of your paper, list the author’s last name only (no initials) and the year the information was published, like this: (Dodge, 2008). (Author, Date).
Which referencing style is the best?
How to do I choose a citation style?
- APA (American Psychological Association) is used by Education, Psychology, and Sciences.
- MLA (Modern Language Association) style is used by the Humanities.
- Chicago/Turabian style is generally used by Business, History, and the Fine Arts.
Is APA 6th Harvard?
The Harvard (APA 6th) system of referencing requires you to set this information out in a certain way, and the examples below will show you how to do this.
Adding citations and references is essential for students for their academic projects. Failing to add relevant references can not only lead to a deduction of marks but might even result in the project being rejected by the teacher. Furthermore, it can be difficult to keep up with different types of referencing styles to meet the criteria set by your teachers. Fortunately, Microsoft Word makes it quite easy to add citations and references to your Word documents.
How to Create References in Microsoft Word
The References tab in MS Word provides a comprehensive set of features for adding citations and references. The below guide will help you to add references in your Word documents, using Microsoft Word and older versions.
Step 1: To create a reference, head over to the References tab in MS Word and select a referencing style. By default Microsoft Word provides a variety of referencing styles, including the most commonly used styles like the Chicago and Harvard style of referencing.
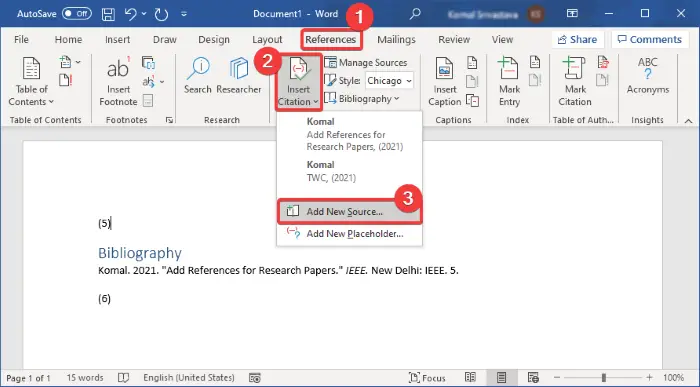
Step 2: To add a citation click Insert Citation and select Add New Source.
Step 3: This will open a dialog box where you can select a source type and add relevant details. The available source types include Book, Book Section, Journal Article, Article in a Periodical, Conference Proceedings, Report.
Step 4: Once your reference has been created, go to Insert Citation and select it to add it as an inline reference.
Editing Your Citations and References in Microsoft Word
You can edit your citation anytime by clicking on the inline citation. The available options in the drop down menu will allow you to edit the citation and source, convert the citation to static format, as well as to update citation and bibliography.
You can also manage your added references by going to Manage Sources in the References tab. This section can be used to edit and remove added sources, as well as to copy and add new sources.
Adding Bibliographies to MS Word
In the References section you can use the Bibliography menu to add a Bibliography to your Microsoft Word document.
Adding End Notes to Your Microsoft Word Document
You can add end notes to your MS Word documents via References –> Insert Endnote.
As we could see, adding citations in Microsoft Word is possible with these simple steps. These tips can be helpful for Academic research or when preparing business documents. If you need more help you can learn Microsoft Word and how to accomplish simple tasks to be more productive at work.
Managing citations for research papers, theses, dissertations, and other nonfiction works can be overwhelming. However, you can ease the process by learning how to insert citations in Microsoft Word using the software’s citation and bibliography tools.
This tutorial covers six topics:
- How to select a citation style
- How to insert citations for new sources
- How to insert citations for existing sources
- How to edit sources
- How to use citation placeholders
- How to insert bibliographies, reference lists, or works cited lists
Important Note: At the time this tutorial was published, Microsoft Word did not offer the most up-to-date formatting for several of our primary style guides, including APA, Chicago, MLA, and Turabian. Therefore, I encourage you to review the available styles before using the citation and bibliography tools. We will cover the steps to customize citation and bibliography styles in a separate tutorial.
This tutorial is also available as a YouTube video showing all the steps in real time.
Watch more than 150 other writing-related software tutorials on my YouTube channel.
The images below are from Word in Microsoft 365. The steps are the same in Word 2021, Word 2019, and Word 2016. However, your interface may look slightly different in those older versions of the software.
How to Select a Citation Style in Microsoft Word
- Select the References tab in the ribbon.
- Select your citation style from the Style menu in the Citations & Bibliography group.
How to Insert Citations for New Sources in Microsoft Word
- Place your cursor where you want to insert the citation.
- Select the References tab in the ribbon (see figure 1).
- Select the Insert Citation button in the Citations & Bibliography group.
- Select Add New Source from the drop-down menu.
- Select the source type from the Type of Source menu in the Create Source dialog box.
- Enter the source information into the bibliography fields.
- (Optional Step) Select Show All Bibliography Fields if you need to add additional information.
- (Optional Step) Enter the source information into the additional fields.
- Select the OK button.
Your citation should appear in your text.
How to Insert Citations for Existing Sources in Microsoft Word
Once you enter a source, as shown in the section above, you can create additional citations for that source without reentering the information.
- Place your cursor where you want to insert the citation (see figure 3).
- Select the References tab in the ribbon (see figure 1).
- Select the Insert Citation button in the Citations & Bibliography group (see figure 4).
- Select the source from the drop-down menu.
Your citation should appear in your text (see figure 11).
How to Edit Sources in Microsoft Word
When you edit an existing source, you will also edit any existing citations for that source in your current document.
- Select the References tab in the ribbon (see figure 1).
- Select the Manage Sources button in the Citations & Bibliography group.
- Select the source you want to edit in the Master List or the Current List in the Source Manager dialog box.
Pro Tip: The Master List is stored in your computer and is accessible in all your documents. The Current List is part of your current file and is only accessible in that file. By default, Word stores new sources in the Master List and the Current List.
- Select the Edit button.
- Enter your edits in the Edit Source dialog box. (Select Show All Bibliography Fields, if necessary.)
- Select the OK button.
- Select Yes or No in the alert box stating that you will be updating the source in both the Master List and the Current List. (Strongly consider selecting Yes to update both lists if you plan to cite this source in future documents.)
- Select the Close button in the Source Manager dialog box.
How to Use Citation Placeholders in Microsoft Word
You can use placeholders if your source information is not available.
- Place your cursor where you want to insert the citation placeholder.
- Select the References tab in the ribbon (see figure 1).
- Select the Insert Citation button in the Citations & Bibliography group (see figure 4).
- Select Add New Placeholder from the drop-down menu.
- (Optional Step) Change the name of the placeholder in the Placeholder Name dialog box.
- Select the OK button.
Pro Tip: You can use the same placeholder in the future by selecting it from the Insert Citation drop-down menu (see figure 12).
- When you are ready to replace the placeholder with a source, complete the steps in How to Edit Sources above.
How to Insert Bibliographies, Reference Lists, or Works Cited Lists in Microsoft Word
These steps will only work if you inserted your sources using Word’s citation and bibliography tools.
- Place your cursor where you want to insert the bibliography, reference list, or works cited list.
- Select the References tab in the ribbon (see figure 1).
- Select the Bibliography button in the Citations & Bibliography group.
- Select Bibliography, References, or Works Cited from the drop-down menu.
Your bibliography, reference list, or works cited list should appear in your document.
Related Resources
How to Create Hanging Indents in Microsoft Word
How to Insert Footnotes and Endnotes in Microsoft Word
How to Convert Individual Footnotes to Endnotes in Microsoft Word (and Individual Endnotes to Footnotes)
How to Create a Cover Page in Microsoft Word (Built-In and Custom)
Updated August 22, 2022
Download Article
Download Article
Microsoft Word has many automatic features that can help you write a report or academic paper. Among these, you can keep a list of sources and citations to automatically generate a bibliography (also called a «Reference List» or «Works Cited») at the end of your paper. If you need footnotes or endnotes, Word has features that can help you format those as well.
-
1
Choose a citation style on the «References» tab. When you click on the «References» tab, you’ll see the word «Style» next to a drop-down menu. If you click on the drop-down menu, you can select the citation style you want to use for your references.
- Make sure the edition is the same as the one you need to use. Word typically offers the most recent edition of each style, but if you have an older version of Word you may need to upgrade. If you have a subscription version, simply download the latest update.[1]
- Make sure the edition is the same as the one you need to use. Word typically offers the most recent edition of each style, but if you have an older version of Word you may need to upgrade. If you have a subscription version, simply download the latest update.[1]
-
2
Click «Add New Source» to enter information about a source. On the «References» tab, click the «Insert Citation» button in the «Citations and Bibliography» group. Any sources you’ve already entered will appear in a drop-down. Select «Add New Source» if the source you want to cite isn’t already listed.
- A dialogue box will appear with the necessary fields for the citation, including spaces for the author, title, year of publication, city, and publisher. Enter all the information you have for your source, then click «OK.»
- If you have additional information about the source that doesn’t fit into any of these basic fields, check the box next to «Show All Bibliography Fields.»
Tip: If you don’t have all the information for the source, or if you don’t want to interrupt your train of thought to add a new source, you can click «Add New Placeholder» instead. This alerts you that you need to add a citation there.
Advertisement
-
3
Continue to insert citations as you write your paper. Set the cursor at the end of a sentence where you need a citation. Go back up to the «References» tab and click on «Insert Citation» to bring up the list of sources. Click on the source you want to cite, and Word will automatically generate an in-text citation in the style you’ve chosen.
- To edit an individual citation, such as if you wanted to add a page number for a direct quote, right-click the citation for citation options and click «Edit Citation.»[2]
- To edit an individual citation, such as if you wanted to add a page number for a direct quote, right-click the citation for citation options and click «Edit Citation.»[2]
-
4
Use the «Manage Sources» button to edit or delete sources. Particularly if you have a long paper with a lot of sources, you may find as you go that you have some duplicated sources or some that you no longer need to use. You can add, delete, or edit sources using the «Manage Sources» button in the «Citations & Bibliography» group under the «References» tab.
- Choose the source you want to edit from your master list. As you edit, you’ll see a preview of the final citation in the lower box.
- If you inserted placeholders while you were writing, you can also use this menu to add information for those sources.
Advertisement
-
1
Select the footnote or endnote option on the «References» tab. Set your cursor where you want the footnote or endnote number in your text. Typically this will be at the end of a sentence, but it may be after a signal phrase or author’s name. Go up to the «References» tab and click «Insert Footnote» or «Insert Endnote.»[3]
- Word will automatically create a superscripted number in your text and move the cursor to the footnote or endnote field.
Keyboard shortcuts:
Insert Footnote: Alt+Ctrl+F (PC); Command+Option+F (Mac)
Insert Endnote: Alt+Ctrl+D (PC); Command+Option+E (Mac) -
2
Use the «Expand» icon to adjust footnote or endnote settings. You can use sequential numbers, letters, or other symbols to mark your footnotes or endnotes. You can also specify what number or letter you want them to start from.[4]
- By default, footnotes or endnotes will continue sequential numbering throughout your document. If you want the numbers to restart at the beginning of each new section or chapter, you can specify this in the settings.
If you need to convert footnotes to endnotes, click on the «Insert» menu, then «Footnote,» then «Options.» Select «Convert» from the menu, then click on «Endnotes.»
-
3
Type your footnote or endnote into your document. You can enter your citation by hand, or you can use the «Insert Citation» tool to add a citation in your footnote or endnote. Choose your source from the drop-down or add a new source if you want to cite a source that you haven’t entered yet.[5]
- You can also use the «Placeholder» tool if you don’t yet have all the information for the source and need to add it in later.
- Check the formatting against your style guide to make sure it’s correct before you continue.
-
4
Double-click the footnote number to go back to the document. When you’re ready to go back up to where you left off and start writing again, double-click the number or other symbol at the beginning of the footnote. It will send the cursor back to the end of the text.[6]
- Similarly, you can double-click a superscripted footnote number in the text to check that footnote, edit, or add to it. While you can also simply scroll down the page, this is a quicker way to get there.
To delete a footnote or endnote, highlight the footnote or endnote number in your text and press the delete key. Word will automatically renumber your other footnotes or endnotes to accommodate for the deletion.
Advertisement
-
1
Choose the format for your bibliography. Word automatically builds your bibliography for you as you enter your sources. Select «Bibliography» fro the «References» tab, then choose the type of bibliography you want from the drop-down.[7]
- For example, if you’re writing your paper in MLA style, you would want a «Works Cited» bibliography. Assuming you chose MLA as the style for your source citations, the «Works Cited» format would be the first format option in the «Bibliography» drop-down menu.
-
2
Generate your bibliography with a click. When you find the format you want, simply select it from the drop-down menu and click. Word will automatically create your bibliography at the end of your document.[8]
- The bibliography is considered a separate object from the paper you’re writing, and will automatically start on a new page.
Tip: You don’t have to wait until you’ve finished writing your paper to create your bibliography. Word will auto-populate your bibliography with any new sources you add after the bibliography has been generated.
-
3
Proofread your bibliography carefully. Even though Word has done the hard work of formatting for you, you still need to double-check each entry. Make sure the source is correct and the entry is formatted correctly for the style you’ve chosen.[9]
- For example, if you made a typographical error when entering the information about the source, that error would carry over into your bibliography.
Advertisement
Ask a Question
200 characters left
Include your email address to get a message when this question is answered.
Submit
Advertisement
Thanks for submitting a tip for review!
-
The steps and information in this article are accurate for Word for Office 365, Word 2019, Word 2016, Word 2013, Word 2010, and Word 2007. If you have a different edition of Word, your menu options may differ slightly.[10]
Advertisement
About This Article
Thanks to all authors for creating a page that has been read 91,028 times.
Is this article up to date?
Download PC Repair Tool to quickly find & fix Windows errors automatically
Referencing is a prominent thing in academic writing. It is used to provide sources to other authors’ work you have referred to in your studies. In this article, I am going to share a tutorial on how you can add references for research papers in Microsoft Word.
Thankfully, Microsoft Word comes with a dedicated feature to add references to your documents. So, you don’t need any external app or add-on to do that. You can add citations to your sources and research papers in different styles. Plus, it also lets you search for references to research papers online and then directly cite them in your documents.
We have seen how to put References or cite Sources in PowerPoint. now let us see how to use the Referencing feature of Word.
Launch Microsoft Word and open your document or create a new one.
Then, go to the References tab present on main toolbar. In this tab, you will find a Citations & Bibliography section.
From here, click on the Insert Citation > Add New Source option.
You can also select a Style to add citations in the required format, such as APA, Chicago, IEEE, Harvard, MLA, etc.
Now, add details of the research paper to add its reference. You can enter type of source (journal article, book, conference proceedings, website, electronic source, etc.), title, author, year, pages, and more. Press OK button after specifying the details of your reference.
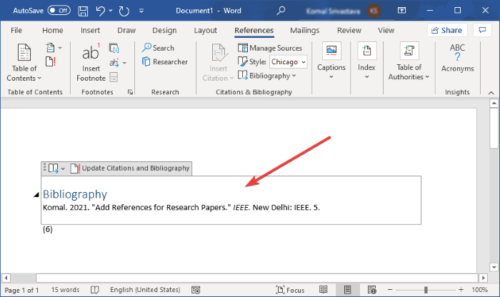
A reference for the research paper will be added to your document. To list all your references and sources in a dedicated bibliography or works cited section, click on the Bibliography option.
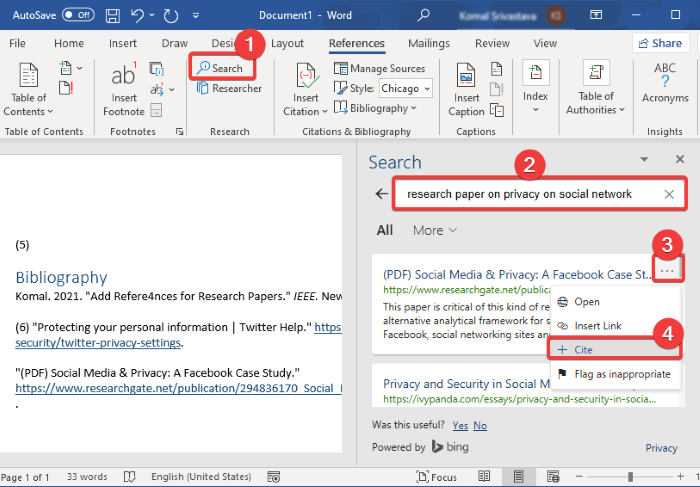
If you want to generate citation for a research paper automatically, you can use its Search feature. This feature basically lets you search for your sources online and then directly add their references into your document.
From the References tab, click on the Search button which will open a Search panel at the right. Type the full title of your research paper and press Enter button. It will fetch and display your research paper and similar results. Select the one you want to cite, click on the three-dot menu, and then tap on the Cite button. This will add a citation to your referred research paper in the Word document.
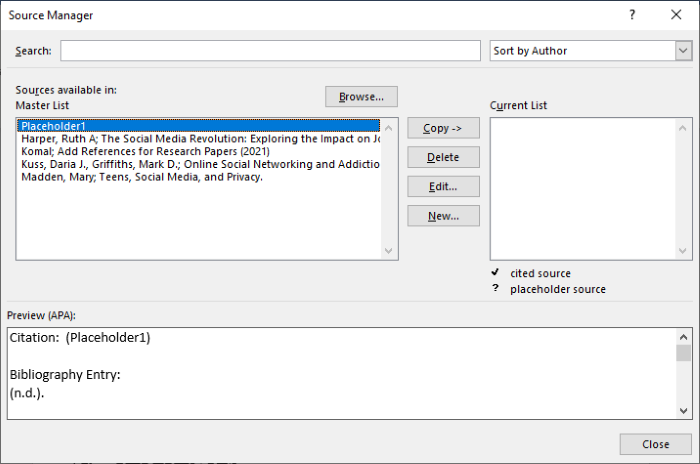
You can manage all your references and sources that you have added to a document using its Manage Sources option. It lets you copy, edit, delete, and search for required sources from one place.
Hope this guide helps you add references and citations of research paper and other sources to your Microsoft Word document.
Now read: How to create a Drop-down List in Word.
Komal has done M.Tech in Computer Science & Engineering. She is a keen follower of the Windows ecosystem & a technical writer since the last six years. She loves finding solutions for day-to-day tech problems.
So for cross references (to tables, figures, etc) Word will make the reference link to the spot in the document that contains the caption like you expect but it seems for citations it doesn’t do this. You can’t ctrl+click them to go to their location which is odd. Is there anyway to change their behavior that clicking on them links to their position in the generated References page?
asked May 14, 2013 at 18:14
Short answer is «no.»
It is precisely because the Reference page is automatically generated that this functionality is not available. (For the same reason that outline headers don’t hyperlink back to the generated Table of Contents.) (Conceivably, I suppose, citations on the reference page could link back to where they are cited in the document, but of course this would be problematic due to the 1-n nature of citations.)
What is it that you are trying to accomplish? You realize, I’m sure, that you can edit the citations right on the page, right?
answered May 14, 2013 at 19:53
kmotekmote
2,5323 gold badges22 silver badges28 bronze badges
Unfortunately it does not look like this is possible. There do appear to be add-ins, such as Endnote, that enable you to do this, as seen here.
answered Apr 28, 2020 at 17:20
About cross-referencing in Word – what is a cross-reference?
In this article, you will find general information about cross-referencing in Word. You will learn how cross-reference fields in Word work, how to insert a cross-reference, etc. The information applies to both cross-references you insert using Word’s own functionality and using the Word add-in DocTools CrossReferenceManager.
The DocTools CrossReferenceManager add-in makes it easier and faster to work with cross-references in Word than using the built-in functionality. However, cross-references you have inserted in a document using DocTools CrossReferenceManager work precisely as if they had been inserted using Word’s built-in functionality.
This article is relevant for Word 2010, Word 2013, Word 2016, Word 2019, and Word for Microsoft 365.
What is a cross-reference in Word?
In general, a cross-reference is a note in a text that tells you to look somewhere else in the text for more information.
In Word, you can insert dynamic cross-references that can be updated if the text you refer to changes.
Technically, a cross-reference in Word is a field, i.e. set of codes that instructs Word to automatically insert material into a document. The material inserted by cross-reference fields can be text, section numbers, paragraph numbers, caption numbers, caption labels, etc. The field code can also include special information (referred to as switches) that make the field act or look in a special way. For example, a cross-reference field may function as a hyperlink so you can jump directly to the target of the cross-reference by clicking the field.
As opposed to cross-references you type manually, the great advantage of using cross-reference fields is that you only need to update fields to have the cross-references corrected if you have made changes to the document.
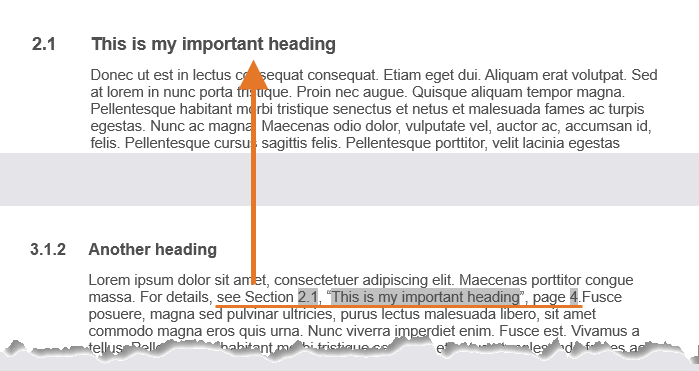
Cross-reference example. This example has three cross-reference fields referring to the paragraph number, paragraph text, and page number of the target for the cross reference. In order to insert a cross-reference like the one in this example using Word’s own cross-reference feature, you have to insert three separate cross-references in three operations and type the surrounding text. The DocTools CrossReferenceManager add-in lets to do it all in one operation. The gray shading is the result of having field shading in Word turned on. It is visible on the screen only and does not print.
How to insert a cross-reference in Word?
Note that you can only insert cross-references to content that already exits in the document. For example, you cannot insert a cross-reference to a heading that has not yet been added to the document. In case you want to refer to something in another document, you can create a hyperlink.
The purpose of the article is not to go into detail about how to insert cross-references in Word but to explain how cross-references work. For completeness, here are the steps to follow to insert a cross-reference using the built-in functionality of Word:
- In your document, position the insertion point where the cross-reference is to be inserted.
- In the Ribbon, select References tab > Captions group: Cross-references.
Note that you will also find the command in Insert tab > Links group: Cross-references.The following takes place in the Cross-reference dialog box. See the illustration below.
- In the Reference type list, select the type you want.
You can select from: Numbered item, Heading, Bookmark, Footnote, Endnote plus caption types depending on which caption labels are available (e.g. Figure, Table, Equation). Note that the dialog box shows all types no matter whether there are any targets of the different types in your document.
- In the Insert reference to list, select what type of content you want the cross-reference to show.
The items in the list depend on what you selected as the reference type in step 3.
- Turn on Insert as hyperlink if you want the cross-reference field to function as a hyperlink so users can click or Ctrl-click it to jump to the target.
- In the For which list, select the item the cross-reference must refer to.
The list is empty if no items match the reference type you selected. - Click Insert.
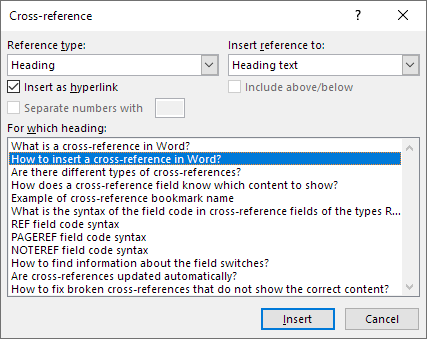
The built-in Cross-reference dialog box that lets you insert cross-references in Word. The targets in the For which list depend on the reference type you have selected and of the content in your document.
When you have clicked Insert in the Cross-reference dialog box, a cross-reference field is inserted in your document. Note that you must update cross-references yourself if you make changes to the document that influence the cross-reference targets.
The procedure above includes the main steps needed for most cross-references. In the Cross-reference dialog box, the Separate numbers with and Include above/below check boxes are enabled under some conditions. They are used for special purposes and are not covered here.
If you want to insert cross-reference constructions like «See Section 1.2, «This is the title», page 14″, you will need to type the surrounding text and repeat the steps above three times because you need a cross-reference to three items: The paragraph number (1.2 in the example), the paragraph text («This is the title» in the example) and the page number (14 in the example). On the other hand, the DocTools CrossReferenceManager add-in lets you insert entire cross-reference constructions like «See Section 1.2, «This is the title», page 14″ in a single operation.
What to do if headings are missing in the Cross-reference dialog box?
In the illustration above, you can see that Heading is selected as the reference type in the Cross-reference dialog box. You can see that several headings are listed in the For which heading field.
If your document has a number of headings and if all or some of the headings are missing in the dialog box, you need to check the formatting of your document. All paragraphs that are formatted with one of the built-in styles Heading 1-9 are automatically shown in the dialog box. If you have used other styles for the headings, they will only appear in the heading list if the outline level of each of the headings has been set to one of the levels Level 1-9 in the Paragraph dialog box > Indents and Spacing tab > Outline level field. Headings with the outline level is set to Body Text will not appear in the target list.
Note that the style names of Heading 1, Heading 2, … , Heading 9 are language-specific. If your Word isn’t English, you will see another word than «Heading» but still with the numbers 1-9. For example, the styles are named Overskrift 1, Overskrift 2, etc. in Danish.
See also Shauna Kelly’s article Why use Microsoft Word’s built-in heading styles?
Are there different types of cross-reference fields?
Let’s look a bit closer into the cross-reference fields. When you insert a cross-reference, the field code inside the field will depend on what the reference refers to. There are three types of cross-reference fields in Word. The first part of the field code of a cross-reference field tells which type of field it is. The field type can be one of the following:
- REF
- PAGEREF
- NOTEREF
You can read more about the syntax later in this article.
Below, you can read about how the three types of cross-references work.
A cross-reference field that directly or relatively refers to the page on which the target is found is of the type PAGEREF. When you select “Page number” as the “Reference to insert” in the built-in Cross-reference dialog box in Word or in the Insert Cross-reference dialog box in DocTools CrossReferenceManager, the inserted cross-reference field will be of the type PAGEREF. Also, the custom text placeholders {P} and {P_a/b} that can be used in DocTools CrossReferenceManager will insert PAGEREF fields.
A cross-reference field with a footnote or an endnote as the target will be of the type NOTEREF.
All other cross-reference fields will be of the type REF.
How does a cross-reference field know which content to show?
In order for a cross-reference field to show the correct content, it must include information that makes this possible – and that is precisely what it does. The field code inside a cross-reference field refers to a bookmark that points out the target
A bookmark in Word is a named location or a named block of text or other content in a document.
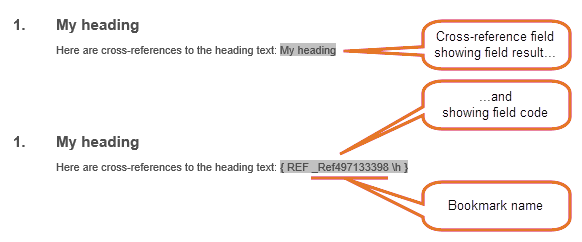
The field code inside a cross-reference field includes a reference to a bookmark that acts as the target of the cross-reference. See the illustration below.
If you use the built-in functionality in Word for inserting e.g. a cross-reference to a heading, Word automatically adds a bookmark around the heading text, excluding the paragraph mark, if such bookmark is not already found. The name of the bookmark is included in the field code of the cross-reference field. Such automatically added bookmarks are named _Ref followed by eight or nine digits.
When inserting a cross-reference to a caption, a bookmark will also be used to enclose the part of the caption content that is to be displayed by the cross-reference field. The bookmark will enclose different parts of the caption depending on the kind of caption reference you select (e.g. the entire caption or only the label and number).
Example of cross-reference bookmark name
_Ref123456789
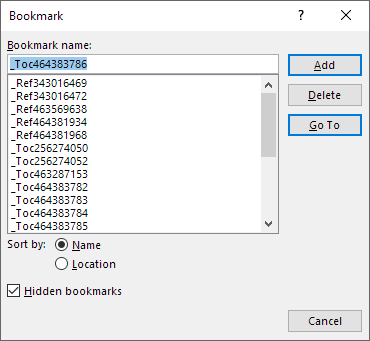
The underscore in start of the bookmark name results in the bookmark being handled as a hidden bookmark in Word. You cannot add hidden bookmarks manually, i.e. the built-in Bookmark dialog box doesn’t let you start a bookmark name with “_”.
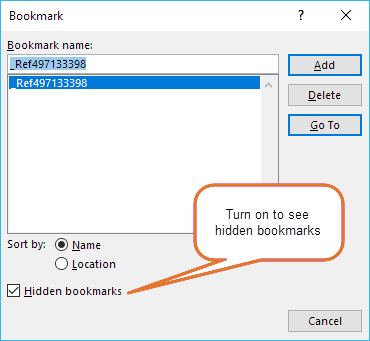
Hidden bookmarks remain invisible on the screen even if you turn on display of bookmarks. In the Bookmarks dialog box, you must turn on Hidden bookmarks to have the hidden bookmarks listed in the dialog box.
The Bookmark dialog box showing bookmarks for cross-references (names start with _Ref) and table of contents (names start with _Toc).
You can see a list of bookmarks in a Word document in the Bookmark dialog box. To open the dialog box, select Insert tab in the Ribbon > Bookmark or press Ctrl+Shift+F5.
Note that names of bookmarks added by DocTools CrossReferenceManager follow the same syntax rules as the bookmarks added by the built-in cross-reference functionality.
Example of cross-reference field of the type REF showing the field result and the field code. In this example, the h switch is included which means that the field works as a hyperlink so that you go to the bookmarked target when clicking or Ctrl-clicking the field (depending on your Word settings).
The Bookmark dialog box showing the related _Ref bookmark.
What is the syntax of the field code in cross-reference fields of the types REF, PAGEREF and NOTEREF?
REF field code syntax
The syntax for REF fields is:
{ [REF] Bookmark [* Format Switch ] [Switches ] }
The format switch and switches parts are optional.
Examples:
PAGEREF field code syntax
The syntax for PAGEREF fields is:
{ PAGEREF Bookmark [* Format Switch ] [Switches ]}
The format switch and switches parts are optional.
Examples:
NOTEREF field code syntax
The syntax for NOTEREF fields is:
{ NOTEREF Bookmark [* Format Switch ] [Switches ]}
The format switch and switches parts are optional.
Examples:
How to format cross-references?
You may want cross-references in a Word document to stand out from the surrounding text. You can use switches to change the formatting of cross-references. As mentioned above, a «switch» in a Word field is special information that makes the field act or look in a special way.
Note that the DocTools CrossReferenceManager can automatically format cross-references. For example, you can automatically apply a style to cross-references you insert. For help on manually formatting cross-references, see Formatting Cross-references.
How to find information about the field switches?
As mentioned above, a «switch» in a Word field is special information that makes the field act or look in a special way.
In the general help on Word, you can find information about the different types of switches that can be used with specific fields.
The fastest way to find this information is often to search using your preferred browser. You can search for «field codes [TYPE OF FIELD] field» (example: «field codes ref field») or something similar. You will find a full list covering all field types in the Microsoft article List of field codes in Word.
Are cross-references updated automatically?
Note that cross-references do not update automatically. If cross-references refer to headings, bookmarks, numbers or other targets that have been changed, you need to update the fields to reflect the changes.
You can update cross-references manually by selecting all (Ctrl+A) and pressing F9. Cross-references will also be updated when you switch to Print Preview or when you print if the Word option File > Options > Display > Printing options: Update fields before printing is turned on.
For detailed information about how all types of fields are updated, see my article Updating Fields in Word – How it Works.
How to fix broken cross-references that do not show the correct content?
You may experience that one or more cross-reference fields in a document do not show the expected content even if you have updated fields.
For example, you may experience problems of the following types:
- A cross-reference is missing part of the text it should have shown
- A cross-reference to a numbered heading shows 0 instead of the expected number or shows a wrong number
- A cross-reference includes more text than expected
- A cross-reference shows an error, telling that the reference source is not found.
If you run into such problems, my article Cross-reference Problems – Troubleshooting on my website thedoctools.com can help you understand the cause of the problems and help you solve them. The article includes videos that illustrate what causes the problems and how to solve them.
Note that my add-in DocTools CrossReferenceManager can help you automatically find and fix cross-reference problems. It can even prevent some of the problems from occurring.
Generate complete documents in seconds from re-usable text or graphics
Manage comments in Word fast and easy – review comments, extract comments to Word or Excel, etc.
Simplify and speed up the management of cross-references even in your most complex documents
Manage and repeat data in Word fast and easy with custom document properties and DocProperty fields
Extract insertions, deletions and comments from any Word document, incl. context and headings
Apply any highlight color or remove highlight in Word with a single click – customizable shortcuts
Browse pages, sections, headings, tables, graphics, etc. and find text in Word with a single click
Check safety-critical procedure documents for human factor issues in minutes – improve quality and help prevent errors
Create screen tips in Word fast and easy – with up to 2040 characters
Understanding cross-referencing in Word and how cross-reference fields in Word work can save you from a lot of time and trouble with Word documents. I hope this article helps you in your future work with cross-references in Word.


