Format a date the way you want
Excel for Microsoft 365 Excel for Microsoft 365 for Mac Excel for the web Excel 2021 Excel 2021 for Mac Excel 2019 Excel 2019 for Mac Excel 2016 Excel 2016 for Mac Excel 2013 Excel 2010 Excel 2007 Excel for Mac 2011 More…Less
When you enter some text into a cell such as «2/2″, Excel assumes that this is a date and formats it according to the default date setting in Control Panel. Excel might format it as «2-Feb». If you change your date setting in Control Panel, the default date format in Excel will change accordingly. If you don’t like the default date format, you can choose another date format in Excel, such as «February 2, 2012″ or «2/2/12″. You can also create your own custom format in Excel desktop.
Follow these steps:
-
Select the cells you want to format.
-
Press CTRL+1.
-
In the Format Cells box, click the Number tab.
-
In the Category list, click Date.
-
Under Type, pick a date format. Your format will preview in the Sample box with the first date in your data.
Note: Date formats that begin with an asterisk (*) will change if you change the regional date and time settings in Control Panel. Formats without an asterisk won’t change.
-
If you want to use a date format according to how another language displays dates, choose the language in Locale (location).
Tip: Do you have numbers showing up in your cells as #####? It’s likely that your cell isn’t wide enough to show the whole number. Try double-clicking the right border of the column that contains the cells with #####. This will resize the column to fit the number. You can also drag the right border of the column to make it any size you want.
If you want to use a format that isn’t in the Type box, you can create your own. The easiest way to do this is to start from a format this is close to what you want.
-
Select the cells you want to format.
-
Press CTRL+1.
-
In the Format Cells box, click the Number tab.
-
In the Category list, click Date, and then choose a date format you want in Type. You can adjust this format in the last step below.
-
Go back to the Category list, and choose Custom. Under Type, you’ll see the format code for the date format you chose in the previous step. The built-in date format can’t be changed, so don’t worry about messing it up. The changes you make will only apply to the custom format you’re creating.
-
In the Type box, make the changes you want using code from the table below.
|
To display |
Use this code |
|---|---|
|
Months as 1–12 |
m |
|
Months as 01–12 |
mm |
|
Months as Jan–Dec |
mmm |
|
Months as January–December |
mmmm |
|
Months as the first letter of the month |
mmmmm |
|
Days as 1–31 |
d |
|
Days as 01–31 |
dd |
|
Days as Sun–Sat |
ddd |
|
Days as Sunday–Saturday |
dddd |
|
Years as 00–99 |
yy |
|
Years as 1900–9999 |
yyyy |
If you’re modifying a format that includes time values, and you use «m» immediately after the «h» or «hh» code or immediately before the «ss» code, Excel displays minutes instead of the month.
-
To quickly use the default date format, click the cell with the date, and then press CTRL+SHIFT+#.
-
If a cell displays ##### after you apply date formatting to it, the cell probably isn’t wide enough to show the whole number. Try double-clicking the right border of the column that contains the cells with #####. This will resize the column to fit the number. You can also drag the right border of the column to make it any size you want.
-
To quickly enter the current date in your worksheet, select any empty cell, press CTRL+; (semicolon), and then press ENTER, if necessary.
-
To enter a date that will update to the current date each time you reopen a worksheet or recalculate a formula, type =TODAY() in an empty cell, and then press ENTER.
When you enter some text into a cell such as «2/2″, Excel assumes that this is a date and formats it according to the default date setting in Control Panel. Excel might format it as «2-Feb». If you change your date setting in Control Panel, the default date format in Excel will change accordingly. If you don’t like the default date format, you can choose another date format in Excel, such as «February 2, 2012″ or «2/2/12″. You can also create your own custom format in Excel desktop.
Follow these steps:
-
Select the cells you want to format.
-
Press Control+1 or Command+1.
-
In the Format Cells box, click the Number tab.
-
In the Category list, click Date.
-
Under Type, pick a date format. Your format will preview in the Sample box with the first date in your data.
Note: Date formats that begin with an asterisk (*) will change if you change the regional date and time settings in Control Panel. Formats without an asterisk won’t change.
-
If you want to use a date format according to how another language displays dates, choose the language in Locale (location).
Tip: Do you have numbers showing up in your cells as #####? It’s likely that your cell isn’t wide enough to show the whole number. Try double-clicking the right border of the column that contains the cells with #####. This will resize the column to fit the number. You can also drag the right border of the column to make it any size you want.
If you want to use a format that isn’t in the Type box, you can create your own. The easiest way to do this is to start from a format this is close to what you want.
-
Select the cells you want to format.
-
Press Control+1 or Command+1.
-
In the Format Cells box, click the Number tab.
-
In the Category list, click Date, and then choose a date format you want in Type. You can adjust this format in the last step below.
-
Go back to the Category list, and choose Custom. Under Type, you’ll see the format code for the date format you chose in the previous step. The built-in date format can’t be changed, so don’t worry about messing it up. The changes you make will only apply to the custom format you’re creating.
-
In the Type box, make the changes you want using code from the table below.
|
To display |
Use this code |
|---|---|
|
Months as 1–12 |
m |
|
Months as 01–12 |
mm |
|
Months as Jan–Dec |
mmm |
|
Months as January–December |
mmmm |
|
Months as the first letter of the month |
mmmmm |
|
Days as 1–31 |
d |
|
Days as 01–31 |
dd |
|
Days as Sun–Sat |
ddd |
|
Days as Sunday–Saturday |
dddd |
|
Years as 00–99 |
yy |
|
Years as 1900–9999 |
yyyy |
If you’re modifying a format that includes time values, and you use «m» immediately after the «h» or «hh» code or immediately before the «ss» code, Excel displays minutes instead of the month.
-
To quickly use the default date format, click the cell with the date, and then press CTRL+SHIFT+#.
-
If a cell displays ##### after you apply date formatting to it, the cell probably isn’t wide enough to show the whole number. Try double-clicking the right border of the column that contains the cells with #####. This will resize the column to fit the number. You can also drag the right border of the column to make it any size you want.
-
To quickly enter the current date in your worksheet, select any empty cell, press CTRL+; (semicolon), and then press ENTER, if necessary.
-
To enter a date that will update to the current date each time you reopen a worksheet or recalculate a formula, type =TODAY() in an empty cell, and then press ENTER.
When you type something like 2/2 in a cell, Excel for the web thinks you’re typing a date and shows it as 2-Feb. But you can change the date to be shorter or longer.
To see a short date like 2/2/2013, select the cell, and then click Home > Number Format > Short Date. For a longer date like Saturday, February 02, 2013, pick Long Date instead.
-
If a cell displays ##### after you apply date formatting to it, the cell probably isn’t wide enough to show the whole number. Try dragging the column that contains the cells with #####. This will resize the column to fit the number.
-
To enter a date that will update to the current date each time you reopen a worksheet or recalculate a formula, type =TODAY() in an empty cell, and then press ENTER.
Need more help?
You can always ask an expert in the Excel Tech Community or get support in the Answers community.
Need more help?
Want more options?
Explore subscription benefits, browse training courses, learn how to secure your device, and more.
Communities help you ask and answer questions, give feedback, and hear from experts with rich knowledge.
This article will explain to you how to change the default Date format by your custom display.
How is displayed a date in Excel?
By default, when you insert a date in a cell, the default delimiter between the day, the month and the year it’s the slash. And this, even if you write your date with dashes.
Excel automatically replaces the dashes with slashes 🤔
Change the default Date format
If you want to customize the default display, you must change a Windows setting.
Step 1: Open the Regional setting
To open the Regional setting quickly, you write the command line intl.cpl in the Windows Search box
And there, you have the following dialog box with the default date format.
Step 2: Select another date format
When you press on the drop-down button, you display other date formats but the number of choices is limited 😕
Step 3: Change the default date format
To change the default date format, you must click on the button Additional Settings
Step 4: Create your custom date format
- Select the Date tab
- Change the custom date format (here dd-MM-yyyy)
The code of your custom date follow the standard rules of date format in Excel
And without restarting Excel, neither your computer, all the dates format in your worksheets has the dash for date delimiter 😉
Caution
When you change the setting of the date format of Windows, ALL THE DATES of your computer are impacted.
As you can see, after changing the default date format, the format of the date in the taskbar has changed too.
In this guide, we’ll learn how to change date format in Excel. Date and Time data is an integral part of any statistical document or sheet. It is important to accurately track and analyze events, sales, figures, and others.
By convention, Excel uses a general data format that may be as per your need. But in most cases, that format may need to be customized.
Changing the format of Date in a particular cell or all the cells in your Excel sheet is an easy process and doesn’t require any complex methodologies. Excel provides a wide range of formatting options based on Location and Languages which helps in better date formatting in native language and style. Also, For some Languages there is also features to select from different Calendar types.
Follow the below step-by-step tutorial to change date format in Excel quickly and easily.
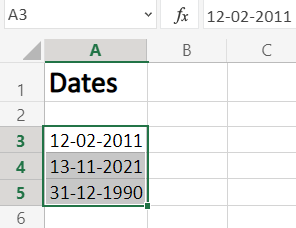
Step 1. Select the range of cells containing the date
To start with, select the cell values where want to change the date format, as shown in the image below.
Step 2. Go to Number Format dropdown
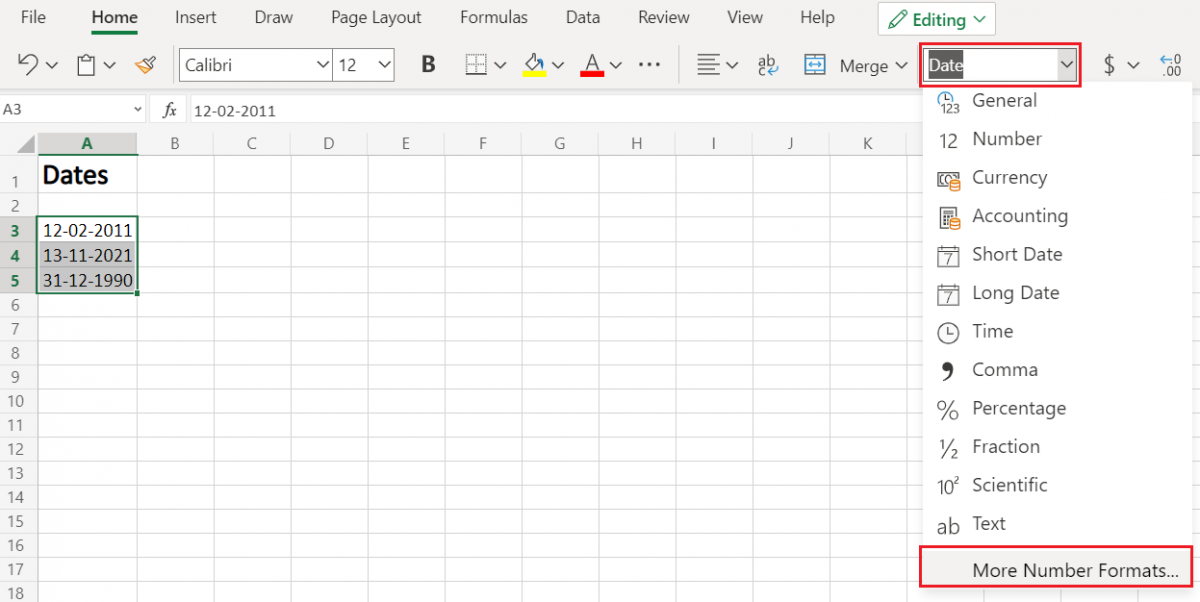
- To select ‘Number Format’, go to ‘Home‘ in the option menu and look for Number Format, as shown below
- Then from the drop-down menu, select ‘More Number Formats‘ to reveal the ‘Number Format’ dialogue menu.
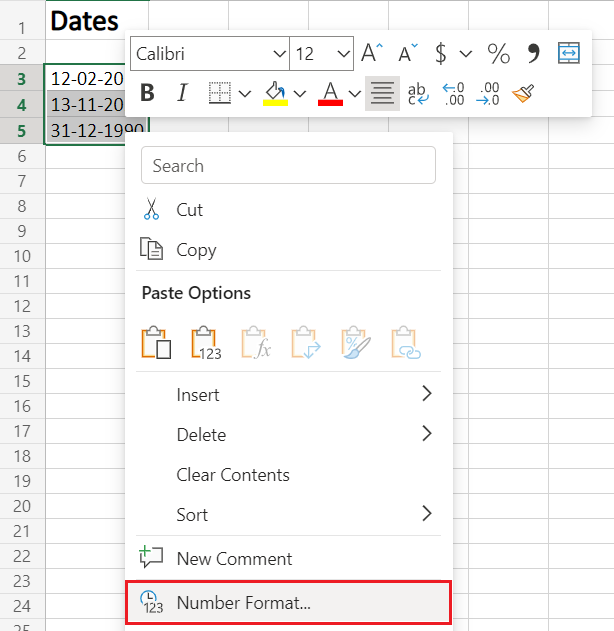
- Alternatively, you may directly go to Number Format, by right-clicking on the selected cell/s
- Click on ‘Number Format’.
Step 3. Choose Date
- From the Category menu on the right, choose ‘Date‘.
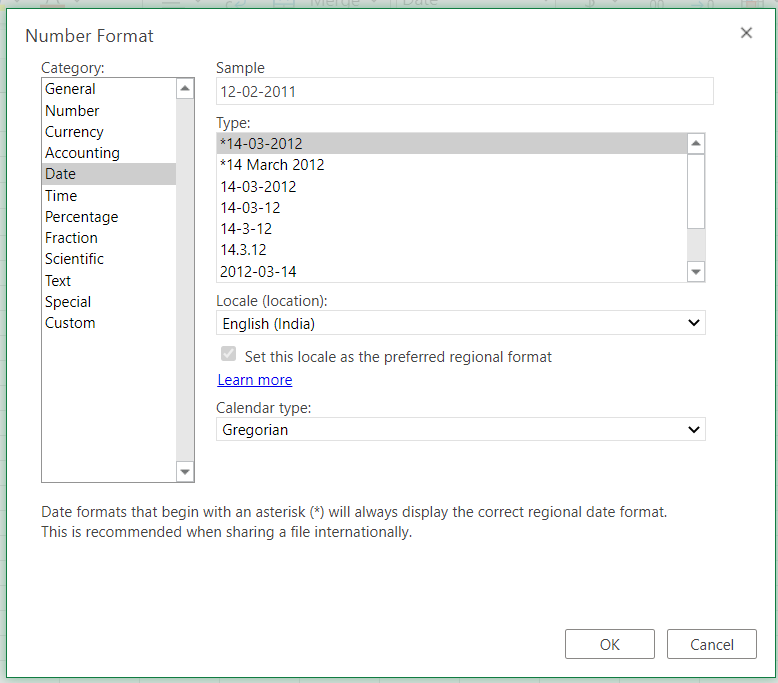
Now, to apply any date formatting type, select it from the right panel of the pop-up menu of Number Format. Click on ‘OK‘ to apply the formatting to the selected cell/s.
Note: You may check the date format implementation in the ‘Sample‘ at the top of the menu option
Choose the Date Type
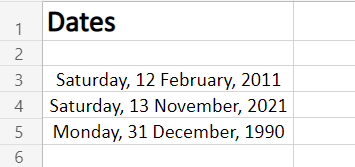
The general option type to choose from a variety of Date Formatting options. Scroll down in this section to reveal a plethora of options for formatting, ranging from date, text (month name), year, and others.
This option can be perceived as the display menu, as the formatting options in this will keep on changing as per the selection in Locale(Location) and Calendar type.
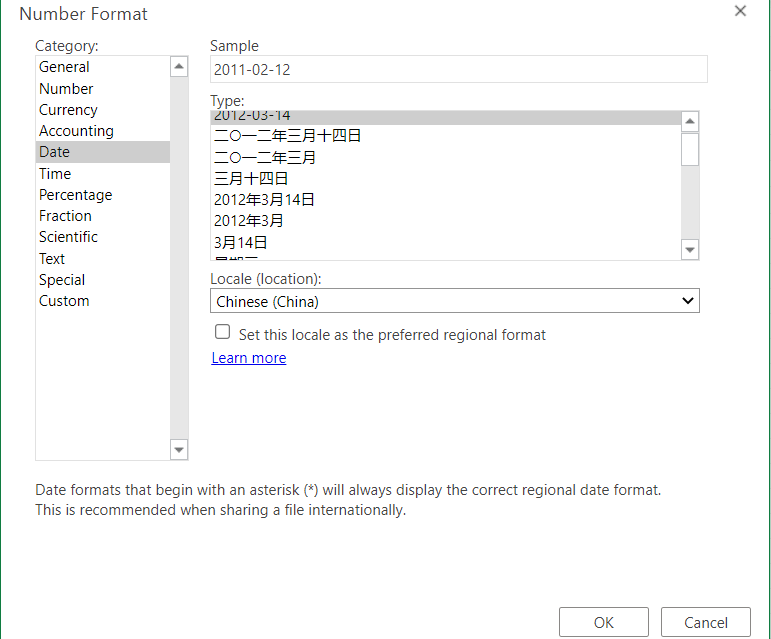
Choose the Locale (location)
This option features the Location or Language options to help format the date accordingly. This option is probably the most used option as users require to format the date according to their or audience preference as per the native formatting style, based on language and location.
Choose any language or Location from this options menu. After selecting, all the supported date format options available for that particular locale will be available for selecting in the above Type menu.
Choose the type of calendar
This option reveals different calendar types available based on the Locale(Location) selected from the above option menu. This formatting option is only available for certain Locale and not all.
As shown in our example below, the variety of calendar types available for selection are only available for the Locale (location) selected (here, Arabia), for other locales the calendar type might be different or not at all present.
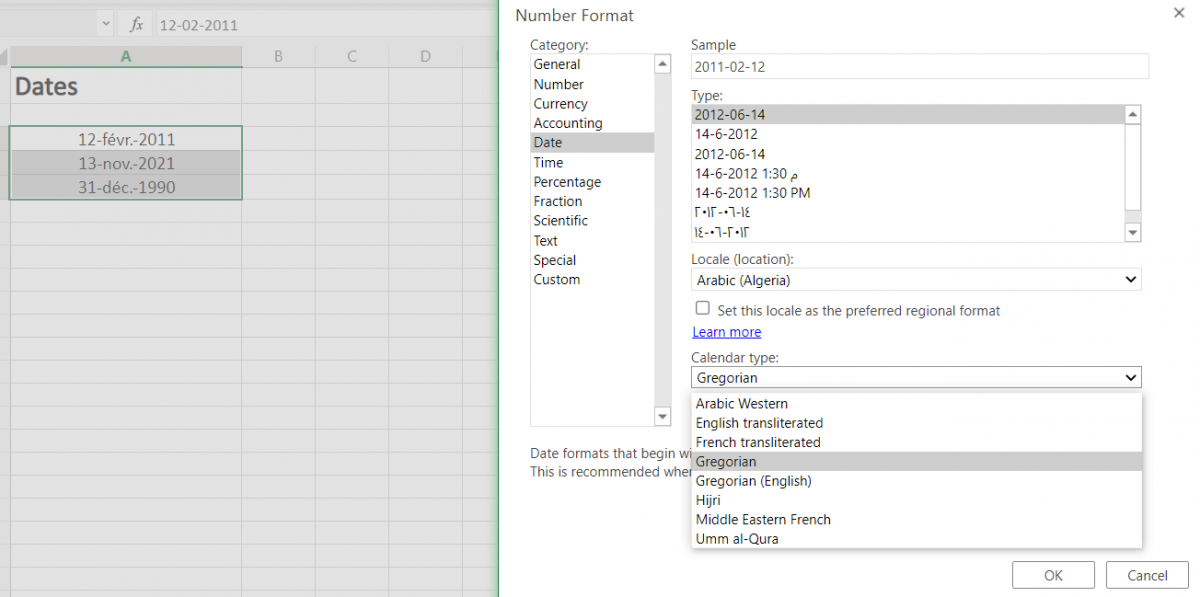
To apply selected formatting, you will need to click ‘OK‘ after selection to apply to your dates.
Conclusion
That’s It! You can now easily convert your dates to your desired format style easily.
We hope you learned and enjoyed this lesson and we’ll be back soon with another awesome Excel tutorial at QuickExcel!
How to change date format in Excel 365 Online
Are you having a problem with date formatting in Excel 365 online? For example, are you finding your dates are showing as an American date format of mm/dd/yyyy or maybe the opposite with a UK date format of dd/mm/yyyy?
In this blog I’ll take you through a few things you can check in Excel 365 Desktop and Excel 365 Online so that you can change your date format to the Excel date format you require.
Why is the Excel 365 Online date format not working?
You may be experiencing problems within your own files, files you share with others, or both.
Saving files into OneDrive or SharePoint is a fantastic way for team members to be updating and working with files from outside of the office, and an excellent way for everyone to have access to the same file either inside or outside of the office.
However, it can be super frustrating when data is entered incorrectly as this impacts everyone using the file, and fixing formatting problems can be such a waste of your precious time.
Different date formats
Our client’s team had a problem with date formatting in Excel 365 Online when some members were updating dates in a shared file in the Desktop version of Excel 365, and others were updating dates in the same file using Excel 365 online, the web browser version.
Some team members were using both Excel 365 for Desktop when working in the office, and Excel 365 Online when working from home.
When dates were entered using Excel 365 desktop the date format was correct.
Sadly, the date formats kept changing when anyone accessing the file using Excel 365 online updated the file.
The team continually battled with dates entered as mm/dd/yyyy when they would normally use the dd/mm/yyyy format.
Additionally, some dates were aligned to the left of the cell and some to the right and this was happening in both the desktop and web versions of Excel.
This is how we fixed it.
Tip #1 Check the Date format in Excel Desktop
The first thing we checked was the date formatting had been set correctly as dd/mm/yyyy in Excel 365 Desktop.
We work with a New Zealand date format of day/month/year, a.k.a dd/mm/yyyy, e.g. 31/01/2022.
Change the date format in Excel Desktop
1. To check the current date format first select the cell range containing the dates, and then right-click any cell in the selected range.
2. Click Format Cells.
3. On the Number tab click Date and then check that your date is set to the format you require. You can see in the image below that ours is set to dd/mm/yyyy and the Sample box shows the date as 31/01/2022 which is exactly how we are wanting it to be displayed.
Also, check that the Locale option is set to your location. Ours is set correctly with English (New Zealand).
Notes: if the Date format is set incorrectly here you can select the format you require from the Date options.
Additionally, if the date format is showing as an American date format, you can easily change the date format in Excel by selecting Custom from the Category group, and then changing the Excel date format to the format you require.
You can see in the image below that ours is set to dd/mm/yyyy and the Sample box shows the date as 31/01/2022 which is exactly how we are wanting it to be displayed for our New Zealand date format.
If you wanted month/day/year you could enter a new format into the Type box. For example, for an American date format you could type mm/dd/yyyy, as shown below.
Excel Online date format not working
We found that the date settings were set correctly in Excel 365 Desktop.
However, even if we clicked OK to reapply the formatting on every selected cell, we still had several cells that were still formatted incorrectly with the date still left-aligned in the column.
We used the steps in Tip #3 below to reset the dates to the correct format.
Additionally, as soon as a team member accessed the file using Excel 365 Online the dates went back to being formatted incorrectly.
We then tried the steps in Tip #2.
Tip #2 Change the date format in Excel 365 Online
When team members were editing the sheet in the browser version of Excel (Excel 365 Online) the formatting changed to month/day/year, a.k.a mm/dd/yyyy, even though the date formats were set correctly in Excel 365 Desktop.
This was the reason some of the dates were being left-aligned in the column. For example, 31/01/2022 was being entered incorrectly because the web version of Excel 365 was seeing the date as mm/dd/yyyy. Since there isn’t a 31st month, Excel saw this as a mistype and entered the date as text, not a date.
However, because the date format was set to read month then day, entering 01/02/2022 was being entered as a date but it was being held as the 2nd of January, not the 1st of February.
Change the Date Format in Excel 365 Online
We followed the same steps as for Excel 365 Desktop to check the current Excel date format. To do this follows these steps.
1. Login to your Excel 365 Online account and open the file.
2. Select the cell range containing the dates, and then right-click any cell in the selected range.
3. Click Number Format.
4. On the Custom option we can see that the date format is set to dd/mm/yyyy. However, the dates were still being formatted incorrectly.
Note: there isn’t currently a way to change the date format within the Custom area in Excel 365 Online. To do this you will need to open the file into Excel 365 Desktop and follow the steps outlined above.
5. Click Date in the Category list.
6. Now, this is the important part. Check the Locale (location) setting. We had such a mix of settings for this. Some members of the team had English (United States), while others had Armenian or Azerbaijani!
7. Now select the correct date format you require from the Type list.
8. Select your location from the Locale (location) list.
Note: please be aware that changing the Regional format settings in Excel affect dates, currency, formula delimiters and more. For more information, please check the Microsoft support page online.
9. BEFORE you click OK be sure to select the Set this locate as the preferred regional format option box. If you don’t do this the date format will change itself back to its former setting again.
10. When you click OK the file will update.
11. Once the new date format is in place all dd/mm/yyyy date entries will be formatted with the correct Excel date format. If you find existing date entries still haven’t updated, please check the steps in Tip #3 below.
Note: you can also change the Excel 365 Online Regional format settings through File, Options. To do this follow the steps below.
1. Click the File tab and then click the 3 dots for access the More File Options.
2. Select Options.
3. Now click Regional Format Settings.
4. Select your preferred regional format from the drop-down list and then click Change.
Tip #3 Change existing dates to the correct date format in Excel
The tips above will set your date format for all dates entered going forward.
However, you may now be left with existing dates that are still in the incorrect format.
Let’s look at a quick way to fix this.
1. Select the cells that need to be reformatted with the correct date format.
2. From the Data tab select Text to Columns.
3. Follow the instruction for the version of Excel you are working in.
Change existing dates in Excel 365 Online
Remove the selection from all the Delimiter options and then click Apply.
Change existing dates in Excel 365 for Desktop
1. On Step 1 of the Convert Text to Columns Wizard select Delimited and then click Next.
2. On Step 2, leave all the delimiter options unchecked and then click Next.
3. On Step 3, select Date from the Column data format option box, and then select the format that the date is currently using. For example, if your date format is currently mm/dd/yy, and you want to change it to your default locale setting, select MDY. If it is dd/mm/yy and you want the dates to be formatted as American date format select DMY.
4. Click Finish.
Your dates will now be updated and the correct Date Formats reapplied.
Was this blog helpful? Let us know in the Comments below.
Instructions
Change the date format in Excel Desktop
- Select the cell range containing the dates, and then right-click any cell in the selected range.
- Click Format Cells.
- On the Number tab click Date and then check that your date is set to the format you require. Also, check that the Locale option is set to your location.
Change the Date Format in Excel 365 Online
- Login to your Excel 365 Online account and open the file.
- Select the cell range containing the dates, and then right-click any cell in the selected range.
- Click Number Format.
- On the Custom option we can see that the date format is set to dd/mm/yyyy.
- Click Date in the Category list.
- Check the Locale (location) setting.
- Now select the correct date format you require from the Type list.
- Select your location from the Locale (location) list.
- BEFORE you click OK be sure to select the Set this locate as the preferred regional format option box. If you don’t do this the date format will change itself back to its former setting again.
- When you click OK the file will update.
Change existing dates to the correct date format in Excel
The tips above will set your date format for all dates entered going forward. However, you may now be left with existing dates that are still in the incorrect format. To fix this:
- Select the cells that need to be reformatted with the correct date format.
- From the Data tab select Text to Columns.
- Follow the instruction for the version of Excel you are working in.
Change existing dates in Excel 365 Online
Remove the selection from all the Delimiter options and then click Apply.
Change existing dates in Excel 365 for Desktop
- On Step 1 of the Convert Text to Columns Wizard select Delimited and then click Next.
- On Step 2, leave all the delimiter options unchecked and then click Next.
- On Step 3, select Date from the Column data format option box, and then select the format that the date is currently using. For example, if your date format is currently mm/dd/yy, and you want to change it to your default locale setting, select MDY. If it is dd/mm/yy and you want the dates to be formatted as American date format select DMY.
- Click Finish.
Notes
Why is the Excel 365 Online date format not working?
Different date formats: Our client’s team had a problem with date formatting in Excel 365 Online when some members were updating dates in a shared file in the Desktop version of Excel 365, and others were updating dates in the same file using Excel 365 online, the web browser version. The team continually battled with dates entered as mm/dd/yyyy when they would normally use the dd/mm/yyyy format.
Change the date format in Excel Desktop
Note: if the Date format is set incorrectly in the Format Cells display box you can select the format you require from the Date options. Additionally, if the date format is showing as an American date format, you can easily change the date format in Excel by selecting Custom from the Category group, and then changing the Excel date format to the format you require. If you wanted month/day/year you could enter a new format into the Type box. For example, for an American date format you could type mm/dd/yyyy.
Change the Date Format in Excel 365 Online
Note: there isn’t currently a way to change the date format within the Custom area in Excel 365 Online.
Note: please be aware that changing the Regional format settings in Excel affect dates, currency, formula delimiters and more.
Change the Excel 365 Online Regional Format settings
- Click the File tab and then click the 3 dots for access the More File Options.
- Select Options.
- Now click Regional Format Settings.
- Select your preferred regional format from the drop-down list and then click Change.
Elevate your Excel game and become a pro with our exclusive Insider Group.
Be the first to know about new tutorials, videos, and tips for Microsoft 365 products. Join us now and claim your exclusive bonus today!
This article will teach you how to change the date format in Microsoft Excel to have a uniform structure across your spreadsheet.
How to convert cells to the date format?
- Open your excel spreadsheet.
- Select all the cells you want to modify, and right-click on them.
- Select Format Cells.
- Go to the Number tab.
- In the Category list, click Date.
- Under the Type list, choose the date format you want on the right side.
-
If you want to use a date format according to how another language displays dates, choose the language in Locale (location).
-
Click Ok.

How to uniformize the date format?
Microsoft Excel offers its users various formats for writing dates, including DD/MM/YYYY, DD/MM/YY, MM/DD/YY, and date custom formats. Unfortunately, if dates are formatted differently within a spreadsheet, the system does not always recognize when a cell contains a date. This oversight can easily lead to confusion when dates are formatted differently across a spreadsheet. Luckily, there is an easy way to format your spreadsheet so that each piece of data input into your spreadsheet reads the same.
- Click on Data.
- Select Text to Columns.
- In the Convert Text to Columns Wizard, select Delimited > Next.
- Uncheck all delimiters and click Next.
- Click on date, and choose the format you’d like to read your dates (the default format is D/M/Y).
- Click Finish.
any more questions about excel? check out our forum!


