Import or export text (.txt or .csv) files
There are two ways to import data from a text file with Excel: you can open it in Excel, or you can import it as an external data range. To export data from Excel to a text file, use the Save As command and change the file type from the drop-down menu.
There are two commonly used text file formats:
-
Delimited text files (.txt), in which the TAB character (ASCII character code 009) typically separates each field of text.
-
Comma separated values text files (.csv), in which the comma character (,) typically separates each field of text.
You can change the separator character that is used in both delimited and .csv text files. This may be necessary to make sure that the import or export operation works the way that you want it to.
Note: You can import or export up to 1,048,576 rows and 16,384 columns.
Import a text file by opening it in Excel
You can open a text file that you created in another program as an Excel workbook by using the Open command. Opening a text file in Excel does not change the format of the file — you can see this in the Excel title bar, where the name of the file retains the text file name extension (for example, .txt or .csv).
-
Go to File > Open and browse to the location that contains the text file.
-
Select Text Files in the file type dropdown list in the Open dialog box.
-
Locate and double-click the text file that you want to open.
-
If the file is a text file (.txt), Excel starts the Import Text Wizard. When you are done with the steps, click Finish to complete the import operation. See Text Import Wizard for more information about delimiters and advanced options.
-
If the file is a .csv file, Excel automatically opens the text file and displays the data in a new workbook.
Note: When Excel opens a .csv file, it uses the current default data format settings to interpret how to import each column of data. If you want more flexibility in converting columns to different data formats, you can use the Import Text Wizard. For example, the format of a data column in the .csv file may be MDY, but Excel’s default data format is YMD, or you want to convert a column of numbers that contains leading zeros to text so you can preserve the leading zeros. To force Excel to run the Import Text Wizard, you can change the file name extension from .csv to .txt before you open it, or you can import a text file by connecting to it (for more information, see the following section).
-
Import a text file by connecting to it (Power Query)
You can import data from a text file into an existing worksheet.
-
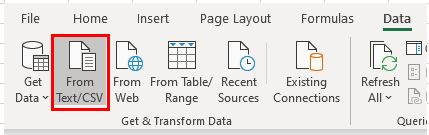
On the Data tab, in the Get & Transform Data group, click From Text/CSV.
-
In the Import Data dialog box, locate and double-click the text file that you want to import, and click Import.
-
In the preview dialog box, you have several options:
-
Select Load if you want to load the data directly to a new worksheet.
-
Alternatively, select Load to if you want to load the data to a table, PivotTable/PivotChart, an existing/new Excel worksheet, or simply create a connection. You also have the choice of adding your data to the Data Model.
-
Select Transform Data if you want to load the data to Power Query, and edit it before bringing it to Excel.
-
If Excel doesn’t convert a particular column of data to the format that you want, then you can convert the data after you import it. For more information, see Convert numbers stored as text to numbers and Convert dates stored as text to dates.
Export data to a text file by saving it
You can convert an Excel worksheet to a text file by using the Save As command.
-
Go to File > Save As.
-
Click Browse.
-
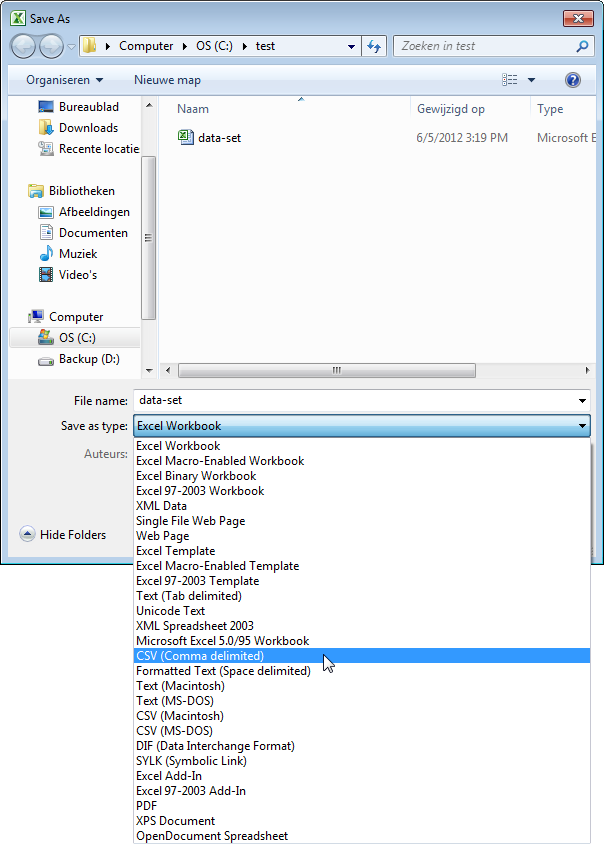
In the Save As dialog box, under Save as type box, choose the text file format for the worksheet; for example, click Text (Tab delimited) or CSV (Comma delimited).
Note: The different formats support different feature sets. For more information about the feature sets that are supported by the different text file formats, see File formats that are supported in Excel.
-
Browse to the location where you want to save the new text file, and then click Save.
-
A dialog box appears, reminding you that only the current worksheet will be saved to the new file. If you are certain that the current worksheet is the one that you want to save as a text file, click OK. You can save other worksheets as separate text files by repeating this procedure for each worksheet.
You may also see an alert below the ribbon that some features might be lost if you save the workbook in a CSV format.
For more information about saving files in other formats, see Save a workbook in another file format.
Import a text file by connecting to it
You can import data from a text file into an existing worksheet.
-
Click the cell where you want to put the data from the text file.
-
On the Data tab, in the Get External Data group, click From Text.
-
In the Import Data dialog box, locate and double-click the text file that you want to import, and click Import.
Follow the instructions in the Text Import Wizard. Click Help
 on any page of the Text Import Wizard for more information about using the wizard. When you are done with the steps in the wizard, click Finish to complete the import operation.
 -
In the Import Data dialog box, do the following:
-
Under Where do you want to put the data?, do one of the following:
-
To return the data to the location that you selected, click Existing worksheet.
-
To return the data to the upper-left corner of a new worksheet, click New worksheet.
-
-
Optionally, click Properties to set refresh, formatting, and layout options for the imported data.
-
Click OK.
Excel puts the external data range in the location that you specify.
-
 on any page of the Text Import Wizard for more information about using the wizard. When you are done with the steps in the wizard, click Finish to complete the import operation.
If Excel does not convert a column of data to the format that you want, you can convert the data after you import it. For more information, see Convert numbers stored as text to numbers and Convert dates stored as text to dates.
Export data to a text file by saving it
You can convert an Excel worksheet to a text file by using the Save As command.
-
Go to File > Save As.
-
The Save As dialog box appears.
-
In the Save as type box, choose the text file format for the worksheet.
-
For example, click Text (Tab delimited) or CSV (Comma delimited).
-
Note: The different formats support different feature sets. For more information about the feature sets that are supported by the different text file formats, see File formats that are supported in Excel.
-
-
Browse to the location where you want to save the new text file, and then click Save.
-
A dialog box appears, reminding you that only the current worksheet will be saved to the new file. If you are certain that the current worksheet is the one that you want to save as a text file, click OK. You can save other worksheets as separate text files by repeating this procedure for each worksheet.
-
A second dialog box appears, reminding you that your worksheet may contain features that are not supported by text file formats. If you are interested only in saving the worksheet data into the new text file, click Yes. If you are unsure and would like to know more about which Excel features are not supported by text file formats, click Help for more information.
For more information about saving files in other formats, see Save a workbook in another file format.
The way you change the delimiter when importing is different depending on how you import the text.
-
If you use Get & Transform Data > From Text/CSV, after you choose the text file and click Import, choose a character to use from the list under Delimiter. You can see the effect of your new choice immediately in the data preview, so you can be sure you make the choice you want before you proceed.
-
If you use the Text Import Wizard to import a text file, you can change the delimiter that is used for the import operation in Step 2 of the Text Import Wizard. In this step, you can also change the way that consecutive delimiters, such as consecutive quotation marks, are handled.
See Text Import Wizard for more information about delimiters and advanced options.
If you want to use a semi-colon as the default list separator when you Save As .csv, but need to limit the change to Excel, consider changing the default decimal separator to a comma — this forces Excel to use a semi-colon for the list separator. Obviously, this will also change the way decimal numbers are displayed, so also consider changing the Thousands separator to limit any confusion.
-
Clear Excel Options > Advanced > Editing options > Use system separators.
-
Set Decimal separator to , (a comma).
-
Set Thousands separator to . (a period).
When you save a workbook as a .csv file, the default list separator (delimiter) is a comma. You can change this to another separator character using Windows Region settings.
Caution: Changing the Windows setting will cause a global change on your computer, affecting all applications. To only change the delimiter for Excel, see Change the default list separator for saving files as text (.csv) in Excel.
-
In Microsoft Windows 10, right-click the Start button, and then click Settings.
-
Click Time & Language, and then click Region in the left panel.
-
In the main panel, under Regional settings, click Additional date, time, and regional settings.
-
Under Region, click Change date, time, or number formats.
-
In the Region dialog, on the Format tab, click Additional settings.
-
In the Customize Format dialog, on the Numbers tab, type a character to use as the new separator in the List separator box.
-
Click OK twice.
-
In Microsoft Windows, click the Start button, and then click Control Panel.
-
Under Clock, Language, and Region, click Change date, time, or number formats.
-
In the Region dialog, on the Format tab, click Additional settings.
-
In the Customize Format dialog, on the Numbers tab, type a character to use as the new separator in the List separator box.
-
Click OK twice.
Note: After you change the list separator character for your computer, all programs use the new character as a list separator. You can change the character back to the default character by following the same procedure.
Need more help?
You can always ask an expert in the Excel Tech Community or get support in the Answers community.
See Also
Import data from external data sources (Power Query)
Need more help?
Импорт и экспорт текстовых файлов (в формате TXT или CSV)
Импортировать данные из текстового файла в Excel можно двумя способами: открыть их в Excel или импортировать как диапазон внешних данных. Чтобы экспортировать данные из Excel в текстовый файл, воспользуйтесь командой Сохранить как и измените тип файла в меню.
Чаще всего используются два формата текстовых файлов:
-
текстовые файлы с разделителями (TXT), в которых для разделения полей текста обычно используется знак табуляции (знак ASCII с кодом 009);
-
текстовые файлы с разделителями-запятыми (CSV), в которых в качестве разделителя полей текста обычно используется запятая (,).
Вы можете изменить знак разделения, используемый в TXT- и CSV-файлах. Это может потребоваться для обеспечения успешного выполнения импорта и экспорта.
Примечание: Можно импортировать и экспортировать до 1 048 576 строк и 16 384 столбцов.
Импорт текстового файла путем его открытия в Excel
Текстовый файл, созданный в другой программе, можно открыть как книгу Excel с помощью команды Открыть. При открытии текстового файла в Excel его формат не изменяется — это можно заметить по заголовку окна Excel, где имя указывается с расширением текстового файла (например, TXT или CSV).
-
Перейдите в >открыть и перейдите в папку с текстовым файлом.
-
В диалоговом окне Открытие выберите текстовые файлы в списке тип файла.
-
Найдите нужный файл и дважды щелкните его.
-
Если это текстовый файл (с расширением ТХТ), запустится мастер импорта текста. Окончив работу с мастером, нажмите кнопку Готово, чтобы завершить импорт. Дополнительные сведения о разных вариантах и дополнительных параметрах см. в мастере импорта текста.
-
Если файл имеет расширение CSV, Excel автоматически откроет его и отобразит данные в новой книге.
Примечание: При открытии CSV-файлов для определения способа импорта каждого столбца используются заданные по умолчанию параметры форматирования данных. Если вы хотите применить другие параметры, используйте мастер импорта текста. Например, мастер потребуется, если столбец данных в CSV-файле имеет формат МДГ, а в Excel по умолчанию используется формат ГМД или необходимо преобразовать в текст столбец чисел, содержащих начальные нули, чтобы сохранить их. Чтобы принудительно запустить мастер импорта текста, можно изменить расширение имени файла с CSV на TXT или импортировать текстовый файл путем подключения к нем (дополнительные сведения см. в следующем разделе).
-
Импорт текстового файла путем подключения к нем (Power Query)
Вы можете импортировать данные из текстового файла в существующий.
-
На вкладке Данные в группе & преобразование данных выберите из текстового/CSV-документа.
-
В диалоговом окне Импорт данных найдите и дважды щелкните текстовый файл, который нужно импортировать,и нажмите кнопку Импорт.
-
В диалоговом окне предварительного просмотра есть несколько вариантов:
-
Выберите Загрузить, если вы хотите загрузить данные непосредственно на новый.
-
Кроме того, выберите загрузить в, если вы хотите загрузить данные в таблицу, в смету или на существующий или новый листа Excel, или просто создать подключение. Вы также можете добавить данные в модель данных.
-
Выберите Преобразовать данные, если вы хотите загрузить данные в Power Query и отредактировать их перед их преобразованием в Excel.
-
Если Excel не преобразует определенный столбец данных в нужный формат, их можно преобразовать после импорта. Дополнительные сведения см. в статьях Преобразование чисел из текстового формата в числовой и Преобразование дат из текстового формата в формат даты.
Экспорт данных в текстовый файл путем его сохранения
Лист Excel можно преобразовать в текстовый файл, используя команду Сохранить как.
-
Выберите Файл > Сохранить как.
-
Нажмите кнопку Обзор.
-
В диалоговом окне Сохранить как в поле Тип файла выберите формат текстового файла для этого документа. Например, щелкните Текст (с табу женой) или CSV (сзапятой).
Примечание: Различные форматы текстовых файлов поддерживают разные возможности. Дополнительные сведения см. в статье Поддерживаемые Excel форматы файлов.
-
Перейдите в папку, куда вы хотите сохранить файл, а затем нажмите кнопку Сохранить.
-
Откроется диалоговое окно с напоминанием о том, что в текстовом файле будет сохранен только текущий лист. Если вы хотите сохранить именно текущий лист, нажмите кнопку ОК. Другие листы можно сохранить в отдельных текстовых файлах, повторив эту процедуру для каждого из них.
Кроме того, под лентой может появиться предупреждение о том, что некоторые возможности могут быть потеряны при сохранение книги в формате CSV.
Дополнительные сведения о сохранении файлов в других форматах см. в статье Сохранение книги в другом формате файла.
Импорт текстового файла путем подключения к нему
Вы можете импортировать данные из текстового файла в существующий.
-
Щелкните ячейку, в которую вы хотите поместить данные из текстового файла.
-
На вкладке Данные в группе Получение внешних данных нажмите Из текста.
-
В диалоговом окне Импорт данных найдите и дважды щелкните текстовый файл, который нужно импортировать,и нажмите кнопку Импорт.
Следуйте инструкциям мастера импорта текста. Щелкните
на любой странице мастера импорта текста, чтобы получить дополнительные сведения об использовании мастера. Окончив работу с мастером, нажмите кнопку Готово, чтобы завершить импорт. -
В диалоговом окне Импорт данных:
-
В группе Куда следует поместить данные? выполните одно из следующих действий:
-
Чтобы поместить данные в выбранные ячейки, щелкните На существующий лист.
-
Чтобы поместить данные в верхний левый угол нового листа, выберите вариант На новый лист.
-
-
При необходимости нажмите кнопку Свойства, чтобы задать параметры обновления, форматирования и макета импортируемых данных.
-
Нажмите кнопку ОК.
Excel добавит диапазон внешних данных в указанное место.
-
 на любой странице мастера импорта текста, чтобы получить дополнительные сведения об использовании мастера. Окончив работу с мастером, нажмите кнопку Готово, чтобы завершить импорт.
Если Excel не преобразует столбец в необходимый формат, это можно сделать после импорта. Дополнительные сведения см. в статьях Преобразование чисел из текстового формата в числовой и Преобразование дат из текстового формата в формат даты.
Экспорт данных в текстовый файл путем его сохранения
Лист Excel можно преобразовать в текстовый файл, используя команду Сохранить как.
-
Выберите Файл > Сохранить как.
-
Откроется диалоговое окно Сохранение документа.
-
В поле Тип файла выберите формат текстового файла для листа.
-
Например, выберите Текстовые файлы (с разделителями табуляции) или CSV (разделители — запятые).
-
Примечание: Различные форматы текстовых файлов поддерживают разные возможности. Дополнительные сведения см. в статье Поддерживаемые Excel форматы файлов.
-
-
Перейдите в папку, куда вы хотите сохранить файл, а затем нажмите кнопку Сохранить.
-
Откроется диалоговое окно с напоминанием о том, что в текстовом файле будет сохранен только текущий лист. Если вы хотите сохранить именно текущий лист, нажмите кнопку ОК. Другие листы можно сохранить в отдельных текстовых файлах, повторив эту процедуру для каждого из них.
-
Откроется второе диалоговое окно с напоминанием о том, что сохраняемый лист может содержать возможности, которые не поддерживаются текстовыми форматами файлов. Если в новом текстовом файле нужно сохранить только данные листа, нажмите кнопку Да. Если вы не уверены и хотите получить дополнительные сведения о том, какие возможности Excel не поддерживаются форматами текстовых файлов, нажмите кнопку Справка.
Дополнительные сведения о сохранении файлов в других форматах см. в статье Сохранение книги в другом формате файла.
Способ изменения деления при импорте зависит от того, как вы импортируете текст.
-
Если вы используете get & Transform Data > From Text/CSV, после выбора текстового файла и нажатия кнопки Импорт выберитесимвол, который нужно использовать в списке …. Новый вариант можно сразу же увидеть в окне предварительного просмотра данных, чтобы убедиться в том, что вы сделаете нужный вариант, прежде чем продолжить.
-
Если вы импортируете текстовый файл с помощью мастера импорта текста, вы можете изменить его на шаге 2 мастера импорта текста. На этом шаге также можно изменить способ обработки последовательных разделителей (например, идущих подряд кавычек).
Дополнительные сведения о разных вариантах и дополнительных параметрах см. в мастере импорта текста.
Если при сохранение в CSV-окне вы хотите использовать в качестве по умолчанию полу двоеточие, но для этого нужно ограничиться Excel, измените десятичной запятой. В этом случае Excel будет использовать для этого двоеточие. Очевидно, что это также изменит способ отображения десятичных чисел, поэтому также рассмотрите возможность изменения разграничения чисел в тысячах, чтобы сузить путаницу.
-
Очистка параметров Excel> Дополнительные>параметры редактирования> Использование системных междугов.
-
Для десятичной запятой установитедля десятичной запятой (запятую).
-
Установите для 1000-го построитель. (точка).
Когда вы сохраняете книгу в CSV-файле, по умолчанию в качестве разных списков запятой является запятая. Вы можете изменить этот знак на другой знак с помощью параметров региона Windows.
Внимание: Изменение параметров Windows приведет к глобальным изменениям на компьютере и повлияет на все приложения. Чтобы изменить только делитель для Excel, см. изменение стандартного деления в списке для сохранения файлов в виде текста (CSV- или CSV-файла) в Excel.
-
В Microsoft Windows 10 щелкните правой кнопкой мыши кнопку Начните и выберите параметры.
-
Нажмите кнопку & языки выберите регион в левой области.
-
На главной панели в группе Региональные параметрыщелкните Дополнительные параметры даты,времени и региона.
-
В областивыберите изменить форматы даты, времени или числа.
-
В диалоговом окке Регион на вкладке Формат нажмите кнопку Дополнительные параметры.
-
В диалоговом окне Настройка формата на вкладке Числа введите символ, который будет использовать в качестве нового в поле «Сепаратор списков».
-
Дважды нажмите кнопку ОК.
-
Нажмите кнопку Пуск и выберите пункт Панель управления.
-
В разделе Часы, язык и регион щелкните элемент Изменение форматов даты, времени и чисел.
-
В диалоговом окке Регион на вкладке Формат нажмите кнопку Дополнительные параметры.
-
В диалоговом окне Настройка формата на вкладке Числа введите символ, который будет использовать в качестве нового в поле «Список».
-
Дважды нажмите кнопку ОК.
Примечание: После изменения разделителя элементов списка все программы на компьютере будут использовать новый символ. Вы можете вернуть стандартный символ, выполнив эти же действия.
Дополнительные сведения
Вы всегда можете задать вопрос специалисту Excel Tech Community или попросить помощи в сообществе Answers community.
См. также
Импорт данных из внешних источников (Power Query)
Нужна дополнительная помощь?
Different applications generate data in different forms.
A SaaS application might generate a report in the form of a PDF, while another application might generate data in the form of a TXT or CSV file.
The challenge lies in consolidating the data into a single application that can work with all the data to produce the required results.
Microsoft Excel is one application that is frequently used for this, owing to its versatility in importing data from files with a wide variety of extensions.
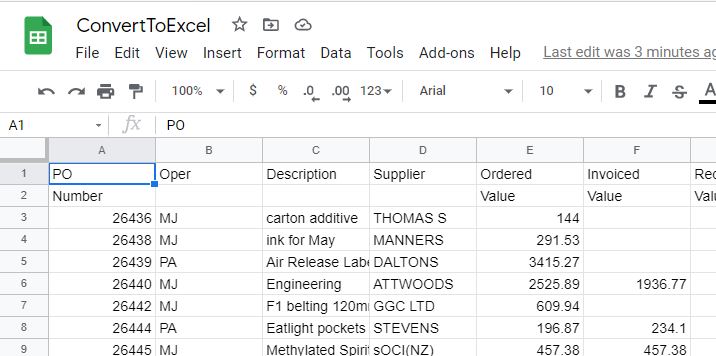
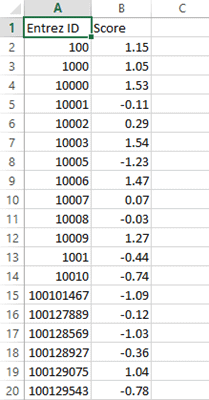
For example, if you have a list of items saved in a Text file (or in Notepad), Excel allows you to import this list so that you can process it further.
In this tutorial we will show you two ways to convert a text file to Excel:
- By using the Text Import Wizard
- By opening the file directly in Excel
What is a Text File?
A Text file is one that contains text with no special formatting (as in bold, italic, images, etc.).
These files are identified with the ‘.txt’ extension and can be opened in any text editor, like Notepad or word processor, like Microsoft Word.
But in many cases, you can have data in a text file that you need to open in Excel and analyze there.
Thankfully, you can easily open text files in Microsoft Excel and then further work on it.
Let’s see how to do that!
Let us look at two ways in which we can convert a Text file (.txt) to Excel.
Method 1: Using the Text Import Wizard to Convert a Text File to Excel
If you have a spreadsheet open in Excel and want to import the contents of a Text file at a specific area of your spreadsheet, the Text Import Wizard might be the best way to go.
This wizard scans your text file and ensures that the data in the file is imported the way you want.
To use the Text Import Wizard, select the Data tab, followed by ‘From Text’ (which you will find under the ‘Get External Data’ group.
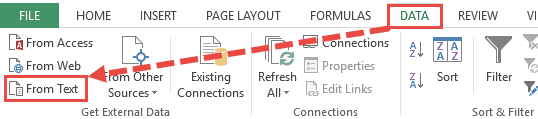
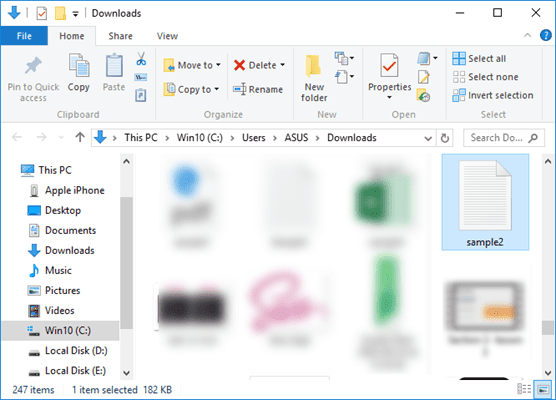
After this, select the text file that you want to import.
Your Text Import Wizard should now open automatically.
The Text Import Wizard guides you in providing the best settings to import your text file data through 3 steps:
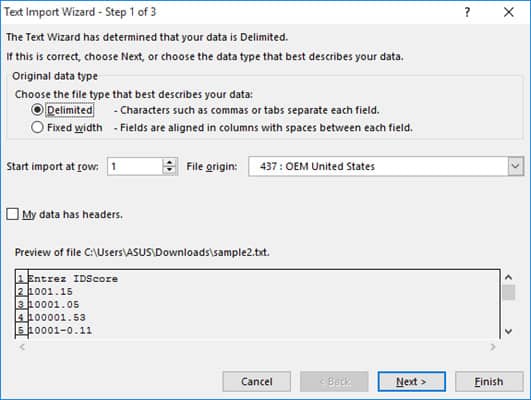
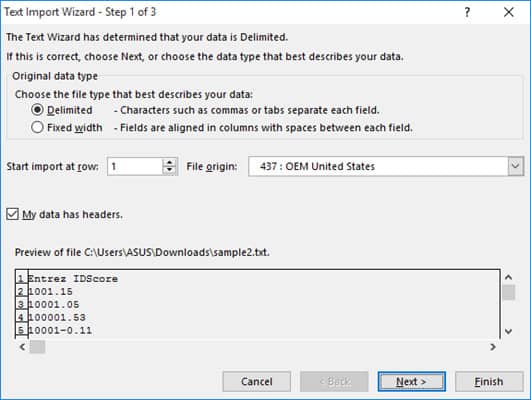
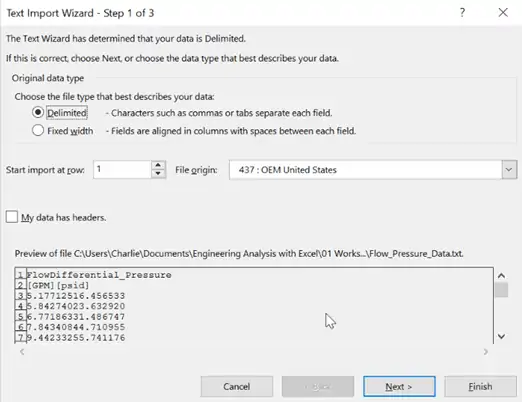
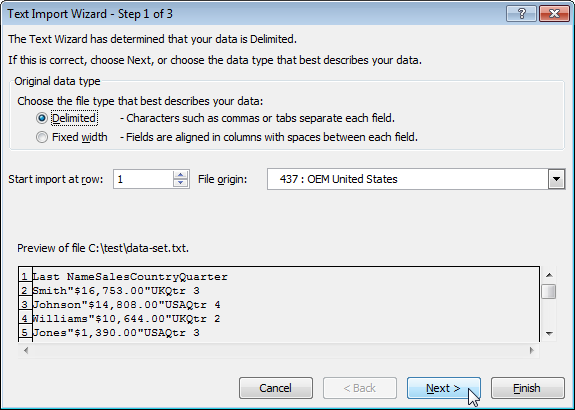
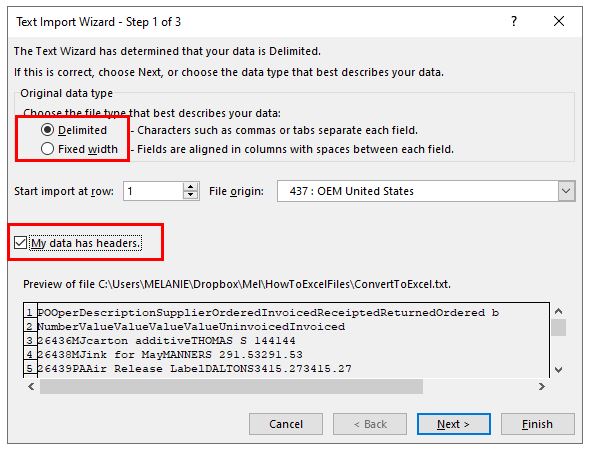
Step 1 of 3
In this step you can provide the settings for the following:
- Original Data Type: Here you can choose how you want your data to be separated into columns. You have two options:
- Delimited: Select this if your text file data is separated by tabs, colons, semicolons or other characters.
- Fixed width: Select this if all items in each column of your data are the same width.
- Start import at row: Type or select the first row of your data from where you want to start importing.
- File origin: Select the character set that your text file uses, for example 437 (for the OEM United States character set). Usually, it’s fine to leave this at the default setting.
- My data has headers: Keep this field checked if your Text file’s dataset contains headers.
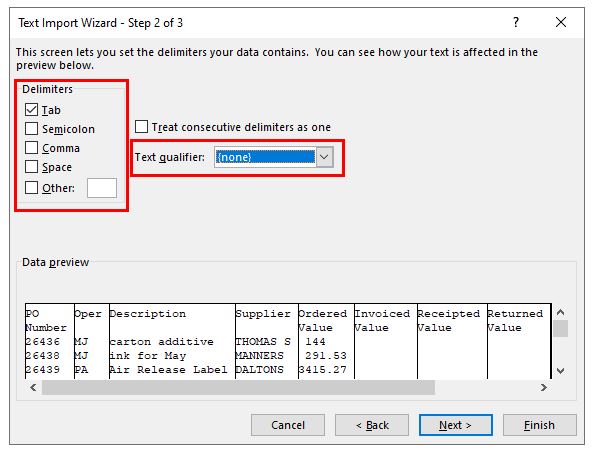
Step 2 of 3
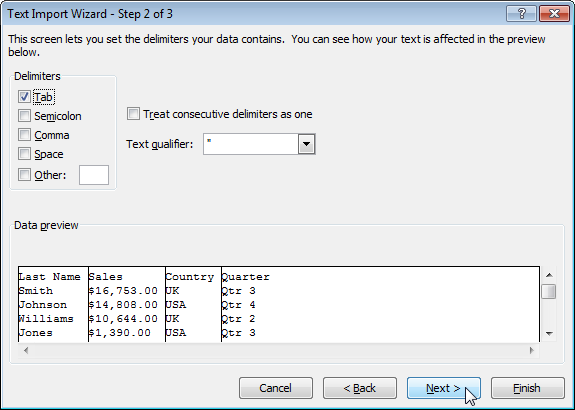
If you had selected the ‘Delimited’ radio button in Step 1, then this step lets you specify the delimiters that your data contains (for example tabs, commas, semicolons, etc.) You can also specify if you want consecutive delimiters to be counted as one.
Moreover, if your text values are enclosed in a special set of characters (for example in single or double quotes), then you can specify the character in this step.
These characters are known as ‘Text qualifiers’ and help specify if you want a set of values to be imported as one.
For example, “Scott, Steve” is imported as a single value, even though the words are separated by a comma delimiter.
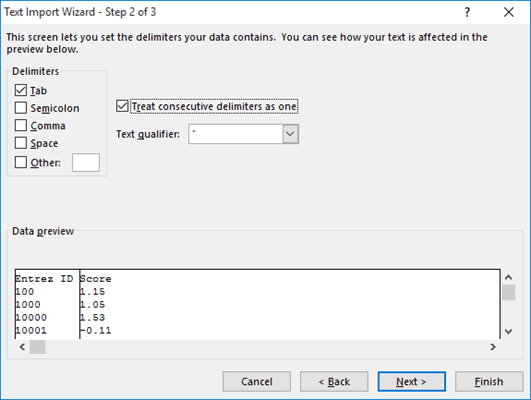
At the bottom of the screen, you can see a preview of how your data will get affected in the spreadsheet after conversion.
If you had selected the ‘Fixed Width’ radio button in Step 1, on the other hand, then Step 2 lets you specify widths for each column.
You can introduce a new column break in the preview window by simply clicking at the appropriate point on the scale.
A line with an arrow should appear to represent the column break.
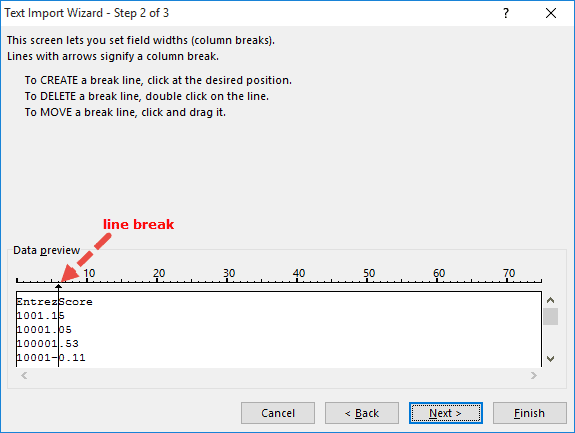
Place line breaks wherever you need to in the preview window.
If you want to move a line break, simply drag it across. If you want to remove a line, simply double-click on it.
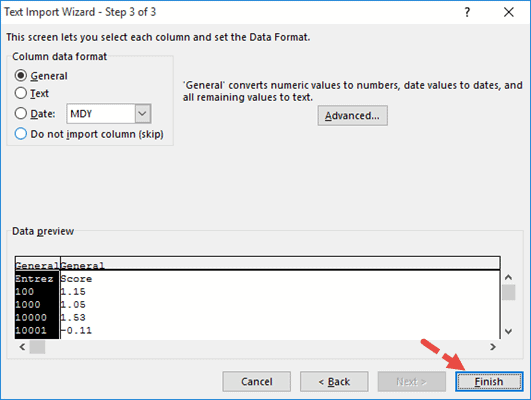
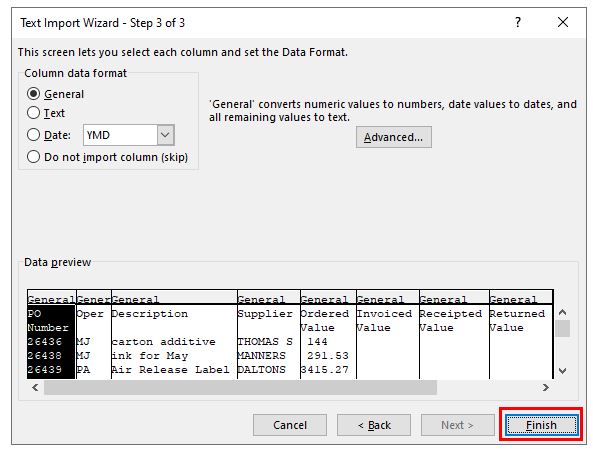
Step 3 of 3
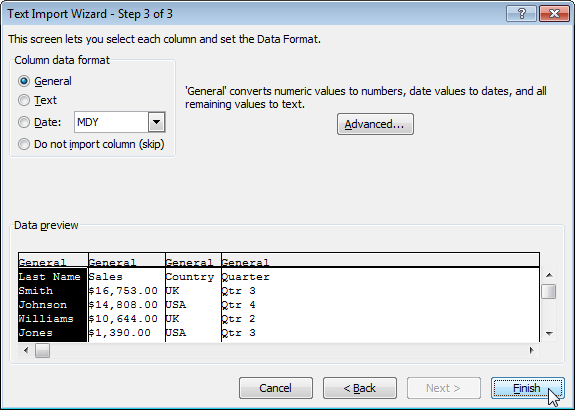
This lets you specify the data format for each column.
You can specify if you want a column to remain in the default format set by the Text Import Wizard or if you want to set the format to be General, Text, or Date.
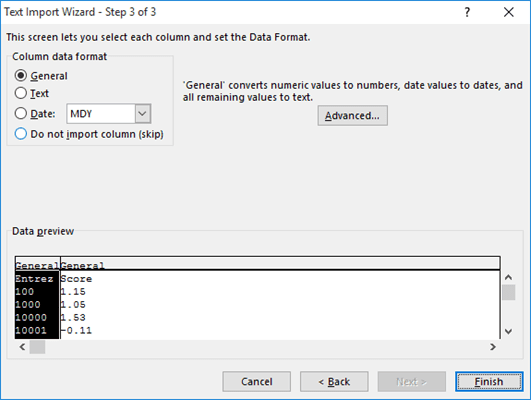
Simply select a column from the preview window and select the format you want.
If you want to remove a selected column, select the last radio button option (which says ‘Do not import column‘).
The Advanced button in this step opens the Advanced Text Import Settings dialog box.
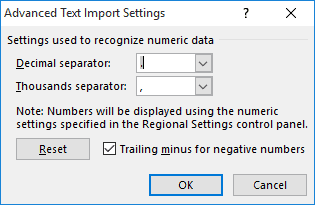
This dialog box lets you specify advanced formatting options.
For example, you can use the Advanced Text Import Settings to specify what decimal or thousands separators have been used in the text file, so that they can be made to match your computer’s regional settings.
Once you’re done providing all the settings for your imported text data, click on the Finish button.
This will open the Import Data dialog box.
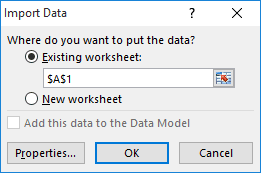
In this box, you can select where you want your text file’s data imported.
If you want to import it into the existing worksheet, you can select or type in a reference to the cell where you want Excel to start displaying the imported data.
If you want to open it in a new worksheet, however, then select the radio button next to ‘New Worksheet’.
Click OK.
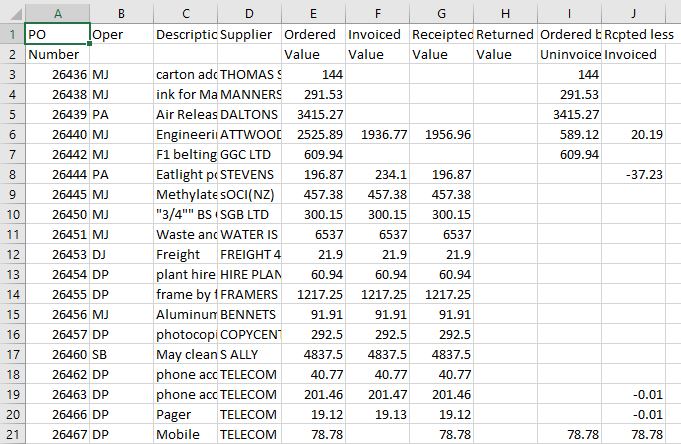
Your text file should now get imported to your selected location in Excel, with the format settings that you had specified in the Text Import Wizard.

Also read: How to Open XML Files in Excel?
Method 2: Opening a Text File Directly in Excel
You can also choose to simply open the text file directly in Excel.
While opening, Excel recognizes a text file and automatically converts it into a format that can be displayed in a spreadsheet.
All you need to do is click on the File tab, select Open and then browse and select the text file that you want to open.
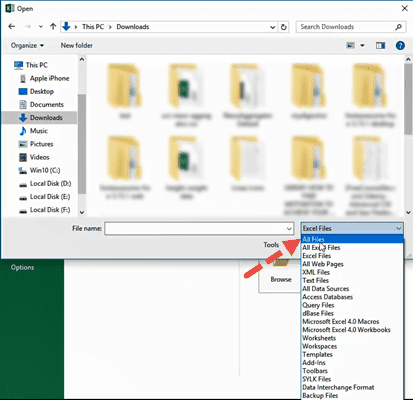
One issue that you are likely to face when trying to open a text file directly in Excel is trying to locate the file in the folder.
This is because Excel’s ‘Open File’ dialog box, by default, filters, and displays only Excel files like those with extensions ‘.xls’, ‘.xlsx’, etc.
It also displays CSV files, if your computer is set up to use Excel as the default application to open CSV files.
So if you don’t see your required text file in the folder when trying to open it in Excel, simply select ‘All Files’ from the ‘File Types’ drop-down, as shown below:
This will display the Text Import Wizard from where you can set up how you want your Text file’s data to be displayed in Excel (as shown in method 1).

You should now see your text file converted and displayed in Excel.
Once the file opens, if you still find some of the columns (or individual cells) not converted to your required format, you can convert them manually.
While this method to open the Text file directly in Excel works well, the benefit of using the first method (using Text Import Wizard) allows you to make some adjustments even before getting the data in Excel.
In this tutorial, we showed you two ways to convert and open a Text file in Excel.
A third method could be by using online tools like Online2pdf, but we did not dwell too much on this because Excel’s Text Import Wizard provides much more flexibility, allowing you to adjust your data, and format them exactly how you want them.
We hope this tutorial was helpful for you.
Other Excel tutorials you may also like:
- How to Convert a CSV File to Excel?
- How to Open VCF File in Excel?
- How to Open Excel File [xls, xlsx] Online (for FREE)
- Why does Excel Open on Startup (and How to Stop it)
- How to Make Excel File Read Only
- How to Insert an Excel file into MS Word
- How to Save Selection in Excel as PDF (3 Easy Methods)
- How to Merge Two Excel Files?
- How to Convert PDF to Excel without Software?
- How to Open DAT Files in Excel?
На онлайн курсах Excel, проводимых мной по Skype, я объясняю не только принципы создания таблиц в самом Excel, но и интеграцию данной программы пакета Microsoft Office с другими программами. В частности, рассматривается вопрос обмена данными.
Смотрите видео после статьи
видео может дополнять статью или содержать её полностью
Как известно, часто встречаются случаи, когда данные для обработки уже есть. В этом случае требуется их поместить на лист Excel и обработать нужным образом. Самый плохой вариант — перепечатать вручную. На самом деле это в большинстве случаев не нужно, поскольку можно использовать функции импорта данных, встроенные в Excel.
Если вы пользуетесь программой 1С, то вам также будет полезно узнать как сделать экспорт данных в Excel из 1С.
Когда допустимо использовать импорт в Excel
Далеко не всегда. Дело в том, что любой лист Excel состоит из отдельных ячеек, а значит данные из внешнего источника нужно вставить на лист так, чтобы они нужным образом расположились в ячейках. Как подсказывает логика, это возможно только в том случае, когда импортируемые данные имеют вполне определённую структуру. Например, это могут быть регулярно повторяющиеся блоки данных (строки).
Если данные не имеют выраженной структуры, то автоматизировать процесс их импорта в Excel не получится.
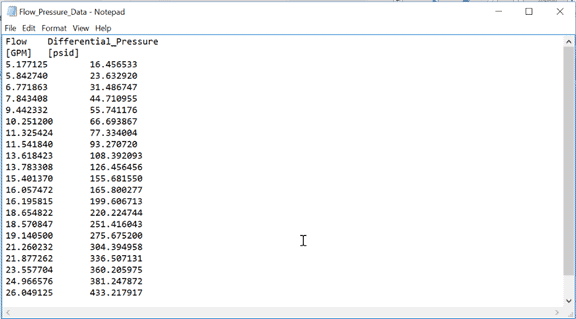
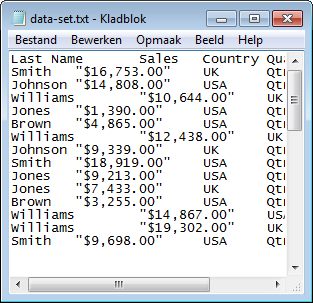
Пример хорошо структурированных данных показан на рисунке ниже (текст в блокноте).
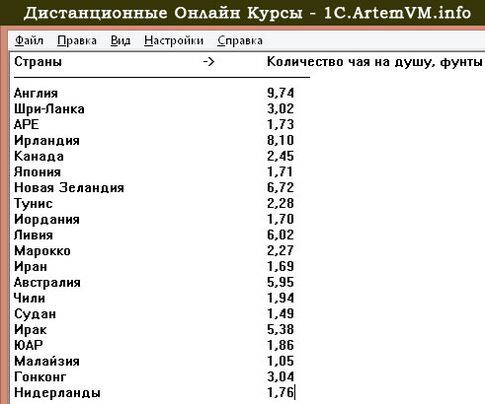
[нажмите на картинку для увеличения]
Справка: как сохранять фото с сайтов
В данном примере текст разделён на столбцы и строки. Также обратите внимание на то, что в качестве разделителей целой и дробной частей чисел везде использована запятая. Если бы использовалась то точка, то запятая, пришлось бы предварительно привести текст к некоторому единообразию посредством поиска и замены.
Как использовать мастер импорта текста в Excel
Чтобы преобразовать таблицу в блокноте в таблицу Excel, копируем текст и вставляем его на лист Excel. При этом получается следующая картина.

[нажмите на картинку для увеличения]
Справка: как сохранять фото с сайтов
Оставлять в таком виде таблицу нельзя. Нажимаем на значок меню в правом нижнем углу и выбираем пункт «Использовать мастер импорта текста«. Назначение данного инструмента — указать Excel, как именно структурирован вставляемый текст, чтобы программа могла его разбить на ячейки так, как нам нужно (если значок пропал, то просто отменить вставку и повторить заново).
[нажмите на картинку для увеличения]
Справка: как сохранять фото с сайтов
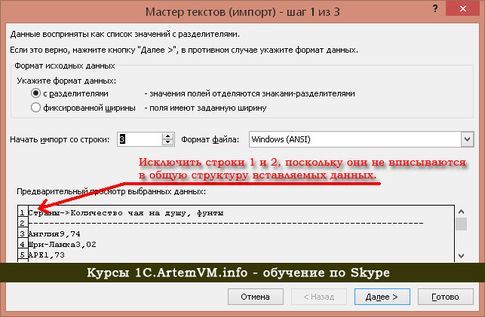
В нижней части окна отображается текст, структуру которого мы пока ещё не объяснили программе. Именно поэтому он выглядит не так, как нужно. Сразу можно заметить, что заголовок таблицы отличается по форматированию от данных под ним, поскольку вместе с пробелами (или табуляциями) там есть ещё символы «->». Строка под заголовком также нам не нужна, поэтому начинаем импорт с третьей строки. И переходим к следующему шагу в мастере импорта текста.
[нажмите на картинку для увеличения]
Справка: как сохранять фото с сайтов
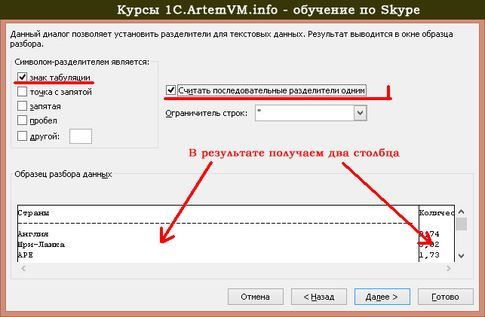
Здесь потребуется указать, какой символ (или символы) является разделителем столбцов в таблице, скопированной из блокнота. В данном случае я определил, что это табуляция, причём, как правило, несколько, поэтому настройки будут выглядеть так, как показано на рисунке выше.
Вопрос: а вы умеете различать символы табуляции и пробел? (я имею ввиду уже кем-то написанный текст!). На онлайн курсах Word мы это разбираем.
Нажимаем Далее и переходим к следующему шагу.

[нажмите на картинку для увеличения]
Справка: как сохранять фото с сайтов
На заключительном этапе требуется указать тип данных в каждом столбце. По умолчанию — Общий. Какой тип данных указывать, зависит от того, что в столбцах, а также для чего потом будет использоваться эта таблица. Я это подробно рассматриваю на курсах Microsoft Excel. Сейчас для простоты данный шаг просто пропускаю, поскольку в данном случае (почему?) это не обязательно. В результате получим следующее.

[нажмите на картинку для увеличения]
Справка: как сохранять фото с сайтов
Добавим заголовок (можно также импортом, а можно вручную) и отформатируем таблицу. И вот конечный результат.

[нажмите на картинку для увеличения]
Справка: как сохранять фото с сайтов
Подведём итоги
Функция импорта текста в Microsoft Excel позволяет экономить время при создании таблиц в том случае, если данные для таблицы уже есть в другой программе.
Уникальная метка публикации: 73E6AC6D-8C0B-9484-3676-3590E5F10B3F
Источник: //artemvm.info/information/uchebnye-stati/microsoft-office/import-teksta-v-excel/
Importing text files into Excel comes up very often in engineering because there are many different types of engineering software that export text files. Often, you’ll need to bring data from data acquisition, remote measurement, CAD programs, or finite element software into Excel for further examination. So it’s really good to be able to know how to get that data into Excel without a lot of hassle so you can quickly perform your analysis.
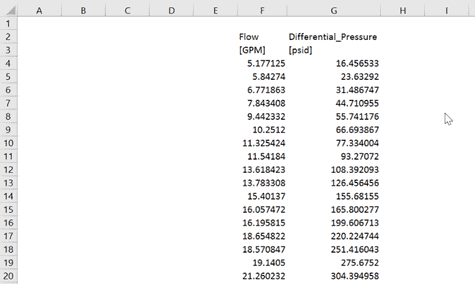
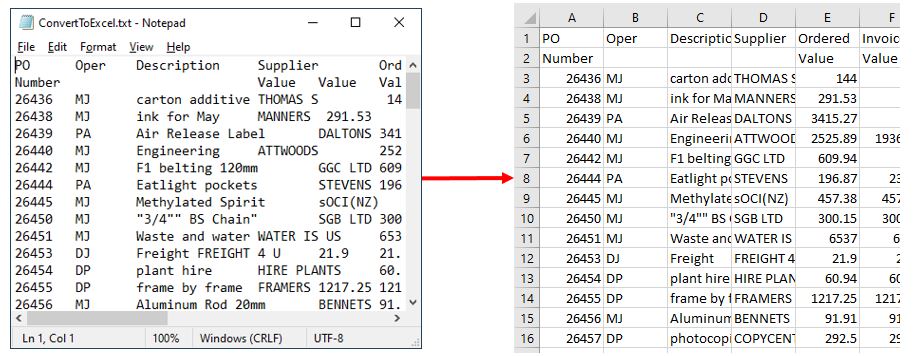
In this particular example, I have some data in a text file called Flow_Pressure_Data.txt.
Copy-and-Paste
The simplest way to get this data into Excel, although it may not be the best, is just to highlight it, type Ctrl+C to copy it, then select a cell in the workbook, and type Ctrl+V to paste it.
If the text data contains tab-separated-values, meaning that the columns of data are separated by a tab-stop character, then the data will automatically split into columns in Excel.
In this case, the data was separated into tabs, and everything came into columns like we’d want.
However, once the data has been pasted into Excel, there is really no good way to refresh it later on if the source file changes. The only way to update it is to re-paste the data. And maybe that’s ok for some situations. But if it’s not, we can use a text data import in Excel to create a refreshable table of data from a text file.
You can find this command under the Data tab in the “Get External Data” group.

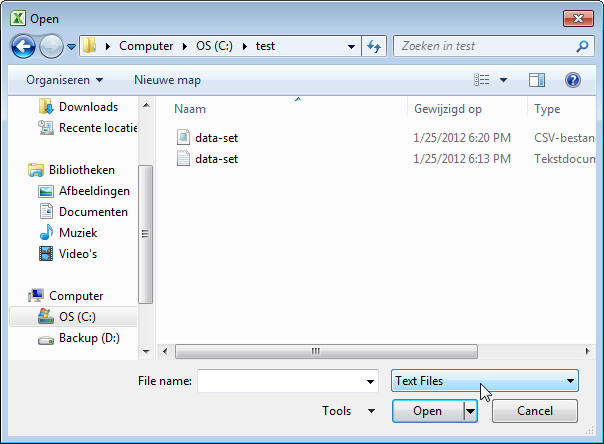
By clicking on that button, we’re given the option to select a text file. And once I select the text file, the Text Import Wizard opens.
There are more details to Text Import Wizard that I’ll cover in another post, but for now click Next twice and then Finish.
Now Excel is asking where to put the data. The cell that is selected is going to be the top left corner of the imported data.
If I select cell F2, that selection will be represented in the window. You can also choose to import the data to a new sheet.
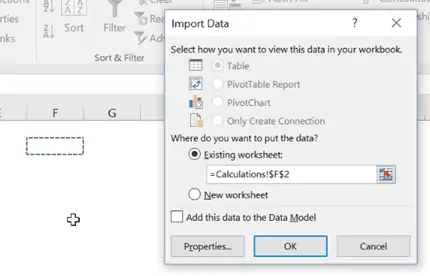
So once the location for the data is selected, I can click Ok and the data is added to the worksheet starting at cell F2.
Modifying Text Import Properties
As I mentioned above, if you copy-and-paste data into Excel there’s no way to update it without copying and pasting again. But if you import a text file into Excel, there are many more options. We can see what those options are by right-clicking anywhere on the imported data.
Now there are three extra commands to select in the context menu that were not available before:
- Edit Text Import
- Data Range Properties
- Refresh
By selecting Edit Text Import, we can select a new file to import – which will take us through the whole text import wizard again.
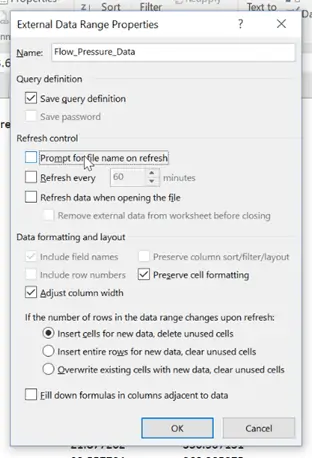
The next command allows us to set the Data Range Properties. By clicking on that, the Properties window opens. From this window we can change things like the name or whether or not the query definition should be saved.
Refreshing Imported Text Data
You can also control how the text data is refreshed. You could choose to update the data on a fixed schedule or whenever the workbook is opened. You can also choose whether or not to prompt for the file name every time the data is refreshed. If I know that the file name will be the same each time I like to unselect the box, so I’ll do that here.
I’m going to click OK in the Data Range Properties window and open up the text file again. I’ll change the first flow value to 5.0 and the first pressure value to 20.0, and then save it.
Next I’ll go back to Excel, right-click on the import data, and select “Refresh” way at the bottom.
Excel will then go back out to the text file and re-query the data and pull in the updated values.
Wrap-Up
Hopefully you can see how importing a text file into Excel can be so much more powerful than simply copying and pasting the data. I use this feature quite often when I need to update the data in a spreadsheet from software sources outside of Excel.
Перейти к содержанию
На чтение 2 мин Опубликовано 21.06.2015
- Импорт
- Экспорт
Эта статья описывает, как импортировать или экспортировать текстовые файлы. Текстовые файлы могут быть разделены запятыми (.csv) или знаками табуляции (.txt).
Импорт
Чтобы импортировать текстовые файлы, следуйте нашей инструкции:
- На вкладке File (Файл) кликните Open (Открыть).
- Из выпадающего списка выберите Text Files (Текстовые файлы).
- Чтобы импортировать файл …
- CSV, выберите документ с расширением .csv и нажмите кнопку Open (Открыть). Это всё.
- TXT, выберите документ с расширением .txt и кликните по Open (Открыть). Excel запустит Text Import Wizard (Мастер текстов (импорт)).
- Выберите Delimited (С разделителями) и нажмите Next (Далее).
- Уберите все галочки кроме той, что напротив Tab (Знак табуляции) и кликните Next (Далее).
- Нажмите Finish (Готово).
Результат:

Экспорт
Чтобы экспортировать книгу Excel в текстовый файл, сделайте следующее:
- Откройте документ Excel.
- На вкладке File (Файл) нажмите Save As (Сохранить как).
- Из выпадающего списка выберите Text (Tab delimited) (Текстовые файлы (с разделителями табуляции)) или CSV (Comma delimited) (CSV (разделители – запятые)).
- Нажмите Save (Сохранить).
Результат: CSV файл (разделенный запятыми) и TXT файл (разделённый знаками табуляции).

Оцените качество статьи. Нам важно ваше мнение:
Skip to content
![]()
Microsoft quietly replaced the comfortable Text Import Wizard from Excel and replaced it with the “Get & Transform” tools. The “Get & Transform” tools offer a lot of options and are very powerful. Unfortunately, they are quite complicated to use. Here is what you should now.
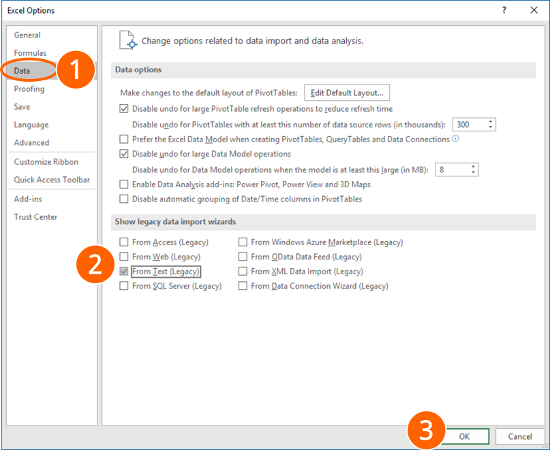
In a hurry? Click on “File” –> “Options” –> “Data” and set the corresponding checkmarks for reactivating the “Text Import Wizard” in Excel. Start the text import by clicking on “Data” –>”Get Data” –> “Legacy Wizards” –> “From Text (Legacy)”.
Introduction
In Excel 365 (only) 2016 (since version 1704) the “Text Import Wizard” was removed. It was replaced by the powerful “Get & Transform” tools. The “Get & Transform” tools also provide a function to import text and CSV files into Excel.
You have the following two options:
- Luckily, the comfortably “Text Import Wizard” still exists. You can re-activate and use it for importing text and csv files into Excel.
- Use the import function of the “Get & Transform” tools.
Restore the “Text Import Wizard”
The good news: You can easily restore the “Text Import Wizard”. Unfortunately, the option for re-activating them is hidden.
Follow these steps:
- Click on File and then on “Options”. Go to “Data” on the left-hand side.
- In the lower section of the window you can select the wizard you’d like to restore. For only importing text- or csv-files, select “From Text (Legacy)”. Feel free to also activate the corresponding wizard for importing Access files, files from web, from SQL servers and so on.
- Confirm with OK.
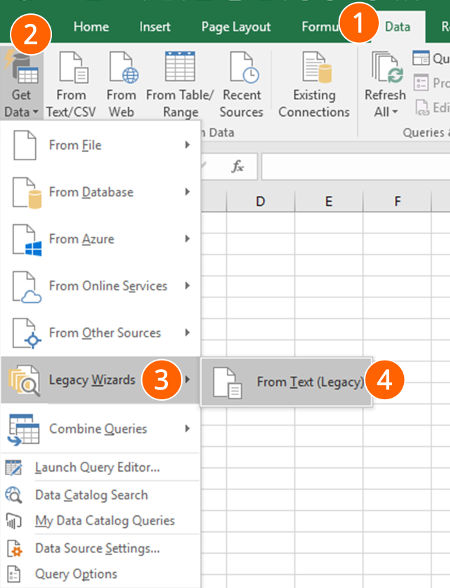
Now, you can find the so-called “Legacy Wizards” in the “Get Data” drop-down menu. In order to use them, follow these steps:
- Go to the “Data” ribbon.
- Click on “Get Data” on the left-hand side.
- Next, go to “Legacy Wizards”.
- Click on “From Text (Legacy)”.
How to use the “Text Import Wizard”
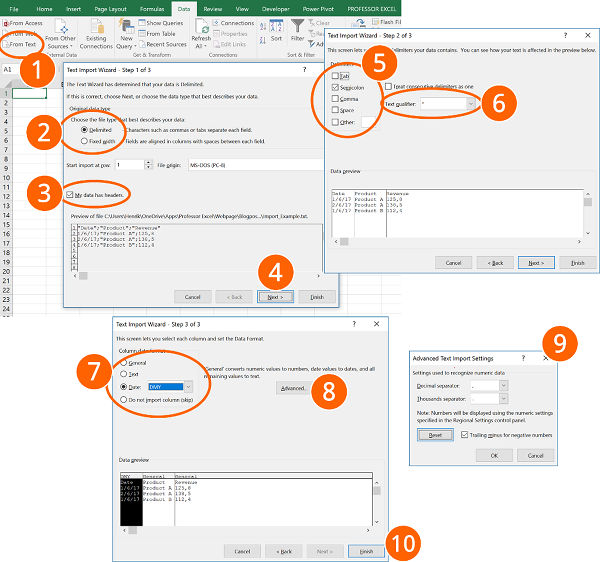
The steps for using the “Text Import Wizard” in Excel are shown in the screenshots.
- Go to the “Data” ribbon and click on “From Text”. If you have a recent Excel version and there is no button called “From Text” (but instead “From Text/CSV”), click on “Get Data”, then on “Legacy Wizards” and then on “From Text (Legacy)”. Please refer to the paragraph above if this option is missing.
- Select how you want to define the columns: Either with a character as a separator or with a fixed width.
- If the first row contains headers, check the corresponding box.
- Continue with “Next >”.
- Select the delimiter. This is the character dividing the data into columns, for example “Tab”, “Semicolon” or “Comma”.
- Usually text fields use quotation marks marking the beginning and end of a text field.
- For each column, you can choose the data format. For dates, you could define the order of days, months and years.
- Click on “Advanced”…
- …for defining decimals and thousands separators.
- Finalize the import by clicking on “Finish”.
Import text and csv files with the “Get & Transform” tools
Importing text files in Excel with the “Get & Transform” tools requires many steps. Please refer to the numbers on the screenshots:
- Click on “From Text/CSV” on the “Data” ribbon in order to start the import process.
- Choose the delimiter (e.g. semi-colon, comma etc.). Here you can also switch to “Fixed Width”. If you want to separate your import data with the “Fixed Width” option, you have to type the numbers of characters, after which you want to data to be divided.
- For further options (e.g. switching thousands- and decimal separators) click on “Edit”.
- If you data is not represented correctly, delete the automatically created step “Changed Type”.
- Change the date format: Right-click on a column that contains a date. Alternatively click on the small “ABC” symbol in the top left corner of the column heading.
- Move the mouse to “Change Type”.
- Click on “Using Locale…”.
- Select “Date”.
- Select the locale format for dates. In this example, the German date format is used.
- Confirm with OK. Repeat the steps 5 to 10 for each date column.
Recommendation: Select several date columns at the same time by pressing and holding the Ctrl key while selecting the columns. - Change the decimal and thousand separators: Right-click again on a column with decimal numbers.
- Move the mouse to “Change Type”.
- Click on “Using Local…”.
- Choose “Decimal Number”.
- Select the local number format. Please refer to this article for a list of local number formats.
- Confirm with “OK”.
- Last step: Insert the data into a worksheet. In order to achieve this, click on “Close & Load” in the top-left corner.

Henrik Schiffner is a freelance business consultant and software developer. He lives and works in Hamburg, Germany. Besides being an Excel enthusiast he loves photography and sports.
We use cookies on our website to give you the most relevant experience by remembering your preferences and repeat visits. By clicking “Accept”, you consent to the use of ALL the cookies.
.
Often you need to import data to the Excel spreadsheet from a text file. Microsoft Excel offers a Text Import Wizard to import data from different text file formats:
- Comma-separated files (.csv) or tab-separated files (.txt), see how to import data from a structured text file,
- Files with fixed-width columns without delimiters between data columns where data starts at fixed positions of the line:

To import data from a text file, do the following:
1. On the File tab, click Open (or click
Ctrl+O).
2. On the Open pane, click the Browse button:

3. On the Open dialog box:
- Select the path to the text file you want to import,
- From the File Type dropdown list, select All Files or Text Files:

- Click the Open button.

4. In the Text Import Wizard – Step 1 of 3 dialog box:
4.1. In the Original data type group, choose the Fixed width option:

Note: If you see delimiters, leave the option Delimited selected and follow the steps of importing a structured text file.
4.2. You can change the File origin to use another encoding to display the data (you need to know the character encoding for the data or try other encodings until you see the correct data in the preview section):

4.3. Click the Next > button.
5. In the Text Import Wizard – Step 2 of 3 dialog box:

5.1. Create, move, and delete break lines:

5.2. Click the Next > button.
6. In the Text Import Wizard – Step 3 of 3 dialog box:
6.1. Select the column and the appropriate data format for this column in the Column data format group:

Notes:
- You can skip this step and format columns after importing.
- You can click the Advanced… button to select the correct Decimal separator and Thousands separator (see how to change the used by default decimal symbol and digit grouping symbol):

- You can ignore some columns for importing by selecting the Do not import column (skip) in the Column data format group (the second column Session in the previous example).

6.2. Repeat the previous step for all columns you want to import and click Finish.
Excel imports all the data you selected:

See also this tip in French:
Comment importer un fichier texte dans la feuille de calcul Excel.
See all How-To Articles
This tutorial demonstrates how to open a text file in Excel and Google Sheets.
Open Text File in Excel
- In the Ribbon, select File > Open > Browse, and then select the text or CSV file to be opened.
The Text Import Wizard opens to the first of three steps.
- Depending on the data contained in the file selected, you can either choose Delimited or Fixed Width as the file type. If the data is separated with a character like a comma, semicolon, space, or tab, select Delimited. If the first row of data contains column headings, check My data has headers.
- Click Next.
- In Step 2, select the type of delimiters contained in the text file – in this case the tab delimiter. Then select the text qualifier. In some cases, the data may be enclosed in quotes, but for this example, (none) is selected as the text qualifier.
- Click Next.
- The final step of the text import wizard allows you to specify the data type contained in each column. Most of the time, Excel is able to determine the data type automatically, and you can leave the selected Column data format on General.
- Click Finish to import the data into Excel.
Import Text File Using Get Data
An alternative way of importing data into Excel from a text file, is to use the Get and Transform Data feature.
- In the Ribbon, select Data > Get and Transform Data > From Text/CSV.
- Select the file to be imported, and then click Import.
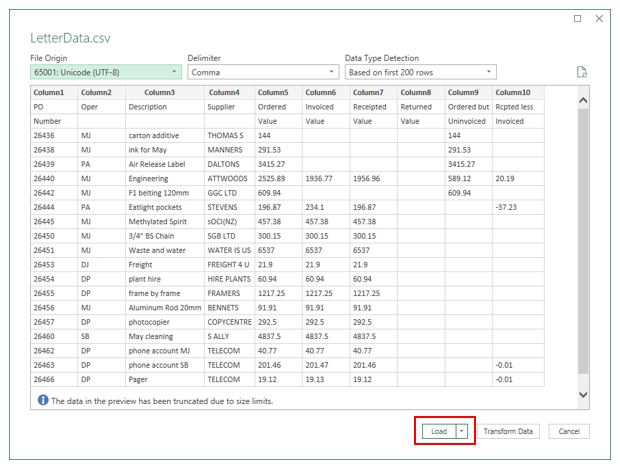
- The file appears in a dialog box with the delimiter already automatically selected, and the text divided by Excel according to the data stored in the text file. Click Load to load the data into Excel.
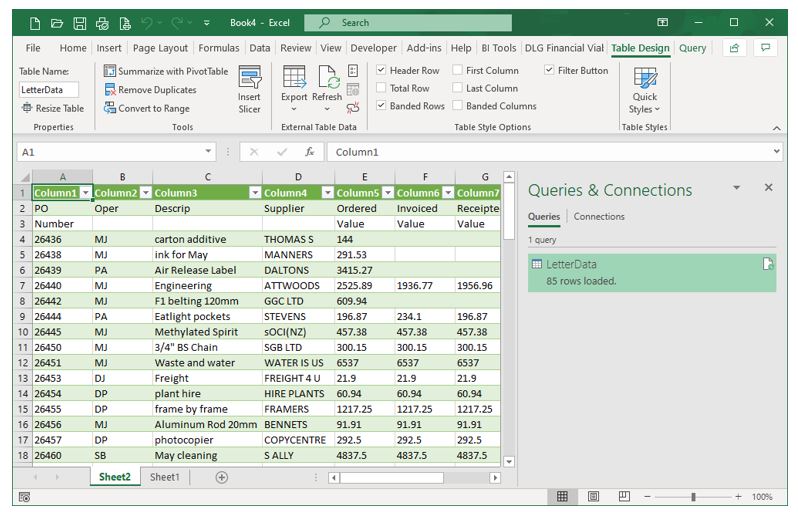
The data now appears in a new sheet in Excel. There are now two new tabs on the Ribbon – Table Design and Query – as well as a Queries & Connections pane appearing on the right-hand side of the screen. This shows that the data is linked to the TXT file and if any data in the TXT file was to change (external to Excel), the data displayed in Excel would change too.
- To unlink the imported data from the external TXT file, in the Ribbon, select Table Design > External Table Data > Unlink.

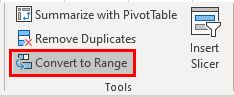
- The data is imported into Excel as a table. To convert it to a standard Excel range, in the Ribbon, select Table Design > Tools > Convert to Range.
Both the Table Design and Query tabs on the Ribbon disappear.
Open Text File in Google Sheets
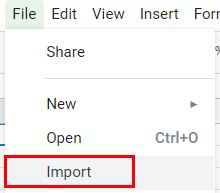
- From the File menu in Google Sheets, select Import.
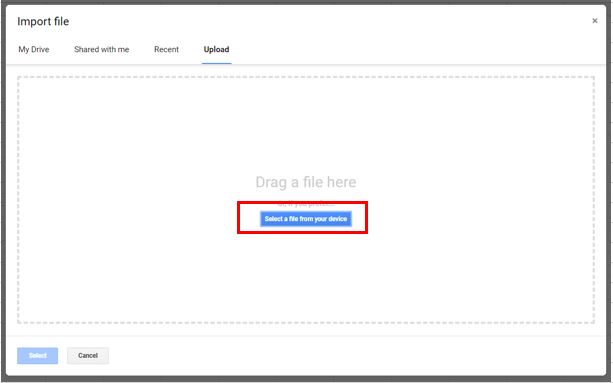
- Click Upload, and then click on the blue Select a file from your device button to select the required file.
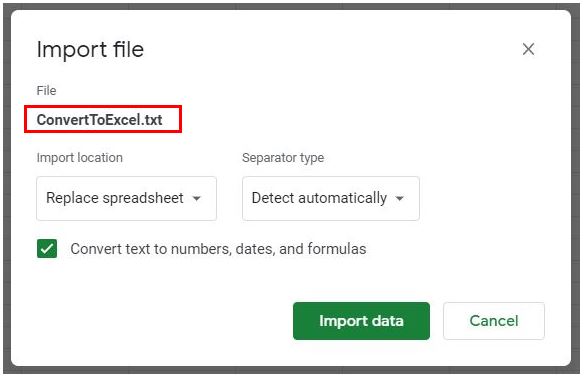
The name of the file to be imported is displayed under File with the default options available for importing automatically selected.
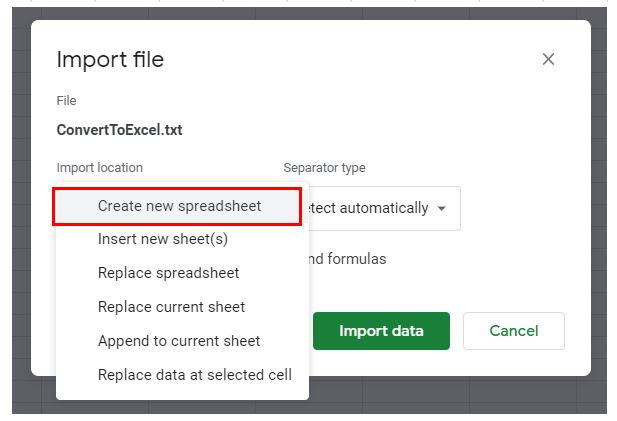
- To change the Import Location, click the drop-down list under Import Location and select the option required.
To change the Separator type, click the drop-down list on the right and select a character to delineate by.

- Keep Convert text to numbers, dates, and formulas checked and then click Import Data to import the file into a new Google sheet.
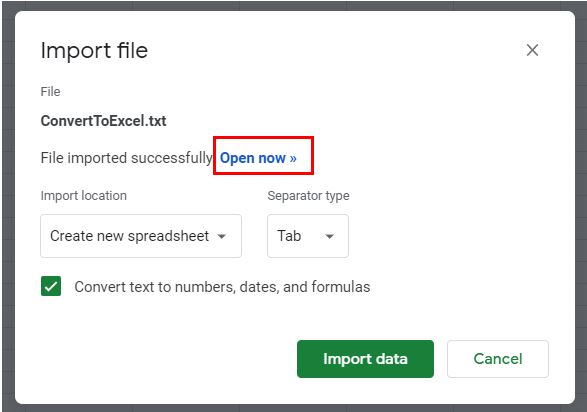
- Click Open now.