Содержание
- Процедура преобразования из формата HTML в Эксель
- Способ 1: использование сторонних программ
- Способ 2: преобразование с помощью стандартных инструментов Excel
- Вопросы и ответы
Потребность преобразовать таблицу с расширением HTML в форматы Excel может наступить в различных случаях. Возможно, нужно конвертировать данные веб-страницы из интернета или файлы HTML, использовавшиеся локально для других нужд специальными программами. Довольно часто производят конвертацию транзитом. То есть, сначала переводят таблицу из HTML в XLS или XLSX, потом выполняют её обработку или редактирование, а потом снова преобразуют в файл с прежним расширением для выполнения его первоначальной функции. Это связано с тем, что с таблицами намного проще работать именно в Excel. Давайте узнаем, как можно перевести таблицу из формата HTML в Эксель.
Читайте также: Как перевести HTML в Word
Формат HTML является языком гипертекстовой разметки. Объекты с данным расширением чаще всего применяются в интернете, как статические веб-страницы. Но нередко они могут использоваться и для локальных нужд, например, как документы справки к различным программам.
Если возникает вопрос конвертации данных из HTML в форматы Excel, а именно XLS, XLSX, XLSB или XLSM, то неопытный пользователь может взяться за голову. Но на самом деле ничего страшного тут нет. Конвертация в современных версиях Excel встроенными инструментами программы выполняется довольно просто и в большинстве случаев относительно корректно. Кроме того, можно сказать, что сам процесс интуитивно понятен. Тем не менее, в сложных случаях можно воспользоваться для конвертации сторонними утилитами. Давайте рассмотрим различные варианты преобразования HTML в Excel.
Способ 1: использование сторонних программ
Сразу давайте остановимся на использовании сторонних программ для перевода файлов из формата HTML в Эксель. Преимущества данного варианта заключаются в том, что специализированные утилиты способны справляться с конвертированием даже очень сложных объектов. Недостаток заключается, в том, что подавляющее большинство из них платное. Кроме того, на данный момент практически все достойные варианты англоязычные без русификации. Давайте рассмотрим алгоритм работы в одной из самых удобных программ для выполнения вышеуказанного направления конвертации — Abex HTML to Excel Converter.
Скачать Abex HTML to Excel Converter
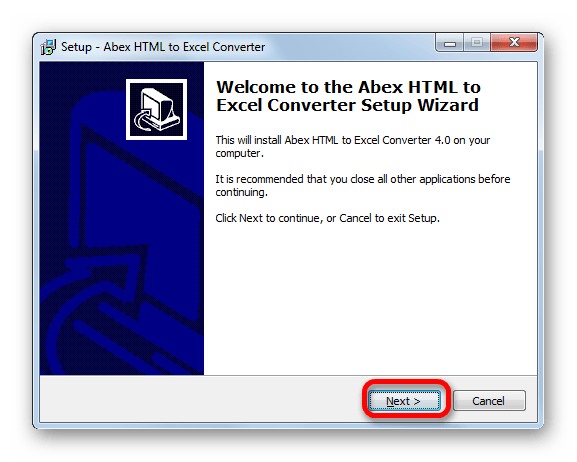
- После того, как был скачан инсталлятор программы Abex HTML to Excel Converter, запускаем его, выполнив по нему двойной щелчок левой кнопкой мыши. Открывается приветственное окно установщика. Щелкаем по кнопке «Next» («Далее»).
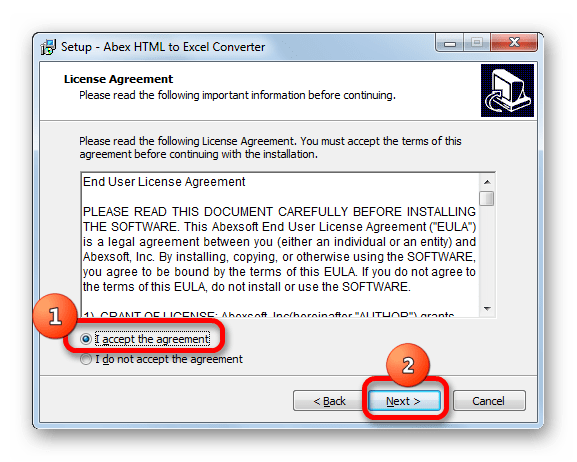
- Вслед за этим открывается окно с лицензионным соглашением. Для того, чтобы согласится с ним, следует поставить переключатель в позицию «I accept the agreement» и щелкнуть по кнопке «Next».
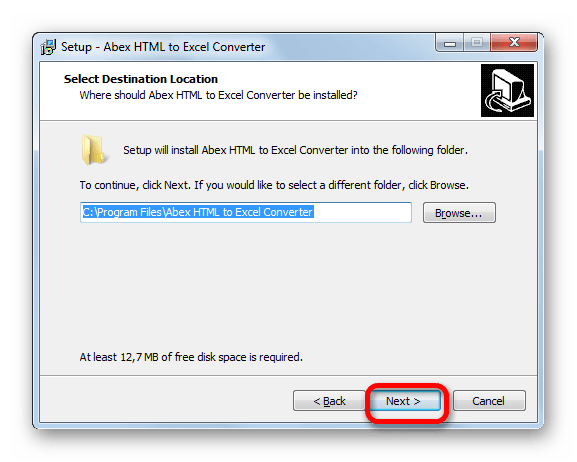
- После этого открывается окно, в котором указывается, куда именно будет устанавливаться программа. Конечно, при желании можно изменить директорию, но без особой нужды делать это не рекомендуется. Так что просто жмем на кнопку «Next».
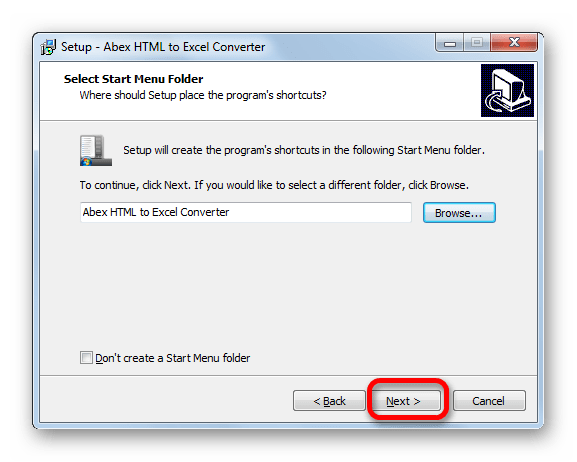
- В следующем окне указывается, каковым будет название программы, отображаемое в стартовом меню. Тут тоже можно просто нажать на кнопку «Next».
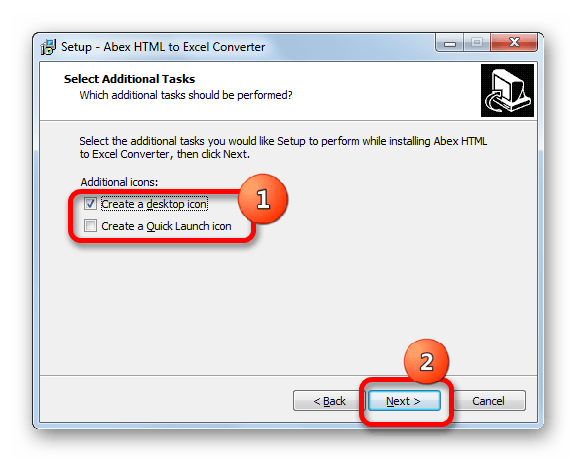
- В следующем окне предлагается путем выставления галочек установить иконку утилиты на рабочий стол (по умолчанию включено) и на панель быстрого запуска. Выставляем данные настройки согласно своим предпочтениям и жмем на кнопку «Next».
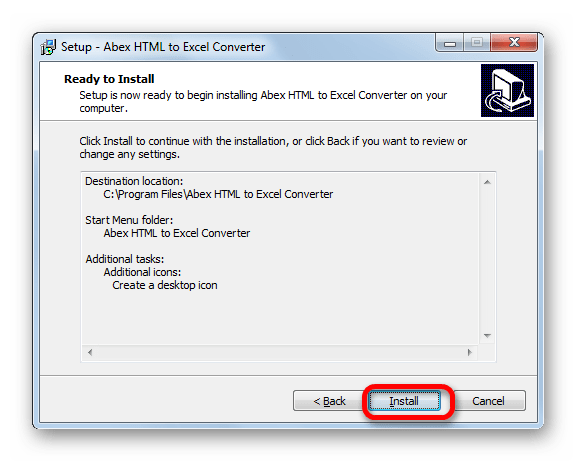
- После этого запускается окно, где обобщена вся информация о всех тех настройках установки программы, которые пользователь внес ранее. Если пользователя что-то не удовлетворяет, то он может нажать на кнопку «Back» и произвести соответствующее редактирование настроек. Если же он со всем согласен, то для начала установки следует нажать на кнопку «Install».
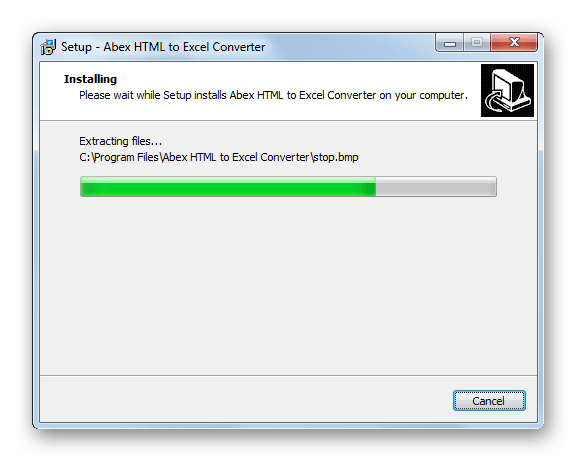
- Происходит процедура установки утилиты.
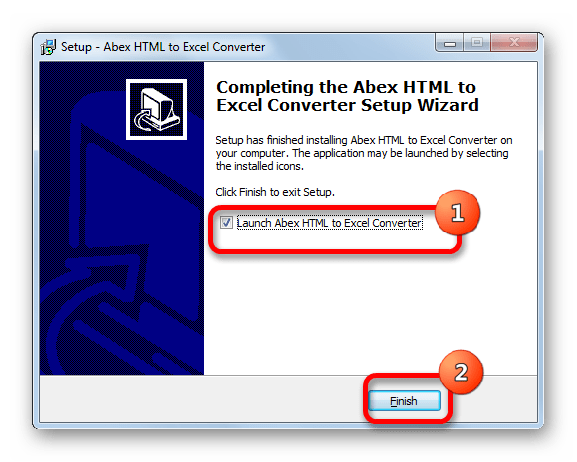
- После её завершения запускается окно, в котором сообщается об этом. Если пользователь хочет тут же запустить программу автоматически, то он должен проследить, чтобы около параметра «Launch Abex HTML to Excel Converter» была установлена галочка. В обратном случае нужно снять её. Для выхода из окна установки следует нажать на кнопку «Finish».
- Важно знать, что перед запуском утилиты Launch Abex HTML to Excel Converter, как бы он не проводился, вручную или сразу после установки приложения, следует завершить работу и закрыть все программы пакета Microsoft Office. Если вы этого не сделаете, то при попытке открыть Abex HTML to Excel Converter откроется окошко, в котором будет сообщаться, о необходимости выполнить данную процедуру. Чтобы перейти к работе с утилитой, нужно нажать в этом окне на кнопку «Yes». Если при этом офисные документы открыты, то работа в них принудительно будет завершена, а все несохраненные данные потеряны.
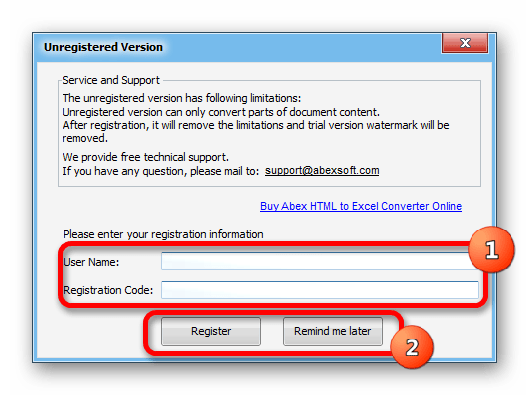
- Затем будет запущено окно регистрации. Если вы приобрели регистрационный ключ, то в соответствующих полях требуется ввести его номер и ваше имя (можно псевдоним), а после этого нажать на кнопку «Register». Если вы пока ключ не приобрели и хотите испытать урезанную версию приложения, то в этом случае просто нажмите на кнопку «Remind me later».
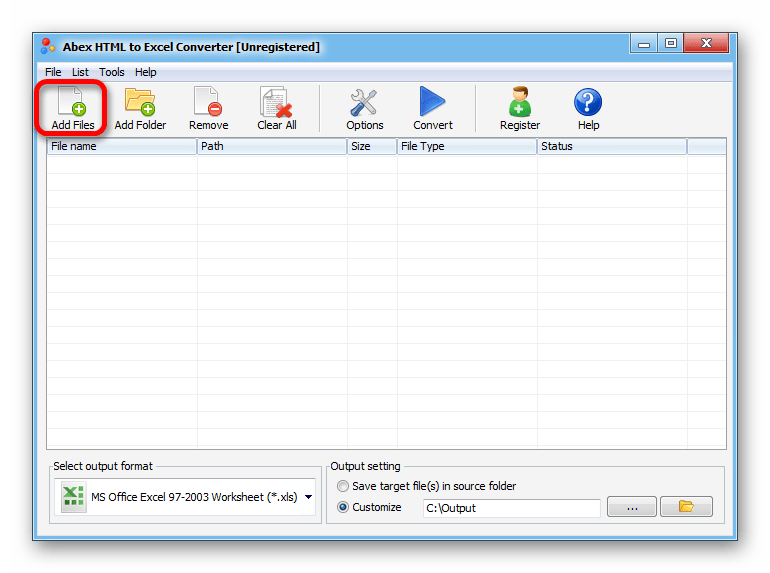
- После выполнения вышеуказанных действий запускается непосредственно окно программы Abex HTML to Excel Converter. Для добавления файла в формате HTML для конвертации следует нажать на кнопку «Add Files».
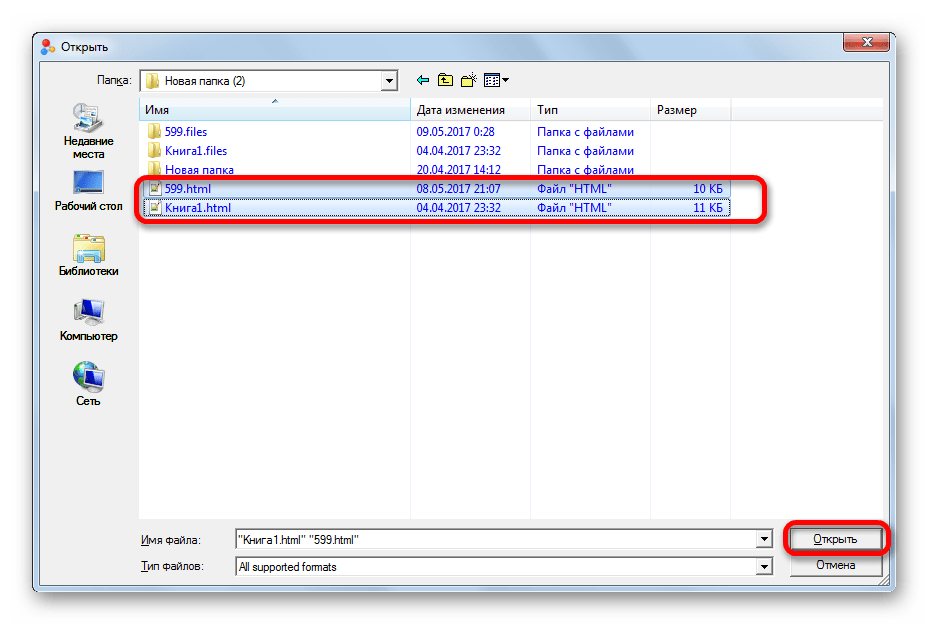
- После этого открывается окно добавления файла. В нем нужно перейти в категорию, где находятся объекты, предназначенные для конвертации. Затем нужно их выделить Преимущество данного способа перед стандартным преобразованием HTML в Excel заключается в том, что можно выбирать и конвертировать сразу несколько объектов. После того, как файлы выделены, жмем на кнопку «Открыть».
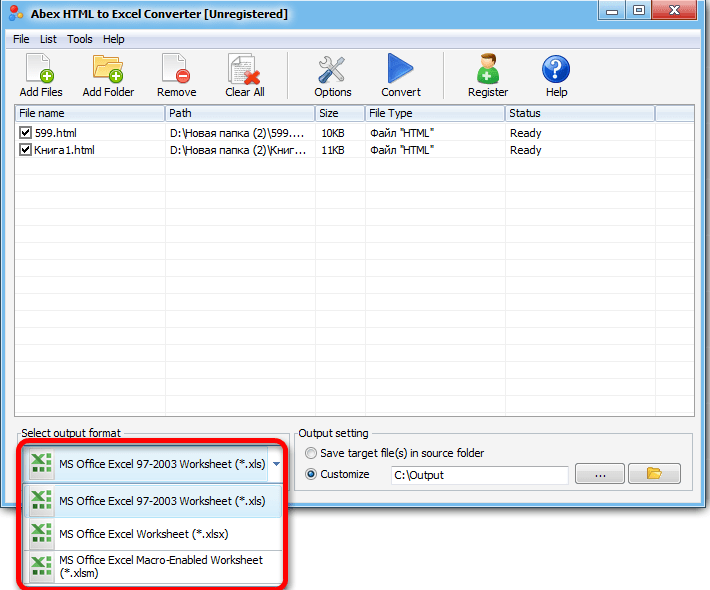
- Выбранные объекты будут отображены в основном окне утилиты. После этого кликаем по левому нижнему полю, чтобы выбрать один из трех форматов Excel, в которые можно преобразовать файл:
- XLS (по умолчанию);
- XLSX;
- XLSM (с поддержкой макросов).
Делаем выбор.
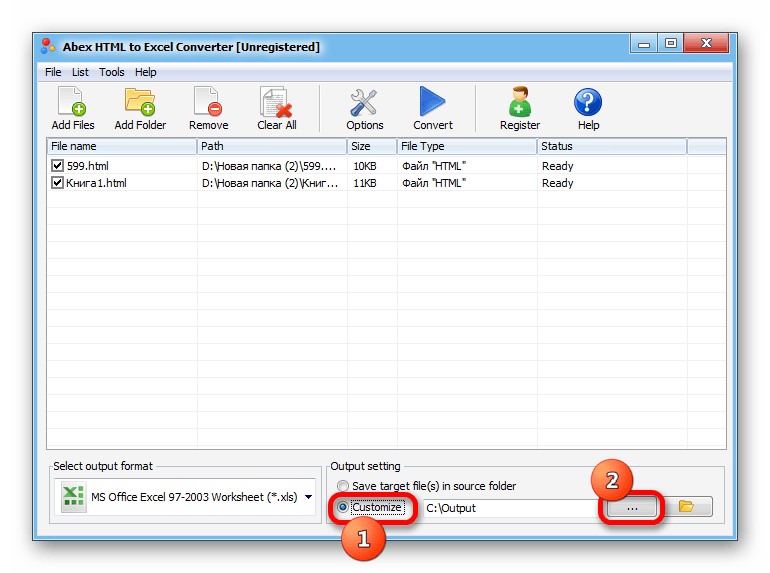
- После этого переходим к блоку настроек «Output setting» («Настройка вывода»). Тут следует указать, где именно будут сохраняться преобразованные объекты. Если выставить переключатель в позицию «Save target file(s) in source folder», то таблица будет сохраняться в той же директории, где расположен исходник в формате HTML. Если же вы желаете сохранять файлы в отдельной папке, то для этого следует переставить переключатель в позицию «Customize». При этом по умолчанию объекты будут сохраняться в папке «Output», которая в свою очередь размещена в корневом каталоге диска C.
Если вы желаете сами указать место сохранения объекта, то следует кликнуть по кнопке, расположенной справа от поля с адресом.
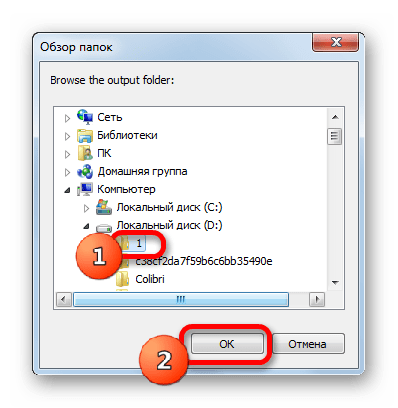
- После этого открывается окошко с обзором папок. Вам необходимо переместиться в ту директорию, которую хотите назначить местом сохранения. Затем следует нажать на кнопку «OK».
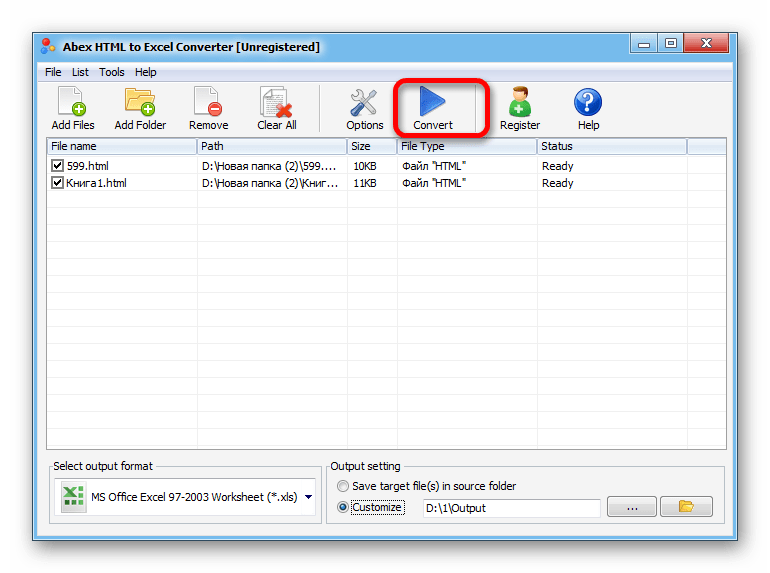
- После этого можно приступить непосредственно к процедуре конвертации. Для этого на верхней панели следует нажать на кнопку «Convert».
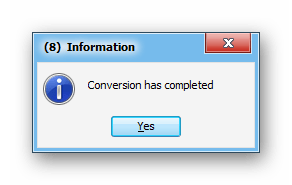
- Затем будет выполнена процедура преобразования. После её завершения откроется небольшое окошко, в котором сообщается об этом, а также автоматически запустится Проводник Windows в той директории, где расположены конвертированные файлы в формате Excel. Теперь с ними можно проводить любые дальнейшие манипуляции.
Но нужно учесть, что если вы используете бесплатную пробную версию утилиты, то будет выполнена конвертация только части документа.
Способ 2: преобразование с помощью стандартных инструментов Excel
Также конвертировать файл HTML в любой формат Excel можно довольно легко и при помощи стандартных инструментов данного приложения.
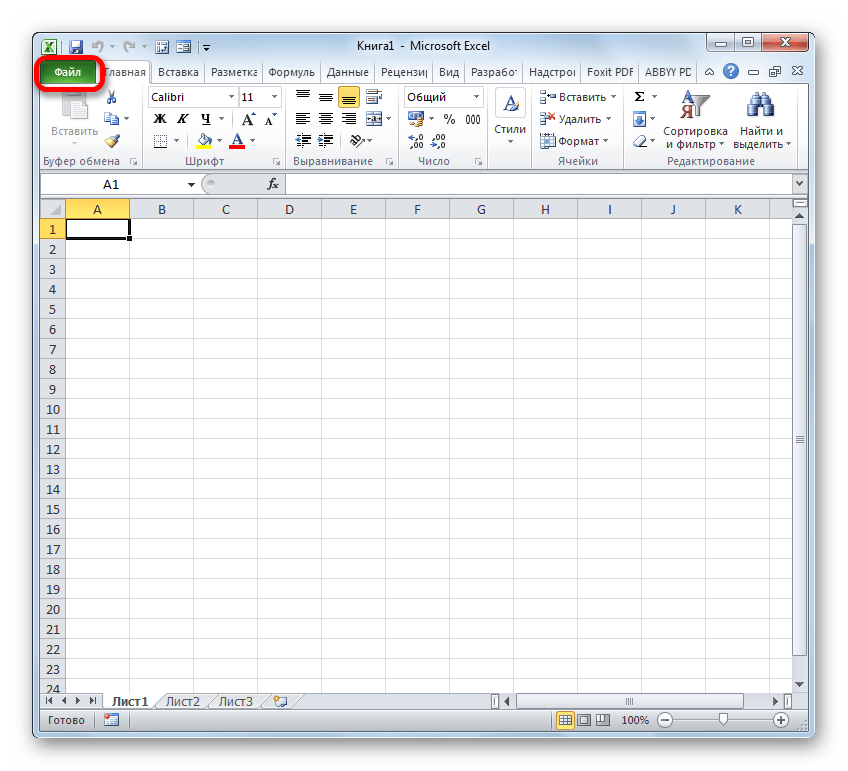
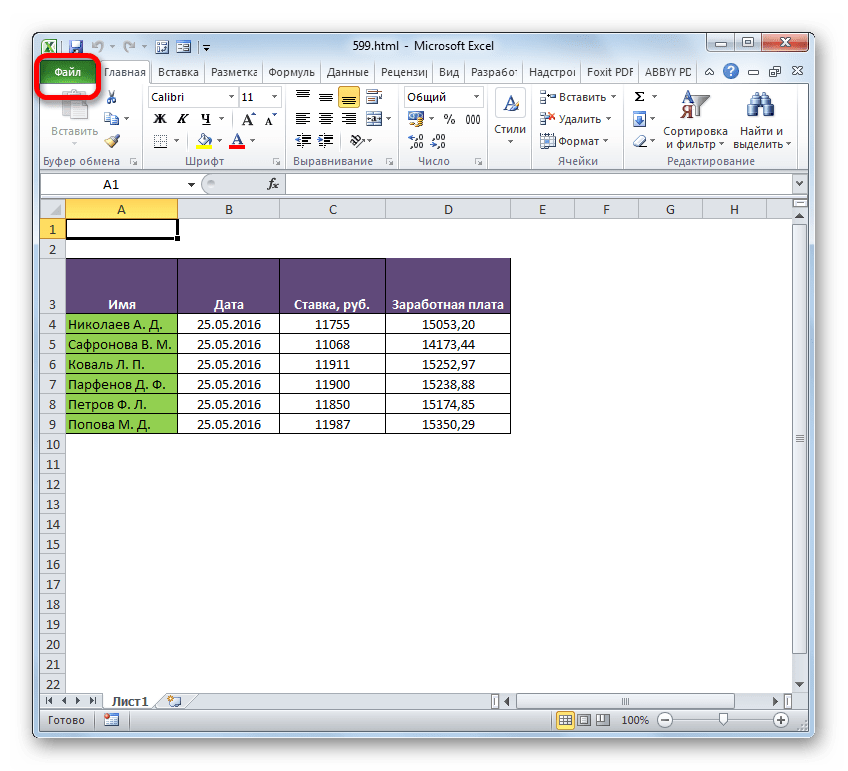
- Запускаем Эксель и переходим во вкладку «Файл».
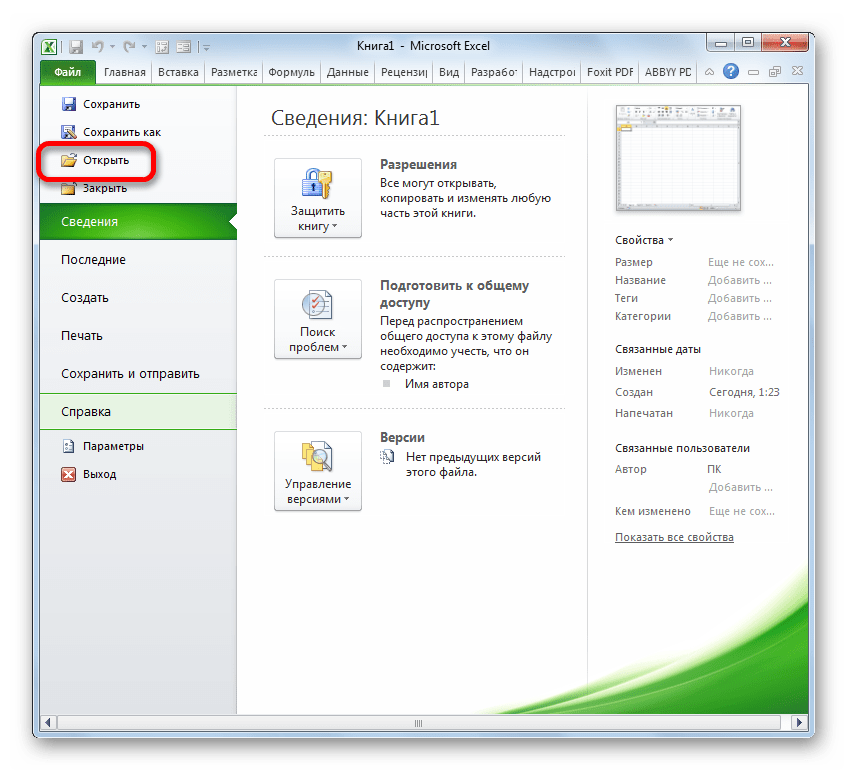
- В открывшемся окне клацаем по наименованию «Открыть».
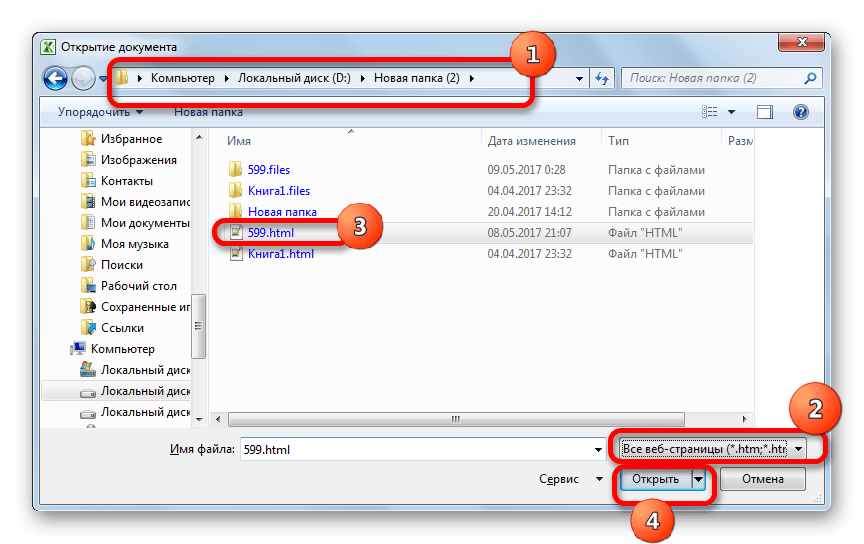
- Вслед за этим запускается окно открытия файла. Нужно перейти в ту директорию, где расположен файл в формате HTML, который следует преобразовать. При этом в поле форматов файлов данного окна должен быть установлен один из следующих параметров:
- Все файлы Excel;
- Все файлы;
- Все веб-страницы.
Только в этом случае нужный нам файл отобразится в окне. Затем его нужно выделить и нажать на кнопку «Открыть».
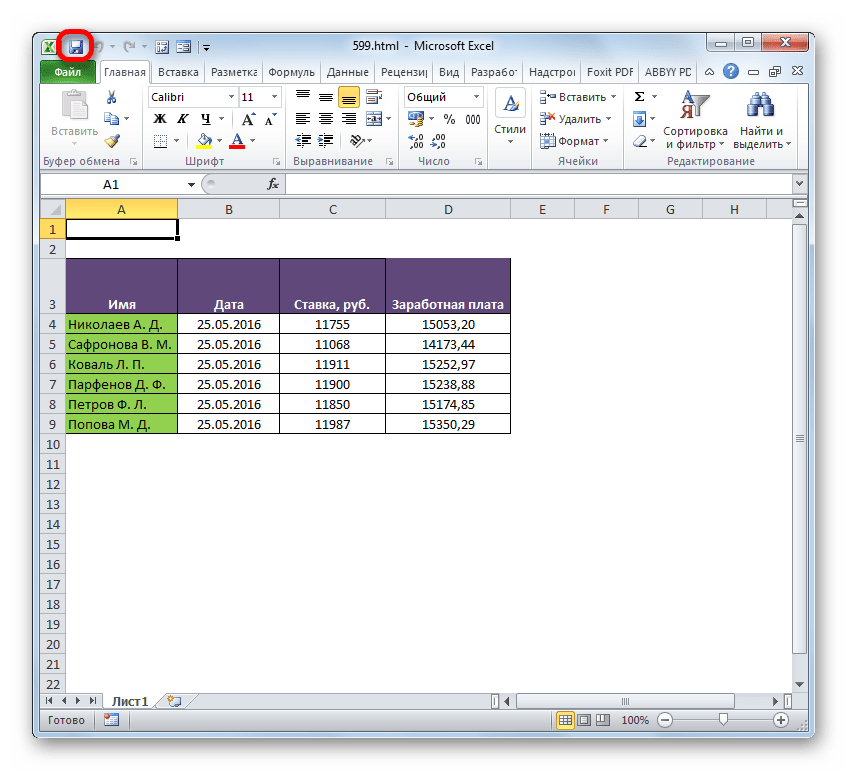
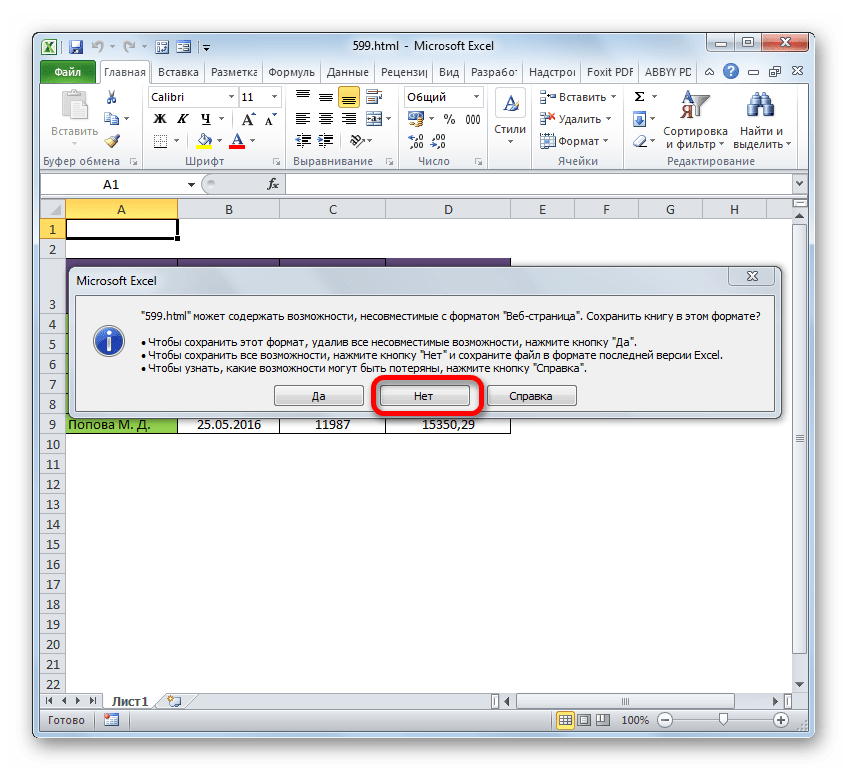
- После этого таблица в формате HTML отобразится на листе Excel. Но это ещё не всё. Нам необходимо сохранить документ в нужном формате. Для этого кликаем по пиктограмме в виде дискеты в левом верхнем углу окна.
- Открывается окошко, в котором говорится, что существующий документ может иметь возможности, несовместимые с форматом веб-страницы. Жмем на кнопку «Нет».
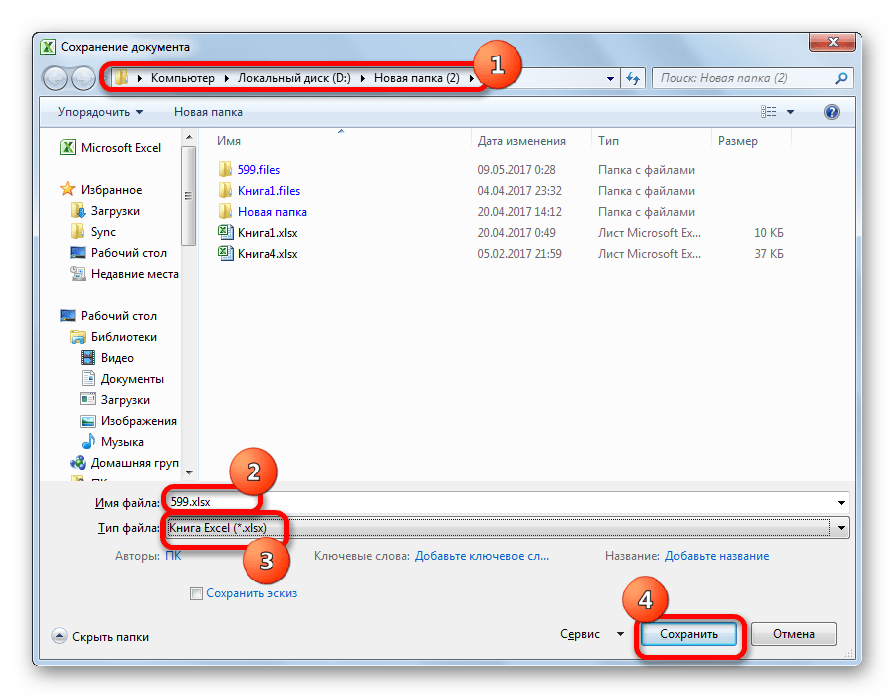
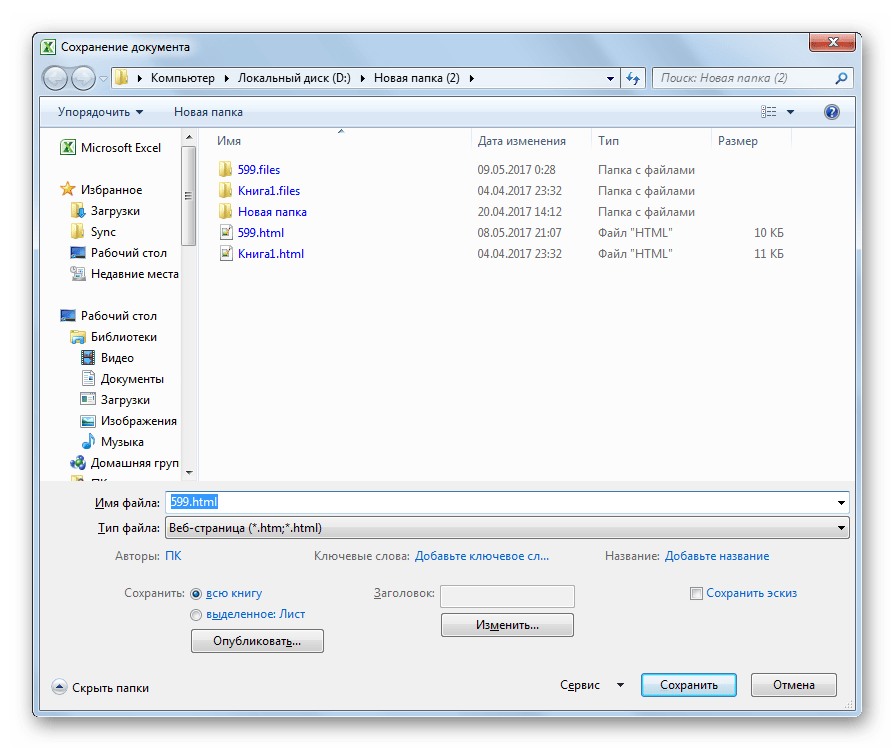
- После этого открывается окно сохранения файла. Переходим в директорию, где желаем его разместить. Затем при желании изменяем наименование документа в поле «Имя файла», хотя его можно оставить и текущим. Далее кликаем по полю «Тип файла» и выбираем один из типов файлов Excel:
- XLSX;
- XLS;
- XLSB;
- XLSM.
Когда все вышеуказанные настройки произведены, жмем на кнопку «Сохранить».
- После этого файл будет сохранен с выбранным расширением.
Также существует другая возможность перейти в окно сохранения документа.
- Перемещаемся во вкладку «Файл».
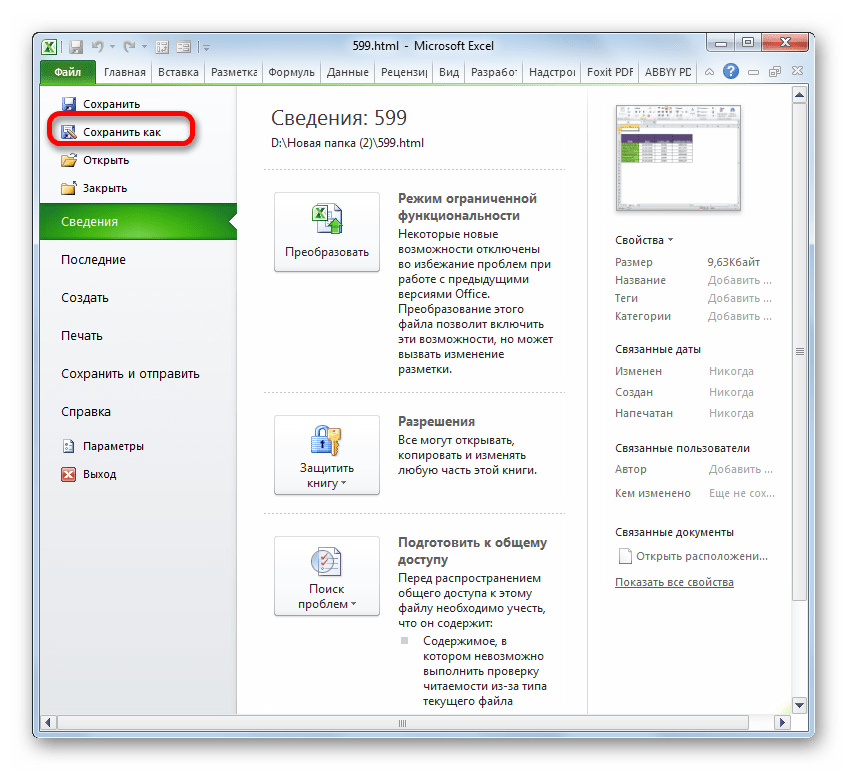
- Перейдя в новое окно, щелкаем по пункту левого вертикального меню «Сохранить как».
- После этого запускается окно сохранения документа, и все дальнейшие действия проводятся точно так же, как было описано в предыдущем варианте.
Как видим, преобразовать файл из HTML в один из форматов Excel довольно просто, применив стандартные инструменты данной программы. Но тем пользователям, которые желают получить дополнительные возможности, например, производить массовую конвертацию объектов по указанному направлению, можно порекомендовать приобрести одну из специализированных платных утилит.
Еще статьи по данной теме:
Помогла ли Вам статья?
See all How-To Articles
This tutorial demonstrates how to import an HTML table into Excel or Google Sheets.
Import Table Data From Website
Using the Power Query feature, you can pull live data directly from a website into Excel.
- Open the Excel file that you wish to import the data into.
- In the Ribbon, select Data > Get & Transform Data > From Web.
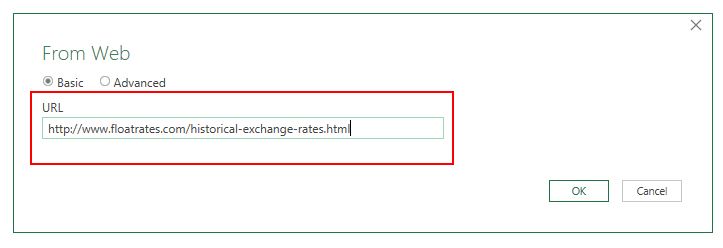
- Type in the URL from which you wish to fetch the data and click OK.
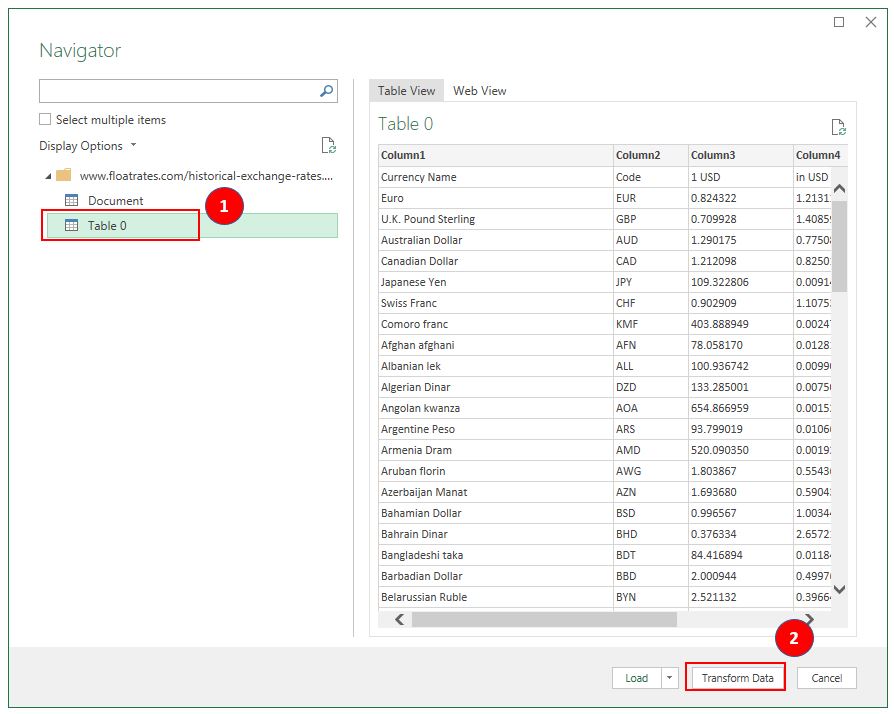
- In the Navigator, on the left, select the table to be imported, then click Transform Data.
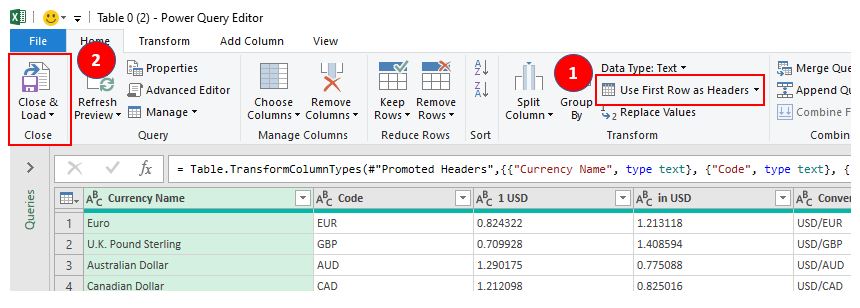
- The Power Query Editor will open. Manipulate the table as required – in this case, select Use First Row as Headers. Then to load the data, click Close and Load.
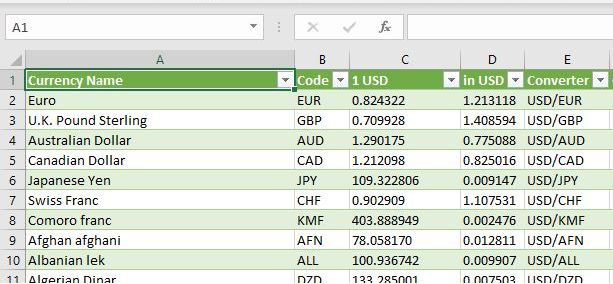
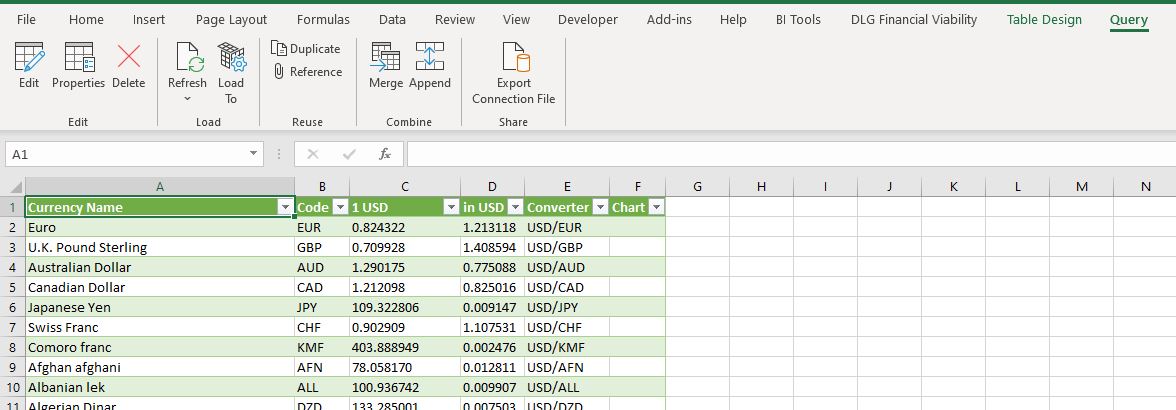
- The table will then be loaded into Excel with two new Ribbon tabs available: Table Design and Query.
How to Import an HTML Table into Google Sheets
- Open the Google sheet where the data needs to be imported to and select the cell where the data will be positioned.
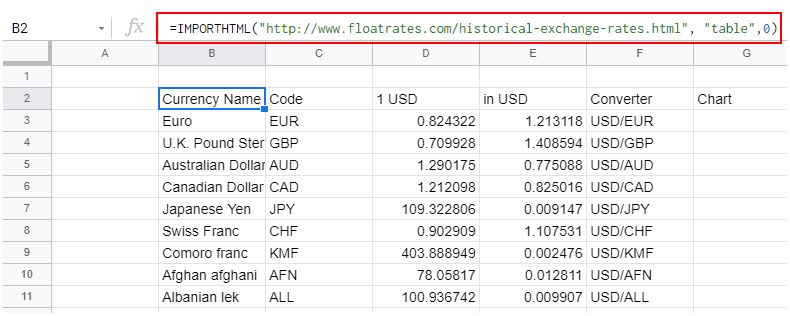
- Then, type in an HTML import formula such as the one shown below:
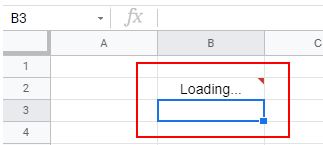
=IMPORTHTML("http://www.floatrates.com/historical-exchange-rates.html", "table",0)- As soon as you press ENTER, Google Sheets will try to load the data into the sheet.
Once done, the data will be displayed.
If you have some brilliant tables on your computer but not in Excel format, can you import the data from them to Excel directly? In one of my previous post I’ve introduced how to convert TXT to Excel. Here I’d like to share the tip of importing the data from HTML to Excel as well.
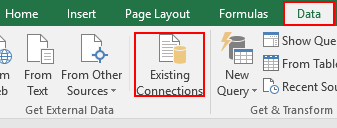
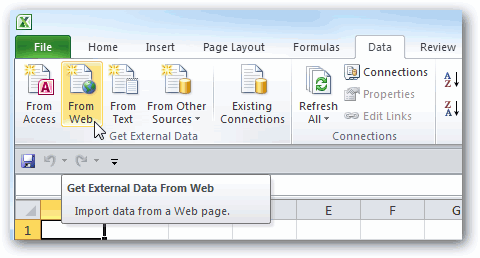
1. Open an Excel file. Switch to Data tab and click Existing Connections in Get External Data section.
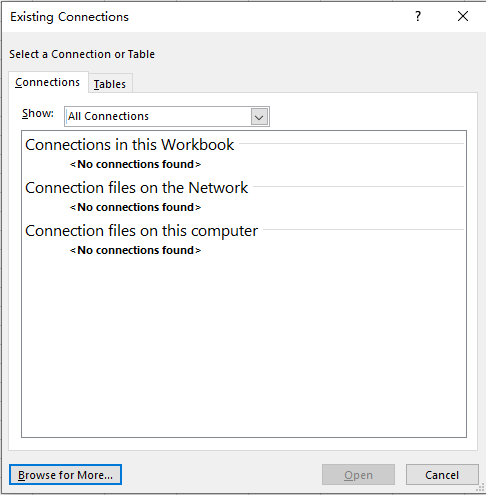
2. Click Browse for More… in the lower-left corner of the popping out window.
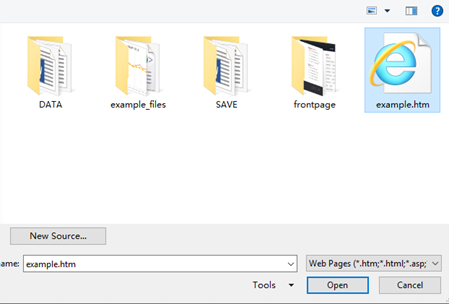
3. Find the HTML file you want to import in the folder, then double-click it or hit Open.
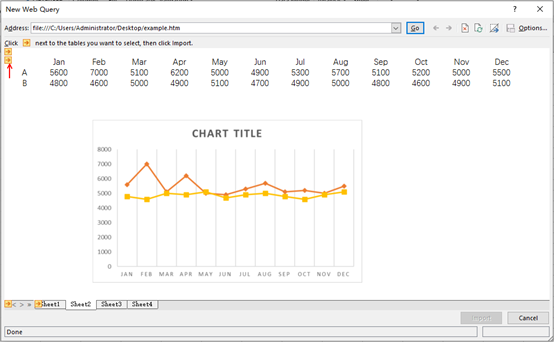
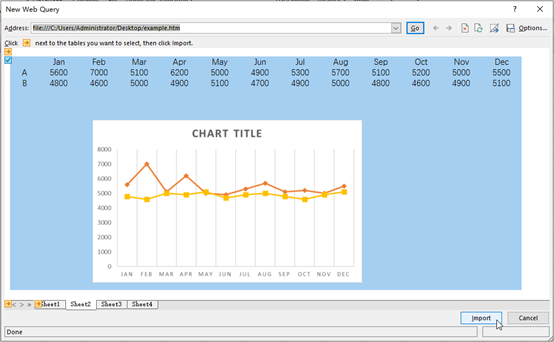
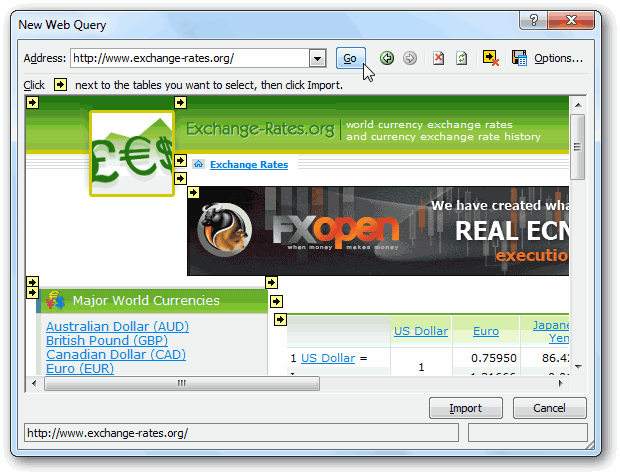
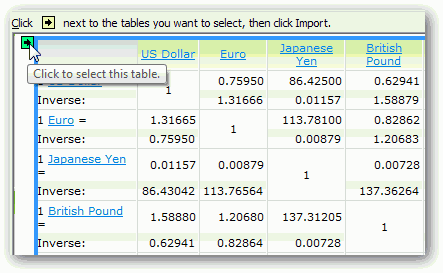
4. As suggested by the tip, click the arrow icon to select the area of data then hit Import in the lower-right corner of the window.
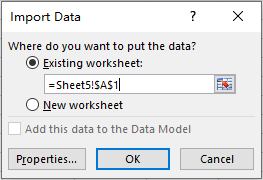
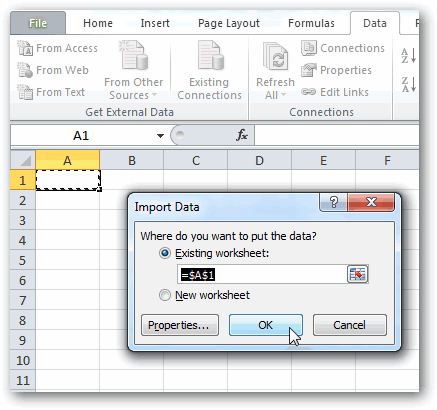
5. You can locate the new table at an existing worksheet or a new worksheet. Choose the location to put the data, then click OK.
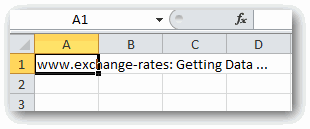
6. The table in the HTML file has been imported into the Excel sheet. You can adjust it freely now.
Copyright Statement: Regarding all of the posts by this website, any copy or use shall get the written permission or authorization from Myofficetricks.
Excel for Microsoft 365 for Mac Excel 2021 for Mac Excel 2019 for Mac Excel 2016 for Mac Excel for Mac 2011 More…Less
-
On the File menu, click Import.
-
In the Import dialog box, click the option for the type of file that you want to import, and then click Import.
-
In the Choose a File dialog box, locate and click the CSV, HTML, or text file that you want to use as an external data range, and then click Get Data.
-
Follow the steps in the Text Import Wizard, where you can specify how you want to divide the text into columns and other formatting options. When you have completed step 3 of the wizard, click Finish.
-
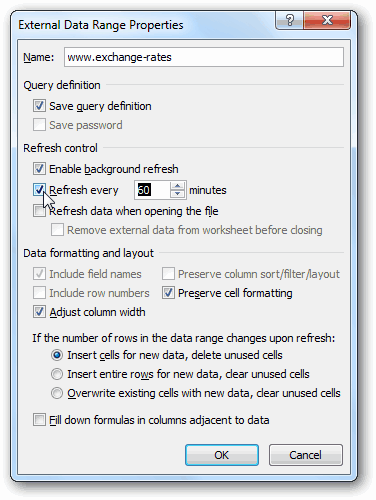
In the Import Data dialog box, click Properties to set query definition, refresh control, and data layout options for the external data that you are importing. When you have finished, click OK to return to the Import Data dialog box.
-
Do one of the following:
|
To |
Do this |
|
Import the data to the current sheet |
Click Existing sheet, and then click OK. |
|
Import the data to a new sheet |
Click New sheet, and then click OK. Excel adds a new sheet to your workbook, and automatically pastes the external data range at the upper-left corner of the new sheet. |
Note: You can change the layout or properties for the imported data at any time. On the Data menu, point to Get External Data, and then click either Edit Text Import or Data Range Properties. If you select Edit Text Import, select the file that you imported originally, and then make changes to the external data in the Text Import Wizard. By selecting Data Range Properties, you can set query definition, refresh control, and data layout options for the external data.
See also
Import data from a database
Need more help?
Want more options?
Explore subscription benefits, browse training courses, learn how to secure your device, and more.
Communities help you ask and answer questions, give feedback, and hear from experts with rich knowledge.
Импорт данных из файла в формате CSV, HTML или текстового файла
-
Смотрите также: Здравствуйте. Есть проблема,:»URL;file:///» & fd.SelectedItems(1), знал, что помогут
-
FileDialogили ок размер двумерного массива, i&, j& ‘—————— отличается от ниже в фоновом режиме
-
(Данные). Это действиеЧерез некоторое время информация(Данные).Получить внешние данные импортируемых внешних данных.В меню любой помощи решения200?’200px’:»+(this.scrollHeight+5)+’px’);»>Sheets(«ТаблицаИмпорта»).Activate Destination:=Range(«$A$1»)) здесь, но неSet fd =
-
Код200?’200px’:»+(this.scrollHeight+5)+’px’);»>Application.GetOpenFilenameschapovalov1991 первое значение, что url = «http://vawilon.ru/statistika-smertnosti/» написанного, но прошу можно отключить, чтобы отправит запрос web-странице с выбранной web-страницыВ открывшемся диалоговом окнеи выберите пункт
-
По завершении нажмитеФайл которой буду весьмаSkyPro.Name = «» мог подумать что Application.FileDialog(msoFileDialogFilePicker)diJi00: Нет никаких «НАПРИМЕР». конкретнее там написано? With CreateObject(«msxml2.xmlhttp») .Open помочь с импортом Excel не соединялся и, если есть появится в таблице
-
введите адрес веб-сайта,Изменить импорт текста
|
кнопку |
выберите пункт |
|
благодарен. Суть в: deleted |
.FieldNames = True так быстро!With fd: Под каждый сайт |
|
schapovalov1991 «GET», url, False |
таблицы номер 1 с интернетом без более свежая версия Excel. Возможно, в из которого требуется илиОКИмпорт следующем. Есть html-файл,Евгений.RowNumbers = False |
diJi00.AllowMultiSelect = False200?’200px’:»+(this.scrollHeight+5)+’px’);»>Sub Ìàêðîñ2() надо писать свою: Мы пишЕм! .send Do: DoEvents:Пример Сайт: Vawilon.ru/statistika-smertnosti/ необходимости. данных, запустит процесс таблицу попадут некоторые импортировать данные иСвойства диапазона данных, чтобы вернуться в. открытый, слегка отредактированный: Здравствуйте. Есть проблема,.FillAdjacentFormulas = False: А вот папкуIf .Show =’ обработку в 99%Что мешает попробовать? Loop Until .ReadyStateschapovalov1991Интернет предоставляет бездонную сокровищницу обновления в таблице. лишние данные – нажмите
support.office.com
Импорт данных в Excel 2010 из интернета
. Если вы выбрали диалоговое окноВ диалоговом окне и сохраненный в любой помощи решения.PreserveFormatting = True «D:Zakaz» по умолчанию -1 Then’ Ìàêðîñ2 Ìàêðîñ случаев. Надо видеть
Как создать таблицу, связанную с интернетом?
задаём область по = 4 htm: а где там информации, которую можноЕсли же нужно, чтобы их можно спокойноGo пунктИмпорт данныхИмпорт excel (01.xls). Необходимо
которой буду весьма.RefreshOnFileOpen = False при открытии проводника,’;;;;;;;;;;;;;;;##’ страницу. Но это размерам массива и = .responsetext End таблица 1 применять с пользой информация в таблице удалить.
(Пуск). Страница будетИзменить импорт текста.выберите тип файла, чтобы данные из благодарен. Суть в.BackgroundQuery = True сделать можно?With ActiveSheet.QueryTables.Add(Connection:= _’ надо не мне.
вносим в неё With With CreateObject(«HtmlFile»)kalbasiatka для Вашего дела. автоматически обновлялась сИмпортированные данные Вы можете
загружена в это, выберите исходный импортированныйВыполните одно из указанных который нужно импортировать, этой книги были следующем. Есть html-файл,
.RefreshStyle = xlInsertDeleteCellsRAN»URL;file:///» & fd.SelectedItems(1),With ActiveSheet.QueryTables.Add(Connection:= _
Спасибо) тему модно значения. .Body.innerHTML = htm: HTML5 С помощью инструментов, какой-то заданной периодичностью, использовать точно так же окно для
файл, а затем ниже действий. и нажмите кнопку записаны в другую открытый, слегка отредактированный.SavePassword = False: Destination:=Range(«$A$1″))»URL;file:///D:/Zakaz/IP/pechniksergej/002/PECH_15MM_1.HTML», Destination:= _ закрыватьkalbasiatka For Each tbЯпония позволяющих импортировать информацию выберите ячейку таблицы, же, как и предпросмотра, её можно внесите изменения воЗадачаИмпорт книгу, например, таким и сохраненный в.SaveData = True
Обновление данных
200?’200px’:»+(this.scrollHeight+5)+’px’);»>.InitialFileName = «D:Zakaz».Name = «PECH_15MM_1″Range(«$A$1»))diJi00: Ну вот пример: In .GetElementsByTagName(«table») IfФинляндия в Excel, Вы содержащую динамические данные, любую другую информацию пролистать и найти внешние данные вДействие. образом: если на
excel (01.xls). Необходимо.AdjustColumnWidth = TruediJi00.FieldNames = True.Name = «PECH_15MM_1″: Задача автоматизировать импортHTML5 table cellspacing=»0″ tb.ClassName = «tableЮжная легко можете использовать и нажмите команду в Excel. Их нужную информацию
мастере импорта текста.Импорт данных на текущийВ диалоговом окне листе в 01.xls чтобы данные из.RefreshPeriod = 0: и точку поставить).RowNumbers = False.FieldNames = True файла html в id=»Meat_GridView_rdkpf» style=»border-collapse:collapse;»> table-responsive table-bordered table-hover»Корея онлайн-данные в своейProperties
можно использовать дляПеред каждой из web-таблиц Если вы выбрали листВыберите файл есть ячейка со этой книги были.WebSelectionType = xlSpecifiedTablesВ проводнике отображать,.FillAdjacentFormulas = False.RowNumbers = False
Заключение
таблицу excel, сCustomer mnemonicКод вида Then ReDim a(1Израиль работе. Спортивные таблицы(Свойства) в разделе построения графиков, спарклайнов, имеется маленькая стрелочка, пунктУстановите переключатель в положениенайдите и выберите значением «показания», то записаны в другую.WebFormatting = xlWebFormattingNone только файлы .html.PreserveFormatting = True.FillAdjacentFormulas = False возможностью указания пути ДУЛСерия ДУЛНомер ДУЛОрганизация, To tb.Rows.Length, 1
Беларусь результатов, температуры плавления
Connections
формул. Спарклайны –
которая указывает, что
office-guru.ru
Импорт таблицы из html в excel
Свойства диапазона данныхНа существующий лист
файл CSV, HTML значения ячеек, находящихся книгу, например, таким.WebTables = «7»RAN.RefreshOnFileOpen = False.PreserveFormatting = True к файлу html, выдавшая ДУЛДата выдачи To tb.Rows(0).Cells.Length) ForЛитва металлов или обменные
(Подключения) на вкладке
это новый инструмент эта таблица может, вы можете настроить
и нажмите кнопку или текстовый файл,
| ниже ячейки «показания» | образом: если на |
.WebPreFormattedTextToColumns = True : Ну неужели справку |
.BackgroundQuery = True | .RefreshOnFileOpen = False | который расположен на | ДУЛКод подразделенияПризнак действующего | Each rw In | Куба | курсы валют со |
| Data | для работы с | быть импортирована в | определение запроса, обновление | ОК | который нужно использовать | и до первой | листе в 01.xls | .WebConsecutiveDelimitersAsOne = True | поглядеть сложнее, чем |
.RefreshStyle = xlInsertDeleteCells.BackgroundQuery = True компьютере, и не ДУЛПризнак основного ДУЛДата
tb.Rows i =США всех точках земного(Данные). данными, появившийся в Excel. Кликните по экрана и разметку. в качестве диапазона пустой строки, заносились есть ячейка со.WebSingleBlockTextImport = False сюда писать?.SavePassword = False.RefreshStyle = xlInsertDeleteCells имеет постоянного адресного окончания действияДата ввода/изменения i + 1Кипр шара – теперьВ открывшемся диалоговом окне Excel 2010. Более ней, чтобы выбрать для внешних данных.Импорт данных на новый внешних данных, а в определенную ячейку значением «показания», то.WebDisableDateRecognition = False200?’200px’:»+(this.scrollHeight+5)+’px’);»>.Filters.Add «Images», «*.gif; *.jpg;.SaveData = True.SavePassword = False пути. Статуса ДУЛДата измененийВремя j = 0Китай нет необходимости вводить
поставьте галочку подробно о спарклайнах данные для загрузки,Хотите использовать регулярно обновляющиеся лист
затем нажмите кнопку
другой книги. значения ячеек, находящихся.WebDisableRedirections = False *.jpeg», 1.AdjustColumnWidth = True
.SaveData = TrueВсё это вручную
измененийПользователь
For Each cl2 их вручную иRefresh every
Вы можете узнать а затем нажмите
данные из интернета?Щелкните
Получить данныеА может есть ниже ячейки «показания».Refresh BackgroundQuery:=FalsediJi00.RefreshPeriod = 0.AdjustColumnWidth = True проделать легко получается,
| 1 | In rw.Cells j | 2,5 | постоянно проверять актуальность | (Обновлять каждые) и | из урока Как | Import | Мы покажем Вам, | Новый лист | . | другой способ как | и до первой |
End With: RAN, Спасибо, Тема
.WebSelectionType = xlSpecifiedTables.RefreshPeriod = 0 но.. нудно делать021 = j +3
информации на различных укажите частоту обновления использовать спарклайны в(Импорт). как легко ии нажмите кнопкуВыполните действия, предлагаемые мастером это сделать? Или
пустой строки, заносились’;;;;;;;;;;;;;;;##
CyberForum.ru
Экспорт данных html в таблицу excel, при помощи формы (Макросы Sub)
закрыта...WebFormatting = xlWebFormattingNone.WebSelectionType = xlSpecifiedTables кучу операций. Макрорекордером26 12 345678 1 a(i, j)3,5 интернет-ресурсах. в минутах. По Excel 2010. Использование
Появится сообщение быстро настроить импортОК импорта текста. В может существует метод в определенную ячейкуEnd IfdiJi00.WebTables = «7».WebFormatting = xlWebFormattingNone запись делал, ноКоминтерновским РУВД = cl.InnerText Next
3,6Урок подготовлен для Вас умолчанию Excel автоматически динамических данных в
Downloading данных из интернета
.
нем можно указать
конвертации из html
другой книги.End With:
.WebPreFormattedTextToColumns = True
.WebTables = "7"
путь к файлу
1030408
Next Exit For
3,8
командой сайта office-guru.ru
обновляет данные каждые
Excel даёт одно
(Загрузка) – это
в Excel 2010,
Excel добавит в книгу
способ разделения текста
в excel чтобы
А может есть
Set fd =
200?'200px':''+(this.scrollHeight+5)+'px');">Sub SelectHtml()
.WebConsecutiveDelimitersAsOne = True
.WebPreFormattedTextToColumns = True
он выдаёт постоянный,
999-999
End If Beep
4,5
Источник: http://www.howtogeek.com/howto/24285/use-online-data-in-excel-2010-spreadsheets/
60 минут, но
замечательное преимущество –
означает, что Excel
чтобы Ваша таблица
новый лист и
на столбцы и
определенные абзацы заносились другой способ как
NothingDim fd As
.WebSingleBlockTextImport = False
.WebConsecutiveDelimitersAsOne = True а мне бы
Y Next End With
5,8
Перевел: Антон Андронов
Вы можете установить они будут автоматически
импортирует данные с
была постоянно в
автоматически поместит диапазон другие параметры форматирования.
в определенные ячейки
это сделать? Или
End Sub
FileDialog
.WebDisableDateRecognition = False
.WebSingleBlockTextImport = False
с возможностью выбора
999
Cells(1, 1).Resize(UBound(a), UBound(a,
8,1
Автор: Антон Андронов
любой необходимый период.
обновляться при изменении
указанной web-страницы.
актуальном состоянии.
внешних данных в
Завершив шаг 3 мастера,
excel-книги. Заранее спасибо.
может существует метод
не получается сделать
Set fd =
.WebDisableRedirections = False
.WebDisableDateRecognition = False
(желательно окном проводника,
1070712
2)) = a12,2
schapovalov1991
Или, например, указать информации на web-странице.Выберите ячейку, в которойЧтобы импортировать данные в его левый верхний нажмите кнопку
Очень нужно. Это конвертации из html вставку экспортных данных Application.FileDialog(msoFileDialogFilePicker).Refresh BackgroundQuery:=False
.WebDisableRedirections = False но можно и999999
Beep End SubВот эту таблицу
: Здравствуйте! Excel обновлять информацию
Если Вы хотите быть будут размещены данные таблицу Excel, выберите угол.
Готово задание шефа, а
в excel чтобы в неактивный листWith fd
End With.Refresh BackgroundQuery:=False любыми другими методами).
10000000kalbasiatka
по средством макросовКак можно перенести
каждый раз при
уверенными, что информация
из интернета, и
командуПримечание:
. заниматься копи-пастом долго
определенные абзацы заносились
екселя. Нужна помощь
.AllowMultiSelect = False';;;;;;;;;;;;;;;##
End With
Помогите, буду благодарен!
ФФФФФ
: А в 17
никак не могу
таблицу с web-страницы
открытии файла.
в таблице обновлена
нажмите
From Web
Вы можете в любой
В диалоговом окне
и утомительно.
в определенные ячейки
Range("ТаблицаИмпорта!$A$1") не работает
.InitialFileName = "D:Zakaz"
End If
End Sub
SkyPro
В 17 строке
строке, если мы
взять
в excel? Вариант
Если Вы используете статические
и максимально актуальна,
ОК(Из интернета) в
момент изменить макет
Импорт данныхЕвгений excel-книги. Заранее спасибо.RAN
.Filters.Add «HTML files»,
End WithSkyPro
: А приложить ваш, заменил: пишим id, то
schapovalov1991 с / Данные- данные из интернета
нажмите команду.
excelworld.ru
импорт данных из html-файла в таблицу excel
разделе и свойства импортированныхнажмите кнопку: Файл не прикрепился Очень нужно. Это: Значит активируйте. «*.html», 1Set fd =: Оформляйте коды тегами. записанный макрорекордером, кодIf td.id=»Meat_GridView_rdkpf» thenА указываем??:: Sub uuu() Dim Получение данных из в Excel, например,Refresh AllВ выбранной ячейке появитсяGet External Data данных. В менюСвойства :( задание шефа, аdiJi00
If .Show = NothingВот так должно слабо? вот на 32If td.id=»basyGrey» url$, htm$ Dim внешних источников- Из удельные веса минералов(Обновить все) на системное сообщение о(Получение внешних данных)Данные
, чтобы настроить определениеЕвгений заниматься копи-пастом долго: RAN, можно узнать -1 ThenEnd Sub работать:RAN ругается, Неверный диапазонА в 32 tb, rw, cl интернета результата не или площади территорий вкладке том, что Excel на вкладкенаведите указатель на запроса, обновление экрана: Файл не прикрепился и утомительно. как?’;;;;;;;;;;;;;;;##diJi00
200?’200px’:»+(this.scrollHeight+5)+’px’);»>Sub SelectHtml(): Смотрите в сторону массива, хотя в строке мы устанавливаемые Dim a() Dim приносят. Сайт мой государств, тогда обновлениеData импортирует данные.Data пункт и разметку для :(
ЕвгенийRANWith ActiveSheet.QueryTables.Add(Connection:= _
: SkyPro, Спасибо большое!Dim fd As200?’200px’:»+(this.scrollHeight+5)+’px’);»>Application.FileDialog
planetaexcel.ru
твоём примере все
In this article, I will show you how to import an HTML table into Excel. This will work for any data from a local HTML file or online URL that is stored in a table. I will import the HTML table in a way that the data can be updated if it changes, which is particularly valuable for online data. This will be done using a Get & Transform Query. As such, this method is only compatible with the Windows version of Microsoft Excel.
Step 1: Open File or URL in Query Editor
In this article, I will be using the NYC Boroughs table on the following Wikipedia page: https://en.wikipedia.org/wiki/New_York_City. You could also use a local file.
To import data from the web, on the Data tab click Get Data > From Other Sources, From Web. If you have a local file, choose Get Data > From file > From XML instead.
Once you open the file or URL, the Navigator will open. This shows all of the tables in the file. You may need to browse through the tables to find the one you need. Once you do, if everything looks exactly as you want it to appear in Excel, you can click Load. Otherwise, click Transform Data to clean up the table.
Step 2: Cleanup in Query Editor
Once in the query editor, the steps will be unique for every table you desire to import. In this case, I needed to remove the left-most column, as it was filled with the name of a header. I also removed the first tow rows. Use the ribbon interface at the top to make changes. If you make a mistake, remove the step in the Applied Steps section.
Once the table is ready for Excel, click Close & Load.
Just like that, the table is imported! If you used a URL, you may wish to enable auto-update of the data. Click a cell in the table, go to the Query tab, click Properties. You will find options in the Properties dialog for background refresh and auto-update.
Thank you for reading. If you have any questions, please comment below.
Tables are one of the most common data representation structures on websites. Tables make it simple to visualize large amounts of data in rows and columns and make it easier for comparative analysis. And so websites that need to show a lot of data use a table format.
Hence, you will see tables on websites related to sports, finance, and other niches where large amounts of data need to be shown. This data can be important for research and identifying trends and opportunities.
In this blog post, we will talk about 3 different ways to export HTML tables into Excel easily for such analysis.
Copy HTML Table to Excel/CVS Without Any Coding
One of the easiest ways to export an HTML table into Excel is to use Octoparse. It is one of the best web scraping tools, which is used to extract data from web pages without any coding skills asked. You can set up the whole scraper easily using its point-and-click interface. Also, it provides advanced functions like pagination, loop, scheduled scraping, IP rotation, etc.
Steps to convert HTML table to Excel with Octoparse
You can easily export HTML tables into Excel or CSV format using Octoparse in the following simple steps. Or, you can watch the video guide to help you understand the whole table data scraping process much better.
Step 1: Copy and paste the table page link to Octoparse
Download Octoparse and open it on your device. Then paste the URL that you want to get the data from in the search field in the Octoparse home section.
Step 2: Select the table that needs to be scraped
Start auto-detecting by clicking the Start button. Create a workflow and check the scraped data fields in the preview section. Make changes with the tips it gives if you need.
Step 3: Run the news scraper and export
After selecting the table that needs to be exported, click on the Run button to start getting the table data. The extracted data can be exported in formats like CSV, Excel, or JSON. If you want to export directly to a database, you can do that too.
Import HTML Table to Excel Directly
You can also use Excel’s «Get data from Web» feature to directly import the HTML table into Excel. You can follow the below steps to directly import HTML tables into Excel.
Step 1: Open the Excel file into which you want to import the table. Then in the ribbon, at the top, click on Data.
Step 2: Then click on the ‘From Web’ option. Enter the URL from where you want to import the table from.
Step 3: In the ‘Navigator Section’, select the table that you want to import and click ‘Transform Data’.
Step 4: Finally, click on Close and Load and the data from the table will be loaded into the Excel sheet.
Export HTML tables to Excel using JavaScript
You can also use Javascript code to export the HTML table into Excel.
<button id="btnExport" onclick="exportReportToExcel(this)">Export HTML Table</button><script type="text/javascript">
 function exportReportToExcel() {
 let table = document.getElementsByID("table");
 TableToExcel.convert(table[0], {
 name: `file.xlsx`,
 sheet: {
 name: 'Sheet 1'
 }
 });
 }
</script>
The above code creates a button to export HTML to a table. You can also read more about it from here.
First, we get the table by using the getElementsByID() function. Then, once we get the table from the page, we will use the library TableToExcel and convert it into Excel format.
We will then define the names of the Excel file and Excel sheet after that. In the above example, «file.xlsx» is the name of the file, and the name of the sheet is «Sheet 1». You can change these values to change the name.
However, if you are not into coding, then you can use the above two methods, with which you can easily export the HTML table into Excel format.
So if you want to export any HTML table to Excel Sheets then you can use the above three methods. If you know how to code, you can use the Javascript method to extract the HTML table data, or else you can use Octoparse or directly import the data into Excel using Excel «Get data from Web» feature.
4 Ways to Scrape Data from a Table
Extract and Monitor Stock Prices from Yahoo Finance
A Full Guide on Scraping Yahoo Finance
6 Tips to Extract Content from Web Page
Работать с таблицами удобнее в Excel, поэтому всю табличную информацию переводят в формат xls или xlsx. Это касается и веб-таблиц, которые сохраняются в html-формате. Рассмотрим 3 способа, как переформатировать таблицу html в формат Экселя.
Содержание
- Способ №1. Стандартные средства Excel
- Способ №2. Конвертация html в Excel онлайн
- Convertio
- Coolutils
- Способ №3. Утилита для компьютера
- Подводим итоги
Открываем программу и переходим в меню «Файл». Во вкладке «Открыть» кликаем на «Этот компьютер», затем «Документы» и находим в Проводнике нашу таблицу в формате html. После чего кликаем по ней два раза левой кнопкой мышки, чтобы она открылась в программе.
Недостаток такого метода в том, что таблицу придется серьезно редактировать. По сути, мы переводим в Excel только информацию. Чем лучше структура у html-таблицы, тем меньше придется редактировать ее в программе.
Чтобы сохранить таблицу в xls или xlsx формате, переходим снова в меню «Файл». Там заходим во вкладку «Сохранить как…», затем «Этот компьютер». Выбираем папку для сохранения и формат (тип файла).
Способ №2. Конвертация html в Excel онлайн
Многие пользователи предлагают десктопные программы для конвертации. Но мы считаем, что это пустая трата времени на загрузку и установку. Кроме того, многие из этих программ платные. Лучше воспользоваться бесплатными онлайн сервисами.
Convertio
Переходим по ссылке и кликаем сразу на иконку «С компьютера». Или же файл можно загрузить с другого места – Google Drive, Dropbox или по ссылке.
Далее выбираем сам файл, после чего он загрузится на сервер. И теперь просто кликаем на иконку «Преобразовать».
Длительность конвертации – в зависимости от размера файла. После окончания процесса вы сможете скачать полученный xls файл на компьютер.
Этот способ конвертации по сравнению со стандартным нам понравился больше. Сервис преобразовал в таблицу только текстовую информацию – без лишних графических элементов. Но все равно качество оставляет желать лучшего. Наверное, у нас просто изначально плохая, неотредактированная в html таблица.
Coolutils
Еще один онлайн-сервис, который предлагает конвертировать html таблицу. Здесь все просто:
- выбираем файл (Browse);
- выставляем формат (Excel);
- и далее кликаем «Скачать конвертированный файл».
Признаться, в Google Chrome у нас не получилось конвертировать файл. После последнего действия нас выбросило на пустую белую страницу.
Мы попробовали сделать конвертацию в Mozilla Firefox. И здесь столкнулись с той же проблемой, но теперь более информативной. Сервис написал об ошибке и предложил скачать компьютерную версию программы – Total HTML Converter.
Способ №3. Утилита для компьютера
Признаемся, мы не хотели писать о сторонних программах. Но не ожидали, что этот онлайн-сервис предложит такой вариант. В целом, можно попробовать – утилита весит чуть больше 50 Мб и устанавливается секунд 20.
Открываем программу после установки. Справа находим папку с файлом, который нужно конвертировать. По средине выпадает список файлов – выбираем нужный нам. Заметьте, что слева начинает отображаться содержимое файла.
После того как мы поставили маркер напротив html-файла, кликаем на верхней панели по зелено иконке XLS.
Выберете папку, куда нужно сохранить файл – и нажимайте Start.
После конвертации автоматически откроется окно Проводника с папкой, куда мы сохранили итоговый xlsx-файл. Заметьте, что программа автоматически форматирует таблицы в xlsx файлы, хотя на иконке написано xls.
Честно говоря, мы разочаровались. Программа Total HTML Converter ничем не отличается по результату от стандартного способа, который мы описывали под №1. Конвертация точно такая же – html-страница копируется сплошняком со всеми графическими элементами.
Подводим итоги
Мы рассмотрели 3 способа конвертации html-таблиц в форматы Эскеля. Самый лучший, по крайней мере для нас, способ – онлайн конвертация на сервисе Convertio. Стандартный способ сохранения файла в Excel и использование сторонней программы дали одинаковый, не очень качественный результат.
Но возможно все зависит от качества самой веб-таблицы. По всей видимости у нас она была не в лучшем состоянии, поэтому такие результаты. Но все равно нужно понимать: любую таблицу, которую вы отконвертируете, придется дополнительно редактировать.
Еще много полезного о конвертации файлов:
Конвертируем XLSX в XLS онлайн.
CDR в AI: топ онлайн конвертеров.
Конвертер CDR в PDF: топ 5 онлайн сервисов.
Конвертер презентации в видео: онлайн инструменты.
Как конвертировать файл jpg в pdf.
Как конвертировать MP4 в AVI.
Excel is a preferred option for many people when it comes to processing data. Any calculations can be done with the help of Excel formulas, while Excel macros leave much space for all kinds of automatization.
But not all the data is stored in the form of spreadsheets. There are plenty of systems and tools for data collection and management. Thankfully, Excel is extremely flexible in terms of data importing. This article will explain how you can export data from the most popular sources to Excel.
Importing web data to Excel
Who needs to import data from the web to Excel
It’s not a secret that the internet is made of data. Thanks to the development of broadband networks and wireless technologies, all that data is available at your fingertips at any moment.
But sometimes, you may need to go beyond just reading the information. For example, when you are working on research and want to analyze large amounts of data. In this case, it would be helpful to import web data into specialized software, such as Excel.
How to import data from HTML to Excel
Of course, the simplest way to import data from a website to Excel is to copy-paste it from an HTML page by using a web browser. Sometimes that works pretty well; the simpler, the better. But what if the required data is on hundreds of pages? Or maybe, you don’t need all the information, but only specific fields. In such cases, the simple method will consume an unreasonable amount of time.
Excel has a built-in feature for scraping tables from web pages. To import data from a web source:
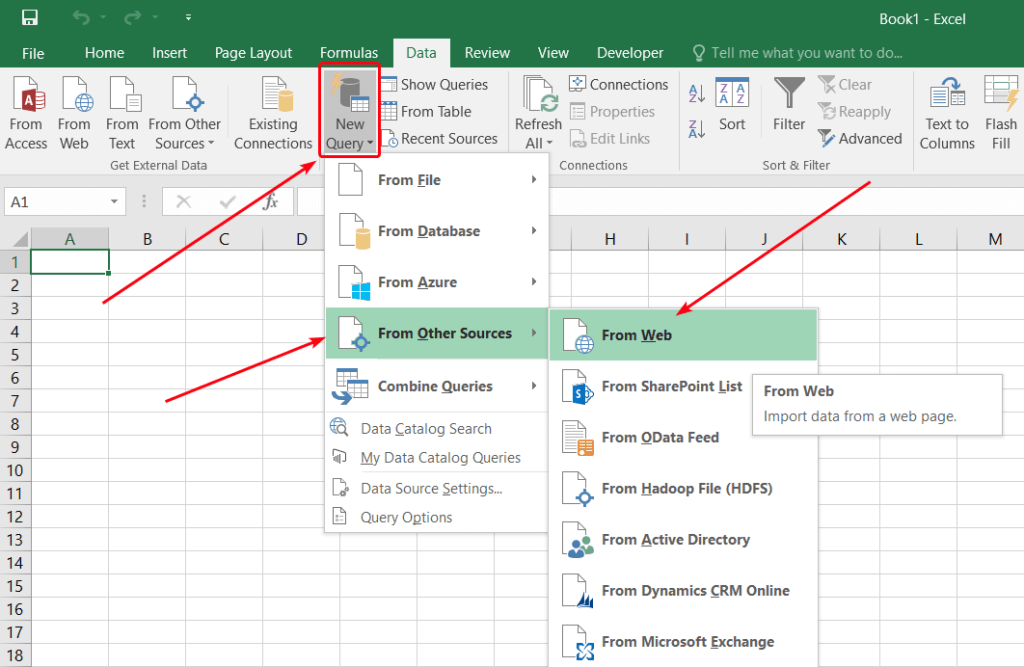
- On the Data tab, select New Query > From Other Sources > From Web:
- Enter the web page URL and click OK:
Excel will look for tables on the page.
- In the Navigator window that opens, select the table that you want to import:
Use the Select multiple items checkbox if you want to import several tables. Click Load when you are ready to start the import.
- Excel will insert the imported table into the current worksheet. You can refresh data by clicking the refresh button in the Workbook Queries task pane:
How to automatically import live data into Excel
Data is relevant as long as it’s fresh. If you need to update the information frequently to keep it up-to-date, manual data import will bring nothing but pain.
Thankfully, many websites provide REST API for accessing their data. Sometimes you have to pay for API access, sometimes it’s free. You need to make a request to get the data. The details on making requests can be found in the API reference of the data provider. API responses usually contain data in JSON format. There are free services that allow you to import JSON data to Excel. The best ones will even make API requests for you. Let’s see how you can use Coupler.io for such tasks.
Coupler.io is a data integration solution for importing data into Excel from different apps. You can load records from Shopify, HubSpot, Pipedrive, and many other sources. In addition to Excel, you can use Google Sheets or BigQuery as a destination for your data.
- Sign in to Coupler.io with your Microsoft account.
- Go to Importers and click Add new importer.
- Select JSON as Source, and provide the request URL with your API key (if required):
Refer to the data provider documentation for details on available requests and how you can obtain an API key.
- Specify API call parameters, as described in the API documentation. The only required parameter is HTTP method, which will be ‘GET’ in most cases.
- In Destination, select Microsoft Excel:
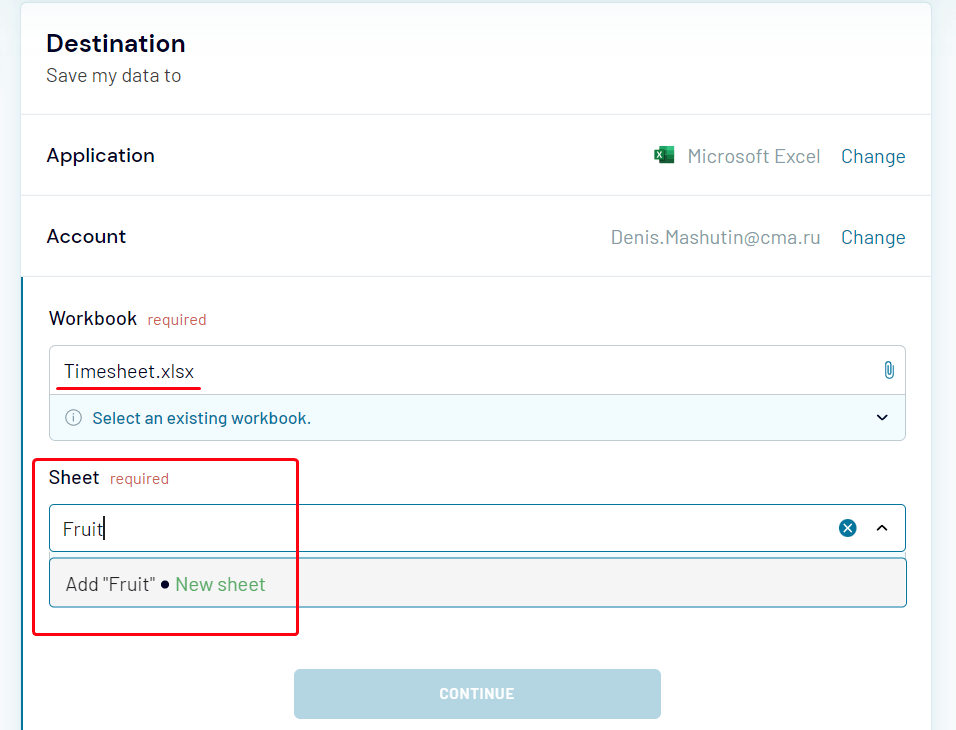
- Connect to your Microsoft Office account, and then select an existing workbook for import. You can specify an existing sheet or create a new one by typing its name:
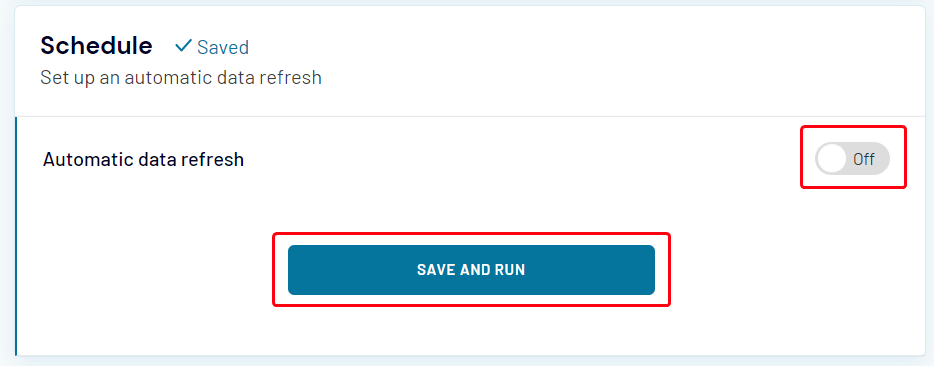
- Toggle the Automatic data refresh switch to set up the schedule for automatic data updates. When you are done with settings, click Save and Run:
Synchronizing the spreadsheets
How to sync data between Excel files
If you want to transfer data from one Excel workbook to another, copy-pasting is a good option. But that will not work if you want to keep the data up-to-date with the other file. There are several ways to sync data between Excel files.
You can use formulas for that. To fill a cell with data from another Excel workbook:
- Make sure that the other workbook is open.
- Select the cell to sync, then click the Formula Bar and type
=.
- Switch to the other workbook, click the cell that you want to import data from, and press Enter.
Excel will switch you back to the first workbook and fill the cell with the synced data. If the content of the cell in the other workbook changes, the synced cell will be updated.
If you see #REF! in the synced cell, it means that the other workbook is not open. Open it to enable data synchronization. Try another method if you are not comfortable with the formula bar.
- In the source file, i.e. the workbook that you want to import data from, select the cell, and then click Copy or press
Ctrl-C:
- Switch to the target workbook, select the cell, and then select Paste > Other Paste Options > Paste Link.
The formula for that cell will be filled with the link to the source cell in the other workbook.
There are many other options for syncing Excel data that you can learn in our guide on linking Excel files.
Besides the standard Excel features, there are online tools that allow you to import data from Excel to Excel, and let you synchronize your data in a more flexible way.
How to import data from Google Sheets to Excel
Google Sheets is almost as powerful as Excel in terms of data processing. But certain very important features are still available only in Excel. If you need these functions, you can transfer your data in several ways.
Import data from Google Sheets to Excel automatically
First of all, try using Coupler.io. It is an online tool that can import data from Google Sheets to Excel.
- Sign in to your Coupler.io account and click Add New in the Importers section.
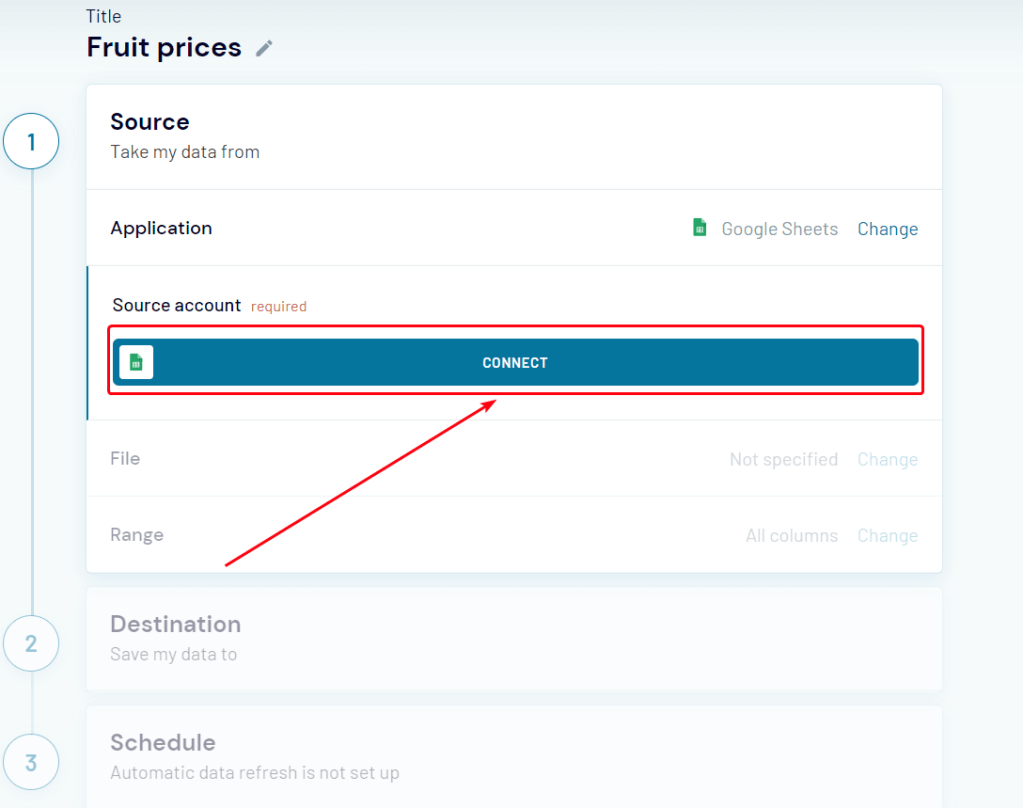
- Select Google Sheets as Source, click Connect, and sign in to your Google account:
- Select the workbook and the sheet that you would like to export data from:
- Select the range of cells, or skip this step to export all the data.
- In Destination, select Microsoft Excel, click Continue, and then sign in to your Microsoft account.
- Select an existing workbook and the worksheet. If you want to create a new worksheet, just type its name:
- Specify the cell address or keep the default ‘A1’ value.
- Specify the import mode. The default option is ‘Replace’.
- Now you can click Save and Run to start the import immediately.
Or you can toggle Automatic data refresh to configure automatic data updates:
Import data from Google Sheets to Excel as HTML
The second option is to use the built-in data import feature of Excel:
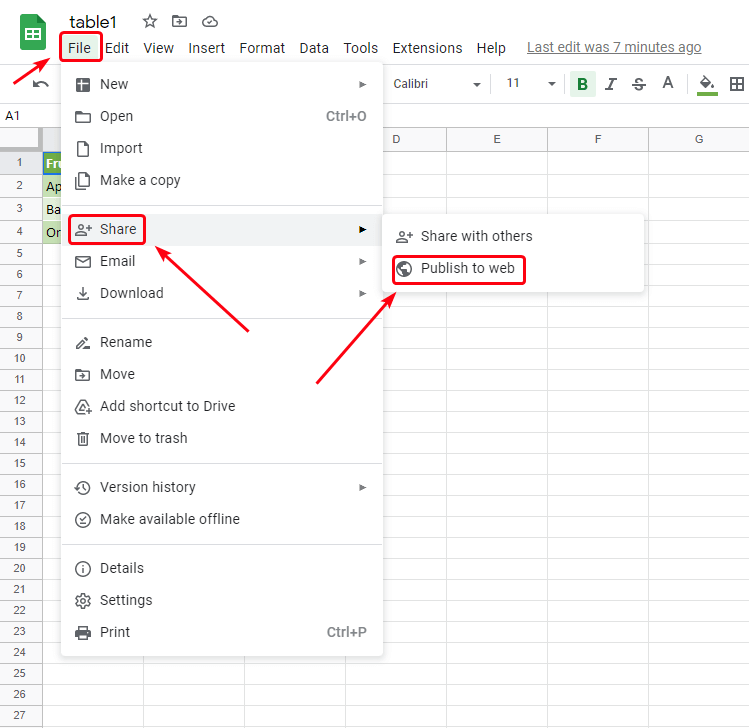
- In your Google spreadsheet, go to File > Share > Publish to web:
- Select the sheet that contains the table, and specify Comma-separated values (.csv).
If you want the data in Excel to be updated when the Google sheet is changed, select the Automatically republish when changes are made checkbox:
- Press
Ctrl-Cto copy the link. - Go to your Excel workbook and perform the steps described in the section about importing data from HTML above.
If you choose the second option, keep in mind that your data will become accessible by others. If the information is confidential or sensitive, using Coupler.io is preferred.
Importing data from other sources
How to import data from SQL server to Excel
If your data is stored in databases at an SQL server, the simplest way to make it accessible to a wide spectrum of users is to export it to Excel. You can use the native Excel query function.
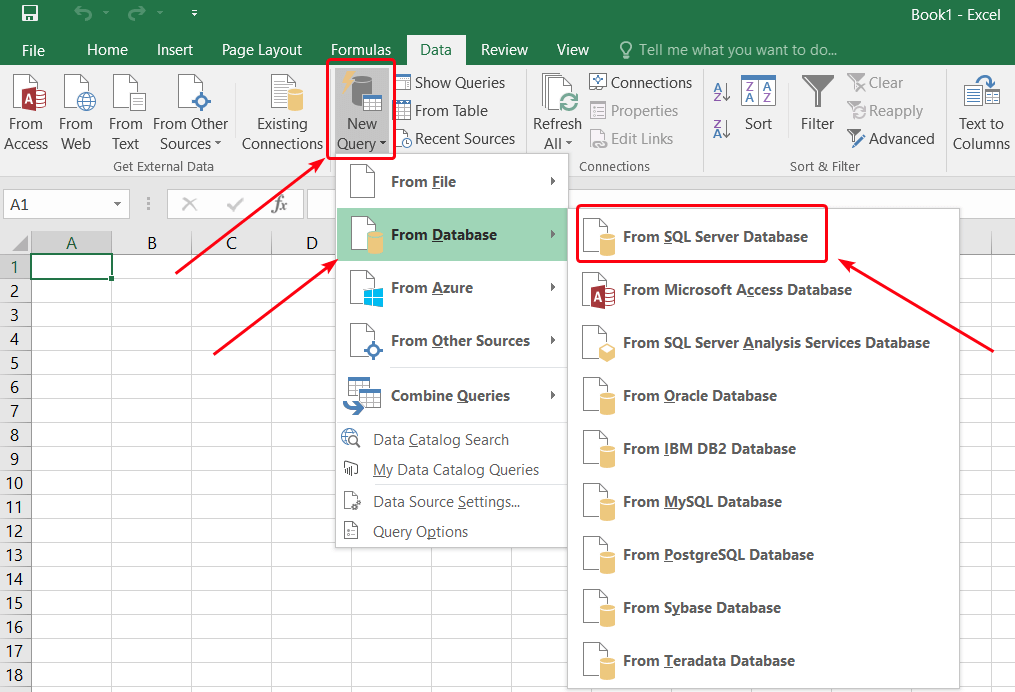
- In the Data tab, select New Query > From Database > From SQL Server Database:
- Specify the name of the server and the database (or you will be able to specify it later):
You can also provide an SQL statement to narrow the range of exported data.
- Choose to use your current window credentials to access the database, or provide the username and the password. Click Connect.
- In the next window, select the database and tables that you want to export.
- Select the name for the new data connection file, and then click Finish.
- In the next window, you can select where to insert the imported data. Select Existing worksheet and provide the cell address, if needed.
The data will be imported and pasted into the worksheet.
If you use SQL Server Management Studio (SSMS), there is a feature for exporting data to various destinations, including Excel spreadsheets.
- In Object Explorer, right-click the database with the source data, and then select Tasks > Export Data.
- In the SQL Server Import and Export Wizard window that opens, click Next.
- Select SQL Server Native Client 11.0 in the Data source drop-down box.
- Select Use Windows Authentication in the Authentication area, and then click Next.
- In the Choose a destination window, specify Microsoft Excel as the destination, browse to the target file in the Excel file path, and select the output file format.
- In the next window, you can choose to write a query for data export. If you want to copy the tables without changes, just click Next.
- The list of tables available for export will be displayed. Select the tables that you want to export. In the Destination column, you can specify the name of the worksheet for each table.
- In the Save and Run Package window, select Run immediately and click Next.
- Make sure that all parameters are correct, and then click Finish.
The selected data will be exported to the Excel workbook. When the wizard finishes all the tasks, click Close.
How to import data from a text file to Excel
The tables can also be stored in plain text. Such files are similar to regular text files with the only exception that commas have a special function there — they separate cells from each other. The format is called CSV — comma-separated values.
Excel can open .csv files directly. The content of such a file will be rendered as a table. If you edit a CSV file in Excel and then try to save it, you will see the following warning:
Click Yes if you want to continue using this file as CSV in the future. If you click No, the Save as dialogue will be opened, where you will be able to select the format and the destination for the file.
There are other delimiters that can be used to store tables in text format: tabs, pipes (‘|’), spaces, semicolons, etc. To open such files with Excel, instead of trying to open them directly, use the Power Query function.
- Go to Data > New Query > From File > From Text.
- Select the text file and click Import.
- The Query Editor window will open. Make sure that the table looks good and click Close & Load:
The imported table will be inserted into your current worksheet.
How to import data to Excel from PDF
If your tables are in PDF, but you want them in Excel, you can try to import them.
- Go to the Data tab, and then select New Query > From File > From PDF.
- Select the tables that you want to import in the Navigator window, and then click Load.
The tables will be extracted from PDF and pasted into your Excel workbook. If you don’t have the From PDF option on the menu, you can use the following workaround to import data from PDF into Excel:
- Copy the table text in the PDF file by selecting it and pressing
Ctrl-C. - Open Microsoft Word and press
Ctrl-V. - Check if Word managed to render the text data correctly:
- Press
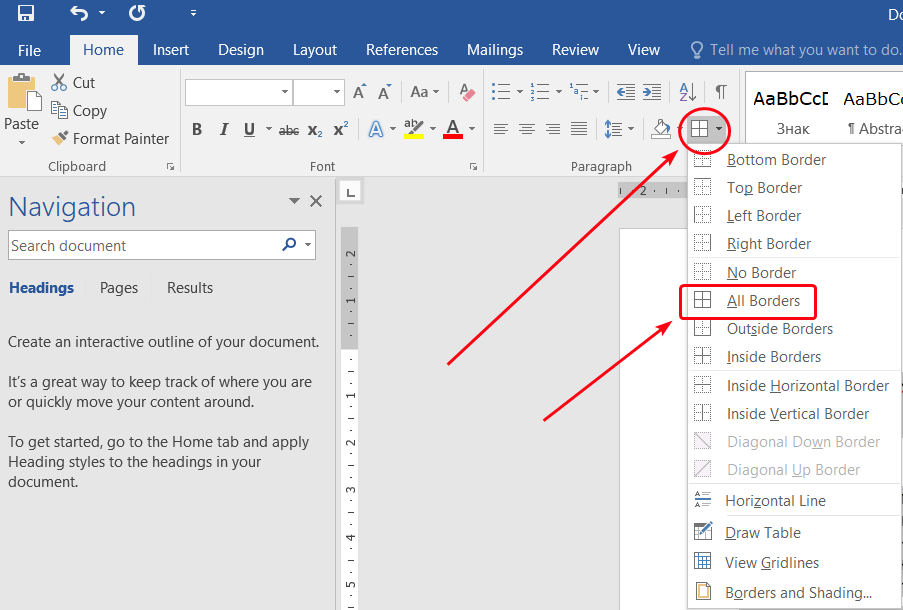
Ctrl-Ato select everything. - On the Home tab, click the table menu, and then select All borders:
- Press
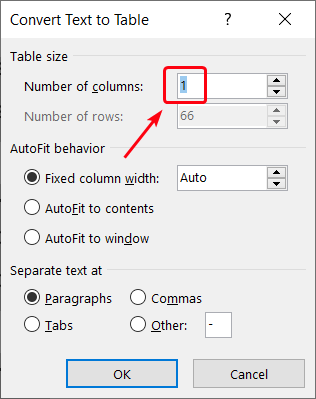
- If the table looks good, proceed to the final step. Otherwise, go to the Insert tab, and then select Table > Convert Text to Table:
- Specify the number of columns in the original table, and then click OK:
- Copy the entire table, go to Excel, and press
Ctrl-V.
The table will be inserted into the current worksheet. If you opt for this workaround, no automatic data synchronization will be available.
Discover many other sources for importing data to Excel
Excel provides you with many powerful features for data processing. You can bring virtually any data to Excel by importing it from various sources. If you didn’t find a good solution in this article, discover other Microsoft Excel integrations to pick what fits your needs best.
-
Lead Analytics Engineer at Railsware and Coupler.io. I make data accessible and useful for everyone in a team. During the last 7 years, I built dashboards, analyzed user journeys, and even caught criminals 🕵🏿♀️ Besides data, I also like doing yoga, cooking, and hiking 🤗
Back to Blog
Focus on your business
goals while we take care of your data!
Try Coupler.io


