Using the Export Wizard, you can export data from an Access database to in a file format that can be read by Excel. This article shows you how to prepare and export your data to Excel, and also gives you some troubleshooting tips for common problems that might occur.
In this article
-
Exporting data to Excel: the basics
-
Prepare for the export operation
-
Run the export operation
-
What else should I know about exporting?
-
Troubleshoot missing and incorrect values
Exporting data to Excel: the basics
When you export data to Excel, Access creates a copy of the selected data, and then stores the copied data in a file that can be opened in Excel. If you copy data from Access to Excel frequently, you can save the details of an export operation for future use, and even schedule the export operation to run automatically at set intervals.
Common scenarios for exporting data to Excel
-
Your department or workgroup uses both Access and Excel to work with data. You store the data in Access databases, but you use Excel to analyze the data and to distribute the results of your analysis. Your team currently exports data to Excel as and when they have to, but you want to make this process more efficient.
-
You are a long-time user of Access, but your manager prefers to work with data in Excel. At regular intervals, you do the work of copying the data into Excel, but you want to automate this process to save yourself time.
About exporting data to Excel
-
Access does not include a “Save As” command for the Excel format. To copy data to Excel, you must use the Export feature described in this article, or you can copy Access data to the clipboard and then paste it into an Excel spreadsheet.
-
You can export a table, query, form, or report. You can also export selected records in a multiple-record view, such as a datasheet.
-
Microsoft Excel includes a command to import data from an Access database. You can use that command instead of the export command in Access; however, the Excel import command only allows you to import tables or queries. For more information, see the Excel Help article Connect to (import) external data.
-
You cannot export macros or modules to Excel. When you export a form, report, or datasheet that contains subforms, subreports, or subdatasheets, only the main form, report, or datasheet is exported. You must repeat the export operation for each subform, subreport, and subdatasheet that you want to export to Excel.
-
You can only export one database object in a single export operation. However, you can merge multiple worksheets in Excel after you complete the individual export operations.
Top of Pge
Prepare for the export operation
Before performing an export procedure, it is a good idea to review the data that you want to export to make sure that it does not contain any error indicators or error values. If there are any errors, try to resolve them before you export the data to Excel. Otherwise, problems can occur during the export operation, and null values might be inserted into cells in the Excel worksheet. For more information about problems that can occur when exporting to Excel, see the section Troubleshoot missing and incorrect values.
If the source object is a table or a query, decide whether you want to export the data with or without its formatting. This decision affects two aspects of the resulting workbook — the amount of data that is exported and the display format of the data. The following table describes the outcome of exporting formatted and unformatted data.
|
Export |
Source Object |
Fields and records |
Formatting |
|
Without formatting |
Table or query Note: Forms and reports cannot be exported without their formatting. |
All fields and records in the underlying object are exported. |
The Format property settings are ignored during the operation. For lookup fields, only the lookup ID values are exported. For hyperlink fields, the contents are exported as a text column that displays the links in the format displaytext#address#. |
|
With formatting |
Table, query, form, or report |
Only fields and records that are displayed in the current view or object are exported. Filtered records, hidden columns in a datasheet, and fields not displayed on a form or report are not exported. |
The wizard respects the Format property settings. For lookup fields, the lookup values are exported. For hyperlink fields, the values are exported as hyperlinks. For rich text fields, the text is exported but the formatting is not. |
-
Choose the destination workbook and file format. Note that reports can only be exported in the older *.xls file format, not in the newer *.xlsx file format.
During the export operation, Access prompts you to specify the name of the destination workbook. The following table summarizes when a workbook is created (if it does not already exist) and when it is overwritten (if it does already exist).
|
If the destination workbook |
And the source object is |
And you want to export |
Then |
|
Does not exist |
A table, query, form, or report |
The data, with or without the formatting |
The workbook is created during the export operation. |
|
Already exists |
A table or query |
The data, but not the formatting |
The workbook is not overwritten. A new worksheet is added to the workbook, and is given the name of the object from which the data is being exported. If a worksheet having that name already exists in the workbook, Access prompts you to either replace the contents of the corresponding worksheet or specify another name for the new sheet. |
|
Already exists |
A table, query, form, or report |
The data, including the formatting |
The workbook is overwritten by the exported data. All existing worksheets are removed, and a new worksheet having the same name as the exported object is created. The data in the Excel worksheet inherits the format settings of the source object. |
The data is always added in a new worksheet. You cannot append the data to any existing worksheet or named range.
Top of Page
Run the export operation
-
If the destination Excel workbook is open, close it before you continue.
-
In the Navigation Pane of the source database, select the object that you want to export.
Export only a portion of the data
If the object is a table, query, or form, and you want to export only a portion of the data, open the object in Datasheet view and select the records you want.
To open a form in Datasheet view:
-
Double-click the form to open it.
-
Right-click the form, and then click Datasheet View. If this option is not available:
-
Click Design View.
-
Press F4 to display the Property Sheet task pane.
-
Select Form from the drop-down list at the top of the Property Sheet.
-
On the Format tab of the Property Sheet, set the Allow Datasheet View property to Yes.
-
On the Design tab, in the Views group, click Datasheet View.
Note: You cannot export a portion of a report. However, you can select or open the table or query that the report is based on, and then export a portion the data in that object.
-
-
-
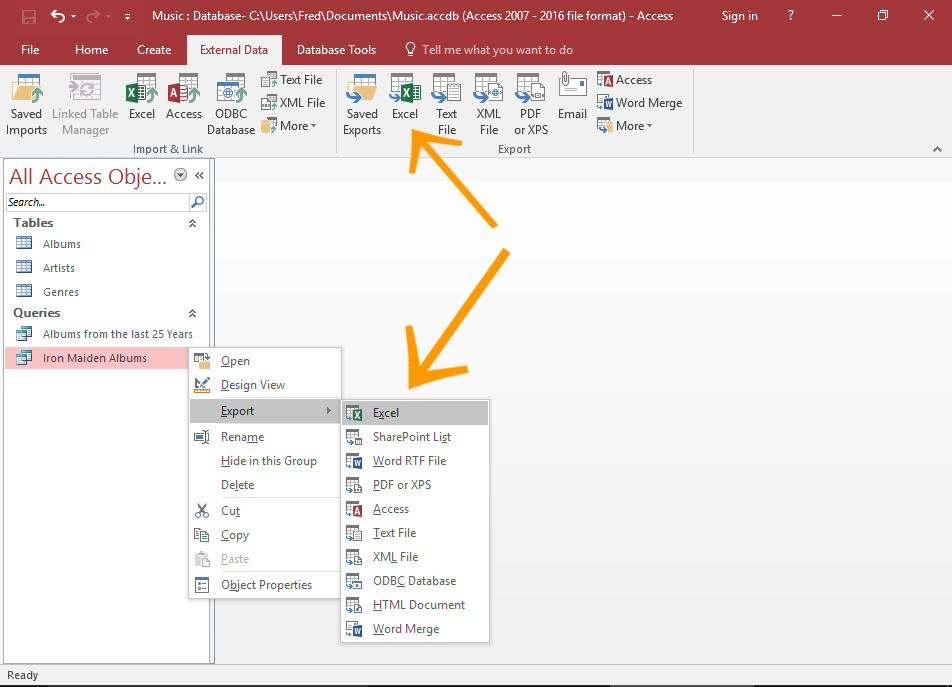
On the External Data tab, in the Export group, click Excel.
-
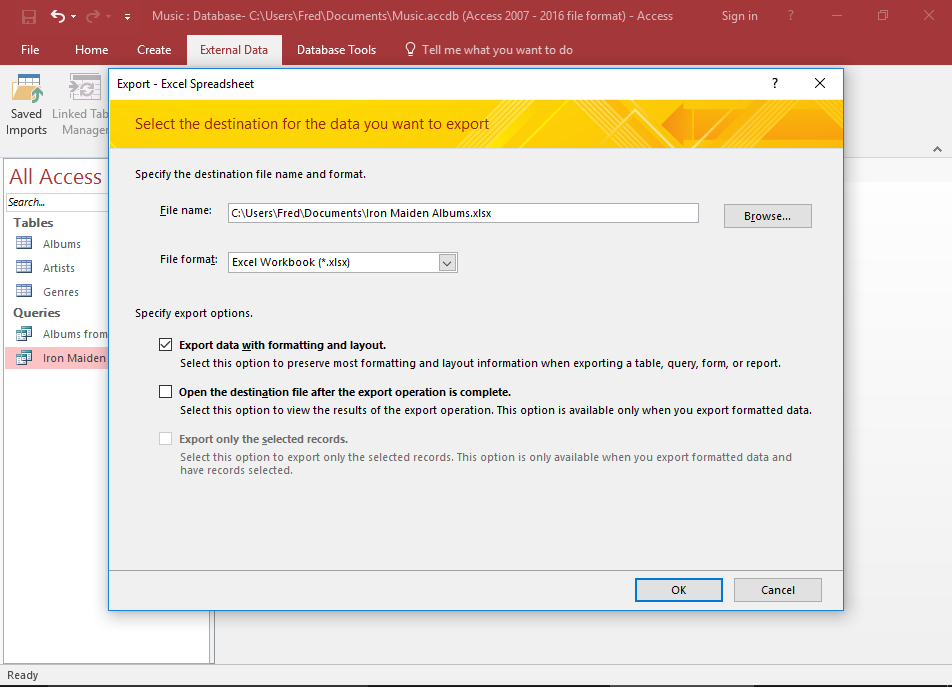
In the Export — Excel Spreadsheet dialog box, review the suggested file name for the Excel workbook (Access uses the name of the source object). If you want, you can modify the file name.
-
In the File Format box, select the file format that you want.
-
If you are exporting a table or a query, and you want to export formatted data, select Export data with formatting and layout. For more information, see the section Prepare for the export operation.
Note: If you are exporting a form or report, this option is always selected but unavailable (it appears dimmed).
-
To view the destination Excel workbook after the export operation is complete, select the Open the destination file after the export operation is complete check box.
If the source object is open, and if you selected one or more records in the view before starting the export operation, you can select Export only the selected records. To export all the records displayed in the view, leave this check box cleared.
Note: This check box remains unavailable (dimmed) if no records are selected.
-
Click OK.
If the export operation fails because of an error, Access displays a message that describes the cause of the error. Otherwise, Access exports the data and, depending on your selection in step 7, opens the destination workbook in Excel. Access then displays a dialog box in which you can create a specification that uses the details from the export operation.
Top of Page
What else should I know about exporting?
-
For information on how to save the details of your export into a specification that you can reuse later, see the article Save the details of an import or export operation as a specification.
-
For information on how to run saved export specifications, see the article Run a saved import or export operation.
-
For information on how to schedule specifications to run at specific times, see the article Schedule an import or export operation.
-
For information on how to change a specification name, delete specifications, or update the names of source files in specifications, see the article Manage Data Tasks.
Top of Page
Troubleshoot missing and incorrect values
The following table describes various ways of troubleshooting common errors.
Tip: If you find that just a few values are missing, fix them in the Excel workbook. Otherwise, fix the source object in the Access database, and then repeat the export operation.
|
Issue |
Description and resolution |
|
Calculated fields |
The results of calculated fields are exported; the underlying expressions that perform the calculations are not. |
|
Multivalued fields |
Fields that support multiple values are exported as a list of values separated by semicolons (;). |
|
Pictures, objects, and attachments |
Graphical elements (such as logos, contents of OLE object fields, and attachments that are part of the source data) are not exported. Add them to the worksheet manually after you complete the export operation. |
|
Graph |
When you export a form or report that contains a Microsoft Graph object, the graph object is not exported. |
|
Data in the wrong column |
Null values in the resulting worksheet are sometimes replaced by the data that should be in the next column. |
|
Missing date values |
Date values earlier than Jan 1, 1900 are not exported. The corresponding cells in the worksheet will contain a null value. |
|
Missing expressions |
Expressions that are used to calculate values are not exported to Excel. Only the results of the calculations are exported. Manually add the formula to the Excel worksheet after you complete the export operation. |
|
Missing subforms, subreports, and subdatasheets |
When you export a form, report, or datasheet, only the main form, report, or datasheet is exported. You must repeat the export operation for each subform, subreport, and subdatasheet that you want to export. |
|
Missing or incorrectly formatted columns |
If none of the columns appear to be formatted in the resulting worksheet, repeat the export operation, being sure to select the Export data with formatting and layout check box in the wizard. Conversely, if only some columns appear to be formatted differently from the versions in the source object, apply the formatting that you want manually in Excel. Format a column in Excel
|
|
«#» value in a column |
You might see the value # in a column that corresponds to a Yes/No field in a form. This can be the result of starting the export operation from the Navigation Pane or in Form view. To resolve this issue, open the form in Datasheet view before exporting the data. |
|
Error indicators or error values |
Check the cells for error indicators (green triangles in the corners) or error values (strings that begin with the # character instead of the appropriate data). |
Top of Page
Can I convert access data to Excel? This is a very common question that many people asked when they are learning Access is “how to convert Access database into Excel spreadsheet?”.
Well, it not actually converting Access to Excel. It usually means that “how to export data from Access database to Excel spreadsheet”. Often, people do this as they need to distribute the data from one person to another.
Short Intro About Access Into Excel:
Microsoft Access and Microsoft Excel both have basic features like they provide data sheets which contain rows and columns which allow keeping a record of all the information. MS Access tables are the foundation of the database that provides an initial point for viewing and inputting data and on the other hand, MS Excel contains tools for keeping information using formulas.
Microsoft Access is also known as Source database and Microsoft Excel is also known as Target database Excel.
If you are also those people who want to convert Access into Excel that this article is perfect for you. Here you will find the ways to convert Access into Excel but before that first, know why there is a need for Access to Excel conversion?
Why There Is A Need To Convert Access Into Excel?
- Access database is huge, sending the entire database only for some information may be annoying for the other person as they need to find that particular information from huge data.
- When you are using the Access database from long time but all of sudden you need to work in Excel. Regularly you need to copy Access data into Excel. So, you want to automate this procedure.
- When your workgroup make use of both MS Excel and Access Database application to store data. Suppose you are using the Access database to store data but using excel application to analyze it. At that time you and your team may needs to convert Access data to Excel.
So, there is a need to convert Access database to Excel as it is easier to send a simple Excel spreadsheet that contains the required data/information rather than the whole Access database.
There are a few ways mentioned below through which you will be able to convert Access database into Excel.
Method 1: Copy and Paste
This copy & paste method is the simplest one that might not even click anyone: to do this you just need to select the rows you need from Access (or select all using ⌘A) copy and paste them into Excel. That’s it your Access database is converted to Excel.
Method 2: CSV file format
Another method is that you can export your Access tables as CSV file and import those into Excel spreadsheet.
How MS Excel handles CSV files totally depends on the region setting in your System Preferences. For example, if you set your region to “United States”, Excel will then only expect International CSV files and if you set your region as to “Germany”, then Excel will expect Continental CSV files.
Excel file opens with CSV files in MacRoman encoding.
Excel do not allow line breaks inside the fields, so be careful that you uncheck that option.
Method 3: Export Access Database To Excel
To convert Access database to Excel another method is by export Access Database To Excel
Step 1: Opening the Access database file
At first you need to open the Access database that contains the data you want to export in Excel.
For Access 2003 or earlier: Click on the File > Open
For Access 2007: Click on Office> Open
Step 2: Open the Export Dialog box
Go to the External Data tab and tap to the export group. From this group hit the Excel icon.
Step 3: Export Options
In the opened Window of Export – Excel spreadsheet check out the complete options. Here you will get the option to specify the destination file name and format.
After making all the setup, tap to the OK option to export the data.
Step 4: Save Export Steps
Access database application allows you to save the complete steps you have performed for exporting Access to Excel. For this you have to click on the option save export steps. This will allow you to quickly repeat the operation in the future without using the wizard.
Access gives you the option of saving the steps you just took, so that you can re-run them again later.
At last click to the close option to finish the export Access to Excel.
Step 5: View the Exported File
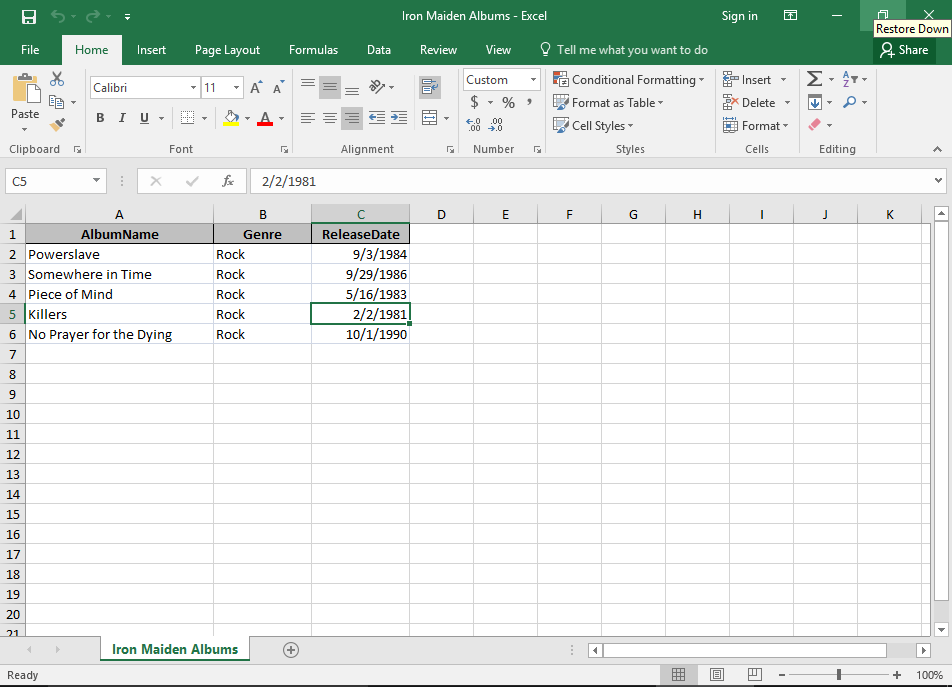
To view the exported file in Excel you need to go to the location which you have assigned in the save step.
Conclusion:
Here I have provided you the relevant information on how to convert Access into Excel. I hope the above-mentioned methods have helped you in converting data from Access to Excel.
After the conversion of Access data into Excel, if any issue arises that you are unable to open the Excel file, to solve this problem you can try Excel Repair Tool. It will help you to solve all your Excel related issues automatically.
Hope this article turns out to be helpful for you. If you have any queries or questions feel free to share in our comment section.
Priyanka is an entrepreneur & content marketing expert. She writes tech blogs and has expertise in MS Office, Excel, and other tech subjects. Her distinctive art of presenting tech information in the easy-to-understand language is very impressive. When not writing, she loves unplanned travels.
Содержание
- ImportExportSpreadsheet Macro Action
- Setting
- Remarks
- Export data to Excel
- In this article
- Exporting data to Excel: the basics
- Common scenarios for exporting data to Excel
- About exporting data to Excel
- Prepare for the export operation
- Импорт данных из Access в Excel
- Import or link to data in an Excel workbook
- What do you want to do?
- Understand importing data from Excel
- Common scenarios for importing Excel data into Access
- If this is the first time you are importing data from Excel
- Import data from Excel
- Prepare the worksheet
- Prepare the destination database
- Start the import operation
- Use the Import Spreadsheet wizard
- Troubleshoot missing or incorrect values
ImportExportSpreadsheet Macro Action
You can use the ImportExportSpreadsheet macro action to import or export data between the current Access database (.mdb or .accdb) and a spreadsheet file. You can also link the data in an Excel spreadsheet to the current Access database. With a linked spreadsheet, you can view the spreadsheet data with Access while still allowing complete access to the data from your Excel spreadsheet program. You can also link to data in a Lotus 1-2-3 spreadsheet file, but this data is also read-only in Access.
Note: Beginning in Access 2010, the TransferSpreadsheet macro action was renamed to ImportExportSpreadsheet.
Note: This action will not be allowed if the database is not trusted.
Setting
The ImportExportSpreadsheet macro action has the following arguments.
The type of transfer you want to make. Select Import, Export, or Link in the Transfer Type box in the Action Arguments section of the macro design window. The default is Import.
Note: The Link transfer type is not supported for Access projects (.adp).
The type of spreadsheet to import from, export to, or link to. You can select one of a number of spreadsheet types in the box. The default is Excel Workbook.
Note: You can import from and link (read-only) to Lotus .WK4 files, but you can’t export Access data to this spreadsheet format. Access also no longer supports importing, exporting, or linking data from Lotus .WKS or Excel version 2.0 spreadsheets with this action. If you want to import from or link to spreadsheet data in Excel version 2.0 or Lotus .WKS format, convert the spreadsheet data to a later version of Excel or Lotus 1-2-3 before importing or linking the data into Access.
The name of the Access table to import spreadsheet data to, export spreadsheet data from, or link spreadsheet data to. You can also type the name of the Access select query you want to export data from. This is a required argument.
If you select Import in the Transfer Type argument, Access appends the spreadsheet data to this table if the table already exists. Otherwise, Access creates a new table containing the spreadsheet data.
In Access, you can’t use an SQL statement to specify data to export when you are using the ImportExportSpreadsheet macro action. Instead of using an SQL statement, you must first create a query and then specify the name of the query in the Table Name argument.
The name of the spreadsheet file to import from, export to, or link to. Include the full path. This is a required argument.
Access creates a new spreadsheet when you export data from Access. If the file name is the same as the name of an existing spreadsheet, Access replaces the existing spreadsheet, unless you’re exporting to an Excel version 5.0 or later workbook. In that case, Access copies the exported data to the next available new worksheet in the workbook.
If you are importing from or linking to an Excel version 5.0 or later spreadsheet, you can specify a particular worksheet by using the Range argument.
Has Field Names
Specifies whether the first row of the spreadsheet contains the names of the fields. If you select Yes, Access uses the names in this row as field names in the Access table when you import or link the spreadsheet data. If you select No, Access treats the first row as a normal row of data. The default is No.
When you export an Access table or select query to a spreadsheet, the field names are inserted into the first row of the spreadsheet no matter what you select in this argument.
The range of cells to import or link. Leave this argument blank to import or link the entire spreadsheet. You can type the name of a range in the spreadsheet or specify the range of cells to import or link, such as A1:E25 (note that the A1..E25 syntax does not work in Access 97 or later). If you are importing from or linking to an Excel version 5.0 or later spreadsheet, you can prefix the range with the name of the worksheet and an exclamation point; for example, Budget!A1:C7.
Note: When you export to a spreadsheet, you must leave this argument blank. If you enter a range, the export will fail.
You can export the data in Access select queries to spreadsheets. Access exports the result set of the query, treating it just like a table.
Spreadsheet data that you append to an existing Access table must be compatible with the table’s structure.
Each field in the spreadsheet must be of the same data type as the corresponding field in the table.
The fields must be in the same order (unless you set the Has Field Names argument to Yes, in which case the field names in the spreadsheet must match the field names in the table).
This macro action is similar to clicking the External Data tab and clicking Excel in the Import or Export group. You can use these commands to select a source of data, such as Access or a type of database, spreadsheet, or text file. If you select a spreadsheet, a series of dialog boxes appear, or an Access wizard runs, in which you select the name of the spreadsheet and other options. The arguments of the ImportExportSpreadsheet macro action reflect the options in these dialog boxes or in the wizards.
Note: If you query or filter a linked spreadsheet, the query or filter is case-sensitive.
If you link to an Excel spreadsheet that is open in Edit mode, Access will wait until the Excel spreadsheet is out of Edit mode before completing the link; there’s no time-out.
To run the ImportExportSpreadsheet action in a Visual Basic for Applications (VBA) module, use the TransferSpreadsheet method of the DoCmd object.
Источник
Export data to Excel
Using the Export Wizard, you can export data from an Access database to in a file format that can be read by Excel. This article shows you how to prepare and export your data to Excel, and also gives you some troubleshooting tips for common problems that might occur.
In this article
Exporting data to Excel: the basics
When you export data to Excel, Access creates a copy of the selected data, and then stores the copied data in a file that can be opened in Excel. If you copy data from Access to Excel frequently, you can save the details of an export operation for future use, and even schedule the export operation to run automatically at set intervals.
Common scenarios for exporting data to Excel
Your department or workgroup uses both Access and Excel to work with data. You store the data in Access databases, but you use Excel to analyze the data and to distribute the results of your analysis. Your team currently exports data to Excel as and when they have to, but you want to make this process more efficient.
You are a long-time user of Access, but your manager prefers to work with data in Excel. At regular intervals, you do the work of copying the data into Excel, but you want to automate this process to save yourself time.
About exporting data to Excel
Access does not include a “Save As” command for the Excel format. To copy data to Excel, you must use the Export feature described in this article, or you can copy Access data to the clipboard and then paste it into an Excel spreadsheet.
You can export a table, query, form, or report. You can also export selected records in a multiple-record view, such as a datasheet.
Microsoft Excel includes a command to import data from an Access database. You can use that command instead of the export command in Access; however, the Excel import command only allows you to import tables or queries. For more information, see the Excel Help article Connect to (import) external data.
You cannot export macros or modules to Excel. When you export a form, report, or datasheet that contains subforms, subreports, or subdatasheets, only the main form, report, or datasheet is exported. You must repeat the export operation for each subform, subreport, and subdatasheet that you want to export to Excel.
You can only export one database object in a single export operation. However, you can merge multiple worksheets in Excel after you complete the individual export operations.
Prepare for the export operation
Before performing an export procedure, it is a good idea to review the data that you want to export to make sure that it does not contain any error indicators or error values. If there are any errors, try to resolve them before you export the data to Excel. Otherwise, problems can occur during the export operation, and null values might be inserted into cells in the Excel worksheet. For more information about problems that can occur when exporting to Excel, see the section Troubleshoot missing and incorrect values.
If the source object is a table or a query, decide whether you want to export the data with or without its formatting. This decision affects two aspects of the resulting workbook — the amount of data that is exported and the display format of the data. The following table describes the outcome of exporting formatted and unformatted data.
Источник
Импорт данных из Access в Excel
Этот пример научит вас импортировать информацию из базы данных Microsoft Access. Импортируя данные в Excel, вы создаёте постоянную связь, которую можно обновлять.
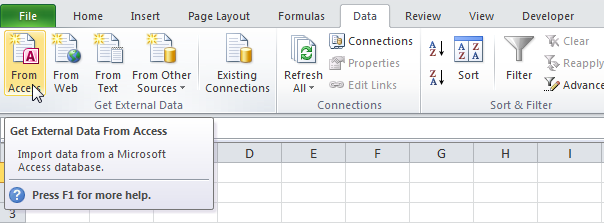
- На вкладке Data (Данные) в разделе Get External Data (Получение внешних данных) кликните по кнопке From Access (Из Access).
- Выберите файл Access.
- Кликните Open (Открыть).
- Выберите таблицу и нажмите ОК.
- Выберите, как вы хотите отображать данные в книге, куда их следует поместить и нажмите ОК.
Результат: Записи из базы данных Access появились в Excel.
Примечание: Когда данные Access изменятся, Вам достаточно будет нажать Refresh (Обновить), чтобы загрузить изменения в Excel.
Источник
Import or link to data in an Excel workbook
Note: Microsoft Access doesn’t support importing Excel data with an applied sensitivity label. As a workaround, you can remove the label before importing and then re-apply the label after importing. For more information, see Apply sensitivity labels to your files and email in Office.
You can bring the data from an Excel workbook into Access databases in many ways. You can copy data from an open worksheet and paste it into an Access datasheet, import a worksheet into a new or existing table, or link to a worksheet from an Access database.
This topic explains in detail how to import or link to Excel data from Access desktop databases.
What do you want to do?
Understand importing data from Excel
If your goal is to store some or all of your data from one or more Excel worksheets in Access, you should import the contents of the worksheet into a new or existing Access database. When you import data, Access creates a copy of the data in a new or existing table without altering the source Excel worksheet.
Common scenarios for importing Excel data into Access
You are a long-time user of Excel but, going forward, you want to use Access to work with this data. You want to move the data in your Excel worksheets into one or more new Access databases.
Your department or workgroup uses Access, but you occasionally receive data in Excel format that must be merged with your Access databases. You want to import these Excel worksheets into your database as you receive them.
You use Access to manage your data, but the weekly reports you receive from the rest of your team are Excel workbooks. You would like to streamline the import process to ensure that data is imported every week at a specific time into your database.
If this is the first time you are importing data from Excel
There is no way to save an Excel workbook as an Access database. Excel does not provide functionality to create an Access database from Excel data.
When you open an Excel workbook in Access (in the File Open dialog box, change the Files of Type list box to Microsoft Office Excel Files and select the file you want), Access creates a link to the workbook instead of importing its data. Linking to a workbook is fundamentally different from importing a worksheet into a database. For more information about linking, see the section Link to data in Excel, later in this article.
Import data from Excel
The steps in this section explain how to prepare for and run an import operation, and how to save the import settings as a specification for later reuse. As you proceed, remember that you can import data from only one worksheet at a time. You cannot import all the data from a whole workbook at the same time.
Prepare the worksheet
Locate the source file and select the worksheet that contains the data that you want to import to Access. If you want to import only a portion of a worksheet, you can define a named range that includes only the cells that you want to import.
Define a named range (optional)
Switch to Excel and open the worksheet that has data that you want to import.
Select the range of cells that contain the data that you want to import.
Right-click within the selected range and then click Name a Range or Define Name.
In the New Name dialog box, specify a name for the range in the Name box and click OK.
Remember that you can import only one worksheet at a time during an import operation. To import data from multiple worksheets, repeat the import operation for each worksheet.
Review the source data and take action as described in this table.
Number of columns
The number of source columns that you want to import cannot exceed 255, because Access does not support more than 255 fields in a table.
Skipping columns and rows
It is a good practice to include only the rows and columns that you want to import in the source worksheet or named range.
Rows You cannot filter or skip rows during the import operation.
Columns You cannot skip columns during the operation if you choose to add the data to an existing table.
Ensure that the cells are in tabular format. If the worksheet or named range includes merged cells, the contents of the cell are placed in the field that corresponds to the leftmost column, and the other fields are left blank.
Blank columns, rows, and cells
Delete all unnecessary blank columns and blank rows in the worksheet or range. If the worksheet or range contains blank cells, try to add the missing data. If you are planning to append the records to an existing table, ensure that the corresponding field in the table accepts null (missing or unknown) values. A field will accept null values if its Required field property is set to No and its ValidationRule property setting doesn’t prevent null values.
If one or more cells in the worksheet or range contain error values, such as #NUM and #DIV, correct them before you start the import operation. If a source worksheet or range contains error values, Access places a null value in the corresponding fields in the table. For more information about ways to correct those errors, see the section Troubleshoot missing or incorrect values, later in this article.
To avoid errors during importing, ensure that each source column contains the same type of data in every row. Access scans the first eight source rows to determine the data type of the fields in the table. We highly recommend that you ensure that the first eight source rows do not mix values of different data types in any of the columns. Otherwise, Access might not assign the correct data type to the column.
Also, it is a good practice to format each source column in Excel and assign a specific data format to each column before you start the import operation. Formatting is highly recommended if a column includes values of different data types. For example, the FlightNo column in a worksheet might contain numeric and text values, such as 871, AA90, and 171. To avoid missing or incorrect values, do the following:
Right-click the column header and then click Format Cells.
On the Number tab, under Category, select a format. For the FlightNo column, you would probably choose Text.
If the source columns are formatted, but still contain mixed values in the rows following the eighth row, the import operation might still skip values or convert values incorrectly. For troubleshooting information, see the section Troubleshoot missing or incorrect values.
If the first row in the worksheet or named range contains the names of the columns, you can specify that Access treat the data in the first row as field names during the import operation. If your source worksheet or range doesn’t include the names, it is a good idea to add them to the source before you start the import operation.
Note: If you plan to append the data to an existing table, ensure that the name of each column exactly matches the name of the corresponding field. If the name of a column is different from the name of the corresponding field in the table, the import operation will fail. To see the names of the fields, open the table in Design view in Access.
Close the source workbook, if it is open. Keeping the source file open might result in data conversion errors during the import operation.
Prepare the destination database
Open the Access database where the imported data will be stored. Ensure that the database is not read-only, and that you have permissions to make changes to the database.
If you don’t want to store the data in any of your existing databases, create a blank database. To do so:
Click the File tab, click New, and then click Blank Database.
Before you start the import operation, decide whether you want to store the data in a new or existing table.
Create a new table If you choose to store the data in a new table, Access creates a table and adds the imported data to this table. If a table with the specified name already exists, Access overwrites the contents of the table with the imported data.
Append to an existing table If you choose to add the data to an existing table, the rows in the Excel worksheet are appended to the specified table.
Remember that most failures during append operations occur because the source data does not match the structure and field settings of the destination table. To avoid this, open the destination table in Design view and review the following:
First row If the first row of the source worksheet or named range does not contain column headings, ensure that the position and data type of each column in the source worksheet matches those of the corresponding field in the table. If the first row contains column headings, the order of columns and fields do not need to match, but the name and data type of each column must exactly match those of its corresponding field.
Missing or extra fields If one or more fields in the source worksheet do not exist in the destination table, add them before you start the import operation. However, if the table contains fields that don’t exist in the source, you do not need to delete those fields from the table if they accept null values.
Tip: A field will accept null values if its Required property is set to No and its ValidationRule property setting doesn’t prevent null values.
Primary key If the table contains a primary key field, the source worksheet or range must have a column that contains values that are compatible with the primary key field, and the imported key values must be unique. If an imported record contains a primary key value that already exists in the destination table, the import operation displays an error message.
Indexed fields If the Indexed property of a field in the table is set to Yes (No Duplicates), the corresponding column in the source worksheet or range must contain unique values.
Go to the next steps to run the import operation.
Start the import operation
The location of the import/link wizard differs slightly depending upon your version of Access. Choose the steps that match your Access version:
If you’re using the latest version of the Microsoft 365 subscription version of Access or Access 2019, on the External Data tab, in the Import & Link group, click New Data Source > From File > Excel.
If you’re using Access 2016, Access 2013, or Access 2010, on the External Data tab, in the Import & Link group, click Excel.
Note: The External Data tab is not available unless a database is open.
In the Get External Data — Excel Spreadsheet dialog box, in the File name box, specify the name of the Excel file that contains the data that you want to import.
Click Browse and use the File Open dialog box to locate the file that you want to import.
Specify how you want to store the imported data.
To store the data in a new table, select Import the source data into a new table in the current database. You will be prompted to name this table later.
To append the data to an existing table, select Append a copy of the records to the table and select a table from the drop-down list. This option is not available if the database has no tables.
To link to the data source by creating a linked table, see the section Link to data in Excel, later in this article.
The Import Spreadsheet Wizard starts, and leads you through the import process. Go to the next set of steps.
Use the Import Spreadsheet wizard
On the first page of the wizard, select the worksheet that contains the data that you want to import, and then click Next.
On the second page of the wizard, click either Show Worksheets or Show Named Ranges, select either the worksheet or the named range that you want to import, and then click Next.
If the first row of the source worksheet or range contains the field names, select First Row Contains Column Headings and click Next.
If you are importing the data into a new table, Access uses these column headings to name the fields in the table. You can change these names either during or after the import operation. If you are appending the data to an existing table, ensure that the column headings in the source worksheet exactly match the names of the fields in the destination table.
If you are appending data to an existing table, skip directly to step 6. If you are adding the data to a new table, follow the remaining steps.
The wizard prompts you to review the field properties. Click a column in the lower half of the page to display the corresponding field’s properties. Optionally, do any of the following:
Review and change, if you want, the name and data type of the destination field.
Access reviews the first eight rows in each column to suggest the data type for the corresponding field. If the column in the worksheet contains different types of values, such as text and numbers, in the first eight rows of a column, the wizard suggests a data type that is compatible with all the values in the column — most often, the text data type. Although you can choose a different data type, remember that values that are incompatible with the data type that you choose will be either ignored or converted incorrectly during the import process. For more information about how to correct missing or incorrect values, see the section Troubleshoot missing or incorrect values, later in this article.
To create an index on the field, set Indexed to Yes.
To completely skip a source column, select the Do not import field (Skip) check box.
Click Next after you finish selecting options.
In the next screen, specify a primary key for the table. If you select Let Access add primary key, Access adds an AutoNumber field as the first field in the destination table, and automatically populates it with unique ID values, starting with 1. Click Next.
In the final wizard screen, specify a name for the destination table. In the Import to Table box, type a name for the table. If the table already exists, Access displays a prompt that asks whether you want to overwrite the existing contents of the table. Click Yes to continue or No to specify a different name for the destination table, and then click Finish to import the data.
If Access was able to import some or all the data, the wizard displays a page that shows you the status of the import operation. In addition, you can save the details of the operation for future use as a specification. Conversely, if the operation completely failed, Access displays the message An error occurred trying to import file.
Click Yes to save the details of the operation for future use. Saving the details helps you repeat the operation at a later time without having to step through the wizard each time.
See Save the details of an import or export operation as a specification to learn how to save your save your specification details.
See Run a saved import or export specification to learn how to run your saved import or link specifications.
See Schedule an import or export specification to learn how to schedule import and link tasks to run at specific times.
Troubleshoot missing or incorrect values
If you receive the message An error occurred trying to import file, the import operation completely failed. Conversely, if the import operation displays a dialog box that prompts you to save the details of the operation, the operation was able to import all or some of the data. The status message also mentions the name of the error log table that contains the description of any errors that occurred during the import operation.
Important: Even if the status message indicates a completely successful operation, you should review the contents and structure of the table to ensure that everything looks correct before you start using the table.
Open the destination table in Datasheet view to see whether all data was added to the table.
Open the table in Design view to review the data type and other property settings of the fields.
The following table describes the steps that you can take to correct missing or incorrect values.
Tip: While you are troubleshooting the results, if you find just a few missing values, you can add them to the table manually. Conversely, if you find that entire columns or a large number of values are either missing or were not imported properly, you should correct the problem in the source file. After you have corrected all known problems, repeat the import operation.
Graphical elements, such as logos, charts, and pictures cannot be imported. Manually add them to the database after completing the import operation.
The results of a calculated column or cells are imported, but not the underlying formula. During the import operation, you can specify a data type that is compatible with the formula results, such as Number.
TRUE or FALSE and -1 or 0 values
If the source worksheet or range includes a column that contains only TRUE or FALSE values, Access creates a Yes/No field for the column and inserts -1 or 0 values in the field. However, if the source worksheet or range includes a column that contains only -1 or 0 values, Access, by default, creates a numeric field for the column. You can change the data type of the field to Yes/No during the import operation to avoid this problem.
When you import data to a new table or append data to an existing table, Access does not enable support for multiple values in a field, even if the source column contains a list of values separated by semicolon ( ;). The list of values is treated as a single value and is placed in a text field.
If data appears truncated in a column in the Access table, try increasing the width of the column in Datasheet view. If that doesn’t resolve the issue, the data in a numeric column in Excel is too large for the field size of the destination field in Access. For example, the destination field might have the FieldSize property set to Byte in an Access database but the source data contains a value greater than 255. Correct the values in the source file and try importing again.
You might have to set the Format property of certain fields in design view to ensure that the values are displayed correctly in Datasheet view. For example:
A Yes/No field displays -1 and 0 in Datasheet view after the import operation is completed. To fix this, after the import operation is complete, set the field’s Format property to Yes/No to display check boxes instead.
Long and medium dates might appear as short dates in Access. To fix this, open the destination table in Design view in Access and set the date field’s Format property to Long Date or Medium Date.
Note: If the source worksheet contains rich text formatting such as bold, underline, or italics, the text is imported, but the formatting is lost.
Duplicate values (key violation error)
Records that you are importing might contain duplicate values that cannot be stored in the primary key field of the destination table or in a field that has the Indexed property set to Yes (No Duplicates). Eliminate the duplicate values in the source file and try importing again.
Date values off by 4 years
The date fields that are imported from an Excel worksheet might be off by four years. Excel for Windows can use two date systems:
The 1904 Date System (in which serial numbers range from 0 to 63,918), which correspond to the dates January 1, 1904 through December 31, 2078.
The 1900 Date System (in which serial numbers range from 1 to 65,380), which correspond to the dates January 1, 1900 through December 31, 2078.
You can set the date system in Excel Options: File > Options > Advanced > Use 1904 date system.
Note If you import from a .xlsb workbook, it always uses the 1900 Date System regardless of the Date System setting.
Before you import the data, change the date system for the Excel workbook or, after appending the data, perform an update query that uses the expression [ date field name] + 1462 to correct the dates.
Excel for the Macintosh only uses the 1904 Date System.
You might see an error message at the end of the import operation about data that was deleted or lost during the operation, or when you open the table in Datasheet view, you might see that some field values are blank. If the source columns in Excel are not formatted, or the first eight source rows contain values of different data types, open the source worksheet and do the following:
Format the source columns.
Move the rows so that the first eight rows in each column do not contain values of different data types.
During the import operation, select the appropriate data type for each field. If the data type is incorrect, you might see null values or incorrect values in the entire column after the import operation has completed.
The preceding steps can help minimize the appearance of null values. The following table lists cases in which you will still see null values:
Источник
How to Import Data in Excel?
Importing the data from another file or another source file is often required in Excel. For example, sometimes people need data directly from very complicated servers, and sometimes we may need to import data from a text file or even from an Excel workbook.
If you are new to Excel data importing, then in this article, we will take a tour of importing data from text files, different Excel workbooks, and MS Access. Follow this article to learn the process involved in importing the data.
Table of contents
- How to Import Data in Excel?
- #1 – Import Data from Another Excel Workbook
- #2 – Import Data from MS Access to Excel
- #3 – Import Data from Text File to Excel
- Things to Remember
- Recommended Articles
#1 – Import Data from Another Excel Workbook
You can download this Import Data Excel Template here – Import Data Excel Template
Let us start.
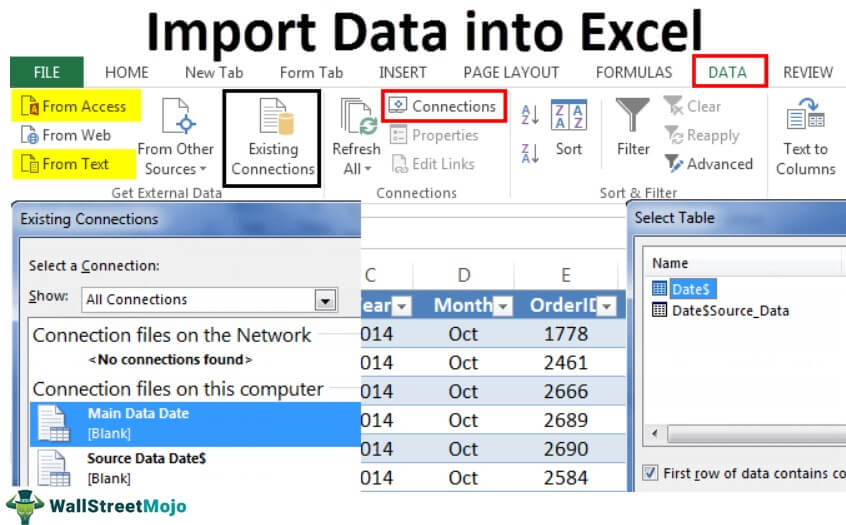
- First, we must go to the DATA tab. Then, under the DATA tab, click on Connections.
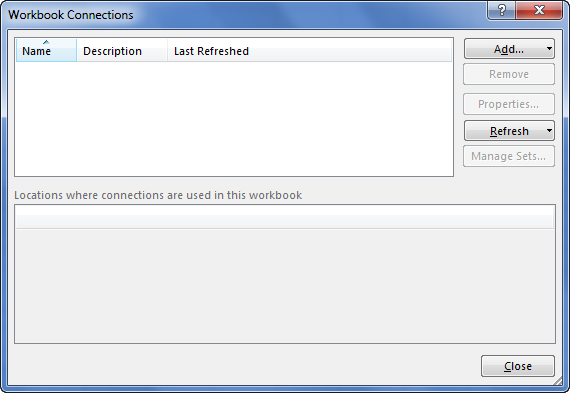
- As soon as we click on Connections, we may see the below window separately.
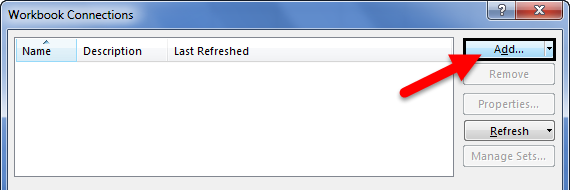
- Now, click on Add.
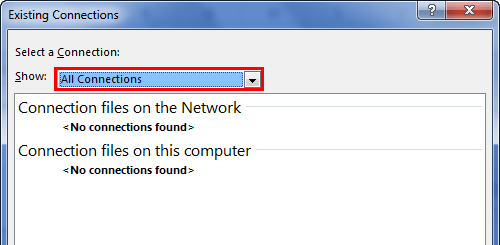
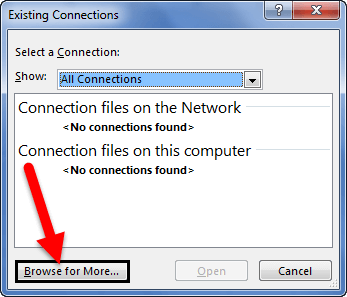
- It will open up a new window. In the below window, select All Connections.
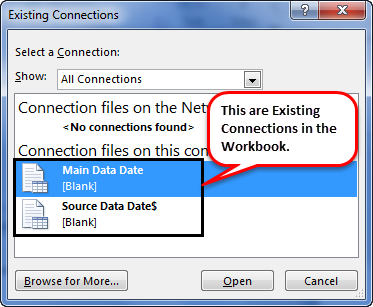
- If there are any connections in this workbook, it will show what those connections are here.
- Since we are connecting to a new workbook, click on Browse for more.
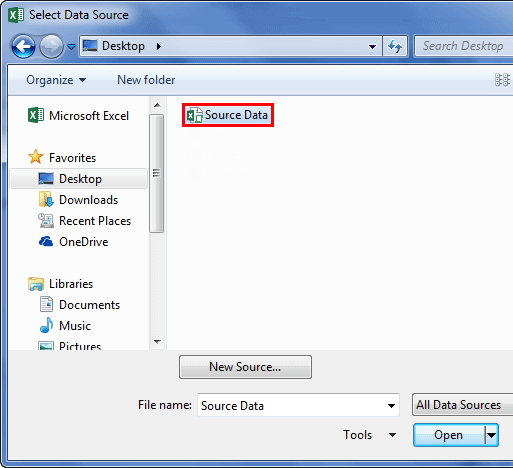
- In the below window, browse the file location. Then, click on Open.
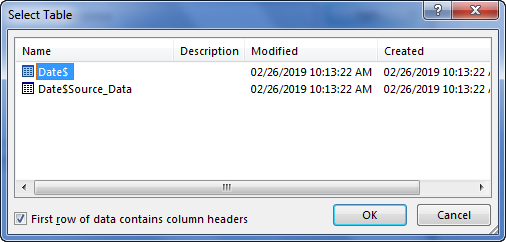
- After clicking on Open, it shows the below window.
- Here, we need to select the required table to be imported to this workbook. Select the table and click on OK.
After clicking on OK, close the Workbook Connection window.
- Then, go to Existing Connections under the DATA tab.
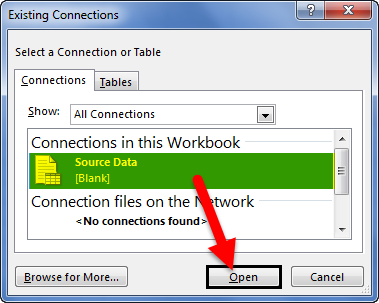
- Here, we will see all the existing connections. Select the connection we have just made and click on Open.
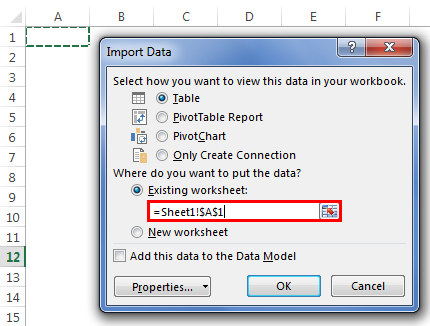
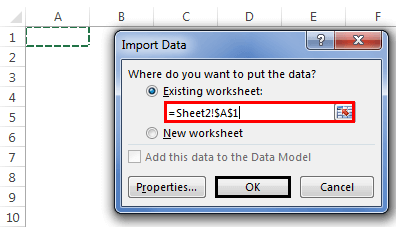
- Once we click on Open, it will ask us where to import the data. First, we need to select the cell reference here. Then, click on the OK button.
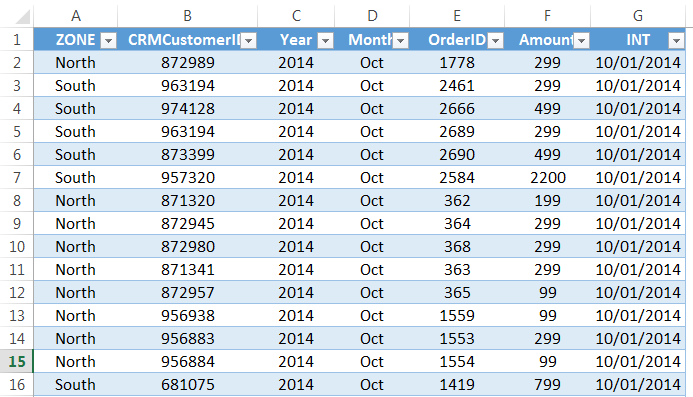
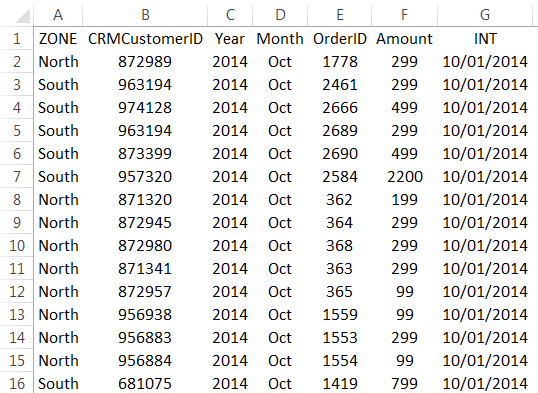
- It will import the data from the selected or connected workbook.
Like this, we can connect to the other workbook and import the data.
#2 – Import Data from MS Access to Excel
MS Access is the main platform to store the data safely. We can import the data directly from the MS Access File itself whenever the data is required.
Step 1: Go to the “DATA” ribbon in excelThe ribbon is an element of the UI (User Interface) which is seen as a strip that consists of buttons or tabs; it is available at the top of the excel sheet. This option was first introduced in the Microsoft Excel 2007.read more and select “From Access.“
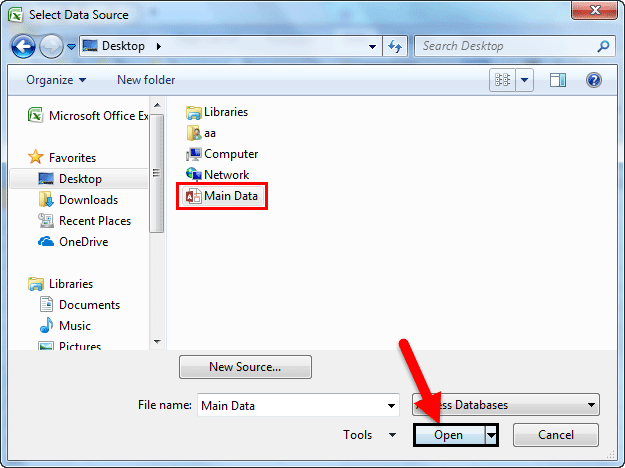
Step 2: Now, it will ask us to locate the desired file. Select the desired file path. Then, click on “Open.”
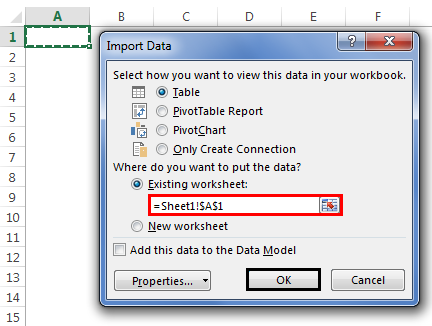
Step 3: Now, it will ask us to select the desired destination cell where we want to import the data. Then, click on “OK.”
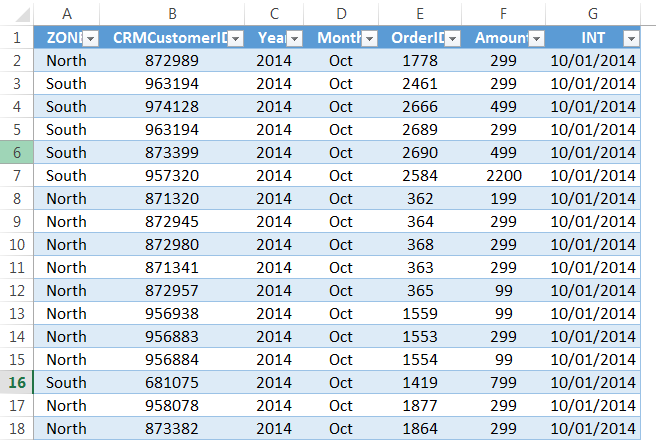
Step 4: It will import the data from access to the A1 cell in Excel.
#3 – Import Data from Text File to Excel
In almost all the corporations, whenever we ask for the data from the IT team, they will write a query and get the file in TEXT format. But unfortunately, TEXT file data is not the ready format to use in Excel; we need to make some modifications to work on it.
Step 1: Go to the “DATA” tab and click on “From Text.”
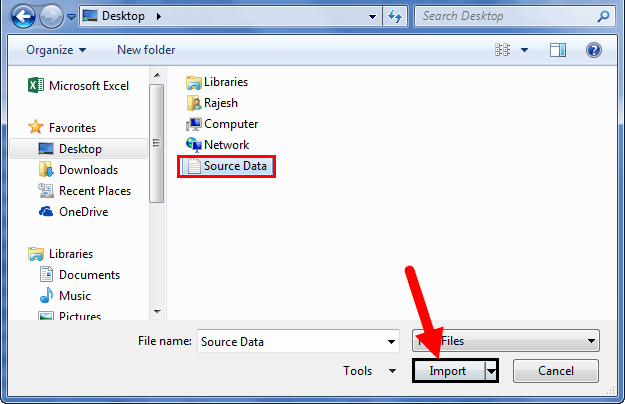
Step 2: Now, it will ask us to choose the file location on the computer or laptop. Select the targeted file, then click on “Import.”
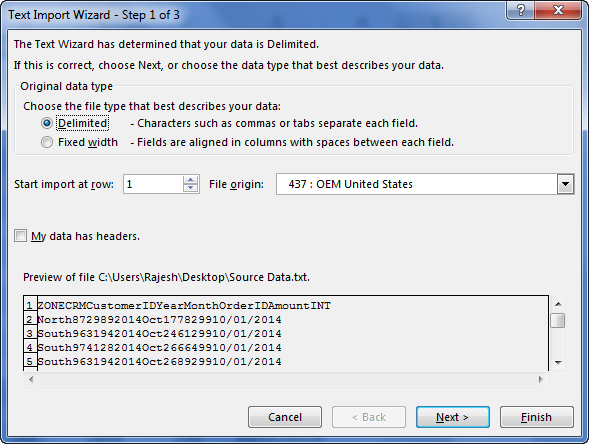
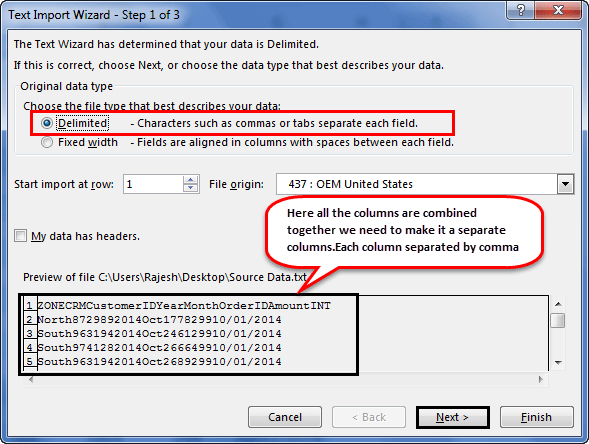
Step 3: It will open up a “Text Import Wizard.”
Step 4: By selecting the “Delimited,” click on “Next.”
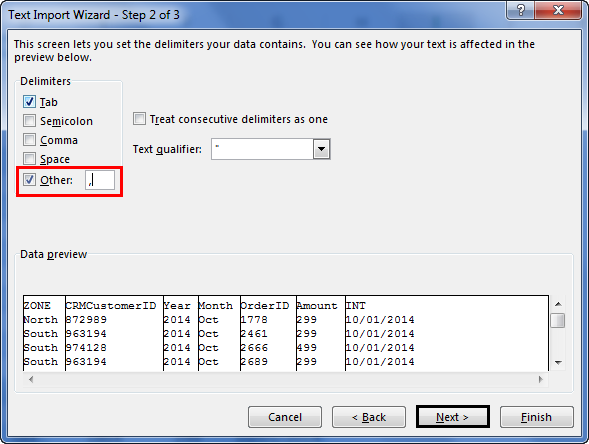
Step 5: In the next window, select the other and mention comma (,) because, in the text file, each column is separated by a comma (,). Then click on “Next.”
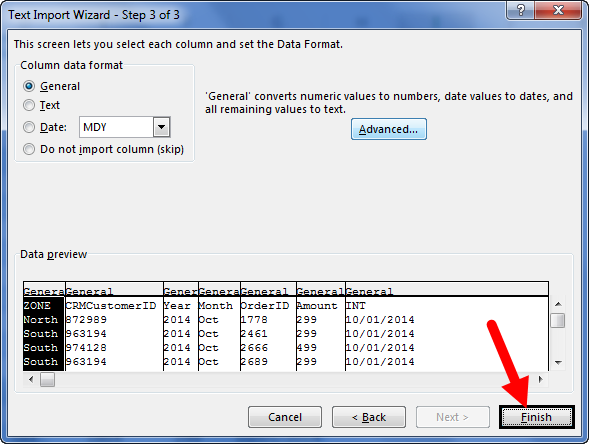
Step 6: In the next window, click on “Finish.”
Step 7: Now, it will ask us to select the desired destination cell where we want to import the data. Select the cell and click on “OK.”
Step 8: It will import the data from the text file to the A1 cell in Excel.
Things to Remember
- If there are many tables, we must specify which table data we need to import.
- If we want the data in the current worksheet, we need to select the desired cell. Else, if we need data in a new worksheet, we must choose the new worksheet as the option.
- We need to separate the column in the TEXT file by identifying the common column separators.
Recommended Articles
This article is a guide to Import Data in Excel. Here, we discuss how to import data from 1) Excel Workbook, 2) MS Access, 3) Text File, practical examples, and a downloadable Excel template. You may learn more about Excel from the following articles: –
- KPI Dashboard in Excel
- Insert Image in Excel Cell
- How to Insert New Worksheet In Excel?
- Create a Dashboard in Excel
- Page Numbers in Excel
Import or Export Data from Access to Excel using ADO
Microsoft Access: ActiveX Data Objects (ADO), Connect with Access Databases from Excel using VBA.
Part 3 of 4
Microsoft Access: ActiveX Data Objects (ADO), Connect with Access Databases from Excel using VBA:
1. Microsoft Access: ActiveX Data Objects Library (ADO).
2. Microsoft Access: Use ADO to Execute SQL statements.
3. Import or Export Data from Access to Excel using ADO.
4. Microsoft Access: ActiveX Data Objects Extensions (ADOX).
—————
Also Read:
Microsoft Access: Data Access Objects Library (DAO), Connect with Access Databases from Excel using VBA.
———————————————————————————————————
Contents:
Use ADO to Import Data from Microsoft Access Database to Excel
Use ADO to Import data from an Access Database Table to an Excel worksheet (your host application)
Use ADO to Export data from Excel worksheet (your host application) to Access Database Table
———————————————————————————————————
Use ADO to Import Data from Microsoft Access Database to Excel
In this section we show, with the help of practical examples, how to connect to Access Database from Excel (your host application) using ADO to: (i) import or retrieve data from Access database to Excel worksheet; and (ii) Export data from Excel worksheet to Access Database Table.
Range.CopyFromRecordset Method: This method is commonly used to copy records from an Aceess Table to an Excel worksheet. Syntax: Range.CopyFromRecordset(Data, MaxRows, MaxColumns).
Range is the worksheet range to which the records are copied, starting at its upper-left corner. Data is the Recordset (ie. set of records) in the Access database to be copied and the current row in the Recordset is the starting record from where copying begins. MaxRows and MaxColumns refer to the maximum numbers of rows (ie. records) and fields respectively to be copied and omitting these arguments will indicate that all rows and fields are copied. Data is mandatory to specify while other arguments of MaxRows and MaxColumns are optional.
Example 9: Using ADO to Import data from an Access Database Table to an Excel worksheet (your host application).
Refer to Images 9a, 9b, 9c, 9d and 9e as mentioned in the code.
The code is simple to understand, though apparantly long due to multiple options shown (reference to images 9a to 9e) as to how data can be imported into Excel. Each option can be treated as a separate code and run accordingly.
Sub automateAccessADO_9()
‘Using ADO to Import data from an Access Database Table to an Excel worksheet (your host application).
‘refer Image 9a to view the existing SalesManager Table in MS Access file «SalesReport.accdb».
‘To use ADO in your VBA project, you must add a reference to the ADO Object Library in Excel (your host application) by clicking Tools-References in VBE, and then choose an appropriate version of Microsoft ActiveX Data Objects x.x Library from the list.
‘—————
‘DIM STATEMENTS
Dim strMyPath As String, strDBName As String, strDB As String, strSQL As String
Dim i As Long, n As Long, lFieldCount As Long
Dim rng As Range
‘instantiate an ADO object using Dim with the New keyword:
Dim adoRecSet As New ADODB.Recordset
Dim connDB As New ADODB.Connection
‘—————
‘THE CONNECTION OBJECT
strDBName = «SalesReport.accdb»
strMyPath = ThisWorkbook.Path
strDB = strMyPath & «» & strDBName
‘Connect to a data source:
‘For pre — MS Access 2007, .mdb files (viz. MS Access 97 up to MS Access 2003), use the Jet provider: «Microsoft.Jet.OLEDB.4.0». For Access 2007 (.accdb database) use the ACE Provider: «Microsoft.ACE.OLEDB.12.0». The ACE Provider can be used for both the Access .mdb & .accdb files.
connDB.Open ConnectionString:=«Provider = Microsoft.ACE.OLEDB.12.0; data source=» & strDB
‘—————
‘OPEN RECORDSET, ACCESS RECORDS AND FIELDS
Dim ws As Worksheet
‘set the worksheet:
Set ws = ActiveWorkbook.Sheets(«Sheet8»)
‘Set the ADO Recordset object:
Set adoRecSet = New ADODB.Recordset
‘Opening the table named SalesManager:
strTable = «SalesManager»
‘—————
‘COPY RECORDS FROM ALL FIELDS USING CopyFromRecordset:
‘refer Image 9b to view records copied to Excel worksheet
‘open recordset/table:
adoRecSet.Open Source:=strTable, ActiveConnection:=connDB, CursorType:=adOpenStatic, LockType:=adLockOptimistic
Set rng = ws.Range(«A1»)
lFieldCount = adoRecSet.Fields.count
For i = 0 To lFieldCount — 1
‘copy column names in first row of the worksheet:
rng.Offset(0, i).Value = adoRecSet.Fields(i).Name
Next i
‘copy record values starting from second row of the worksheet:
rng.Offset(1, 0).CopyFromRecordset adoRecSet
‘to copy 4 rows and 3 columns of the recordset to excel worksheet:
‘rng.Offset(1, 0).CopyFromRecordset Data:=adoRecSet, MaxRows:=4, MaxColumns:=3
‘select a column range:
Range(ws.Columns(1), ws.Columns(lFieldCount)).AutoFit
‘worksheet columns are deleted because this code is only for demo:
Range(ws.Columns(1), ws.Columns(lFieldCount)).Delete
adoRecSet.Close
‘—————
‘COPY RECORDS FROM SELECTED FIELDS USING CopyFromRecordset:
‘refer Image 9c to view records copied to Excel worksheet
‘copy all records from the selected fields (EmployeeId, FirstName & JoinDate):
strSQL = «SELECT EmployeeId, FirstName, JoinDate FROM SalesManager WHERE EmployeeId > 15″
adoRecSet.Open Source:=strSQL, ActiveConnection:=connDB, CursorType:=adOpenDynamic, LockType:=adLockOptimistic
Set rng = ws.Range(«A1»)
lFieldCount = adoRecSet.Fields.count
For i = 0 To lFieldCount — 1
‘copy column names in first row of the worksheet:
rng.Offset(0, i).Value = adoRecSet.Fields(i).Name
Next i
‘copy record values starting from second row of the worksheet:
rng.Offset(1, 0).CopyFromRecordset adoRecSet
‘select a column range:
Range(ws.Columns(1), ws.Columns(lFieldCount)).AutoFit
‘worksheet columns are deleted because this code is only for demo:
Range(ws.Columns(1), ws.Columns(lFieldCount)).Delete
adoRecSet.Close
‘—————
‘COPY RECORDS FROM ALL FIELDS OF A RECORDSET:
‘refer Image 9d to view records copied to Excel worksheet
adoRecSet.Open Source:=strTable, ActiveConnection:=connDB, CursorType:=adOpenStatic, LockType:=adLockOptimistic
Set rng = ws.Range(«A1»)
lFieldCount = adoRecSet.Fields.count
For i = 0 To lFieldCount — 1
‘copy column names in first row of the worksheet:
rng.Offset(0, i).Value = adoRecSet.Fields(i).Name
adoRecSet.MoveFirst
‘copy record values starting from second row of the worksheet:
n = 1
Do While Not adoRecSet.EOF
rng.Offset(n, i).Value = adoRecSet.Fields(i).Value
adoRecSet.MoveNext
n = n + 1
Loop
Next i
‘select column range to AutoFit column width:
Range(ws.Columns(1), ws.Columns(lFieldCount)).AutoFit
‘worksheet columns are deleted because this code is only for demo:
Range(ws.Columns(1), ws.Columns(lFieldCount)).Delete
adoRecSet.Close
‘—————
‘COPY RECORDS FROM SELECTED FIELDS OF A RECORDSET:
‘refer Image 9e to view records copied to Excel worksheet
‘copy all records from the 3 fields of EmployeeId, SurName, JoinDate:
strSQL = «SELECT EmployeeId, SurName, JoinDate FROM SalesManager»
adoRecSet.Open Source:=strSQL, ActiveConnection:=connDB, CursorType:=adOpenDynamic, LockType:=adLockOptimistic
Set rng = ws.Range(«A1»)
lFieldCount = adoRecSet.Fields.count
For i = 0 To lFieldCount — 1
‘copy column names in first row of the worksheet:
rng.Offset(0, i).Value = adoRecSet.Fields(i).Name
adoRecSet.MoveFirst
‘copy record values starting from second row of the worksheet:
n = 1
Do While Not adoRecSet.EOF
rng.Offset(n, i).Value = adoRecSet.Fields(i).Value
adoRecSet.MoveNext
n = n + 1
Loop
Next i
‘select a column range:
Range(ws.Columns(1), ws.Columns(lFieldCount)).AutoFit
‘worksheet columns are deleted because this code is only for demo:
Range(ws.Columns(1), ws.Columns(lFieldCount)).Delete
adoRecSet.Close
‘—————
‘close the objects
connDB.Close
‘destroy the variables
Set adoRecSet = Nothing
Set connDB = Nothing
End Sub
Example 10: Using ADO to Export data from Excel worksheet (your host application) to Access Database Table.
Refer to Images 10a, 10b & 10c, as mentioned in the code.
Sub automateAccessADO_10()
‘Using ADO to Export data from Excel worksheet (your host application) to an Access Database Table.
‘refer Image 10a to view the existing SalesManager Table in MS Access file «SalesReport.accdb»
‘refer Image 10b for data in Excel worksheet which is exported to Access Database Table.
‘refer Image 10c to view the SalesManager Table in Access file «SalesReport.accdb», after data is exported.
‘To use ADO in your VBA project, you must add a reference to the ADO Object Library in Excel (your host application) by clicking Tools-References in VBE, and then choose an appropriate version of Microsoft ActiveX Data Objects x.x Library from the list.
‘—————
‘DIM STATEMENTS
Dim strMyPath As String, strDBName As String, strDB As String, strSQL As String
Dim i As Long, n As Long, lastRow As Long, lFieldCount As Long
‘instantiate an ADO object using Dim with the New keyword:
Dim adoRecSet As New ADODB.Recordset
Dim connDB As New ADODB.Connection
‘—————
‘THE CONNECTION OBJECT
strDBName = «SalesReport.accdb»
strMyPath = ThisWorkbook.Path
strDB = strMyPath & «» & strDBName
‘Connect to a data source:
‘For pre — MS Access 2007, .mdb files (viz. MS Access 97 up to MS Access 2003), use the Jet provider: «Microsoft.Jet.OLEDB.4.0». For Access 2007 (.accdb database) use the ACE Provider: «Microsoft.ACE.OLEDB.12.0». The ACE Provider can be used for both the Access .mdb & .accdb files.
connDB.Open ConnectionString:=«Provider = Microsoft.ACE.OLEDB.12.0; data source=» & strDB
‘—————
‘OPEN RECORDSET, ACCESS RECORDS AND FIELDS
Dim ws As Worksheet
‘set the worksheet:
Set ws = ActiveWorkbook.Sheets(«Sheet9»)
‘Set the ADO Recordset object:
Set adoRecSet = New ADODB.Recordset
‘Opening the table named SalesManager:
strTable = «SalesManager»
adoRecSet.Open Source:=strTable, ActiveConnection:=connDB, CursorType:=adOpenStatic, LockType:=adLockOptimistic
‘—————
‘COPY RECORDS FROM THE EXCEL WORKSHEET:
‘Note: Columns and their order should be the same in both Excel worksheet and in Access database table
lFieldCount = adoRecSet.Fields.count
‘determine last data row in the worksheet:
lastRow = ws.Cells(Rows.count, «A»).End(xlUp).Row
‘start copying from second row of worksheet, first row contains field names:
For i = 2 To lastRow
adoRecSet.AddNew
For n = 0 To lFieldCount — 1
adoRecSet.Fields(n).Value = ws.Cells(i, n + 1)
Next n
adoRecSet.Update
Next i
‘—————
‘close the objects
adoRecSet.Close
connDB.Close
‘destroy the variables
Set adoRecSet = Nothing
Set connDB = Nothing
End Sub
This example teaches you how to import data from a Microsoft Access database. In Excel, when you import data, you make a permanent connection that can be refreshed.
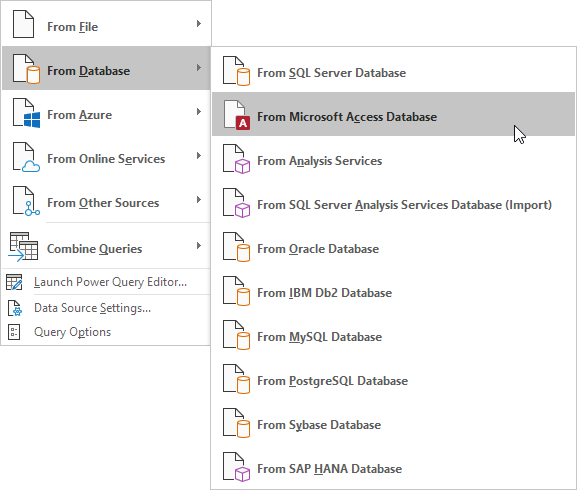
1. On the Data tab, in the Get & Transform Data group, click Get Data.
2. Click From Database, From Microsoft Access Database.
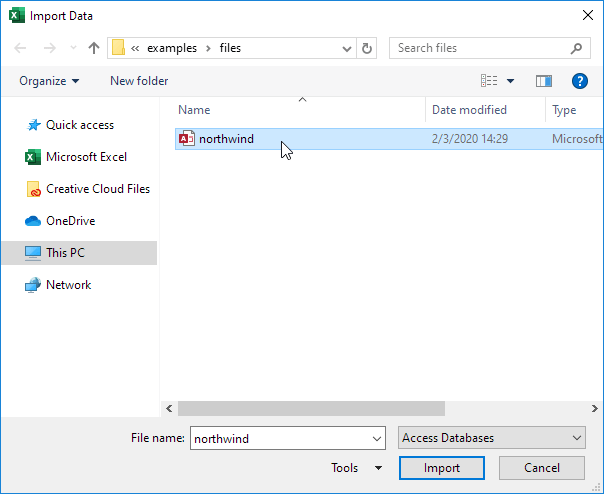
3. Select the Access file.
4. Click Import.
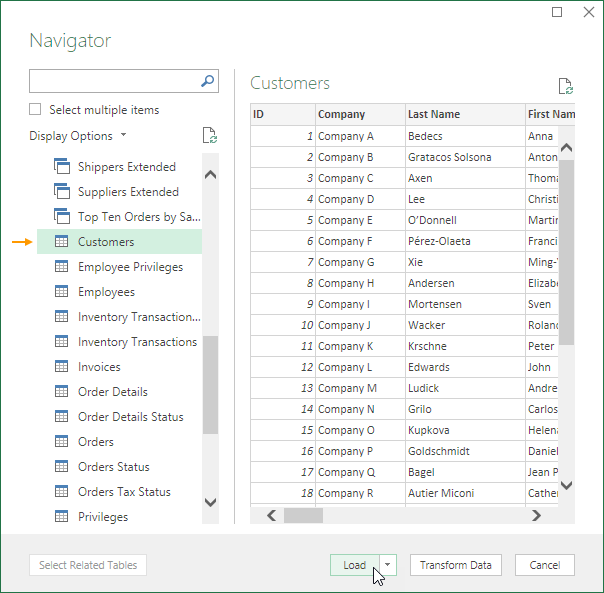
5. Select a table on the left side of the Navigator window and click Load.
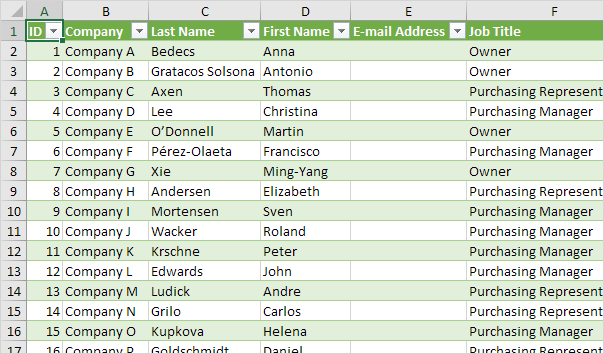
Result. Your database records in Excel.
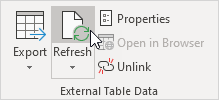
6. When your Access data changes, you can easily refresh the data in Excel. First, select a cell inside the table. Next, on the Table Design tab, in the External Table Data group, click Refresh.
Перейти к содержанию
На чтение 1 мин Опубликовано 19.06.2015
Этот пример научит вас импортировать информацию из базы данных Microsoft Access. Импортируя данные в Excel, вы создаёте постоянную связь, которую можно обновлять.
- На вкладке Data (Данные) в разделе Get External Data (Получение внешних данных) кликните по кнопке From Access (Из Access).
- Выберите файл Access.
- Кликните Open (Открыть).
- Выберите таблицу и нажмите ОК.
- Выберите, как вы хотите отображать данные в книге, куда их следует поместить и нажмите ОК.
Результат: Записи из базы данных Access появились в Excel.
Примечание: Когда данные Access изменятся, Вам достаточно будет нажать Refresh (Обновить), чтобы загрузить изменения в Excel.
Оцените качество статьи. Нам важно ваше мнение:
CopyFromRecordset is probably the easiest method of getting data from an Access table to an Excel worksheet.
Sub DAOCopyFromRecordSet(DBFullName As String, TableName As String, _
    FieldName As String, TargetRange As Range)
' Example: DAOCopyFromRecordSet "C:FolderNameDataBaseName.mdb", _
    "TableName", "FieldName", Range("C1")
Dim db As Database, rs As Recordset
Dim intColIndex As Integer
    Set TargetRange = TargetRange.Cells(1, 1)
    Set db = OpenDatabase(DBFullName)
    Set rs = db.OpenRecordset(TableName, dbOpenTable) ' all records
    'Set rs = db.OpenRecordset("SELECT * FROM " & TableName & _
        " WHERE " & FieldName & _
        " = 'MyCriteria'", dbReadOnly) ' filter records
    ' write field names
    For intColIndex = 0 To rs.Fields.Count - 1
        TargetRange.Offset(0, intColIndex).Value = rs.Fields(intColIndex).Name
    Next
    ' write recordset
    TargetRange.Offset(1, 0).CopyFromRecordset rs
    Set rs = Nothing
    db.Close
    Set db = Nothing
End Sub
If you want more control with the data import, you can customize the macro below:
Sub DAOFromAccessToExcel(DBFullName As String, TableName As String, _
    FieldName As String, TargetRange As Range)
' Example: DAOFromAccessToExcel "C:FolderNameDataBaseName.mdb", _
    "TableName", "FieldName", Range("B1")
Dim db As Database, rs As Recordset
Dim lngRowIndex As Long
    Set TargetRange = TargetRange.Cells(1, 1)
    Set db = OpenDatabase(DBFullName)
    Set rs = db.OpenRecordset(TableName, dbOpenTable) ' all records
    'Set rs = DB.OpenRecordset("SELECT * FROM " & _
        TableName & " WHERE " & FieldName & _
        " = 'MyCriteria'", dbReadOnly) ' filter records
    lngRowIndex = 0
    With rs
        If Not .BOF Then .MoveFirst
        While Not .EOF
            TargetRange.Offset(lngRowIndex, 0).Formula = .Fields(FieldName)
            .MoveNext
            lngRowIndex = lngRowIndex + 1
        Wend
    End With
    Set rs = Nothing
    db.Close
    Set db = Nothing
End Sub
The macro examples assumes that your VBA project has added a reference to the DAO object library.
You can do this from within the VBE by selecting the menu Tools, References and selecting Microsoft DAO x.xx Object Library.
Use ADO if you can choose between ADO and DAO for data import or export.
Contents
- How to Import MS Access Data into Excel
- Here is how to import MS Access data into Excel:
- How to Import Excel Data into an Existing Access Table
- How to Import Excel Data into a New Table in MS Access

Access is the main Microsoft Office application that helps create and manage a database. You can analyze large amounts of information and work on the related data in a more efficient way than other spreadsheet applications, including Microsoft Excel, allow.
However, there may come a time when you need to export data from Access to an Excel worksheet, or vice versa. This guide will show you how to do just that.
How to Import MS Access Data into Excel
The procedure for importing data from Access to Excel is quite simple. Before we begin, ensure that the Microsoft Access file that contains the data you want to import is on your computer’s hard drive. If it is on an external drive, plug in the drive and make sure it is properly connected.
Here is how to import MS Access data into Excel:
- Open an Excel worksheet.
- Switch to the Data tab on the Office ribbon.
- Click the Get Data drop-down in the Get & Transform Data category.
- Click From Database and select From Microsoft Access Database.
- Locate the Access file and select it. Then click Import.
- Select a table in the left pane of the Navigator window.
- Click the Load button.
- Once you have completed the above steps, your Access database records on the Excel worksheet.
The best part is that importing data into Excel makes a permanent connection that you can refresh. So if you make any changes to your data in Access, you can easily refresh it in Excel. To do this, select a cell inside the Excel table and click on the Design tab in the Office ribbon. Then click Refresh in the External Table Data category.
How to Import Excel Data into an Existing Access Table
Follow the steps below if you would like to import an Excel spreadsheet into an existing MS Access table:
- See that the spreadsheet uses the same headers as the existing Access database.
- Open the Access database.
- Click the Enable Content button if a security warning is displayed.
- Switch to the External Data tab on the Office ribbon.
- Click Excel from the options.
- When the ‘Get External Data – Excel Spreadsheet’ dialog opens, browse to the Excel file in the File Name field.
- Select the option that says, ‘Append a copy of records to the table.’
- Select the suitable table in the drop-down and click OK.
- Select the worksheet you want to import and click Next.
- Click Finish.
How to Import Excel Data into a New Table in MS Access
Here are the steps you should take:
- Open the Access database.
- Click the Enable Content button if a security warning is displayed.
- Switch to the External Data tab in the Office ribbon and click Excel from the options.
- When the ‘Get External Data – Excel Spreadsheet’ wizard appears, browse to the Excel file in the File Name field.
- Select the option that says, ‘Import the source data into a new table in the current database’ and click OK.
- Select the Excel worksheet you wish to import and click Next.
- If the first row on the Excel worksheet contains headers, mark the checkbox for “First ‘Row Contains Column Headings’ and click Next.
- You can select the options for each column or leave it at default.
- Click Next.
- Accept the ‘Let Access add primary key’ default and click Next.
- The Import to Table field bears the name of the worksheet. You can change the name if you wish.
- Click Finish.
The Excel worksheet imports into your Microsoft Access table once you have completed the above steps.
Pro Tip:
Run regular malware scans to ensure that all your important files are safe. Auslogics Anti-Malware checkmates stubborn malicious items that may corrupt your files or cause your computer to malfunction and crash. The tool makes it possible to schedule automatic scans that arrest threats and give you continuous protection.
Do you like this post? 🙂
Please rate and share it and subscribe to our newsletter!
0 votes,
average: 0.00 out of
5
Loading…
There are many ways you can import Access data into Excel, the simplest way is via the Data Import wizard contained within Excel. Read on and learn the fast way to import Access data into Excel…
The problem
As an Excel analyst there will be occasions when the data you need lives on another software system, Microsoft Access databases are a common place for that data to live as many businesses use it as part of the Microsoft Office suite.
When creating reports and dashboards in Excel, which use data from Access, it is not practical to copy and paste the data directly from a table, especially when tens of thousands of rows exist or a regular update is required, the best solution is to import the Access data into Excel using the import wizard and create a connection.
The Solution
Let’s jump right in:
1) Locate your Access database and data table. If you are importing data from Access into Excel then you need to know what you are trying to import (the Access table) and where that file is located (the location and name of the Access database). These things are always best completed at the outset.
2) Now you know what you are going to get from Access you can open up your Excel file and select the “Data” option from the ribbon, followed by the option “From Access” (as shown in the below image):
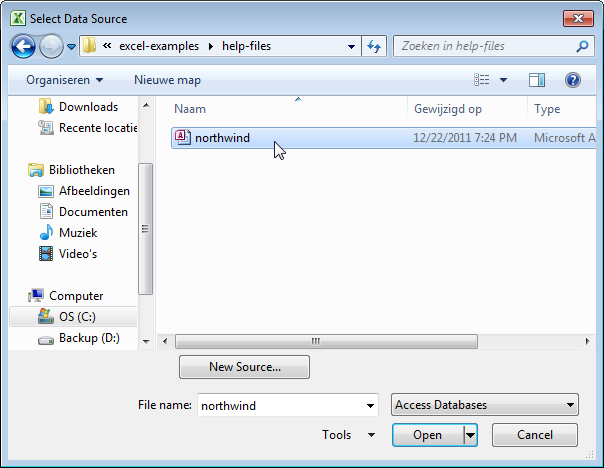
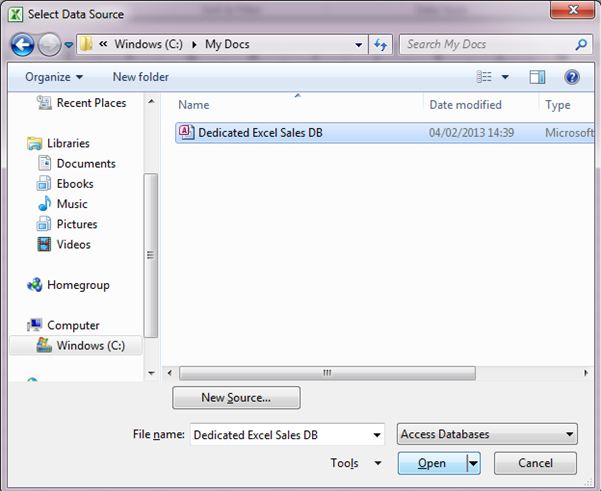
3) When you select “From Access” a new window will open up called “Select Data Source”, this is where you must navigate to the Access database that contains your data, when you have found it either double click to make the selection or left click the name once to highlight the database, then select “Open”:
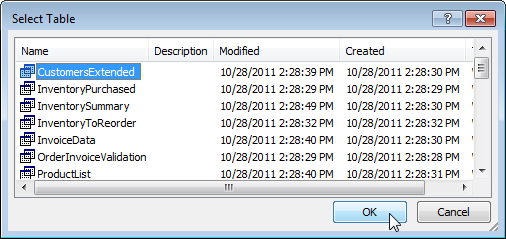
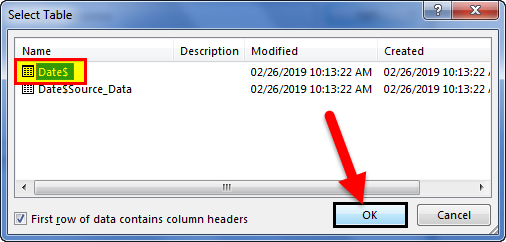
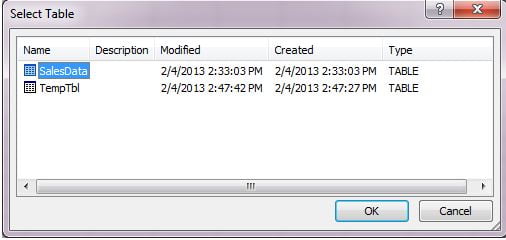
4) The next window is the “Select Table” window. From the list select the Access table that you want to import into Excel and click OK. It’s worth noting that if there is only one table in the Access database this part will be skipped automatically:
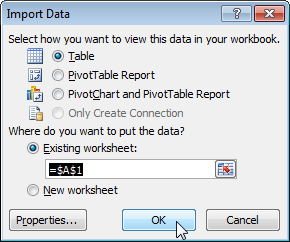
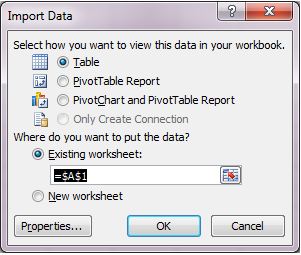
5) After you select your table the “Import Data” window appears. This is where you can toggle with some last minute options such as where you want to place the data, you can even use the data straight in a Pivot Table or chart, for this example just click OK to go ahead and import the Access data into Excel:
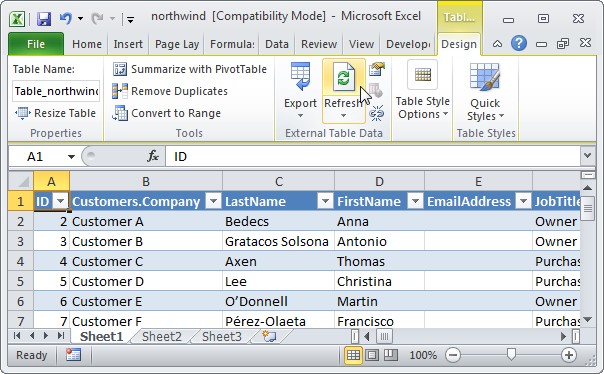
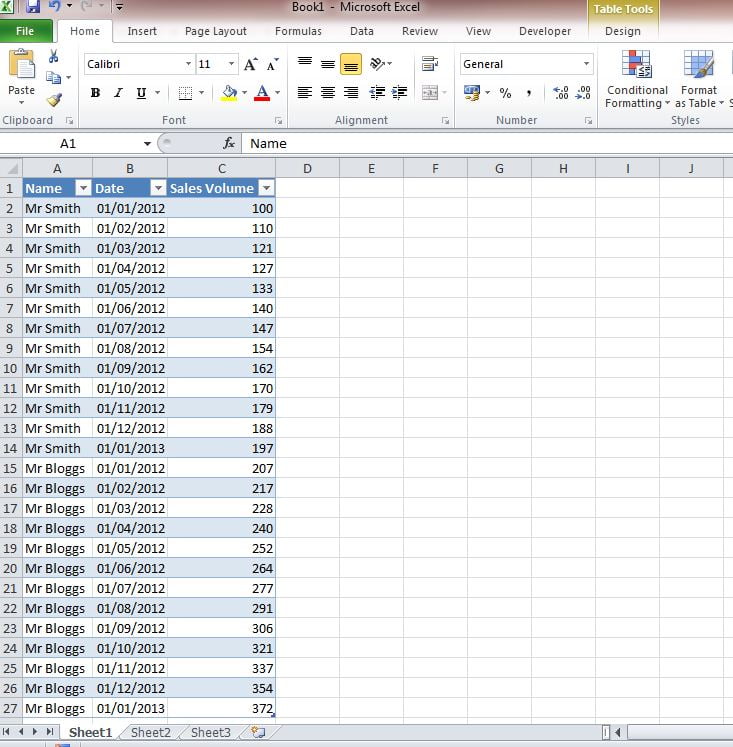
6) After you have clicked OK your Access data will import into Excel. Depending on the size of the table it might take a few seconds to complete:
Now you can manipulate the Access data within Excel or build reports and create charts from the data.
Very useful tip
By importing the data this way you create a direct connection to the Access data, that means if your Access table changes, i.e. the data inside it grows, all you have to do is refresh the table in Excel and the latest data will update. This is extremely useful for setting up frequent reports or dashboards.
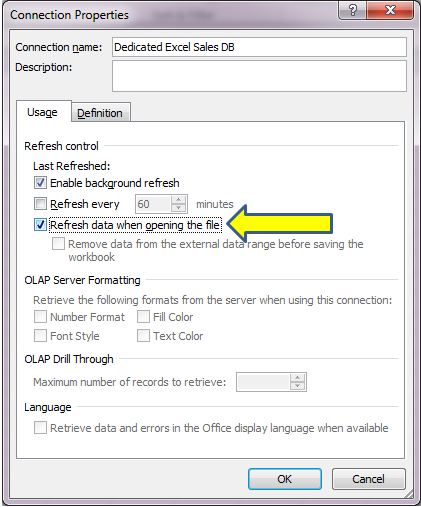
One of the useful features often ignored is within the “Properties” of the import. When you are on stage 5 and are faced with this window:
Select the “Properties” item and then you will be faced with the “Connection Properties” window. Here you can check the box to refresh the data when opening the file which is a useful technique if the Access database is frequently updated and you want your Excel version of the data to stay up-to-date:
Hopefully you will find this method one of the easiest ways to import Access data into Excel, there are lots of great uses for this technique in connected Excel dashboards or advanced reporting so it is a great process to understand for all Excel analysts.
Keep Excelling,


