
Note: Microsoft Access doesn’t support importing Excel data with an applied sensitivity label. As a workaround, you can remove the label before importing and then re-apply the label after importing. For more information, see Apply sensitivity labels to your files and email in Office.
This article shows you how to move your data from Excel to Access and convert your data to relational tables so that you can use Microsoft Excel and Access together. To summarize, Access is best for capturing, storing, querying, and sharing data, and Excel is best for calculating, analyzing, and visualizing data.
Two articles, Using Access or Excel to manage your data and Top 10 reasons to use Access with Excel, discuss which program is best suited for a particular task and how to use Excel and Access together to create a practical solution.
When you move data from Excel to Access, there are three basic steps to the process.
Note: For information on data modeling and relationships in Access, see Database design basics.
Step 1: Import data from Excel to Access
Importing data is an operation that can go a lot more smoothly if you take some time to prepare and clean your data. Importing data is like moving to a new home. If you clean out and organize your possessions before you move, settling into your new home is much easier.
Clean your data before you import
Before you import data into Access, in Excel it’s a good idea to:
-
Convert cells that contain non-atomic data (that is, multiple values in one cell) to multiple columns. For example, a cell in a «Skills» column that contains multiple skill values, such as «C# programming,» «VBA programming,» and «Web design» should be broken out to separate columns that each contain only one skill value.
-
Use the TRIM command to remove leading, trailing, and multiple embedded spaces.
-
Remove non-printing characters.
-
Find and fix spelling and punctuation errors.
-
Remove duplicate rows or duplicate fields.
-
Ensure that columns of data do not contain mixed formats, especially numbers formatted as text or dates formatted as numbers.
For more information, see the following Excel help topics:
-
Top ten ways to clean your data
-
Filter for unique values or remove duplicate values
-
Convert numbers stored as text to numbers
-
Convert dates stored as text to dates
Note: If your data cleaning needs are complex, or you don’t have the time or resources to automate the process on your own, you might consider using a third-party vendor. For more information, search for «data cleansing software» or «data quality» by your favorite search engine in your Web browser.
Choose the best data type when you import
During the import operation in Access, you want to make good choices so that you receive few (if any) conversion errors that will require manual intervention. The following table summarizes how Excel number formats and Access data types are converted when you import data from Excel to Access, and offers some tips on the best data types to choose in the Import Spreadsheet Wizard.
|
Excel number format |
Access data type |
Comments |
Best practice |
|---|---|---|---|
|
Text |
Text, Memo |
The Access Text data type stores alphanumeric data up to 255 characters. The Access Memo data type stores alphanumeric data up to 65,535 characters. |
Choose Memo to avoid truncating any data. |
|
Number, Percentage, Fraction, Scientific |
Number |
Access has one Number data type that varies based on a Field Size property (Byte, Integer, Long Integer, Single, Double, Decimal). |
Choose Double to avoid any data conversion errors. |
|
Date |
Date |
Access and Excel both use the same serial date number to store dates. In Access, the date range is larger: from -657,434 (January 1, 100 A.D.) to 2,958,465 (December 31, 9999 A.D.). Because Access does not recognize the 1904 date system (used in Excel for the Macintosh), you need to convert the dates either in Excel or Access to avoid confusion. For more information, see Change the date system, format, or two-digit year interpretation and Import or link to data in an Excel workbook. |
Choose Date. |
|
Time |
Time |
Access and Excel both store time values by using the same data type. |
Choose Time, which is usually the default. |
|
Currency, Accounting |
Currency |
In Access, the Currency data type stores data as 8-byte numbers with precision to four decimal places, and is used to store financial data and prevent rounding of values. |
Choose Currency, which is usually the default. |
|
Boolean |
Yes/No |
Access uses -1 for all Yes values and 0 for all No values, whereas Excel uses 1 for all TRUE values and 0 for all FALSE values. |
Choose Yes/No, which automatically converts underlying values. |
|
Hyperlink |
Hyperlink |
A hyperlink in Excel and Access contains a URL or Web address that you can click and follow. |
Choose Hyperlink, otherwise Access may use the Text data type by default. |
Once the data is in Access, you can delete the Excel data. Don’t forget to backup the original Excel workbook first before deleting it.
For more information, see the Access help topic Import or link to data in an Excel workbook.
Automatically append data the easy way
A common problem Excel users have is appending data with the same columns into one large worksheet. For example, you may have an asset tracking solution that started out in Excel but now has grown to include files from many workgroups and departments. This data may be in different worksheets and workbooks, or in text files that are data feeds from other systems. There is no user interface command or easy way to append similar data in Excel.
The best solution is to use Access, where you can easily import and append data into one table by using the Import Spreadsheet Wizard. Furthermore, you can append a lot of data into one table. You can save the import operations, add them as scheduled Microsoft Outlook tasks, and even use macros to automate the process.
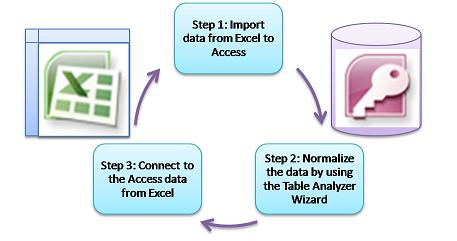
Step 2: Normalize data by using the Table Analyzer Wizard
At first glance, stepping through the process of normalizing your data may seem a daunting task. Fortunately, normalizing tables in Access is a process that is much easier, thanks to the Table Analyzer Wizard.
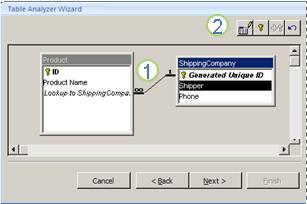
1. Drag selected columns to a new table and automatically create relationships
2. Use button commands to rename a table, add a primary key, make an existing column a primary key, and undo the last action
You can use this wizard to do the following:
-
Convert a table into a set of smaller tables and automatically create a primary and foreign key relationship between the tables.
-
Add a primary key to an existing field that contains unique values, or create a new ID field that uses the AutoNumber data type.
-
Automatically create relationships to enforce referential integrity with cascading updates. Cascading deletes are not automatically added to prevent accidentally deleting data, but you can easily add cascading deletes later.
-
Search new tables for redundant or duplicate data (such as the same customer with two different phone numbers) and update this as desired.
-
Back up the original table and rename it by appending «_OLD» to its name. Then, you create a query that reconstructs the original table, with the original table name so that any existing forms or reports based on the original table will work with the new table structure.
For more information, see Normalize your data using the Table Analyzer.
Step 3: Connect to Access data from Excel
After the data has been normalized in Access and a query or table has been created that reconstructs the original data, it’s a simple matter of connecting to the Access data from Excel. Your data is now in Access as an external data source, and so can be connected to the workbook through a data connection, which is a container of information that is used to locate, log on to, and access the external data source. Connection information is stored in the workbook and can also be stored in a connection file, such as an Office Data Connection (ODC) file (.odc file name extension) or a Data Source Name file (.dsn extension). After you connect to external data, you can also automatically refresh (or update) your Excel workbook from Access whenever the data is updated in Access.
For more information, see Import data from external data sources (Power Query).
Get your data into Access
This section walks you through the following phases of normalizing your data: Breaking values in the Salesperson and Address columns into their most atomic pieces, separating related subjects into their own tables, copying and pasting those tables from Excel into Access, creating key relationships between the newly created Access tables, and creating and running a simple query in Access to return information.
Example data in non-normalized form
The following worksheet contains non-atomic values in the Salesperson column and the Address column. Both columns should be split into two or more separate columns. This worksheet also contains information about salespersons, products, customers, and orders. This information should also be split further, by subject, into separate tables.
|
Salesperson |
Order ID |
Order Date |
Product ID |
Qty |
Price |
Customer Name |
Address |
Phone |
|---|---|---|---|---|---|---|---|---|
|
Li, Yale |
2349 |
3/4/09 |
C-789 |
3 |
$7.00 |
Fourth Coffee |
7007 Cornell St Redmond, WA 98199 |
425-555-0201 |
|
Li, Yale |
2349 |
3/4/09 |
C-795 |
6 |
$9.75 |
Fourth Coffee |
7007 Cornell St Redmond, WA 98199 |
425-555-0201 |
|
Adams, Ellen |
2350 |
3/4/09 |
A-2275 |
2 |
$16.75 |
Adventure Works |
1025 Columbia Circle Kirkland, WA 98234 |
425-555-0185 |
|
Adams, Ellen |
2350 |
3/4/09 |
F-198 |
6 |
$5.25 |
Adventure Works |
1025 Columbia Circle Kirkland, WA 98234 |
425-555-0185 |
|
Adams, Ellen |
2350 |
3/4/09 |
B-205 |
1 |
$4.50 |
Adventure Works |
1025 Columbia Circle Kirkland, WA 98234 |
425-555-0185 |
|
Hance, Jim |
2351 |
3/4/09 |
C-795 |
6 |
$9.75 |
Contoso, Ltd. |
2302 Harvard Ave Bellevue, WA 98227 |
425-555-0222 |
|
Hance, Jim |
2352 |
3/5/09 |
A-2275 |
2 |
$16.75 |
Adventure Works |
1025 Columbia Circle Kirkland, WA 98234 |
425-555-0185 |
|
Hance, Jim |
2352 |
3/5/09 |
D-4420 |
3 |
$7.25 |
Adventure Works |
1025 Columbia Circle Kirkland, WA 98234 |
425-555-0185 |
|
Koch, Reed |
2353 |
3/7/09 |
A-2275 |
6 |
$16.75 |
Fourth Coffee |
7007 Cornell St Redmond, WA 98199 |
425-555-0201 |
|
Koch, Reed |
2353 |
3/7/09 |
C-789 |
5 |
$7.00 |
Fourth Coffee |
7007 Cornell St Redmond, WA 98199 |
425-555-0201 |
Information in its smallest parts: atomic data
Working with the data in this example, you can use the Text to Column command in Excel to separate the «atomic» parts of a cell (such as street address, city, state, and postal code) into discrete columns.
The following table shows the new columns in the same worksheet after they have been split to make all values atomic. Note that the information in the Salesperson column has been split into Last Name and the First Name columns and that the information in the Address column has been split into Street Address, City, State, and ZIP Code columns. This data is in «first normal form.»
|
Last Name |
First Name |
Street Address |
City |
State |
ZIP Code |
|
|---|---|---|---|---|---|---|
|
Li |
Yale |
2302 Harvard Ave |
Bellevue |
WA |
98227 |
|
|
Adams |
Ellen |
1025 Columbia Circle |
Kirkland |
WA |
98234 |
|
|
Hance |
Jim |
2302 Harvard Ave |
Bellevue |
WA |
98227 |
|
|
Koch |
Reed |
7007 Cornell St Redmond |
Redmond |
WA |
98199 |
Breaking data out into organized subjects in Excel
The several tables of example data that follow show the same information from the Excel worksheet after it has been split into tables for salespersons, products, customers, and orders. The table design isn’t final, but it’s on the right track.
The Salespersons table contains only information about sales personnel. Note that each record has a unique ID (SalesPerson ID). The SalesPerson ID value will be used in the Orders table to connect orders to salespeople.
|
Salespersons |
||
|---|---|---|
|
Salesperson ID |
Last Name |
First Name |
|
101 |
Li |
Yale |
|
103 |
Adams |
Ellen |
|
105 |
Hance |
Jim |
|
107 |
Koch |
Reed |
The Products table contains only information about products. Note that each record has a unique ID (Product ID). The Product ID value will be used to connect product information to the Order Details table.
|
Products |
|
|---|---|
|
Product ID |
Price |
|
A-2275 |
16.75 |
|
B-205 |
4.50 |
|
C-789 |
7.00 |
|
C-795 |
9.75 |
|
D-4420 |
7.25 |
|
F-198 |
5.25 |
The Customers table contains only information about customers. Note that each record has a unique ID (Customer ID). The Customer ID value will be used to connect customer information to the Orders table.
|
Customers |
||||||
|---|---|---|---|---|---|---|
|
Customer ID |
Name |
Street Address |
City |
State |
ZIP Code |
Phone |
|
1001 |
Contoso, Ltd. |
2302 Harvard Ave |
Bellevue |
WA |
98227 |
425-555-0222 |
|
1003 |
Adventure Works |
1025 Columbia Circle |
Kirkland |
WA |
98234 |
425-555-0185 |
|
1005 |
Fourth Coffee |
7007 Cornell St |
Redmond |
WA |
98199 |
425-555-0201 |
The Orders table contains information about orders, salespersons, customers, and products. Note that each record has a unique ID (Order ID). Some of the information in this table needs to be split into an additional table that contains order details so that the Orders table contains only four columns — the unique order ID, the order date, the salesperson ID, and the customer ID. The table shown here has not yet been split into the Order Details table.
|
Orders |
|||||
|---|---|---|---|---|---|
|
Order ID |
Order Date |
SalesPerson ID |
Customer ID |
Product ID |
Qty |
|
2349 |
3/4/09 |
101 |
1005 |
C-789 |
3 |
|
2349 |
3/4/09 |
101 |
1005 |
C-795 |
6 |
|
2350 |
3/4/09 |
103 |
1003 |
A-2275 |
2 |
|
2350 |
3/4/09 |
103 |
1003 |
F-198 |
6 |
|
2350 |
3/4/09 |
103 |
1003 |
B-205 |
1 |
|
2351 |
3/4/09 |
105 |
1001 |
C-795 |
6 |
|
2352 |
3/5/09 |
105 |
1003 |
A-2275 |
2 |
|
2352 |
3/5/09 |
105 |
1003 |
D-4420 |
3 |
|
2353 |
3/7/09 |
107 |
1005 |
A-2275 |
6 |
|
2353 |
3/7/09 |
107 |
1005 |
C-789 |
5 |
Order details, such as the product ID and quantity are moved out of the Orders table and stored in a table named Order Details. Keep in mind that there are 9 orders, so it makes sense that there are 9 records in this table. Note that the Orders table has a unique ID (Order ID), which will referred to from the Order Details table.
The final design of the Orders table should look like the following:
|
Orders |
|||
|---|---|---|---|
|
Order ID |
Order Date |
SalesPerson ID |
Customer ID |
|
2349 |
3/4/09 |
101 |
1005 |
|
2350 |
3/4/09 |
103 |
1003 |
|
2351 |
3/4/09 |
105 |
1001 |
|
2352 |
3/5/09 |
105 |
1003 |
|
2353 |
3/7/09 |
107 |
1005 |
The Order Details table contains no columns that require unique values (that is, there is no primary key), so it is okay for any or all columns to contain «redundant» data. However, no two records in this table should be completely identical (this rule applies to any table in a database). In this table, there should be 17 records — each corresponding to a product in an individual order. For example, in order 2349, three C-789 products comprise one of the two parts of the entire order.
The Order Details table should, therefore, look like the following:
|
Order Details |
||
|---|---|---|
|
Order ID |
Product ID |
Qty |
|
2349 |
C-789 |
3 |
|
2349 |
C-795 |
6 |
|
2350 |
A-2275 |
2 |
|
2350 |
F-198 |
6 |
|
2350 |
B-205 |
1 |
|
2351 |
C-795 |
6 |
|
2352 |
A-2275 |
2 |
|
2352 |
D-4420 |
3 |
|
2353 |
A-2275 |
6 |
|
2353 |
C-789 |
5 |
Copying and pasting data from Excel into Access
Now that the information about salespersons, customers, products, orders, and order details has been broken out into separate subjects in Excel, you can copy that data directly into Access, where it will become tables.
Creating relationships between the Access tables and running a query
After you have moved your data to Access, you can create relationships between tables and then create queries to return information about various subjects. For example, you can create a query that returns the Order ID and the names of the salespersons for orders entered between 3/05/09 and 3/08/09.
In addition, you can create forms and reports to make data entry and sales analysis easier.
Need more help?
You can always ask an expert in the Excel Tech Community or get support in the Answers community.
Note: Microsoft Access doesn’t support importing Excel data with an applied sensitivity label. As a workaround, you can remove the label before importing and then re-apply the label after importing. For more information, see Apply sensitivity labels to your files and email in Office.
You can bring the data from an Excel workbook into Access databases in many ways. You can copy data from an open worksheet and paste it into an Access datasheet, import a worksheet into a new or existing table, or link to a worksheet from an Access database.
This topic explains in detail how to import or link to Excel data from Access desktop databases.
What do you want to do?
-
Understand importing data from Excel
-
Import data from Excel
-
Troubleshoot missing or incorrect values
-
Link to data in Excel
-
Troubleshoot #Num! and other incorrect values in a linked table
Understand importing data from Excel
If your goal is to store some or all of your data from one or more Excel worksheets in Access, you should import the contents of the worksheet into a new or existing Access database. When you import data, Access creates a copy of the data in a new or existing table without altering the source Excel worksheet.
Common scenarios for importing Excel data into Access
-
You are a long-time user of Excel but, going forward, you want to use Access to work with this data. You want to move the data in your Excel worksheets into one or more new Access databases.
-
Your department or workgroup uses Access, but you occasionally receive data in Excel format that must be merged with your Access databases. You want to import these Excel worksheets into your database as you receive them.
-
You use Access to manage your data, but the weekly reports you receive from the rest of your team are Excel workbooks. You would like to streamline the import process to ensure that data is imported every week at a specific time into your database.
If this is the first time you are importing data from Excel
-
There is no way to save an Excel workbook as an Access database. Excel does not provide functionality to create an Access database from Excel data.
-
When you open an Excel workbook in Access (in the File Open dialog box, change the Files of Type list box to Microsoft Office Excel Files and select the file you want), Access creates a link to the workbook instead of importing its data. Linking to a workbook is fundamentally different from importing a worksheet into a database. For more information about linking, see the section Link to data in Excel, later in this article.
Import data from Excel
The steps in this section explain how to prepare for and run an import operation, and how to save the import settings as a specification for later reuse. As you proceed, remember that you can import data from only one worksheet at a time. You cannot import all the data from a whole workbook at the same time.
Prepare the worksheet
-
Locate the source file and select the worksheet that contains the data that you want to import to Access. If you want to import only a portion of a worksheet, you can define a named range that includes only the cells that you want to import.
Define a named range (optional)
-
Switch to Excel and open the worksheet that has data that you want to import.
-
Select the range of cells that contain the data that you want to import.
-
Right-click within the selected range and then click Name a Range or Define Name.
-
In the New Name dialog box, specify a name for the range in the Name box and click OK.
Remember that you can import only one worksheet at a time during an import operation. To import data from multiple worksheets, repeat the import operation for each worksheet.
-
-
Review the source data and take action as described in this table.
Element
Description
Number of columns
The number of source columns that you want to import cannot exceed 255, because Access does not support more than 255 fields in a table.
Skipping columns and rows
It is a good practice to include only the rows and columns that you want to import in the source worksheet or named range.
Rows You cannot filter or skip rows during the import operation.
Columns You cannot skip columns during the operation if you choose to add the data to an existing table.
Tabular format
Ensure that the cells are in tabular format. If the worksheet or named range includes merged cells, the contents of the cell are placed in the field that corresponds to the leftmost column, and the other fields are left blank.
Blank columns, rows, and cells
Delete all unnecessary blank columns and blank rows in the worksheet or range. If the worksheet or range contains blank cells, try to add the missing data. If you are planning to append the records to an existing table, ensure that the corresponding field in the table accepts null (missing or unknown) values. A field will accept null values if its Required field property is set to No and its ValidationRule property setting doesn’t prevent null values.
Error values
If one or more cells in the worksheet or range contain error values, such as #NUM and #DIV, correct them before you start the import operation. If a source worksheet or range contains error values, Access places a null value in the corresponding fields in the table. For more information about ways to correct those errors, see the section Troubleshoot missing or incorrect values, later in this article.
Data type
To avoid errors during importing, ensure that each source column contains the same type of data in every row. Access scans the first eight source rows to determine the data type of the fields in the table. We highly recommend that you ensure that the first eight source rows do not mix values of different data types in any of the columns. Otherwise, Access might not assign the correct data type to the column.
Also, it is a good practice to format each source column in Excel and assign a specific data format to each column before you start the import operation. Formatting is highly recommended if a column includes values of different data types. For example, the FlightNo column in a worksheet might contain numeric and text values, such as 871, AA90, and 171. To avoid missing or incorrect values, do the following:
-
Right-click the column header and then click Format Cells.
-
On the Number tab, under Category, select a format. For the FlightNo column, you would probably choose Text.
-
Click OK.
If the source columns are formatted, but still contain mixed values in the rows following the eighth row, the import operation might still skip values or convert values incorrectly. For troubleshooting information, see the section Troubleshoot missing or incorrect values.
First row
If the first row in the worksheet or named range contains the names of the columns, you can specify that Access treat the data in the first row as field names during the import operation. If your source worksheet or range doesn’t include the names, it is a good idea to add them to the source before you start the import operation.
Note: If you plan to append the data to an existing table, ensure that the name of each column exactly matches the name of the corresponding field. If the name of a column is different from the name of the corresponding field in the table, the import operation will fail. To see the names of the fields, open the table in Design view in Access.
-
-
Close the source workbook, if it is open. Keeping the source file open might result in data conversion errors during the import operation.
Prepare the destination database
-
Open the Access database where the imported data will be stored. Ensure that the database is not read-only, and that you have permissions to make changes to the database.
-or-
If you don’t want to store the data in any of your existing databases, create a blank database. To do so:
Click the File tab, click New, and then click Blank Database.
-
Before you start the import operation, decide whether you want to store the data in a new or existing table.
Create a new table If you choose to store the data in a new table, Access creates a table and adds the imported data to this table. If a table with the specified name already exists, Access overwrites the contents of the table with the imported data.
Append to an existing table If you choose to add the data to an existing table, the rows in the Excel worksheet are appended to the specified table.
Remember that most failures during append operations occur because the source data does not match the structure and field settings of the destination table. To avoid this, open the destination table in Design view and review the following:
-
First row If the first row of the source worksheet or named range does not contain column headings, ensure that the position and data type of each column in the source worksheet matches those of the corresponding field in the table. If the first row contains column headings, the order of columns and fields do not need to match, but the name and data type of each column must exactly match those of its corresponding field.
-
Missing or extra fields If one or more fields in the source worksheet do not exist in the destination table, add them before you start the import operation. However, if the table contains fields that don’t exist in the source, you do not need to delete those fields from the table if they accept null values.
Tip: A field will accept null values if its Required property is set to No and its ValidationRule property setting doesn’t prevent null values.
-
Primary key If the table contains a primary key field, the source worksheet or range must have a column that contains values that are compatible with the primary key field, and the imported key values must be unique. If an imported record contains a primary key value that already exists in the destination table, the import operation displays an error message.
-
Indexed fields If the Indexed property of a field in the table is set to Yes (No Duplicates), the corresponding column in the source worksheet or range must contain unique values.
Go to the next steps to run the import operation.
-
Start the import operation
-
The location of the import/link wizard differs slightly depending upon your version of Access. Choose the steps that match your Access version:
-
If you’re using the latest version of the Microsoft 365 subscription version of Access or Access 2019, on the External Data tab, in the Import & Link group, click New Data Source > From File > Excel.
-
If you’re using Access 2016, Access 2013, or Access 2010, on the External Data tab, in the Import & Link group, click Excel.
Note: The External Data tab is not available unless a database is open.
-
-
In the Get External Data — Excel Spreadsheet dialog box, in the File name box, specify the name of the Excel file that contains the data that you want to import.
-or-
Click Browse and use the File Open dialog box to locate the file that you want to import.
-
Specify how you want to store the imported data.
To store the data in a new table, select Import the source data into a new table in the current database. You will be prompted to name this table later.
To append the data to an existing table, select Append a copy of the records to the table and select a table from the drop-down list. This option is not available if the database has no tables.
To link to the data source by creating a linked table, see the section Link to data in Excel, later in this article.
-
Click OK.
The Import Spreadsheet Wizard starts, and leads you through the import process. Go to the next set of steps.
Use the Import Spreadsheet wizard
-
On the first page of the wizard, select the worksheet that contains the data that you want to import, and then click Next.
-
On the second page of the wizard, click either Show Worksheets or Show Named Ranges, select either the worksheet or the named range that you want to import, and then click Next.
-
If the first row of the source worksheet or range contains the field names, select First Row Contains Column Headings and click Next.
If you are importing the data into a new table, Access uses these column headings to name the fields in the table. You can change these names either during or after the import operation. If you are appending the data to an existing table, ensure that the column headings in the source worksheet exactly match the names of the fields in the destination table.
If you are appending data to an existing table, skip directly to step 6. If you are adding the data to a new table, follow the remaining steps.
-
The wizard prompts you to review the field properties. Click a column in the lower half of the page to display the corresponding field’s properties. Optionally, do any of the following:
-
Review and change, if you want, the name and data type of the destination field.
Access reviews the first eight rows in each column to suggest the data type for the corresponding field. If the column in the worksheet contains different types of values, such as text and numbers, in the first eight rows of a column, the wizard suggests a data type that is compatible with all the values in the column — most often, the text data type. Although you can choose a different data type, remember that values that are incompatible with the data type that you choose will be either ignored or converted incorrectly during the import process. For more information about how to correct missing or incorrect values, see the section Troubleshoot missing or incorrect values, later in this article.
-
To create an index on the field, set Indexed to Yes.
-
To completely skip a source column, select the Do not import field (Skip) check box.
Click Next after you finish selecting options.
-
-
In the next screen, specify a primary key for the table. If you select Let Access add primary key, Access adds an AutoNumber field as the first field in the destination table, and automatically populates it with unique ID values, starting with 1. Click Next.
-
In the final wizard screen, specify a name for the destination table. In the Import to Table box, type a name for the table. If the table already exists, Access displays a prompt that asks whether you want to overwrite the existing contents of the table. Click Yes to continue or No to specify a different name for the destination table, and then click Finish to import the data.
If Access was able to import some or all the data, the wizard displays a page that shows you the status of the import operation. In addition, you can save the details of the operation for future use as a specification. Conversely, if the operation completely failed, Access displays the message An error occurred trying to import file.
-
Click Yes to save the details of the operation for future use. Saving the details helps you repeat the operation at a later time without having to step through the wizard each time.
See Save the details of an import or export operation as a specification to learn how to save your save your specification details.
See Run a saved import or export specification to learn how to run your saved import or link specifications.
See Schedule an import or export specification to learn how to schedule import and link tasks to run at specific times.
Troubleshoot missing or incorrect values
If you receive the message An error occurred trying to import file, the import operation completely failed. Conversely, if the import operation displays a dialog box that prompts you to save the details of the operation, the operation was able to import all or some of the data. The status message also mentions the name of the error log table that contains the description of any errors that occurred during the import operation.
Important: Even if the status message indicates a completely successful operation, you should review the contents and structure of the table to ensure that everything looks correct before you start using the table.
-
Open the destination table in Datasheet view to see whether all data was added to the table.
-
Open the table in Design view to review the data type and other property settings of the fields.
The following table describes the steps that you can take to correct missing or incorrect values.
Tip: While you are troubleshooting the results, if you find just a few missing values, you can add them to the table manually. Conversely, if you find that entire columns or a large number of values are either missing or were not imported properly, you should correct the problem in the source file. After you have corrected all known problems, repeat the import operation.
|
Issue |
Resolution |
||||||||||||
|---|---|---|---|---|---|---|---|---|---|---|---|---|---|
|
Graphical elements |
Graphical elements, such as logos, charts, and pictures cannot be imported. Manually add them to the database after completing the import operation. |
||||||||||||
|
Calculated values |
The results of a calculated column or cells are imported, but not the underlying formula. During the import operation, you can specify a data type that is compatible with the formula results, such as Number. |
||||||||||||
|
TRUE or FALSE and -1 or 0 values |
If the source worksheet or range includes a column that contains only TRUE or FALSE values, Access creates a Yes/No field for the column and inserts -1 or 0 values in the field. However, if the source worksheet or range includes a column that contains only -1 or 0 values, Access, by default, creates a numeric field for the column. You can change the data type of the field to Yes/No during the import operation to avoid this problem. |
||||||||||||
|
Multivalued fields |
When you import data to a new table or append data to an existing table, Access does not enable support for multiple values in a field, even if the source column contains a list of values separated by semicolon (;). The list of values is treated as a single value and is placed in a text field. |
||||||||||||
|
Truncated data |
If data appears truncated in a column in the Access table, try increasing the width of the column in Datasheet view. If that doesn’t resolve the issue, the data in a numeric column in Excel is too large for the field size of the destination field in Access. For example, the destination field might have the FieldSize property set to Byte in an Access database but the source data contains a value greater than 255. Correct the values in the source file and try importing again. |
||||||||||||
|
Display format |
You might have to set the Format property of certain fields in design view to ensure that the values are displayed correctly in Datasheet view. For example:
Note: If the source worksheet contains rich text formatting such as bold, underline, or italics, the text is imported, but the formatting is lost. |
||||||||||||
|
Duplicate values (key violation error) |
Records that you are importing might contain duplicate values that cannot be stored in the primary key field of the destination table or in a field that has the Indexed property set to Yes (No Duplicates). Eliminate the duplicate values in the source file and try importing again. |
||||||||||||
|
Date values off by 4 years |
The date fields that are imported from an Excel worksheet might be off by four years. Excel for Windows can use two date systems:
You can set the date system in Excel Options: File > Options > Advanced > Use 1904 date system. Note If you import from a .xlsb workbook, it always uses the 1900 Date System regardless of the Date System setting. Before you import the data, change the date system for the Excel workbook or, after appending the data, perform an update query that uses the expression [date field name] + 1462 to correct the dates. Excel for the Macintosh only uses the 1904 Date System. |
||||||||||||
|
Null values |
You might see an error message at the end of the import operation about data that was deleted or lost during the operation, or when you open the table in Datasheet view, you might see that some field values are blank. If the source columns in Excel are not formatted, or the first eight source rows contain values of different data types, open the source worksheet and do the following:
The preceding steps can help minimize the appearance of null values. The following table lists cases in which you will still see null values:
|
||||||||||||
|
Date values replaced by numeric values |
You will see seemingly random five-digit numbers instead of the actual date values in the following situations:
|
||||||||||||
|
Numeric values replaced by date values |
You will see seemingly random date values instead of the actual numeric values in the following situations:
To avoid this, replace the numeric values with date values in the source column and then try importing again. |
In addition, you might want to review the error log table (mentioned in the last page of the wizard) in Datasheet view. The table has three fields — Error, Field, and Row. Each row contains information about a specific error, and the contents of the Error field should help you troubleshoot the problem.
Error strings and troubleshooting hints
|
Error |
Description |
|---|---|
|
Field Truncation |
A value in the file is too large for the FieldSize property setting for this field. |
|
Type Conversion Failure |
A value in the worksheet is the wrong data type for this field. The value might be missing or might appear incorrect in the destination field. See the previous table for more information how to troubleshoot this issue. |
|
Key Violation |
This record’s primary key value is a duplicate — it already exists in the table. |
|
Validation Rule Failure |
A value breaks the rule set by using the ValidationRule property for this field or for the table. |
|
Null in Required Field |
A null value isn’t allowed in this field because the Required property for the field is set to Yes. |
|
Null value in AutoNumber field |
The data that you are importing contains a Null value that you attempted to append to an AutoNumber field. |
|
Unparsable Record |
A text value contains the text delimiter character (usually double quotation marks). Whenever a value contains the delimiter character, the character must be repeated twice in the text file; for example: 4 1/2″» diameter |
Top of Page
Link to data in Excel
By linking an Access database to data in another program, you can use the querying and reporting tools that Access provides without having to maintain a copy of the Excel data in your database.
When you link to an Excel worksheet or a named range, Access creates a new table that is linked to the source cells. Any changes that you make to the source cells in Excel appear in the linked table. However, you cannot edit the contents of the corresponding table in Access. If you want to add, edit, or delete data, you must make the changes in the source file.
Common scenarios for linking to an Excel worksheet from within Access
Typically, you link to an Excel worksheet (instead of importing) for the following reasons:
-
You want to continue to keep your data in Excel worksheets, but be able to use the powerful querying and reporting features of Access.
-
Your department or workgroup uses Access, but data from external sources that you work with is in Excel worksheets. You don’t want to maintain copies of external data, but want to be able to work with it in Access.
If this is the first time you are linking to an Excel worksheet
-
You cannot create a link to an Access database from within Excel.
-
When you link to an Excel file, Access creates a new table, often referred to as a linked table. The table shows the data in the source worksheet or named range, but it doesn’t actually store the data in the database.
-
You cannot link Excel data to an existing table in the database. This means that you cannot append data to an existing table by performing a linking operation.
-
A database can contain multiple linked tables.
-
Any changes that you make to the data in Excel are automatically reflected in the linked table. However, the contents and structure of a linked table in Access are read-only.
-
When you open an Excel workbook in Access (in the File Open dialog box, change the Files of Type list box to Microsoft Excel, and select the file you want), Access creates a blank database and automatically starts the Link Spreadsheet Wizard.
Prepare the Excel data
-
Locate the Excel file and the worksheet or range that has the data you want to link to. If you don’t want to link to the entire worksheet, consider defining a named range that includes only the cells you want to link to.
Create a named range in Excel (optional – useful if you only want to link to some of the worksheet data)
-
Switch to Excel and display the worksheet in which you want to define a named range.
-
Select the range of cells that contain the data you want to link to.
-
Right-click within the selected range and click Name a Range or Define Name.
-
In the New Name dialog box, specify a name for the range in the Name box and then click OK.
Note that you can link to only one worksheet or range at a time during a link operation. To link to data in multiple places in a workbook, repeat the link operation for each worksheet or range.
-
-
Review the source data, and take action as described in the following table:
Element
Description
Tabular format
Ensure that the cells are in tabular format. If the range includes merged cells, the contents of the cell are placed in the field that corresponds to the leftmost column and the other fields are left blank.
Skipping columns and rows
You cannot skip source columns and rows during the linking operation. However, you can hide fields and filter records by opening the linked table in Datasheet view after you have imported them into Access.
Number of columns
The number of source columns cannot exceed 255, because Access does not support more than 255 fields in a table.
Blank columns, rows, and cells
Delete all unnecessary blank columns and blank rows in the Excel worksheet or range. If there are blank cells, try to add the missing data.
Error values
If one or more cells in a worksheet or range contain error values, correct them before you start the import operation. Note that if a source worksheet or range contains error values, Access inserts a null value in the corresponding fields in the table.
Data type
You cannot change the data type or size of the fields in the linked table. Before you start the linking operation, you must verify that each column contains data of a specific type.
We highly recommend that you format a column if it includes values of different data types. For example, the FlightNo column in a worksheet might contain numeric and text values, such as 871, AA90, and 171. To avoid missing or incorrect values, do the following:
-
Right-click the column and then click Format Cells.
-
On the Number tab, under Category, select a format.
-
Click OK.
First row
If the first row in the worksheet or named range contains the names of the columns, you can specify that Access should treat the data in the first row as field names during the link operation. If there are no column names in the worksheet, or if a specific column name violates the field naming rules in Access, Access assigns a valid name to each corresponding field.
-
-
Close the source file, if it is open.
Prepare the destination database
-
Open the database in which you want to create the link. Ensure that the database is not read-only and that you have the necessary permissions to make changes to it.
-
If you don’t want to store the link in any of your existing databases, create a blank database: Click the File tab, click New, and then click Blank Database. Note, if you’re using Access 2007, click the Microsoft Office Button and then click New.
You are now ready to start the linking operation.
Create the link
-
The location of the import/link wizard differs slightly depending upon your version of Access. Choose the steps that match your Access version:
-
If you’re using the latest version of the Microsoft 365 subscription version of Access or Access 2019, on the External Data tab, in the Import & Link group, click New Data Source > From File > Excel.
-
If you’re using Access 2016, Access 2013, or Access 2010, on the External Data tab, in the Import & Link group, click Excel.
Note: The External Data tab is not available unless a database is open.
-
-
In the Get External Data — Excel Spreadsheet dialog box, in the File name box, specify the name of the Excel source file.
-
Select Link to the data source by creating a linked table, and then click OK.
The Link Spreadsheet Wizard starts and guides you through the linking process.
-
On the first page of the wizard, select a worksheet or a named range and click Next.
-
If the first row of the source worksheet or range contains the field names, select First row contains column headings. Access uses these column headings to name the fields in the table. If a column name includes certain special characters, it cannot be used as a field name in Access. In such cases, an error message is displayed that tells you that Access will assign a valid name for the field. Click OK to continue.
-
On the final page of the wizard, specify a name for the linked table and then click Finish. If the table with the name you specify already exists, you are asked if you want to overwrite the existing table or query. Click Yes if you want to overwrite the table or query, or click No to specify a different name.
Access tries to create the linked table. If the operation succeeds, Access displays the Finished linking table message. Open the linked table and review the fields and data to ensure that you see the correct data in all the fields.
If you see error values or incorrect data, you must troubleshoot the source data. For more information about how to troubleshoot error values or incorrect values, see the next section.
Top of Page
Troubleshoot #Num! and other incorrect values in a linked table
Even if you receive the message Finished linking table, you should open the table in Datasheet view to ensure that the rows and columns show the correct data.
If you see errors or incorrect data anywhere in the table, take correct action as described in the following table, and then try linking again. Remember that you cannot add the values directly to the linked table, because the table is read-only.
|
Issue |
Resolution |
|---|---|
|
Graphical elements |
Graphical elements in an Excel worksheet, such as logos, charts, and pictures, cannot be linked to in Access. |
|
Display format |
You might have to set the Format property of certain fields in Design view to ensure that the values are displayed correctly in Datasheet view. |
|
Calculated values |
The results of a calculated column or cells are displayed in the corresponding field, but you cannot view the formula (or expression) in Access. |
|
Truncated text values |
Increase the width of the column in Datasheet view. If you still don’t see the entire value, it could be because the value is longer than 255 characters. Access can only link to the first 255 characters, so you should import the data instead of linking to it. |
|
Numeric field overflow error message |
The linked table might appear to be correct, but later, when you run a query against the table, you might see a Numeric Field Overflow error message. This can happen because of a conflict between the data type of a field in the linked table and the type of data that is stored in that field. |
|
TRUE or FALSE and -1 or 0 values |
If the source worksheet or range includes a column that contains only TRUE or FALSE values, Access creates a Yes/No field for the column in the linked table. However, if the source worksheet or range includes a column that contains only -1 or 0 values, Access, by default, creates a numeric field for the column, and you will not be able to change the data type of the corresponding field in the table. If you want a Yes/No field in the linked table, ensure that the source column includes TRUE and FALSE values. |
|
Multivalued fields |
Access does not enable support for multiple values in a field, even if the source column contains a list of values separated by semicolon (;). The list of values will be treated as a single value, and placed in a text field. |
|
#Num! |
Access displays the #Num! error value instead of the actual data in a field in the following situations:
Do the following to minimize the instances of null values in the table:
|
|
Numeric values instead of date values |
If you see a seemingly random five-digit number in a field, check to see if the source column contains mostly numeric values but also includes a few date values. Date values that appear in numeric columns get incorrectly converted to a number. Replace the date values with numeric values and then try linking again. |
|
Date values instead of numeric values |
If you see a seemingly random date value in a field, check to see if the source column contains mostly date values but also includes a few numeric values. Numeric values that appear in date columns get incorrectly converted to a date. Replace the numeric values with date values and then try linking again. |
Top of Page
![]()
Загрузить PDF
![]()
Загрузить PDF
Access – это реляционная система управления базами данных, в которую можно импортировать одну или несколько таблиц Excel и согласовать их однородные элементы. Более того, при помощи Access можно собрать и проанализировать большое количество данных, так как один файл Access включает несколько таблиц Excel. Но для начала необходимо импортировать данные из Excel в Access; это можно сделать, выполнив несколько основных действий.
-

1
На компьютере запустите Excel и Access. Необходимо купить и скачать пакет Microsoft Office, который содержит и Excel,[1]
и Access. Это можно сделать на официальном сайте компании Microsoft.- Установив пакет Microsoft Office, в Windows нажмите «Пуск» – «Все программы».[2]
- Нажмите «Microsoft Office» и в открывшемся меню выберите «Access» (или «Excel»). Скорее всего, у вас уже есть таблица Excel, которую вы скачали или получили по электронной почте. При помощи программы Excel вы сможете открыть такую таблицу.
- Установив пакет Microsoft Office, в Windows нажмите «Пуск» – «Все программы».[2]
-
2
Перед импортом данных в Access обработайте таблицу Excel. Это сильно облегчит задачу по переносу данных из Excel в Access. Суть в том, что в разных таблицах определенные данные должны иметь один формат.[3]
- Для начала удостоверьтесь, что первая строка каждой импортируемой таблицы содержит названия (заголовки) столбцов – названия должны ясно характеризовать данные, занесенные в столбцы.[4]
Например, если столбец содержит фамилии людей, назовите его «Фамилии». Давайте точные названия, чтобы облегчить процесс согласования заголовков столбцов в разных таблицах. - В Access вы можете согласовать однородные элементы в двух и более таблицах Excel. Например, у вас есть таблица Excel с данными по заработной плате, которая содержит ФИО (фамилия, имя, отчество), адреса и суммы заработной платы. Допустим, вы хотите сопоставить эту таблицу с другой таблицей, включающей данные о пожертвованиях на некий проект (ФИО, адреса и суммы пожертвований). В Access вы можете согласовать заголовки столбцов в разных таблицах. В нашем примере согласуйте названия столбцов с фамилиями, чтобы выяснить, какие люди присутствуют в обеих таблицах.
- Просмотрите каждую таблицу Excel и убедитесь, что данные внесены в одном формате; в противном случае обработайте таблицу так, чтобы привести данные к одному формату.[5]
Такой подход к формату данных отражает слово «реляционная» (от relation – зависимость, связь) в описании Access. Например, если в зарплатной таблице в столбце «ФИО» введены фамилии, имена и отчества, а в таблице о пожертвованиях в столбце «ФИО» – только фамилии и имена, то Access не считает данные столбцы однородными (то есть не сможет согласовать их). Поэтому одинаковыми должны быть как названия столбцов, так и формат данных, которые содержатся в этих столбцах.
- Для начала удостоверьтесь, что первая строка каждой импортируемой таблицы содержит названия (заголовки) столбцов – названия должны ясно характеризовать данные, занесенные в столбцы.[4]
-
3
Разделите данные в столбцах таблицы Excel. Для того чтобы сделать элементы таблицы Excel однородными (для их импорта в Access), разделите информацию в соответствующих столбцах.[6]
- Например, вы можете поместить фамилию в один столбец, имя – во второй, а отчество – в третий. Аналогичным образом поступите с соответствующим столбцом во второй таблице. Теперь в Access вы сможете согласовать, например, фамилии из одной таблицы с фамилиями из другой и найти людей, которые присутствуют в обеих таблицах.
- Для разделения данных в столбце Excel выделите нужный столбец. В панели инструментов нажмите «Данные». Затем нажмите «Текст по столбцам». Рекомендуется выбрать опцию «С разделителями». Затем нажмите «Далее».
-
4
Для разделения данных, расположенных в одном столбце, следуйте подсказкам Мастера текстов. Выполните следующие действия:
- Выберите символ-разделитель между данными. Помните, что информация, занесенная в ячейку, разделяется каким-то символом. Как правило, таким символом-разделителем является пробел, запятая или точка с запятой. В подавляющем большинстве случаев информация разделяется пробелом. Например, в ячейку занесена следующая информация: Иванов Иван Иванович. Здесь Фамилия отделена от имени пробелом, а имя отделено от отчества также пробелом. В этом случае в окне Мастера текстов выберите опцию «Пробел».
- Нажмите «Далее». Затем нажмите «Готово». Столбец с ячейкой «Иванов Иван Иванович» разделится на три столбца. Теперь вы можете присвоить имя каждому из трех новых столбцов, то есть назвать их как «Фамилия», «Имя», «Отчество». Перед разделением информации справа от разделяемого столбца вставьте несколько пустых столбцов, чтобы Excel занес в них разделенные данные (а не в уже заполненные столбцы с другими данными).
Реклама


-
1
Запустите Access. Для этого нажмите «Пуск» – «Microsoft Office» – «Microsoft Access». Для импорта данных из Excel создайте новую базу данных Access.
- Для создания базы данных в окне программы Access нажмите «Новая база данных».
- Если хотите, присвойте созданной базе данных имя. Затем нажмите «Создать».
-
2
Импортируйте таблицу Excel в Access. Теперь вы можете импортировать данные из одной или нескольких таблиц Excel в Access.
- На панели инструментов (в окне программы Access) нажмите «Внешние данные».[7]
В некоторых версиях Access на панели инструментов нажмите «Файл» – «Внешние данные».[8]
- В разделе «Имя файла» нажмите «Обзор», чтобы найти нужную таблицу Excel.
- Поставьте флажок у опции «Импортировать исходные данные в новую таблицу в текущей базе данных» (эта опция активирована по умолчанию).
- Найдя нужную таблицу, щелкните по ней. Затем нажмите «OK». Откроется мастер импорта данных из Excel в Access.
Реклама
- На панели инструментов (в окне программы Access) нажмите «Внешние данные».[7]


-
1
Выполните указания мастера импорта данных. Это необходимо сделать для завершения процесса импорта таблицы Excel в Access.
- Выберите лист в таблице Excel, данные которого вы хотите импортировать в Access. Порой это очень легко, потому что таблица содержит всего один лист. Но иногда одна таблица Excel включает множество листов, вкладки которых отображаются в нижней части окна программы Excel; в этом случае нужно указать определенный лист. Затем нажмите «Далее».
- Отобразится окно с вопросом, содержит ли первая строка таблицы заголовки столбцов. Здесь имеются в виду названия, характеризующие данные в каждом столбце (например, фамилия, адрес, сумма заработной платы и так далее). Прекрасно, если до этого вы обработали таблицу Excel так, что первая строка содержит строго определенные названия столбцов; в этом случае отметьте опцию, что первая строка содержит заголовки столбцов. Затем нажмите «Далее».
- Если в первой строке заголовков столбцов нет, в открывшемся окне отобразится вопрос о том, хотите ли вы присвоить имена «полям» (в Access под «полями» понимаются заголовки столбцов). Если до этого вы не вводили названия столбцов, сделайте это сейчас.
-
2
Завершите импорт данных. Вам осталось выполнить всего несколько действий. В открывшемся окне определите первичный ключ (если хотите).
- Вы можете, но не обязаны, делать это. Первичный ключ – это уникальный номер, присваиваемый каждой строке с данными; это может пригодиться при сортировке данных. Затем нажмите «Далее».[9]
- В последнем окне отобразится имя по умолчанию. Вы можете переименовать таблицу Excel (по завершении импорта она отобразится в виде таблицы Access на левой стороне экрана).
- Нажмите «Импорт», а затем нажмите «Закрыть». Таблица отобразится на левой стороне экрана; это значит, что она полностью импортирована в Access.
- Если вы хотите согласовать несколько баз данных, проделайте вышеописанные действия для импорта одной или нескольких дополнительных таблиц Excel. Теперь вы можете приступить к согласованию данных в Access.
Реклама
- Вы можете, но не обязаны, делать это. Первичный ключ – это уникальный номер, присваиваемый каждой строке с данными; это может пригодиться при сортировке данных. Затем нажмите «Далее».[9]


Предупреждения
- Имейте в виду, что если версия Excel, в которой была создана таблица, отличается от версии Access, вы можете столкнуться с проблемами при импорте данных.
- Повторим еще раз: перед импортом данных обработайте таблицу Excel. То есть обратите внимание на формат данных, с которыми вы собираетесь работать.
- Сделайте копию исходной таблицы, чтобы в крайнем случае вы смогли импортировать данные еще раз.
- В Access можно импортировать не более 255 столбцов.[10]
Реклама
Об этой статье
Эту страницу просматривали 45 293 раза.
Была ли эта статья полезной?
We can use Microsoft Access to store a wide range of information for reporting and analysis. In this tutorial, we will learn how to Import Excel Data into a new or existing table in the Access database or link Excel Data to Access. When we import data, Access simply creates a copy of our source data, without making any changes to it.
 Figure 1 – How to import excel into access
How to Import Excel Data into New table in the Access Database
- If we are using Access 2010 or 2013, we will go to the External Data Tab, and select the Excel option in the Import & Link group
- If we are using Access 2007, we will go to the External Data Tab, click on the Excel option in the Import Group
- If we are using the Access 2019, 2016 or Office 365, we will go to the External Data tab and select New Data Source in the Import & Link group. Next, we will select From File and then, Excel
 Figure 2 – Importing access data into excel
- We will be directed to the External Data dialog box
 Figure 3 – Import excel into access
- In the Get External Data dialog box, we will select the location of the file we want to import
 Figure 4 – Import excel data into access
- We will mark “Import the source data into a new table in the current database” option
 Figure 5 – Microsoft access import from excel
- In the Import Spreadsheet Wizard, we will mark “first Row contains Headings” and we will click Next.
 Figure 6 – Import excel data into access
- Next, we can specify the format for each category.
 Figure 7 – How to import excel data into access
- We will define our Primary Key, which is the unique signature to our table. We will let Access define this key for the sake of our tutorial.
 Figure 8 – Import excel data into access
- We may choose to save Import steps
 Figure 9 – How to import excel data into access
- We will enter our desired name for the Table
 Figure 10 – Enter the desired name for our table
- Now, if we click on the My New Data Table, we will see our created table
 Figure 11 – The New imported Table from Excel
How to import Excel Data into an existing table in the Access Database
We can add a different Excel worksheet to the already existing table in the Access Database. But we have to make sure that the column headings of the new table match with the existing table.
- We will go to the External Data Tab on the Ribbon
- In the Import and Link Group, we will go to From File and choose the Excel Button
- In the Get External Data dialog box, we will select the location of the file we want to import
- We will mark “Append a copy to the records to the table” option and specify the table we want to add our new data.
 Figure 12 – Importing excel to access
- We will click Next
 Figure 13 – Use Import Spreadsheet Wizard
- Our New Table will be added into the existing table in Access.
How to Link Excel Data to Access
We can link Excel Data to access so that we can make use of reporting and querying tools without storing a copy of our data inside the Access Database. When we link Data to Access, it will simply create a new table that contains links to the source cells. Whenever we modify the source cells, this will appear automatically in the linked table.
- In the Get External Data-Excel Spreadsheet dialog box, we will specify the location of the Excel sheet
 Figure 14 – Link Excel Data to Access
- Next, we will mark “Link to a data source by creating a linked table”
 Figure 15– Import Excel data into access
- We will specify that the first row contains headings
 Figure 16 – Access Importing data from Excel
- We will name the Table
 Figure 17 – Link Table to Access
- We will verify that we want to click Table by selecting OK.
 Figure 18 – Excel Data into access
- When we click on My Linked Table, the result is the next figure
 Figure 19 – New Excel Table from Access
Instant Connection to an Excel Expert
Most of the time, the problem you will need to solve will be more complex than a simple application of a formula or function. If you want to save hours of research and frustration, try our live Excelchat service! Our Excel Experts are available 24/7 to answer any Excel question you may have. We guarantee a connection within 30 seconds and a customized solution within 20 minutes.
Convert Excel to Access Database
Use this simple method to learn how to create Access database from Excel spreadsheet.
Programmers convert Excel to Access database for easy maintenance, minimize the load or as a database backup. This article is going to explain how to import Excel into Access without using any ADODB or connection string. This method is going to very simple.
Instead of creating a connection string and mapping to it in SQL query every time, we are going to just do an Export in single step by using the Microsoft Access Object Library. The process explained in this article will work better in Office 2007 and above.
How to Import Excel into Access Database?
Before using the Macro code, let’s see how import Excel into Access is done manually. We need a source file (Excel) and a target destination file (MDB). Assume there is a table as in below format in an Excel sheet. To convert this Excel to Access database, create a new MDB file.
- Open the MDB file & Choose “External Data” from Menu.
- Choose “Excel” from the list of sources (Access, Excel, Text, XML etc) Import Tab.
- Enter Excel file path in ‘File Name’ field in the Pop up window.
- Choose ‘Import to new Table’ or ‘Append’ or ‘Link’ as per your requirement.
- Click next, proceed with few more windows to choose the Sheet or view that has data.
- click Finish to complete importing Excel data to Access.
Now, the data from Excel will be imported to the current mdb database. Access will also ask confirmation whether you want to store the import steps, so that it will be easy to repeat the same steps in just one click.
Also Read: Different methods to Read Data from external Excel Workbook.
VBA to Export Excel to Access Database
To create Access database from Excel spreadsheet, Press Alt + F11 to view the VB Editor in Excel. Copy paste the below code, change the MDB File path and Table name as per your need.
- Include “Microsoft Access Object Library” from Tools -> References.
- Press F5 to execute this code and export data.
Option Explicit
'This Code is downloaded from Officetricks.com
Public Sub Export_Excel_To_Access_MDB()
    Dim oDB As New Access.Application

    'Create Object to Link to the Access Databse
    oDB.OpenCurrentDatabase "C:OfficeTricksExcel_To_Access.accdb", False

    'Import data from Excel Spreadsheet to Access Database
    oDB.DoCmd.TransferSpreadsheet acImport, acSpreadsheetTypeExcel12, "ExcelToAccess", ThisWorkbook.FullName, True

    'Import only specific data range from Excel to Access
    oDB.DoCmd.TransferSpreadsheet acImport, acSpreadsheetTypeExcel12, "ExcelToAccess", ThisWorkbook.FullName, True, "Sheet1$A1:E3"

    'Export Data from Access to a Text File
    oDB.DoCmd.TransferText acExportDelim, TableName:="ExcelToAccess", Filename:=ThisWorkbook.Path & "ExportText.txt"

    'Close Access Application and quit
    oDB.CloseCurrentDatabase
    oDB.Quit
    Set oDB = Nothing

    'Process Completed
    MsgBox "Data Exported to Access DB"
End Sub
The above code also explains how to (1) Export particular range from Excel to Access and (2) Export data from Access database to a Text file.
This page only explains about how to do a plain data transfer (i.,e directly convert Excel to Access). It does not include the explanations about how to build a SWL query, to insert, alter, and inquire data from Access. To do those processes, we have to make use of other options present in DoCmd collection of Access Application Object.
Содержание
- Метод DoCmd.TransferSpreadsheet (Access)
- Синтаксис
- Параметры
- Примечания
- Пример
- Поддержка и обратная связь
- Импорт данных excel access vba
- Access VBA – Import / Export Excel – Query, Report, Table, and Forms
- Import Excel File Into Access
- Import Excel to Access Function
- Access VBA Export to New Excel File
- Export Query to Excel
- Export Report to Excel
- Export Table to Excel
- VBA Coding Made Easy
- Export Form to Excel
- Export to Excel Functions
- Export to Existing Excel File
- Export SQL Query to Excel
- Function to Export to New Excel File
- VBA Code Examples Add-in
- Доступ к VBA — импорт / экспорт Excel — запрос, отчет, таблица и формы
- Импортировать файл Excel в Access
- Импортировать Excel в функцию доступа
- Доступ к экспорту VBA в новый файл Excel
- Экспорт запроса в Excel
- Экспорт отчета в Excel
- Экспорт таблицы в Excel
- Экспорт формы в Excel
- Экспорт в функции Excel
- Экспорт в существующий файл Excel
- Экспорт SQL-запроса в Excel
- Функция экспорта в новый файл Excel
- Импорт данных excel access vba
Метод DoCmd.TransferSpreadsheet (Access)
Метод TransferSpreadsheet выполняет действие TransferSpreadsheet в Visual Basic.
Синтаксис
выражение.TransferSpreadsheet (TransferType, SpreadsheetType, TableName, FileName, HasFieldNames, Range, UseOA)
выражение: переменная, представляющая объект DoCmd.
Параметры
| Имя | Обязательный или необязательный | Тип данных | Описание |
|---|---|---|---|
| TransferType | Необязательный | AcDataTransferType | Нужный тип переноса. Значение по умолчанию — acImport. |
| SpreadsheetType | Необязательный | AcSpreadSheetType | Тип электронной таблицы для импорта, экспорта или связи. |
| TableName | Необязательный | Variant | Строковое выражение, являющееся именем таблицы Office Access, предназначенной для импорта данных электронной таблицы, экспорта данных электронной таблицы или связывания данных электронной таблицы, или запрос на выборку Access, результаты которого нужно экспортировать в электронную таблицу. |
| FileName | Необязательный | Variant | Строковое выражение, являющееся именем и путем электронной таблицы для импорта, экспорта или связывания. |
| HasFieldNames | Необязательный | Variant | Используйте значение True (1), чтобы использовать первую строку электронной таблицы в качестве имен полей при импорте или связывании. Используйте значение False (0), чтобы считать первую строку электронной таблицы обычными данными. Если оставить этот аргумент пустым, предполагается, что используется значение по умолчанию (False). При экспорте таблицы или данных запроса на выборку Access в электронную таблицу имена полей записываются в первую строку электронной таблицы независимо от введенного значения этого аргумента. |
| Range | Необязательный | Variant | Строковое выражение, являющееся допустимым диапазоном ячеек или именем диапазона в электронной таблице. Этот аргумент применяется только для импорта. Чтобы импортировать электронную таблицу целиком, оставьте этот аргумент пустым. При экспорте в электронную таблицу необходимо оставить этот аргумент пустым. Если ввести диапазон, экспорт завершится сбоем. |
| UseOA | Необязательный | Variant | Этот аргумент не поддерживается. |
Примечания
Используйте метод TransferSpreadsheet для импорта или экспорта данных между текущей базой данных Access или проектом Access (ADP) и файлом электронной таблицы. Вы также можете связать данные в электронной таблице Excel с текущей базой данных Access. Это позволит просматривать и изменять данные электронной таблицы с помощью Access, при этом не теряя возможность полного доступа к ним в Excel. Кроме того, вы можете связать данные в файле электронной таблицы Lotus 1-2-3, но они будут доступны в Access только для чтения.
Также можно использовать объекты данных ActiveX (ADO) для создания связи с помощью свойства ActiveConnection для объекта Recordset.
Пример
В следующем примере импортируются данные из указанного диапазона электронной таблицы Lotus Newemps.wk3 в таблицу Employees (Сотрудники) Access. В качестве имен полей используется первая строка электронной таблицы.
Поддержка и обратная связь
Есть вопросы или отзывы, касающиеся Office VBA или этой статьи? Руководство по другим способам получения поддержки и отправки отзывов см. в статье Поддержка Office VBA и обратная связь.
Источник
Импорт данных excel access vba
Учимся работать с базами данных Access из макросов Excel
Кратко о структуре базы данных. База состоит из таблиц. Таблица — из строк. Строка — из полей. В полях могут храниться данные разных форматов. Форматы определяются в момент создания таблицы. Создать базу и таблицы в ней можно в Access, а можно и средствами макроса прямо из Excel.
Чтобы Access смог обращаться к базам Access, нужно подключить библиотеку DAO. Для этого в редакторе Visual Basic выбираем меню «Tools->References», открывается окошко, в котором нужно поставить галочку напротив Microsoft DAO 3.6 Object Library.
Теперь делаем так:
‘Объявляем переменные
Dim dbs As DAO.Database ‘База данных
Dim rs As DAO.Recordset ‘Запрос к базе данных
‘Открываем базу
Set dbs = DAO.OpenDatabase(«c:database.mdb»)
‘Выполняем запрос к базе данных
Set rs = dbs.OpenRecordset(«SELECT * FROM тбл_тов WHERE ID_тов>2»)
Тут объясню подробнее. Запросы к базе выполняются на языке SQL. Пока рассмотрим только одну команду этого языка — SELECT. Эта команда выбирает из таблицы строки, удовлетворяющие заданному условию. Там, где у нас стоит звездочка, можно указать названия полей, которые будут присутствовать в ответе. В нашем случае будет возвращаться вся строка полностью. После слова FROM идет название таблицы, из которой идет выбор строк. Таблиц в базе может быть много. В нашем случае это тбл_тов — таблица товаров. После слова WHERE указывается условие, по которому отбираются строки. У нас условие такое: если поле ID_тов > 2, то строка включается в ответ. Ответ получается в переменной rs, которая имеет тип Recordset. Recordset — это временная таблица, сформированная из строк, удовлетворяющих условию запроса.
‘Если ничего не найдено — выдаем сообщение и выходим
If RS.RecordCount = 0 Then
MsgBox ( «По вашему запросу ничего не найдено» )
Do While Not RS.EOF ‘цикл выполняется пока не достигнута последняя строка в таблице ответа
‘Присваиваем ячейкам таблицы значения из базы
Cells ( i , 2 ). Value = RS.Fields ( «назв_тов» )
Cells ( i , 1 ). Value = RS.Fields ( «ID_тов» )
‘переходим к следующей строке во временной таблице ответа
‘Закрываем временную таблицу
‘Очищаем память. Если этого не сделать, то таблица так и останется в памяти до закрытия рабочей книги.
Источник
Access VBA – Import / Export Excel – Query, Report, Table, and Forms
This tutorial will cover the ways to import data from Excel into an Access Table and ways to export Access objects (Queries, Reports, Tables, or Forms) to Excel.
Import Excel File Into Access
To import an Excel file to Access, use the acImport option of DoCmd.TransferSpreadsheet :
Or you can use DoCmd.TransferText to import a CSV file:
Import Excel to Access Function
This function can be used to import an Excel file or CSV file into an Access Table:
You can call the function like this:
Access VBA Export to New Excel File
To export an Access object to a new Excel file , use the DoCmd.OutputTo method or the DoCmd.TransferSpreadsheet method:
Export Query to Excel
This line of VBA code will export a Query to Excel using DoCmd.OutputTo:
Or you can use the DoCmd.TransferSpreadsheet method instead:
Note: This code exports to XLSX format. Instead you can update the arguments to export to a CSV or XLS file format instead (ex. acFormatXLSX to acFormatXLS).
Export Report to Excel
This line of code will export a Report to Excel using DoCmd.OutputTo:
Or you can use the DoCmd.TransferSpreadsheet method instead:
Export Table to Excel
This line of code will export a Table to Excel using DoCmd.OutputTo:
Or you can use the DoCmd.TransferSpreadsheet method instead:
VBA Coding Made Easy
Stop searching for VBA code online. Learn more about AutoMacro — A VBA Code Builder that allows beginners to code procedures from scratch with minimal coding knowledge and with many time-saving features for all users!

Export Form to Excel
This line of code will export a Form to Excel using DoCmd.OutputTo:
Or you can use the DoCmd.TransferSpreadsheet method instead:
Export to Excel Functions
These one line commands work great to export to a new Excel file. However, they will not be able to export into an existing workbook. In the section below we introduce functions that allow you to append your export to an existing Excel file.
Below that, we’ve included some additional functions to export to new Excel files, including error handling and more.
Export to Existing Excel File
The above code examples work great to export Access objects to a new Excel file. However, they will not be able to export into an existing workbook.
To export Access objects to an existing Excel workbook we’ve created the following function:
You can use the function like this:
Notice you are asked to define:
- What to Output? Table, Report, Query, or Form
- Object Name
- Output Sheet Name
- Output File Path and Name.
Export SQL Query to Excel
Instead you can export an SQL query to Excel using a similar function:
Called like this:
Where you are asked to input:
- SQL Query
- Output Sheet Name
- Output File Path and Name.
Function to Export to New Excel File
These functions allow you to export Access objects to a new Excel workbook. You might find them more useful than the simple single lines at the top of the document.
The function can be called like this:

VBA Code Examples Add-in
Easily access all of the code examples found on our site.
Simply navigate to the menu, click, and the code will be inserted directly into your module. .xlam add-in.
Источник
Доступ к VBA — импорт / экспорт Excel — запрос, отчет, таблица и формы

В этом руководстве будут рассмотрены способы импорта данных из Excel в таблицу Access и способы экспорта объектов Access (запросов, отчетов, таблиц или форм) в Excel.
Импортировать файл Excel в Access
Чтобы импортировать файл Excel в Access, используйте acImport вариант DoCmd.TransferSpreadsheet :
Или вы можете использовать DoCmd.TransferText чтобы импортировать файл CSV:
Импортировать Excel в функцию доступа
Эту функцию можно использовать для импорта файла Excel или CSV в таблицу доступа:
Вы можете вызвать функцию так:
Доступ к экспорту VBA в новый файл Excel
Чтобы экспортировать объект Access в новый файл Excel, используйте DoCmd.OutputTo метод или DoCmd.TransferSpreadsheet метод:
Экспорт запроса в Excel
Эта строка кода VBA экспортирует запрос в Excel с помощью DoCmd.OutputTo:
Или вы можете использовать вместо этого метод DoCmd.TransferSpreadsheet:
Примечание: Этот код экспортирует в формат XLSX. Вместо этого вы можете обновить аргументы для экспорта в формат файла CSV или XLS (например, acFormatXLSX к acFormatXLS).
Экспорт отчета в Excel
Эта строка кода экспортирует отчет в Excel с помощью DoCmd.OutputTo:
Или вы можете использовать вместо этого метод DoCmd.TransferSpreadsheet:
Экспорт таблицы в Excel
Эта строка кода экспортирует таблицу в Excel с помощью DoCmd.OutputTo:
Или вы можете использовать вместо этого метод DoCmd.TransferSpreadsheet:
Экспорт формы в Excel
Эта строка кода экспортирует форму в Excel с помощью DoCmd.OutputTo:
Или вы можете использовать вместо этого метод DoCmd.TransferSpreadsheet:
Экспорт в функции Excel
Эти однострочные команды отлично подходят для экспорта в новый файл Excel. Однако их нельзя будет экспортировать в существующую книгу. В следующем разделе мы представляем функции, которые позволяют вам добавить экспорт в существующий файл Excel.
Ниже мы включили некоторые дополнительные функции для экспорта в новые файлы Excel, включая обработку ошибок и многое другое.
Экспорт в существующий файл Excel
Приведенные выше примеры кода отлично подходят для экспорта объектов Access в новый файл Excel. Однако их нельзя будет экспортировать в существующую книгу.
Чтобы экспортировать объекты Access в существующую книгу Excel, мы создали следующую функцию:
Вы можете использовать эту функцию так:
Обратите внимание, что вас просят определить:
- Что выводить? Таблица, отчет, запрос или форма
- Имя объекта
- Имя выходного листа
- Путь и имя выходного файла.
Экспорт SQL-запроса в Excel
Вместо этого вы можете экспортировать SQL-запрос в Excel, используя аналогичную функцию:
Где вас просят ввести:
- SQL-запрос
- Имя выходного листа
- Путь и имя выходного файла.
Функция экспорта в новый файл Excel
Эти функции позволяют экспортировать объекты Access в новую книгу Excel. Вы можете найти их более полезными, чем простые одиночные строки в верхней части документа.
Источник
Импорт данных excel access vba
Excel: умный импорт из Excel листа в таблицу Access
Всем привет, помогите разобраться с нижеизложенным.
Что Дано:
Есть книга Excel «C:Datatest.xls». В этой книге есть лист «output», с таблицей данных (первая строка — название полей).
Есть база Access «C:DatamyData.mdb.xls». В этой базе есть таблица «test» с данными.
Что надо сделать:
Необходимо создать макрос в Excel, который бы вставлял данные из листа output, в таблицу «test», причем если в таблице «test» есть уже такие данные (определяется по трем ключевым полям), то их необходимо заменить. Т.е. не должно быть дублированых записей в таблице «test». Этим макросом я буду пополнять ежедневно данные в таблице «test», либо заменять уже существующие (на верные или скорректированные).
В чем проблема:
Я не знаю как создать таблицу (объект?) с дынными из Excel, что бы:
a. проверить есть ли такие же записи в таблице «test» (если есть, то удалить их из «test» и залить заново)
b. Вставить их в access.
Все это я буду делать (уже делаю) через ADO. Сейчас копаюсь в книгах и инете — не нашел примеров создания таблицы (recordset’а) в Excel, копированием/выделением/селектом диапазона ячеек. Помогите пожалуйста, горит.
Решать такую задачу со стороны Excel сложнее чем из Access, в котором достаточно выполнить два запроса, один на обновление второй на добавление.
В Вашем варианте можно сделать следующее:
создать рекордсет ADO в Excel,
заполнить его данными из листа «output»,
открыть рекордсет с набором записей таблицы «test»
фильтром и перебором всех записей произвести сравнение, для редактирования или добавления записей.
Все эти процедуры и библиотека ADO должны присутствовать в проекте VBA файла xls.
Евгений.
Получается последовательность такая:
1создать рекордсет ADO в Excel,
2заполнить его данными из листа «output»,
22 Подконнектится
3открыть рекордсет с набором записей таблицы «test»
4фильтром и перебором всех записей произвести сравнение, для редактирования или добавления записей.
Как раз проблема с пп. 1 и 2 — я не знаю что прописать.
Dim xlsRecordSet as ADODB.Recordset
Set xlsRecordSet = New ADOD.Recordset
Const ConnectionString As String = _
«Provider = Microsoft.Jet.OLEDB.4.0;» + _
«Data Source = C:DatamyData.mdb;Persist Security Info=False»
Dim Connection As ADODB.Connection
Set Connection = New ADODB.Connection
If Connection.State = ObjectStateEnum.adStateOpen Then objConn.Close
If Connection.State = ObjectStateEnum.adStateOpen Then objConn.Close
Как рекордсет создается и заполняется Вы можете посмотреть в коде.
Также его можно сортировать и передавать в массив ( это для примера ).
Dim rs As Object , i% , V ()
Set rs = CreateObject ( «ADODB.Recordset» ) ‘создание рекордсета
rs.Fields.Append «Fld» , 200 , 255 ‘ добавление поля в рекордсет
rs.Open ‘открываем рекордсет
rs.AddNew ‘добавление записи в реккордсет
rs ( 0 ) = «Text» ‘ввод данных
rs.Sort = «Fld» ‘имя поля сортировки «Fld desk» — по убыванию
V = rs.GetRows ‘при необходимости передаем все содержимое рекордсета в массив
rs.Close ‘ закрываем рекордсет
Set rs = Nothing ‘ очищаем переменную для освобождения памяти
Организовать циклы добавления нужного количества полей , сбора данных листа и заполнения полей рекордсета , надеюсь Вы сможете самостоятельно.
‘=======================================================================В цикле перебора набора записей, создается строчная переменная содержащая значение поля рекордсета
sSql = «INSERT INTO Table1 ( Fld1 ) SELECT ‘» & rs ( 1 ) & «‘» ‘текст момещается в апострофы
Источник