
If you have a lot of business or personal contact information that you keep in a spreadsheet, you can import it straight into Outlook 2013 or Outlook 2016 for Windows with just a little preparation. There are three major steps.
-
Save your Excel workbook as a .csv file.
-
Import your contacts.
-
Map the Excel spreadsheet columns with the appropriate Outlook fields.
Step 1: Save your Excel workbook as a .csv file
Outlook can import comma separated value (.csv) files, but not workbooks with multiple sheets, so step 1 is saving your Excel workbook as a .csv file. Here’s how:
-
In your workbook, click the worksheet with the contact information you want to import.
-
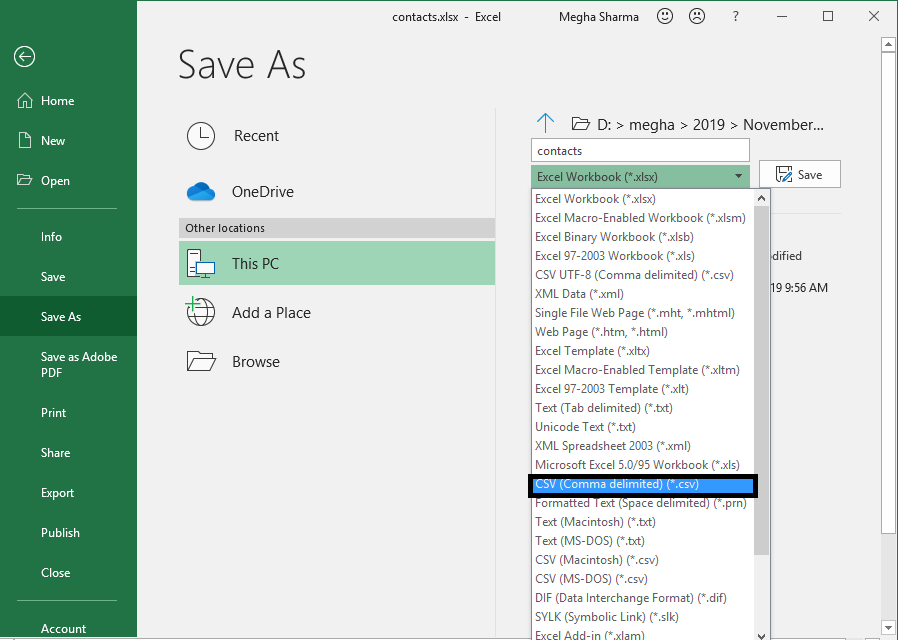
Click File > Save As.
-
Choose where to save your file.
-
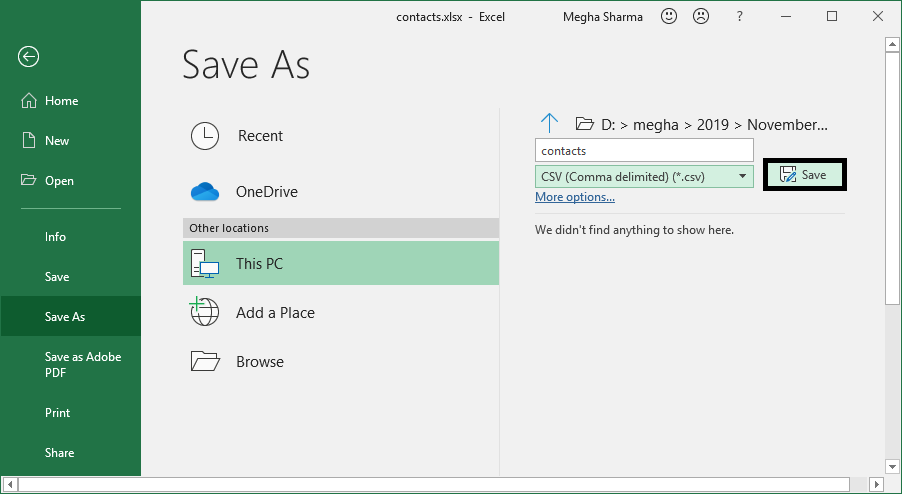
In the Save as type box, choose CSV (Comma delimited) (*.csv), and click Save.
Excel tells you “The selected file type does not contain workbooks that contain multiple sheets.” This refers to a limitation of the CSV file; nothing will happen to your original workbook (the .xlsx file).
-
Click OK.
Excel tells you “Some features in your workbook might be lost if you save it as CSV (Comma delimited).” This refers only to limitations of the CSV file and can be ignored.
-
Click Yes to have Excel save the current worksheet as a CSV file. The original workbook (the .xlsx file) closes.
-
Close the CSV file.
You’re done with Excel. Now, you can start the import process in Outlook.
Note: Some locales use different list separators by default. For example, the default separator for German is the semicolon. But Outlook doesn’t support the semicolon as a field separator. So you might need to replace any semicolons in the CSV file with commas before going to the next step.
Step 2: Import your contacts to Outlook
Note: If you’re importing the .csv file into an Outlook.com account (or another Exchange ActiveSync account) in Outlook 2013, see Import contacts into an Outlook.com account.
-
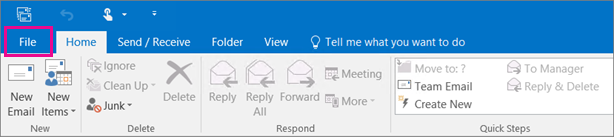
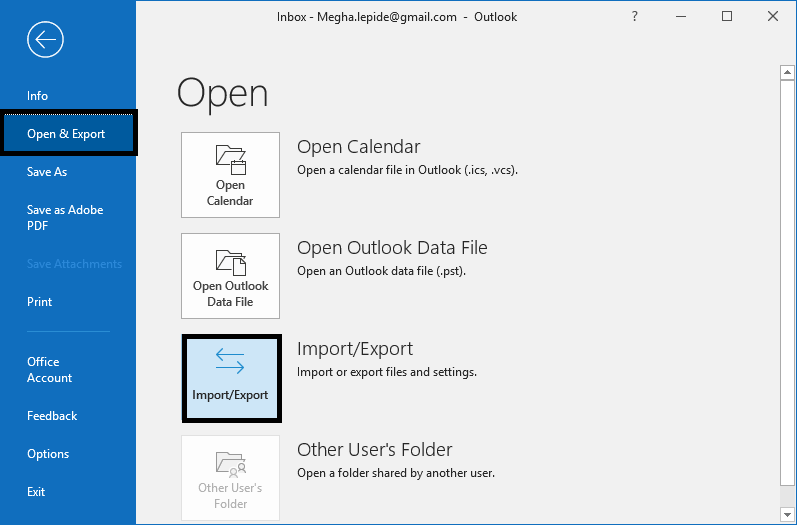
At the top of your Outlook ribbon, choose File.

-
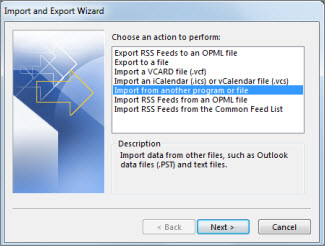
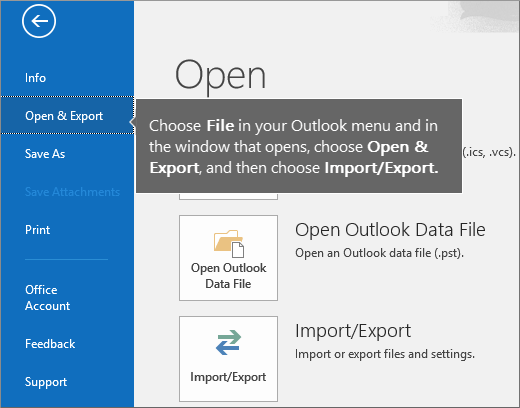
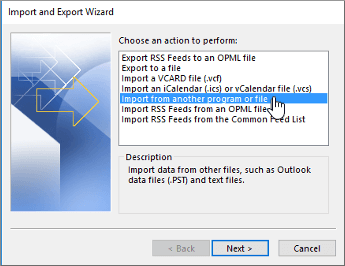
Choose Open & Export > Import/Export.
-
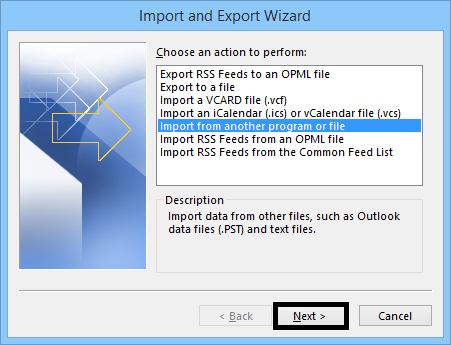
Choose Import from another program or file and then click Next.
Tip: If you are prompted to enter a password and you haven’t set a password, click Cancel to move to the next window.
-
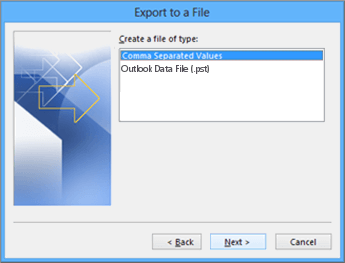
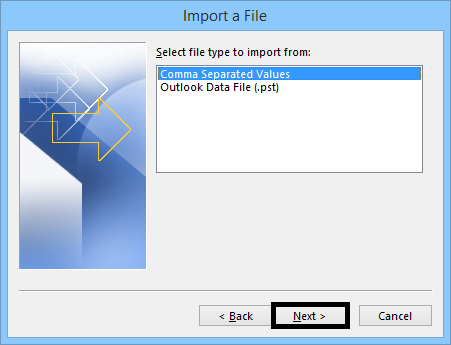
Choose Comma Separated Values and click Next.
-
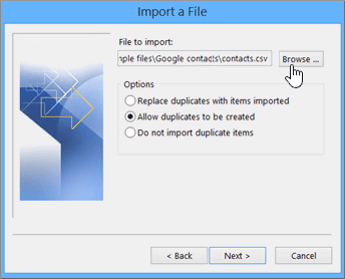
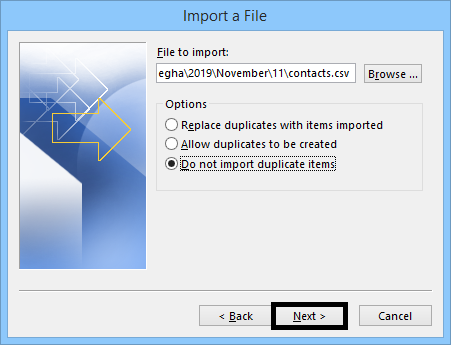
Browse to the .csv file you want to import.
-
Under Options, choose whether to replace duplicates (existing contacts), create duplicate contacts, or not import duplicates.
-
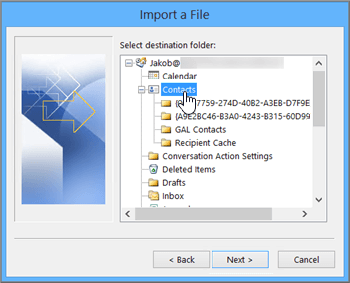
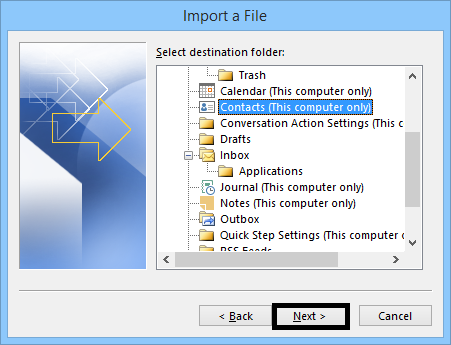
Click Next and choose the destination folder for your contacts. Contacts should be selected by default, but if it’s not, scroll up or down until you find it. You can also choose a different folder, or create a new one.
-
Click Next.
-
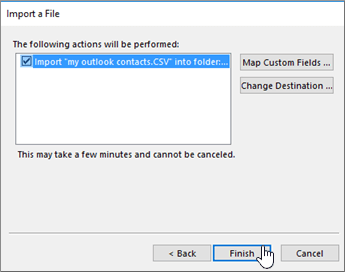
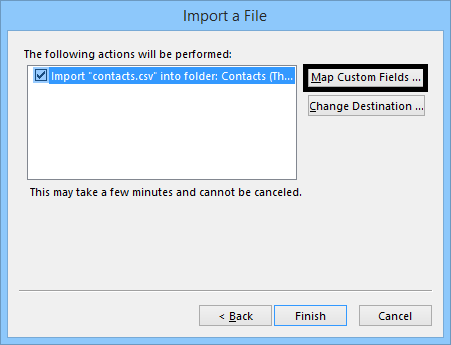
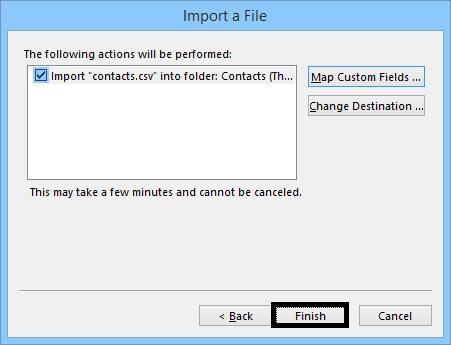
Make sure the check box next to Import «MyContacts.csv» (assuming that’s your file name) is selected.
-
Don’t click Finish yet, because you’ll need to «map» some of the columns in your CSV file to the contact fields in Outlook. Mapping can help the imported contacts turn out just the way you want.
Step 3: Map your CSV file columns to Outlook contact fields
-
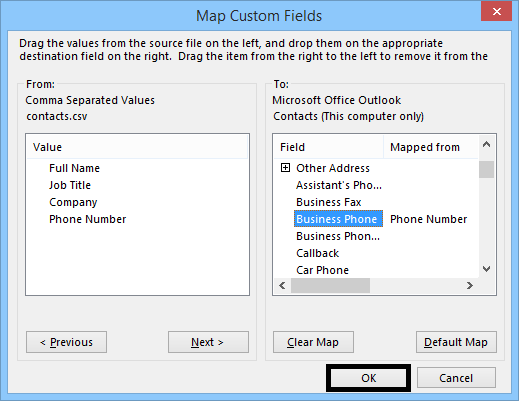
Click the Map Custom Fields button. The Map Custom Fields dialog box appears.
-
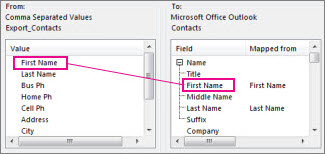
Under From, you’ll see a box with the column names from the CSV file you’re importing.
-
Under To, you’ll see the standard fields that Outlook uses for contacts. If a field matches a column in the CSV file, you’ll see your column under Mapped from.
-
The fields Name, First Name, and Last Name are standard Outlook contact fields, so if the contact information in your file has any of those contact names, you’re good to go.
-
-
You’ll probably need to do some manual mapping. For example, in this imported file, the contact’s cell phone is in a column named «Cell Ph.» It won’t have an exact match in Outlook. But you can find a suitable match in Outlook by doing this:
-
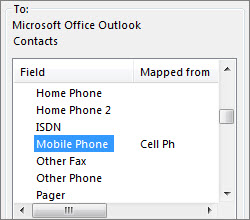
Scroll down in the pane on the right, and you’ll find Other Address, which has a plus sign (+) next to it.
-
Click the plus sign to expand what’s under it, and you’ll see a good match, Mobile Phone.
-
-
In the pane on the left, drag Cell Ph and drop it on Mobile Phone in the right pane.
You’ll notice that Cell Ph now appears next to Mobile Phone in the Mapped from column.
-
One at a time, drag the rest of the values from the left pane to the appropriate Outlook fields in the right pane. For example, you might drag Address to either Home Street or Business Street, depending on the type of address for your contacts.
-
Click Finish.
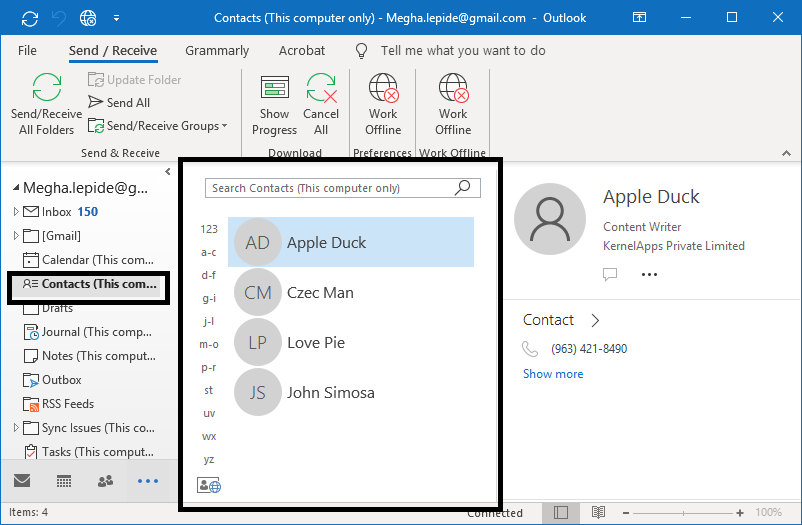
Your contacts are imported into Outlook.
-
To view your contacts in Outlook 2016, at the bottom of the navigation bar, choose the People icon.
See also
Import and export Outlook email, contacts, and calendar
-
If you are importing into an existing Contacts folder, skip to step 3.
-
To create a new folder in Outlook, right-click the Contacts folder, click New Folder, type a name for the new folder, and then click OK.
-
Click the File tab in the Ribbon, and then click Open on the menu.
-
Click on Import tab. The Import and Export Wizard opens.
-
Select Import from another program or file, and then click Next.
-
Click Comma Separated Values (Windows), and then click Next.
-
If the file that is displayed is not the correct file, click Browse , browse to the folder that is mentioned in step 3, and then double-click the file to select it.
-
If you are importing into a new folder, the Options settings are irrelevant because there are no duplicates. If you are not importing to a new folder, choose the most logical selection. Click Allow duplicates if you are not sure, and then click Next.
-
Click the Contacts folder or another contacts-type folder that you have created, and then click Next.
-
If you are not sure that the column names in the first row of the spreadsheet will map correctly to the Outlook fields, click Map custom fields to verify them.
-
If you are importing into an existing Contacts folder, skip to step 3.
-
To create a new folder in Outlook, click Contacts, right-click the Contacts folder, and then click New Folder, type a name for the new folder, and then click OK.
-
On the File menu, click Import and Export.
-
Select Import from another program or file, and then click Next.
-
Click Comma Separated Values (Windows), and then click Next.
-
If the file that is displayed is not the correct file, click Browse, browse to the folder noted in step 3, and then double-click the file to select it.
-
If you are importing into a new folder, the Options settings is irrelevant because there are no duplicates. If not, choose the most logical selection. Click Allow duplicates if you are not sure, and then click Next.
-
Click the Contacts folder, or other contacts-type folder that you have created, to import into, and then click Next.
-
If you are not sure that the column names in the first row of the spreadsheet will map correctly to the Outlook fields, click Map custom fields to verify them.
Note: If Map custom fields is unavailable, you have chosen a non-contact-type folder to import into. Click Back, and then choose the correct folder. If you are satisfied with the mapping, click OK to close the Map Custom Fields dialog box, and then click Finish.
![]()
Download Article
![]()
Download Article
Do you need to send an email to a large list of email addresses on Outlook? If you have a directory of contacts in an Excel spreadsheet that you’d like to import to Outlook, you’ve come to the right place. This wikiHow article will teach you how to bulk import contacts to Outlook from Excel using a csv file.
-
1
Open the Excel spreadsheet with your contacts. In the Excel application, open the worksheet with the contacts you wish to import to Outlook.
- Make sure that your spreadsheet columns are labeled «First Name,» «Last Name,» «Phone Number,» «Email Address,» etc. These labels will make the import process much more simple.
- If you want to learn how to import contacts from Excel to a Microsoft Word mailing list, check out [(https://www.wikihow.com/Mail-Merge-in-Microsoft-Word) this article.]
-
2
Click the «Save as» button. At the very top of your spreadsheet, you will see an icon of a memory card with a pencil across it. Clicking on this icon will pull up the «Save as…» menu.
- On a Mac computer, you can also access this menu by clicking File > Save as… in the bar at the top of your computer screen.
Advertisement
-
3
Save the spreadsheet as a CSV. Open the «File Format» option list and click the option to save your spreadsheet as a CSV, or a .csv, which is a comma-separated values file. Once you have selected the CSV option, press «Save».
- A «Possible Data Loss» warning might pop up after you choose to save as a CSV. This warning refers to the fact that some platforms may not fully support a CSV data file, though you shouldn’t experience any issues importing this data to Outlook.https://support.microsoft.com/en-us/office/import-and-export-outlook-email-contacts-and-calendar-92577192-3881-4502-b79d-c3bbada6c8ef</ref>
- If you are worried about converting your spreadsheet to a CSV file, do not fret. Your spreadsheet will remain exactly as it is in the Excel app after downloading a copy of it as a CSV.


Advertisement
-
1
Open Outlook. Enter the Outlook app on your computer.
- You will need the Outlook app to import the CSV file, so download the app if you don’t yet have it installed.
-
2
Click «File» > «Open & Export» > «Import / Export». In the menu at the top of your Outlook app, click «File», then «Open & Export,» and then «Import / Export».
- If you can’t see the «File» option in the Outlook menu, be sure that you are using the application as opposed to the website. [1]
- If you can’t see the «File» option in the Outlook menu, be sure that you are using the application as opposed to the website. [1]
-
3
Choose «Import from another program or file». Select the option to import data from another program or file, and then click «Next».
-
4
Click «Browse» and select the CSV file. Find and select the CSV file you exported from Excel from your computer documents.
-
5
Choose whether to replace, create, or not import duplicate contacts. Below the CSV file, you will see a list of options relating to «duplicates». Duplicates are contacts that already exist in your Outlook. Make a selection from these options before clicking «Next».
- The options of “Allow duplicates to be created” and “Do not import duplicate items” will not cause any contacts already in your Outlook to be lost. The option to “Replace duplicates with items imported” may cause you to lose some pre-existing Outlook contacts.
-
6
Select «Contacts» as the import destination. In the next window, you will choose the import destination for the CSV file. «Contacts» should be automatically selected. Once you have ensured that this file will be imported to your contacts folder, click «Next».


Advertisement
-
1
Click «Map Custom Fields». This action will open the field-mapping menu, where you will match the columns of your CSV file with different fields of contact information.
-
2
Match the values in the «From» and the «To» columns. The column names from the CSV file you imported will be listed under «From». The Outlook contact fields will be listed under «To». Match up these values by dragging the titles from the left to the corresponding fields on the right.[2]
Once you are done mapping these values, click «OK».- This process will be much easier if you labeled your spreadsheet columns with «Last Name», «First Name», «Email Address», and so on in before exporting it as a CSV file.
-
3
Click «Finish». Once you have clicked the «Finish» button, the contacts will be imported to your Outlook account.
- You can access your list of contacts by clicking on the icon of people in the bottom Outlook menu.


Advertisement
Ask a Question
200 characters left
Include your email address to get a message when this question is answered.
Submit
Advertisement
Thanks for submitting a tip for review!
References
About This Article
Thanks to all authors for creating a page that has been read 6,364 times.
Is this article up to date?
Содержание
- How to Import Contacts to Gmail from Excel Effectively
- Cisdem ContactsMate
- Import contacts into Gmail from Excel on Mac
- Get your Excel spreadsheet ready to be imported to Gmail
- One more tip: make the conversion more efficient
- Import contacts to Gmail from Excel with Google Contacts
- Import contacts from Excel to Gmail with ContactsMate
- Tip 1: Transfer contacts from other sources to Gmail
- Tip 2: Fix contacts formatting errors and merge duplicate contacts
- Conclusion
- Import contacts to Outlook


This article will show you how to import contacts to Gmail from Excel easily and effectively.
Available in Gmail, Google Contacts is a contact management tool from Google. It offers a number of useful features. For example, it allows you to import contacts for backup, management or other purposes. It supports importing contacts from CSV and vCard files. What if your contacts are stored on an Excel spreadsheet? Please read on.
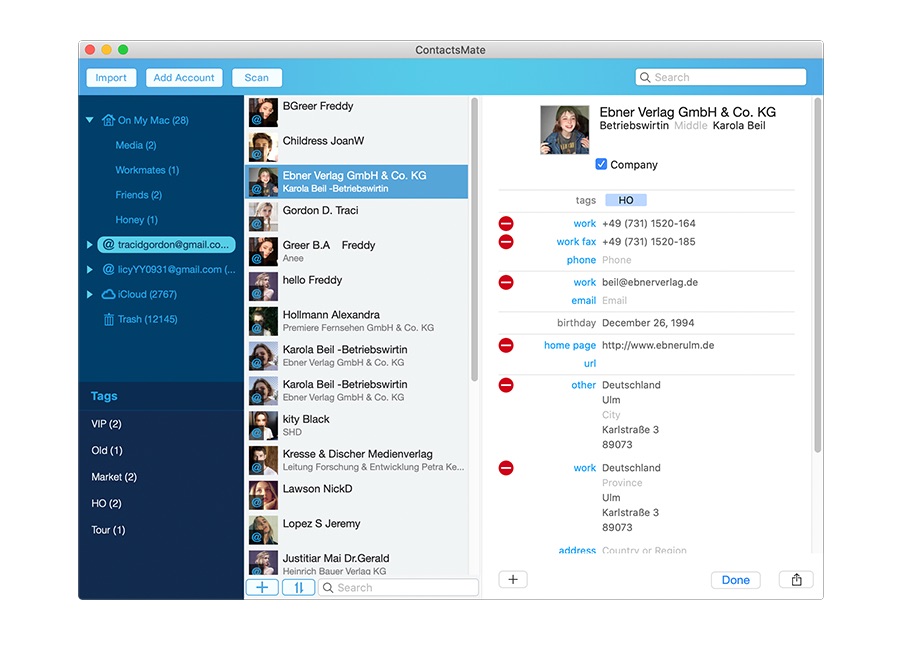
Cisdem ContactsMate
 Cisdem ContactsMate
 Import contacts into Gmail from Excel on Mac
- Support contacts from sources such as Mac Contacts, Gmail, iCloud, Exchange, LinkedIn and more
- Lets you easily transfer contacts between supported sources
- Allow you to import contacts directly from CSV or vCard file
- Export contacts to 8 formats, including Excel, CSV, vCard, Docx, etc.
- Let you efficiently view, search, add, edit, group, tag, print, share, and sync contacts
- Enable you to backup/restore contacts with 1 click
- Make it easy to find and delete/merge duplicate contacts
- Help you fix conflicting or incomplete contacts
- Easy and safe to use
- Compatible with macOS 10.11 or later
 Free Download
Get your Excel spreadsheet ready to be imported to Gmail
There are two things to do.
- Convert Excel to CSV.
- Make sure you use correct headers for the columns in your CSV file, which is optional but may be necessary.
When it comes to importing contacts from a file, Gmail only supports CSV and vCard files. If your contacts are stored in an Excel (with the extension .xlsx or .xls) file, then you need to convert the file to CSV (.csv).
You can do it with some professional Excel to CSV converter tool such as cloudconverter. This is an online document and spreadsheet converter that supports multiple files formats. It enables you to convert Excel to CSV and download the converted file freely.
You can also manually do this with Microsoft Excel or Google Sheets:
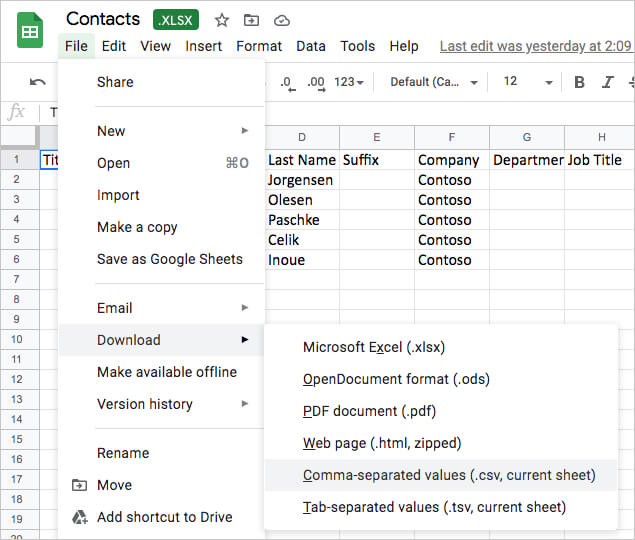
- Open your web browser. Go to Google Drive.
- Sign in.
- Upload the Excel file that contains your contacts.
- Right-click it and select Open with >Google Sheets.
- Choose File >Download >Comma-separated values (.csv, current sheet).
Now you can try to import your contacts.
One more tip: make the conversion more efficient
In many cases, things can go wrong. For example, there could be missing fields (e.g. name, email address and phone numbers). Let’s find out how to successfully import contacts to Gmail from Excel.
Where does the Excel file come from? You may create a spreadsheet for your contacts manually. You may export the contacts from an email client. In either case, it’s recommended to check the header of each column in your file before the import. If a column header is not properly named, Gmail may have problems recognizing the data.
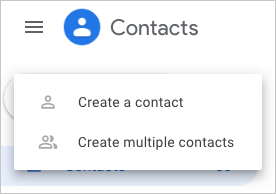
- Go to Google Contacts.
- Sign in.
- In the top left corner, click Create Contact >Create a contact.
- When creating a new contact, fill in as many fields as possible if needed. Click Show more to reveal more fields. You can use fake information.
- In the list of contacts, click the 3-dot icon next to the contact created in the previous step. Choose Export and choose CSV as the export format.
- Open the CSV file provided by Gmail in Microsoft Excel or Google Sheets, etc. Take a look at how Gmail names the headers.
- Edit the spreadsheet containing your contacts. Make sure that the column headers in your file are the same as the column headers in the template from Gmail.
- Save the edited file to CSV.


This is how you prepare your contacts file before you upload it to Gmail. You can do it in your preferred way. The instructions here aim to help you figure out how to make things more effective before you import contacts to Google Contacts from Excel.
If you already have a very organized contacts list in the first place, then things can be easy. If not, it may take a lot of copying and pasting.
The header names don’t have to be exactly the same. For example, Gmail’s default header name for the email field is “E-mail 1 — Value”, but it can also recognize “E-mail Address”. For convenience’s sake, you can directly use the default headers. Don’t delete any column in the template. As for headers/columns that you don’t need, just leave them empty.
Below are some of the column headers in the template.
- Name
- Given Name
- Additional Name
- Family Name
- Yomi Name
- Given Name Yomi
- Additional Name Yomi
- Family Name Yomi
- Name Prefix
- Name Suffix
- Initials
- Nickname
- Birthday
- Gender
- Location
- Billing Information
- Occupation
- Notes
- E-mail 1 — Type
- E-mail 1 — Value
- Phone 1 — Type
- Phone 1 — Value
- On your web browser, sign in to Google.
- Go to https://contacts.google.com/.
- On the left, click Import.
- Click Select file and upload the CSV file containing your contacts.
- Under the Labels section, find the contacts you’ve imported.
- Mass select all of them and click the Add to contacts icon.
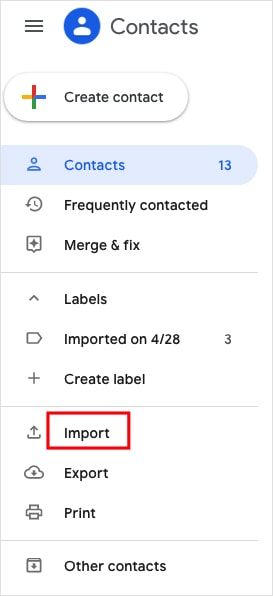
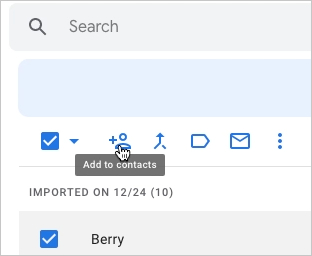
If you don’t do Step 6, the imported contacts won’t appear in the Contacts list.
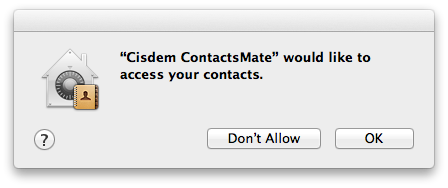
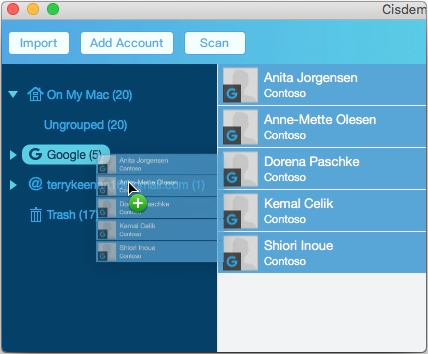
Mac users can also import contacts to Gmail from Excel using Cisdem ContactsMate, the best contact manager for Mac.
1. Download Cisdem ContactsMate and install it.
2. When you open the app for the first time, it will ask you to grant it access to your contacts. Click OK.
3. Click Add Account in the toolbar.
4. Select Google and sign in with your Gmail account.
5. Select the box next to Contacts.
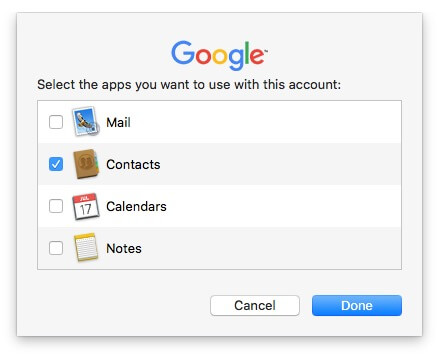
6. Click the button next to the Updated contacts detected message. Now you should find Google in the sidebar.
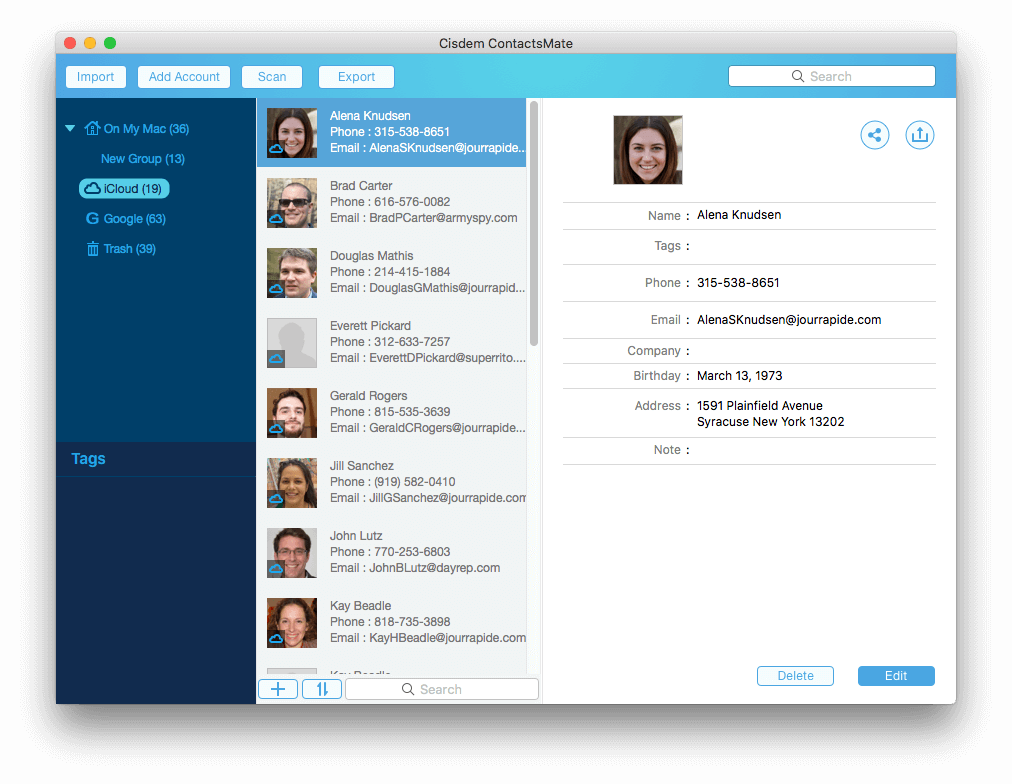
7. Click Import in the toolbar.
8. Select the CSV file you have prepared for import. Click Open. Drag the imported contacts from Latest Import into Google in the sidebar.
Tip 1: Transfer contacts from other sources to Gmail
ContactsMate works with contacts from Mac’s Contacts app, Gmail, iCloud, Facebook, Twitter, LinkedIn, Exchange Yahoo and more. It enables you to transfer contacts between all these sources without converting contacts formats. For example, if you want to transfer your Exchange contacts to Gmail, here you don’t need to export your contacts from Exchange then import to Gmail. With ContactsMate, just a simple drag and drop can do that. All your settings in this tool will keep up to date with your contacts systems.
Tip 2: Fix contacts formatting errors and merge duplicate contacts
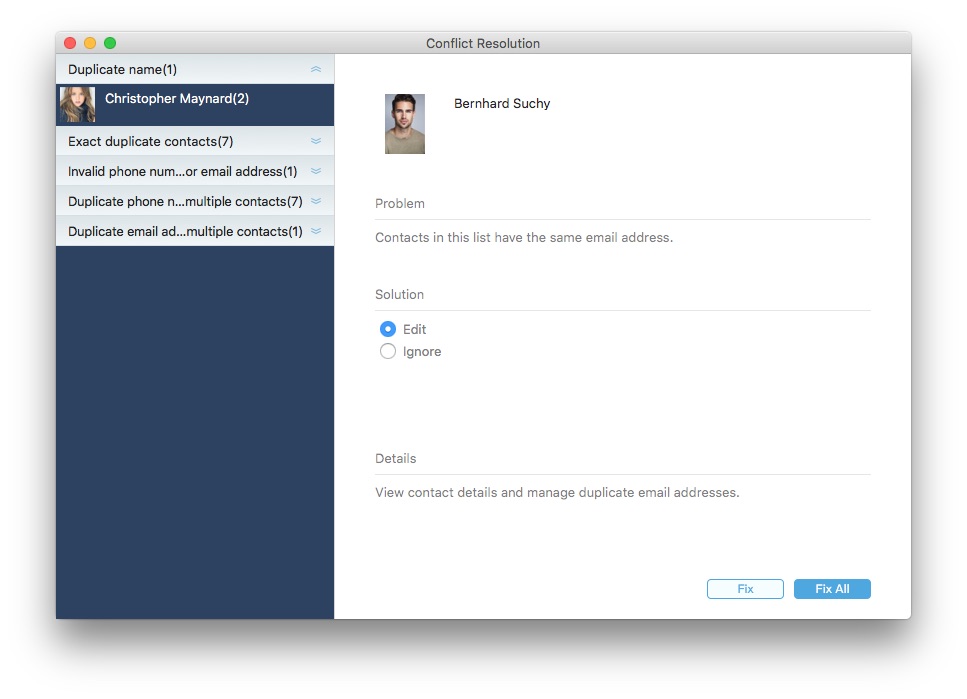
This tool helps you to fix conflicting or incomplete contacts. Also detect duplicate contacts for you to delete or merge in bulk. This can make your contacts list clearer especially when you have a huge list of contacts. To do that, choose an account group then click on “Scan” on the top tool bar. After scanning, the Conflict Resolusion window will appear and show you the found duplicate and conflicting contacts. They’ll be listed in types, such as Exact Duplicate Contacts, Duplicate Name, Invalid phone number or email address, etc. Select contacts in a type then choose a desired solution.
Conclusion
You can successfully import contacts to Gmail from Excel with ease as long as you use the right method. I hope this article can be helpful. Gmail or Google Contacts can be used to back up and manage your contacts. The service is free and easily accessible. It’s web-based and widely compatible.
Rosa has worked in Mac software industry for more than eight years. She believes that the purpose of software is to make life better and work more productively. In addition to writing, Rosa is also an avid runner.
Источник
Outlook has an Import/Export wizard that makes it easy to import contacts from a CSV file.
At the top of your Outlook ribbon, choose File.
If your ribbon doesn’t have a File option in the top left corner, you’re using an older Outlook version. See What version of Outlook do I have? to get to the import instructions for your version of Outlook.
Choose Open & Export > Import/Export. This starts the wizard!
Choose Import from another program or file, and then choose Next.
Choose Comma Separated Values, and then choose Next.
In the Import a File box, browse to your contacts file, and then double-click to select it.
Choose one of the following to specify how you want Outlook to handle duplicate contacts:
Replace duplicates with items imported If a contact is already in Outlook and your contacts file, Outlook discards the info it has for that contact and uses the info from your contacts file. You should choose this option if the contact info in your contacts file is more complete or more current than the contact info in Outlook.
Allow duplicates to be created If a contact is in Outlook and your contacts file, Outlook creates duplicate contacts, one with the original Outlook info and one with the info imported from your contacts file. You can combine info for those people later to eliminate duplicate contacts. This is the default option.
Do not import duplicate items If a contact is in Outlook and your contacts file, Outlook keeps the info it has for that contact and discards the info from your contacts file. You should choose this option if the contact info in Outlook is more complete or more current than the info in your contacts file.
In the Select a destination folder box, scroll to the top if needed and select the Contacts folder > Next. If you have multiple email accounts, choose the Contacts folder that’s under the email account you want to be associated with the contacts.
Outlook begins importing your contacts immediately. You’ll know it’s finished when the Import Progress box closes.
To see your contacts, at the bottom of Outlook, choose the People icon.
Use a comma separated values file (CSV) to import your contacts into your Outlook on the web account.
Tip: For best results, make sure that the CSV file has UTF-8 encoding. This encoding works for all languages and alphabets.
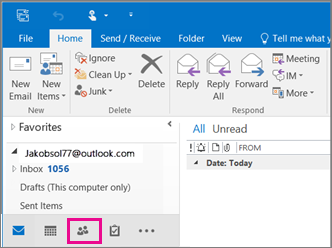
At the bottom of the page, select  to go to the People page.
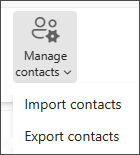
On the toolbar, select Manage > Import contacts.
Select Browse, choose your CSV file, and then select Open.
Note: If the file doesn’t have UTF-8 encoding, the import tool may not recognize and display all text correctly. The import tool will then show you some example contacts from your file, and you can check that the text is readable and correct. If the text is not displayed correctly, select Cancel. You will need a file in UTF-8 encoding to continue. Convert your CSV file to use UTF-8 encoding, and restart the import. To learn more about UTF-8 encoding, see Why should I care about UTF-8 encoding?
Typically, you can import contacts without worrying about the underlying details of how the text is stored in the CSV file. However, if the contact information includes characters not found in the English alphabet, such as Greek, Cyrillic, Arabic, or Japanese characters, this can cause problems when importing contacts. Therefore, you should save the contacts file with UTF-8 encoding if you have that option during export.
If you can’t export your contacts using UTF-8 directly, you can convert the exported CSV file using Excel or third-party apps. How to do this will be different between apps and app versions.
How to convert your CSV file to UTF-8 using Microsoft Excel 2016:
In Excel, create a new blank document (workbook).
From the Data menu, select From Text/CSV. Browse to your exported CSV file (you may have to select to display Text Files (. csv) to see it). Select Import.
In the dialog box that appears, under File Origin, choose the encoding that makes the characters in the text appear correctly, for example, Cyrillic Windows 1251, and then select Load.
Check that characters are displayed correctly in Excel.
Select File > Save As. Enter a name for your file, and select CSV UTF-8 (Comma delimited) (*.csv) as your file type.
Use a comma separated values file (CSV) to import your contacts into your Outlook account.
Tip: For best results, make sure that the CSV file has UTF-8 encoding. This encoding works for all languages and alphabets.
On the side panel, select .
On the toolbar, select Manage contacts > Import contacts.
Select Browse, choose your CSV file, and select Open.
Note: If the file doesn’t have UTF-8 encoding, the import tool may not recognize and display all text correctly. The import tool will then show you some example contacts from your file, and you can check that the text is readable and correct. If the text is not displayed correctly, select Cancel. You will need a file in UTF-8 encoding to continue. Convert your CSV file to use UTF-8 encoding and restart the import. To learn more about UTF-8 encoding, see Why should I care about UTF-8 encoding?
Typically, you can import contacts without worrying about the underlying details of how the text is stored in the CSV file. However, if the contact information includes characters not found in the English alphabet, such as Greek, Cyrillic, Arabic, or Japanese characters, this can cause problems when importing contacts. Therefore, you should save the contacts file with UTF-8 encoding if you have that option during export.
If you can’t export your contacts using UTF-8 directly, you can convert the exported CSV file using Excel or third-party apps. How to do this will be different between apps and app versions.
How to convert your CSV file to UTF-8 using Microsoft Excel 2016:
In Excel, create a new blank document (workbook).
From the Data menu, select From Text/CSV. Browse to your exported CSV file (you may have to select to display Text Files (. csv) to see it). Select Import.
In the dialog box that appears, under File Origin, choose the encoding that makes the characters in the text appear correctly, for example, Cyrillic Windows 1251, and then select Load.
Check that characters are displayed correctly in Excel.
Select File > Save As. Enter a name for your file, and select CSV UTF-8 (Comma delimited) (*.csv) as your file type.
Источник
Microsoft Outlook consists of a great feature for adding your all contacts which includes a contact name, Address, Email Address, Mobile Number, Name of the Company, Job title of your contact, and many more.
Creating contact is important for future needs like group mail, bulk mail, etc. Are you moving your Email contacts from Excel to Outlook?
It’s a pretty simple process, and we’re here to help you through it!
Here’s a step-by-step guide on how to get your contacts from Excel into Outlook:
How to Create a New Email Contact in Outlook?
Creating contact fields is like filling out your nomination form which includes all your details.

Step by Step Guide
- Step 1 – Open Outlook >> Click New items (shortcut key Alt + H I C) >> Contacts.

- Step 2 – Contact Form appears, now it’s time to fill in the details and finally Click Save and Close.
Your contact is saved in Outlook, the only problem is you must fill in the details for individual contact separately, that way importing contacts in Outlook comes into play.
How your Excel spreadsheet of contacts can be added in a few steps?
To import the contacts from the Excel list, you need to save the Excel file as a CSV file first. Import contacts from Microsoft Excel to outlook required contact details in Excel which were further imported into your Outlook contact.
Here is the step-by-step method, How to Create Excel Spread Sheet, and the basic information required to add a contact in Outlook and then save the file to CSV format.
Step 1 – Create an Excel-based spreadsheet (contact list, Phone number, contact names, Email list), no matter what details you have, refer to a sample Excel Spreadsheet below.

- Step 2 – Save your Excel sheet into CSV (comma-separated values) file, In the Save as type box, choose CSV (Comma delimited) (*.csv), and click Save.

Note: – Quick steps on how to save Excel file to (.csv)
- Click the File tab and select the Save As option.
- Select the location you need to save your file.
- You will see the Save As dialog box. Select the option CSV (Comma delimited) from the drop-down list and Hit Save.


Your File is ready to import in Outlook.
How to Import CSV file to Outlook?
Now you have your (.csv) file ready to import. [Why to save Excel in CSV for import contact – The reason is Microsoft Outlook allows the user to import the database in Comma Separated Values only.]
- Step 3 – Click File >> Open & Export >> Import/Export

- Step 4 – Import and Export Wizard dialog box appears, select Import from another program or file to import CSV to Outlook, then select Next.

- Step 5 – Select Comma Separated Values and click next, (you already have saved the .csv file in the preferred location of your computer).

- Step 6 – Now import your file by clicking on the browse button and selecting your file.

There are three options you have to choose from Click Next.
~ Replace duplicate contacts with items imported.
~ Allow duplicates to be created.
~ Do not import duplicate items.
- Step 7 – Another dialog box is required now you must select your specific email id contacts, where you want to import your (.csv) file and click Next.

- Step 8 – Next Step is very interesting and the real game-changer, is the key answer to ‘How to import contacts in Outlook from Excel’, Mapping a custom field. Basically, this step fetches your data into Outlook contact format.

- Step 9 – Click on the attachment above and Click the Map Custom field.
- Step 10 – Map Custom Fields dialog box appears, follow the below steps:
Look at Comma Separated Values-It consist of data from your (.csv) file, you can check from the image below to the image of the Excel sheet above in the article.
Another Field is – Microsoft Office Outlook Contacts (This computer only) – Which will show you multiple options required to fetch your data.

How To Map Custom Fields Outlook?
Mapping is the method is connecting the corresponding Outlook fields of your CSV file and Outlook inbuilt field together.
Basically, you have to drag your (.csv) data heading with the help mouse one by one which matches with outlook headers, (for instance: click on the Name from comma-separated Value, hold the left mouse button, drag to the exact match to the right hand-filed options and leave your mouse button). That way you fetch all your data to the Microsoft Outlook database.
If you inappropriately fetch the wrong data with the wrong field, do not worry you can easily correct it by again dragging (manual mapping) the same data to the correct field, that way your previous drag is detected by itself.
If you feel there are really major changes required, you can easily click Clear Map and reset your setting.
- Step 10 – Finally Click Finish
- Step 11 – The system begins importing contact data into Outlook.

After you have completed the above process, you can easily check whether your contact properly merges in your Outlook Account.
- Open Outlook and reach the left-hand bottom corner of the screen >> Click People (also use the keyboard shortcut Alt +3)

- Outlook shift to the Contact screen >> Click Home >> Move to the current view portion, you can check your uploaded contacts easily over there.

- People
- Bussines Card
- Card
- Phone
- List
All these options allow the user to analyze the contact from different views.
Import Contacts on Outlook.com
Recently I configured my Gmail account with Outlook, one major problem I face is my contacts which are already available in my Gmail account, but after configuration, I have to import all those contacts to Outlook web.
I manage to create a CSV file; it is further required to import the contacts into Outlook. The above method is likely to help in Outlook Applications.
You will learn step by step method “How to Import Contacts on Outlook.com?”
- Open Outlook Web >> and click the People icon from the left-hand upper portion of the screen.
- Click Import Contact (Outlook.com is a web-based platform that on the interval updates the design, sometimes you need to find the import contact options).

- Click on Browse and upload your CSV file.

- Find your specified location where you saved your contacts CSV file, then click import, It will take a few movements to upload

- Your contacts are uploaded and imported to your Outlook.com email account.

- Finally, you can check out the new contacts that are added to the list.

The best part of Outlook web import is you don’t need to Map the contacts, Fields.
Importing email addresses into Outlook always works for you in a professional way. It will help you in several ways for future actions of work.
Wrap up
This article provides a comprehensive guide to importing contacts from Excel to Outlook. We will cover how to export an Excel workbook to a CSV format that can be imported into Microsoft Outlook.
Also Read:
- How to attach an email in Outlook?
- How to Export Email addresses from Outlook?
- How to make a regular to-do list on Microsoft Outlook?
How to Import Contacts from a CSV File into Outlook
Your Excel spreadsheet of contacts can be added in a few steps
Updated on December 28, 2020
What to Know
- Desktop: Go to File > Open & Export > Import/Export to open the Import/Export Wizard.
- Then choose Import from another program or file > Comma Separated Values. Select the CSV file and follow the on-screen steps.
- Outlook.com: Open Applications Launcher > People > Manage > Import contacts > Browse. Select the CSV file and choose Open.
Contact data stored in a database or spreadsheet can be easily imported into Outlook. In this guide, we show you how to import contacts from a CSV file using Outlook 2019, 2016, 2013, 2010, Outlook for Microsoft 365, and Outlook.com.
Import Contacts from a CSV File Into Outlook
In the database or spreadsheet program, export the contacts data to a CSV (comma separated values) file. Make sure the columns have meaningful headers, though they don’t need to correspond precisely to the fields used in the Outlook address book. You can manually map columns to fields during the import process.
The screenshots below are for Outlook 2016. Screens in other versions of Outlook may differ slightly, but the steps are the same. Any variations for older versions will be noted.
-
Go to File.
-
Click Open & Export. In Outlook 2010, then click Open.
-
Click Import/Export. In Outlook 2010, click Import.
-
In the Import and Export Wizard, select Import from another program or file, then click Next.
-
Select Comma Separated Values, then click Next.
-
Click Browse, then locate the CSV file that contains the contacts you want to import.
-
Choose one of the following:
- Do not import duplicate items.
- Replace duplicates with items imported. If the data in the CSV file is more recent or more complete, this might be the best choice.
- Allow duplicates to be created. If duplicates are created, you can always search for and eliminate them using a duplicate removal utility, for example.
-
Click Next.
-
Select the Outlook folder into which you want to import the contacts. This may be your Contacts folder, or it can be a Contacts folder in any of your other folders. You can also create an Outlook folder just for imported items.
-
Click Next.
-
Click Map Custom Fields.
-
Map all columns from the CSV file to the desired Outlook address book fields. Outlook automatically maps some fields; change these if they are not mapped correctly.
To map a field, drag the Value to the desired Field.
-
Click OK, and then click Finish to begin the import process.
You can upload your contacts CSV file to Outlook.com as well. The process is a bit different from the software versions.
-
Open the Applications Launcher and click People.
-
Click Manage > Import contacts.
-
Click Browse.
-
Select the CSV file, then click Open.
-
In the Import contacts dialog box, click Import.
-
Your contacts are uploaded and imported to your Outlook.com email account.
-
When the process is finished, click Close. You’ll find the new contacts in your Outlook address book.
Thanks for letting us know!
Get the Latest Tech News Delivered Every Day
Subscribe
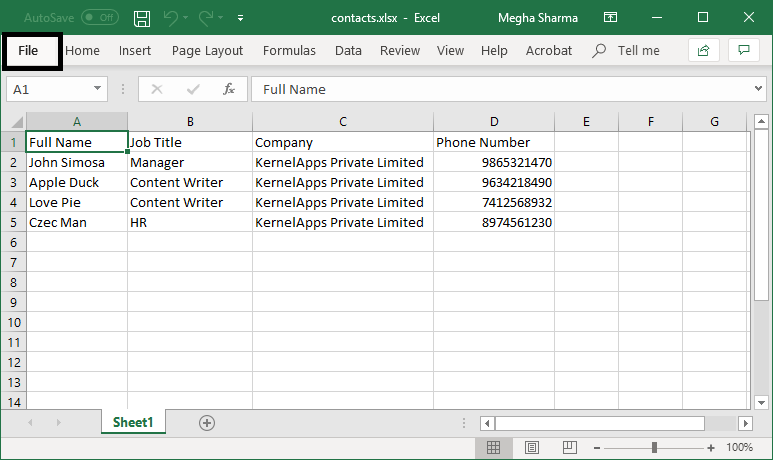
In this article we are going to import contacts to Outlook from an Excel file. My file is currently in .xlsx format so we will first convert it to .csv format. Then, we will map it and import the contacts.

Pictured above is the file with the contacts I would like to import. It is dummy data, but made to be similar to something you might receive as a list of players on a sports team. It features separate First and Last name fields, an email address field, as well as each player’s position. The position will be discarded when we import the file. Note that the first row of the file is a header row – it has labels describing what data the column contains. This is very important. If your file does not have a header row, please add one. Without a header row, importing the contacts into Outlook will not work correctly.
Step 1: Save the File as a .CSV
If you already have your Excel file saved as a .csv, skip this step. If it is in any other format, you will need to save a copy as CSV (Comma Separated Value).

To save the file as a CSV, go to File > Save As and make sure “Save as type:” is set to “CSV UTF-8 (Comma delimited)(*.csv)”. Click Save. Remember the location you saved this file, you will need to find it to import the contacts to Outlook.
Step 2: Import the File in Outlook

Now that we have a CSV file, we need to import the contacts in Outlook. Start by opening the import wizard by clicking File > Open & Export > Import / Export

When the wizard pops up, select “Import from another program or file” and click Next.

On the next screen, select “Comma Separated Values”. Click Next.

On this screen, browse to select the CSV file saved earlier. Choose your desired duplicates behavior. “Allow duplicates to be created” and “Do not import duplicate items” won’t result in data loss, but may result in duplicate contacts or only part of the file being imported. “Replace duplicates with items imported” may result in data loss. Make sure the file is closed and isn’t also open in Excel and click Next.

Next, select the Contacts folder of the email account you want to import to. This may say simply Contacts for an Exchange account or Contacts (This computer only) for other accounts. Click Next.

On this screen, you need to map the fields of the CSV to the Outlook contacts. Click the checkbox next to the file you are importing. If the Map Custom Fields box does not pop up right away, click the Map Custom Fields … button. Drag the Values on the left to the corresponding Fields on the right. Once satisfied, click OK. Click Finish on the next screen.

The contacts are imported! Have a quick look over everything, and you are done. If you have any questions, feel free to leave a comment below.
This article will show you how to import contacts to Gmail from Excel easily and effectively.
Available in Gmail, Google Contacts is a contact management tool from Google. It offers a number of useful features. For example, it allows you to import contacts for backup, management or other purposes. It supports importing contacts from CSV and vCard files. What if your contacts are stored on an Excel spreadsheet? Please read on.
- Part 1. Get your Excel spreadsheet ready to be imported to Gmail
- Part 2. Import contacts from Excel to Gmail
- A professional contacts management tool to Import Excel contacts to Gmail
Cisdem ContactsMate
Import contacts into Gmail from Excel on Mac
- Support contacts from sources such as Mac Contacts, Gmail, iCloud, Exchange, LinkedIn and more
- Lets you easily transfer contacts between supported sources
- Allow you to import contacts directly from CSV or vCard file
- Export contacts to 8 formats, including Excel, CSV, vCard, Docx, etc.
- Let you efficiently view, search, add, edit, group, tag, print, share, and sync contacts
- Enable you to backup/restore contacts with 1 click
- Make it easy to find and delete/merge duplicate contacts
- Help you fix conflicting or incomplete contacts
- Easy and safe to use
- Compatible with macOS 10.11 or later
Free Download
Get your Excel spreadsheet ready to be imported to Gmail
There are two things to do.
- Convert Excel to CSV.
- Make sure you use correct headers for the columns in your CSV file, which is optional but may be necessary.
When it comes to importing contacts from a file, Gmail only supports CSV and vCard files. If your contacts are stored in an Excel (with the extension .xlsx or .xls) file, then you need to convert the file to CSV (.csv).
You can do it with some professional Excel to CSV converter tool such as cloudconverter. This is an online document and spreadsheet converter that supports multiple files formats. It enables you to convert Excel to CSV and download the converted file freely.
You can also manually do this with Microsoft Excel or Google Sheets:
- Open your web browser. Go to Google Drive.
- Sign in.
- Upload the Excel file that contains your contacts.
- Right-click it and select Open with > Google Sheets.
- Choose File > Download > Comma-separated values (.csv, current sheet).
Now you can try to import your contacts.
One more tip: make the conversion more efficient
In many cases, things can go wrong. For example, there could be missing fields (e.g. name, email address and phone numbers). Let’s find out how to successfully import contacts to Gmail from Excel.
Where does the Excel file come from? You may create a spreadsheet for your contacts manually. You may export the contacts from an email client. In either case, it’s recommended to check the header of each column in your file before the import. If a column header is not properly named, Gmail may have problems recognizing the data.
- Go to Google Contacts.
- Sign in.
- In the top left corner, click Create Contact > Create a contact.
- When creating a new contact, fill in as many fields as possible if needed. Click Show more to reveal more fields. You can use fake information.
- In the list of contacts, click the 3-dot icon next to the contact created in the previous step. Choose Export and choose CSV as the export format.
- Open the CSV file provided by Gmail in Microsoft Excel or Google Sheets, etc. Take a look at how Gmail names the headers.
- Edit the spreadsheet containing your contacts. Make sure that the column headers in your file are the same as the column headers in the template from Gmail.
- Save the edited file to CSV.
This is how you prepare your contacts file before you upload it to Gmail. You can do it in your preferred way. The instructions here aim to help you figure out how to make things more effective before you import contacts to Google Contacts from Excel.
If you already have a very organized contacts list in the first place, then things can be easy. If not, it may take a lot of copying and pasting.
The header names don’t have to be exactly the same. For example, Gmail’s default header name for the email field is “E-mail 1 — Value”, but it can also recognize “E-mail Address”. For convenience’s sake, you can directly use the default headers. Don’t delete any column in the template. As for headers/columns that you don’t need, just leave them empty.
Below are some of the column headers in the template.
- Name
- Given Name
- Additional Name
- Family Name
- Yomi Name
- Given Name Yomi
- Additional Name Yomi
- Family Name Yomi
- Name Prefix
- Name Suffix
- Initials
- Nickname
- Birthday
- Gender
- Location
- Billing Information
- Occupation
- Notes
- E-mail 1 — Type
- E-mail 1 — Value
- Phone 1 — Type
- Phone 1 — Value
Import contacts to Gmail from Excel with Google Contacts
- On your web browser, sign in to Google.
- Go to https://contacts.google.com/.
- On the left, click Import.
- Click Select file and upload the CSV file containing your contacts.
- Under the Labels section, find the contacts you’ve imported.
- Mass select all of them and click the Add to contacts icon.
If you don’t do Step 6, the imported contacts won’t appear in the Contacts list.
Mac users can also import contacts to Gmail from Excel using Cisdem ContactsMate, the best contact manager for Mac.
1. Download Cisdem ContactsMate and install it.
Free Download
2. When you open the app for the first time, it will ask you to grant it access to your contacts. Click OK.
3. Click Add Account in the toolbar.
4. Select Google and sign in with your Gmail account.
5. Select the box next to Contacts.
6. Click the button next to the Updated contacts detected message. Now you should find Google in the sidebar.
7. Click Import in the toolbar.
8. Select the CSV file you have prepared for import. Click Open. Drag the imported contacts from Latest Import into Google in the sidebar.
Tip 1: Transfer contacts from other sources to Gmail
ContactsMate works with contacts from Mac’s Contacts app, Gmail, iCloud, Facebook, Twitter, LinkedIn, Exchange Yahoo and more. It enables you to transfer contacts between all these sources without converting contacts formats. For example, if you want to transfer your Exchange contacts to Gmail, here you don’t need to export your contacts from Exchange then import to Gmail. With ContactsMate, just a simple drag and drop can do that. All your settings in this tool will keep up to date with your contacts systems.
Tip 2: Fix contacts formatting errors and merge duplicate contacts
This tool helps you to fix conflicting or incomplete contacts. Also detect duplicate contacts for you to delete or merge in bulk. This can make your contacts list clearer especially when you have a huge list of contacts. To do that, choose an account group then click on “Scan” on the top tool bar. After scanning, the Conflict Resolusion window will appear and show you the found duplicate and conflicting contacts. They’ll be listed in types, such as Exact Duplicate Contacts, Duplicate Name, Invalid phone number or email address, etc. Select contacts in a type then choose a desired solution.
Conclusion
You can successfully import contacts to Gmail from Excel with ease as long as you use the right method. I hope this article can be helpful. Gmail or Google Contacts can be used to back up and manage your contacts. The service is free and easily accessible. It’s web-based and widely compatible.
Rosa Reyes
Rosa has worked in Mac software industry for more than eight years. She believes that the purpose of software is to make life better and work more productively. In addition to writing, Rosa is also an avid runner.
Readers! Looking for a method to move contacts details from Microsoft Excel file to Outlook contacts folder? Then you are on the right page. Here, is a free native way to import contacts from Microsoft Excel to Outlook.
Some users maintain a contact list in the Excel file for future reference when there is a large number of contacts. The contact list can be imported to the Contacts folder of the Outlook application which is definitely better than creating contacts individually in the Outlook application. That is why many users seek for methods to import contacts from Excel to Outlook.
In all Outlook versions, there is an Import/Export feature using which you can import or export files to the Outlook application. The application supports either .pst or .csv file format for both import and export processes.
MS Outlook supports CSV file format for Import and Export process. So, if you have an Excel file in .xls or .xlsx format, you need to convert or save it to the .csv format first. After it is converted to .csv format, you can easily import it to the Microsoft Outlook Contacts folder. Let us understand the process:
A. Change Excel File to CSV format
- First, prepare an Excel sheet with the required details of the contacts to be imported.

- Browse to the location of the corrupt/damaged word files you want to recover. Add more Word files if required.
- Now, click the Repair DOC File (s) button.

- View the progress of the files being repaired in the Repair Progress window that appears.

- Now, you can view the Excel file in CSV format at the specified folder location.

Now that you have changed the file format of the Excel file and prepared it to import in the Outlook application, the next procedure would be to import the CSV file to Outlook.
B. Import the CSV file to Outlook
- Open your Microsoft Outlook application. Click File ≫ Open & Export ≫ Import/Export.

- On the Import and Export Wizard, choose the option Import from another program or file and click Next.

- On the next page, select Comma Separated Values and click Next.
- Next, click on the Browse option and provide the CSV file path. Select the option from duplicates filters and click Next.
- Choose the destination folder Contacts of your Outlook application and then click Next.
- On the next page, you will see that import action is selected. You can map the custom fields between the source Excel file and Outlook contacts. For that, click Map Custom Fields.
- On the Map Custom Fields page, you can map the source file values to values in Outlook contacts. Perform mapping as you desire and then click OK.

- Click Finish to continue.
- The contacts will get imported very soon. You can view it now in the Outlook application Contacts folder.

Hence you just have read about the simplest way to import contacts from an Excel file to the Outlook Contacts folder and if you are facing any issue in
your Excel file like unable to access, open, error pop ups, etc., then we bring you the most effective and quick Excel repair software, Kernel for Excel Repair, capable to recover multiple Excel files of any sizes along with data, table, chart, formula, images, charge-sheet, etc. It supports all Excel Server versions and users can try its trial version for free first experience.
Conclusion
The Import and Export feature in Outlook helps to import Excel files (in CSV format) to Outlook. Moving a large number of contacts with details from Excel file to Outlook is easy with this feature.
- Download Free 100% SECURE
- Buy Now