
Word for Microsoft 365 Word 2021 Word 2019 Word 2016 More…Less
In Word, you can easily add citations when writing a document where you need to cite your sources, such as a research paper. Citations can be added in various formats, including APA, Chicago-style, GOST, IEEE, ISO 690, and MLA. Afterwards, you can create a bibliography of the sources you used to write your paper.
To add a citation to your document, you first add the source that you used.
Add a new citation and source to a document
-
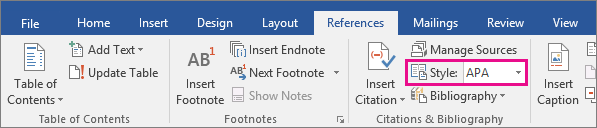
On the References tab, in the Citations & Bibliography group, click the arrow next to Style and click the style that you want to use for the citation and source. For example, social sciences documents usually use the MLA or APA styles for citations and sources.

-
Click at the end of the sentence or phrase that you want to cite.
-
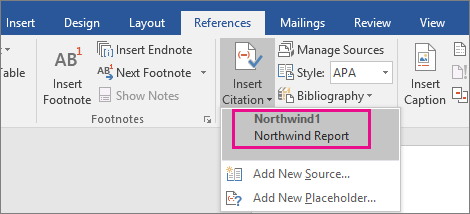
On the Reference tab, click Insert Citation and then do one of the following:
-
To add the source information, click Add New Source, and then, in the Create Source dialog box, click the arrow next to Type of Source, and select the type of source you want to use (for example, a book section or a website).
-
To add a placeholder, so that you can create a citation and fill in the source information later, click Add New Placeholder. A question mark appears next to placeholder sources in Source Manager.
-
-
If you chose to add a source, enter the details for the source. To add more information about a source, click the Show All Bibliography Fields check box.
-
Click OK when finished. The source is added as a citation at the place you selected in your document.
When you’ve completed these steps, the citation is added to the list of available citations. The next time you quote this reference, you don’t have to type it all out again. You just add the citation to your document. After you’ve added a source, you may find you need to make changes to it at a later time. To do this, see Edit a source.
Notes:
-
If you’ve added a placeholder and want to replace it with citation information, see Edit a source.
-
If you choose a GOST or ISO 690 style for your sources and a citation is not unique, append an alphabetic character to the year. For example, a citation would appear as [Pasteur, 1848a].
-
If you choose ISO 690-Numerical Reference and your citations still don’t appear consecutively, you must click the ISO 690 style again, and then press ENTER to correctly order the citations.
Add citations to your document
-
Click at the end of the sentence or phrase that you want to cite, and then on the References tab, in the Citations & Bibliography group, click Insert Citations.
-
From the list of citations under Insert Citation, select the citation you want to use.
Find a source
The list of sources that you use can become quite long. At times, you might need to search for a source that you cited in another document.
-
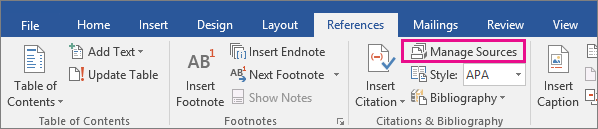
On the References tab, in the Citations & Bibliography group, click Manage Sources.
If you open a new document that does not yet contain citations, all of the sources that you used in previous documents appear under Master List.
If you open a document that includes citations, the sources for those citations appear under Current List. All the sources that you have cited, either in previous documents or in the current document, appear under Master List.
-
To find a specific source, do one of the following:
-
In the sorting box, sort by author, title, citation tag name, or year, and then look for the source that you want in the resulting list.
-
In the Search box, type the title or author for the source that you want to find. The list dynamically narrows to match your search term.
-
Note: You can click the Browse button in Source Manager to select another master list from which you can import new sources into your document. For example, you might connect to a file on a shared server, on a research colleague’s computer or server, or on a Web site that is hosted by a university or research institution.
Edit a source
-
On the References tab, in the Citations & Bibliography group, click Manage Sources.
-
In the Source Manager dialog box, under Master List or Current List, select the source you want to edit, and then click Edit.
Note: To edit a placeholder to add citation information, select the placeholder from Current List and click Edit.
-
In the Edit Source dialog box, make the changes you want and click OK.

Need more help?
Want more options?
Explore subscription benefits, browse training courses, learn how to secure your device, and more.
Communities help you ask and answer questions, give feedback, and hear from experts with rich knowledge.
Import references with Endnote
- 1. Import the method of reference
-
-
- 1.1, number, then reference
- 1.2, use literature management software
- 1.3, other instructions
-
- 2, Endnote installation and setting
-
-
- 2.1, installation
- 2.2, set the citation pattern
-
- 2.2.1, will file the latest style file (2 below)
- 2.2.2, install style file
- 2.3, update software style
- 2.4, set the Word plugin
-
- 3, import literature to endnote
-
-
- 3.1, download any document data
- 3.2, literature data import EndNote
-
- 4, import reference to Word
-
-
- 4.1, a confirmation
- 4.2, Word Format Adjustment
- 4.3, the literature to be inserted in EndNote
- 4.4, insert in Word
- 4.5, outcome show
-
- 5, this article
1. Import the method of reference
1.1, number, then reference
This type of tutorial isBaiduThat’s, it is recommended to write your own tutorial.CSDN
Office2016 formula automatic number
1.2, use literature management software
1. NoteExpress: Domestic Support Chinese, can retrieve «Tsinghua University Version»
2, Endnote: Foreign English, can retrieve the «Chinese University of Science», «Chinese version»
Others, such as Mendeley, Zotero, etc., it is not considered.
The software used in this case:Endnote X9.3.1 Chinese version + Microsoft Word
1.3, other instructions
considerKnow1with ADS 2All support EndNote export formats, and ADS does not support exporting NoteExpress formats.
This method is convenient:
- The information of the citation is unified in EndNote.
- Multiple continuous references and single citations format automatic settings.
- Quote Insert position, automatically update.
2, Endnote installation and setting
Normal installation, you need to install when installing the plugin.
2.1, installation
For specific installation steps, because I have installed, I don’t have to remove the re-demo, as shown below is after the installation is complete.

2.2, set the citation pattern
National standard GB / T 7714-2015
2.2.1, will file the latest style file (2 below)
Chinese Std GBT7714-2015 (numeric).ens
Chinese Std GBT7714 (author-year).ens
Note: The above style can beEndnote official websiteSearch download.
The above file has been packaged:Blue cloud Password: Shift
2.2.2, install style file
Put the above style files in the installation directory style folds folder, such as (indicating is my directory):
D:Program Files (x86)EndNote X9Styles
2.3, update software style
After putting it, open the software, install the following serial number, choose the latest Styles

carry on,

Select the window to close the window in the upper right corner.
The software part is set to here.
Set the Word plugin below.
2.4, set the Word plugin
Open Word to find the EndNote plugin,

At this point, the software installation and setting ends.
3, import literature to endnote
First, you need to download document data.
3.1, download any document data
Select the required citations (the following picture is to know the network as an example),

supplement:
The ADS is exported is .NW format, how to export .txt format. Both can be. (The picture below)

3.2, literature data import EndNote
Back to ENDNOTE Software Import Documents Downloaded

Successful schematic after export,

At this way, the use of the EndNote management document has ended.
You can also directly import PDF literature management.
Ignore here.
Next, the steps introduced in the reference will continue.
4, import reference to Word
This section introduces the citation to Word from EndNote.
4.1, a confirmation
Note: EndNote will automatically use the document to the end of the document. Confirm that the style of the software body and the plugin literature is consistent.

4.2, Word Format Adjustment
Normally, we will set a reference in the upper right corner.
 The format here may have been set when it is written, and below is analog scenario.

Then, it is formally introduced.
4.3, the literature to be inserted in EndNote

Note:
Choose a literature, you can use Shift continuously, you can also select a few single one using Ctrl.
Then, jump to Word,
4.4, insert in Word
The following is a story,

4.5, outcome show

In accordance with the above method, it will simplify the workload of the reference.
5, this article
-
cnki.net ↩︎
-
Astronomical database ↩︎
With that many sources, I wouldn’t use the Word plugin. Add a CODED tag to all of the references in your review. If you add or remove a source, adjust the tag accordingly.
Then, filter your library on this tag, select all, right-click and Create Bibliography from Selection. Choose a style with a Short Bibliogrpahy format (I am away from the computer, but can post a link to one later today or tomorrow). Paste this list in Word, select them all, and use Word’s covert text to table function. Then continue to add your other data. (You can also just simply paste into Excel and enter your other data there. This is what I would recommend to make the data easier to consume for readers.)
Then, Create Bibliogrpahy again in Zotero and use the Elsevier APA style that the journal requests.
This method requires manually exporting the Bibliogrpahy, but is much faster than inserting one by one into Word using the plugin. The CODED tag makes it easy to track the items that need to be in the Bibliogrpahy. If you later need to add or remove an item, you just delete the existing one and re-export it from Zotero.
in:
Protocols, Researchon November 21, 2016
The goal of any research is to extend the knowledge about something. However, it would be stupid and infeasible to start from scratch in every research project. So, what we usually do to create something new is to combine our own thoughts with what was previously discovered and published by others. Therefore, an important element of any scientific text are citations of previous publications.
As an engineer, I have been writing my documentation in Latex. Therefore, my citations have been all collected in a Bibtex (.bib) file and are managed with JabRef. While this combination works beautifully for technical manuscripts, it’s often easier or required to use Word instead of Latex in a mixed collaborative environment with colleagues of various professional backgrounds. This brought up the question of “How can I use my Bibtex library to create citations and bibliography in a Word document?”. In this blog post, I want to look at two ways of achieving this: First, only using the built-in tools of JabRef and Word. And second, using the Bibtex4Word macro.
Option 1: Using the built-in tools of MS Word

Step 1: Conversion of the .bib-file
As only citations from .xml files can be inserted in Word, the .bib bibliography must be converted from .bib to the Word-compatible xml format. Luckily, JabRef offers the possibility to export your library into an .xml file (File → Export → Files of type: “MS Office 2007 (*.xml)”)
Step 2: Import relevant citations
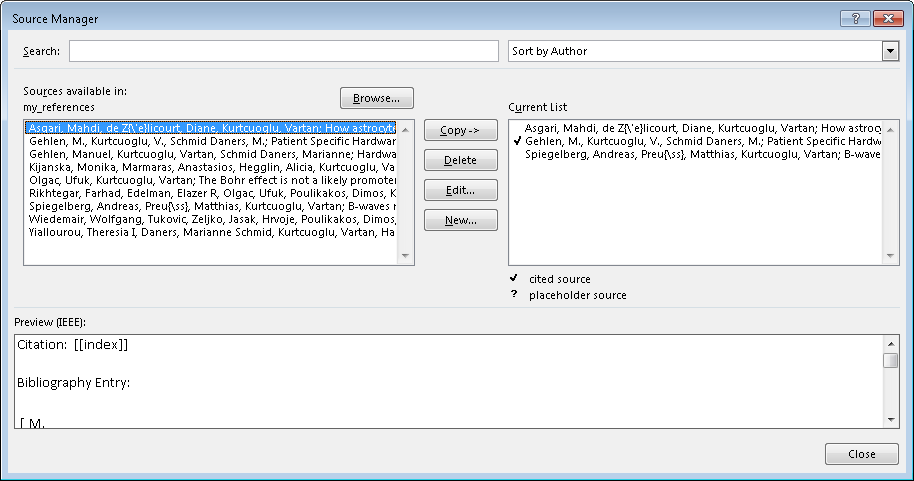
This newly exported file with all your citations can then be directly imported into Word documents (References → Manage Sources → Browse… ). All entries of the .xml file will then appear in the “master list”. But before they can be added to the document, the relevant entries must be copied to the “current list”.
Step 3: Inserting citations and bibliography
After importing the bibliography into Word, any reference from the “Current List” can be cited (References → Insert Citation). And, finally, the bibliography can be added to the document (References → References).
Discussion
While using the built-in functionality of Word to add citations doesn’t require the installation of additional tools, this method does involve quite some manual work: First, the .xml file has to be re-exported after each addition of a citation to the Bibtex library; and second, the reference list represents the citations in the “Current List” instead of the citations actually used in the document. So, the current list has to be maintained manually. Also, the customizability of citations and bibliography is very limited.
Option 2: Bibtex4Word
![]()
If you want bibliography that includes automatically the entries cited in the text just like it works in Latex, and with just the same customizability, you will have to use a third-party plugin such as the Bibtex4Word macro. Installing Bibtex4Word adds a toolbar (under the “Add-Ins” ribbon in the newer Word version), which allows to insert and modify citations as well as bibliography in your Word document. Beside the macro itself, you need to have a the MikTeX word processing package installed on your PC.
Step 1: Selecting bibliography file
With Bibtex4Word installed, the .bib file containing your references can be used directly (Bibtex4Word → Define Bibtex File). And even when a new reference is added to the file, no manual update is needed.
Step 2: Inserting citations and bibliography
Citations are inserted (Bibtex4Word → Insert citations) using the Bibtex keys defined in the Bibtex library just like in Latex. The macro also allows insertion of bibliography (Bibtex4Word → Insert/Update Bibliography) that only contains the citations actually used in the text.
Step 3: Bibliography and citations style
The style of bibliography and citations is based on a chosen Bibtex style (Bibtex4Word → Define Bibtex Style). It can be modified with what are called style flags. While these style flags allow to modify a lot of the formatting options, the sort order cannot be changed. Thus, make sure to choose an underlying Bibtex style with the desired sort order. If you want to further modify the bibliography style, you can create your own Bibtex style with the makebst tool (command prompt → latex makebst).
Discussion
So, if you are using Word to write manuscripts with a decent number of citations and still want to use your Bibtex library, you will quickly hit the limits of what the built-in tools of Word are capable of. This is especially the case if you have specific requirements regarding the formatting of citations and bibliography. Bibtex4Word offers a simple and lightweight way around these limitations and allows you to maintain a single library of references that can be used similarly in Latex and Word manuscripts.
I have three pages worth of references.
I can not import them into word, at least I can’t find a way. Only way to import them is inputting them one by one, which I don’t really fancy.
I do not have the folder containing sources.xml, as far as I am aware it does not exist for me. Under applications support > microsoft I do not even have an office folder and search of any other folders with office in it also leads me nowhere.
I was trying to follow this guide as well, but i do not have the Manage Sources icon available either.
Answer
I am not sure if Word has a built in reference manager. In the past I have been using EndNote, but it will cost money. You should check out Mendeley (https://www.mendeley.com/). Once a reference manager is installed, you should see some of those menu items show in in Word.
Attribution
Source : Link , Question Author : mega_creamery , Answer Author : Stone
Skip to content
[Editor’s Note–We thought you’d like to know: this 2017 post is a bit dated. Find current info on Mendeley’s citation abilities here, and in the Mendeley Guides.]
You can now export references from your Mendeley Web Library into the Microsoft Word Citation Manager — without opening your Mendeley Desktop.
The export feature uses Microsoft Word’s built-in citation tool. This feature is only available on Windows for Word 2010 and above.
To export your references:
- Open your Mendeley Web Library
- Select the references you want to export
- Click on Export to MS Word, which will download an .xml file.
- Open Word and go to “References” and then “Manage Resources.”
- Browse your folder and select the .xml file. Your references will be available in Word’s Citation Manager.

The number of citation styles in Word are limited but you can install more styles from BibWord.
MS Word’s citation system is not the same system used by Mendeley Desktop. Using both on the same document will yield two sets of citations and two bibliographies.
Add citations to your document Click at the end of the sentence or phrase that you want to cite, and then on the References tab, in the Citations & Bibliography group, click Insert Citations. From the list of citations under Insert Citation, select the citation you want to use.
Contents
- 1 How do you add References manually?
- 2 Can I add a referencing style to Word?
- 3 How do I turn on References in Word?
- 4 How do you add more references?
- 5 How do you do apa style referencing?
- 6 How do I add Oxford Referencing to Microsoft Word?
- 7 How do I insert references in Word 2010?
- 8 How do you put references in a research paper?
- 9 Is APA the same as Harvard?
- 10 How do you write references?
- 11 How do I reference a website in APA?
- 12 How do I install Oscola in Word?
- 13 How do you reference in-text Harvard style?
- 14 How do you reference a website Harvard style?
- 15 How do you copy and paste references in Word?
- 16 How do I insert a reference in Word 2016?
- 17 How do you add references to a research paper in Word?
- 18 How do you incorporate references in an essay?
- 19 Which referencing style is the best?
- 20 Is APA 6th Harvard?
How do you add References manually?
Select “References” and then “New Reference”, or press “Ctrl+N” on your keyboard or click the “New Reference” button (a clipboard with a plus sign). Choose the appropriate reference type from the “Reference Type” drop-down menu.
Can I add a referencing style to Word?
In your Word document, click on the References tab in the Ribbon. In the Citations & Bibliography group, click the arrow next to Style. Click the style that you want to use for the citation and source. Click at the end of the sentence or phrase that you want to cite.
How do I turn on References in Word?
Go to Add-In tab -> Reference Manager -> Instant Formatting. Click the Enable Instant Formatting box to toggle Instant Formatting. Click OK to save changes to the Instant Formatting settings. Click OK to format all citations and build the bibliography.
How do you add more references?
Put your cursor at the end of the text you want to cite. Go to References > Style, and choose a citation style. Select Insert Citation. Choose Add New Source and fill out the information about your source.
How do you do apa style referencing?
About APA Style
The APA referencing style is an “author-date” style, so the citation in the text consists of the author(s) and the year of publication given wholly or partly in round brackets. Use only the surname of the author(s) followed by a comma and the year of publication.
How do I add Oxford Referencing to Microsoft Word?
The Oxford referencing system
On any Microsoft Word document, simply click on the ‘Insert’ menu and select ‘Footnote’ (or ‘Reference’ and then choose ‘Footnote’ from the drop-down list).
How do I insert references in Word 2010?
- On the References tab, in the Citation & Bibliography group, choose the style of citation you want to use.
- Position the cursor where you want the citation to appear, and then click Insert Citation, Add New Source.
- In the Create Source dialog box, select the type of source and then fill in the fields shown.
How do you put references in a research paper?
Book: online / electronic
- Author/Editor (if it is an editor always put (ed.)
- Title (this should be in italics)
- Series title and number (if part of series)
- Edition (if not the first edition)
- [Online]
- Place of publication (if there is more than one place listed, use the first named)
- Publisher.
- Year of publication.
Is APA the same as Harvard?
APA (American Psychological Association)
APA referencing is a variant on Harvard style. Many of the conventions are the same, with brief author-date citations in brackets in the body of the text and full citations in the reference list.
How do you write references?
References
- author(s) name and initials.
- title of the article (between single quotation marks)
- title of journal (in italics)
- any publication information (volume, number etc.)
- page range.
- accessed day month year (the date you accessed the article)
- from name of database.
- item number (if given).
How do I reference a website in APA?
When citing a web page or online article in APA Style, the in-text citation consists of the author’s last name and year of publication. For example: (Worland & Williams, 2015). Note that the author can also be an organization. For example: (American Psychological Association, 2019).
How do I install Oscola in Word?
To create a footnote in Microsoft Word, click your mouse on the place you want it to refer to. Click on ‘References’ at the top and then on ‘Insert Footnote‘. A number will appear in the text, and also at the bottom of the page, where you write your citation.
How do you reference in-text Harvard style?
An in-text citation should appear wherever you quote or paraphrase a source in your writing, pointing your reader to the full reference. In Harvard style, citations appear in brackets in the text. An in-text citation consists of the last name of the author, the year of publication, and a page number if relevant.
How do you reference a website Harvard style?
To reference a website in Harvard style, include the name of the author or organization, the year of publication, the title of the page, the URL, and the date on which you accessed the website. Author surname, initial. (Year) Page Title. Available at: URL (Accessed: Day Month Year).
How do you copy and paste references in Word?
Use the keyboard shortcut CTRL+C (CMD+C for Mac) to copy. Alternatively you can use the menu “Edit > Copy”. In your email, IM, Google Docs or any other text editing field, paste the content you just copied. Do so by pressing CTRL+V (CMD+V for Mac) or the menu “Edit > Paste”.
How do I insert a reference in Word 2016?
To add a citation to your document, first add the source you used.
- On the References tab, click the arrow next to Bibliography Style, and click the style that you want to use for the citation and source.
- Click at the end of the sentence or phrase that you want to cite.
- On the References tab, click Insert Citation.
How do you add references to a research paper in Word?
Add citations to your document
- Click at the end of the sentence or phrase that you want to cite, and then on the References tab, in the Citations & Bibliography group, click Insert Citations.
- From the list of citations under Insert Citation, select the citation you want to use.
How do you incorporate references in an essay?
You must cite all information used in your paper, whenever and wherever you use it. When citing sources in the body of your paper, list the author’s last name only (no initials) and the year the information was published, like this: (Dodge, 2008). (Author, Date).
Which referencing style is the best?
How to do I choose a citation style?
- APA (American Psychological Association) is used by Education, Psychology, and Sciences.
- MLA (Modern Language Association) style is used by the Humanities.
- Chicago/Turabian style is generally used by Business, History, and the Fine Arts.
Is APA 6th Harvard?
The Harvard (APA 6th) system of referencing requires you to set this information out in a certain way, and the examples below will show you how to do this.

Properly formatting bibliographies has always driven students crazy. With modern versions of Microsoft Word, though, the process is streamlined to the point of almost being automatic, and today we’re going to show you how to add citations and bibliographies to your Word documents.
Note: the techniques we’re going to cover here should work for Microsoft Word 2007 and later. The screenshots are all taken in the latest version of Word 2016, so your version might look slightly different, but it works the same way.
Creating Sources and Adding Citations To Your Text
When you’re working on any Word document, place your cursor where you want the citation to be placed. Switch to the “References” tab on the Ribbon, and then click the “Insert Citation” button.

The popup menu that appears shows any sources you have already added (we’ll get to that in a moment), but to add a new source, just click the “Add New Source” command.
In the Create Source window that appears, you can enter all of the relevant information for just about any source. The default setting for the “Type of Source” dropdown is Book, but just open that dropdown to choose other types of sources like journal articles, web sites, interviews, and so on. So, pick the type of source, fill out the fields, give your source a tag name (typically a shortened version of the title), and then click “OK” to finish the source.
Note: By default, Word uses APA citation style, but it’s not limited to that. If you’re using another citation method for your document, click the “Show All Bibliography fields” option to fill out extra information.
Word adds a citation for your new source to your document. And, the next time you need to cite that particular source, simply click that “Insert Citation” button again. Your source appears on the list (along with any other sources you’ve added). Select the source you want, and Word correctly inserts the citation into the document.
By default, Word uses the APA style for citations, but you can change that by picking another option from the “Style” dropdown right next to the “Insert Citation” button.
Just repeat those steps to add any other sources you need, and to place citations where you want.
Creating Your Bibliography
When your document is finished, you’ll want to add a bibliography that lists all your sources. Head to the end of your document and create a new page using Layout > Breaks > Page Break. Switch over the “References” tab, and click the “Bibliography” button. You can select from a few pre-formatted bibliography styles with headers, or you can click the “Insert Bibliography” option to add one without any header or extra formatting.
Bam! Word adds all the works you cited in your document to the bibliography, in the correct order and format for the writing style you’ve set up.
Back Up and Retrieve Your Sources
What if you frequently write papers on similar topics, and you don’t want to have to re-enter the source information to Word each time? Word has you covered here too. Every time you enter a new source, it’s saved in what Word calls the “master source list.” For each new document, you can retrieve old sources from the master list and apply them to your current project.
On the “References” tab, click the “Manage Sources” button.
The window that appears shows all the sources you’ve used before. Click a source on the left side of the window, and then click “Copy” to apply it to the current document. Repeat this for each source you need, and then click “OK” to finish.
If you’ve entered dozens or hundreds of sources, you can use the search tool at the top of this window to quickly narrow down the list by author, title, year, or the tag you’ve personally applied to the individual source.
If you need to move your source list to another computer and another copy of Word, you’ll find your sources stored in an XML file at the following location (where username is your user name):
C:UsersusernameAppDataRoamingMicrosoftBibliography
After copying that file to another computer, click the “Manage Sources” button in Word on the new computer, and you can browse for the file.
Image source: Shutterstock/Mikael Damkier
READ NEXT
- › Learn These Microsoft Word Features to Make College Easier
- › How to Use Researcher in Microsoft Word for Essays and Papers
- › How to Cite Pictures in PowerPoint
- › How to Use Footnotes and Endnotes in Microsoft Word
- › How to Create Your Own Bibliography Template in Microsoft Word
- › How to Edit and Reuse Citations in Microsoft Word
- › How to Add a Hanging Indent in Microsoft Word
- › The New NVIDIA GeForce RTX 4070 Is Like an RTX 3080 for $599