

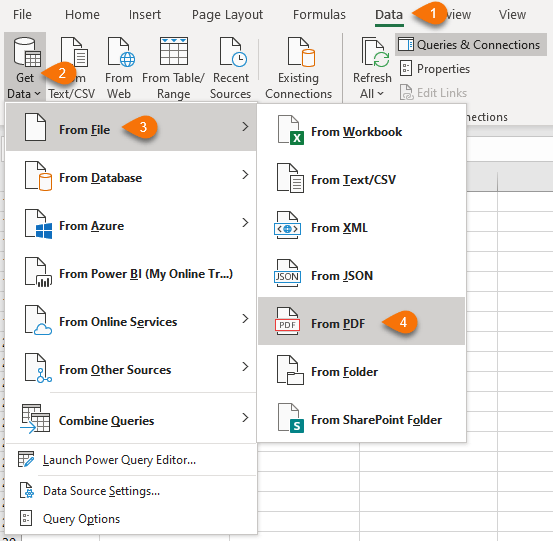
To import data from a PDF file to Excel, open Excel and go to the «Data» tab, then navigate to Get Data > From File > From PDF and select your PDF. Customize the import settings as necessary for your data, then click «OK.»
If you have a PDF document such as a bank statement or financial report, you may want to pull this information into Microsoft Excel. With a built-in feature, you can easily import and automatically convert a PDF to Excel.
This convenient feature can save you from hunting down a PDF file converter. Not only that, but it allows you to pick and choose the data from the file you want to import. The entire process takes only a minute.
Note: Since the time this feature was implemented, August 2020, it has only been available to Office 365 subscribers.
Connect a PDF File to Excel
To get started, select the sheet you want to work with in Excel and go to the Data tab. Click the Get Data drop-down arrow on the left side of the ribbon. Move your cursor to From File and pick “From PDF.”

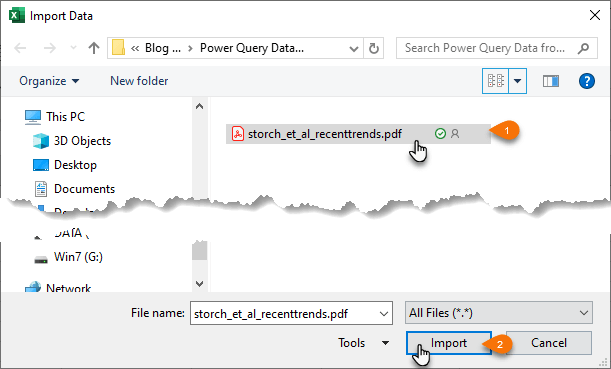
Locate your file in the browse window, select it, and click “Import.”
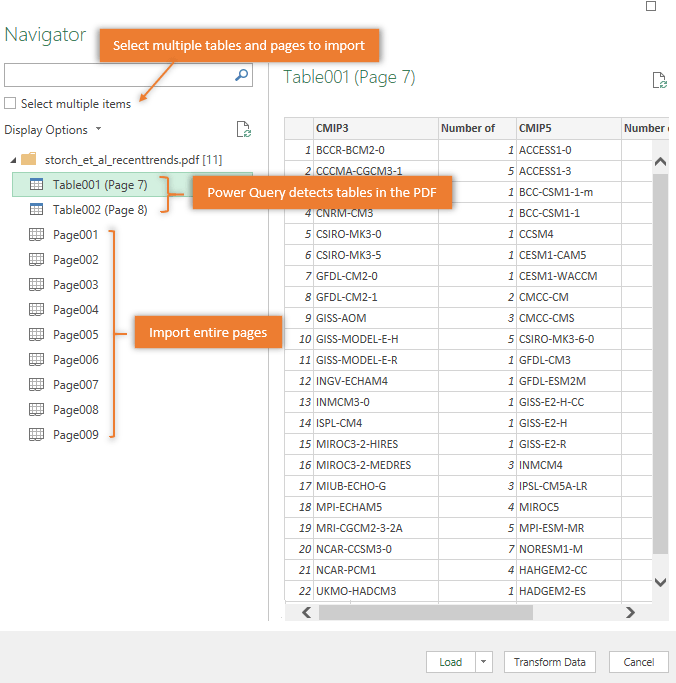
Next, you’ll see the Navigator pane. On the left are the tables and pages in your PDF file. You can search for one at the top or simply select an element and see a preview on the right side.
When you see the item you want to import, click “Load” at the bottom of the window.
Once your data is imported from the PDF, you should see it in your sheet along with the Queries & Connections sidebar. This handy spot lets you adjust the connected data if you wish, and we’ll explain these options below.
Adjust the Load Settings
If you prefer to load the data in a specific format such as a pivot table or to a new worksheet, select the Load drop-down arrow and pick “Load to” instead.
Then choose your options in the Import Data window and click “OK.”
RELATED: How to Use Pivot Tables to Analyze Excel Data
Transform the Data with Power Query
Another option for importing data from your PDF is to transform it using the Power Query Editor. In the Navigator window where you select the element to import, click “Transform Data” at the bottom instead of “Load.”
This will open the Power Query window where you can do things like choosing or adding more columns, transposing rows and columns, managing parameters, and formatting the data.
Adjust the Connected Data
If you want to adjust the data you imported, you can do so by opening the data from the Queries & Connections sidebar. You can then take actions such as editing it using the Power Query Editor, duplicating, merging, adding a reference, or deleting the connected data.
RELATED: How to Create Your Own Data Type in Microsoft Excel
As mentioned, you’ll see the Queries & Connections sidebar open when you import your PDF file. If you happen to close it, you can reopen it by going to the Data tab and clicking “Queries & Connections” in the ribbon.
Place your cursor over the connected data and you’ll see a window appear. At the bottom, you have actions for View in Worksheet, Edit, and Delete. If you click the three dots, you’ll see options like Duplicate, Reference, and Merge.
You can also manipulate the data within your sheet as you normally would. If you’re using a table, you can filter and sort. You can also select a different style, update the font, and apply additional formatting.
RELATED: How to Create and Use a Table in Microsoft Excel
For those times when the data you need to work with or analyze comes in the form of a PDF, remember that you can pull that PDF file right into Microsoft Excel.
If you’re looking to do the reverse, learn how easy it is to save an Excel sheet as a PDF file.
READ NEXT
- › How to Export a Cell Range or Excel Workbook as a PDF
- › How to Combine First and Last Names in Microsoft Excel
- › How to Create a PDF from a Google Docs Document
- › BLUETTI Slashed Hundreds off Its Best Power Stations for Easter Sale
- › Google Chrome Is Getting Faster
- › HoloLens Now Has Windows 11 and Incredible 3D Ink Features
- › The New NVIDIA GeForce RTX 4070 Is Like an RTX 3080 for $599
- › How to Adjust and Change Discord Fonts
![]()
Download Article
![]()
Download Article
Do you have a PDF table that you want to add to your Excel sheet? If you try copying the data in PDF and then pasting it into your Excel sheet, you’ll probably get jumbled and non-sensical results. PDFs and Excel don’t use the same file format, so they aren’t easy to move information between. This wikiHow article will teach you how to copy a table from a PDF to Excel using the import feature in the spreadsheet software.
Steps
-

1
Open Excel. You can open a new project or continue a saved project in Excel.
- You’ll also need to know where in the PDF your table is so when you’re importing it, you’ll be able to find it easily.
-
2
Select a cell where you want to start the table. This will be the top left corner of the table you’re copying from the PDF.
Advertisement
-
3
Click Data. It’s in the menu above the editing ribbon next to File and Review.
- If you’re using a Mac, this is in the menu that’s running along the top of your screen.
-
4
Click Get Data. For Windows, it’s the furthest icon on the left of the menu.
- For Mac, you’ll see this in the drop-down when you click Data.
-
5
Click From File and From PDF. With each selection, the menu will continue expanding until you select From PDF, after which Excel will open your file manager (Finder for Mac and File Explorer for Windows).
-
6
Navigate to and double-click your PDF. You can also single-click your PDF to select it, then click Import.
-
7
Click the table you want to copy from the PDF to Excel. Knowing the location of the table you want to copy is important since they are labeled by location (which page they are on).
- If you click on a table on the left, the table’s preview will appear in the panel on the right side.
-
8
Click Load. It’s in the bottom right corner and will allow you to copy the table from the PDF to your Excel sheet.
- If you want to make changes to the data in the table, you can do it after you click Load.[1]
- If you want to make changes to the data in the table, you can do it after you click Load.[1]


Advertisement
Ask a Question
200 characters left
Include your email address to get a message when this question is answered.
Submit
Advertisement
Thanks for submitting a tip for review!
About This Article
Article SummaryX
1. Open Excel.
2. Select a cell where you want to start the table.
3. Click Data.
4. Click Get Data.
5. Click From File and From PDF.
6. Navigate to and double-click your PDF.
7. Click the table you want to copy from the PDF to Excel.
8. Click Load.
Did this summary help you?
Thanks to all authors for creating a page that has been read 116,712 times.
Is this article up to date?
Задача переноса данных из таблицы в PDF-файле на лист Microsoft Excel — это всегда «весело». Особенно если у вас нет дорогих программ распознавания типа FineReader или чего-то подобного. Прямое копирование обычно ни к чему хорошему не приводит, т.к. после вставки скопированных данных на лист, они, скорее всего, «слипнутся» в один столбец. Так что их потом придется кропотливо разделять с помощью инструмента Текст по столбцам с вкладки Данные (Data — Text to Columns).
И само-собой, копирование возможно только для тех PDF-файлов, где есть текстовый слой, т.е. с только что отсканированным с бумаги в PDF документом это не сработает в принципе.
Но все не так грустно, на самом деле 
Если у вас Office 2013 или 2016, то за пару минут без дополнительных программ вполне можно реализовать перенос данных из PDF в Microsoft Excel. А помогут нам в этом Word и Power Query.
Для примера, давайте возьмем вот такой PDF-отчет с кучей текста, формул и таблиц с сайта Европейской Экономической Комиссии:

… и попробуем вытащить из него в Excel, скажем первую таблицу:

Поехали!
Шаг 1. Открываем PDF в Word
Почему-то мало кто знает, но начиная с 2013 года Microsoft Word научился открывать и распознавать PDF файлы (даже отсканированные, т.е. без текстового слоя!). Делается это совершенно стандартным образом: открываем Word, жмем Файл — Открыть (File — Open) и уточняем PDF-формат в выпадающем списке в правом нижнем углу окна.
Затем выбираем нужный нам PDF-файл и жмем Открыть (Open). Word сообщает нам, что собирается запустить распознавание этого документа в текст:

Соглашаемся и через несколько секунд увидим наш PDF открытым для редактирования уже в Word:

Само-собой, у документа частично слетит дизайн, стили, шрифты, колонтитулы и т.п., но для нас это не важно — нам нужны только данные из таблиц. В принципе, на этом этапе уже возникает соблазн дальше просто скопировать таблицу из распознанного документа в Word и просто вставить ее в Excel. Иногда это срабатывает, но чаще приводит ко всевозможным искажениям данных — например числа могут превратиться в даты или остаться текстом, как в нашем случае, т.к. в PDF используется не российские разделители:

Так что давайте не будем срезать углы, а сделаем все чуть сложнее, но правильно.
Этап 2. Сохраняем документ как веб-страницу
Чтобы потом загрузить полученные данные в Excel (через Power Query), наш документ в Word нужно сохранить в формате веб-страницы — этот формат является, в данном случае, неким общим знаменателем между Word’ом и Excel’ем.
Для этого идем в меню Файл — Сохранить как (File — Save As) или жмем клавишу F12 на клавиатуре и в открывшемся окне выбираем тип файла Веб-страница в одном файле (Webpage — Single file):

После сохранения должен получиться файл с расширением mhtml (если у вас в Проводнике видны расширения файлов).
Этап 3. Загружаем файл в Excel через Power Query
Можно открыть созданный MHTML-файл в Excel напрямую, но тогда мы получим, во-первых сразу все содержимое PDF вместе текстом и кучей ненужных таблиц, а, во-вторых, опять потеряем данные из-за неправильных разделителей. Поэтому импорт в Excel мы будем делать через надстройку Power Query. Это совершенно бесплатная надстройка, с помощью которой можно загружать в Excel данные практически из любых источников (файлов, папок, баз данных, ERP-систем) и всячески затем полученные данные трансформировать, придавая им нужную форму.
Если у вас Excel 2010-2013, то скачать Power Query можно с официального сайта Microsoft — после установки у вас появится вкладка Power Query. Если у вас Excel 2016 или новее, то качать ничего не нужно — весь функционал уже встроен в Excel по-умолчанию и находится на вкладке Данные (Data) в группе Загрузить и преобразовать (Get & Transform).
Так что идем либо на вкладку Данные, либо на вкладку Power Query и выбираем команду Получить данные или Создать запрос — Из файла — Из XML. Чтобы были видны не только XML-файлы — меняем в выпадающем списке в правом нижнем углу окна фильтры на Все файлы (All files) и указываем наш MHTML-файл:

Обратите внимание, что импорт успешно не завершится, т.к. Power Query ждет от нас XML, а у нас, на самом деле, HTML-формат. Поэтому в следующем появившемся окне нужно будет щелкнуть правой кнопкой мыши по непонятному для Power Query файлу и уточнить его формат:

После этого файл будет корректно распознан и мы увидим список всех таблиц, которые в нем есть:

Посмотреть содержимое таблиц можно, если щелкать левой кнопкой мыши в белый фон (не в слово Table!) ячеек в столбце Data.
Когда нужная таблица определена, щелкните по зеленому слову Table — и вы «провалитесь» в её содержимое:

Останется проделать несколько простых действий, чтобы «причесать» ее содержимое, а именно:
- удалить ненужные столбцы (правой кнопкой мыши по заголовку столбца — Удалить)
- заменить точки на запятые (выделить столбцы, щелкнуть правой — Замена значений)
- удалить знаки равно в шапке (выделить столбцы, щелкнуть правой — Замена значений)
- удалить верхнюю строку (Главная — Удалить строки — Удаление верхних строк)
- удалить пустые строки (Главная — Удалить строки — Удаление пустых строк)
- поднять первую строку в шапку таблицы (Главная — Использовать первую строку в качестве заголовков)
- отфильтровать лишние данные с помощью фильтра
Когда таблица будет приведена в нормальный вид, ее можно выгрузить на лист командой Закрыть и загрузить (Close & Load) на Главной вкладке. И мы получим вот такую красоту, с которой уже можно работать:

Ссылки по теме
- Трансформация столбца в таблицу с помощью Power Query
- Разделение слипшегося текста по столбцам
We’ve helped you to insert PDF files into popular file formats, such as Word and PPT in the past, so here’s an article on how to insert PDF into Excel sheets. We’ll also tell you how to convert PDF to Excel, so you can then merge all of your files into one, without needing to insert a PDF into an Excel file. But first, let’s look at how you can do this in Excel.
How To Insert PDF Into Excel as a Picture
One of the quickest ways to insert PDF files into Excel sheets is via the software itself.
- Open the Excel file you want to insert a PDF into.
- Click on the «Insert» tab, «Pictures» and then «Picture from file.»
- Locate and double-click on the PDF you wish to insert into Excel.
Voila, inserting content from a PDF file into an Excel sheet couldn’t get any easier than this. Similarly, you can also choose other file formats, such as images, to place inside your Excel files.
Many sources of data are PDF files. There are online services to convert data tables from PDF to spreadsheet; for example CleverPDF.com, Investitech.com, PDF2Excel, SmallPDF, or DocsZone.
If such services are not working for you, there is also a conversion process that involves moving the data first into Word and then into Excel. These are the steps.
We will use Table 10 from the European Economy Statistical Annex. This shows economic growth rates for all 27 EU countries plus the USA and Japan (see site 8 in our links to free economic data)
Step 1: Open the relevant PDF file and select and copy table
The first page of Table 10 from the Spring 2007 version of the European Economy Statistical Annex is shown below.
To copy the table, click on Select and click and drag the cursor to highlight the whole table. Then press Ctrl C (to copy this).
Step 2: Copy this into Word and convert to a table
Open a new Word document and paste the copied text by pressing Ctrl V. This should look as follows:
Now convert this into a table by highlighting it all (you can easily do this by pressing Ctrl A) and selecting Table > Convert > Text to Table. A dialogue box will pop up and under Separate Text at, you should select Other and click in the little box next to it; delete what is there and type in a space. Press OK.
A table will appear (poorly formatted) which will be all highlighted. While still highlighted, copy this by pressing Ctrl C.
Step 3: Paste this into Excel
Open a new blank Excel document. The first cell should be highlighted. Click in this cell and past in the table you have copied from Word. To do this, simply press Ctrl V. This will give you a table similar to that below.
Step 4: Manipulating the Excel table
You will now need to do a little manipulation. It will help if you have an Insert Row and a Delete Row icon in your toolbar at the top (how to configure your toolbar).
First ensure that the columns are correctly aligned. In the above, row 5 is one cell too far to the left. To rectify this, click in cell A5 (currently labelled BE). Then click on Insert > Cells > Shift Cells Right and then OK. This will move all the entries in row 5 one column to the right.
Next delete unwanted rows, by selecting the row (click on the row number in the left-hand column) and then pressing the delete row icon (![]() ). In the above table you will probably want to delete rows 1, 2, 3, 4, 6 and 7. If you want to work out average inflation rates over the period 1961 to 2008, you will also want to delete all except rows 5, 8, 9, 20, 31 and 40.
). In the above table you will probably want to delete rows 1, 2, 3, 4, 6 and 7. If you want to work out average inflation rates over the period 1961 to 2008, you will also want to delete all except rows 5, 8, 9, 20, 31 and 40.
Step 5: Working out average inflation for the whole period
Insert a row below the final row of figures. Select the second cell of that row, click on the fx icon and in the right-hand panel select AVERAGE and press OK and OK again. This will give the average of that column. You can change the number of decimal places by clicking on the same cell again and selecting Format > Cells > Number and then choosing the number of decimal places.
When this is done, click on this cell again and copy it by pressing Ctrl C. Then simply use the right arrow key to go from one cell to the next, each time pressing Ctrl V. This will give the average for each respective column.
(Thanks to David Allen of the University of the West of England for suggesting this method.)
- 2062373 views
Office 365/Microsoft 365 users can now import data from a PDF to Excel using Power Query*.
It’s super handy for importing data tables inside PDF documents because Excel locates them for you ready to import. And if the data is a little messy you can use the Power Query transform tools to clean it before loading it into the Excel file.
*Only available to Office/Microsoft 365 subscribers, find out how to get the latest updates.
Tip: If you don’t have Office/Microsoft 365 then this same functionality is available in Power BI Desktop.
Watch the Video

Download Workbook
Enter your email address below to download the sample workbook.
By submitting your email address you agree that we can email you our Excel newsletter.
Step 1: Get Data from PDF — It’s as easy as going to the Data tab of the ribbon > Get Data > From File > From PDF:
Step 2: Locate the PDF File you want to import to Excel — Browse to the location the PDF is saved > click Import:
Step 3: Select Tables and Pages in PDF — The Power Query Navigator window opens with a list of pages and tables Excel has identified in the PDF. You can select a table or page to preview in the pane on the right, as shown below with the table on page 7 displayed:
Step 4: Import Data from PDF or Clean — From here you can click the ‘Load’ button to import data directly to the Excel worksheet or to the Data Model. However, you’re most likely to want to do some more cleaning of the data first, in which case click the ‘Transform Data’ button to open the Power Query Editor:
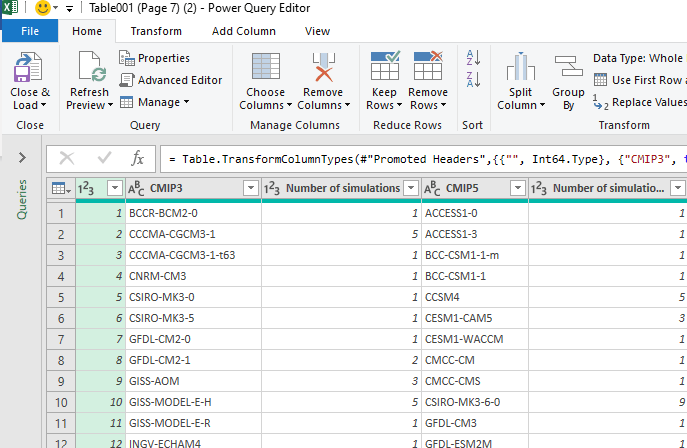
Notice Power Query has correctly identified the column labels and placed them in the header row. If it doesn’t do this automatically, click on the drop down in the top left of the table > Use First Row as Headers:

Not all tables will import as easily. For example, Table2 in this PDF has column headers split over multiple rows. Watch the video to see how to fix them so they’re in a single row and can form the column labels.
When you’re done with tidying up the data, give the query a name in the Properties pane, then go to the Home tab > Close & Load to finalise importing data from the PDF to Excel.
Import Multiple Tables/Pages from PDF
If you have tables that run over multiple pages, for example credit card or bank statements, Power Query will automatically combine then into a single table.
You can also import consecutive pages with the StartPage and EndPage optional parameters like so:
= Pdf.Tables(File.Contents("C:Sample.pdf"), [StartPage=3, EndPage=5])
More on the Pdf.Tables function here.
Import Multiple PDFs From Folder
If you have multiple PDFs containing data or tables with the same structure, you can use the Power Query Get Data From Folder connector to get them and import the data into a single table.
Преобразуйте PDF в Excel онлайн
бесплатно в любом месте
Универсальный конвертер PDF в Excel
Всё просто. Загрузите PDF-документ с жёсткого диска / из облачного хранилища или перетащите в поле загрузки.
Загрузите PDF-файл и выберите формат электронной таблицы Microsoft Excel из выпадающего меню. Доступно два варианта: XLS и XLSX.
Затем нажмите «Начать», а PDF-конвертер позаботится об остальном.
Онлайн-конвертер PDF в Excel
Вам не надо скачивать приложение или устанавливать программу. PDF2Go работает онлайн в любом браузере. Просто подключитесь к сети и зайдите на PDF2Go.com.
Никаких вирусов и вредоносных программ. Просто скачайте готовую таблицу Excel.
Зачем конвертировать PDF в Excel?
Формат PDF универсален, но его сложно редактировать. Если вам надо извлечь и отредактировать таблицу, преобразуйте PDF в формат Excel.
Оптическое распознавание символов (OCR) позволяет редактировать даже отсканированные книги. Не тратьте время, чтобы скопировать текст вручную, мы обо всём позаботимся!
Безопасный конвертер PDF в Excel
Преобразуйте PDF-документ в Microsoft Excel на сайте PDF2Go и не беспокойтесь о безопасности файла.
SSL-шифрование, регулярная очистка сервера, безопасность загрузки и скачивания файлов. Все права на документы остаются за вами.
Для получения дополнительной информации ознакомьтесь с Политикой конфиденциальности.
В какой формат можно преобразовать?
С помощью PDF-конвертера вы можете преобразовать PDF в Excel, в частности, Microsoft XLS и XLSX. Преобразовать PDF-файл в другие форматы тоже можно!
Например:
XLS, XLSX
Мобильный конвертер PDF-файлов
Конвертируйте PDF-файлы на компьютере, смартфоне или планшете!
PDF2Go работает везде — в поезде и в автобусе, дома и в офисе. Хотите преобразовать PDF в Excel? Просто подключитесь к интернету!