
Import Spreadsheets from Microsoft Excel is a WordPress plugin that allows you to import live, calculating spreadsheets from Microsoft Excel to your blog or website in WordPress. The plugin is free but the calculating web page must have been generated with a paid license for SpreadsheetConverter, an add-in for Excel that converts the Excel spreadsheet to HTML and the formulas in Excel to JavaScript. The uploaded online spreadsheet is live and looks and feels exactly like in Excel. Now you can use Excel everywhere!
SpreadsheetConverter works like an Excel compiler creating live online spreadsheets in HTML and JavaScript. It is not a simple Excel viewer; the web spreadsheet plugin runs all your formulas in real-time – all the cells and charts are live!
You usually need to have your own WordPress server to install plugins. It may not be possible to install plugins on WordPress.com or other shared WordPress servers. If you are unable to use this plugin, you can use our Publish to Cloud service instead. It is built into SpreadsheetConverter and uploads the calculator to a cloud server. In most cases, this works just as well.
Note: before you upload a spreadsheet, you must use the SpreadsheetConverter add-in for Microsoft Excel to convert your spreadsheet to web format. To use this add-in, you must have Microsoft Excel 2007 or later for Windows – and the basic skills to create spreadsheets with it. Prices for unlimited, lifetime licenses for the current version start at $254. There are no extra fees per server, month, page or visitor.
We’d love to help you try SpreadsheetConverter on one of your own spreadsheets. You don’t have to install the software to test it. Just send one of your own spreadsheets, and we’ll send it back as a live, intelligent web form or calculator. Use the online form and remember to attach the spreadsheet!
This service is free, because it’s so simple to convert your spreadsheet to web format with SpreadsheetConverter that we can do it in almost no time at all. If you want to keep your web calculator or form up-to-date without ever installing or learning the converter, you can have us do all the conversion work for you, forever, using the paid conversion service.
SpreadsheetConverter is an advanced product that may require some time to learn. If you don’t want to invest in this new skill set right now, you can test the plugin right now with example files in the plugin’s ZIP file – read more below.
Please don’t post negative reviews until you have at least read the FAQ. Even better: contact support for any difficulties you have; we will help you get started for free!
Insert a live spreadsheet in your blog with just a few clicks
Any Excel spreadsheet can be published on the web:
- Open the spreadsheet in Excel and click Convert on the SpreadsheetConverter toolbar to have the Excel converter create a web spreadsheet.
- Click WordPress Plugin on the SpreadsheetConverter toolbar to create an SSC Calculator file with everything you will need in WordPress.
- Use this plugin to upload the SSC Calculator file to WordPress.
- Embed the calculator or form into one or more of your posts or pages in WordPress.
- Click Publish in WordPress and your calculator goes live, online on the web!
Please visit the Embed a spreadsheet in WordPress, FAQ and Screenshots sections for more detailed instructions.
A full online help for the plugin is available on the SpreadsheetConverter website.
Create beautiful web apps
At last you can create online calculators for your website without the help of a programmer. All you need is Microsoft Excel. Help your visitors do a better job, and they will return to your website for more.
- Price calculation: Online pricing calculators help your customers get the total price including options, maintenance etc.
- Financial calculation: provide online mortgage calculators, interest calculation, loan calculators or online lease calculation.
- Calculators for government and counties: online income tax calculation, online social benefits, online payroll calculators.
- ROI: Use online return on investment calculation to better show the benefits of your product, or calculate internal rate of return (IRR).
- Technical and engineering calculators: online dimensioning tools, online HVAC calculations, load calculators, concrete calculation, torque calculation, area calculators, volume calculation, electrical calculation, power calculation.
- Health calculators: online body mass index calculator, online calorie calculation, online body fat calculator.
You can use any feature of Excel on the web, including formulas and functions, to validate data entry, select intelligent default values or show customized images or maps.
- Create mobile-friendly, responsive calculators that automatically adapt to different screen widths, portrait/landscape orientation etc.
- Embed xls files with smart table lookup in an unlimited number of background data tables.
- Use graphical widgets like buttons and sliders to make the calculator easier to use.
- Use advanced data validation including Excel’s Data Validation presets.
- Show live graphs that automatically update when values are changed.
- Upload spreadsheets to any standard web server.
- With Real-time Sync, two or more persons can collaborate on an advanced calculation in real-time.
- Fetch live data from corporate databases when run on Node.js servers.
- Build calculating web apps that can be started directly from the iPhone or Android Home screen – even when the phone is offline.
Our calculators are completely self-contained and do not require any additional plugins. There is nothing to install in your server or website except this plugin, and it is only used when you edit. You don’t need any programming skills and there is no change to configuration or settings.
Build smart web forms with automatic data validation
Publish your electronic forms on the web and have completed web forms sent directly to your inbox. If you get a lot of electronic forms for post-processing, have forms saved in a cloud database as they arrive.
- Website contact forms with quality assurance for all contact data including e-mail addresses, phone numbers and addresses.
- HTML order forms with automatic calculation of totals and weights.
- Web booking forms with built-in input data validation.
- Online purchase order forms with automatic assignment of cost center and accounts.
- Web surveys converted from xlsx files.
The tabular Excel worksheet makes it very easy to design easy-to-use forms. The web page inherits the formatting in Excel and supports the use of graphical themes.
You can use any feature of Excel, including formulas and functions, to validate data entry, select intelligent default values or show customized images or Google maps.
- Create mobile-friendly, responsive forms that automatically adapt to different screen widths, portrait/landscape orientation etc.
- To make it easier to understand a large form, split into two or more sections and let users navigate between the sections using tabs, next/previous buttons or sliding panels.
- Use graphical widgets like menus and calendars to make the form easier to use.
- Hide rows or complete sections of a form until you know they are applicable.
- Allow file attachments with submitted web forms.
- Form fields can be made mandatory. Use hidden fields to discretely include supplemental information in the form.
- With Real-time Sync, two or more persons can collaborate on a form in real-time.
- Fetch live data from corporate databases when run on Node.js servers.
- Build apps for mobile data entry that can submit smart forms directly from iPhone or Android devices – even when the phone is offline.
- Use live, interactive charts that invite users to point-and-click, and the charts automatically update when values are changed.
Our forms processing services are completely self-contained, and the only thing you need to provide is an e-mail address. There is nothing to install in your server or website except this plugin, and it is only used when you edit. You don’t need any programming skills and there is no change to configuration or settings.
Create simple sign-up lists and other shared forms
Want to bring people together for a football game, a beach party or a barbecue? The Real-Time Sync feature allows all the users of a web spreadsheet to share the same content. Just create a spreadsheet with column headings for the information you want from each participant, e.g. Name and Age. Publish the empty list on your blog with the Real-Time Sync feature enabled, and all the readers of your blog will see who has registered for the event.
More information
Learn more about the plugin in the full Online Help for the plugin.
Learn more about the SpreadsheetConverter add-in for Microsoft Excel on the SpreadsheetConverter web site.
Installation instructions
Requirements
To use the plugin, you need the following:
- A web page created with a paid or free-trial license for SpreadsheetConverter. The plugin does not import unconverted spreadsheets. An example file is delivered with the plugin.
- Your paid SpreadsheetConverter license must be for the Professional Edition.
- You must use the same major version of the plugin as your SpreadsheetConverter license is for.
- A WordPress server that allows you to install plugins and use iframes. If you use WordPress.com or other hosted environments that limit this, it’s usually just as easy to use Publish to Cloud instead.
- Your WordPress server must be running version 4.5 or later of WordPress. For security reasons, WordPress should always be updated to the latest stable version.
- The plugin supports PHP 5, PHP 7, and PHP 8.
- The plugin requires that the ZipArchive extension for PHP is installed and enabled.
- You will need the help of a WordPress Administrator or be one yourself to install and maintain the plugin. Unfortunately we are unable to support you with basic WordPress issues.
Test it with the example file!
To upload a spreadsheet to WordPress, you first convert it to web format with an add-in for Excel called SpreadsheetConverter. Excel and the add-in will be your primary tools when publishing spreadsheets on your website.
You should first test the plugin with the example files that come with it. If you like it, you can then install SpreadsheetConverter in Excel and learn how to convert your own spreadsheets for the web.
Install the plugin file directly from the WordPress plugin directory
- Login to the WordPress administration page for your server.
- Click on Plugins in the left-hand menu. If you cannot find this in the menu, contact your WordPress administrator.
- Click on Add New.
- Type import spreadsheets in the search box on the right-hand side, and navigate to the plugin Import Spreadsheets from Microsoft Excel.
- Click on Install Now for this plugin.
- Locate the new plugin in the list of installed plugins and click on Activate Plugin.
- The plugin is now installed and active. You should now see a new menu option Upload SSC Calculator in the left-hand menu.
Manually upload the plugin file to your WordPress server
- Login to the WordPress administration page for your server.
- Click on Plugins in the left-hand menu. If you cannot find this in the menu, contact your WordPress administrator.
- Click on Add New.
- Click on Upload Plugin on the Add Plugin page.
- Click on Choose File on the Add Plugin page.
- In the File Explorer window, select the plugin zip file and click Open.
- Click on Install Now on the Add Plugin page.
- Locate the new plugin in the list of installed plugins and click on Activate Plugin.
- The plugin is now installed and active. You should now see a new menu option Upload SSC Calculator in the left-hand menu. This is where you start when you want to upload a converted calculator to WordPress.
A full online help for the plugin is available on the SpreadsheetConverter website.
Unfortunately, we are unable to support you in normal day-to-day WordPress activities. If you have problems installing the plugin, begin by contacting your local WordPress Administrator or webmaster. If they find any errors in our plugin, they are welcome to report the error in the support forum for the plugin.
Uploading instruction
You upload the result of the conversion in SpreadsheetConverter to WordPress in the form of an SSC Calculator file. The SSC Calculator file contains everything that WordPress needs to run the calculator.
Uploading a new calculator
Follow these instructions only when you upload a new calculator for the first time. If you later want to update an existing calculator that you have already uploaded at least once to WordPress, there are separate instructions below.
Creating the SSC Calculator file
With the plugin, you get two example files, one that you will use for this initial upload and one for the update described below.
Uploading the SSC Calculator file
- In WordPress, locate the Upload SSC Calculator link in your WordPress menu. If you don’t see this link, please verify that you have installed the plugin correctly according to the instructions above.
- Click on Upload SSC Calculator, then Add New if you are about to upload a new calculator that you haven’t uploaded before.
- Enter a unique, descriptive name for this particular calculator in the Enter calculator name field. For the example file, you can use Weekly Time Card.
- Click on Choose Package and select the SSC Calculator file. The example file provided with the plugin is in the examples > 1-upload folder of the plugin ZIP. Locate the weekly-time-card.zip file, select it and press Open.
- Press the Publish button and the SSC Calculator file will be uploaded to WordPress. It will not be visible in any post or page until you embed it (read more below).
Embedding instructions
Before you embed a spreadsheet, you must follow the steps above to upload the SSC Calculator file to WordPress. Now, it’s time to embed the calculator in one or more web pages.
Using the Block editor
To insert a converted spreadsheet in WordPress using the Block editor:
- In WordPress, click on the Upload SSC Calculator link in the menu.
- In the list of calculators, locate the calculator you want to embed.
- In the column Calculator iframe, click on the Click to Copy button for the calculator you want to embed. This copies the complete embed code to the clipboard.
- Open the Block editor for the page or post where you want the uploaded calculator to appear.
- Click on the plus sign to insert a new block. Type “html” in the search box and select to insert a Custom HTML block.
- Move the Custom HTML block to the correct position on the page, either by dragging it or using the up/down arrows.
- Select the HTML view for the Custom HTML block.
- Paste the embed code HTML into the Custom HTML block with Ctrl+V or right mouseclick+Paste.
- Select the Preview view for the block.
- If you cannot see the entire calculator, or if scrollbars appear, or if there’s too much whitespace around the calculator, you may need to adjust the size of the iframe. Select the HTML view for the Custom HTML block, adjust the height and width parameters in the table id=”hasIframe” tag that represents the calculator, switching back and forth to the Preview tab until the calculator looks good. Don’t be afraid of leaving a considerable margin around the calculator.
- Save your changes by clicking Publish.
- If you want to use an uploaded calculator on more than one page, just repeat the above once for every page where you want it to appear.
Using the Classic editor
To insert a converted spreadsheet in WordPress using the Classic editor:
- Open the Classic editor for the page or post where you want the uploaded calculator to appear.
- Place the cursor at the right spot and click Embed SSC Calculator.
- In the list called Calculator Link, scroll to and select the calculator you want to embed.
- If necessary, modify the size of the calculator frame in the web page using the fields Iframe Width and Iframe Height. Click Insert Calculator.
- If you don’t see the calculator, only a set of HTML tags, click on the Visual tab for a preview of the page.
- If you cannot see the entire calculator, or if scrollbars appear, or if there’s too much whitespace around the calculator, you may need to adjust the size of the iframe. On the Visual tab, drag the handle to resize the calculator frame. For better control, switch to the Text tab, adjust the height and width parameters in the table id=”hasIframe” tag that represents the calculator, switching back and forth to the Visual tab until the calculator looks good. Don’t be afraid of leaving a considerable margin around the calculator.
- Save your changes by clicking Publish.
- If you want to use an uploaded calculator on more than one page, just repeat the above once for every page where you want it to appear.
A full online help for the plugin is available on the SpreadsheetConverter website.
Updating an existing calculator
If you want to update an existing calculator that you have already uploaded at least once to WordPress, follow these instructions.
Creating the SSC Calculator file
With the plugin, you get two example files, one that you used above for the initial upload and one that you can use now for the update.
Uploading the SSC Calculator file
- In WordPress, locate the Upload SSC Calculator link in your WordPress menu. If you don’t see this link, please verify that you have installed the plugin correctly.
- Click on Upload SSC Calculator in the WordPress menu, then All Calculators.
- Move the mouse cursor over the title of the calculator you want to update, so that its menu links appear. Click on the Edit link.
- Click Choose Package and select the updated SSC Calculator ZIP file in the examples > 2-update folder of the plugin ZIP.
- Press Update. The new version is uploaded and automatically used instead of the old one, in all pages and posts that you have already embedded it.
Caching may delay updates to your web pages
If an update to a calculator does not immediately appear on the web or in the preview in the plugin, it may be a result of caching, which is beyond our control. Caching typically introduces a delay of 1-48 hours in the publishing of new or updated web content. When you test static web content like uploaded calculators, you can try adding a fake “version” parameter to the link to the calculator:
https://example.com/calculator.html?version=1
When you update the calculator, just remember to change also the version number in the links to it, which should force the cache to fetch the updated content. Note: you only need the version parameter during testing, to verify that the update went through correctly. In your production environment, the updated version will be loaded slightly later as the cached copies of the previous version expire.
A full online help for the plugin is available on the SpreadsheetConverter website.
Deletion instructions
Using the Block editor
To remove a calculator that you previously embedded in page or post:
- Select the Custom HTML block that contains the embed code for the calculator.
- Open the block menu for the block and select Remove Block.
- Save your changes by clicking Publish.
Using the Classic editor
To remove a calculator that you previously embedded in page or post:
- Switch to the Text mode.
- Remove the entire “hasIframe” table, from the table id=”hasIframe” statement to the /table statement.
- Switch to the Visual mode to verify the result.
- Save your changes by clicking Publish.
A full online help for the plugin is available on the SpreadsheetConverter website.
I want to test this with my own spreadsheets!
To test the plugin with your own spreadsheets, you need to download the SpreadsheetConverter add-in for Excel and install it in your system. After the free trial, you will be required to purchase SpreadsheetConverter at prices starting from $254, including the WordPress plugin.
- Verify that you are using a PC with a supported version of Windows and Excel, as listed in the requirements on the download page. Our examples convert without issues also in Windows on ARM devices.
- Download the Excel add-in.
- Install the Excel add-in by running the installation file in a Windows PC.
- In Excel, open the “Weekly Time Card” example spreadsheet. If you open Excel from the installation wizard, this file opens automatically. Otherwise, use the Try Examples section of the SpreadsheetConverter ribbon in Excel to open the “Weekly Time Card” example.
- Click on the Start tab in the example spreadsheet. This starts a small wizard that will show you how to edit a spreadsheet and convert it to a web page. Follow the simple, step-by-step instructions in the example spreadsheet until you have successfully created a web version of it. If you run into any problems in this process, please contact our helpdesk.
- Congratulations! You have now created a live web calculator! Play with it a while in the browser window to get a feel for how it works and what it does.
- In Excel, select the SpreadsheetConverter ribbon and click on the link in the ribbon to request a 30-day free trial license key.
- When you get the license key from us, select the SpreadsheetConverter ribbon in Excel and activate the license key.
- In Excel, select the SpreadsheetConverter ribbon and verify that there is a WordPress plugin button in the Publish section. If not, please contact our helpdesk.
Now, you’re ready to upload the converted web page to WordPress according to the instructions above.
To import any CSV, XML, or Excel file into WordPress, simply map the incoming data elements to their corresponding WordPress fields by using our convenient drag & drop tool. You can filter and even modify the incoming data during the import process.
![]()
This documentation covers how to import into WordPress using WP All Import. For a broader look at importing into WordPress, check out:
Import into WordPress
![]()
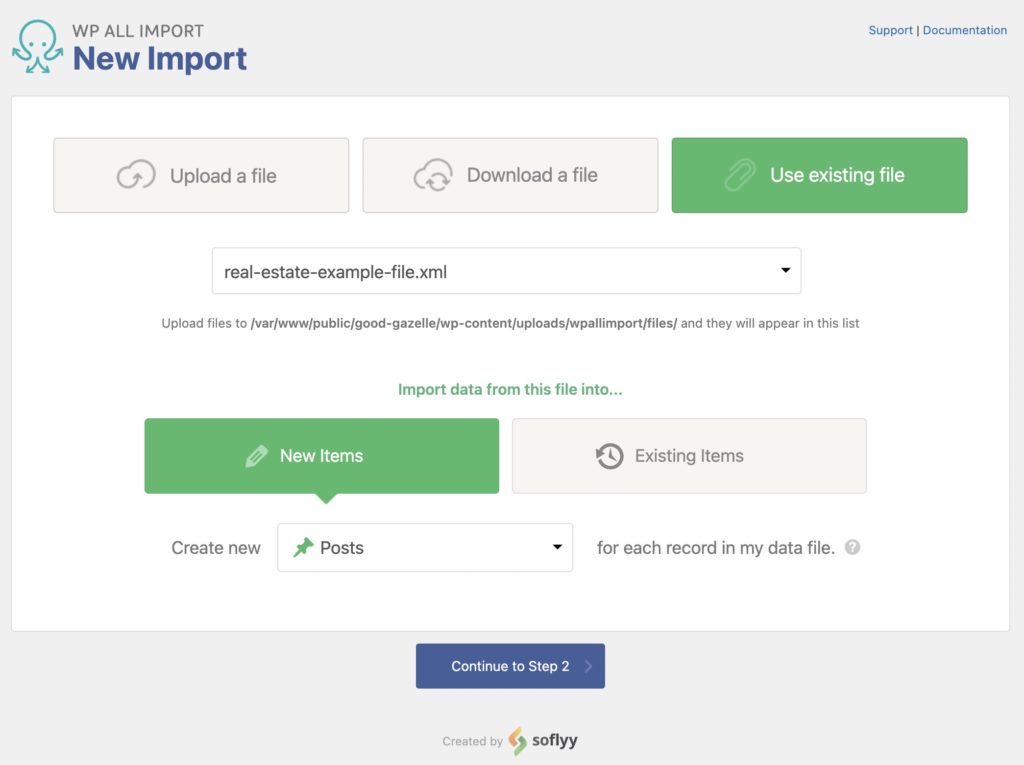
Step 1: Upload Your WordPress Import File
The first step to creating a WordPress import is to upload your import file via All Import › New Import. You can choose to upload the file from your computer, paste in a URL to the file, or choose an existing file that you’ve already used with WP All Import.
Next, choose either New Items or Existing Items. If you are importing data from your file into posts that are already on your site, select Existing Items. Otherwise, select New Items.
Finally, you need to decide what you want to import. You can import Posts, Pages, Taxonomies, Users, or custom post types added by other themes and plugins like WooCommerce Products.
Step 2: Review Your Import Data
WP All Import will process your file and prepare it for import. If you uploaded a CSV, check that the correct delimiter was used. When you upload an XML file, check that the correct node is selected.
If you only want to import some of the records in your import file, you can Add Filtering Options.
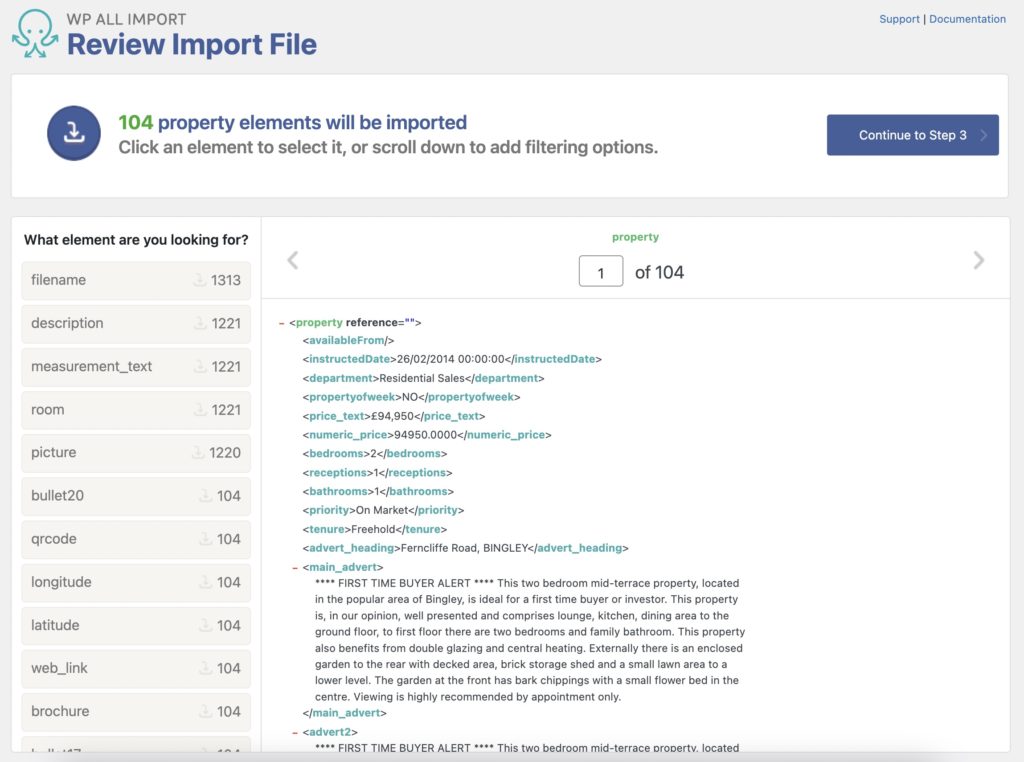
Click Continue to Step 3 to carry on with your WordPress import.
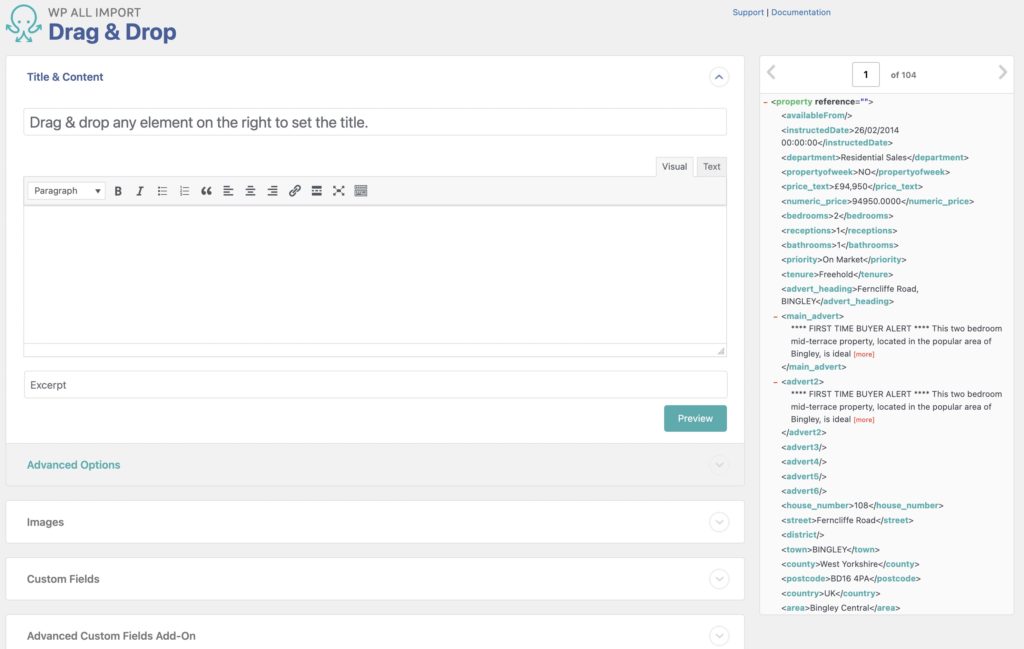
Step 3: Configure Your WordPress Import
Every column or element from your import file will be displayed on the right. On the left, you have your import. WP All Import will create posts using the import template you create here. Simply drag your WordPress import data from right to left. You can fill in as many or as few of the fields as you like depending on your needs.
Step 4: Choose Which Data to Update
Here you can tell WP All Import how to handle each specific piece of data. For example, you can have it only add new images to posts, or just update the stock and price for your products.
You can also configure this import to run on a schedule and other advanced options.
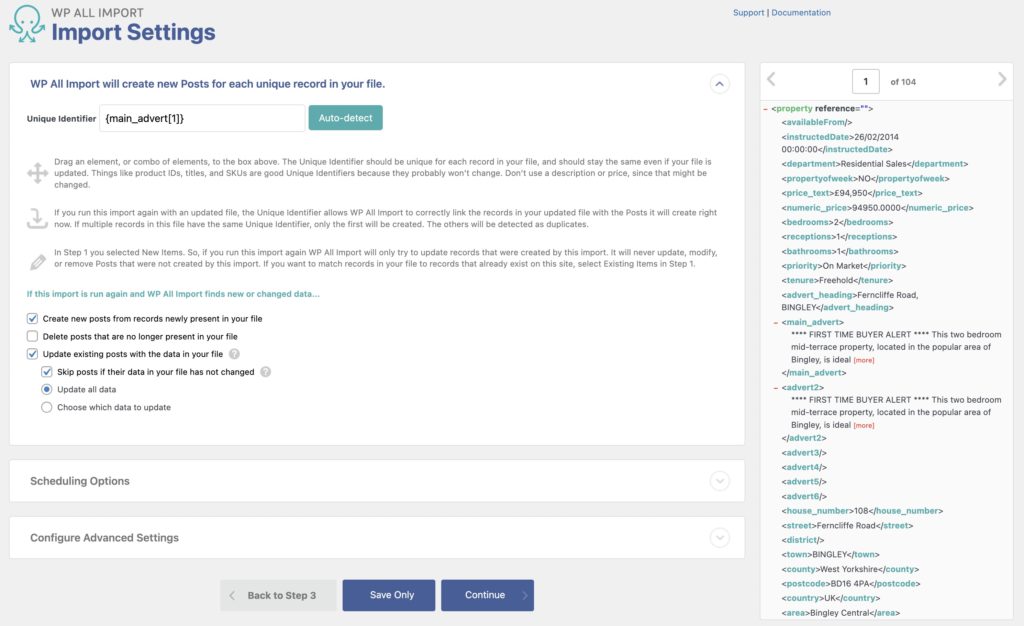
Click Continue at the end to run your WordPress import.
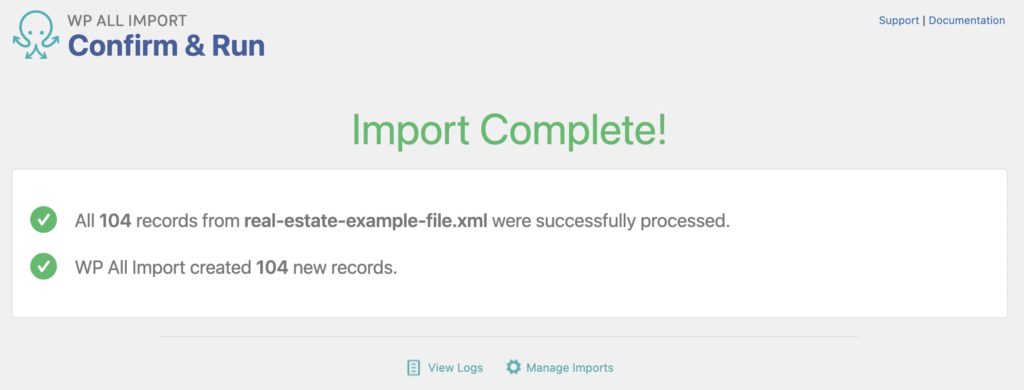
Step 5: Confirm & Run Your WordPress Import
Now it’s time to run your import. You will see an Import Summary section where you can review all import settings and a description of what will happen. To run the import, click on Confirm & Run Import.
Once the import is complete, you’ll see an Import Complete! message.
WordPress Import – Advanced Topics
Add Filtering Options to Control WordPress Import
You can import WordPress data granularly using WP All Import with its visual built-in filtering options. This is done in Step 2 when reviewing the WordPress data to import. Here’s what to do:
- Click on Add Filtering Options
- Select the Element to filter from
- Select what Rule to use
- Assign a Value to match using the selected rule
- Click on Add Rule
- Click on Apply Filters To XPath
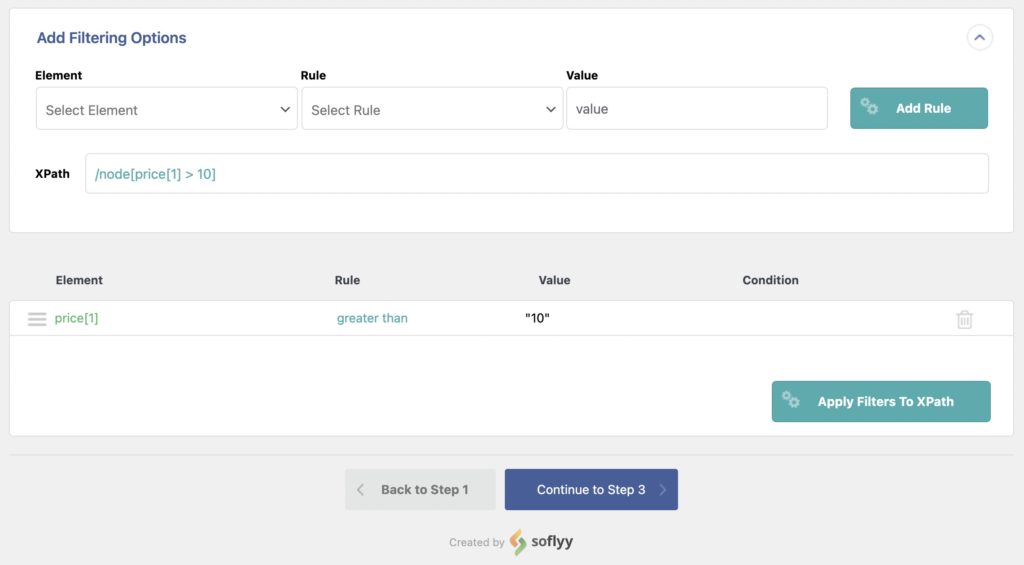
You can learn more about filtering here: Filtering with XPath.
Modify Filtering Options on Existing WordPress Import
Modifying the filter for an already existing import is not possible out of the box but it can be achieved using this workaround:
- Start the process of creating a new import (with the same import file used by the import you want to modify filters for).
- In Step 2, set up the desired filtering rules inside of the Add Filtering Options panel, as explained above in the Add Filtering Options to Control WordPress Import section.
- Once you have set the filters correctly, copy the code in the XPath field (put the code in a safe place such as a note).
- Exit the import process & navigate to the Manage Imports page. Click on the Settings link for your import there.
- Once there, expand the Configure Advanced Settings section & note down what’s currently in the XPath field there (as a backup in case it doesn’t work with the new XPath code).
- Finally, insert the new XPath filtering code and save your import settings.
Saving or Using a Saved Import Template
WP All Import provides full control over the WordPress import process. This means that there’s also a way to save the existing import template and settings to apply to a different/new/future import process. To save an import template, do the following:
- While in Step 3 (as shown in this guide above), scroll all the way down and click to enable the Save settings as a template option.
- Input a name as the Template name.
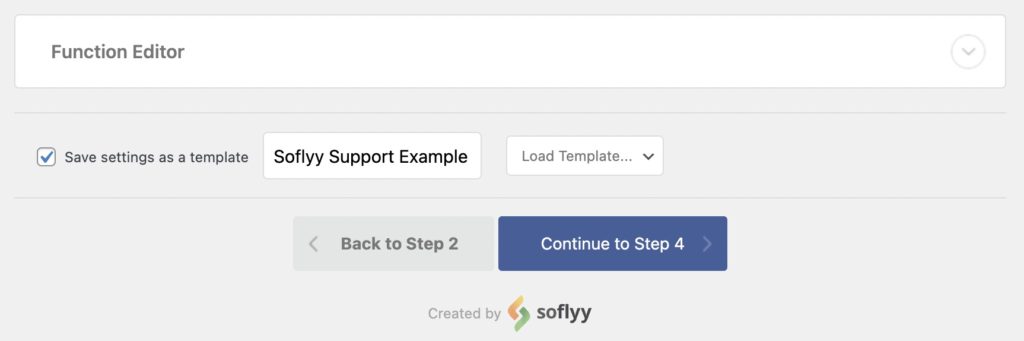
That’s it! The template will be saved once you continue to the next step or save/update the template.
To load a saved template, do the following:
- When in Step 3, scroll all the way down and locate the template section.
- Select the desired import template from the Load Template drop-down list.
- Once selected, the page will reload and apply all import mappings and settings.
You can manage saved import templates via All Import › Settings › Import/Export Templates.
Scheduling an Import to Run Automatically
You can schedule your WordPress import using WP All Import and its built-in options. Here’s what you can do:
- Use manual cron jobs: these can be configured via your web server and allow total manual control to run the import in a schedule. See Manual Scheduling.
- Use Automatic Scheduling Service: this is an optional and paid service that comes built-in with WP All Import. It allows you to configure automatic imports directly from within its interface. See Automatic Scheduling.
WordPress Import — Frequently Asked Questions
How Do I Import My Website into WordPress?
To import your website into WordPress, you need valid import files for all of the posts or custom post types to be imported. If you don’t have them yet, you can generate those files using WP All Export. Then just import your data into WordPress by following the step-by-step process described in this tutorial.
How Does WordPress Import Work?
The default WordPress import tool works by using a brute-force approach. You basically import all or nothing. WP All Import is much more nuanced and lets you filter, modify, and map incoming data elements to more precisely populate WordPress target tables and fields.
Does My Data Have to be Specially Organized for WordPress Imports?
Not when you use our plugin. Our Drag & Drop interface allows you to map incoming data elements to any WordPress or WooCommerce target fields. You can even modify the incoming data as part of the import process.
How Do I Import a CSV File into WordPress?
To import a CSV file into WordPress, just specify the CSV file as your import source. Our plugin will automatically recognize the file type and adjust its interface accordingly. You don’t need to do anything special to handle the CSV format.
Does WordPress Support XML?
WordPress does support XML as an import and export format, yes. The problem is that the built-in import/export tools do not offer you much flexibility. For unlimited flexibility, you need to use a plugin like WP All Import.
How Do I Import XML Data into WordPress?
To import an XML file into WordPress, just specify the XML file as your import source. Our plugin will automatically recognize the file type and adjust its interface accordingly. You don’t need to do anything special to handle an XML file.
How Do I Import a Large XML File into WordPress?
To import a large XML file into WordPress, you can use our advanced settings to split the import into 1,000 records chunks, modify the batch processing size, and take a number of other steps to either speed up the import process or reduce its impact on the server.
How Do I Import Data into a WordPress Custom Plugin?
Fortunately, our plugin automatically recognizes many WordPress custom plugins and themes, so you don’t have to do anything special to import data into them. Just select the custom post type, and away you go. If a custom plugin stores its data in an unconventional manner, just contact our support staff for further guidance.
Can I Import WooCommerce Customers, Products, and Orders?
Yes. WP All Import is fully integrated with WooCommerce and offers complete support to import WooCommerce customers, orders, and all aspects of products, including categories, variations, images, prices, and stock levels. If it’s in WooCommerce, we’ve got you covered.
Can I Use WP All Import On All of My WordPress Sites?
Yes. WP All Import and WP All Export come with unlimited licenses, which means that you can make unlimited installations on any number of your own websites. You can read and review the full license agreement here: www.wpallimport.com/license.
How Do I Export a WordPress Site?
- Go to All Export › New Export and select what post type or custom post type to export.
- Drag and drop to create the export file, then configure the export as required.
- Run the export and download the exported file.
- Review the export file’s contents.
For further instructions, please see How to Export WordPress to CSV, Excel, and XML.
Related Docs
Learn to export your WordPress data to a CSV, Excel, or XML file with WP All Export.
Learn how to migrate data to a different site using WP All Import and WP All Export.
Learn to bulk edit your WordPress data with WP All Import and WP All Export.
Related Videos
With one billion users, Microsoft Excel is the most widely used spreadsheet software available. It has proven to be the best option, whether it is for creating small tables, processing large datasets, or enabling live data functions. The Excel file formats .xls and .xlsx have become universal standards for saving and exchanging data.
It may come as a surprise then that it is not a straightforward process to embed an Excel spreadsheet into a website.
Yet, there is one WordPress Excel spreadsheet plugin that can make it easier for you to add spreadsheets to a WordPress post or page.
Importing Excel Data into WordPress
Using an Excel plugin or add-on is one of the easiest ways to work with. Some allow the user to import an Excel calculator, a live chart, or a smart form into a WordPress website or blog.
It allows the user to share data, compare prices, or perform other related actions. Visitors will receive the information in a straightforward and understandable format.
Many of these plugins make life easier. But wpDataTables makes the whole process smoother and less complicated.
wpDataTables is not only designed to import native .xls and .xlsx files but is also compatible with other spreadsheet sources. It allows the use of CSV, XML, Google Sheets, and JSON documents.
After creating a table in Excel and importing it into WordPress, the following changes can be made:
- Column’s name;
- Column’s order;
- Deleting a column.
Please note, however, that formulas and merged cells are not supported when used in Excel-based tables.
Generally, XLS and XLSX files are processed a little slower than CSV files and Google Sheets. Especially for larger files, using a different file format is best. MySQL tables are highly recommended for these cases.
It requires attention because some of the formatting elements in the parent file will not be reflected after importing. Fonts, color, size, fill color, and others will not be copied, but most of these can be personalized later in wpDataTables.
The tables that are linked to the original Excel are not saved along in the database. These linked spreadsheets are therefore not editable in wpDataTables.
Creating Tables
The input file should have an XLS or XLSX format. Microsoft Excel can be used to prepare it. Alternative Office suites are OpenOffice and LibreOffice among others. The most important thing is to use the correct extension.
1. Create a wpDataTable and upload the Excel file
Now, create a wpDataTable in the WordPress admin environment
- Go to WordPress admin;
- Open wpDataTable;
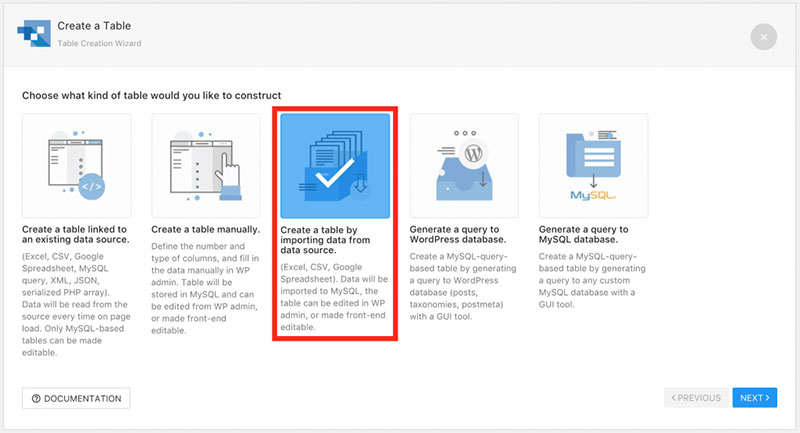
- Click Create a table;
- Select Create a table linked to an existing data source;
- Name the wpDataTable in the Table title field. This title will help in identifying the table;
- Select the Excel file as Table Type;
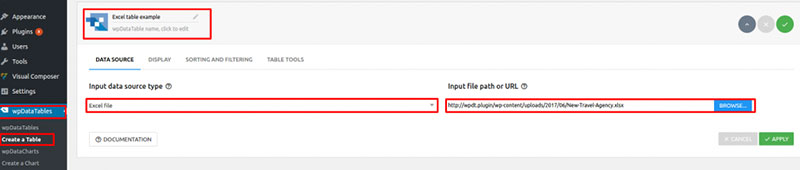
- Click Upload file;
- Open the WordPress media library;
- Upload the .xls or .xlsx files previously prepared;
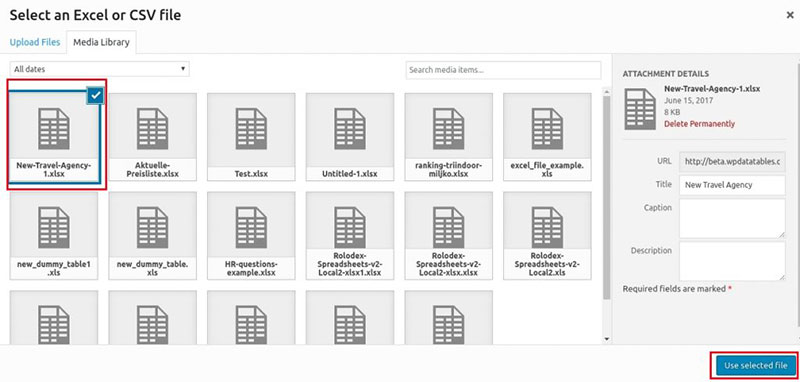
- Then click Use in wpDataTable;
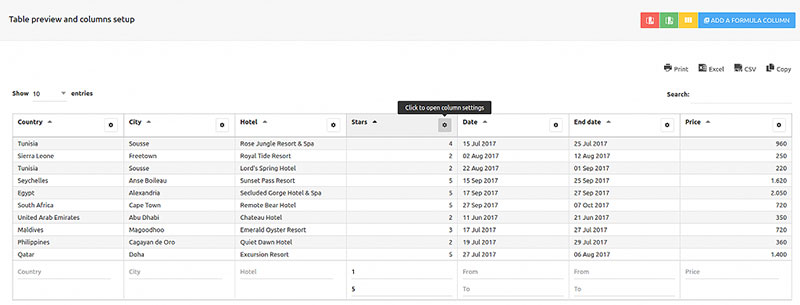
- Upon clicking Save wpDataTable will recognize the column structure and save the file.
2. Additional table and column settings
The definition of the additional table and column settings is optional. These settings include table responsiveness, layout, and table tools. Additional settings for individual columns are data type, filter, display name, among others.
This link gives more information regarding the details of the different table features. For documentation describing the different column features, please follow this link.
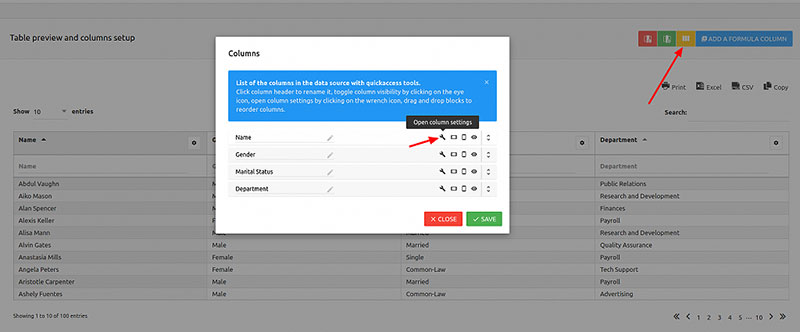
In the example provided, the filter type for the “Star” column was set as the Number range. This was done by using the Column setting option, which can is accessible in two different ways:
- Clicking the Column settings button;
- Clicking the yellow button at the top of the table.
The resulting settings window allows the user to rename, reorder, and toggle visibility of the columns.
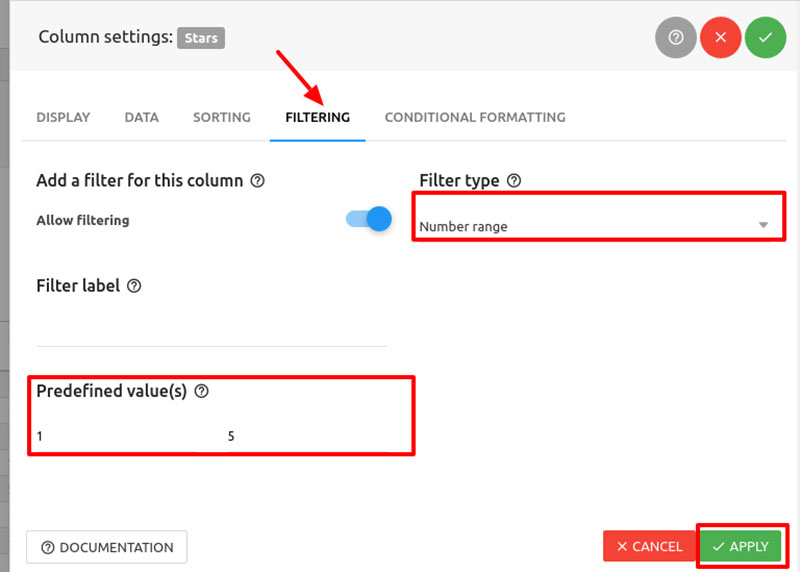
Within the window, click the Filtering tab and select Number range for the “Star” column. Default values can be set for the predefined filter values upon page load.
In this example, it can be set between one and five. After setting the values in this window click Apply to save the changes.
3. Insert the wpDataTable in a page
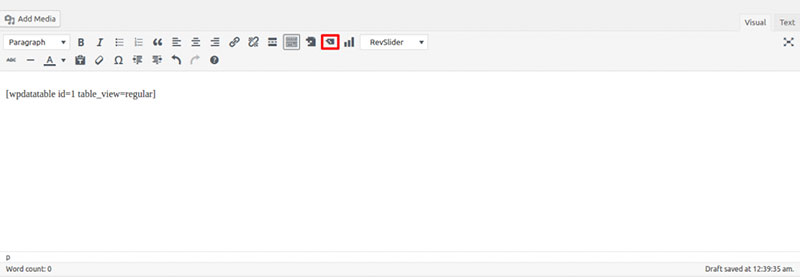
After creating the wpDataTable and customization, the spreadsheet can be inserted into a post or website:
- Create a new page, or open an existing one;
- Place the cursor in the post or page;
- Click the Insert a wpDataTable;
- Select the desired table. Alternatively, the wpDataTable shortcode can be copied and pasted;
- Save the post or page.
When opening the page front-end, the Excel table generated with wpDataTable will appear in WordPress.
Other Data Import WordPress Plugins
Import Spreadsheets from Microsoft Excel
Import Spreadsheets from Microsoft Excel is a WordPress plugin. With it, a user can import live calculating tables from Microsoft Excel to a WordPress page.
This WordPress Excel spreadsheet plugin is not just an Excel viewer. It works like a compiler that can create an embedded interactive Excel spreadsheet in your HTML website. It synchronizes all formulas, so the table is constantly updated.
Excel tables
Importing Excel spreadsheets into a WordPress page becomes easy with the Excel tables plugin.
It is a matter of uploading the Excel file into the media library. The plugin converts the spreadsheet into a data table. The data table that is generated can then be inserted into a post or page by copying and pasting the shortcode.
WP All Import
WP All Import is a WordPress import/export plugin that can handle different data types. It has a clear advantage because of its intuitive data arrangement process. Organizing is easy because of the drag-and-drop feature.
WP All Import can do more than importing tables. It can transfer information from a legacy CMS to WordPress. It can also be used to build a store with an associated data feed that can provide live stock quotes, sports scores, or property info for a real estate portal.
TablePress

The last WordPress Excel spreadsheet plugin in this list is TablePress. It can embed Excel tables into posts, pages, text widgets. A copy and paste of the shortcode will do the trick.
TablePress has a familiar interface in the style of a spreadsheet. Working with it is uncomplicated and coding skill is not necessary.
This Excel plugin can import and export to and from CSV, HTML, JSON, and XLS/XLSX.
Ending thoughts on using a WordPress Excel spreadsheet plugin
This article described how easy it is to import an Excel spreadsheet into a WordPress page.
With the wpDataTables plugin, you no longer need to recreate a data chart or table from scratch to publish it online. You can import it easily and publish it on your WordPress website.

If you enjoyed reading this article on how to import data with a WordPress Excel spreadsheet plugin, you should check out this one about charts vs tables.
We also wrote about a few related subjects like table background color, Bootstrap tables, How to center a table with CSS, HTML tables, responsive tables with CSS, CSS tables and jQuery table plugins.
Do you need to send your data back and forth between WordPress and MS Excel – where you capture & present data using WordPress, but need to process & analyze it using Excel? In that case, the WP Table Manager plugin can help you sync and import Excel files as tables in WordPress.
Here we have a detailed guide showcasing how you can seamlessly import and export your table data to and from Excel documents. Not just that, but the WP Table Manager plugin can also help you sync your WordPress tables with Office 365 Excel for a more dynamic workflow.
So without further ado, let’s get started:
Table of Content:
- What is WP Table Manager?
- WP Table Manager: Features for Importing and Synchronizing Excel Data
- WP Table Manager: Pricing
- Import Excel Files as Tables Using WP Table Manager: A Detailed Walkthrough
- Step 1: Install and Set-Up WP Table Manager
- Step 2: Create a New Table
- Step 3: Sync WordPress Table with Excel Data
- How to import data from an Excel file on your PC?
- How to Sync a Table with a remote Excel file?
- How to Sync Tables with Office 365 Excel?
- Wrapping Up
What is WP Table Manager?
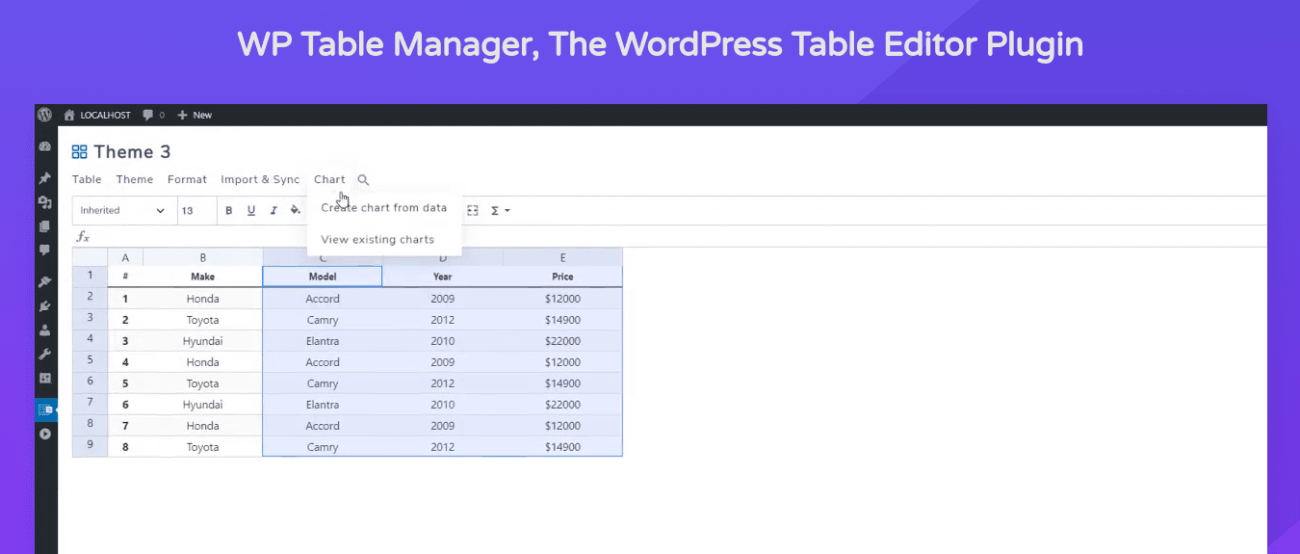
WP Table Manager is a premium and powerful WordPress plugin that gives you a full spreadsheet interface for managing the tables on your website.
The plugin is optimized for creating large tables (although you can also use it to create smaller tables as well) with support for custom filtering and data sorting. You also have the option to insert images, shortcodes, and custom HTML code right into the table cells – it’s that powerful!
And despite having access to some awesome features, it’s super intuitive and easy to use. Editing the tables is as easy as it gets. Just click on one of the cells and start editing the data. You have support for both data editing with or without a visual text editor – whatever makes you comfortable.
However, one of its most impressive features and the one we will be focusing on here is its ability to synchronize and import/export data from Excel files stored on your local system as well as from Office 365.
Here is a look at some of the main WP Table Manager features in regards to importing Excel data.
WP Table Manager: Features for Importing and Synchronizing Excel Data
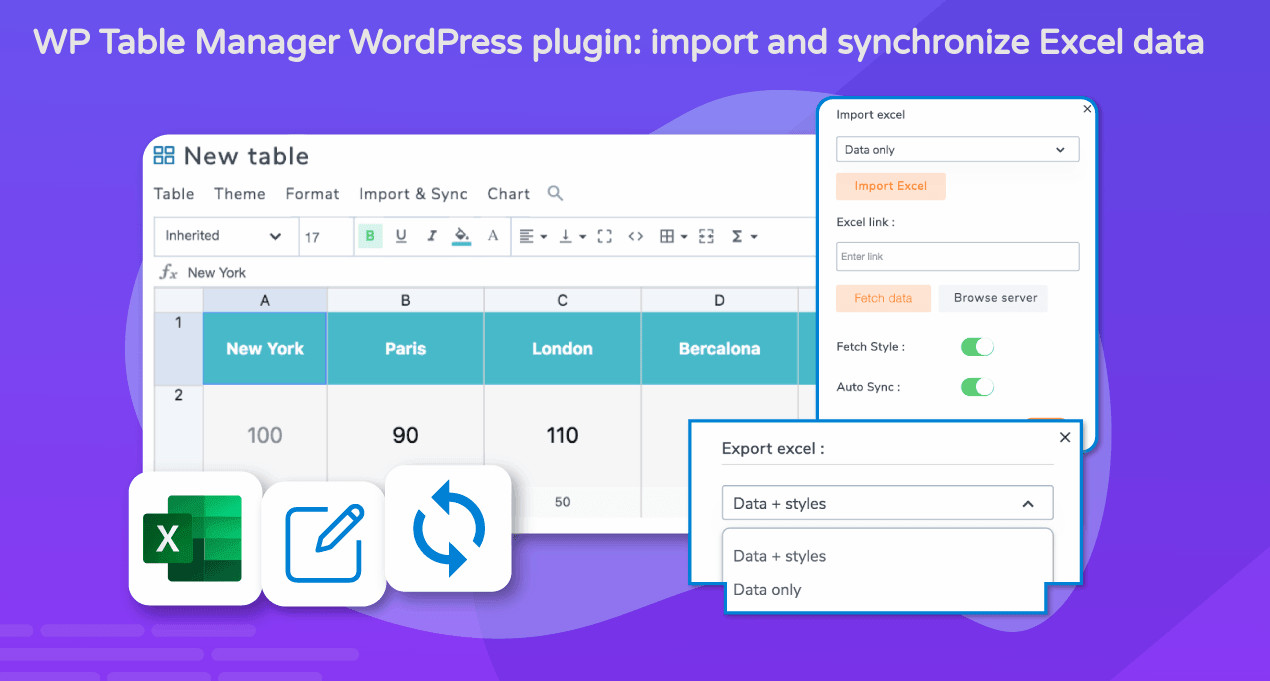
- Option to import Excel data only or import the Excel file with its Style. The second option will transform the Excel file into an editable HTML table.
- Use the data from an Excel file as a source for a WordPress table by uploading it to either the WordPress Media Library or via an FTP client.
- Support for auto-sync between your Excel file and WordPress table. You can set the sync delay anywhere between 1 min to 1 day. There is even the option to delay syncing on publicly accessible tables if someone is viewing it and/or to save server resources in case it’s a large Excel file.
- The uploaded/synced data on your WordPress websites are simple HTML tables. You can easily edit them.
- Just like importing Excel files, the plugin will also let you export your WordPress tables in .xlsx file format.
All of this is just a fraction of the many features offered by the plugin.
Check out the official WP Table Manager features page to learn more about the various bells and whistles that come with the plugin.
WP Table Manager: Pricing
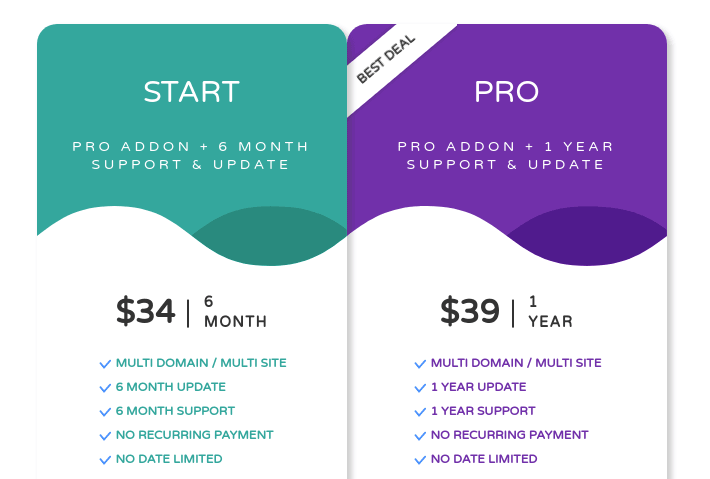
WP Table Manager is a premium WordPress plugin developed by JoomUnited. There are no free versions or free trials for the plugin, but it’s available for an extremely reasonable price.
The Pro plan gives you a license to use WP Table Manager on unlimited websites with support for 1 year of updates and technical support, all at $39.
There’s also a more affordable Start plan at $34, but it reduces access to technical support and plugin updates to just 6 months and it’s not a good deal in our opinion.
But want to know what’s a good great deal? Well, it’s the JoomUnited WordPress Bundle that costs $179 and gives you access to all 8 JoomUnited WordPress plugins including WP Table Manager.
Import Excel Files as Tables Using WP Table Manager: A Detailed Walkthrough
Now that you know how the WP Tables Manager plugin can help you import and sync Excel files, it’s time to see things in action.
Here is a thorough step-by-step guide to walk you through the entire process – starting with the plugin installation & set-up, and ending with you seeing your Excel data on your WordPress website.
Step 1: Install and Set-Up WP Table Manager
After buying the WP Table Manager plugin, you will need to log in to your JoomUnited account, and from there go to the Extension Download area. Here you will find all the JoomUnited plugins you own – including WP Table Manager.
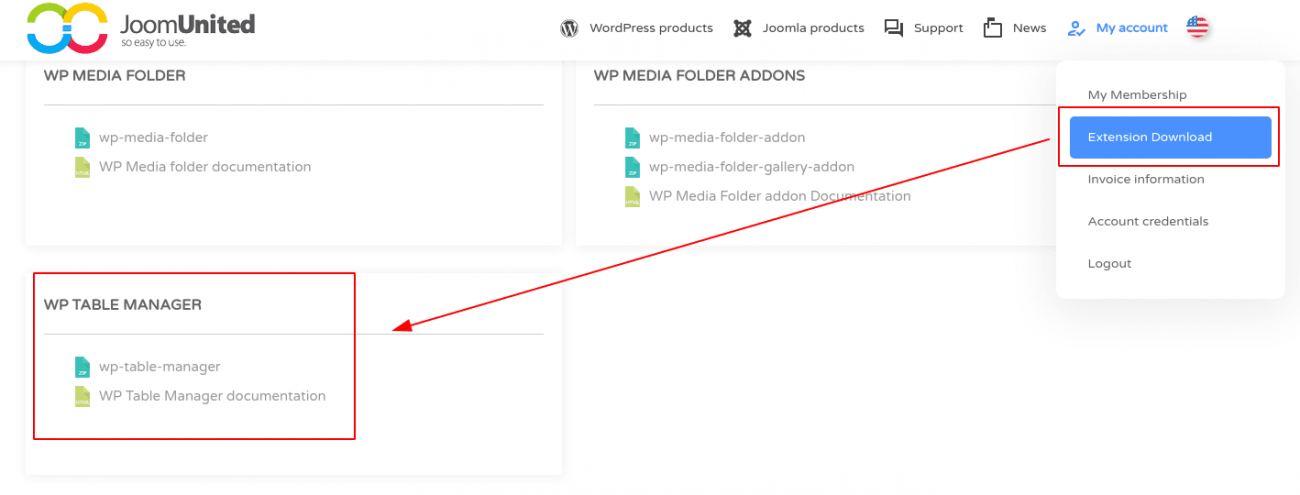
Click on the plugin to download the .zip file on your computer.
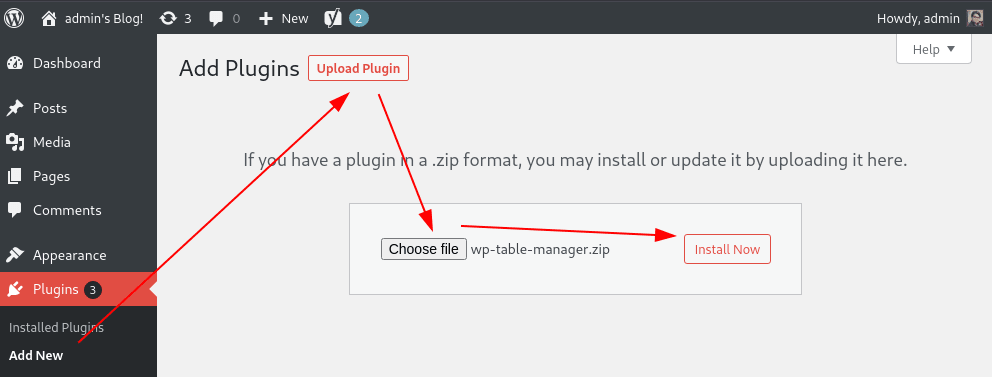
Now, log in to your WordPress dashboard and from the left-hand sidebar go to Plugins > Add New and click on the Upload Plugin button. This is going to bring up an area asking you to choose the plugin file from your local machine. Click on it, and a browser window will appear.
Locate the “wp-table-manager.zip” file you just downloaded and open it. Now click on Install Now as shown in the image.
Wait for a couple of seconds till the installation process is finished. Then click on Activate Plugin.
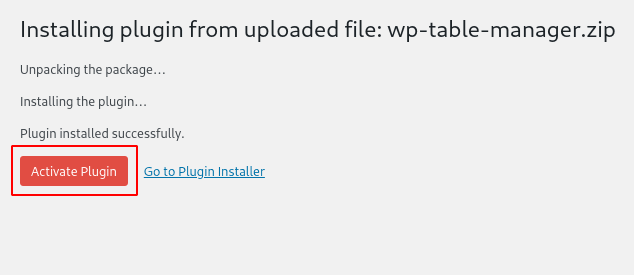
And that’s it, you have successfully installed and activated WP Table Manager plugin on your WordPress website.
You should now see a new Tables Manager option available in your WordPress Sidebar. From here you will be able to create new tables and configure the plugin settings. Let’s do that right now!
Head on over to Tables Manager > Configuration > Main Settings and then click on the Main Settings tab. Under it you will find the option “Enable import/export Excel.”
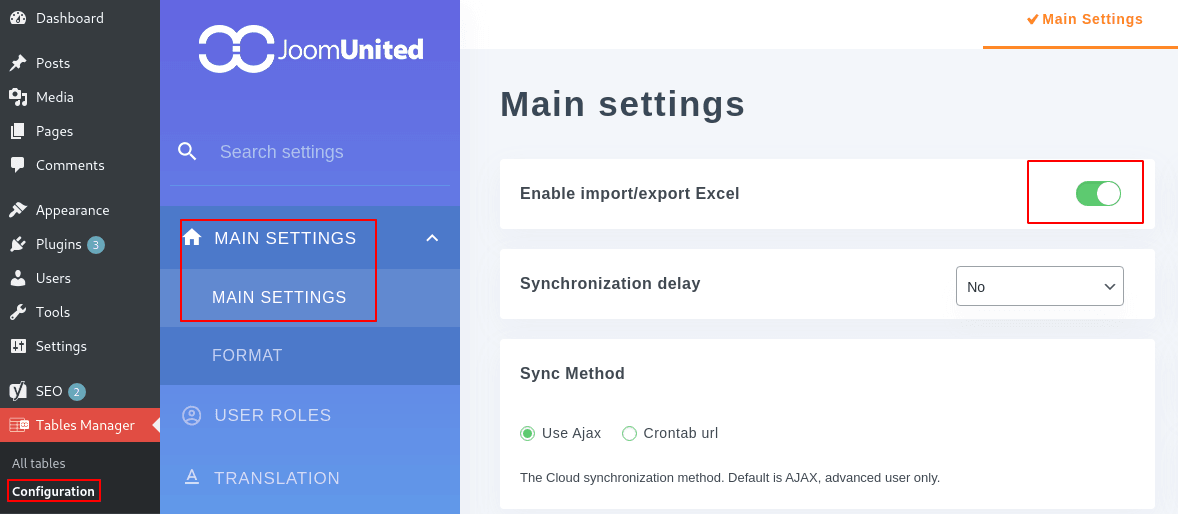
Just turn it on and you’re all set to start syncing Excel files with your WordPress tables.
Step 2: Create a New Table
Before we can start syncing Excel files with the WordPress tables, we first need to create a few WordPress tables. Now, WP Tables Manager already gives you a blank table by default. However, we will be creating a new table just to showcase the process.
First, navigate to Tables Manager > All tables from the WordPress sidebar and click on the + Create New button on the top-left corner of the screen. This is going to bring up three options – Category, Table, and Database Table as shown in the image.
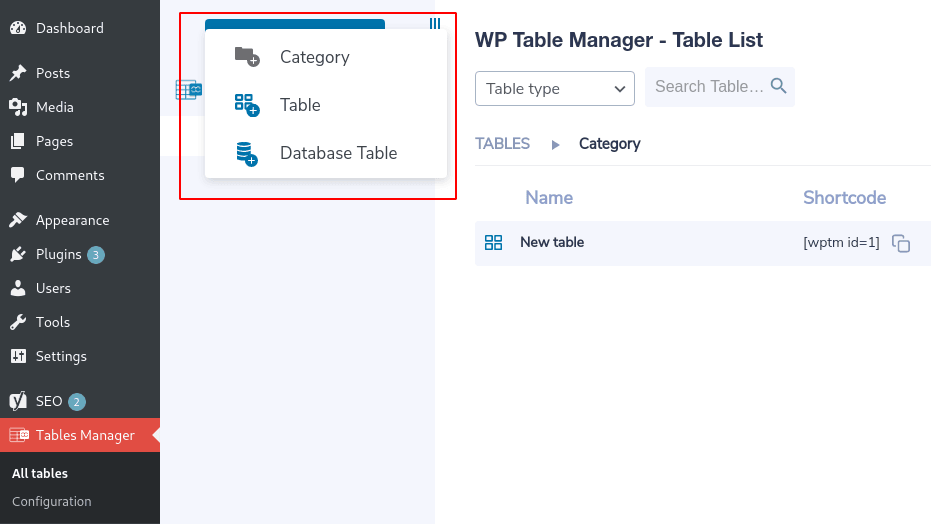
Click on the ‘Table’ option.
This is going to create a spreadsheet like table as you can see here.
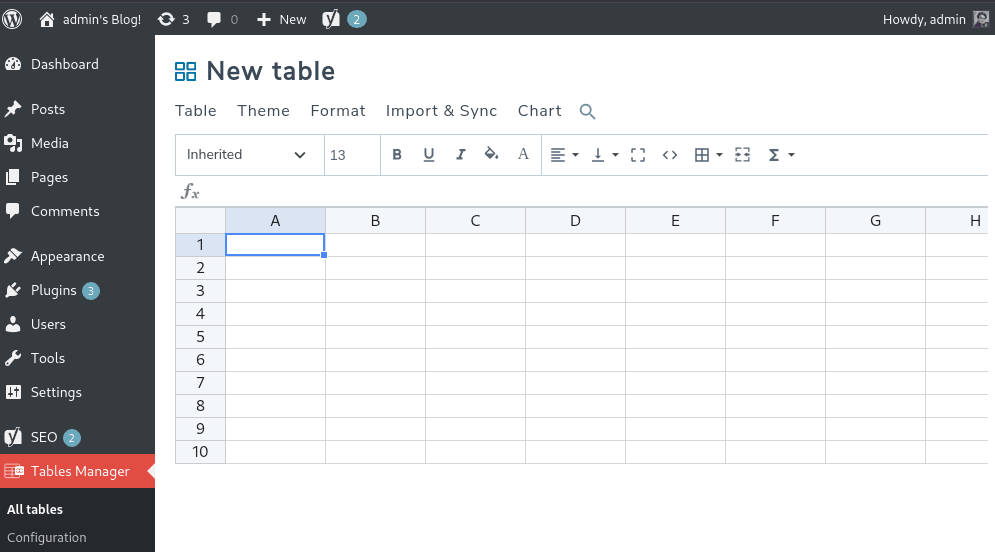
As you can see, you are presented with a lot of options like search functionality, formatting settings, fx function support, theming options, and much more. To name this table, double click on the title and enter a name.
Step 3: Sync WordPress Table with Excel Data
After creating a new table, click on the “Import & Sync” button on the top toolbar. This is going to present you with the following options:
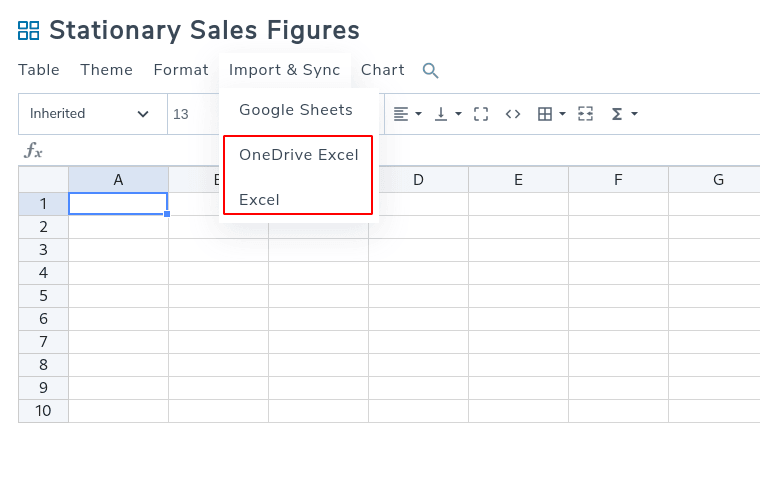
- Google Sheets
- OneDrive Excel
- Excel
In this tutorial, we will only focus on the “OneDrive Excel” and the “Excel” options.
Excel: Allows you to synchronize and/or import data from an offline excel file.
OneDrive Excel: Allows you to synchronize excel files stored in your OneDrive / Office 365.
Let’s go over them one by one.
How to import data from an Excel file on your PC?
Open the table where you wish to import the excel data, click on Import & Sync as shown in the last image, and select the last option – “Excel.” This is going to bring up the following pop-up window with the Import Excel option:
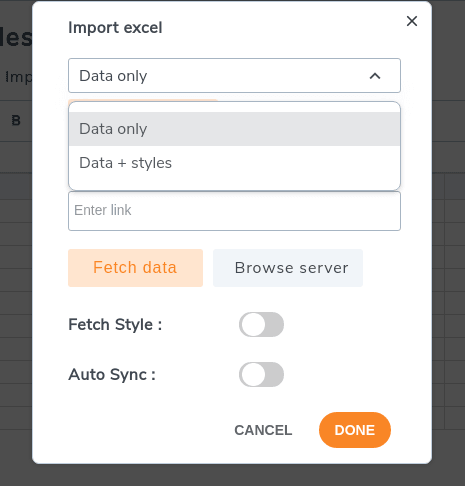
As you can see, there are two options in the drop-down menu: “Data only” – which is going to import only the table data, and “Data + styles” – which is going to import both the table data and the Excel styling by converting it to an HTML table.
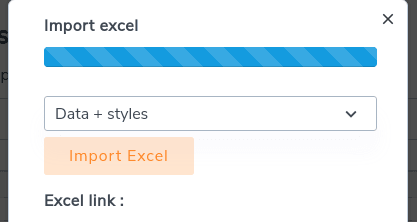
For this tutorial, we will be selecting the “Data + styles” option and then click on the Import Excel button. This is going to bring up a browser window from where you will need to select the Excel file and click “open.”
This will start the importing process.
Note: You may need to wait from a couple of seconds to even minutes depending on how large the Excel file is.
And that’s it. You have successfully imported the data and styling of a local Excel file on your PC to a table on your WordPress website.

How to Sync a Table with a remote Excel file?
The WP Table Manager plugin also makes it possible to sync a WordPress table with an Excel file located anywhere on your WordPress server. To do this, instead of clicking on “Import Excel” we need to use the “Fetch Data” or the “Browse server” option.
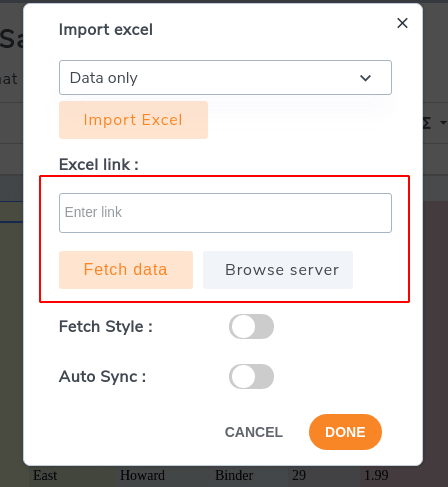
You can either enter the exact URL for the Excel file located on your server in the Excel Link field and then click on Fetch Data. This will import the data from the Excel file to the WordPress table you are working on.
Alternatively, you can click the Browse Server button. This is going to open a browser window letting you browse the content on your WordPress server:
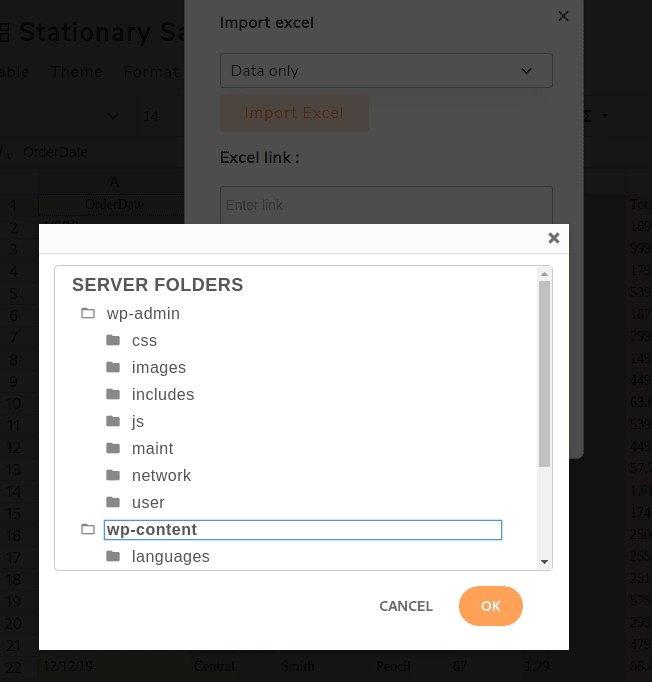
From here, just find the Excel file you want to import and click on OK.
This option is useful if you want to manage your tables through Excel and yet seamlessly transfer the data to your WordPress tables.
You can also have “Auto Sync” enabled which will periodically sync the Excel file with your WordPress tables without you having to lift a finger.
How to Sync Tables with Office 365 Excel?
If you want to sync an Office 365 Excel file with your current WordPress table, then click on the Import & Sync button just like before, but this time select the OneDrive Excel option.
This is going to bring up the following popup window:
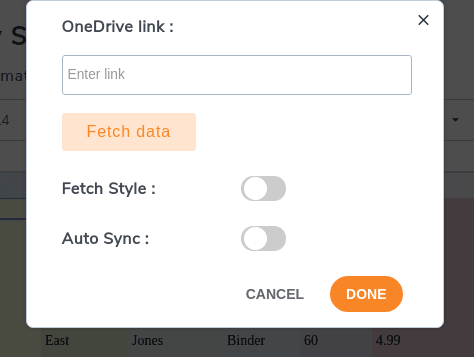
Now in the “OneDrive Link” field, you will need to paste the “embed link” for the Office 365 Excel file you want to import. Where can you find this link?
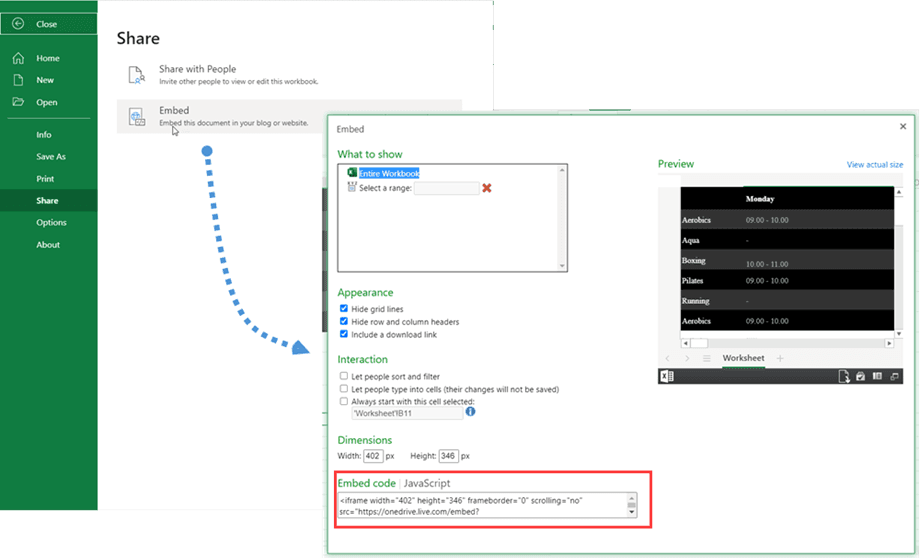
Well, if you have a OneDrive Personal account, then open the Excel file you want to import and go to File> Share > Embed. You will find the Embed link at the bottom of the pop-up window as shown in the image below:
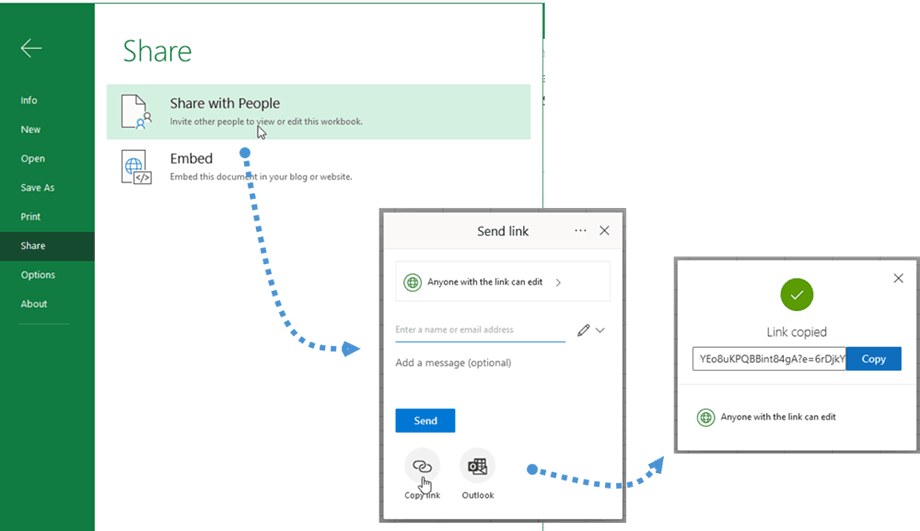
Alternatively, if you have a OneDrive Business account, then open the Excel file and go to File > Share > Share with People. Now click on Copy Link on the new Send Link pop-up window, and you will get the embed link for the Excel file.
Now that you have the embed link for the Office 365 Excel file, head back to your WordPress website and paste it inside the OneDrive Link field, click Done, and that’s it.
You have successfully synced your WordPress table with a Office 365 Excel file.
Wrapping Up
So this was our quick step-by-step guide on how to Import Excel Files as Tables in WordPress. We hope you found this useful and that it helped improve your workflow.
If you have any further questions about how the plugin works, or faced any issues while following this guide then feel free to write to us in the comments below. We will be happy to help you out.
При работе с WordPress часто возникает необходимость обработки табличных данных. Сегодня мы рассмотрим пример, как импортировать данные из excel на сайт на WordPress. В качестве инструмента будем использовать простую библиотеку SimpleXLSX, а о том, как с ней работать мы разбирали ранее.
Библиотека должна быть подключена следующим образом:
require_once get_template_directory() . '/includes/plugin-additions/simplexlsx.class.php';Для примера рассмотрим простую таблицу с контактами:

Для ее обработки использует такой код:
// Simple XLSX Parser Template
$fileImport = get_stylesheet_directory() . '/data/example.xlsx';
if ( $xlsx = SimpleXLSX::parse( $fileImport )) {
	$sheetData = $xlsx->rows(1);

	$array = array();

	foreach ( $sheetData as $keyD => $sheetRow ) {
		if ( $sheetRow['0'] && $sheetRow['1'] ) {
			$array[$sheetRow['0']] = $sheetRow['1'];
		}
	}
	var_dump( $array );

} else {
	var_dump( SimpleXLSX::parse_error() );
}
В результате, в переменной $array у нас должен оказаться такой массив:
array(6) {
  ["address"]=>
  string(65) "м. Савёловская, ул. Вятская улица 35с4"
  ["geo"]=>
  string(20) "55.798401, 37.580502"
  ["working-days"]=>
  string(11) "Пн.-Пт."
  ["working-hours"]=>
  string(15) "10:00 — 18:00"
  ["mail"]=>
  string(20) "webdev1992@yandex.ru"
  ["phone"]=>
  string(18) "+7 (800) 600-50-40"
}
Для того, чтобы сохранить в опции сайта используем этот код:
if ( isset( $array ) && !empty( $array ) ) {
	update_option( '_test_data', $array, 'yes' );
}
Учитывайте, что последний аргумент влияет на то, будет ли эта опция автоматически подгружаться в память при инициализации WordPress. Если указать значение yes, то функция get_option() возьмет данные из кеша, а если no, то сделает дополнительный запрос в базу. Т.е. параметр yes/true стоит использовать, если эта опция понадобится на всех страницах.
Т.к. в нашем примере у нас таблица с контактными данными, то, скорее всего, они будут на всех страницах сайта в подвале, поэтому устанавливаем yes.
Получить данные из опции можно следующим образом:
if ( $test_data = get_option( '_test_data', false ) ) {
	var_dump( $test_data['address'] );
}
Похожие посты
- 23 июля, 2021
- 141
Сегодня мы рассмотрим довольно распространенный сценарий: вы переносите сайт откуда-то куда-то, у вас есть список старых ссылок и список новых ссылок. Ваша задача сделать так, чтобы при заходе по старой ссылке шел редирект на новую ссылку. Это важно как для поисковиков, так и для пользователей — чтобы при переходе по ссылкам у вас не было…

Important organizations have important Microsoft Excel files, and important Excel files deserve to be displayed professionally. This post evaluates all the options you have available on WordPress to display your tables in a manner that is consistent with your WordPress website’s theme, sending a professional message to your website’s customers.
Excel synchronization with WP tables in video
WP Table Manager is the perfect way to create spreadsheets and display aesthetically-pleasing tables in a professional setting. While the plugin has many tools to create spreadsheets on WordPress, you might not have waited for WP Table Manager to start tabulating data. If all your company’s spreadsheets are stored in Microsoft Excel files, then don’t worry: one of WP Table Manager’s tools allows you to import your Excel files into WordPress.
Thanks to WP Table Manager, you won’t have to re-create all your spreadsheets on WordPress manually. Instead, you can use WP Table Manager’s import tool to copy your spreadsheets into your WordPress table manager. Best of all, you can import tables in a few simple steps: copy your files onto your server, and make a few clicks. Keep reading to learn more about how to import your Microsoft Excel spreadsheets into WordPress.
How to import Excel files into WordPress
Importing Excel files into WordPress is not a nightmare. On the contrary, WP Table Manager makes it very easy to start working with Microsoft Excel files in the table manager. Let’s dive in!
For this post, we are going to use a Microsoft Excel file containing some car-related expenses, aptly-called «Expenses». The spreadsheet’s data looks like the following.
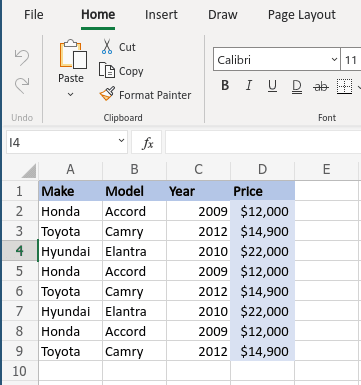

As you can see, it’s not just an Excel file: it also has styling and other customization options. Don’t remove any styling options because you can still work with them on WordPress.
There are two ways of importing spreadsheets. The first one requires that you copy and paste the Excel file anywhere on your server. For the sake of this example, we are going to create a folder called «Excel-Files» and paste the Excel file there.
Now that you have created a copy of the Excel file, head to Tables Manager and click on the button that says Create New and then choose Table. This button will lead you to a new, empty table, which is the container that will soon have the imported Excel spreadsheet. Name the new table «Expenses», like the local Microsoft Excel file.

With the newly-created table, click on the Import & Sync item in the menu and choose Excel.

You should now see a pop-up window. If you have a direct link to the spreadsheet, you can insert the link directly under Excel link. Otherwise, click on Browse server to look for the Excel file that you copied onto your server.
When you click on the Browse server button, you will see a pop-up window, listing all the folders on your server. Navigate through the tree to the file’s location. In our case, the path is wp-content > Excel-Files > Expenses.xlsx. Select the file and click on OK.

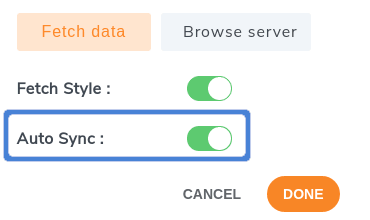
Before importing, there is one last option that you might want to toggle: Fetch Style. This option lets you import the style from the spreadsheet in addition to the data. For example, our spreadsheet had its own style, so we toggled the switch to avoid having to replicate the style on WordPress.

Click on Fetch data and WP Table Manager will import the data as well as the style if you also ticked the Fetch Style option. Once the pop-up disappears, you should see your data and style in your WordPress table manager.

There is also a second, slightly quicker option to import Excel spreadsheets. From Import & Sync again choose Excel. This time, however, don’t click on Browse Server, but click on Import Excel to upload the table. Remember to choose whether you want to import the data only or the style too from the first dropdown.

As you can see, it is really easy to import Excel spreadsheets into WordPress. Now, you can work on the table as you would with any other table created in WP Table Manager, which also means embedding the spreadsheet in any WordPress post or page.
Next Step: Excel Synchronization in WordPress
The next step after importing the table is to synchronize the Excel spreadsheet with WP Table Manager. In other words, if we edit the table in WP Table Manager, we want the file to change, and vice-versa. The best part is that this is even easier than importing the file, if such a thing is even possible!
To set up the synchronization, head to Tables Manager again, and open the table that you just imported. Now that you are in the table manager, again open the Excel option from the Import & Sync menu just like before and look for the synchronization option, Auto Sync.

Like before, if you want to synchronize the style, make sure to tick the Fetch Style option. Finally, you can select the sync periodicity, or how often WP Table Manager will attempt to synchronize the WordPress table with the Microsoft Excel file.
To set the synchronization periodicity, go to Tables Manager > Configuration. Under the Main Settings tab, click on the dropdown next to Synchronization delay and choose a time. For example, if you choose 5 minutes, WP Table Manager will synchronize the WordPress table with the file on the server every five minutes. Choose No for instant synchronization.

Finally, click on Save settings to conclude the synchronization process. WP Table Manager will handle synchronization behind the scenes, making sure that your WordPress table and Excel file are always aligned.
That’s it! We have now converted our Excel file to a WordPress table in just a few simple steps. More importantly, you don’t have to go back and forth between the WordPress table and your Excel file copying changes. Neither do you have to waste time copying the styling options because WP Table Manager does all the work for you. A day’s work in just a few minutes.
Importing online Excel spreadsheets
Nowadays, you don’t have to use Microsoft Office to create or edit spreadsheets. It’s becoming more and more common to use cloud services, like Microsoft’s own Office 365. If you do use Office 365 to collaborate on your spreadsheets, there’s good news: WP Table Manager also supports Office 365 spreadsheets.

The process to import a OneDrive Excel spreadsheet is largely the same. This time, from the Import & Sync menu, choose OneDrive Excel instead of Excel. The biggest difference is that now you do not need to copy and paste the Office 365 spreadsheet onto your server.

Instead, now you just link the OneDrive spreadsheet with WP Table Manager. From Office 365, click on File > Share > Embed and find the Embed code from the bottom of the pop-up window. Copy this link into WP Table Manager and then click on Fetch data.

What are you waiting for? Start saving valuable time that you can spend on another, more productive job. Purchase your membership from here!
Do you want to easily migrate or transfer WordPress users? If so, we are here to help you. You can import and export WordPress users using an Excel file to easily migrate or transfer the user data to your website. We will be using the premium version of the WordPress user import plugin by WebToffee.
If you need a free solution to import and export WordPress users, you can download the free version of this plugin from the WordPress plugin library. But the free version only lets you import and export WordPress users using CSV files. Refer to this article to learn more: How to import and export WordPress users using a CSV file?
Having said that, let’s get started.
Why Do You Need to Import and Export WordPress Users?
There are various situations where you might need to import or export users in WordPress. These include:
- Merging two websites along with their user bases and content.
- Incorporating a newly acquired website’s content and target audience into your main website.
- Creating an email list or CRM for your business.
- Transferring your subscriber list to a new website or another business site.
- Removing a website from a multisite network when it cannot function independently.
Additionally, If you run a membership site or a WooCommerce store, you might want to maintain all of your customer data and ensure a seamless experience.
How to Export WordPress Users to Excel?
Follow the below steps to export WordPress users to Excel.
Step 1: Install the plugin

To export WordPress users to .xls files, you should first purchase, install, and activate the plugin Import and Export WordPress Users and WooCommerce Customers. The pro version is currently the only one with this feature.
For a better understanding of how to purchase, install and activate the plugin – Refer to this article.
Step 2: Navigate to the Export Page
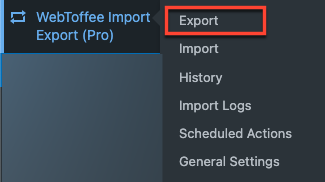
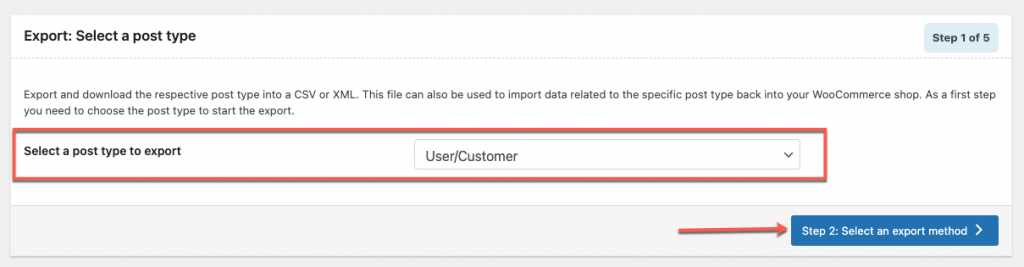
From the WordPress dashboard, go to Webtoffee Import Export (Pro) > Export.
Select User/Customer, as the post type to export and then click the Step 2: Export method button.
Step 3: Select an Export Method
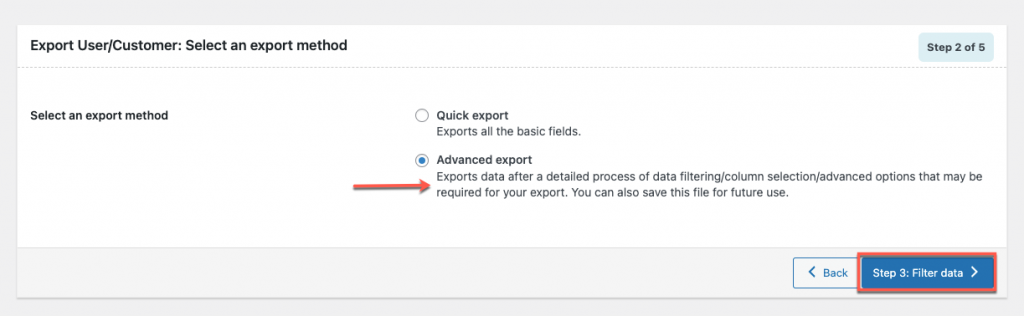
From the available options, select Advanced export. Then click Step 3: Filter data button.
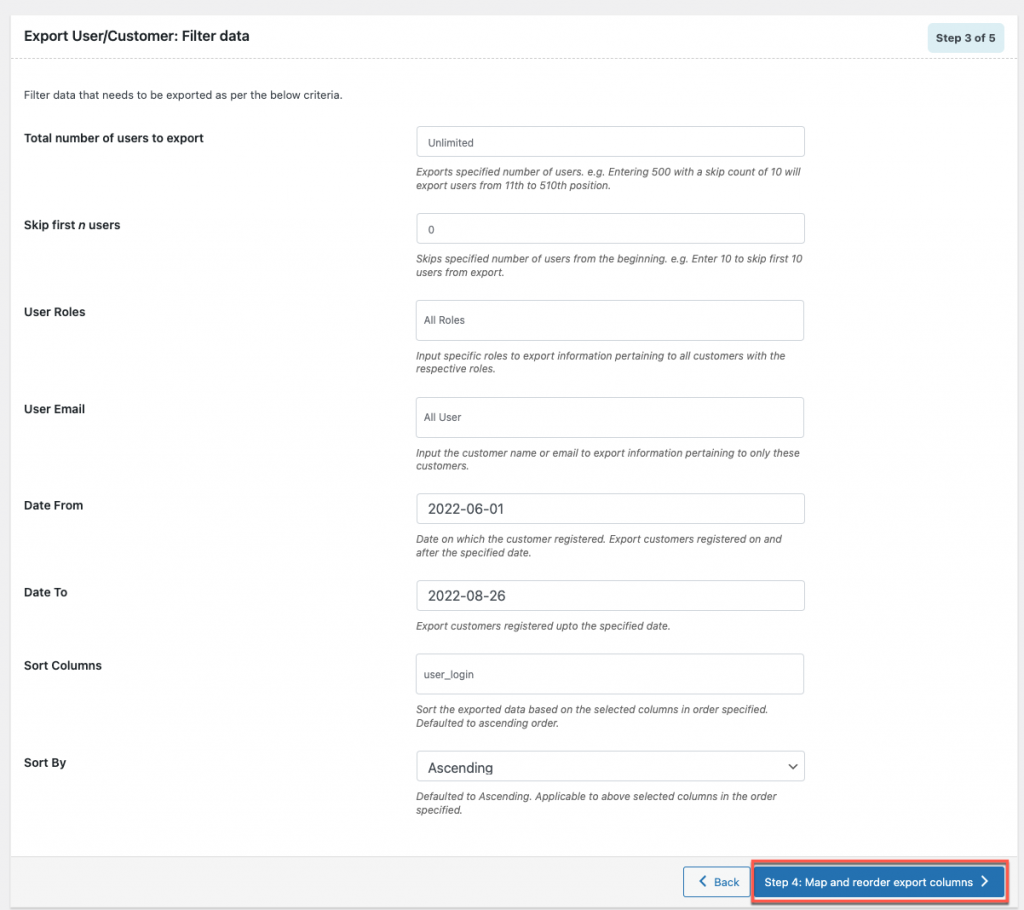
Step 4: Filter Data
Filter the data according to the below criteria. If you do not need to change the default settings, click on Step 4: Mapping & reorder export columns button.
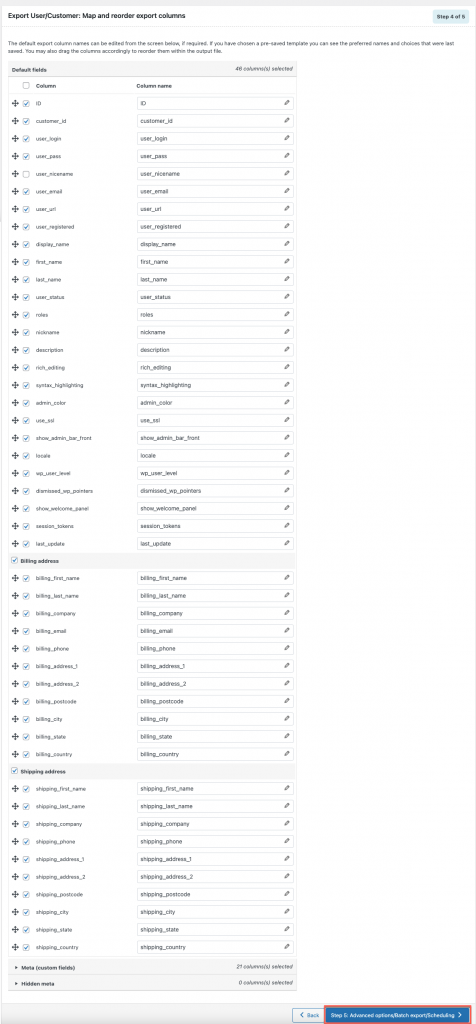
Step 5: Map & Reorder Export Columns
Once you filter the data, it’s time for renaming and reordering columns to export. Here you can reorder the columns according to the priority, rename the columns, and enable or disable the columns you wanted to add to your export Excel file.
Once you’re done with the necessary changes, click Step 5: Advanced options/Batch export/Scheduling button.
Step 6: Export the Excel File
Finally, the final part of the User/Customer exporting. – Here you can simply export the users and customers by providing a file name and selecting the export file format.
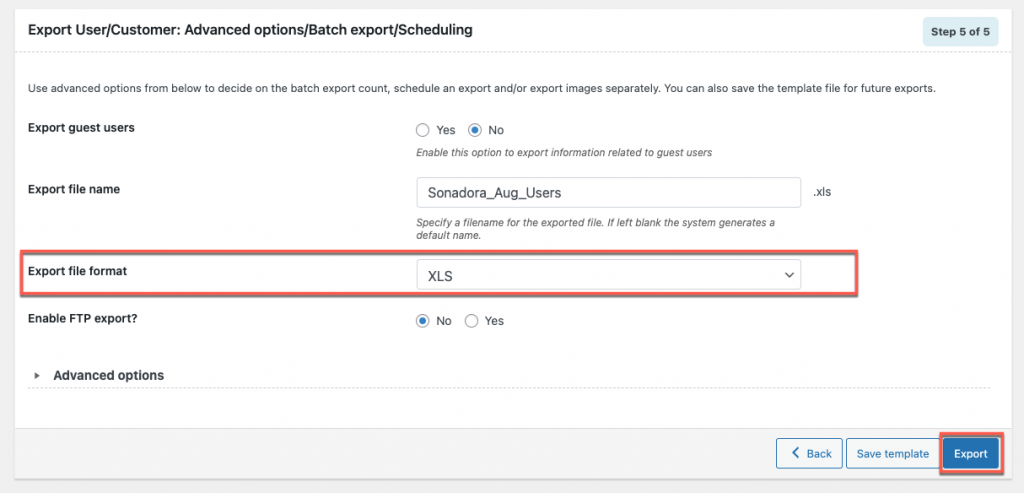
Most importantly change the file format to XLS from the drop-down menu list before exporting. Then click the Export button
Step 7: Download the Excel File
By clicking the Export button, a pop-up will appear – click the Download file button.

Your Excel file of exported users will be downloaded to your computer.
Below is the Sample excel file:

How to Import WordPress Users from Excel?
Follow the below steps to import users to your WordPress website from an Excel file.
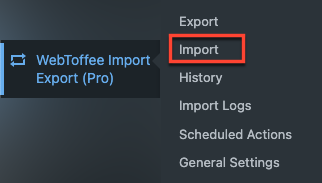
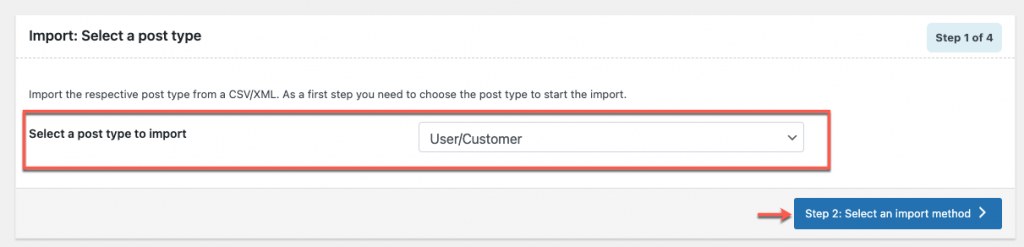
Step 1: Navigate to the Import Page
Go to Webtoffee Import Export (Pro) > Import.
Select User/Customer as the post type to import and then click Step 2: Select an import method button
Step 2: Select an Import Method
Upload the file you want to import into your site. Before uploading makes sure that the file you’re importing file contains the user’s email ID for a successful import.
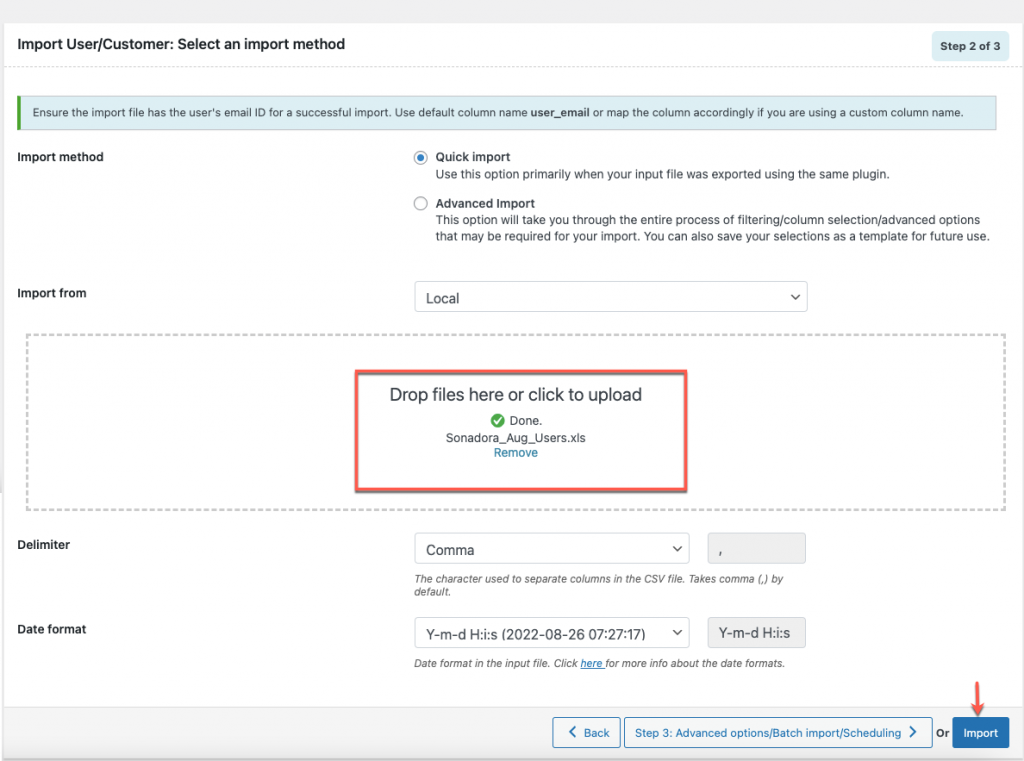
Note that the Advanced import option also supports Excel file format, but let’s go with the first option for easily and quickly importing users/customers.
Once you’re done – click the Import button. When an import is successful, a pop-up window displaying the import status and the number of successful and unsuccessful imports will show (if any).
Summing Up
Whether you are merging websites, using data to improve customer or subscriber relations, or something else altogether, understanding how to export-import WordPress users is a valuable skill. It is not a default functionality in WordPress to import or export users, but you can find a number of plugins to do so.
Following the steps carefully, we’re confident you were able to export and import WordPress users as well. This article may be useful in the future if you anticipate needing the functionality.
- Was this article helpful?
- Yes, thanks!Not really