
In this short post, I’m going to show you how to easily copy all filenames in a Window folder to Microsoft Excel.
First a caveat, the main limitation of the method I’m going to show you, is that you cannot copy filenames in subfolders. If you want to learn how to how to copy filenames in subfolders, check out the how to easily copy all filenames in a folder to Excel using CMD post.
Let’s jump right into it.
Step 1: Open Excel
Open up excel and then navigate to the folder that contains the files.

Step 2: Navigate to Folder and Select All the Files
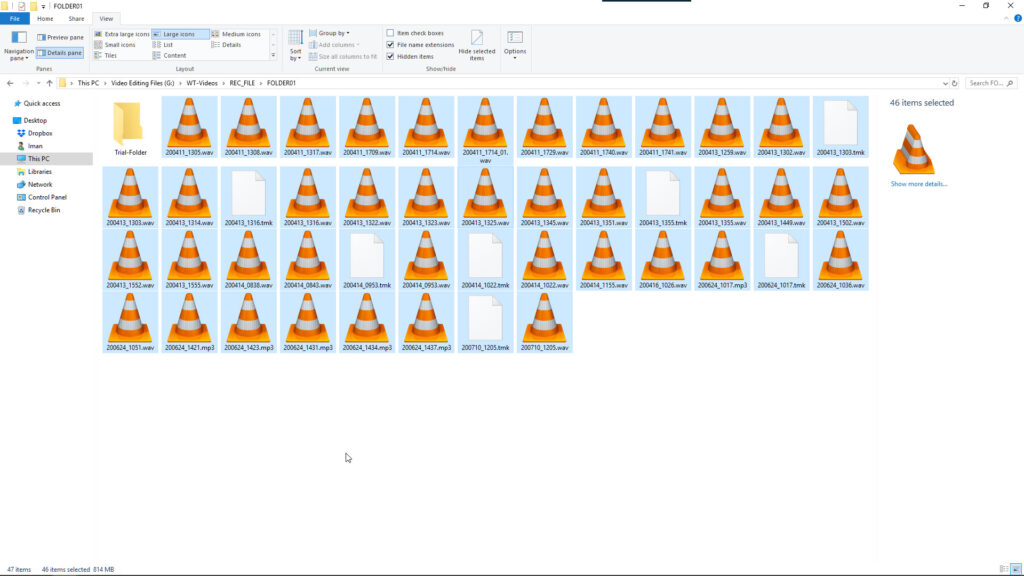
Navigate to the folder that contains the files. In the folder that contains the files, select all the files in the folder. You can use the shortcut keys, Ctrl + a.
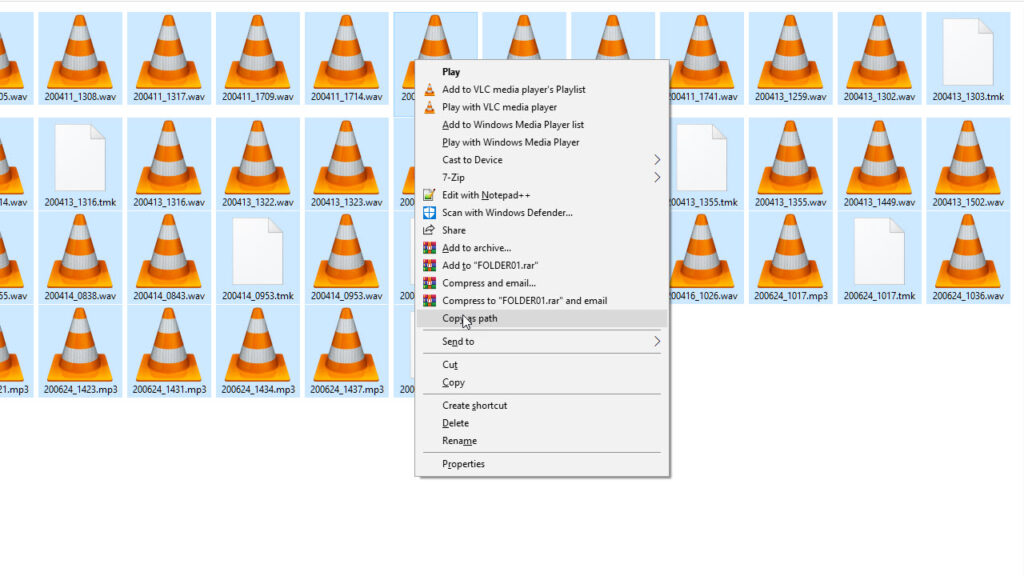
Step 3: Hold Shift Key and Right Click
Now, holding the Shift key, hover over your selection and right click. Don’t let go of the Shift key before you right click.

Step 4: Click Copy as Path
In the window that pops up, click copy as path. This copies the file path of all the files to the Clipboard.
Step 5: Paste Filepaths in Excel
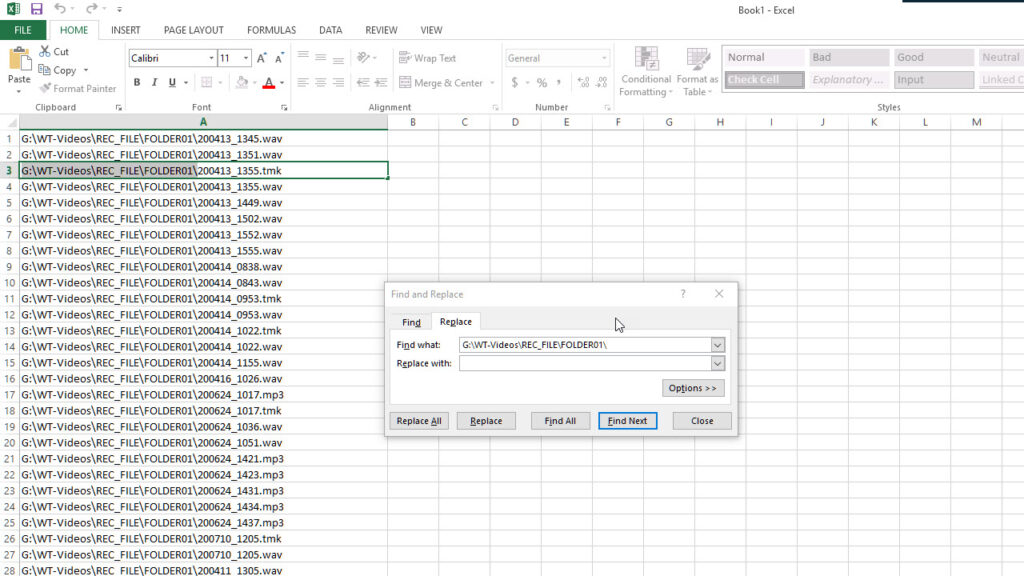
Navigate to Excel, I’m using ALT and Tab key, and paste the file paths.

Step 6: Use Replace Function in Excel
We are going to remove the folder path using replace function in excel and we’ll have the filenames.
So double click on one of the cells, select and copy the folder path. Click on Find and Select, scroll down to replace. Click on replace and paste the folderpath. Then click on replace all.
Close the Find and Select dialog. Save your excel document and you have successfully copied all the file names in a folder into an excel document.
That’s it for this post, if you want to learn how to also copy the filenames into text check out this post on how to copy file names in windows explorer to text.
And here’s a short how-to video:
I’m trying to implement a command button in my excel sheet that will prompt the user to select the files he wants to load before loading the selected files into the specified cells. So far I have tried using the following code but to no avail. I have been getting a type 13 error
Sub check11()
Dim FileName() As Variant
Dim f As String
Dim i As Variant
Dim j As Variant
Dim rng As Variant

rng = ActiveCell.Address
f = Application.GetOpenFilename("TXT File (*.txt), *.txt")
For i = 0 To 1
    FileName(f) = j
    Range(rng).Value = j
    ActiveCell.Offset(1, 0).Select
Next i

End Sub
![]()
Miller86
4047 silver badges17 bronze badges
asked Dec 15, 2015 at 9:46
![]()
2
GetOpenFileName doesn’t work in the way you have coded it. You can’t select multiple files (as far as I’m aware) so the loop you run is redundant. The function will return either False if the user hits Cancel or the name of the file as a string. You ought to test for the Cancel case within your code.
I can’t see the purpose of your loop or why you’re selecting the offset cell. I think it might be a development error so I’ve just disregarded it.
Below is some code that shows you how the GetOpenFileName function could work in your context:
Sub check11()
    Const TARGET_COL As String = "A" 'adjust letter for your column
    Dim ws As Worksheet
    Dim selectedFile As Variant
    Dim cell As Range

    'Find the next blank cell in target column
    Set ws = ThisWorkbook.Worksheets("Sheet1")
    Set cell = ws.Cells(ws.Rows.Count, TARGET_COL).End(xlUp).Offset(1)

    'Open the file dialog window
    selectedFile = Application.GetOpenFilename("Text Files (*.txt), *.txt")

    'Check if user hit cancel
    If selectedFile = False Then Exit Sub

    'Write the file name
    cell.Value = selectedFile

End Sub
answered Dec 15, 2015 at 10:40
![]()
AmbieAmbie
4,7122 gold badges14 silver badges26 bronze badges
You have inccorect acces to Application.GetOpenFilename first of all you need to set MultiSelect to true so you will be able to select multiple files. Then this function will return array which you can loop. In loop i spliting filepath by «» and with knowledge that filename is always last, i just write filename into cell.
Sub check11()

Dim filePath() As Variant
Dim i As Long

filePath = Application.GetOpenFilename("TXT File (*.txt), *.txt", MultiSelect:=True)
For i = 1 To UBound(filePath)

    Sheets("Sheet2").Cells(1 + i, 1).Value = Split(filePath(i), "")(UBound(Split(filePath(i), "")))
Next i

End Sub
answered Dec 15, 2015 at 10:49
![]()
Luboš SukLuboš Suk
1,51615 silver badges38 bronze badges
3
Import or export text (.txt or .csv) files
There are two ways to import data from a text file with Excel: you can open it in Excel, or you can import it as an external data range. To export data from Excel to a text file, use the Save As command and change the file type from the drop-down menu.
There are two commonly used text file formats:
-
Delimited text files (.txt), in which the TAB character (ASCII character code 009) typically separates each field of text.
-
Comma separated values text files (.csv), in which the comma character (,) typically separates each field of text.
You can change the separator character that is used in both delimited and .csv text files. This may be necessary to make sure that the import or export operation works the way that you want it to.
Note: You can import or export up to 1,048,576 rows and 16,384 columns.
Import a text file by opening it in Excel
You can open a text file that you created in another program as an Excel workbook by using the Open command. Opening a text file in Excel does not change the format of the file — you can see this in the Excel title bar, where the name of the file retains the text file name extension (for example, .txt or .csv).
-
Go to File > Open and browse to the location that contains the text file.
-
Select Text Files in the file type dropdown list in the Open dialog box.
-
Locate and double-click the text file that you want to open.
-
If the file is a text file (.txt), Excel starts the Import Text Wizard. When you are done with the steps, click Finish to complete the import operation. See Text Import Wizard for more information about delimiters and advanced options.
-
If the file is a .csv file, Excel automatically opens the text file and displays the data in a new workbook.
Note: When Excel opens a .csv file, it uses the current default data format settings to interpret how to import each column of data. If you want more flexibility in converting columns to different data formats, you can use the Import Text Wizard. For example, the format of a data column in the .csv file may be MDY, but Excel’s default data format is YMD, or you want to convert a column of numbers that contains leading zeros to text so you can preserve the leading zeros. To force Excel to run the Import Text Wizard, you can change the file name extension from .csv to .txt before you open it, or you can import a text file by connecting to it (for more information, see the following section).
-
Import a text file by connecting to it (Power Query)
You can import data from a text file into an existing worksheet.
-
On the Data tab, in the Get & Transform Data group, click From Text/CSV.
-
In the Import Data dialog box, locate and double-click the text file that you want to import, and click Import.
-
In the preview dialog box, you have several options:
-
Select Load if you want to load the data directly to a new worksheet.
-
Alternatively, select Load to if you want to load the data to a table, PivotTable/PivotChart, an existing/new Excel worksheet, or simply create a connection. You also have the choice of adding your data to the Data Model.
-
Select Transform Data if you want to load the data to Power Query, and edit it before bringing it to Excel.
-
If Excel doesn’t convert a particular column of data to the format that you want, then you can convert the data after you import it. For more information, see Convert numbers stored as text to numbers and Convert dates stored as text to dates.
Export data to a text file by saving it
You can convert an Excel worksheet to a text file by using the Save As command.
-
Go to File > Save As.
-
Click Browse.
-
In the Save As dialog box, under Save as type box, choose the text file format for the worksheet; for example, click Text (Tab delimited) or CSV (Comma delimited).
Note: The different formats support different feature sets. For more information about the feature sets that are supported by the different text file formats, see File formats that are supported in Excel.
-
Browse to the location where you want to save the new text file, and then click Save.
-
A dialog box appears, reminding you that only the current worksheet will be saved to the new file. If you are certain that the current worksheet is the one that you want to save as a text file, click OK. You can save other worksheets as separate text files by repeating this procedure for each worksheet.
You may also see an alert below the ribbon that some features might be lost if you save the workbook in a CSV format.
For more information about saving files in other formats, see Save a workbook in another file format.
Import a text file by connecting to it
You can import data from a text file into an existing worksheet.
-
Click the cell where you want to put the data from the text file.
-
On the Data tab, in the Get External Data group, click From Text.
-
In the Import Data dialog box, locate and double-click the text file that you want to import, and click Import.
Follow the instructions in the Text Import Wizard. Click Help
 on any page of the Text Import Wizard for more information about using the wizard. When you are done with the steps in the wizard, click Finish to complete the import operation.
 -
In the Import Data dialog box, do the following:
-
Under Where do you want to put the data?, do one of the following:
-
To return the data to the location that you selected, click Existing worksheet.
-
To return the data to the upper-left corner of a new worksheet, click New worksheet.
-
-
Optionally, click Properties to set refresh, formatting, and layout options for the imported data.
-
Click OK.
Excel puts the external data range in the location that you specify.
-
 on any page of the Text Import Wizard for more information about using the wizard. When you are done with the steps in the wizard, click Finish to complete the import operation.
If Excel does not convert a column of data to the format that you want, you can convert the data after you import it. For more information, see Convert numbers stored as text to numbers and Convert dates stored as text to dates.
Export data to a text file by saving it
You can convert an Excel worksheet to a text file by using the Save As command.
-
Go to File > Save As.
-
The Save As dialog box appears.
-
In the Save as type box, choose the text file format for the worksheet.
-
For example, click Text (Tab delimited) or CSV (Comma delimited).
-
Note: The different formats support different feature sets. For more information about the feature sets that are supported by the different text file formats, see File formats that are supported in Excel.
-
-
Browse to the location where you want to save the new text file, and then click Save.
-
A dialog box appears, reminding you that only the current worksheet will be saved to the new file. If you are certain that the current worksheet is the one that you want to save as a text file, click OK. You can save other worksheets as separate text files by repeating this procedure for each worksheet.
-
A second dialog box appears, reminding you that your worksheet may contain features that are not supported by text file formats. If you are interested only in saving the worksheet data into the new text file, click Yes. If you are unsure and would like to know more about which Excel features are not supported by text file formats, click Help for more information.
For more information about saving files in other formats, see Save a workbook in another file format.
The way you change the delimiter when importing is different depending on how you import the text.
-
If you use Get & Transform Data > From Text/CSV, after you choose the text file and click Import, choose a character to use from the list under Delimiter. You can see the effect of your new choice immediately in the data preview, so you can be sure you make the choice you want before you proceed.
-
If you use the Text Import Wizard to import a text file, you can change the delimiter that is used for the import operation in Step 2 of the Text Import Wizard. In this step, you can also change the way that consecutive delimiters, such as consecutive quotation marks, are handled.
See Text Import Wizard for more information about delimiters and advanced options.
If you want to use a semi-colon as the default list separator when you Save As .csv, but need to limit the change to Excel, consider changing the default decimal separator to a comma — this forces Excel to use a semi-colon for the list separator. Obviously, this will also change the way decimal numbers are displayed, so also consider changing the Thousands separator to limit any confusion.
-
Clear Excel Options > Advanced > Editing options > Use system separators.
-
Set Decimal separator to , (a comma).
-
Set Thousands separator to . (a period).
When you save a workbook as a .csv file, the default list separator (delimiter) is a comma. You can change this to another separator character using Windows Region settings.
Caution: Changing the Windows setting will cause a global change on your computer, affecting all applications. To only change the delimiter for Excel, see Change the default list separator for saving files as text (.csv) in Excel.
-
In Microsoft Windows 10, right-click the Start button, and then click Settings.
-
Click Time & Language, and then click Region in the left panel.
-
In the main panel, under Regional settings, click Additional date, time, and regional settings.
-
Under Region, click Change date, time, or number formats.
-
In the Region dialog, on the Format tab, click Additional settings.
-
In the Customize Format dialog, on the Numbers tab, type a character to use as the new separator in the List separator box.
-
Click OK twice.
-
In Microsoft Windows, click the Start button, and then click Control Panel.
-
Under Clock, Language, and Region, click Change date, time, or number formats.
-
In the Region dialog, on the Format tab, click Additional settings.
-
In the Customize Format dialog, on the Numbers tab, type a character to use as the new separator in the List separator box.
-
Click OK twice.
Note: After you change the list separator character for your computer, all programs use the new character as a list separator. You can change the character back to the default character by following the same procedure.
Need more help?
You can always ask an expert in the Excel Tech Community or get support in the Answers community.
See Also
Import data from external data sources (Power Query)
Need more help?
The homework of import file names to Excel it can be born from the idea of transcribing the amount of elements that are part of a folder. Although for some people it makes no sense to import this type of information into Excel. The truth is that sometimes it is necessary within the workplace.
A clear example of this is an administration and accounting company. Whose computer contains a folder full of files, where each one belongs to the financial monitoring that is carried out to each client.
If for any reason the company requests an endorsement of all the clients to whom it offers service, with this method it will be possible to create a list automatically.
Import file names into Excel via macros
Applying the file import task can make it easier for anyone to spend hours in front of a computer, transcribing the name of each of the files. The Office package has a very useful tool called “Macros”. These macros can be developed by yourself, you just need to discover how easy it is to create macros.
You may also be interested in:
These macros take care of execute a sequence of actions (also known as algorithms) within the program. To prevent the user from performing certain manual procedures and can automate their work more efficiently.
Create and define macros to import file names into Excel
Like any other language, it consists of a series of commands that are recognized within the system to perform a specific task, determining the action to be taken.
 1")
To create it, click on the «Macros» button, which you can locate on the Excel toolbar. After that it is possible to start a new module and thus begin to develop it.
Both the start and the end of the action is determined as a subroutine. Which can take any name you want, but remembering that must be opened with «Sub”.
Set variables within code
The variables are nothing more than names that will characterize a data, action or value specific. You can name and define variables in any way you want. This being the first step of importing file names into Excel, so for explanatory purposes we will call them «Folder», «File» and «Count».
The first will be in charge of storing the information the path where the folder in question is located. The second the name of the files and the last the sequence of occupying the names in each cell, until forming a list. Within the code, this will be achieved by designating the first two values »As String«, And the third as»Integer”.
Define the folder path
Due to the functions of the first variable, it is necessary to ask users for the address where the folder is stored. This is achieved through «InputBox».
 2")
This same command establishes the validation of information, so that the system acts in a specific way depending on the situation: close the procedure if the folder is empty or validate the text string that will be formed with the names.
Running the counting function
This variable will be in charge of making the reading the folder through «Dir», automatically translating it into the names of each of the files. Which will continue advancing within the row until completing all the content.
When you finish importing the file names into Excel, the spreadsheet automatically transforms into a sort of row. Whose cells make up a list with the names of the contents of the folder.
At present, the agility to create this style of content is guaranteed within any scope, even to generate a simple database even by importing data from Excel to an OpenOffice database, compared to what is stored on a computer, in order to have a record.
Likewise, its efficiency and operability allows various users save significant transcription time, and to avoid possible data loss it is always advisable to learn how to activate the autoguadado of our projects.
Source by
You may also be interested in:
How do I copy a list of file names into Excel?
If this is the same question popping in your mind, then you are at the right place.
Also Read: How to Enable Text to Speech On Windows 10.
From the last 2-3 years, I have started backing up my computer files to some external hard drives. To prevent data loss.
And till now I have filled 4-5 hard drives of data.
But it’s really difficult to remember which files are present in which hard drive.
So I started exporting all files names to excel files & keep a record of it.
But it was hell time-consuming. And then I got to know about this trick method of copying filenames from folder in windows explorer.
Let see How it works…
This method of creating a list of the contents of a folder as text has helped me a lot in saving my time. Whether they are too long, short or one word it works with all.
Moreover, you can also create a directory of files present in a folder.
So let’s get started.
1. Open Windows Explorer
Open Windows Explorer and navigate to your favorite folder for which you want to create a list of filenames as text.

2. Copy File Names as Text from folder
Now select only those files for which you want to copy file names into excel from the folder.

Now, Press Shift key + Right Click on it. And then select Copy as path Option.
And you have successfully copied files as text and also its location with the file extension.
3. Export Filenames to Excel
Now it turns to export filenames to excel file in windows 10. So, Open your Excel sheet and Press Ctrl+V to paste it properly.

And you can also copy filenames to Notepad as text using this technique.
Some FAQs
How do I copy file names into Excel Windows 10?
To copy file names into excel in Windows 10, go to the desired folder, select all files, hold the Shift key & right-click and then click on the Copy as Path option.
How do I copy a list of filenames into Excel?
If you want to copy a list of filenames into excel, just select all the files, hold shift + right-click & then choose Copy as Path option.
How can I copy a list of file names as text?
To copy the list of file names as text, Select the full list > Hold Shift-key + Right-click > Copy as Path and then paste it into a notepad file as text.
How do I copy the names of all files in a folder Windows 10?
Copying the names of all files in a folder using Windows 10 is pretty easy, just press Ctrl+A to select the files, right-click on them while holding the Shift key, and then select the “Copy as Path” from the options.
That’s it for now…
Conclusion
So that’s how you can easily get a list of all files in a folder and subfolders into excel. And you can also follow the same method for Windows 7/8.
Check out the next post on how to copy filenames to excel using cmd.
Feel free to share your thoughts and also tell us if you know any better way to Export or Copy File Names Into Excel From Folder in Windows 10.
If you liked this post, Don’t forget to share this post.
Copying files in excel is an important skill that you need as a student or a business person. It is necessary for an individual in this modern technological era to learn copying file name in excel. It is one of the most useful skill in the world.
The copy file name option in Excel is a useful way to display chunk of files in excel or make changes to the name of a file. If you want to copy large number of file names into excel, it will be a hectic and tedious task if you type them manually. In this article we will show you how copy file names in excel in easy and simple way. There are different methods to do it. Let us take you through to each one by one.
Tips that are provided in this article are compatible with versions 2010/2013/2016.
USING CTRL+C AND CTRL+V TO COPY FILE NAMES IN EXCEL
If you want to copy the name of a file in Excel, use CTRL+C and CTRL+V. The keyboard shortcut is Ctrl+c, followed by Ctrl+v on your PC or Command+c followed by Command+v on Mac.
This works well if you want to paste the copied name into another column or cell of your workbook. For example, if you want to copy a filename from one sheet and paste it into another sheet, then use ctrl-c followed by ctrl-v.
1. Open Excel as well as file explorer Open File Explorer
2. Select the file you want to copy.
3. Press CTRL+C
4. Paste the file by using CTRL+V on Excel sheet.
USING COPY AS PATH TO COPY FILE NAMES IN EXCEL
Copy as Path is used to create shortcuts on the desktop and in the Start menu. It is very useful when you want to create shortcuts for files or folders that are located at different locations on your computer.. You can also use this to copy file names into excel.
To copy a file name in Excel, you can use the following steps:
1. Open Excel.
2. Navigate to the folder and select the required files.
3. Right click the mouse, a window will pop up. In this window, select copy as path. This copy the path of files to clipboard.
4. Navigate to excel, press the ALT + TAB key, and paste the files.
And that’s it , you have copied file names into the excel
Copying File name in Excel using Import data
1. Click on Data > Import Data > From File > Select data source.
2. Enter the main folder of your files and select the files you want to import
3. Select open and your file name is copied into excel.
That’s how you import files into excel by using in built tools
Did you learn about how to copy file names in excel using different methods. You can follow WPS academy to learn more features of Word document, Excel Spread sheets, and power point slides.
You can also download WPS office to edit the word documents , Excel Spread sheets, and PowerPoint free of cost. Download Now! And get an enjoyable working space.
Home > Data Recovery > 2 Methods to Copy the List of All File Names in a Folder into Your Excel Worksheet
Sometimes you will need to list all the file names in a folder in an Excel worksheet. Thus, you can better manage those files. In this article, we will introduce two effective methods to copy the list in a folder.
In an Excel worksheet, you can make a menu of some important files. And you need to copy the list of all the file names into one worksheet. However, when there are hundreds or thousands of files, you will find it hard to do this. In the image below, you can see several files.
Now you need to copy the list of all the file names into a worksheet in another Excel file. If you copy and paste them one by one manually, you will certainly spend a lot of time and energy. At this time, you can use the two methods below.
Method 1: Use a New Text Document
Now follow the steps below and see how this method takes effect.
- Before you perform this process, make sure that you have shown the file extensions in your computer. Click the button “Start” in your computer.
- And then click the button “Control Panel”.

- In the control panel, click the “Appearance”.
- And then click the button “Folder Options”.
- After that, choose the option “View” in the “Folder Options” window.
- Next uncheck the option “Hide extension for known file types”.
- And then click “OK” to save the setting.


Therefore, you can see all the extensions of files in your computer.
- Come back to the folder, create a new text document and give it a new name. We will name it “DataNumen Sales Volume”.
- And then open this text file.
- After that, input the following characters into this file:
dir> 1.txt

- Next save this file and close it.
- In this step, change the extension of this file from “.txt” into “.bat”.
- After that, you will see a new window pop up. Here you need to click the button “Yes” to confirm this change.

- And then double click this file again. Next you will see a new text document with the name “1” in this folder.
- Open this new text document in this folder. You will see all the name information in it.
- After that, copy the necessary part in this file.

- And then in the target worksheet, click the small arrow under the button “Paste”.
- In the drop-down list, choose the option “Use Text Import Wizard”.

- Next in the new window, choose the option “Fixed width”.
- And then click the button “Next”.

- In step 2 of the wizard, move the break line and make sure that the names of those files will be in one cell.
- And then also click “Next”.

- In step 3, click “Finish”. Thus, all the information will appear in the worksheet.


You can delete the other useless columns in the worksheet. By using this method, you don’t have to copy and paste the names one by one.
Method 2: Define Name
In this part, we will introduce another excellent method.
- Click the tab “Formulas” in the ribbon.
- And then click the button “Define Name”.
- In the “New Name” window, input a name into the first text box. We will also name it “DataNumen_Sales_Volume”.
- After that, input this formula into the “Refers to” text box:
=FILES(“C:UsersSampleDesktopSales Volume*.*”) &T(NOW())
The path of the folder is “C:UsersSampleDesktopSales Volume” in this example. You need to change it into your actual folder path.
- And then click the button “OK” in the window.
- Now input the following formula into one cell in the worksheet:
=IF(ROW(A1)>COUNTA(DataNumen_Sales_Volume),””,INDEX(DataNumen_Sales_Volume,ROW(A1)))
In this formula, you need to change the define name into yours.
- After that, click the fill handle of this cell and drag downwards. As you move your mouse, you will also find that all the names will appear in this column.

- But you may also find that those results are the results of formulas. You still need to copy and paste them as texts.
- Next delete the formulas in the worksheet.

Until now, you have gone through all the steps. This method is also very effective for this requirement.
A Comparison of the Two Methods
You can see that both of the two methods are very useful. Here we will compare the two methods in this part.
|
Comparison |
Use a New Text Document |
Define Name |
|
Advantages |
If you are not familiar with Name and the complex formula in cells, you can use this first method. | There are fewer steps in this method. You can finish your tasks quickly by using it. |
|
Disadvantages |
Compared with the second methods, there are more steps in this method. You still need to spend a lot of time. | The formulas in cells will produce the results that you need. Therefore, you still need to copy and paste them as values. |
When you need to input all file names into a worksheet, you will know which method is the most suitable one.
Take Actions Quickly in a Data Disaster
It is unavoidable that you will meet with data disaster. In such an accident, your Excel files will most possibly be damaged. Therefore, you need to take actions quickly. In order to repair corrupt xls data quickly and safely, you can use out excellent Excel repair tool. This tool is able to fix most of the Excel problems.
Author Introduction:
Anna Ma is a data recovery expert in DataNumen, Inc., which is the world leader in data recovery technologies, including repair Word doc data error and outlook repair software products. For more information visit www.datanumen.com
Предположим, у вас есть папка с сотнями файлов, и теперь вы хотите импортировать эти имена файлов в ячейки рабочего листа. Копирование и вставка одного за другим займет много времени, в этой статье я расскажу о некоторых быстрых приемах, которые помогут вам импортировать несколько имен файлов из папки в рабочий лист.
Импортируйте несколько имен файлов в ячейки листа с кодом VBA
Импортируйте несколько имен файлов в ячейки рабочего листа с помощью Kutools for Excel
Импортируйте несколько имен файлов в ячейки листа с кодом VBA
Следующий код VBA может помочь вам импортировать имена файлов, расширения файлов и имя папки в ячейки рабочего листа, выполните следующие действия:
1. Запустите новый рабочий лист, в который вы хотите импортировать имена файлов.
2. Удерживайте ALT + F11 , чтобы открыть Microsoft Visual Basic для приложений окно.
3. Нажмите Вставить > Модулии вставьте следующий код в Модули Окно.
Код VBA: импортировать несколько имен файлов в ячейки рабочего листа
Sub GetFileList()
'updateby Extendoffice
    Dim xFSO As Object
    Dim xFolder As Object
    Dim xFile As Object
    Dim xFiDialog As FileDialog
    Dim xPath As String
    Dim i As Integer
    Set xFiDialog = Application.FileDialog(msoFileDialogFolderPicker)
    If xFiDialog.Show = -1 Then
        xPath = xFiDialog.SelectedItems(1)
    End If
    Set xFiDialog = Nothing
    If xPath = "" Then Exit Sub
    Set xFSO = CreateObject("Scripting.FileSystemObject")
    Set xFolder = xFSO.GetFolder(xPath)
    ActiveSheet.Cells(1, 1) = "Folder name"
    ActiveSheet.Cells(1, 2) = "File name"
    ActiveSheet.Cells(1, 3) = "File extension"
    i = 1
    For Each xFile In xFolder.Files
        i = i + 1
        ActiveSheet.Cells(i, 1) = xPath
        ActiveSheet.Cells(i, 2) = Left(xFile.Name, InStrRev(xFile.Name, ".") - 1)
        ActiveSheet.Cells(i, 3) = Mid(xFile.Name, InStrRev(xFile.Name, ".") + 1)
    Next
End Sub
4. Затем нажмите F5 ключ для выполнения этого кода, и в появившемся окне Обзор выберите папку, в которую вы хотите импортировать форму имен файлов, см. снимок экрана:

5, Затем нажмите OK кнопку, и вы получите следующий результат:

Внимание: Если в вашей конкретной папке есть подпапки, имена файлов в подпапках не будут импортированы.
Импортируйте несколько имен файлов в ячейки рабочего листа с помощью Kutools for Excel
Если вам нужно импортировать имена файлов как в папку, так и во вложенные папки, не беспокойтесь, Kutools for ExcelАвтора Список имен файлов утилиту, вы можете легко импортировать все имена файлов в определенной папке, включая подпапки.
После установки Kutools for Excel, пожалуйста, сделайте следующее:
1. Нажмите Кутулс Плюс> Импорт Экспорт > Список имен файлов, см. снимок экрана:

2. В Список имен файлов диалоговом окне выполните следующие операции:
(1.) Щелкните  кнопка для выбора папки с файлами, которые вы хотите импортировать;
(2.) Проверить Включить файлы в подкаталоги импортировать имена файлов вложенных папок;
(3.) Укажите тип файлов, которые вы хотите импортировать, в Тип файлов раздел;
(4.) Выберите единицу размера файла для отображения из Единица размера файла раздел;
(5.) Если вы хотите добавить гиперссылки на имена файлов и папки, установите флажок Создать гиперссылки опцию.

3. После завершения настроек нажмите OK кнопку, и имена файлов в папке и подпапках импортируются в новый рабочий лист, как показано на следующем снимке экрана:

Tips: Если вы просто хотите импортировать файлы одного указанного типа из определенной папки, вы можете проверить Указывать вариант в Список имен файлов диалоговое окно и введите в него расширение файла, тогда он будет импортировать только имена файлов указанного типа как из папки, так и из подпапок.
Нажмите, чтобы узнать больше об этой функции списка имен файлов…
Скачать и бесплатную пробную версию Kutools for Excel Сейчас !
Демонстрация: Импорт нескольких имен файлов в ячейки листа с помощью Kutools for Excel
Статьи по теме:
Как перечислить все файлы в папке и подпапках на листе?
Как перечислить все имена файлов в папке и создать для них гиперссылки в Excel?
Лучшие инструменты для работы в офисе
Kutools for Excel Решит большинство ваших проблем и повысит вашу производительность на 80%
- Снова использовать: Быстро вставить сложные формулы, диаграммы и все, что вы использовали раньше; Зашифровать ячейки с паролем; Создать список рассылки и отправлять электронные письма …
- Бар Супер Формулы (легко редактировать несколько строк текста и формул); Макет для чтения (легко читать и редактировать большое количество ячеек); Вставить в отфильтрованный диапазон…
- Объединить ячейки / строки / столбцы без потери данных; Разделить содержимое ячеек; Объединить повторяющиеся строки / столбцы… Предотвращение дублирования ячеек; Сравнить диапазоны…
- Выберите Дубликат или Уникальный Ряды; Выбрать пустые строки (все ячейки пустые); Супер находка и нечеткая находка во многих рабочих тетрадях; Случайный выбор …
- Точная копия Несколько ячеек без изменения ссылки на формулу; Автоматическое создание ссылок на несколько листов; Вставить пули, Флажки и многое другое …
- Извлечь текст, Добавить текст, Удалить по позиции, Удалить пробел; Создание и печать промежуточных итогов по страницам; Преобразование содержимого ячеек в комментарии…
- Суперфильтр (сохранять и применять схемы фильтров к другим листам); Расширенная сортировка по месяцам / неделям / дням, периодичности и др .; Специальный фильтр жирным, курсивом …
- Комбинируйте книги и рабочие листы; Объединить таблицы на основе ключевых столбцов; Разделить данные на несколько листов; Пакетное преобразование xls, xlsx и PDF…
- Более 300 мощных функций. Поддерживает Office/Excel 2007-2021 и 365. Поддерживает все языки. Простое развертывание на вашем предприятии или в организации. Полнофункциональная 30-дневная бесплатная пробная версия. 60-дневная гарантия возврата денег.
")
Вкладка Office: интерфейс с вкладками в Office и упрощение работы
- Включение редактирования и чтения с вкладками в Word, Excel, PowerPoint, Издатель, доступ, Visio и проект.
- Открывайте и создавайте несколько документов на новых вкладках одного окна, а не в новых окнах.
- Повышает вашу продуктивность на 50% и сокращает количество щелчков мышью на сотни каждый день!
")
Download PC Repair Tool to quickly find & fix Windows errors automatically
In this post, we will see how to get a list of files in a folder into Excel. We will show you how to use Excel to view Files and Folder details in Windows, by importing all files and folders details into Microsoft Excel to keep track of file size, file type, and last modified date.
We have many files and folders in our Windows PC and we may delete or add more files and folders frequently. There could be some folders and files which are very important to us and someone might edit them without our notice. But, we cannot keep on looking at each and every folder and file to know which one was edited. If it was a modification of a file or folder, we can sort them by using ‘Last modified’ and we can get to know which were modified recently.

But, what if some of the files and folders were deleted from that directory? We would not be in a position to keep track of what was exactly deleted. But, you can use Excel to view files and folder details of directory which would be helpful to you to know at least the list of files and folders that were deleted.

Import and get a list of filenames into an Excel sheet
If you use Microsoft Excel to import all details of files and folders into Excel, it will help you keep track of last modified date and time, file types, list of files, files size and many more regularly. To do this, follow these simple steps.
Move to the directory or folder on Windows File Explorer which you want to keep track of. Here, I want to keep track of my files and folders of Documents folder. Copy the path of that directory.

Now, open any web browser of your choice and paste the copied path (Path of the folder you just copied in the previous step) in the address bar of the browser. I used Google Chrome here. Just prefix the URL by file:///and the content will be shown as the web page.

To save this web page as the offline copy, press CTRL+S or right-click on the web page and select “Save Page As”. Select the destination, give it a name, and save the webpage.
Now, via Windows Explorer go the location you saved the offline webpage and copy the path. The, open the Excel sheet and tap on the Data tab and click on From Web. It opens up the Window and in the Address bar paste the copied path and click the “Go” button. It will load all the contents of the webpage.
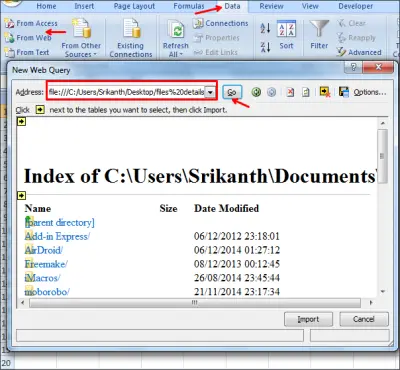
It shows you the yellow boxes with arrows and it will allows you to select the required frame. You can find here that I selected the part I want.
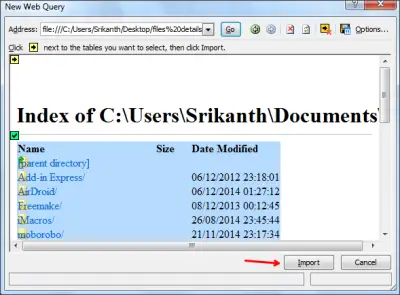
Once done with these steps, now click on Import button and you see that all the files and folders details are imported to your Excel sheet in no time. You can see that the data is shown in the columns and gives us a clear idea of every detail.
Conclusion
As we are engaged most of the time, in organizing files and folders, it is advisable to import files and folders details into Excel. This would be helpful if any of your file or folder was to get deleted. The data in the Excel sheet does not refresh, so we need to import the data regularly.
You can use this method when to not only keep track of file changes but also filenames.
Sridhar is a Software Engineer who loves to stay updated with developments in the world of technology. He is fond of writing everything related to Internet, Computers and Mobile and Desktop Operating Systems.