
TL;DR – Skip to the video!
Hate GUIs, want to do this via the command-line?
THIS is your number one question – and it has been here on my blog since the day I posted it.
You have an Excel file – and you want that data put into a table. I’ll show you how, and we’ll document each step of the way with plenty of pictures.
You will be prepared to import data to an existing table from Excel with confidence after reading this post. Want to build a new table from Excel? We can do that, too.
Warning: This post has a LOT of pictures.
For our example I’ll be using the HR.EMPLOYEES table to create the XLS file for our import. We’ll use that Excel file to populate an empty copy of the EMPLOYEES table in another schema.
Step 0: The Empty Oracle Table and your Excel File
You have an Oracle table and you have one or more Excel files.

You do know how to view multiple objects at once in SQL Developer, right?
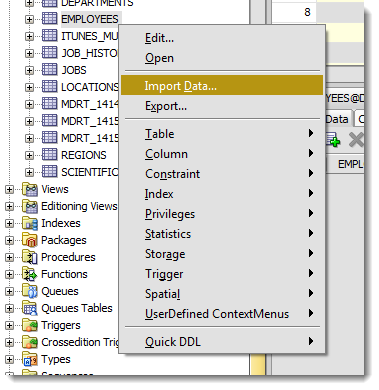
Step 1: Mouse-right click – Import Data

Step 2: Select your input (XLSX) file and verify the data

As you select the file, we’ll grab the first 100 rows for you to browse below. This ‘Preview Row Limit’ defines how many rows you can use to verify the IMPORT as we step through the wizard. You can increase it, but that will take more resources, so don’t go crazy.
Also, does your Excel file have column headers? Do we want to treat those as a row to the table? Probably not. If you uncheck the ‘Header’ flag, the column names will become a new row in your table – and probably fail to be inserted.
Sometimes your Excel file has multiple headers, or you may need to only import a certain subset of the spreadsheet. Use the ‘Skip Rows’ option to get the right data.
Step 3: Create a script or import automatically
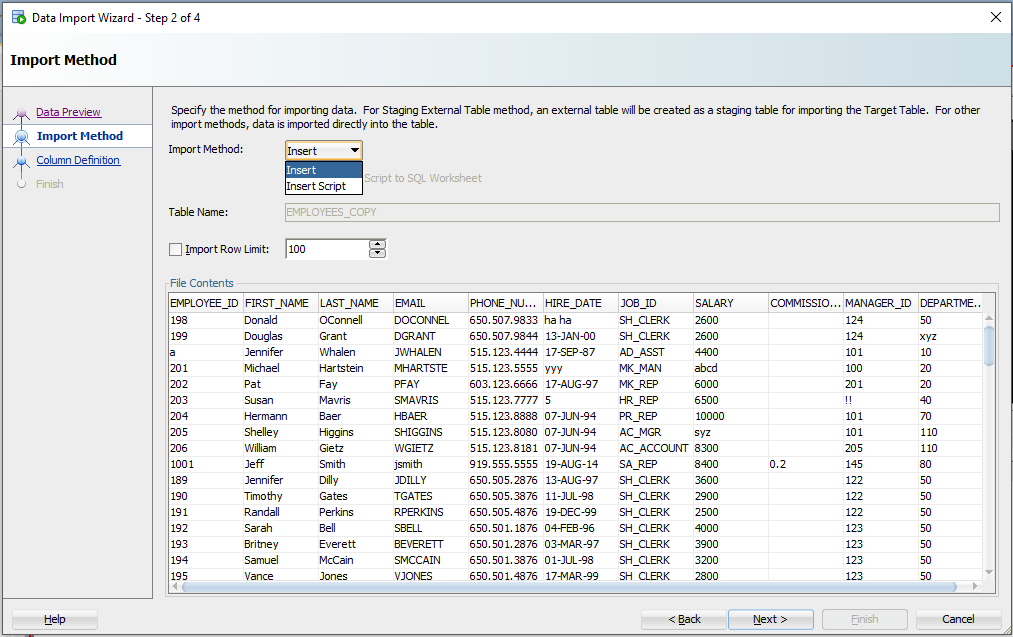
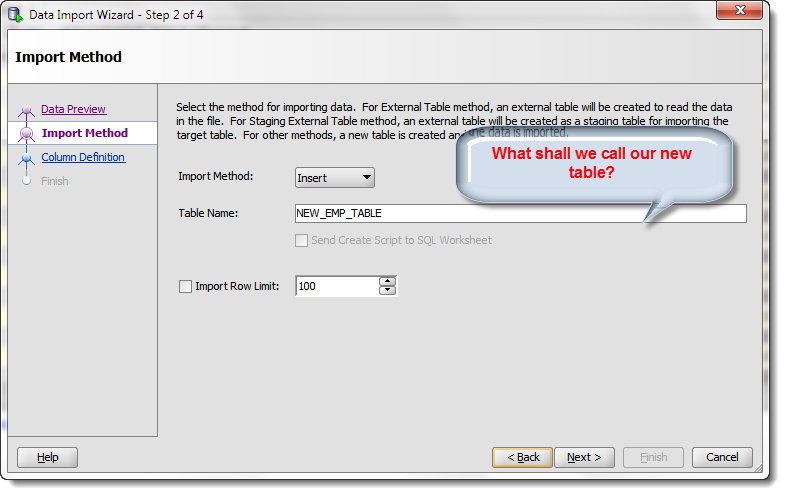
For this exercise the ‘Insert’ method will be used. Each row processed in the Excel file will result in an INSERT statement executed on the table we’re importing to.
If you choose ‘Insert Script’, the wizard will end with an INSERT Script in your SQL Worksheet. This is a nice alternative if you want to customize the SQL, or if you need to debug/see why the ‘Insert’ method isn’t working.
Working with CSV? You’ll get even more methods – great for VERY LARGE data sets.
Step 4: Select the Excel Columns to be Imported
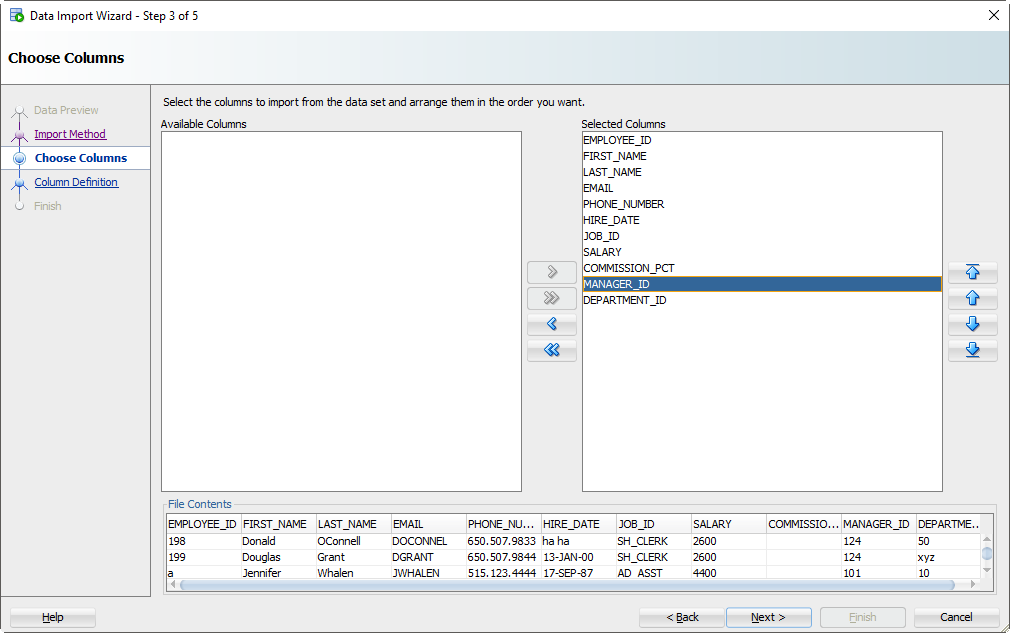
You may have an Excel file with 100 columns but your table only has 30. This is where you tell SQL Developer what columns are to be used for the import. You can also modify the column order, which may make the next step a bit easier.
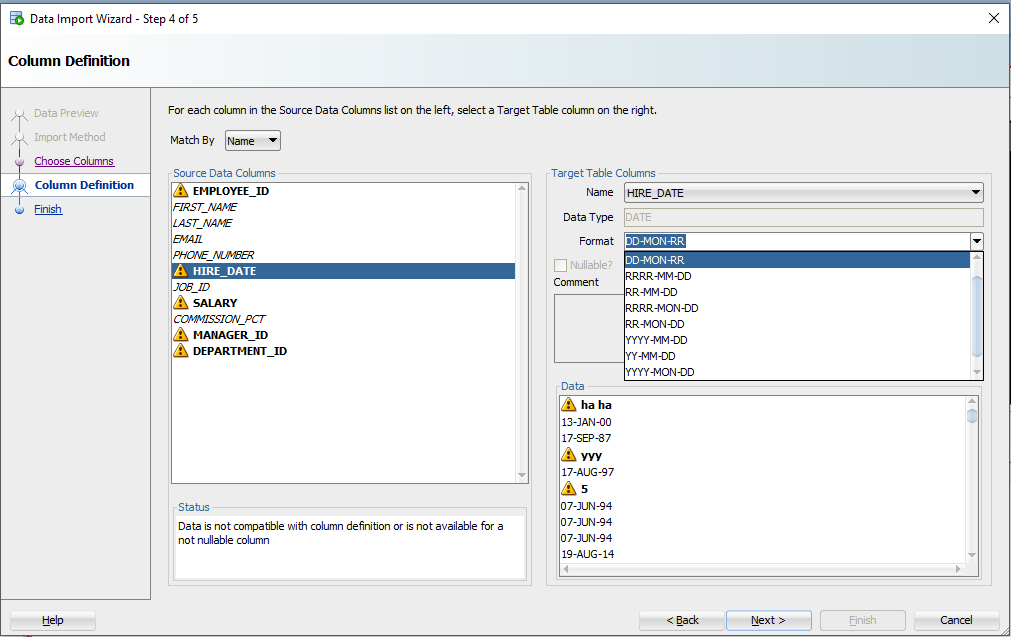
Step 5: Map the Excel Columns to the Table Columns
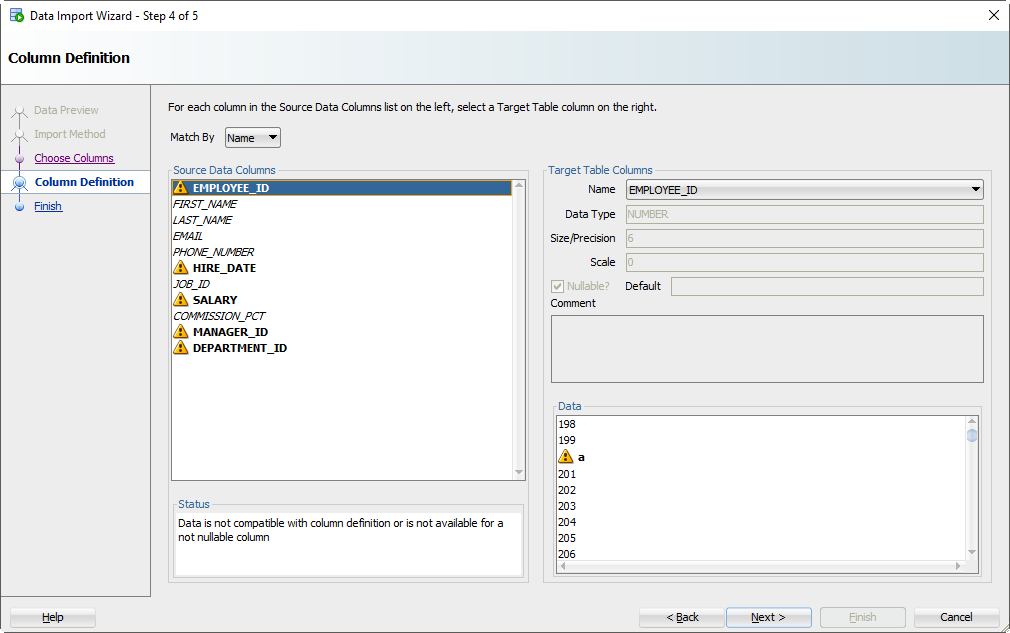
If you’re not paying attention and just letting the wizard guide you home, then now is the time to wake up. There’s a good chance the column order of the Excel file won’t match the definition of your table. This is where you will tell SQL Developer what columns in the spreadsheet match up to what columns in the Oracle table.
And remember how we set that preview window to 100 rows? We’re peaking at the data, looking for problems as we try to fit it into your table column. If we find a problem, we’ll mark the columns with those ‘warning’ symbols.
I’ve polluted my Excel file with some values that I know won’t ‘fit.’ When these rows are encountered in the wizard, they’ll be rejected by the database – but the other rows will come in.
Let’s talk about DATES for a second.
And TIMESTAMPS too. In the excel file, you’re probably going to have some date/time fields you want to move into DATE or TIMESTAMP columns. SQL Developer is treating those value as strings – and YOU need to tell SQL Developer the DATE or TIMESTAMP format to use to be able to convert them.
Let’s look at HIREDATE.

See the ‘Format’ drop down selector? SQL Developer has defaulted the DATE format string to ‘DD-MON-RR’ – we try to guess based on the rows we’re looking at in that 100 preview window.
If we have guessed wrong, or were unable to figure it out, you’ll need to input this yourself. The Oracle Docs can help you define the correct DATE Format Model. If you see the little warning graphics next to your Date values in the Data panel, you might have the wrong format.
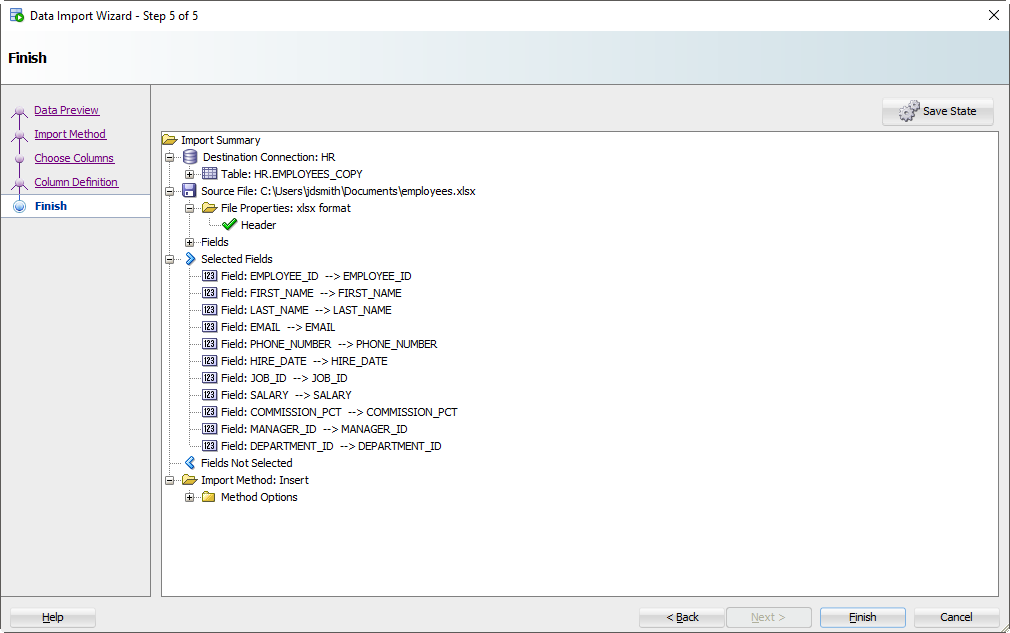
Step 6: Verify your settings and GO!

Click on the ‘Finish’ button.
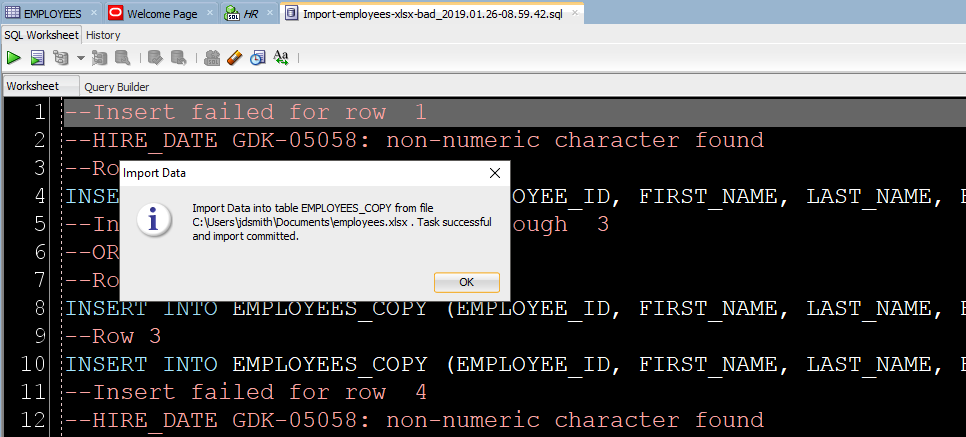
If the Wizard runs into any problems doing the INSERTs, you’ll see this:
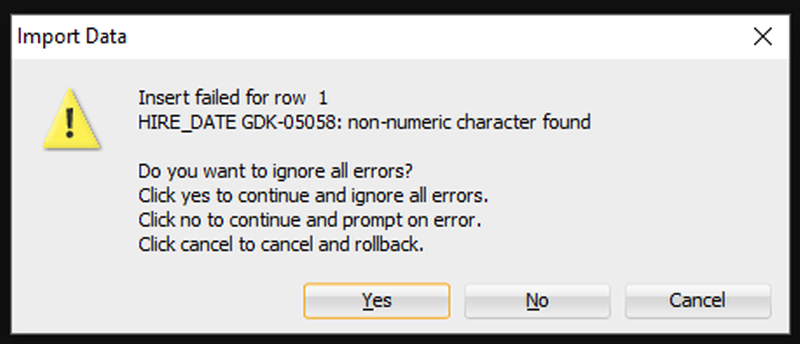
I’m going to say ‘Yes’ to ignore all the errors. But, if you need EVERY single row – you need to say ‘Cancel’ to start over. Then you can either fix your data in the Excel file, or make changes to your table so the data will fit/work.
After clicking ‘Yes’, we’ll get to the end of our story, and our data!
Step 7: See What Worked and What Didn’t
First, any bad news?
If there were rows rejected by the database, we’ll see those now.

Now let’s go look at our new table data!
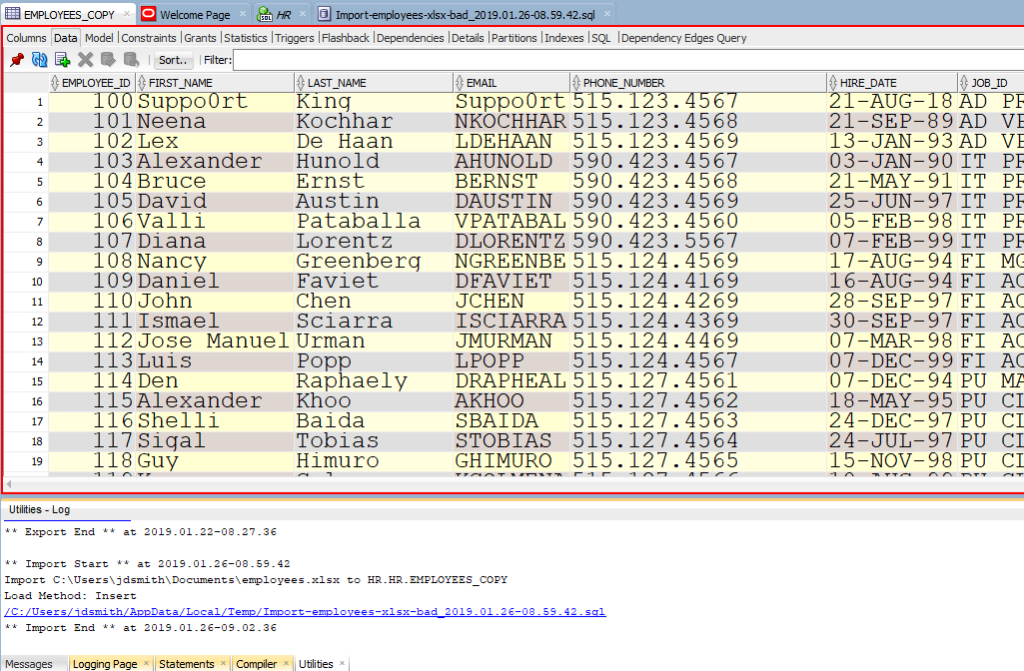
Note the ‘Log’ panel. We’ll show you the file we worked with, and how much time it took to load the data.
Just a few more pointers when it comes to Excel
- Storing data in Excel can be…dangerous
- If you have a lot of data or if this will be a repeating process, consider External Tables or SQL*Loader instead
- If you like to put data in Oracle because you understand SQL better than Excel macros, then welcome to the club 😉
- Here’s 11 more tips on Importing Excel/CSV into your database
The Movie
Задача. У вас есть файл Excel – и вы хотите, чтобы эти данные были помещены в таблицу. Я покажу вам, как это делается, и мы задокументируем каждый шаг с большим количеством иллюстраций.
Прочитав этот пост, вы будете готовы с уверенностью импортировать данные в существующую таблицу из Excel. Хотите создать новую таблицу из Excel? Мы тоже можем это сделать.
В нашем примере я буду использовать таблицу HR.EMPLOYEES для создания XLS-файла для нашего импорта. Мы будем использовать этот файл Excel для заполнения пустой копии таблицы EMPLOYEES в другой схеме.
Шаг 0: Пустая таблица Oracle и ваш файл Excel
У вас есть таблица Oracle и один или несколько файлов Excel.
Шаг 1: Выбираем «Импорт данных» по правому щелчку мыши
Шаг 2: Выберите свой входной файл (XLSX) и проверьте данные

Когда вы выберете файл, мы захватим первые 100 строк для просмотра ниже. Этот «Предел строк предварительного просмотра» определяет, сколько строк вы можете использовать для проверки ИМПОРТА по мере прохождения мастера. Вы можете увеличить его, но это потребует больше ресурсов, так что не сходите с ума.
Кроме того, есть ли в вашем файле Excel заголовки столбцов? Хотим ли мы рассматривать их как строку к таблице? Скорее всего, нет. Если вы снимите флажок «Заголовок», имена столбцов станут новой строкой в вашей таблице – и, вероятно, не будут вставлены.
Иногда ваш файл Excel имеет несколько заголовков, или вам может потребоваться импортировать только определенное подмножество электронной таблицы. Используйте опцию «Пропустить строки», чтобы получить правильные данные.
Шаг 3: Создайте сценарий или импортируйте автоматически

alt+tab туда и обратно от Excel до SQL Developer.
Для этого упражнения будет использоваться метод «Вставки» (Insert). Каждая строка, обработанная в файле Excel, приведет к выполнению инструкции INSERT в таблице, в которую мы импортируем.
Если вы выберете «Вставить скрипт», мастер завершит работу скриптом ВСТАВКИ на вашем листе SQL. Это хорошая альтернатива, если вы хотите настроить SQL, или если вам нужно отладить/посмотреть, почему метод «Insert» не работает.
Шаг 4: Выберите столбцы Excel для импорта

У вас может быть файл Excel со 100 столбцами, но ваша таблица имеет только 30. Здесь вы даете команду SQL Developer, какие столбцы должны использоваться для импорта. Вы также можете изменить порядок столбцов, что может сделать следующий шаг немного проще.
Шаг 5: Сопоставьте столбцы Excel со столбцами таблицы

Если вы не обращаете внимания и просто позволяете Мастеру импорта делать всё по умолчанию, то сейчас самое время проснуться. Есть большая вероятность, что порядок столбцов файла Excel не будет соответствовать определению вашей таблицы. На этом шаге вы указываете SQL Developer-у, какие столбцы в электронной таблице совпадают с какими столбцами в таблице Oracle.
А помните, как мы установили это окно предварительного просмотра на 100 строк? Мы внимательно изучаем данные, ищем проблемы, пытаясь вписать их в столбец вашей таблицы. Если мы обнаружим проблему, мы пометим столбцы этими «предупреждающими» символами.
Я загрязнил свой файл Excel некоторыми намеренно ошибочными значениями, которые, как я знаю, не будут «подходить». Когда эти строки будут обнаружены в мастере, база данных их отклонит, но остальные строки будут введены.
Давайте на секунду поговорим о форматах даты и времени.
О TIMESTAMP тоже. В файле Excel у вас, вероятно, будут некоторые поля даты и времени, которые вы хотите переместить в столбцы формата DATE или TIMESTAMP. SQL Developer обрабатывает эти значения как строки – и ВАМ нужно сообщить SQL Developer формат DATE или TIMESTAMP, чтобы иметь возможность их преобразовать.
Давайте посмотрим на HIREDATE.
HIRE_DATE – если только вы не храните ДАТЫ в VARCHAR2, — и если вы делаете это, то делаете это НЕПРАВИЛЬНО. Всегда храните ДАТЫ в формате DATE!
Видите выпадающий селектор «Формат» (Format)? SQL Developer по умолчанию установил строку формата ДАТЫ в ‘DD-MON-RR’ – мы пытаемся угадать это на основе строк, которые мы рассматриваем в этом окне предварительного просмотра 100.
Если мы ошиблись в догадках или не смогли разобраться, вам нужно будет ввести это самостоятельно. Документы Oracle могут помочь вам определить правильную модель формата ДАТЫ. Если вы видите небольшое предупреждающее изображение рядом со значениями даты на панели данных, возможно, у вас неправильный формат.
Шаг 6: Проверьте свои настройки и ВПЕРЕД!
Нажмите на кнопку «Готово» (Finish).
Если Мастер столкнется с какими-либо проблемами при выполнении вставок, вы увидите следующее:

Я собираюсь сказать «Да», чтобы игнорировать все ошибки. Но если вам нужна КАЖДАЯ отдельная строка – вам нужно сказать «Отмена», чтобы начать все сначала. Затем вы можете либо исправить свои данные в файле Excel, либо внести изменения в свою таблицу, чтобы данные соответствовали/работали.
Нажав ‘Да», мы доберемся до конца нашей истории и наших данных!
Шаг 7: Посмотрите, Что сработало, а Что нет
Во-первых, есть ли плохие новости?
Если были строки, отклоненные базой данных, мы увидим их сейчас.
INSERT, которые мы пытались запустить, но не сработали. Вы можете изменить их вручную, чтобы исправить несколько записей. Но если у вас тысячи забракованных строк – лучше разобраться в файле (в источнике импорта).
Теперь давайте посмотрим на наши новые табличные данные!

Обратите внимание на панель «Журнал» (Log). Там можно увиеть файл, с которым мы работали, и сколько времени потребовалось для загрузки данных.
Всё! Можно выдохнуть свободно. Импорт из файла Excel в таблицу базы данных Oracle завершен. В шапке статьи вы можете посмотреть видео инструкцию — копию этого мануала на английском языке.
Вас заинтересует / Intresting for you:
I have installed SQL Developer in my system, but how can i utilize the GUI.
I am new to this and i want to import datas from Excel to Oracle database using SQL Developer
Thanks in advance
![]()
abatishchev
97.3k85 gold badges297 silver badges432 bronze badges
asked Aug 10, 2010 at 2:04
![]()
1
At what point did you get stuck?
A fast track:
- Create a connection to the database in SQL Developer
- Create a table as a destination for the xls data
- save excel data as csv
- right click on the table from step 2
- select ‘import data’
- select csv file
- use the wizzard
and bob is your uncle
Folowing methed creates the table for you
- Create a connection to the database in SQL Developer
- right click on tables folder
- Choose Import data
- select xls
- use the wizzard (provide table name, row limit, select columns, datatype per column)
- Finish
answered Aug 10, 2010 at 10:49
![]()
It was late. In a corner of the Treasury however, a light burned brightly.
Phillip Hammond, Chancellor of the Exchequer, was still working.
“Spreadsheet Phil” was trying to formulate a plan to rectify the nation’s finances in the event that the Prime Minister was won over by the ebullient Mr Johnson and decided upon a “No Deal” Brexit.
Boris Johnson was currently based at the F.O. which, Phil considered darkly, was somewhat appropriate.
If only his predecessor had had the foresight to stick a couple of billion on Liecester City to win the league at 5000 to 1, The Country’s finances would be in much better shape.
In the midst of this gloomy reflection, he was struck by a sudden inspiration. The crowded half-hour that followed resulted in – what else – a spreadsheet.
The information therein could save The Economy. “Hmmm”, thought Phil, “this stuff is far too important to leave in Excel, I really need to put it into my Oracle database. I wonder if SQLDeveloper could help”…
Being a cautious soul, Phil has decided to stick with something he knows quite well – the question of who is going to be the next Prime Minister of the United Kingdom of Great Britain and Northern Ireland including (for the moment at least), Scotland :
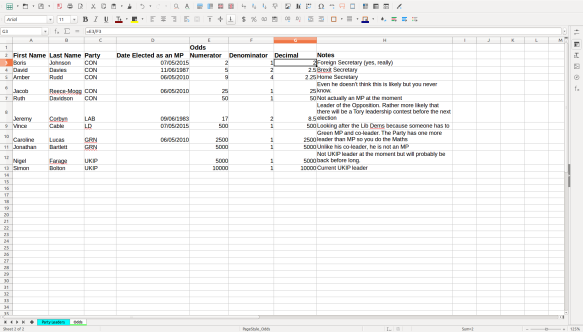
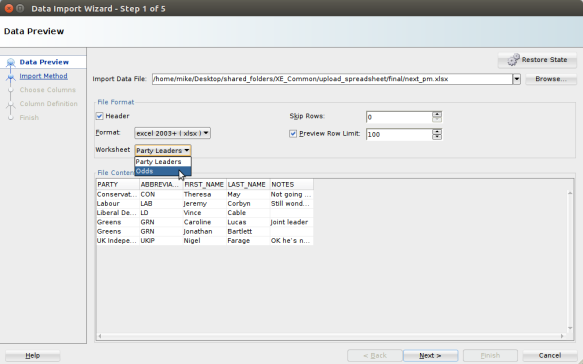
The workbook consists of two sheets – Party Leaders and Odds. At this stage, Phil just wants to upload the data in the Odds sheet.
The data in the decimal odds column is derived by means of a formula, for example :
=E3/F3
As we will see, SQLDeveloper will upload the values in cells rather than any formulas that may be present.
The observant among you will also notice that the above screenshot is taken from Libre Office Calc rather than Excel.
As I’m using Ubuntu at the moment, I don’t have a version of Excel to hand. This wouldn’t be much of a problem except for the fact that the SQLDeveloper version I’m using (4.2), doesn’t offer the option of importing data from an ODS formatted spreadsheet.
Fortunately Calc can save a workbook in numerous formats…including XLSX.
You could pretend that the British Government has come to it’s senses and is saving billions in licensing by using open source software. However, in that scenario, we’d probably be using a different RDBMS so it looks like you’re stuck with the real politik of the situation.
Anyhow, this is our spreadsheet. It is in XLSX (Excel 2003 or later) format. We want to load the data from one of it’s two Worksheets into an Oracle database table…
The target table
The DDL for the target table is :
create table next_pm(
    first_name varchar2(100) not null,
    last_name varchar2(100) not null,
    decimal_odds number,
    date_elected date
)
/
…and there is already some data in it :
select first_name, last_name, decimal_odds,
    to_char(date_elected, 'fmddth Month YYYY') as "Elected to Parliament"
from next_pm
/

FIRST_NAME                     LAST_NAME                      DECIMAL_ODDS Elected to Parliament
------------------------------ ------------------------------ ------------ ----------------------------------------------
Phillip                        Hammond                                3.33 1st May 1997
You’ll notice that the table does not contain the same columns as the spreadsheet does. The columns it does have in common with the spreadsheet are in a different order.
Oh, and they have names that are different from the headings in the spreadsheet.
As Phil is about to find out, all of these potential problems can be easily overcome…
The SQLDeveloper Import Data Wizard
Firing up SQLDeveloper, Phil navigates to the NEXT_PM table.
Now, he could just use the right-click menu in the Tree view on the left of the screen, but he prefers to select the table and then invoke the Actions menu…
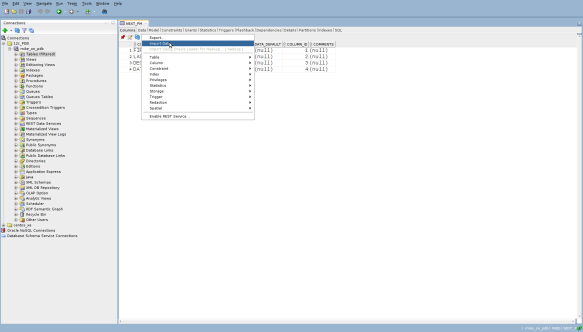
…and selecting Import Data…, which invokes the Data Import Wizard…

When Phil selects his spreadsheet, SQLDeveloper defaults to the first Worksheet. For some reason, it also insists on defaulting the file format to Excel 95-2003 (xls)…
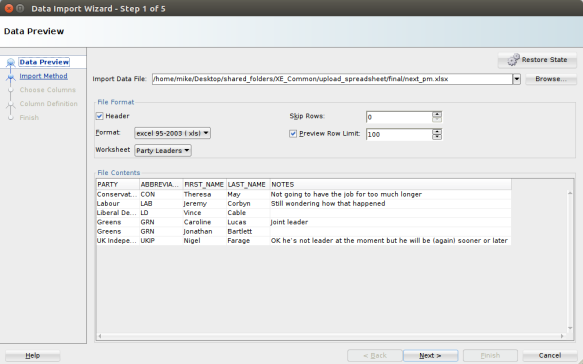
…that’s easily changed, and Phil selects the appropriate Excel format before hitting the Worksheet drop-down to pick the appropriate worksheet
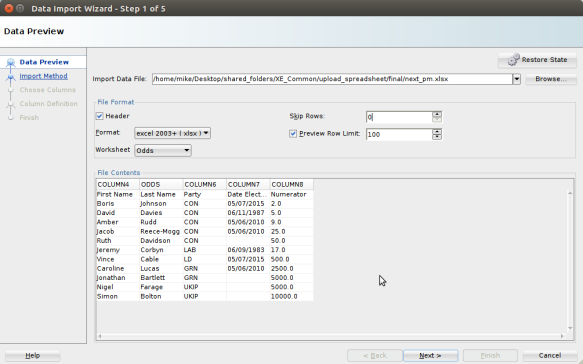
At first, SQLDeveloper isn’t too sure of about the column headings….
…but Phil just sets Skip Rows to 1 and…
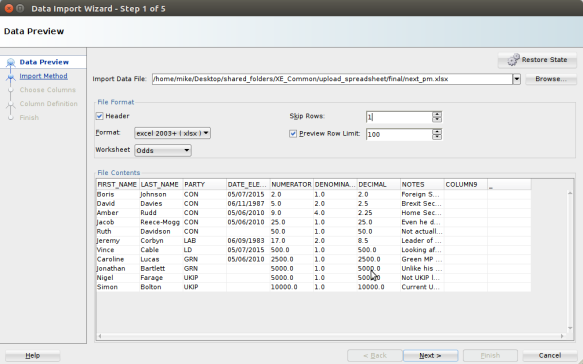
Now Phil is happy with what he sees, he clicks Next
He then has a choice of Import methods. He could just opt to create an Insert script by setting the Input Method to Insert Script. Breaking the habit of a lifetime however, Phil throws caution to the wind and decides to Insert the data directly into the table. By leaving Send create script to SQL Worksheet checked, he’ll get an insert script anyway.
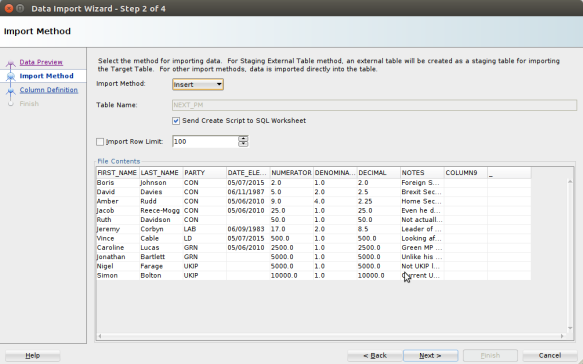
Time to click Next.
By default, all of the columns in the Worksheet are selected. Phil uses the left and right arrow buttons to choose only the columns that he wants to import into the table, and then the up and down arrows to specify the order …
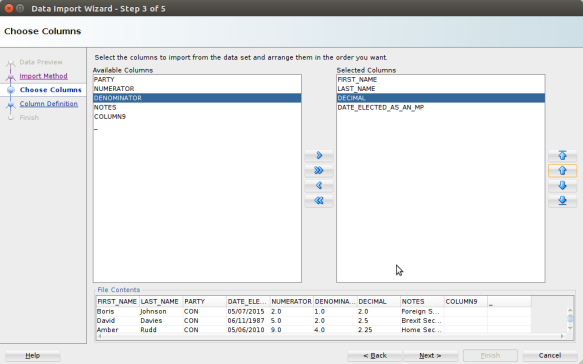
Now, he clicks Next.
What he notices here are the red exclamation marks. SQLDeveloper is smart enough to point out that there are some issues to be sorted out…
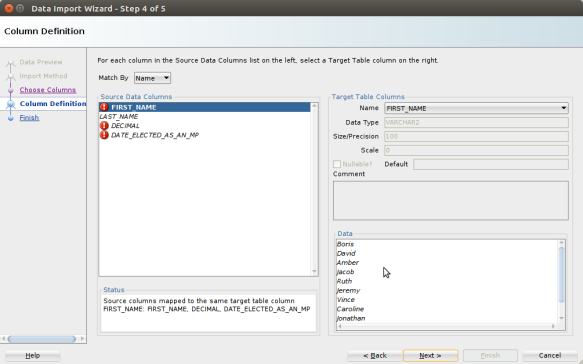
Phil has a couple of options here. By clicking on a Source Data Column that has a red exclamation mark he can see information such as a Status explaining why the column has been marked by SQLDeveloper, the target column this data is currently pointing to in the target table, and even a sample of the data contained in the column…

He can then take the appropriate action to fix the problem. In this case, he could for example, specify that the Decimal column in the spreadsheet should be imported into the DECIMAL_ODDS table column.
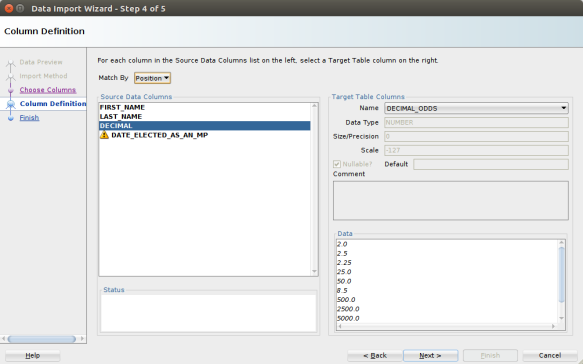
However, as he’s just gone to all that trouble to get his columns in the correct order in the previous screen, he simply changes the Match By drop-down value from Name to Position :
Phil has one last little glitch to sort out, as can be seen from the Yellow exclamation mark on the DATE_ELECTED_AS_AN_MP source column.
In this case, it’s simply a question of setting an appropriate date format…
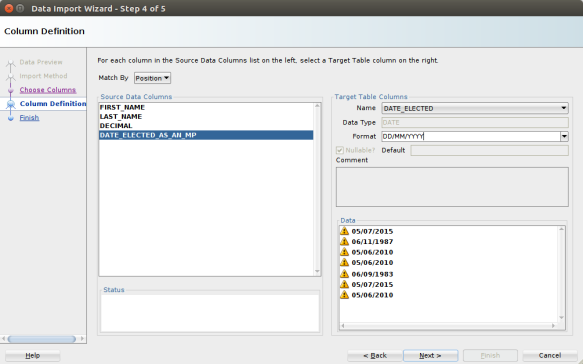
…and clicking Next
Finally, Phil has the opportunity to review his settings…
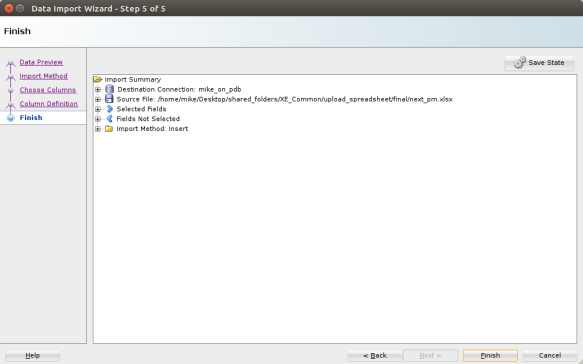
…and then, when he’s happy, hit the Finish button to import the data.
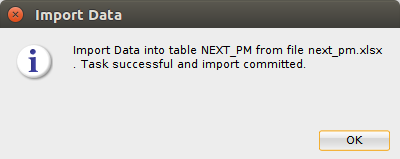
At this point, SQLDeveloper displays this reassuring message :
Now Phil can see that the data has been successfully loaded into the table whilst preserving the pre-existing record :
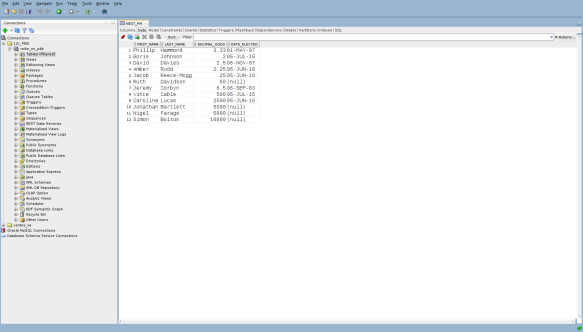
“Well”, thought Phil to himself, “I never knew that getting data from Excel into Oracle was so simple. Now, back to Brexit, it can’t be that hard…”
SQL Developer is an increasingly important tool. I’ve known it since it first came out and in each new release they get things more and more powerful. I have also seen that many people who use it do not exploit more than 10 -20% of the capabilities of the tool.
Perhaps the main disadvantage that SQL Developer has is that it is programmed in JAVA, which makes it portable between different Operating Systems, but penalizes performance and memory consumption. This tool developed in c could be incredible, but it would imply porting to each platform it supports.
Today I just want to show a feature that has saved me hours of work when importing excel sheets into an Oracle database. Of course, using Microsoft Office or LibreOffice you can open a connector to the database and do the same.
Let’s see the steps
On table, click rigth button and select “Import Data”;

The next window appears. Here click on Browse and choose the xlsx file

In this case we will make the insertion as individual inserts, click on “Next”;

In my case I selected all columns to import. Click on “Next”;

In this case it is matched by name, click on “Next”;

In this phase of the process we are shown a summary of all the steps. Click on “Finish”;

If everything went well we will see a window like this;

HTH – Antonio NAVARRO
Содержание
- How to Import from Excel to a New Oracle Table with SQL Developer
- Sample Data
- Step One: Connect to Your Database as the New Table Owner
- Step Two: Find the ‘Table’ Node and Access the Context Menu
- Step Three: Select ‘Import Data…’
- Step Four: Step Through the Wizard
- Load the file
- Preview the data
- Name Your Table
- Choose Columns
- Column(s) Definition
- Verify Your Parameters
- Finish!
- How to Import from Excel to Oracle with SQL Developer
- Step 0: The Empty Oracle Table and your Excel File
- Step 1: Mouse-right click – Import Data
- Step 2: Select your input (XLSX) file and verify the data
- Step 3: Create a script or import automatically
- Step 4: Select the Excel Columns to be Imported
- Step 5: Map the Excel Columns to the Table Columns
- Step 6: Verify your settings and GO!
- Step 7: See What Worked and What Didn’t
- Just a few more pointers when it comes to Excel
- The Movie
- Как импортировать данные из Excel в Oracle с помощью SQL Developer
- Илья Дергунов
- Шаг 0: Пустая таблица Oracle и ваш файл Excel
- Шаг 1: Выбираем «Импорт данных» по правому щелчку мыши
- Шаг 2: Выберите свой входной файл (XLSX) и проверьте данные
- Шаг 3: Создайте сценарий или импортируйте автоматически
- Шаг 4: Выберите столбцы Excel для импорта
- Шаг 5: Сопоставьте столбцы Excel со столбцами таблицы
- Шаг 6: Проверьте свои настройки и ВПЕРЕД!
- Шаг 7: Посмотрите, Что сработало, а Что нет
How to Import from Excel to a New Oracle Table with SQL Developer
In a previous post, How to Import from Excel to Oracle with SQL Developer, I covered step-by-step how to import data from Excel to an existing Oracle table. This post shows how to take a spreadsheet and transform it into a new table in your Oracle database.
But first, please permit me just a few seconds as I step up to my bully-pulpit:
Please do not import data to Excel just because you know SQL better than Excel functions and macros.
Everything has a cost. If you can keep your ad-hoc queries local to your machine and your spreadsheet, that’s a win for everyone. However, if you wan to put your data in Oracle anyway, then who am I to argue? So without much further ado, here’s what you need to know to load your data. And I promise – no more preaching, mostly.
Sample Data
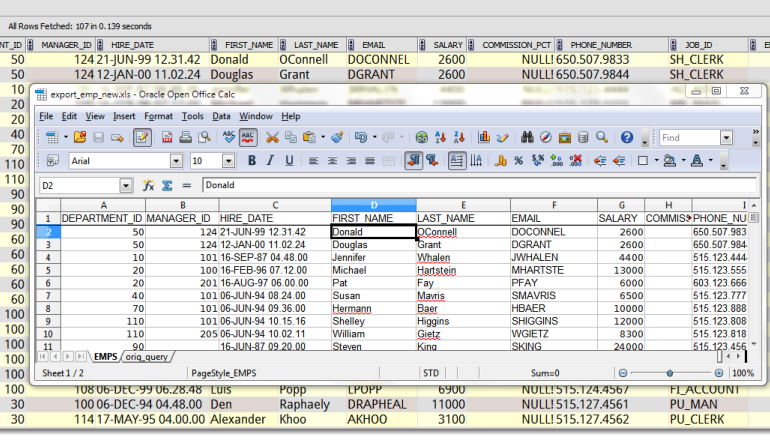
For this exercise I’m taking some data from HR.EMPLOYEES and sending it to a new table. I’m purposely querying the data out in a different column order than the original source.
Obviously if your data is already in a table somewhere, it’s always going to be better to load it to a new table via a Create Table As Select (CTAS.) Even going across a DB_LINK may be more efficient than writing to Excel and then loading it back to Oracle. For this tutorial I’m assuming your data ONLY exists in Excel before getting started.
Step One: Connect to Your Database as the New Table Owner
You can only invoke the ‘Import Data…’ wizard from your connection owner schema. Of course if the table already exists, you can simply load your data by mouse-right-clicking on said table.
Step Two: Find the ‘Table’ Node and Access the Context Menu
Step Three: Select ‘Import Data…’
It says ‘Import,’ but we’ll also be creating a new table for the data to be stored in.
Step Four: Step Through the Wizard
You get to answer a few questions. Don’t like wizards? You could always script out this process yourself using SQL*Loader.
Load the file
Point to your XLS, XLSX, or CSV file.
Preview the data
Depending on the size of your spreadsheet, it may take a few moments to load up the preview dialog. This step exactly mirrors the data preview from my earlier post. However, a few things to note:
- The ‘Header’ tell the tool that there IS a header and not to include the first read row as data
- Skip rows – how many rows to skip. If your header line doesn’t appear until row 5, you’ll want to skip 4 rows
- You can load the data from any worksheet, we’ll default to the first one though
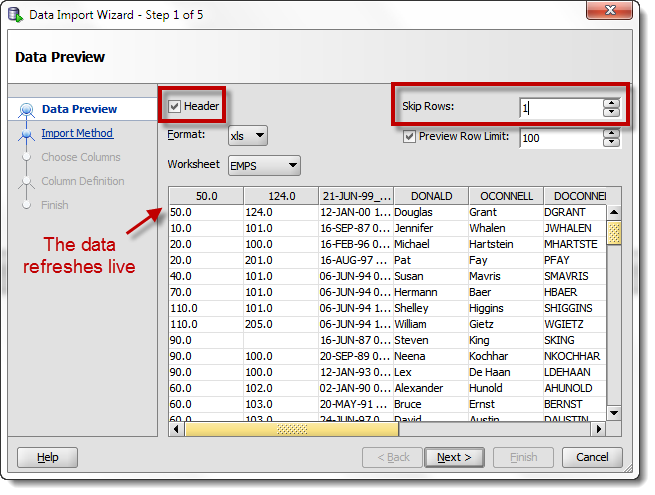 ‘Header’ and ‘Skip’ controls are independent controls. Skip tells how many rows to go before we get to the header.
Name Your Table
There are a few options here. You can generate a script to create the table and then populate the table via INSERTs. Use this option if you want to preview or approve what’s going to be happening in your database. You can also tell SQL Developer to only load a specific number of rows.
 What’s in a name, really?
Choose Columns
This step is important. Your spreadsheet may have 30 columns, but you only want to import 10 of them. Select the 10 columns you want to form the new table. Also, add them to the ‘Selected Columns’ panel in the ORDER you want them created in the new table.
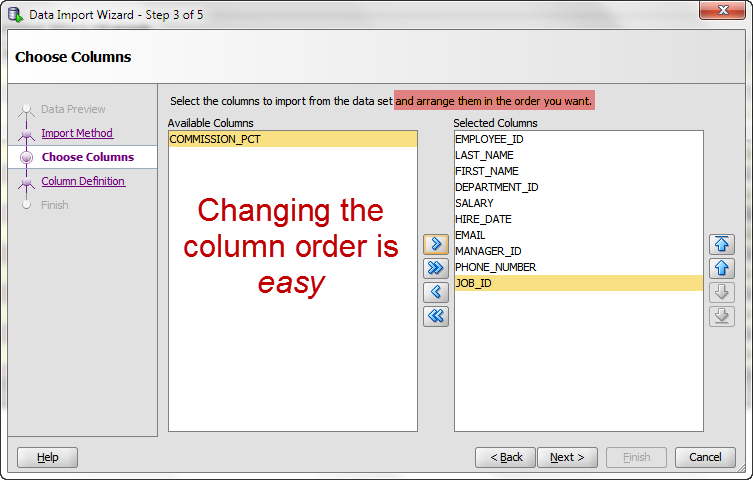 It’s easy to change the column order at creation time. After the fact, not so much.
Column(s) Definition
If there’s a wizard you don’t want to blindly click through, this one definitely qualifies. But if you’re asleep at the wheel, PLEASE make sure you’re paying attention when it comes to defining the columns. Two things to be aware of:
- We’re defaulting the columns to strings (VARCHAR2s)
- We’re defaulting the size to the max length of the data previewed
For point #1, we’re looking to have a better ‘guessing’ scheme for upcoming versions. But there’s no bigger problem in applications and data quality today than developers storing dates as strings or numbers. Be sure the datatype for each column is appropriate. If in doubt, consult your data model. If you don’t have a data model, consider taking a step back and creating one. I know, I know, I said I wouldn’t be preaching anymore. Sorry.
For point #2, there might be values that exceed this length. Size the columns appropriately based on your data model and application specifications.
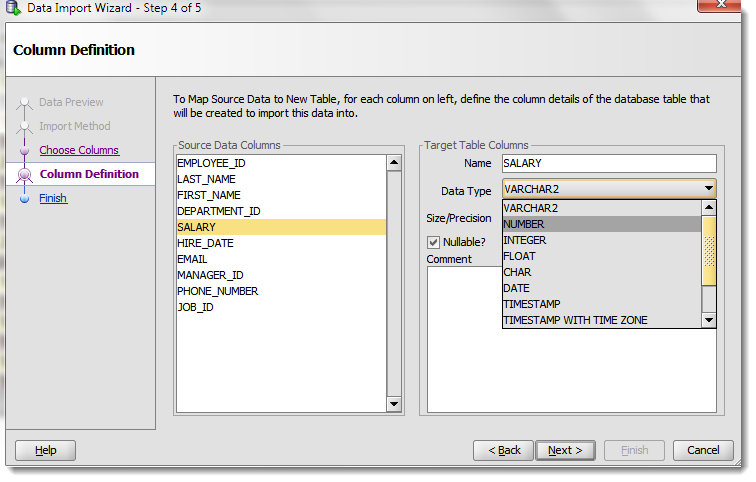 Change the datatypes as appropriate!
Verify Your Parameters
This step is voluntary, but I recommend you always use it. It will help you catch date columns defined with missing or invalid date formats.
Finish!
SQL Developer will either create the table and load the data, or will will generate the create and insert scripts.

I’m a Distinguished Product Manager at Oracle. My mission is to help you and your company be more efficient with our database tools.
Источник
How to Import from Excel to Oracle with SQL Developer
THIS is your number one question – and it has been here on my blog since the day I posted it.
You have an Excel file – and you want that data put into a table. I’ll show you how, and we’ll document each step of the way with plenty of pictures.
You will be prepared to import data to an existing table from Excel with confidence after reading this post. Want to build a new table from Excel? We can do that, too.
Warning: This post has a LOT of pictures.
For our example I’ll be using the HR.EMPLOYEES table to create the XLS file for our import. We’ll use that Excel file to populate an empty copy of the EMPLOYEES table in another schema.
Step 0: The Empty Oracle Table and your Excel File
You have an Oracle table and you have one or more Excel files.
Step 1: Mouse-right click – Import Data
Step 2: Select your input (XLSX) file and verify the data
As you select the file, we’ll grab the first 100 rows for you to browse below. This ‘Preview Row Limit’ defines how many rows you can use to verify the IMPORT as we step through the wizard. You can increase it, but that will take more resources, so don’t go crazy.
Also, does your Excel file have column headers? Do we want to treat those as a row to the table? Probably not. If you uncheck the ‘Header’ flag, the column names will become a new row in your table – and probably fail to be inserted.
Sometimes your Excel file has multiple headers, or you may need to only import a certain subset of the spreadsheet. Use the ‘Skip Rows’ option to get the right data.
Step 3: Create a script or import automatically
For this exercise the ‘Insert’ method will be used. Each row processed in the Excel file will result in an INSERT statement executed on the table we’re importing to.
If you choose ‘Insert Script’, the wizard will end with an INSERT Script in your SQL Worksheet. This is a nice alternative if you want to customize the SQL, or if you need to debug/see why the ‘Insert’ method isn’t working.
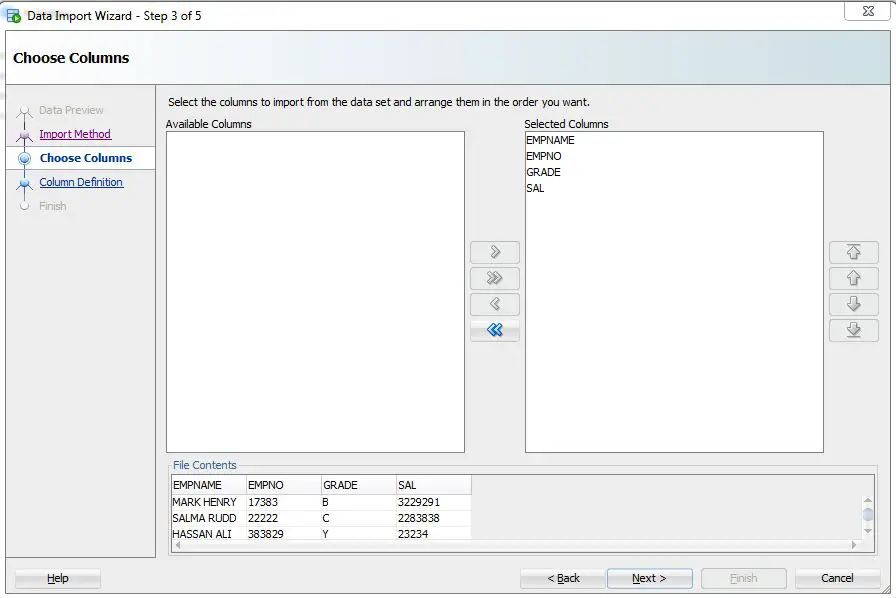
Step 4: Select the Excel Columns to be Imported
You may have an Excel file with 100 columns but your table only has 30. This is where you tell SQL Developer what columns are to be used for the import. You can also modify the column order, which may make the next step a bit easier.
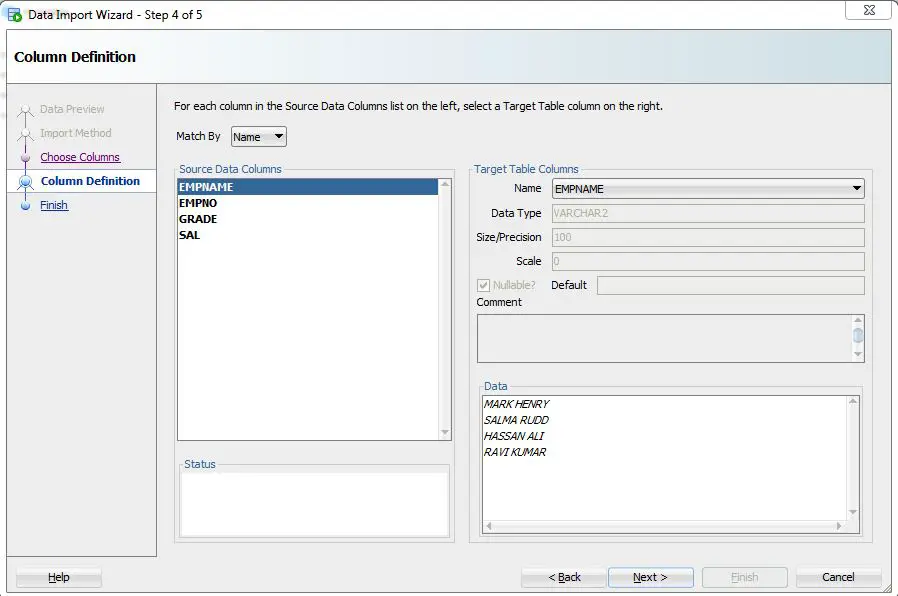
Step 5: Map the Excel Columns to the Table Columns
If you’re not paying attention and just letting the wizard guide you home, then now is the time to wake up. There’s a good chance the column order of the Excel file won’t match the definition of your table. This is where you will tell SQL Developer what columns in the spreadsheet match up to what columns in the Oracle table.
And remember how we set that preview window to 100 rows? We’re peaking at the data, looking for problems as we try to fit it into your table column. If we find a problem, we’ll mark the columns with those ‘warning’ symbols.
I’ve polluted my Excel file with some values that I know won’t ‘fit.’ When these rows are encountered in the wizard, they’ll be rejected by the database – but the other rows will come in.
Let’s talk about DATES for a second.
And TIMESTAMPS too. In the excel file, you’re probably going to have some date/time fields you want to move into DATE or TIMESTAMP columns. SQL Developer is treating those value as strings – and YOU need to tell SQL Developer the DATE or TIMESTAMP format to use to be able to convert them.
Let’s look at HIREDATE.
That ‘ha ha’ value will never make it in as a HIRE_DATE value – unless you’re storing DATES in a VARCHAR2 – and if you’re doing that, you’re doing it WRONG. Always store DATES as a DATE!
See the ‘Format’ drop down selector? SQL Developer has defaulted the DATE format string to ‘DD-MON-RR’ – we try to guess based on the rows we’re looking at in that 100 preview window.
If we have guessed wrong, or were unable to figure it out, you’ll need to input this yourself. The Oracle Docs can help you define the correct DATE Format Model. If you see the little warning graphics next to your Date values in the Data panel, you might have the wrong format.
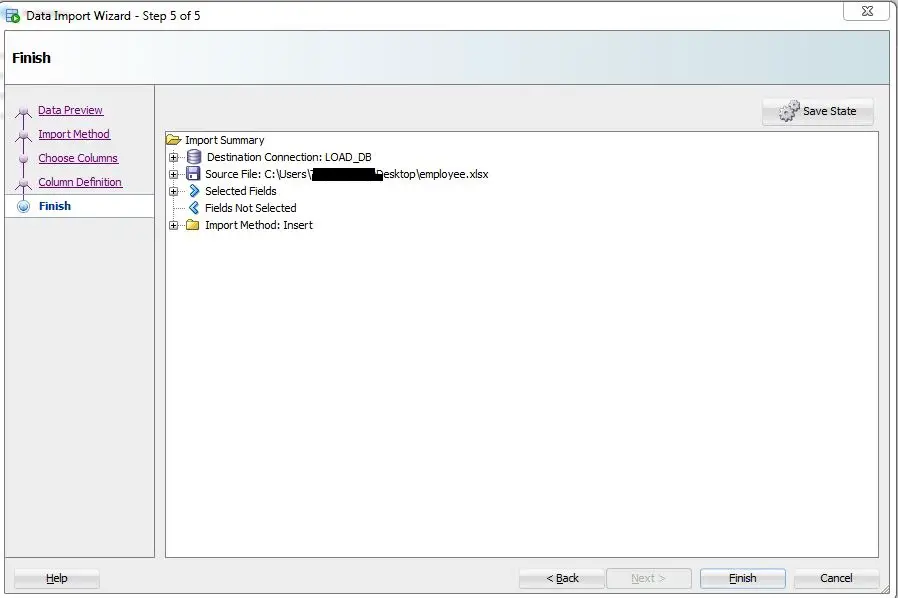
Step 6: Verify your settings and GO!
Click on the ‘Finish’ button.
If the Wizard runs into any problems doing the INSERTs, you’ll see this:
Remember that funny data i put into the Excel file? That’s causing problems now.
I’m going to say ‘Yes’ to ignore all the errors. But, if you need EVERY single row – you need to say ‘Cancel’ to start over. Then you can either fix your data in the Excel file, or make changes to your table so the data will fit/work.
After clicking ‘Yes’, we’ll get to the end of our story, and our data!
Step 7: See What Worked and What Didn’t
First, any bad news?
If there were rows rejected by the database, we’ll see those now.
Behind that dialog are the INSERT statements we tried to run, but didn’t work. You might be able to edit those manually to fix a few records. But if you have thousands of rejected rows – better to fix at the source.
Now let’s go look at our new table data!
I love the sweet smell of data in the morning!
Note the ‘Log’ panel. We’ll show you the file we worked with, and how much time it took to load the data.
Just a few more pointers when it comes to Excel
- Storing data in Excel can be…dangerous
- If you have a lot of data or if this will be a repeating process, consider External Tables or SQL*Loader instead
- If you like to put data in Oracle because you understand SQL better than Excel macros, then welcome to the club 😉
- Here’s 11 more tips on Importing Excel/CSV into your database
The Movie
Источник
Как импортировать данные из Excel в Oracle с помощью SQL Developer

Илья Дергунов
Автор статьи. ИТ-специалист с 20 летним стажем, автор большого количества публикаций на профильную тематику (разработка ПО, администрирование, новостные заметки). Подробнее.
Задача. У вас есть файл Excel – и вы хотите, чтобы эти данные были помещены в таблицу. Я покажу вам, как это делается, и мы задокументируем каждый шаг с большим количеством иллюстраций.
Прочитав этот пост, вы будете готовы с уверенностью импортировать данные в существующую таблицу из Excel. Хотите создать новую таблицу из Excel? Мы тоже можем это сделать.
В нашем примере я буду использовать таблицу HR.EMPLOYEES для создания XLS-файла для нашего импорта. Мы будем использовать этот файл Excel для заполнения пустой копии таблицы EMPLOYEES в другой схеме.
Шаг 0: Пустая таблица Oracle и ваш файл Excel
У вас есть таблица Oracle и один или несколько файлов Excel.
Шаг 1: Выбираем «Импорт данных» по правому щелчку мыши
Шаг 2: Выберите свой входной файл (XLSX) и проверьте данные
Когда вы выберете файл, мы захватим первые 100 строк для просмотра ниже. Этот «Предел строк предварительного просмотра» определяет, сколько строк вы можете использовать для проверки ИМПОРТА по мере прохождения мастера. Вы можете увеличить его, но это потребует больше ресурсов, так что не сходите с ума.
Кроме того, есть ли в вашем файле Excel заголовки столбцов? Хотим ли мы рассматривать их как строку к таблице? Скорее всего, нет. Если вы снимите флажок «Заголовок», имена столбцов станут новой строкой в вашей таблице – и, вероятно, не будут вставлены.
Иногда ваш файл Excel имеет несколько заголовков, или вам может потребоваться импортировать только определенное подмножество электронной таблицы. Используйте опцию «Пропустить строки», чтобы получить правильные данные.
Шаг 3: Создайте сценарий или импортируйте автоматически
Для этого упражнения будет использоваться метод «Вставки» (Insert). Каждая строка, обработанная в файле Excel, приведет к выполнению инструкции INSERT в таблице, в которую мы импортируем.
Если вы выберете «Вставить скрипт», мастер завершит работу скриптом ВСТАВКИ на вашем листе SQL. Это хорошая альтернатива, если вы хотите настроить SQL, или если вам нужно отладить/посмотреть, почему метод «Insert» не работает.
Шаг 4: Выберите столбцы Excel для импорта
У вас может быть файл Excel со 100 столбцами, но ваша таблица имеет только 30. Здесь вы даете команду SQL Developer, какие столбцы должны использоваться для импорта. Вы также можете изменить порядок столбцов, что может сделать следующий шаг немного проще.
Шаг 5: Сопоставьте столбцы Excel со столбцами таблицы
Если вы не обращаете внимания и просто позволяете Мастеру импорта делать всё по умолчанию, то сейчас самое время проснуться. Есть большая вероятность, что порядок столбцов файла Excel не будет соответствовать определению вашей таблицы. На этом шаге вы указываете SQL Developer-у, какие столбцы в электронной таблице совпадают с какими столбцами в таблице Oracle.
А помните, как мы установили это окно предварительного просмотра на 100 строк? Мы внимательно изучаем данные, ищем проблемы, пытаясь вписать их в столбец вашей таблицы. Если мы обнаружим проблему, мы пометим столбцы этими «предупреждающими» символами.
Я загрязнил свой файл Excel некоторыми намеренно ошибочными значениями, которые, как я знаю, не будут «подходить». Когда эти строки будут обнаружены в мастере, база данных их отклонит, но остальные строки будут введены.
Давайте на секунду поговорим о форматах даты и времени.
О TIMESTAMP тоже. В файле Excel у вас, вероятно, будут некоторые поля даты и времени, которые вы хотите переместить в столбцы формата DATE или TIMESTAMP . SQL Developer обрабатывает эти значения как строки – и ВАМ нужно сообщить SQL Developer формат DATE или TIMESTAMP , чтобы иметь возможность их преобразовать.
Давайте посмотрим на HIREDATE.
Это значение «ха – ха» никогда не войдет в качестве значения HIRE_DATE – если только вы не храните ДАТЫ в VARCHAR2 , — и если вы делаете это, то делаете это НЕПРАВИЛЬНО. Всегда храните ДАТЫ в формате DATE !
Видите выпадающий селектор «Формат» (Format)? SQL Developer по умолчанию установил строку формата ДАТЫ в ‘ DD-MON-RR ’ – мы пытаемся угадать это на основе строк, которые мы рассматриваем в этом окне предварительного просмотра 100.
Если мы ошиблись в догадках или не смогли разобраться, вам нужно будет ввести это самостоятельно. Документы Oracle могут помочь вам определить правильную модель формата ДАТЫ. Если вы видите небольшое предупреждающее изображение рядом со значениями даты на панели данных, возможно, у вас неправильный формат.
Шаг 6: Проверьте свои настройки и ВПЕРЕД!
Нажмите на кнопку «Готово» (Finish).
Если Мастер столкнется с какими-либо проблемами при выполнении вставок, вы увидите следующее:
Помните те забавные данные, которые я поместил в файл Excel? Теперь это создает проблемы.
Я собираюсь сказать «Да», чтобы игнорировать все ошибки. Но если вам нужна КАЖДАЯ отдельная строка – вам нужно сказать «Отмена», чтобы начать все сначала. Затем вы можете либо исправить свои данные в файле Excel, либо внести изменения в свою таблицу, чтобы данные соответствовали/работали.
Нажав ‘Да», мы доберемся до конца нашей истории и наших данных!
Шаг 7: Посмотрите, Что сработало, а Что нет
Во-первых, есть ли плохие новости?
Если были строки, отклоненные базой данных, мы увидим их сейчас.
За этим диалогом находятся инструкции INSERT , которые мы пытались запустить, но не сработали. Вы можете изменить их вручную, чтобы исправить несколько записей. Но если у вас тысячи забракованных строк – лучше разобраться в файле (в источнике импорта).
Теперь давайте посмотрим на наши новые табличные данные!
Я люблю сладкий запах данных по утрам!
Обратите внимание на панель «Журнал» (Log). Там можно увиеть файл, с которым мы работали, и сколько времени потребовалось для загрузки данных.
Всё! Можно выдохнуть свободно. Импорт из файла Excel в таблицу базы данных Oracle завершен. В шапке статьи вы можете посмотреть видео инструкцию — копию этого мануала на английском языке.
Источник
In this article, we will explain different methods to load data from excel sheet into Oracle database.
Below are the methods that can be used.
- SQL DEVELOPER
- SQLCL utility
- TOAD
- SQLLOADER
Here we will explain how to do this with SQL developer and SQLCL utility.
USING SQLDEVELOPER TOOL:
SQL developer is a free tool provided by SQL developer is a free tool provided by Oracle for managing database with GUI interface.
You can download and install it on your desktop. Loading the excel sheet into a table using SQL developer is the easiest way.
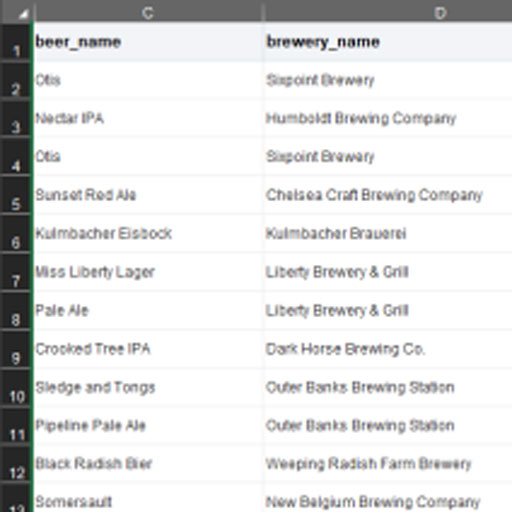
Let’s say, we have an excel sheet names employee.xlsx as below.
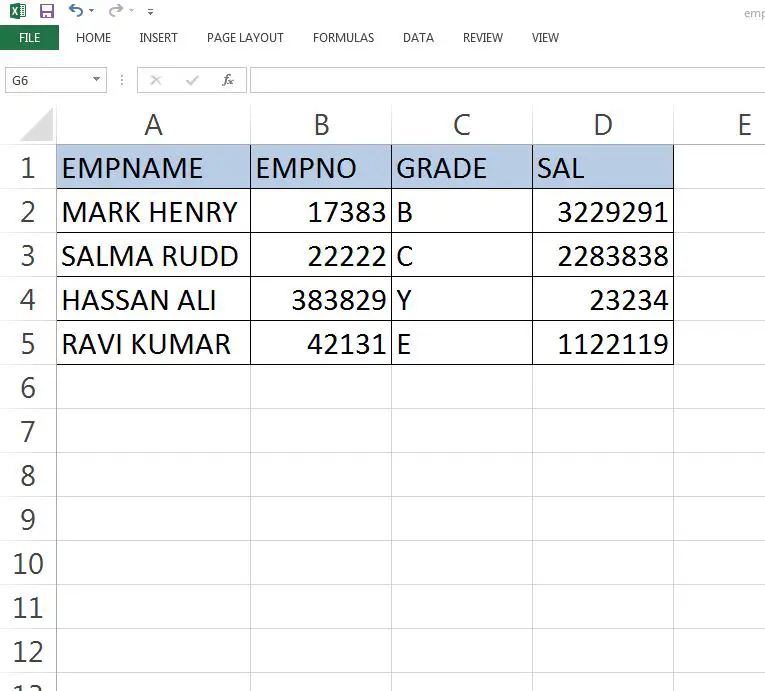
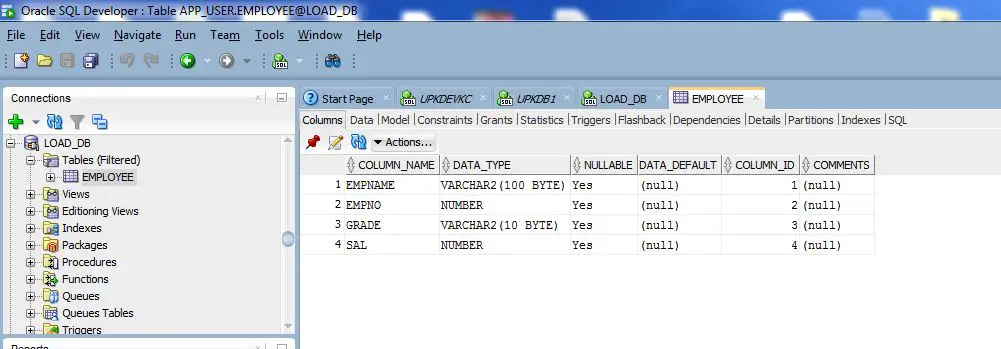
So first create a table with the columns same as excel sheet.
SQL> show user
USER is "APP_USER"
SQL>
SQL>
SQL> CREATE TABLE EMPLOYEE
( EMPNAME VARCHAR2(100),
  EMPNO   NUMBER ,
  GRADE   VARCHAR2(10),
  SAL     NUMBER
);  2    3    4    5    6

Table created.
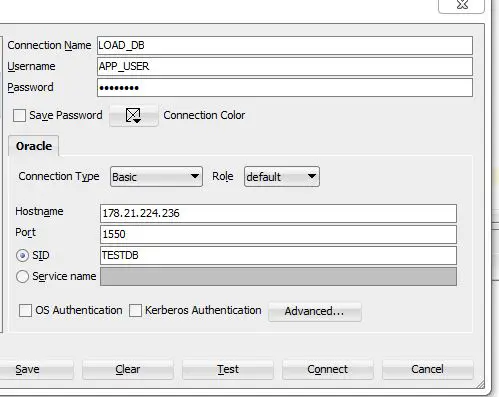
Once the table is created, connect to the database using SQL developer.
Select the table, which we created,(where data will be loaded).
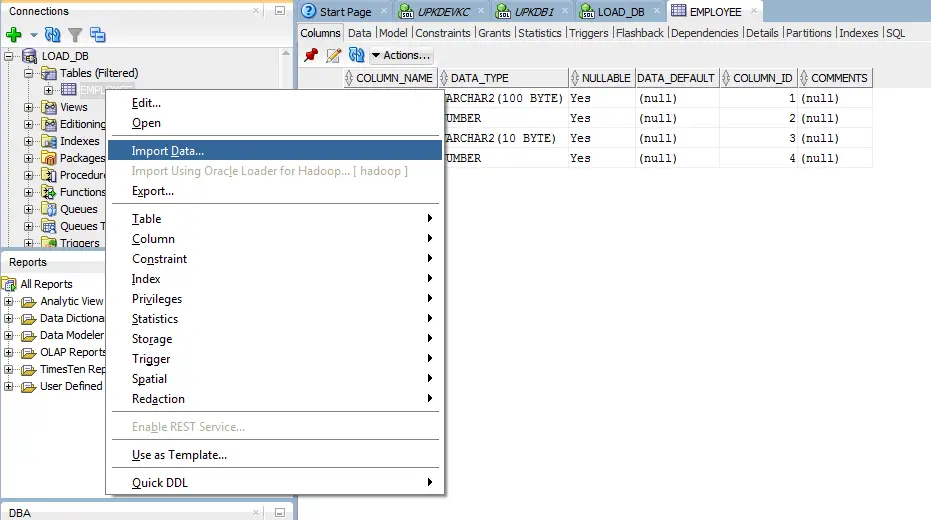
Right click on the table and select Import Data.
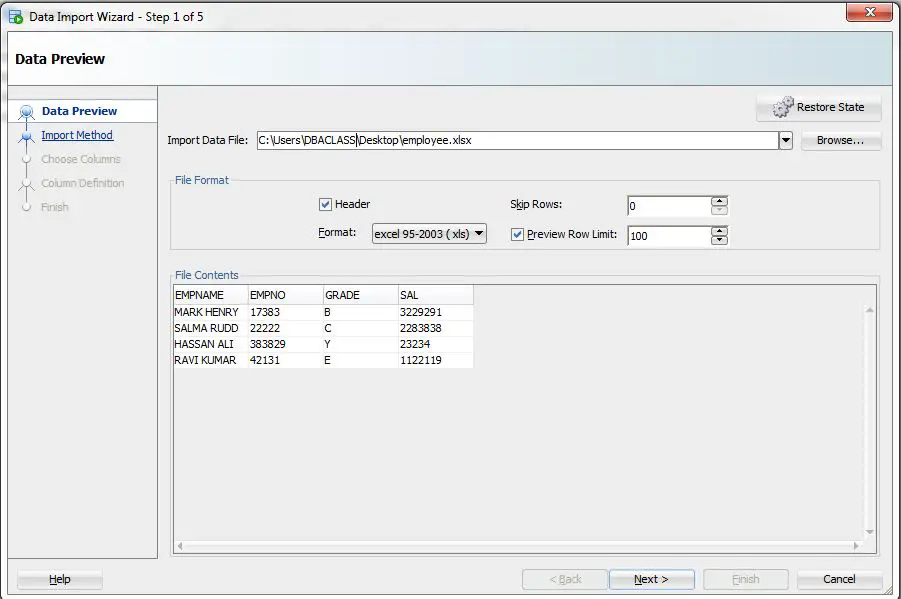
Browse the xlsx file and set format to xls.
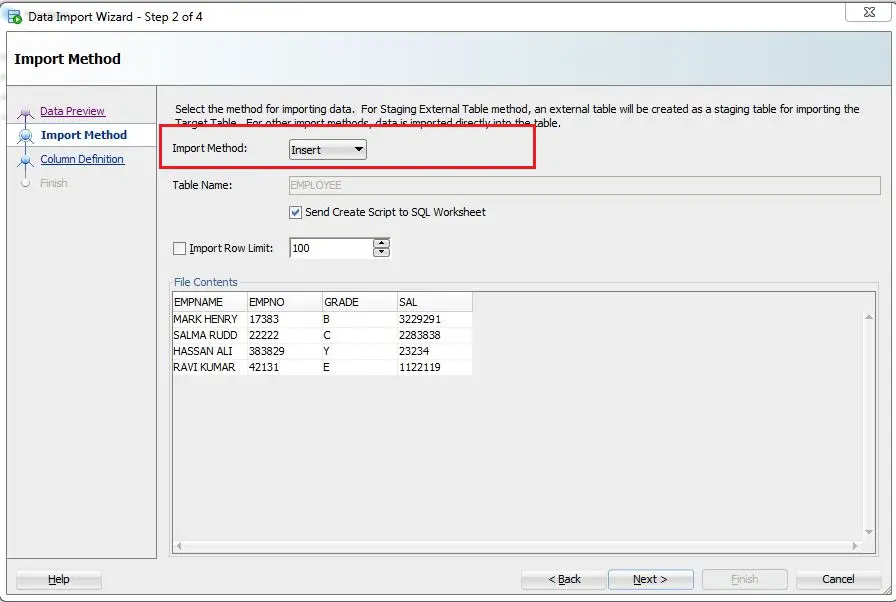
Import method -> Insert
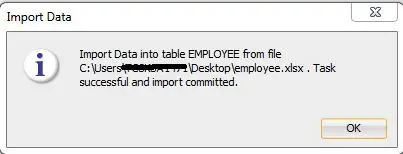
We have successfully imported the excel sheet into the table. Let’s check in the database.
SQL> select count(*) from app_user.employee;

  COUNT(*)
----------
         4
USING SQLCL UTILITY:
SQLCL is a free utility provided by Oracle that provides an option to load CSV file to a database table easily.
For installation and use please refer – SQLCL Utility in Oracle:
But here we have an excel sheet which has the extension. .xlsx So 1st step is to convert this to.xlsx csv .
Steps to convert excel sheet to the csv file.
Open a notepad and paste the below connect and name it as XlsToCsv.vbs
Script reference – https://stackoverflow.com/questions/1858195/convert-xls-to-csv-on-command-line
if WScript.Arguments.Count < 2 Then
    WScript.Echo "Error! Please specify the source path and the destination. Usage: XlsToCsv SourcePath.xls Destination.csv"
    Wscript.Quit
End If
Dim oExcel
Set oExcel = CreateObject("Excel.Application")
Dim oBook
Set oBook = oExcel.Workbooks.Open(Wscript.Arguments.Item(0))
oBook.SaveAs WScript.Arguments.Item(1), 6
oBook.Close False
oExcel.Quit
WScript.Echo "Done"
Now in command prompt, go to the location where this executable file exists.
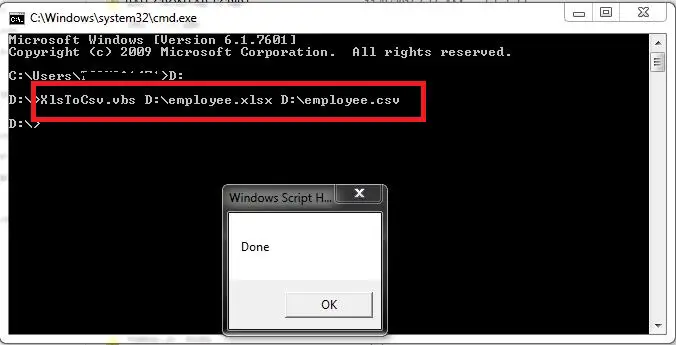
If it shows Done, then CSV file conversion is successful. Then copy this csv file to your database server.
Login with SQLCL utility and use LOAD command. Before that table structure needs to be created in the database.
SQL> CREATE TABLE EMPLOYEE
( EMPNAME VARCHAR2(100),
  EMPNO   NUMBER ,
  GRADE   VARCHAR2(10),
  SAL     NUMBER
);  2    3    4    5    6

Table created.
SYNTAX – LOAD [ table_name ] [ csv file with path ]
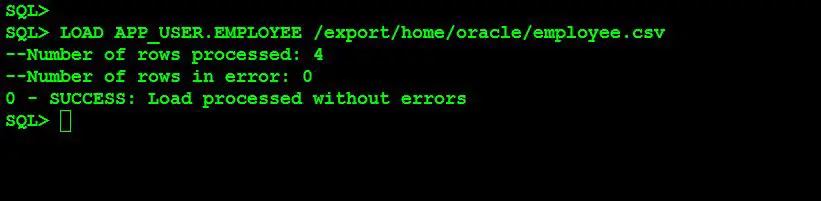
SQL> select count(*) from app_user.employee;

  COUNT(*)
----------
         4
We loaded the CSV file successfully.