
Welcome to a tutorial on how to import an Excel Spreadsheet into a MySQL database with PHP. So you have a project that requires reading some data from a spreadsheet and save them into the database? Sadly, PHP cannot read Excel files natively.
In order to import Excel files into the database:
- We have to use a third-party library that can read Excel files. PHPSpreadsheet is a good recommendation, and we can get it easily using Composer –
composer require phpoffice/phpspreadsheet - Create the database table, and Excel file to import.
- Use PHPSpreadsheet to read the Excel spreadsheet, extract the data, and insert them into the database.
Just how exactly is this done? Let us walk through an example in this guide – Read on!
ⓘ I have included a zip file with all the example source code at the start of this tutorial, so you don’t have to copy-paste everything… Or if you just want to dive straight in.
TLDR – QUICK SLIDES

Fullscreen Mode – Click Here
TABLE OF CONTENTS
DOWNLOAD & NOTES

First, here is the download link to the source code as promised.
QUICK NOTES
- A copy of PHPSpreadsheet is not included in the zip file. Please download the latest version by yourself.
- Create a test database and import
2a-dummy.sql. - Change the database settings in
3-import.phpto your own, then launch it in the browser.
If you spot a bug, feel free to comment below. I try to answer short questions too, but it is one person versus the entire world… If you need answers urgently, please check out my list of websites to get help with programming.
EXAMPLE CODE DOWNLOAD
Click here to download the source code, I have released it under the MIT license, so feel free to build on top of it or use it in your own project.
 All right, let us now get into an example of importing an Excel file into the database.
STEP 1) INSTALL PHPSPREADSHEET
There are no native functions in PHP to read Excel files. So we need to download and use a third-party library called PHPSpreadsheet – Here’s how to get it.
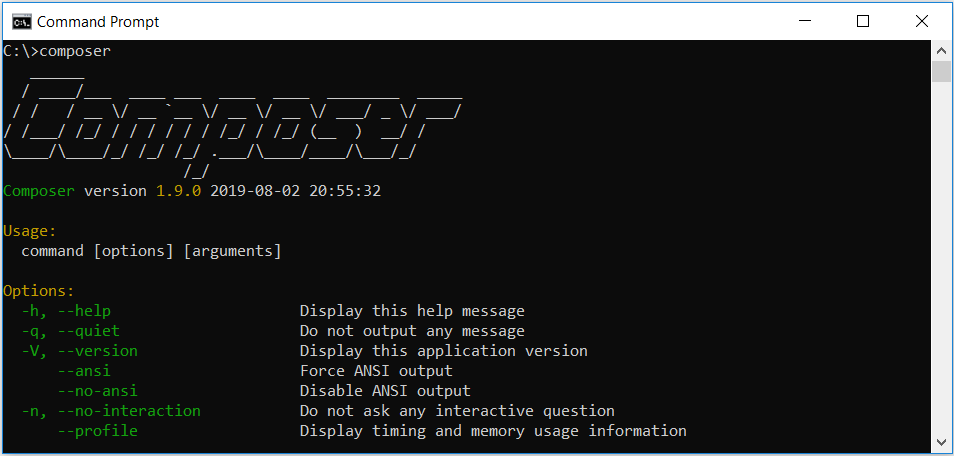
- The easiest way is to use an application manager called Composer – Something like Git, quite a useful one for pulling libraries automatically. A small hassle to download and install, but a one-time effort nonetheless.
- After installing Composer, open the command prompt and navigate to your project folder –
cd HTTP/FOLDER/. - Run
composer require phpoffice/phpspreadsheet.
That’s all. Composer will automatically pull the latest version into the vendor/ folder.
STEP 2) DUMMY DATABASE TABLE & EXCEL FILE
2A) DUMMY USERS TABLE
2a-dummy.sql
CREATE TABLE `users` (
  `id` bigint(20) NOT NULL,
  `name` varchar(255) NOT NULL,
  `email` varchar(255) NOT NULL
) ENGINE=InnoDB DEFAULT CHARSET=utf8mb4;

ALTER TABLE `users`
  ADD PRIMARY KEY (`id`),
  ADD UNIQUE KEY `email` (`email`);

ALTER TABLE `users`
  MODIFY `id` bigint(20) NOT NULL AUTO_INCREMENT;
For this example, we will use a very simple users table with only 3 fields.
| Field | Description |
| id | Primary key, auto-increment. |
| name | The user’s name. |
| The user’s email address. |
2B) DUMMY EXCEL FILE
2b-dummy.xlsx
| Name | |
| John Doe | john@doe.com |
| Jane Doe | jane@doe.com |
| Josh Doe | josh@doe.com |
| Joy Doe | joy@doe.com |
| Janus Doe | janus@doe.com |
| Jay Doe | jay@doe.com |
| June Doe | june@doe.com |
| Julius Doe | julius@doe.com |
| Jess Doe | jess@doe.com |
| Jack Doe | jack@doe.com |
Next, we have some dummy users in an Excel file that need to be imported into the above table.
STEP 3) PHP IMPORT SCRIPT
3-import.php
<?php
// (A) CONNECT TO DATABASE - CHANGE SETTINGS TO YOUR OWN!
$dbhost = "localhost";
$dbname = "test";
$dbchar = "utf8mb4";
$dbuser = "root";
$dbpass = "";
$pdo = new PDO(
  "mysql:host=$dbhost;charset=$dbchar;dbname=$dbname",
  $dbuser, $dbpass, [
  PDO::ATTR_ERRMODE => PDO::ERRMODE_EXCEPTION,
  PDO::ATTR_DEFAULT_FETCH_MODE => PDO::FETCH_ASSOC
]);

// (B) PHPSPREADSHEET TO LOAD EXCEL FILE
require "vendor/autoload.php";
$reader = new PhpOfficePhpSpreadsheetReaderXlsx();
$spreadsheet = $reader->load("2b-dummy.xlsx");
$worksheet = $spreadsheet->getActiveSheet();

// (C) READ DATA + IMPORT
$sql = "INSERT INTO `users` (`name`, `email`) VALUES (?,?)";
foreach ($worksheet->getRowIterator() as $row) {
  // (C1) FETCH DATA FROM WORKSHEET
  $cellIterator = $row->getCellIterator();
  $cellIterator->setIterateOnlyExistingCells(false);
  $data = [];
  foreach ($cellIterator as $cell) { $data[] = $cell->getValue(); }

  // (C2) INSERT INTO DATABASE
  print_r($data);
  try {
    $stmt = $pdo->prepare($sql);
    $stmt->execute($data);
    echo "OK - USER ID - {$pdo->lastInsertId()}<br>";
  } catch (Exception $ex) { echo $ex->getMessage() . "<br>"; }
  $stmt = null;
}

// (D) CLOSE DATABASE CONNECTION
if ($stmt !== null) { $stmt = null; }
if ($pdo !== null) { $pdo = null; }
Yep, this one looks a little intimidating at first but is actually very straightforward.
- Connect to the database. Remember to change the settings to your own.
- Load the PHPSpreadsheet library, and use it to open the dummy Excel spreadsheet.
- Read the cells of the spreadsheet, and import them into the database.
- The end. Close the database connection.
SPREADSHEETS WITH FORMULA
Take note that PHPSpreadSheet will not evaluate the cell formula. Do your own “convert formulas to values” in Excel, and save it as a different spreadsheet before importing.
DATE & TIME CELLS
This is yet another gotcha… Basically, convert the date/time cell into a string or text first.
LINKS & REFERENCES
- Need to do the opposite of exporting into Excel files? – Here’s how.
- Check out the PHPSpreadsheet GitHub Page here.
- Also, the official documentation.
YOUTUBE TUTORIAL
INFOGRAPHIC CHEAT SHEET

THE END

Thank you for reading, and we have come to the end of this guide. I hope that it has helped you with your project, and if you want to share anything with this guide, please feel free to comment below. Good luck and happy coding!
I want to import data from excel file using PHP and then if possible, save it to a MySQL database.
![]()
morten.c
3,4125 gold badges40 silver badges45 bronze badges
asked Jan 14, 2010 at 19:32
![]()
Importing from Excel files (XLS) is way harder than improting from CSV files. Usually I save my XLS to CSV with Excel then work on this CSV with PHP…
Look at PHP function fgetcsv at:
http://ca.php.net/manual/en/function.fgetcsv.php
<?php
$row = 1;
if (($handle = fopen("test.csv", "r")) !== FALSE) {
    while (($data = fgetcsv($handle, 1000, ",")) !== FALSE) {
        $num = count($data);
        echo "<p> $num fields in line $row: <br /></p>n";
        $row++;
        for ($c=0; $c < $num; $c++) {
            echo $data[$c] . "<br />n";
        }
    }
    fclose($handle);
}
?>
If you still want to load XLS directly from PHP it’s possible (but how reliable)… A quick seach resulted in http://sourceforge.net/projects/phpexcelreader/ which might be helpful.
answered Jan 14, 2010 at 19:34
![]()
AlexVAlexV
22.5k17 gold badges87 silver badges122 bronze badges
1
Quite possible. You can save your Excel file as a CSV file, and use fgetcsv() to read that file in to PHP. fgetcsv() will parse your data into an array, which you can then create SQL queries out of to put into your database.
If all you’re doing is putting it into a database, you might be able to bypass the need for a PHP script entirely and just use MySQL’s LOAD DATA INFILE syntax on your CSV file instead:
LOAD DATA LOCAL INFILE '/importfile.csv'
INTO TABLE test_table
FIELDS TERMINATED BY ','
LINES TERMINATED BY 'n'
(field1, filed2, field3);
answered Jan 14, 2010 at 19:36
![]()
zombatzombat
92.1k24 gold badges157 silver badges164 bronze badges
Best bet is to export from Excel to a CSV (Comma separated values) file. These files are easy to parse and load. If you are reading directly from an XLS file, I’m not sure how to do that. You might want to look and see if there is a libarary for PHP that can read Excel data files.
answered Jan 14, 2010 at 19:34
![]()
Here’s a tutorial on reading/writing an Excel spreadsheet directly (without having to export to CSV). The necessary packages are available from SourceForge and PEAR (cf. article).
answered Jan 14, 2010 at 19:42
![]()
AndiDogAndiDog
68k21 gold badges160 silver badges204 bronze badges
<?
 i$db = mysql_connect(“localhost”, “root”, “”) or die(“Could not connect.”);

if(!$db)

die(“no db”);

if(!mysql_select_db(“test”,$db))

die(“No database selected.”);

if(isset($_POST['submit']))

{

$filename=$_POST['filename'];

$handle = fopen(“$filename”, “r”);

while (($data = fgetcsv($handle, 1000, “,”)) !== FALSE)

{

$import=”INSERT into sample(name,email) values(‘$data[0]‘,’$data[1]‘)”;

mysql_query($import) or die(mysql_error());

}

fclose($handle);

print “Import done”;

}

else

{

print “<form action=’import.php’ method=’post’>”;

print “Type file name to import:<br>”;

print “<input type=’text’ name=’filename’ size=’20′><br>”;

print “<input type=’submit’ name=’submit’ value=’submit’></form>”;

}
 ?>
Source
![]()
Matthieu
4,5854 gold badges40 silver badges59 bronze badges
answered Jan 21, 2011 at 11:18
![]()
by Vincy. Last modified on April 8th, 2023.
Database backup and restore is the most important part of maintaining software. Taking automatic periodical backup is a must for any project.
In case of unknown security flaws which may collapse your system. In such an unfortunate situation, it will be the holy grail to save you if you have a backup.
It is not only enough to take a backup by exporting your database. Also, we need to experiment with importing backups to ensure the restoration.
Backup files can be in any format. Many of the database clients support SQL, Excel or CSV format files to import external data.
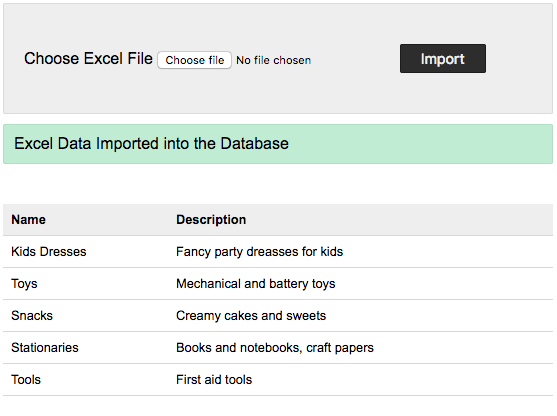
We will create our own PHP database client only for importing Excel data into a database.
Restoring Excel backup into a database via programming will save us time. Let us study how to implement a quick restore by importing bulk data from Excel files. You may visit my earlier export data in CSV format if you want an export example.
This screenshot shows the output by displaying the list of imported rows from the database.
What is inside?
- About this Excel import example
- File Structure
- Database script
- Creating UI to upload import template
- Parse Excel data using PHPSpreadsheet
- Output: Excel import and data listing
About this Excel import example
This example allows users to choose the import template via HTML form input. A sample Excel template is added with this downloadable resource.
With a valid file, the HTML form submitted will call PHP to process Excel parsing.
In PHP, the PHPSpreadsheet library is used to read the Excel file data and convert it into an array.
The code will execute the database insert row by row by iterating the array data.
File Structure
See the Excel import example’s file structure shown below. The vendor folder has the PHPSpreadsheet library and its dependencies.
I have given a sample import template with these files to experiment with the import operation.
The schema.sql has the script to create the target database. You can find the SQL script in the next section.

Database script
Import the following SQL script and create a database environment. Also, configure your database details in DataSource.php to make this example work.
--
-- Database: `import_excel`
--

-- --------------------------------------------------------

--
-- Table structure for table `tbl_info`
--

CREATE TABLE `tbl_info` (
  `id` int(11) NOT NULL,
  `name` varchar(50) NOT NULL,
  `description` varchar(50) NOT NULL,
  `date` timestamp NOT NULL DEFAULT CURRENT_TIMESTAMP ON UPDATE CURRENT_TIMESTAMP
);

--
-- Indexes for table `tbl_info`
--
ALTER TABLE `tbl_info`
  ADD PRIMARY KEY (`id`);

--
-- AUTO_INCREMENT for table `tbl_info`
--
ALTER TABLE `tbl_info`
  MODIFY `id` int(11) NOT NULL AUTO_INCREMENT;;
Creating UI to upload import template
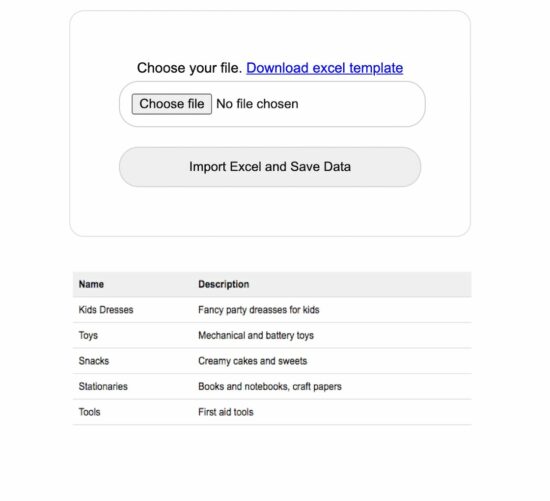
This HTML form with the file upload option is used to choose the Excel source. On submitting this form, the Excel file will be sent to the PHP to parse the data source. This file upload option will only allow the Excel files to choose using the accept attribute.
This code also contains the response HTML for displaying the message returned from PHP. This message is shown based on the type of response sent from PHP after Excel import.
<h2>Import Excel File into MySQL Database using PHP</h2>

	<div class="outer-container">
		<div class="row">
			<form class="form-horizontal" action="" method="post"
				name="frmExcelImport" id="frmExcelImport"
				enctype="multipart/form-data" onsubmit="return validateFile()">
				<div Class="input-row">
					<label>Choose your file. <a href="Template/import-template.xlsx"
						download>Download excel template</a></label>
					<div>
						<input type="file" name="file" id="file" class="file"
							accept=".xls,.xlsx">
					</div>
					<div class="import">
						<button type="submit" id="submit" name="import" class="btn-submit">Import
							Excel and Save Data</button>
					</div>
				</div>
			</form>
		</div>
	</div>
	<div id="response"
		class="<?php if(!empty($type)) { echo $type . " display-block"; } ?>"><?php if(!empty($message)) { echo $message; } ?></div>
<?php
$sqlSelect = "SELECT * FROM tbl_info";
$result = $db->select($sqlSelect);
if (! empty($result)) {
    ?>

    <table class='tutorial-table'>
		<thead>
			<tr>
				<th>Name</th>
				<th>Description</th>
			</tr>
		</thead>
<?php
    foreach ($result as $row) { // ($row = mysqli_fetch_array($result))
        ?>
        <tbody>
			<tr>
				<td><?php  echo $row['name']; ?></td>
				<td><?php  echo $row['description']; ?></td>
			</tr>
<?php
    }
    ?>
        </tbody>
	</table>
<?php
}
?>
Parse Excel data using PHPSpreadsheet
In this PHP code, I specified the array of allowed file types for the file-type validation in PHP. I validated the uploaded file type along with the array allowed type.
If a match is found, the code will execute other logic. Otherwise, it will return the error message to the user.
With successful validation, excel file parsing read and convert the data into an array. Each array index has an array of row data. After reading the non-empty row data, I ran the database insert and showed the response.
<?php
use PhppotDataSource;
use PhpOfficePhpSpreadsheetReaderXlsx;

require_once 'DataSource.php';
$db = new DataSource();
$conn = $db->getConnection();
require_once ('vendor/autoload.php');

if (isset($_POST["import"])) {

    $allowedFileType = [
        'application/vnd.ms-excel',
        'text/xls',
        'text/xlsx',
        'application/vnd.openxmlformats-officedocument.spreadsheetml.sheet'
    ];

    if (in_array($_FILES["file"]["type"], $allowedFileType)) {

        $targetPath = 'uploads/' . $_FILES['file']['name'];
        move_uploaded_file($_FILES['file']['tmp_name'], $targetPath);

        $Reader = new PhpOfficePhpSpreadsheetReaderXlsx();

        $spreadSheet = $Reader->load($targetPath);
        $excelSheet = $spreadSheet->getActiveSheet();
        $spreadSheetAry = $excelSheet->toArray();
        $sheetCount = count($spreadSheetAry);

        for ($i = 1; $i <= $sheetCount; $i ++) {
            $name = "";
            if (isset($spreadSheetAry[$i][0])) {
                $name = mysqli_real_escape_string($conn, $spreadSheetAry[$i][0]);
            }
            $description = "";
            if (isset($spreadSheetAry[$i][1])) {
                $description = mysqli_real_escape_string($conn, $spreadSheetAry[$i][1]);
            }

            if (! empty($name) || ! empty($description)) {
                $query = "insert into tbl_info(name,description) values(?,?)";
                $paramType = "ss";
                $paramArray = array(
                    $name,
                    $description
                );
                $insertId = $db->insert($query, $paramType, $paramArray);
                // $query = "insert into tbl_info(name,description) values('" . $name . "','" . $description . "')";
                // $result = mysqli_query($conn, $query);

                if (! empty($insertId)) {
                    $type = "success";
                    $message = "Excel Data Imported into the Database";
                } else {
                    $type = "error";
                    $message = "Problem in Importing Excel Data";
                }
            }
        }
    } else {
        $type = "error";
        $message = "Invalid File Type. Upload Excel File.";
    }
}
?>
Note: Download the PHPSpreadsheet and include it in the vendor directory.
Download
↑ Back to Top
In this article, you will learn how to import Excel data into the MySQL database using the PHPExcel library. PHPExcel is a library written in pure PHP and provides a set of classes that allow you to write to and read from different spreadsheet file formats.
The web applications may contain data in various formats or they may have to collect data from various sources. It is not necessary that all the gathered data be compatible for storage on the server. Most large-scale websites use server-side code to dynamically display different data when needed. A database stores information more efficiently and can handle volumes of information that would be unmanageable in a spreadsheet. Spreadsheets have record limitations, whereas a database does not. So, we need to store this data in a database for future use. Here, we are using the PHPExcel library to import a CSV file into a PHP database. You can easily implement this by following these steps.
These are the steps to import Excel data to MySQL using PHPExcel-
Install PHPExcel with Composer
First, we need to install the PHPExcel library to read excel data. You can either download this from Github or install it using Composer. If your system does not have composer installed, then first download the latest composer version from its official website-
https://getcomposer.org/download/
You can check a successful installation using the following command on cmd—
Now, go to your project directory on the command prompt and run the following command to install the PHPExcel library.
E:wampwwwexceltomysql>composer require phpoffice/phpexcelAfter this, you will notice that Composer has downloaded all libraries under the ‘vendor‘ directory of your project root. Here is the file structure of this project-

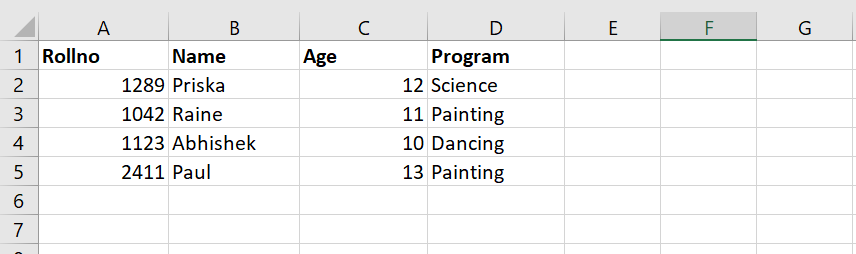
Excel File
Suppose we have the following excel file containing school program participants data-
Database Script (db.php)
Here, we have written the database connection code. Make sure to replace ‘hostname‘, ‘username‘, ‘password‘ and ‘database‘ with your database credentials and name.
<?php
	$hostname = "localhost";
	$db = "school";
	$password = "";
	$user = "root";
	$mysqli = new mysqli($hostname, $user, $password, $db);
?>
If we want to store or import Excel data into the MySQL database, we need a database table. So, we have a MySQL database ‘school‘ and in it we have to create a ‘participants‘ table with the given columns.
CREATE TABLE IF NOT EXISTS `participants` (
  `Id` int(11) NOT NULL AUTO_INCREMENT,
  `rollno` int(11) NOT NULL,
  `name` varchar(100) NOT NULL,
  `age` int(11) NOT NULL,
  `program` varchar(100) NOT NULL,
  PRIMARY KEY (`Id`)
) ENGINE=MyISAM AUTO_INCREMENT=5 DEFAULT CHARSET=latin1;
Create Upload File Template
To create a file uploader, we have created a simple HTML file upload form ‘index.php‘. If a form contains any file type input field, then we have to add an attribute ‘encrypt‘ with a value of ‘multipart/form-data‘.
<!DOCTYPE html>
<html>
<head>
	<title>PHP import Excel data</title>
	<link rel="stylesheet" type="text/css" href="https://maxcdn.bootstrapcdn.com/bootstrap/3.3.7/css/bootstrap.min.css">
</head>
<body>
<div class="container">
	<h1>Upload Excel File</h1>
	<form method="POST" action="uploadexcel.php" enctype="multipart/form-data">
		<div class="form-group">
			<label>Choose File</label>
			<input type="file" name="uploadFile" class="form-control" />
		</div>
		<div class="form-group">
			<button type="submit" name="submit" class="btn btn-success">Upload</button>
		</div>
	</form>
</div>
</body>
</html>
Parse Excel and Insert into Database (uploadexcel.php)
In this PHP code, we have validated the uploaded file type and then included the PHPExcel library files and database configuration file (db.php). We have validated the execution of each logical code. It returns an error message on failure. Further, PHPExcel parses the excel file, reads the data, and stores it in an array. We have looped over this array to insert data into the database and show the response to the web browser.
<?php
if(isset($_POST['submit'])) {
if(isset($_FILES['uploadFile']['name']) && $_FILES['uploadFile']['name'] != "") {
$allowedExtensions = array("xls","xlsx");
$ext = pathinfo($_FILES['uploadFile']['name'], PATHINFO_EXTENSION);
if(in_array($ext, $allowedExtensions)) {
// Uploaded file
$file = "uploads/".$_FILES['uploadFile']['name'];
$isUploaded = copy($_FILES['uploadFile']['tmp_name'], $file);
// check uploaded file
if($isUploaded) {
// Include PHPExcel files and database configuration file
include("db.php");
require_once __DIR__ . '/vendor/autoload.php';
include(__DIR__ .'/vendor/phpoffice/phpexcel/Classes/PHPExcel/IOFactory.php');
try {
// load uploaded file
$objPHPExcel = PHPExcel_IOFactory::load($file);
} catch (Exception $e) {
die('Error loading file "' . pathinfo($file, PATHINFO_BASENAME). '": ' . $e->getMessage());
}
// Specify the excel sheet index
$sheet = $objPHPExcel->getSheet(0);
$total_rows = $sheet->getHighestRow();
$highestColumn = $sheet->getHighestColumn();
$highestColumnIndex = PHPExcel_Cell::columnIndexFromString($highestColumn);
// loop over the rows
for ($row = 1; $row <= $total_rows; ++ $row) {
for ($col = 0; $col < $highestColumnIndex; ++ $col) {
$cell = $sheet->getCellByColumnAndRow($col, $row);
$val = $cell->getValue();
$records[$row][$col] = $val;
}
}
$html="<table border='1'>";
$html.="<tr><th>Roll No</th>";
$html.="<th>Name</th><th>Age</th>";
$html.="<th>Program</th></tr>";
foreach($records as $row){
// HTML content to render on webpage
$html.="<tr>";
$rollno = isset($row[0]) ? $row[0] : '';
$name = isset($row[1]) ? $row[1] : '';
$age = isset($row[2]) ? $row[2] : '';
$program = isset($row[3]) ? $row[3] : '';
$html.="<td>".$rollno."</td>";
$html.="<td>".$name."</td>";
$html.="<td>".$age."</td>";
$html.="<td>".$program."</td>";
$html.="</tr>";
// Insert into database
$query = "INSERT INTO participants (rollno,name,age,program)
values('".$rollno."','".$name."','".$age."','".$program."')";
$mysqli->query($query);
}
$html.="</table>";
echo $html;
echo "<br/>Data inserted in Database";
unlink($file);
} else {
echo '<span class="msg">File not uploaded!</span>';
}
} else {
echo '<span class="msg">Please upload excel sheet.</span>';
}
} else {
echo '<span class="msg">Please upload excel file.</span>';
}
}
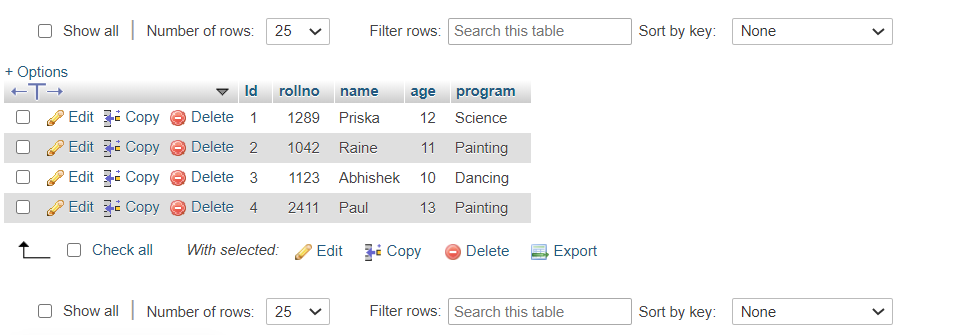
?>On successful execution, the data will be inserted in the database as in the given screenshot-
Related Articles
PHP capitalize first letter
Age calculator in PHP
PHP Display PDF file from Database
Remove empty values from array PHP
Remove duplicates from array PHP
Floor function in PHP
Convert stdclass object to array PHP
How to read CSV file in PHP and store in MySQL
Generating word documents with PHP
PHP SplFileObject Examples
How to Upload a File in PHP
Simple PHP email form
Password reset system in PHP
HTTP authentication with PHP
PHP file cache library
PHP get current directory url
How to prevent CSRF attack in PHP
Forgot Password Script PHP mysqli database
PHP Contact Form with Google reCAPTCHA
HTML Form Validation in PHP
PHP sanitize input for MySQL
Simple pagination in PHP with MySQL
Store Emoji character in MySQL using PHP
How to insert / import excel data into mysql database in php
In this post, you will be learning how to import excel file into mysql database using PHP.
Where we are going to see full example of csv file, xls file, xlsx file import into database using phpspreadsheet package. Click to view documentation
So, let’s begin with import excel data into database in php by the following few steps.
Step 1: Download/Install the Package (phpSpreadSheet — Click here ):
Let’s install via composer, open your terminal from your application root directory (Demo in video):
HP@HP-PC MINGW64 /c/xampp/htdocs/php-excel
$ composer require phpoffice/phpspreadsheet
After successful installation of this package, you will find few files in your application like vendor, composer.json, etc.
Step 2: Create Database Connection in dbconfig.php file:
<?php
$host = «localhost»;
$username = «your_username»;
$password = «your_password»;
$database = «your_database_name»;
// Create DB Connection
$conn = mysqli_connect($host, $username, $password, $database);
// Check connection
if (!$conn) {
die(«Connection failed: « . mysqli_connect_error());
}
echo «Connected successfully»;
?>
Step 3: Create a form in index.php as given below:
<?php session_start(); ?>
<!DOCTYPE html>
<html lang=«en»>
<head>
<meta charset=«UTF-8»>
<meta http-equiv=«X-UA-Compatible» content=«IE=edge»>
<meta name=«viewport» content=«width=device-width, initial-scale=1.0»>
<title>How to Import Excel Data into database in PHP</title>
<link href=«https://cdn.jsdelivr.net/npm/bootstrap@5.1.3/dist/css/bootstrap.min.css» rel=«stylesheet»>
</head>
<body>
<div class=«container»>
<div class=«row»>
<div class=«col-md-12 mt-4»>
<?php
if(isset($_SESSION[‘message’]))
{
echo «<h4>».$_SESSION[‘message’].«</h4>»;
unset($_SESSION[‘message’]);
}
?>
<div class=«card»>
<div class=«card-header»>
<h4>How to Import Excel Data into database in PHP</h4>
</div>
<div class=«card-body»>
<form action=«code.php» method=«POST» enctype=«multipart/form-data»>
<input type=«file» name=«import_file» class=«form-control» />
<button type=«submit» name=«save_excel_data» class=«btn btn-primary mt-3»>Import</button>
</form>
</div>
</div>
</div>
</div>
</div>
<script src=«https://cdn.jsdelivr.net/npm/bootstrap@5.1.3/dist/js/bootstrap.bundle.min.js»></script>
</body>
</html>
After successfully creating the form for import excel, then let’s click on the submit button which takes FORM using POST method to code.php and insert or import excel data into database over there.
Step 4: Create a code.php file and paste the below code:
In this code.php file, we are wrting the code of import excel file data into mysql database in php. where we are checking the Valid file upload and redirect with the message using session.
<?php
session_start();
include(‘dbconfig.php’);
require ‘vendor/autoload.php’;
use PhpOfficePhpSpreadsheetSpreadsheet;
use PhpOfficePhpSpreadsheetWriterXlsx;
if(isset($_POST[‘save_excel_data’]))
{
$fileName = $_FILES[‘import_file’][‘name’];
$file_ext = pathinfo($fileName, PATHINFO_EXTENSION);
$allowed_ext = [‘xls’,‘csv’,‘xlsx’];
if(in_array($file_ext, $allowed_ext))
{
$inputFileNamePath = $_FILES[‘import_file’][‘tmp_name’];
$spreadsheet = PhpOfficePhpSpreadsheetIOFactory::load($inputFileNamePath);
$data = $spreadsheet->getActiveSheet()->toArray();
$count = «0»;
foreach($data as $row)
{
if($count > 0)
{
$fullname = $row[‘0’];
$email = $row[‘1’];
$phone = $row[‘2’];
$course = $row[‘3’];
$studentQuery = «INSERT INTO students (fullname,email,phone,course) VALUES (‘$fullname‘,’$email‘,’$phone‘,’$course‘)«;
$result = mysqli_query($con, $studentQuery);
$msg = true;
}
else
{
$count = «1»;
}
}
if(isset($msg))
{
$_SESSION[‘message’] = «Successfully Imported»;
header(‘Location: index.php’);
exit(0);
}
else
{
$_SESSION[‘message’] = «Not Imported»;
header(‘Location: index.php’);
exit(0);
}
}
else
{
$_SESSION[‘message’] = «Invalid File»;
header(‘Location: index.php’);
exit(0);
}
}
?>
Thank you.
PHPExcel — библиотека для создания и чтения данных из файлов формата OpenXML (который используется в MS Excel 2007). С ее помощью можно считывать из файлов, записывать в файлы, форматировать содержимое, работать с формулами и т.д. Для работы PHPExcel требуется версия PHP 5.2 или выше, с установленными библиотеками Zip, XML и GD2.
Установка PHPExcel
Первым делом библиотеку необходимо скачать. Для этого переходим на официальный сайт библиотеки и скачиваем архив PHPExcel-1.7.8.zip. После распаковки мы получим несколько файлов и папок:
- Classes
- Documentation
- Tests
- changelog.txt
- install.txt
- license.txt
Файлы — это различные описания по предыдущим версиям, лицензионное соглашение и очень краткая инструкция по установке. Далее, в папке Classes, содержится непосредственно сама библиотека PHPExcel — эту папку необходимо скопировать в корень нашего скрипта.
В папке Documentation содержится документация по библиотеке на английском языке. В папке Tests — примеры по использованию библиотеки.
Создание Excel-файла
Итак, давайте создадим файл makeexcel.php и начинаем работать с ним. Для начала нам необходимо подключить главный файл библиотеки PHPExcel.php (который находится в папке Classes) и создать объект класса PHPExcel:
require_once 'Classes/PHPExcel.php';
$pExcel = new PHPExcel();
Настройки листа книги Excel
Документ Excel состоит из книг, а каждая книга в свою очередь, состоит из листов. Далее лист состоит из набора ячеек, доступ к которым осуществляется по координатам. То есть у нас есть столбцы, которые имеют буквенные имена (А, В, С и т.д) и есть строки, которые пронумерованы. Значит, что бы получить доступ к первой ячейке нужно указать код А1. Точно также мы с помощью библиотеки будем получать доступ к каждой ячейке.
Итак, первым делом необходимо выбрать активный лист, на который мы будем выводить данные и получить объект этого листа:
$pExcel->setActiveSheetIndex(0);
$aSheet = $pExcel->getActiveSheet();
С помощью метода setActiveSheetIndex(0) указываем индекс (номер) активного листа. Нумерация листов начинается с нуля. Далее с помощью метода getActiveSheet() получаем объект этого активного листа, то есть другими словами получаем доступ к нему для работы. И сохраняем этот объект в переменную $aSheet.
Если Вы захотите указать активным какой то другой лист, то вначале его необходимо создать, при помощи метода:
$pExcel->createSheet();
Затем, по аналогии, указываем индекс и получаем объект активного листа.
// Ориентация страницы и  размер листа
$aSheet->getPageSetup()
       ->setOrientation(PHPExcel_Worksheet_PageSetup::ORIENTATION_PORTRAIT);
$aSheet->getPageSetup()
       ->SetPaperSize(PHPExcel_Worksheet_PageSetup::PAPERSIZE_A4);
// Поля документа
$aSheet->getPageMargins()->setTop(1);
$aSheet->getPageMargins()->setRight(0.75);
$aSheet->getPageMargins()->setLeft(0.75);
$aSheet->getPageMargins()->setBottom(1);
// Название листа
$aSheet->setTitle('Прайс-лист');
// Шапка и футер (при печати)
$aSheet->getHeaderFooter()
       ->setOddHeader('&CТД ТИНКО: прайс-лист');
$aSheet->getHeaderFooter()
       ->setOddFooter('&L&B'.$aSheet->getTitle().'&RСтраница &P из &N');
// Настройки шрифта
$pExcel->getDefaultStyle()->getFont()->setName('Arial');
$pExcel->getDefaultStyle()->getFont()->setSize(8);
Вначале задаем ориентацию листа при помощи метода setOrientation(), которому передаем константу класса PHPExcel_Worksheet_PageSetup:
- ORIENTATION_PORTRAIT — книжная
- ORIENTATION_LANDSCAPE — альбомная
Обратите внимание, что перед методом setOrientation() необходимо вызвать метод getPageSetup(), который предоставляет доступ к настройкам страницы.
Далее вызываем метод SetPaperSize(), который позволяет задать размер страницы для печати. Ему передаем параметром константу PAPERSIZE_A4 класса PHPExcel_Worksheet_PageSetup. Что означает, что размер листа страницы будет установлен А4.
Далее устанавливаем поля документа, то есть отступы от краев документа. Отступы задаются в специальных символьных единицах. Вначале, обратите внимание, вызываем у объекта $aSheet метод getPageMargins(), который вернет объект класса, отвечающего за настройки полей страницы. Затем вызываем методы setTop(), setRight(), setLeft() и setBottom().
Далее при помощи метода setTitle(‘Прайс лист’) задаем название нашего листа.
Если нужно, можно при печати выводить шапку и подвал листа:
- setOddHeader();
- setOddFooter();
Обратите внимание на передаваемые параметры:
- для шапки передаем строку ‘&CТД ТИНКО: прайс-лист’; метка &C означает, что текст нужно расположить по центру.
- для подвала передаем строку ‘&L&B’.$aSheet->getTitle().’&RСтраница &P из &N’; это означает, что нужно вывести слева и жирным шрифтом (&L&B) название листа (метод $aSheet->getTitle()), затем справа (&R) вывести номер страницы (&P) из общего количества страниц (&N).
Затем указываем настройки шрифта по умолчанию:
- setName(‘Arial’) — задаем имя шрифта;
- setSize(8) — задаем размер шрифта.
Наполнение документа данными
Для начала давайте зададим ширину столбцов (в символьных единицах), которые нам понадобятся:
$aSheet->getColumnDimension('A')->setWidth(3);
$aSheet->getColumnDimension('B')->setWidth(7);
$aSheet->getColumnDimension('C')->setWidth(20);
$aSheet->getColumnDimension('D')->setWidth(40);
$aSheet->getColumnDimension('E')->setWidth(10);
Теперь заполним несколько ячеек текстом:
$aSheet->mergeCells('A1:E1');
$aSheet->getRowDimension('1')->setRowHeight(20);
$aSheet->setCellValue('A1','ТД ТИНКО');
$aSheet->mergeCells('A2:E2');
$aSheet->setCellValue('A2','Поставка технических средств безопасности');
$aSheet->mergeCells('A4:C4');
$aSheet->setCellValue('A4','Дата создания прайс-листа');
Здесь мы сначала объеденяем ячейки с А1 до E1 при помощи метода mergeCells(), далее задаем высоту строки: вначале получаем доступ к строке 1 при помощи метода getRowDimension(‘1’), затем задаем высоту — setRowHeight(20). Далее при помощи метода setCellValue(‘A1′,’ТД ТИНКО’), устанавливаем значение ячейки А1.
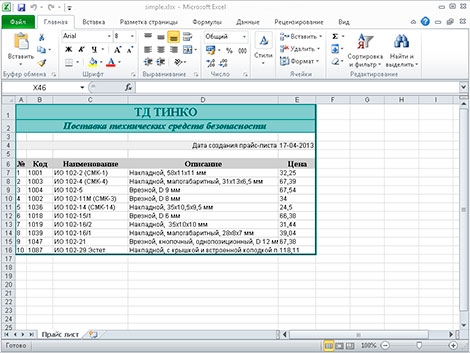
Далее давайте в ячейку D4 запишем текущую дату:
// Записываем данные в ячейку
$date = date('d-m-Y');
$aSheet->setCellValue('D4',$date);
// Устанавливает формат данных в ячейке (дата вида дд-мм-гггг)
$aSheet->getStyle('D4')->getNumberFormat()
->setFormatCode(PHPExcel_Style_NumberFormat::FORMAT_DATE_XLSX14);
С помощью констант, определенных в классе PHPExcel_Style_NumberFormat, можно задать формат ячейки: FORMAT_GENERAL (общий), FORMAT_TEXT (текст), FORMAT_NUMBER (число), FORMAT_NUMBER_00 (число с дробной частью), FORMAT_PERCENTAGE (процент), FORMAT_PERCENTAGE_00 (процент с дробной частью) и т.п.
Теперь, используя метод setCellValue(), а также цикл while() наполним данными наш прайс-лист:
mysql_connect(DB_HOST, DB_USER, DB_PASS);
mysql_query('SET NAMES utf8');
mysql_select_db(DB_NAME);

// Создаем шапку таблички данных
$aSheet->setCellValue('A6','№');
$aSheet->setCellValue('B6','Код');
$aSheet->setCellValue('C6','Наименование');
$aSheet->setCellValue('D6','Описание');
$aSheet->setCellValue('E6','Цена');

$query = "SELECT `code`, `name`, `description`, `price` FROM `products` WHERE 1 LIMIT 10";
$res = mysql_query( $query );

$i = 1;
while( $prd = mysql_fetch_assoc($res) ) {
    $aSheet->setCellValue('A'.($i+6), $i);
    $aSheet->setCellValue('B'.($i+6), $prd['code']);
    $aSheet->setCellValue('C'.($i+6), $prd['name']);
    $aSheet->setCellValue('D'.($i+6), $prd['description']);
    $aSheet->setCellValue('E'.($i+6), $prd['price']);
    $i++;
}
Стилизация данных
Давайте немного украсим наш прайс-лист, то есть каждой ячейке добавим стилей. Для этого необходимо создать массив со стилями и при помощи метода applyFromArray(), применить этот массив к ячейке (или ячейкам):
// массив стилей
$style_wrap = array(
    // рамки
    'borders'=>array(
        // внешняя рамка
        'outline' => array(
            'style'=>PHPExcel_Style_Border::BORDER_THICK,
            'color' => array(
                'rgb'=>'006464'
            )
        ),
        // внутренняя
        'allborders'=>array(
            'style'=>PHPExcel_Style_Border::BORDER_THIN,
            'color' => array(
                'rgb'=>'CCCCCC'
            )
        )
    )
);

$aSheet->getStyle('A1:F'.($i+5))->applyFromArray($style_wrap);
Теперь, по аналогии, применим стили к остальным ячейкам:
// Стили для верхней надписи (первая строка)
$style_header = array(
    // Шрифт
    'font'=>array(
        'bold' => true,
        'name' => 'Times New Roman',
        'size' => 15,
        'color'=>array(
            'rgb' => '006464'
        )
    ),
    // Выравнивание
    'alignment' => array(
        'horizontal' => PHPExcel_STYLE_ALIGNMENT::HORIZONTAL_CENTER,
        'vertical' => PHPExcel_STYLE_ALIGNMENT::VERTICAL_CENTER,
    ),
    // Заполнение цветом
    'fill' => array(
        'type' => PHPExcel_STYLE_FILL::FILL_SOLID,
        'color'=>array(
            'rgb' => '99CCCC'
        )
    ),
    'borders'=>array(
        'bottom'=>array(
            'style'=>PHPExcel_Style_Border::BORDER_THIN,
            'color' => array(
                'rgb'=>'006464'
            )
        )
    )
);
$aSheet->getStyle('A1:E1')->applyFromArray($style_header);

// Стили для слогана компании (вторая строка)
$style_slogan = array(
    // шрифт
    'font'=>array(
        'bold' => true,
        'italic' => true,
        'name' => 'Times New Roman',
        'size' => 12,
        'color'=>array(
            'rgb' => '006464'
        )
    ),
    // выравнивание
    'alignment' => array(
        'horizontal' => PHPExcel_STYLE_ALIGNMENT::HORIZONTAL_CENTER,
        'vertical' => PHPExcel_STYLE_ALIGNMENT::VERTICAL_CENTER,
    ),
    // заполнение цветом
    'fill' => array(
        'type' => PHPExcel_STYLE_FILL::FILL_SOLID,
        'color'=>array(
            'rgb' => '99CCCC'
        )
    ),
    //рамки
    'borders' => array(
        'bottom' => array(
            'style'=>PHPExcel_Style_Border::BORDER_THIN,
            'color' => array(
                'rgb'=>'006464'
            )
        )
    )
);
$aSheet->getStyle('A2:E2')->applyFromArray($style_slogan);

// Стили для текта возле даты
$style_tdate = array(
    // выравнивание
    'alignment' => array(
        'horizontal' => PHPExcel_STYLE_ALIGNMENT::HORIZONTAL_RIGHT,
    ),
    // заполнение цветом
    'fill' => array(
        'type' => PHPExcel_STYLE_FILL::FILL_SOLID,
        'color'=>array(
            'rgb' => 'EEEEEE'
        )
    ),
    // рамки
    'borders' => array(
        'right' => array(
            'style'=>PHPExcel_Style_Border::BORDER_NONE
        )
    )
);
$aSheet->getStyle('A4:D4')->applyFromArray($style_tdate);

// Стили для даты
$style_date = array(
    // заполнение цветом
    'fill' => array(
        'type' => PHPExcel_STYLE_FILL::FILL_SOLID,
        'color'=>array(
            'rgb' => 'EEEEEE'
        )
    ),
    // рамки
    'borders' => array(
        'left' => array(
            'style'=>PHPExcel_Style_Border::BORDER_NONE
        )
    ),
);
$aSheet->getStyle('E4')->applyFromArray($style_date);

// Стили для шапки таблицы (шестая строка)
$style_hprice = array(
    // выравнивание
    'alignment' => array(
    'horizontal' => PHPExcel_STYLE_ALIGNMENT::HORIZONTAL_CENTER,
    ),
    // заполнение цветом
    'fill' => array(
        'type' => PHPExcel_STYLE_FILL::FILL_SOLID,
        'color'=>array(
            'rgb' => 'CFCFCF'
        )
    ),
    // шрифт
    'font'=>array(
        'bold' => true,
        /* 'italic' => true, */
        'name' => 'Times New Roman',
        'size' => 10
    ),
);
$aSheet->getStyle('A6:E6')->applyFromArray($style_hprice);

// Cтили для данных в таблице прайс-листа
$style_price = array(
    'alignment' => array(
    'horizontal' => PHPExcel_STYLE_ALIGNMENT::HORIZONTAL_LEFT,
    )
);
$aSheet->getStyle('A7:E'.($i+5))->applyFromArray($style_price);
Сохранение документа
Осталось только сохранить наш документ:
/*
$objWriter = PHPExcel_IOFactory::createWriter($pExcel, 'Excel5');
$objWriter->save('simple.xls');
*/
$objWriter = PHPExcel_IOFactory::createWriter($pExcel, 'Excel2007');
$objWriter->save('simple.xlsx');
или так
/*
$objWriter = new PHPExcel_Writer_Excel5($pExcel);
$objWriter->save('simple.xls');
*/
$objWriter = new PHPExcel_Writer_Excel2007($pExcel);
$objWriter->save('simple.xlsx');
Если нужно вывести документ в браузер
/*
header('Content-Type:application/vnd.ms-excel');
header('Content-Disposition:attachment;filename="simple.xls"');
$objWriter = new PHPExcel_Writer_Excel5($pExcel);
*/
header('Content-Type:xlsx:application/vnd.openxmlformats-officedocument.spreadsheetml.sheet');
header('Content-Disposition:attachment;filename="simple.xlsx"');
$objWriter = new PHPExcel_Writer_Excel2007($pExcel);
$objWriter->save('php://output');
Первый заголовок указывает браузеру тип открываемого контента — это документ формата Excel. Второй — говорит браузеру, что документ необходимо отдать пользователю на скачивание под именем simple.xlsx.
Добавление формул
Формула Excel — это математическое выражение, которое создается для вычисления результата и которое может зависеть от содержимого других ячеек. Формула в ячейке Excel может содержать данные, ссылки на другие ячейки, а также обозначение действий, которые необходимо выполнить.
Использование ссылок на ячейки позволяет пересчитывать результат по формулам, когда происходят изменения содержимого ячеек, включенных в формулы. Формулы Excel начинаются со знака =. Скобки ( ) могут использоваться для определения порядка математических операции.
Примеры формул Excel: =27+36, =А1+А2-АЗ, =SUM(А1:А5), =MAX(АЗ:А5), =(А1+А2)/АЗ.
PHPExcel тоже поддерживает добавление формул в ячейки. Установить формулу можно так:
// формула для вычисления суммы
$formula = '=SUM(D2:D4)';
$aSheet->setCellValue('D5', $formula);
Чтение Excel-файла
Самый простой вариант — считать все таблицы (на всех листах) и записать данные в трехмерный массив:
// Подключаем библиотеку
require_once 'Classes/PHPExcel.php';
$pExcel = PHPExcel_IOFactory::load('simple.xlsx');

// Цикл по листам Excel-файла
foreach ($pExcel->getWorksheetIterator() as $worksheet) {
    // выгружаем данные из объекта в массив
    $tables[] = $worksheet->toArray();
}
Теперь можно вывести массив:
// Цикл по листам Excel-файла
foreach( $tables as $table ) {
    echo '<table border="1">';
    // Цикл по строкам
    foreach($table as $row) {
        echo '<tr>';
        // Цикл по колонкам
        foreach( $row as $col ) {
            echo '<td>'.$col.'</td>';
        }
        echo '</tr>';
    }
    echo '</table>';
}
Для получения значения отдельной ячейки:
// выбираем лист, с которым будем работать
$pExcel->setActiveSheetIndex(0);
$aSheet = $pExcel->getActiveSheet();
// получаем доступ к ячейке по номеру строки
// (нумерация с единицы) и столбца (нумерация с нуля)
$cell = $aSheet->getCellByColumnAndRow($col, $row);
// читаем значение ячейки
$value = $cell->getValue()
или так:
$value = $pExcel->getActiveSheet()->getCellValue('B2')
Еще два примера:
// Цикл по листам Excel-файла
foreach( $pExcel->getWorksheetIterator() as $worksheet ) {
    echo '<h2>Лист «'.$worksheet->getTitle().'»</h2>';
    echo '<table border="1">';
    // Цикл по строкам
    foreach( $worksheet->getRowIterator() as $row ) {
        echo '<tr>';
        // Цикл по колонкам
        foreach( $row->getCellIterator() as $cell ) {
            $value = $cell->getValue();
            // $calcValue = $cell->getCalculatedValue()
            // $dataType = PHPExcel_Cell_DataType::dataTypeForValue($value);
            echo '<td>'.$value.'</td>';
        }
        echo '</tr>';
    }
    echo '</table>';
}
// Цикл по листам Excel-файла
foreach ($pExcel->getWorksheetIterator() as $worksheet) {
    $worksheetTitle     = $worksheet->getTitle();
    $highestRow         = $worksheet->getHighestRow(); // например, 10
    $highestColumn      = $worksheet->getHighestColumn(); // например, 'E'
    $highestColumnIndex = PHPExcel_Cell::columnIndexFromString($highestColumn);
    $nrColumns = ord($highestColumn) - 64;
    echo '<h2>Лист «'.$worksheetTitle.'» ';
    echo $nrColumns . ' колонок (A-' . $highestColumn . ') ';
    echo ' и ' . $highestRow . ' строк.</h2>';
    echo '<table border="1">';
    // Цикл по строкам
    for ($row = 1; $row <= $highestRow; $row++) {
        echo '<tr>';
        // Цикл по колонкам
        for ($col = 0; $col < $highestColumnIndex; $col++) {
            $cell = $worksheet->getCellByColumnAndRow($col, $row);
            echo '<td>'.$cell->getValue().'</td>';
        }
        echo '</tr>';
    }
    echo '</table>';
}
Дополнительно
- Документация разработчика PHPExcel на русском
- Блог на Laravel 7, часть 17. Временная зона для пользователей, деплой на хостинг TimeWeb
- Блог на Laravel 7, часть 16. Роль нового пользователя, сообщение админу о новом посте
- Блог на Laravel 7, часть 15. Восстановление постов, slug для категории, поста и страницы
- Блог на Laravel 7, часть 14. Валидация данных и права доступа при загрузке изображений
- Блог на Laravel 7, часть 13. Загрузка и ресайз изображений для категорий и постов блога
- Блог на Laravel 7, часть 12. Доп.страницы сайта в панели управления и в публичной части
- Блог на Laravel 7, часть 11. Панель управления — назначение ролей и прав для пользователей
Поиск:
Excel • MS • PHP • Web-разработка
Каталог оборудования
Lorem ipsum dolor sit amet, consectetur adipiscing elit, sed do eiusmod tempor incididunt ut labore et dolore magna aliqua.
Производители
Lorem ipsum dolor sit amet, consectetur adipiscing elit, sed do eiusmod tempor incididunt ut labore et dolore magna aliqua.
Функциональные группы
Lorem ipsum dolor sit amet, consectetur adipiscing elit, sed do eiusmod tempor incididunt ut labore et dolore magna aliqua.
Содержание
- Реализация быстрого импорта из Excel на PHP
- Что использовать в качестве инструмента?
- Наша боль, как разработчиков
- И тут нас отпустило.
- Полученные результаты производительности
- PHP import Excel data to MySQL using PHPExcel
- These are the steps to import Excel data to MySQL using PHPExcel-
- Install PHPExcel with Composer
- Excel File
- Database Script (db.php)
- Create Upload File Template
- Parse Excel and Insert into Database (uploadexcel.php)
- Import Excel File into MySQL Database using PHP
- What is inside?
- About this excel import example
- File Structure
- Database script
- Creating UI to upload import template
- Parse excel data using PHPSpreadsheet
- How to import data from Excel to List in PHP
- 1. EasyXLS on Windows using .NET Framework (COM+) with PHP
- 2. EasyXLS on Linux, Mac, Windows using Java with PHP
- EasyXLS on Windows using .NET Framework (COM+) with PHP
- Step 1: Download and install EasyXLS Excel Library for COM+
- Step 2: Verify if COM and .NET extension is enabled in PHP
- See also
- How to enable COM and .NET extension in PHP?
- Step 3: Verify if EasyXLS is registered
- See also
- How to verify if EasyXLS is registered?
- Step 4: Run PHP code that imports data from Excel to DataSet
- EasyXLS on Linux, Mac, Windows using Java with PHP
- Step 1: Download EasyXLS Excel Library for Java
- Step 2: Install PHP/Java Bridge
- Step 3: Setup EasyXLS library in Tomcat
- Step 4: Run PHP code that imports data from Excel to DataSet
- Заметки программиста
Реализация быстрого импорта из Excel на PHP
Что использовать в качестве инструмента?
В качестве базового стандарта, используемого при импорте адресных баз, мы взяли Microsoft Excel. Объясняется это просто:
- это стандартный инструмент, которым на базовом уровне владеют 100% пользователей компьютеров. Более того, в бизнесе — это де-факто корпоративный стандарт и используется даже, если на рабочих компьютерах Mac или Linux.
- Практически все CRM-, CMS-, облачные или десктопные системы имеют экспорт в Excel или CSV, который простым пересохранением приводится к формату XLS или XLSX.
- Известно также, что “90% ошибок ПО сидит в полуметре от монитора”. Не в обиду будет сказано рядовым пользователям, но мы должны учитывать самый базовый уровень подготовки и тех. поддержке для объяснения достаточно сказать “Загрузите Excel-файл”, а не объяснять процедуру подготовки файла в нужном формате.
Проблему пользователей при импорте адресных баз сняли. Но тут возникает уже проблема непосредственно разработки.
Наша боль, как разработчиков
Excel — это не open-source разработка, а проприетарное решение. Формат данных, особенно в новых версиях после 2007 года (xlsx), нетривиален. На Печкине используется PHP, поэтому мы начали поиск библиотек, которые позволят нам решить данную задачу. Но тут столкнулись с проблемой, что целый ряд библиотек, не позволяют читать xlsx:
- php-spreadsheetreader reads a variety of formats (.xls, .ods AND .csv)
- PHP-ExcelReader (xls only)
- PHP_Excel_Reader (xls only)
- PHP_Excel_Reader2 (xls only)
- XLS File Reader Коммерческая и xls only
- SimpleXLSX Из описания способен читать xlsx, однако, автор ссылается только на xls
- PHP Excel Explorer Коммерческая и xls only
Обратила на себя наше внимание библиотека PHPExcel. Ее мы использовали еще несколько лет назад в сервисе sms-рассылок SMS24X7.ru. Петя Соколов (Petr_Sokolov), наш талантливый разработчик, написал обертку для этой библиотеки, исправляющую ряд ее недостатков и багов.
Библиотека, безусловно, интересная и развитая. Но для Печкина ее использовать стало невозможно уже через пару лет, когда выросли и мы и наши клиенты — ее катастрофическая требовательность к ресурсам и огромное время парсинга файлов. Например, нередки случаи загрузки на сервис адресных баз > 100 000 строк со сложной структурой. А если файл уже 500 000 строк и “весит” больше 30Мб?
И тут нас отпустило.
В процессе поисков мы наткнулись на коммерческую библиотеку libxl, увидев результаты “кустарного benchmark” на Stackoverflow.
Библиотека написана на C++, а благодаря великолепному объектно-ориентированному расширению для PHP от Ilia Alshanetsky, легка в освоении и интеграции (например, переписать наше текущее решение с PHPExcel на LibXL заняло около 3 часов). Что очень классно, учитывая, что, к сожалению, документации от разработчика расширения нет и необходимо пользоваться расширением Reflection.
Процесс установки очень прост.
В результате компиляции вы получите файл excel.so в папке /usr/lib/php5/20090626/. Теперь достаточно создать файл /etc/php5/conf.d/excel.ini с содержимым.
Проверим установился ли модуль и перезагрузим веб-сервер.
В коде все тоже очень просто. Подгружаете файл и читаете необходимые ячейки. Например, вот так:
Полученные результаты производительности
Отсутствие потребности в оперативной памяти (в процессе загрузки файла и его чтения) приятно порадовало. 
А вот и прирост скорости загрузки excel-файла и его чтения на различных размерах адресных баз. 
Данные тесты проводились на xlsx-файлах с N подписчиками в один стоблец с email. Реальные же адресные базы еще больше и сложнее и преимущество в скорости и потреблении памяти выглядит еще значительнее.
Стоимость библиотеки 199$ за девелоперскую лицензию, но, поверьте, это того стоит. Безусловно рекомендуем всем, кто сталкивается с проблемой импорта Excel-файлов на свой сервис.
Источник
PHP import Excel data to MySQL using PHPExcel
In this article, you will learn how to import Excel data into the MySQL database using the PHPExcel library. PHPExcel is a library written in pure PHP and provides a set of classes that allow you to write to and read from different spreadsheet file formats.
The web applications may contain data in various formats or they may have to collect data from various sources. It is not necessary that all the gathered data be compatible for storage on the server. Most large-scale websites use server-side code to dynamically display different data when needed. A database stores information more efficiently and can handle volumes of information that would be unmanageable in a spreadsheet. Spreadsheets have record limitations, whereas a database does not. So, we need to store this data in a database for future use. Here, we are using the PHPExcel library to import a CSV file into a PHP database. You can easily implement this by following these steps.
These are the steps to import Excel data to MySQL using PHPExcel-
Install PHPExcel with Composer
First, we need to install the PHPExcel library to read excel data. You can either download this from Github or install it using Composer. If your system does not have composer installed, then first download the latest composer version from its official website-
You can check a successful installation using the following command on cmd—
Now, go to your project directory on the command prompt and run the following command to install the PHPExcel library.
After this, you will notice that Composer has downloaded all libraries under the ‘vendor‘ directory of your project root. Here is the file structure of this project-
Excel File
Suppose we have the following excel file containing school program participants data-
Database Script (db.php)
Here, we have written the database connection code. Make sure to replace ‘hostname‘, ‘username‘, ‘password‘ and ‘database‘ with your database credentials and name.
If we want to store or import Excel data into the MySQL database, we need a database table. So, we have a MySQL database ‘school‘ and in it we have to create a ‘participants‘ table with the given columns.
Create Upload File Template
To create a file uploader, we have created a simple HTML file upload form ‘index.php‘. If a form contains any file type input field, then we have to add an attribute ‘encrypt‘ with a value of ‘multipart/form-data‘.
Parse Excel and Insert into Database (uploadexcel.php)
In this PHP code, we have validated the uploaded file type and then included the PHPExcel library files and database configuration file (db.php). We have validated the execution of each logical code. It returns an error message on failure. Further, PHPExcel parses the excel file, reads the data, and stores it in an array. We have looped over this array to insert data into the database and show the response to the web browser.
On successful execution, the data will be inserted in the database as in the given screenshot-
Источник
Import Excel File into MySQL Database using PHP
Database backup and restore is the most important part in maintaining software. Taking periodical automatic backup is must for any project.
In case of unknown security flaw which may collapse your system. In such unfortunate situation, it will be the holy grail to save you if you have a backup.
It is not only enough to take a backup by exporting your database. Also, we need to experiment with importing backup to ensure the restore.
Backup files can be in any format. You may see many of the database clients supports SQL, Excel or CSV format files to import external data.
We are going to create our own PHP database client only for importing Excel data into a database.
Restoring excel backup into a database via programming will save our time. Let us study how to implement a quick restore by importing bulk data from excel files. If you are looking for export example, you may visit my earlier export data in CSV format.
This screenshot shows the output by displaying the list of imported rows from the database.
What is inside?
About this excel import example
This example allows the user to choose the import template via HTML form input. A sample Excel template is added with this downloadable resource.
With valid file, the HTML form submit will call PHP to process Excel parsing.
In PHP, the PHPSpreadSheet library is used for reading the Excel file data and convert it into an array.
By iterating the array data, the code will execute database insert row by row.
File Structure
See the Excel import example’s file structure shown below. The vendor folder has the PHPSpreadsheet library and ites dependacies.
I have given sample import template with this files to experiment the import operation.
The schema.sql has the script to create the target database. You can find the SQL script in the next section.
Database script
Import the following SQL script and create database environment. Also, configure your database details in DataSource.php to make this example working.
Creating UI to upload import template
This HTML form with the file upload option is used to choose the excel source. On submitting this form, the excel file will be sent to the PHP to parse the data source. This file upload option will only allow the excel files to choose by using the accept attribute.
This code also contains the response HTML for displaying the message returned from PHP. This message is shown based on the type of response sent from PHP after excel import.
Parse excel data using PHPSpreadsheet
In this PHP code, I specified the array of allowed file type for the file-type validation in PHP. I validated the uploaded file type along with the array allowed type.
If match found, the code will execute further logic. Otherwise, it will return the error message to the user.
With successful validation, excel file parsing read and convert the data into an array. Each array index has an array of row-data. After reading the non-empty row data, I run the database insert and show the response.
Note: Download PHPSpreadsheet and include into the vendor directory.
Источник
How to import data from Excel to List in PHP
EasyXLS Excel library can be used to import Excel files with PHP on Windows, Linux, Mac or other operating systems. The integration vary depending on the operating system or if .NET Framework or Java is chosen:
1. EasyXLS on Windows using .NET Framework (COM+) with PHP
2. EasyXLS on Linux, Mac, Windows using Java with PHP
EasyXLS on Windows using .NET Framework (COM+) with PHP
If you opt for the COM+ version of EasyXLS, be sure that you have EasyXLS installed and registered on your machine.
Step 1: Download and install EasyXLS Excel Library for COM+
To download the trial version of EasyXLS Excel Library, press the below button:

If you already own a license key, you may login and download EasyXLS from your account.
Step 2: Verify if COM and .NET extension is enabled in PHP
Check PHP.ini for [COM_DOT_NET] extension.
See also
How to enable COM and .NET extension in PHP?
Step 3: Verify if EasyXLS is registered
Check if EasyXLS component is present in Component Services.
See also
How to verify if EasyXLS is registered?
Step 4: Run PHP code that imports data from Excel to DataSet
Execute the following PHP code that imports Excel data to DataSet.
Overloaded methods
For methods with same name but different parameters, only the first method overload retains the original name. Subsequent overloads are uniquely renamed by appending to the method name ‘_2’, ‘_3’, etc (method, method_2, method_3), an integer that corresponds to the order of declaration that can be found in EasyXLS.h, a file that comes with EasyXLS installation.
EasyXLS on Linux, Mac, Windows using Java with PHP
If you opt for the Java version of EasyXLS, a similar code as above requires PHP/Java Bridge between PHP and Java.
Step 1: Download EasyXLS Excel Library for Java
To download the trial version of EasyXLS Excel Library, press the below button:
If you already own a license key, you may login and download EasyXLS from your account.
Step 2: Install PHP/Java Bridge
Step 3: Setup EasyXLS library in Tomcat
Copy EasyXLS.jar into Tomcat installation path, lib folder.
Step 4: Run PHP code that imports data from Excel to DataSet
Execute the following PHP code that imports Excel data to DataSet.
Источник
Заметки программиста
Не так давно появилась задача – загрузить данные из Ecxel файла в базу сайта, и реализовать механизм так, чтобы быстро можно было обновлять эти данные, т.е. загружать новый файл. Решил попробовать парсер Excel-файлов phpExcelReader, но сколько не бился с ним, получал ошибку типа “… is not readable”. Поэтому решил использовать библиотеку PHPExcel.
Загружать будем прайс-лист:
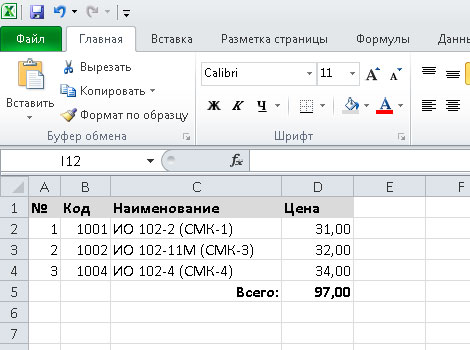
| Артикул | Наименование | Количество | Цена | Валюта | Единица |
| 123456 | Апельсин | 20 | 50000 | руб | килограмм |
| 123457 | Мандарин | 20 | 54000 | руб | килограмм |
| 123458 | Яблоко | 50 | 23500 | руб | килограмм |
В таблицу со структурой:
| id | article | name |
quantity |
price |
currency |
unit |
Скачав архив с библиотекой и открыв его вы увидите несколько папок и файлов – это описание и примеры использования библиотеки. Нам понадобится папка “Classes” – распаковываем архив и загружаем её, например, в корень сайта.
Файл excel можно загрузить в нужную папку на сервере, например uploads, через ftp сервер или создать страницу загрузки с «file» name= «upload_file» . Для меня конечно второй вариант был в приоритете (как реализовать загрузку файла на сервер я писал в статье «Отправка формы и файлов через Ajax»).
Итак, предположим, что форму загрузки мы сделали, библиотеку подключили, начнем писать скрипт обработки файла и загрузки в базу данных.
В принципе, второй цикл можно усовершенствовать, используя количество колонок, но у меня файл всегда будет стандартный, поэтому не вижу в этом смысла.
Источник