
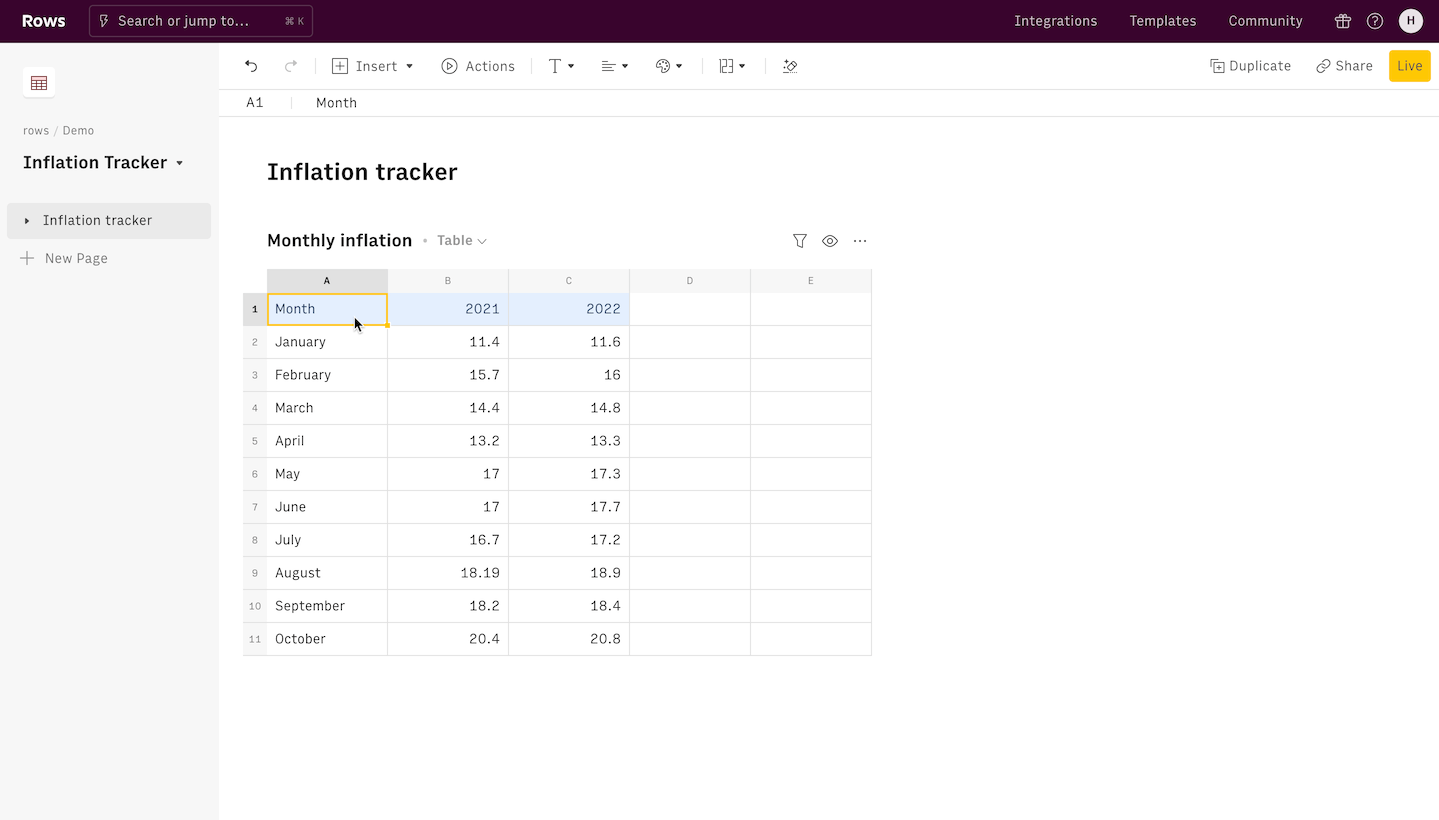
Notion is a great all-in-one productivity tool. It is the Swiss army knife of productivity tools. It supports a variety of tools and formats and allows you to work the way you want to work. One of the ways that Notion shines is its ability to embed and import files from other applications and services. This blog post will show you how to import Excel files into Notion.
So how do you import an Excel file into Notion? Enclosed below are the high level steps required to import an Excel file into Notion:
- Open Page You Want to Import Spreadsheet Into
- Click the Import button at the bottom of the left-hand panel
- Choose CSV from the Import Options screen
- Pick the Excel file in the file chooser and click Open
- The Excel file’s content will appear as a table in the Notion page
While these are the high level steps required to import the Excel file into Notion, the rest of this blog post will provide the step-by-step process complete with images of every screen encountered and every button pushed.
Before we get started, looking for more Notion tips? Check out our article containing 14 essential Notion tips at the link below:
14 Amazing Notion Tips You Must Know article
If you are looking to learn even more about Notion or other apps, Skillshare is a great resource to check out. Skillshare has courses on Notion, Evernote, Todoist, Things 3, Trello and more. In fact, there is a great Notion course by Francesco D’Alessio on Notion that you can check out at the link below:
Link to Notion Course on Skillshare
Now that we know the high-level steps, let’s get started with the import process.
Open Page You Want to Import Spreadsheet Into

To get started, open up Notion. Notion is based on pages. Pages in Notion are like simple web pages that can hold a variety of different content types. Notion is essentially a wiki. A wiki is a set of webpages that can hold a variety of content and can have multiple contributors. Notion, like a wiki, allows you to create pages and subpages.
Once you have Notion open, either open the page you want to import the excel spreadsheet into or create a new page.
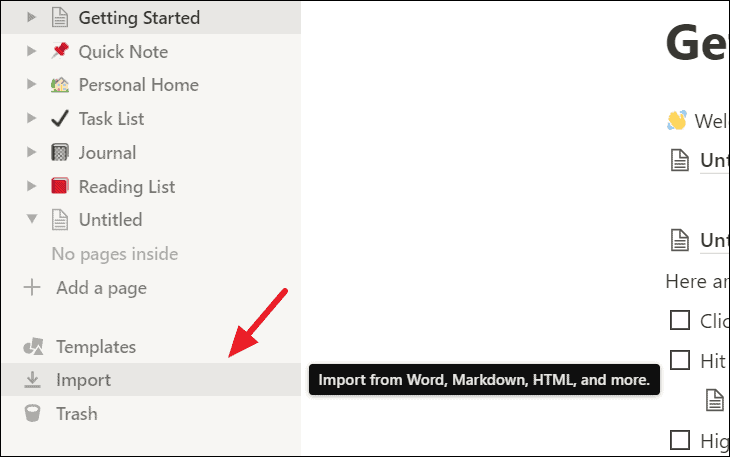
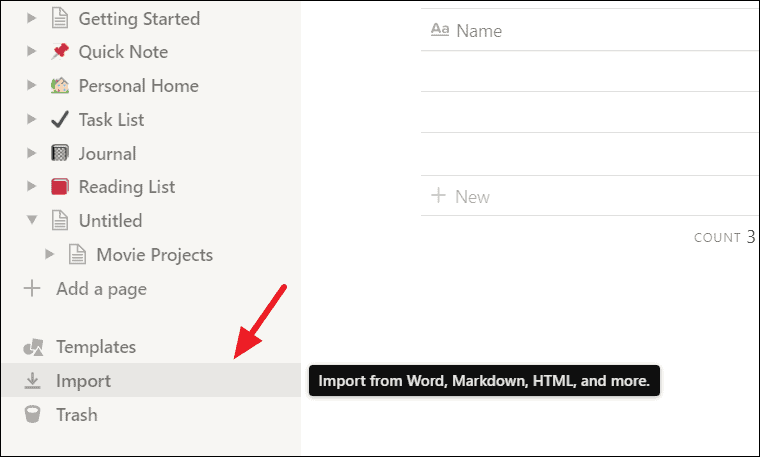
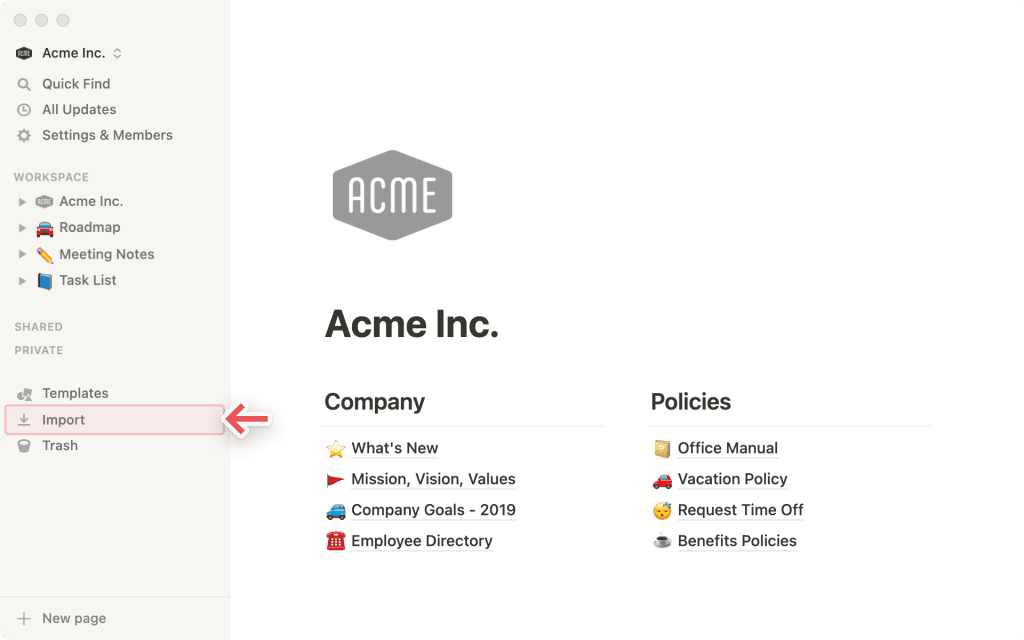
Click the Import button at the bottom of the left-hand panel
Once you have your pages opened or created, the next step is to click on the Import button.

The import button is located toward the bottom of the panel on the left-hand side of the Notion window. Pressing the import button will bring up the import options window.
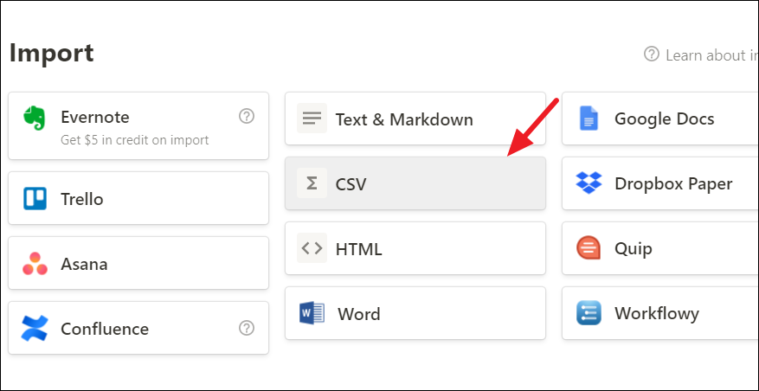
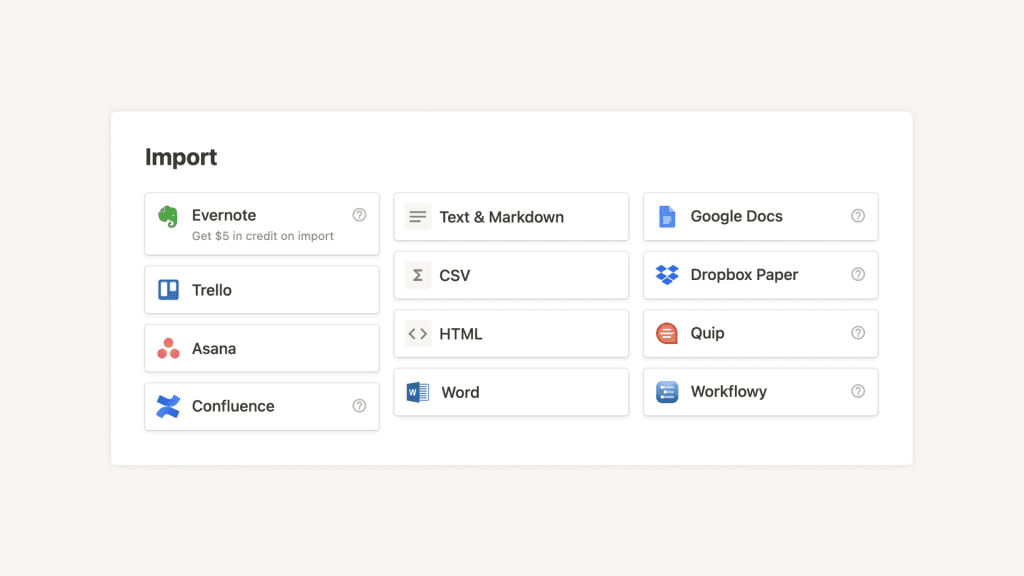
Choose CSV from the Import Options screen
Once the import options window is displayed, you will be given several options for importing a file. You will also probably notice that while Microsoft Word is an import option, Microsoft Excel is not. Fortunately we can use the import CSV option. CSV stands for comma-separated values and is essentially the lowest common denominator file format for representing spreadsheet data. Think of csv files as the txt (text) files of spreadsheets.
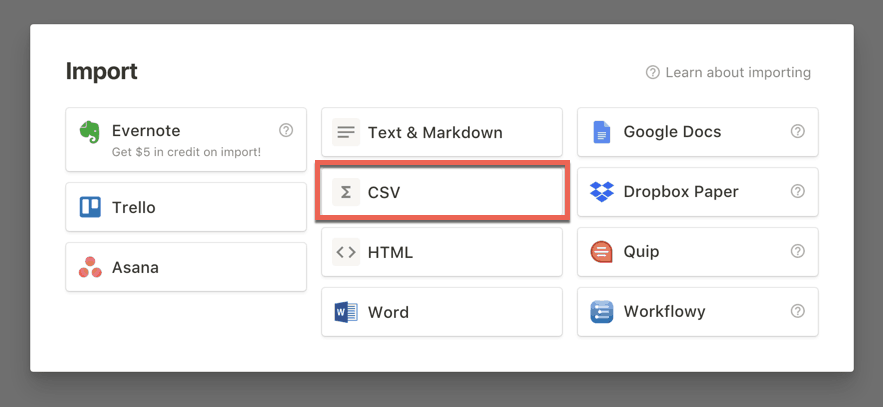
Press or Click the CSV option. You should now be presented with a file picker window.
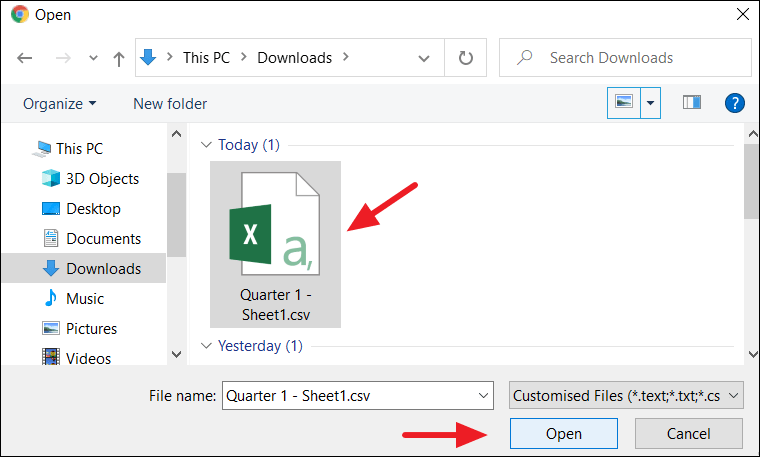
Pick the Excel file in the file chooser and click Open
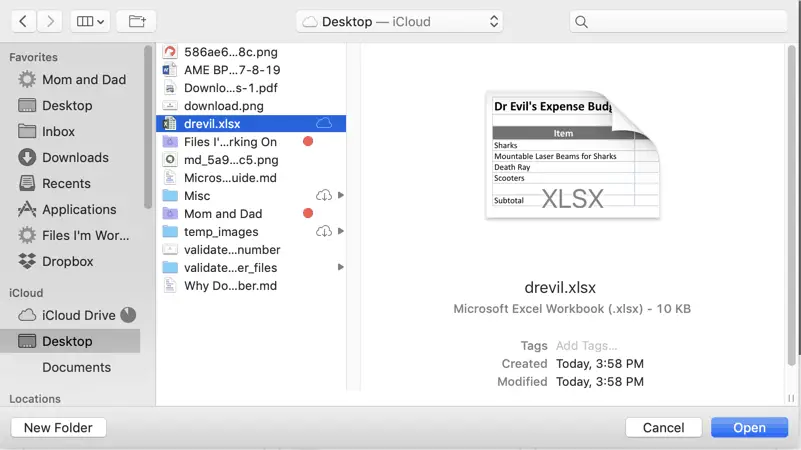
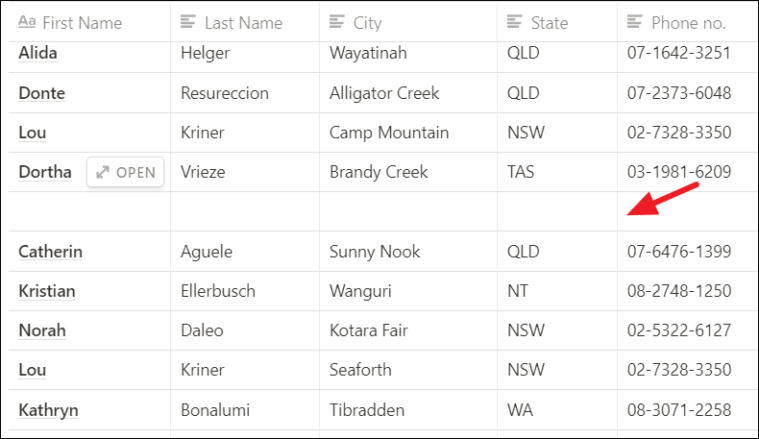
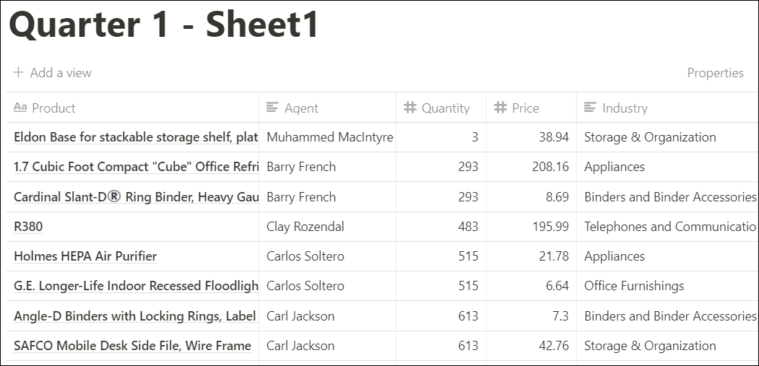
Once the file picker window is displayed, locate the Excel spreadsheet file and press or click Open. Your Excel data will now appear in your Notion page as a table.

You imported the Excel file, now what?
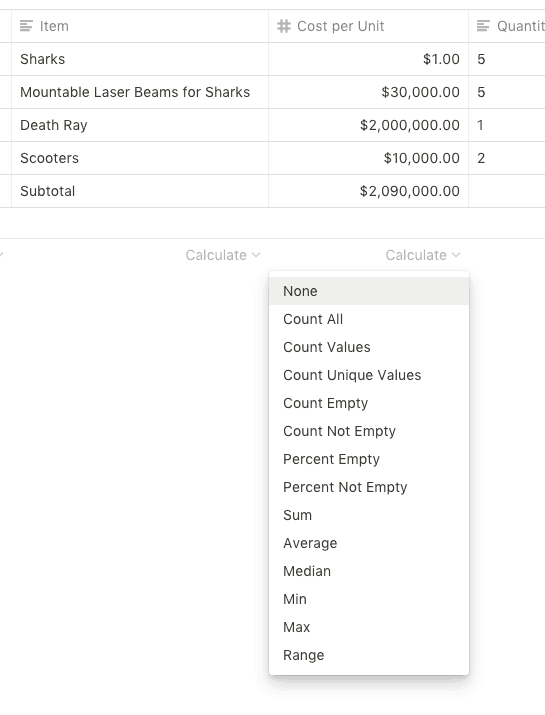
Now that you have the contents of the Excel file into Notion, you can work with it in Notion. The imported data will appear as a table. Tables are very powerful in Notion and you will be able to do a ton of things to them in Notion but the data will likely need to be massaged a little bit.
For one thing, you data will come into Notion but data types will be text. So any numbers, currency, etc. will be text. Also you table column headers will be placed in the first row of your table rather than the column headers section. Any computed cells will be converted to text. Please note that you will need to adjust this in Notion. To add the expected column headers to the column headers section, do the following:
- Add a column to your Notion table to hold the values that were in your first column in your excel spreadsheet
- Copy and Paste the values of each cell in the first column into your new column
- Copy and Paste the title of the column to the column header section of your new column
- Move the new column so that it is the second column in your table
- Delete the first row of your table (it should be an empty row)
- Click on each column header that was a data type other than text in Excel and convert it to the appropriate data type (i.e. text to number)

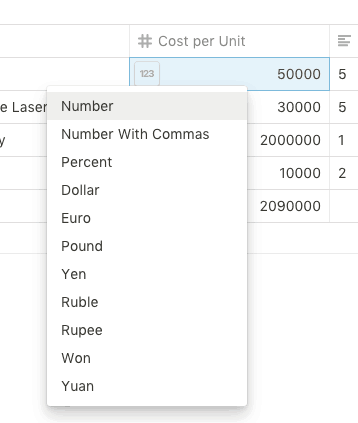
If you convert a text column to numbers and those numbers need to be in a specific format (like currency for example), select the top value cell in your column. A little rectangular box marked 123 will appear. Click/press that button and a list of number formats will appear. The following number formats are available:
- Number
- Number with Commas
- Percent
- Dollar
- Euro
- Pound
- Yen
- Ruble
- Rupee
- Won
- Yuan
Once you change one of the cells in the row, all of the cells in the row will automatically convert to the new format. Your table should now be ready to work with in Notion.

What can you do in Notion to the table?
The short answer is a lot. Tables in Notion are databases and have many of the benefits you get with a database. You can create views of your tables. If you have numbers in your table, you can perform certain operations and sorting on them such as:
- Count
- Empty
- Not Empty
- Unique
- Percent Empty
- Percent Not Empty
- Percent Unique
- Sum
- Average
- Median
- Min
- Max
- Range

The big piece of functionality in Notion in regard to tables are relations. Relations work like the do in any relational database system. Relations allow you to create a relationship or loose coupling between two different tables. Now data in one database or table can be tied to another data in another database or table.

What can’t you do in Notion that you can do in Excel
Excel has way more calculations and formulas. It has pivot tables (although Notion relations and rollups are similar). It has multi-sheet support. It has these things and more because it is a spreadsheet program. Notion is a wiki service that supports database and table functions. That said, Notion’s rich support for these table and database functions are great and comparing Notion and Excel in this regard is a lot like comparing an apple to an orange.
Does the Notion import process support Excel files with multiple worksheets?
No. If you import an Excel spreadsheet with more than one worksheet, only the first worksheet will be imported. You will need to create separate excel files and import them one at a time in order to get all of the worksheets into Notion.
Check out our Resources page
Check out our resources page for the products and services we use everyday to get things done or make our lives a little easier at the link below:
Link to resources page
Summary
Notion allows you to import files from a variety of services. Importing Excel files into Notion is a straight-forward process to get the data into Notion but takes some cleanup work to make the table usable. However, once you have the data in Notion, you can use Notion’s strong relational database functionality to leverage your table with other related tables to marry your data together. I hope you enjoyed this blog post. If you have any questions or comments, please let me know in the comments section at the end of this post.
Please Subscribe to our Newsletter
If you like the content on this site, please subscribe to our newsletter. We promise not to be spammy!
Subscribe Form
Helpful Links
Database 101: build and view
link to Database 101: build and view
Database 1-2: relations and rollups page
link to Database 1-2: relations and rollups page
YouTube video by Rebecca Ford on Using Tables Together in Notion
link to YouTube video by Rebecca Ford on Using Tables Together in Notion
Other Articles You May Be Interested In
How to Embed a Google Sheet into a Notion Page
link to How to Embed a Google Sheet into a Notion Page
How to Create a Project Tracker in Notion for Mac
link to How to Create a Project Tracker in Notion for Mac
PDF Handling – Evernote’s Best Feature
link to PDF Handling – Evernote’s Best Feature
Вы можете импортировать файлы Google Таблиц и Excel (.xslx) в таблицы Notion, экспортировав их как файлы CSV.
Notion-это универсальное решение для повышения производительности, в том числе для написания, планирования, управления знаниями, управления данными, совместной работы в команде.
Notion-один из самых передовых и полезных инструментов для работы с базами данных, доступных сегодня. Notion позволяет создавать базы данных двух типов: полностраничная база данных или встроенная база данных (что означает компонент базы данных, такой как таблица в середине текста или другого документа). Кроме того, есть пять важных типов баз данных, которые вы можете создать в Notion: список, галерея, таблица, доски и календарь.
Все больше и больше пользователей переходят с Google Таблиц и Microsoft Excel на Notion благодаря его гибкости и возможностям настройки. Если вы решили перенести свои базы данных в Notion, но не знаете. В этом посте мы покажем, как импортировать ваши таблицы Google и файлы Excel (.xslx или.xls) в таблицы Notion.
Notion-отличная онлайн-платформа баз данных, которую могут использовать как отдельные лица, так и профессионалы.
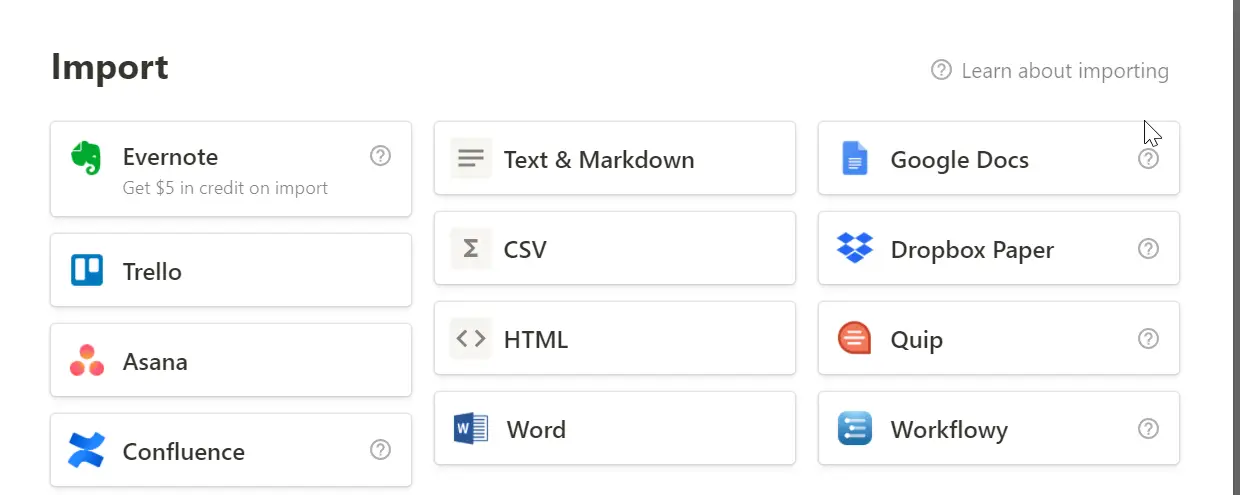
Notion позволяет импортировать данные из файлов следующих типов:
- Обычный текст (.txt)
- Markdown (.md или.markdown)
- Microsoft Word (.docx)
- CSV (.csv )
- HTML (.html)
Вы также можете импортировать данные из различных приложений в Notion.
Помимо этого, вы также можете встраивать таблицы Google в Notion. Но проблема со встраиванием Google Таблиц заключается в том, что вы теряете доступ к файлу или файл удаляется с диска Google, или если URL-адрес не работает, встраивание также прерывается.
Лучший способ импортировать файл Excel или таблицу Google-сначала преобразовать их в файл CSV (.csv) и загрузить в Notion.
Как импортировать файл Excel в Notion
Поскольку Notion не поддерживает файлы.xslx (Excel), вам необходимо экспортировать их в файл.csv, а затем загрузить/импортировать в Notion.
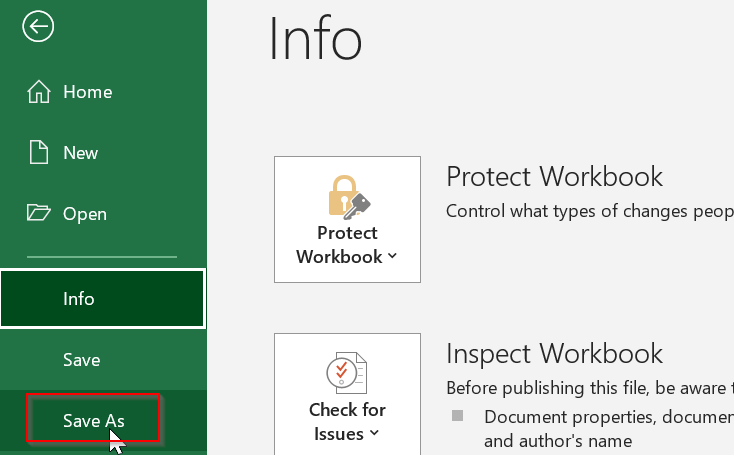
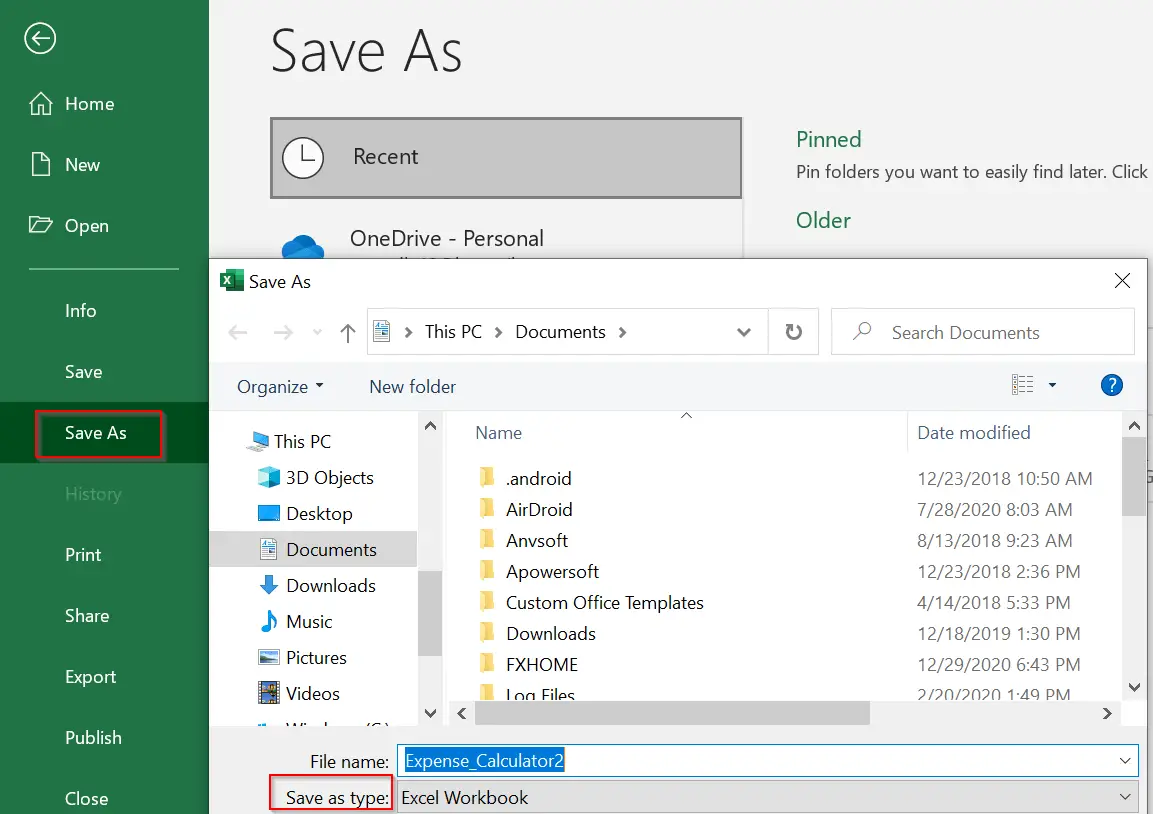
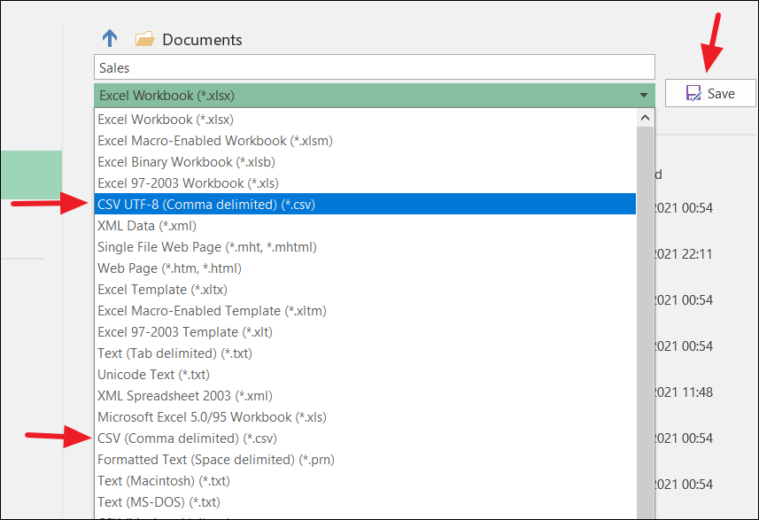
Сначала откройте книгу Excel, которую вы хотите импортировать в Notion. Затем перейдите на вкладку «Файл», чтобы открыть представление Excel за кулисами, и выберите «Сохранить как».

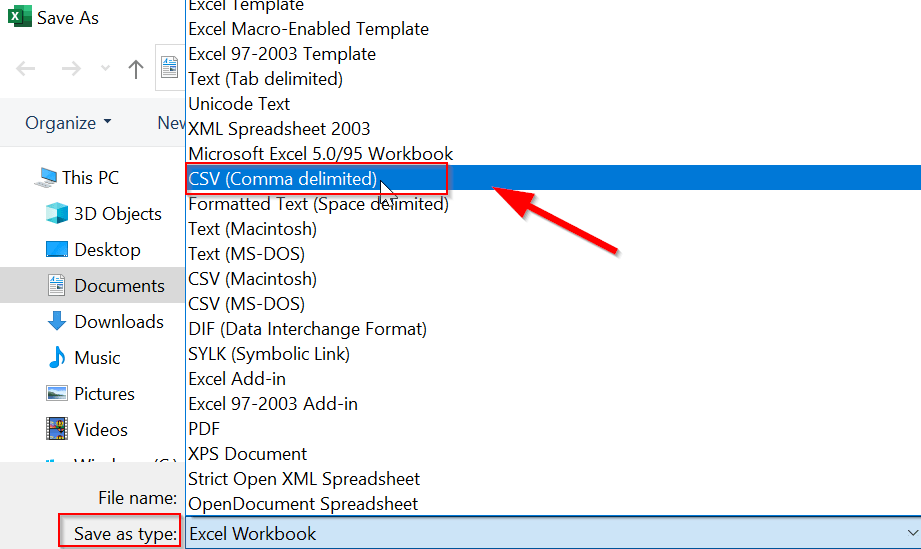
На странице”Сохранить как”выберите”CSV UTF-8 (с разделителями-запятыми) (*. csv)”в качестве типа файла для сохранения. Этот формат также поддерживает неанглийские символы и символы Unicode-8. Или вы можете выбрать простой тип файла «CSV (с разделителями-запятыми) (. * Csv)», который не поддерживает специальные символы. Оба будут работать нормально, если ваша таблица содержит только текст, числа и даты.

CSV-это текстовый файл с разделителями, содержащий список данных. Они часто используются для импорта и экспорта данных в приложениях.
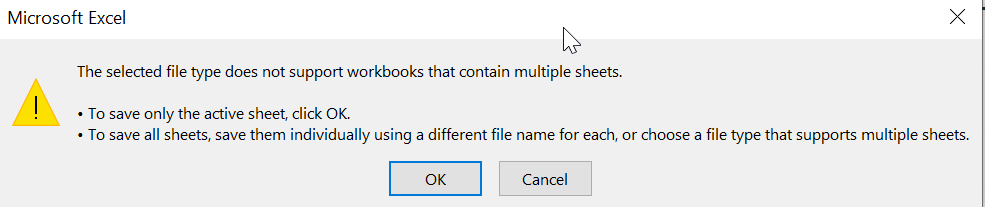
Затем нажмите кнопку «Сохранить». Если у вас в книге только один лист, он будет сразу сохранен. Или, если у вас есть несколько листов в книге, Excel покажет вам это предупреждающее сообщение, говоря, что нажмите «ОК», чтобы сохранить только активный лист в виде файла CSV, а если у вас несколько листов, сохраните их по отдельности с разными именами.
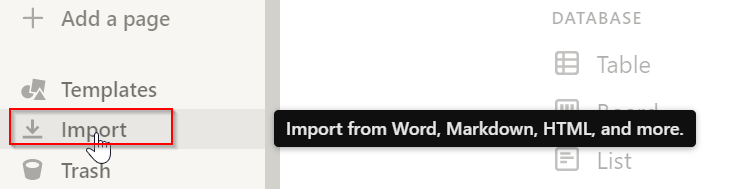
После сохранения данных в виде файла CSV откройте приложение Notion или откройте Notion в браузере. Затем откройте страницу описания, на которую вы хотите импортировать файл CSV, и нажмите «Импорт» на левой панели, как показано ниже.
Откроется диалоговое окно импорта. Выберите в диалоговом окне опцию «CSV».
Теперь перейдите к папке, содержащей ваш CSV-файл, в средстве выбора файлов, выберите его и нажмите «Открыть».

CSV-файл будет импортирован в Notion, и ваши данные Excel появятся в виде таблицы.
Изменение типа собственности в понятии
После успешного импорта данных вам нужно сделать еще одну вещь-проверить, соответствуют ли типы свойств (типы данных) каждого столбца данным. В большинстве случаев вы получаете правильные типы данных, но иногда данные попадают в Notion в виде текстов. Например, если вы импортируете данные о валюте или нераспознанный формат даты и т. Д., Они будут представлены в виде текста.
Поэтому, когда это произойдет, вам нужно будет преобразовать столбцы в соответствующий тип свойства. Вы можете узнать тип данных столбца, посмотрев на значок перед заголовком столбца. Если у вас есть тексты, это будет значок абзаца, значок календаря для дат и знак решетки для чисел и т. Д.
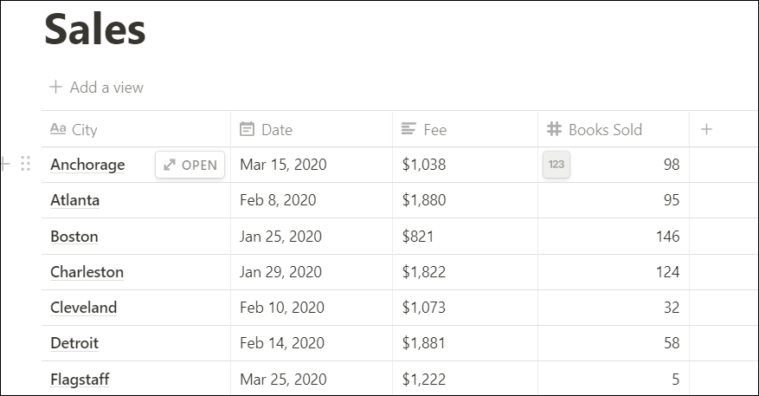
Как вы можете видеть ниже, когда мы импортировали эту таблицу из файла Excel, столбец «Комиссия» со значениями валюты отформатирован как текстовый столбец. Теперь нам нужно изменить тип свойства (тип данных) столбца «Комиссия» на числовой.

Для этого нажмите на заголовок столбца, откроется раскрывающийся список. При этом нажмите «Текст» в разделе «Тип свойства» и выберите соответствующий тип данных (число).
Теперь мы преобразовали значения, но потеряли денежный формат. Не волнуйтесь, добавить легко. Чтобы преобразовать число в определенный формат, просто наведите курсор на одно из значений столбца, и вы увидите кнопку 123 .
Нажмите кнопку 123 и выберите нужный числовой формат из списка.

Теперь числовые значения в столбце”Комиссия”отформатированы как денежные.
Как импортировать лист Google в Notion
Чтобы импортировать таблицы Google в Notion, вам необходимо сначала загрузить электронную таблицу в виде файла CSV.
Чтобы загрузить таблицы Google, откройте электронную таблицу Google, которую вы хотите импортировать, и нажмите меню «Файл» в строке меню. В раскрывающемся списке разверните параметр «Загрузить» и выберите «Значения, разделенные запятыми (.csv, текущий лист)», чтобы загрузить файл в виде файла CSV.
Затем откройте страницу описания, на которую вы хотите импортировать файл CSV, и нажмите «Импорт» в нижней части левой боковой панели.
Выберите файл в меню выбора файлов и нажмите «Открыть», чтобы импортировать этот CSV-файл в Notion.

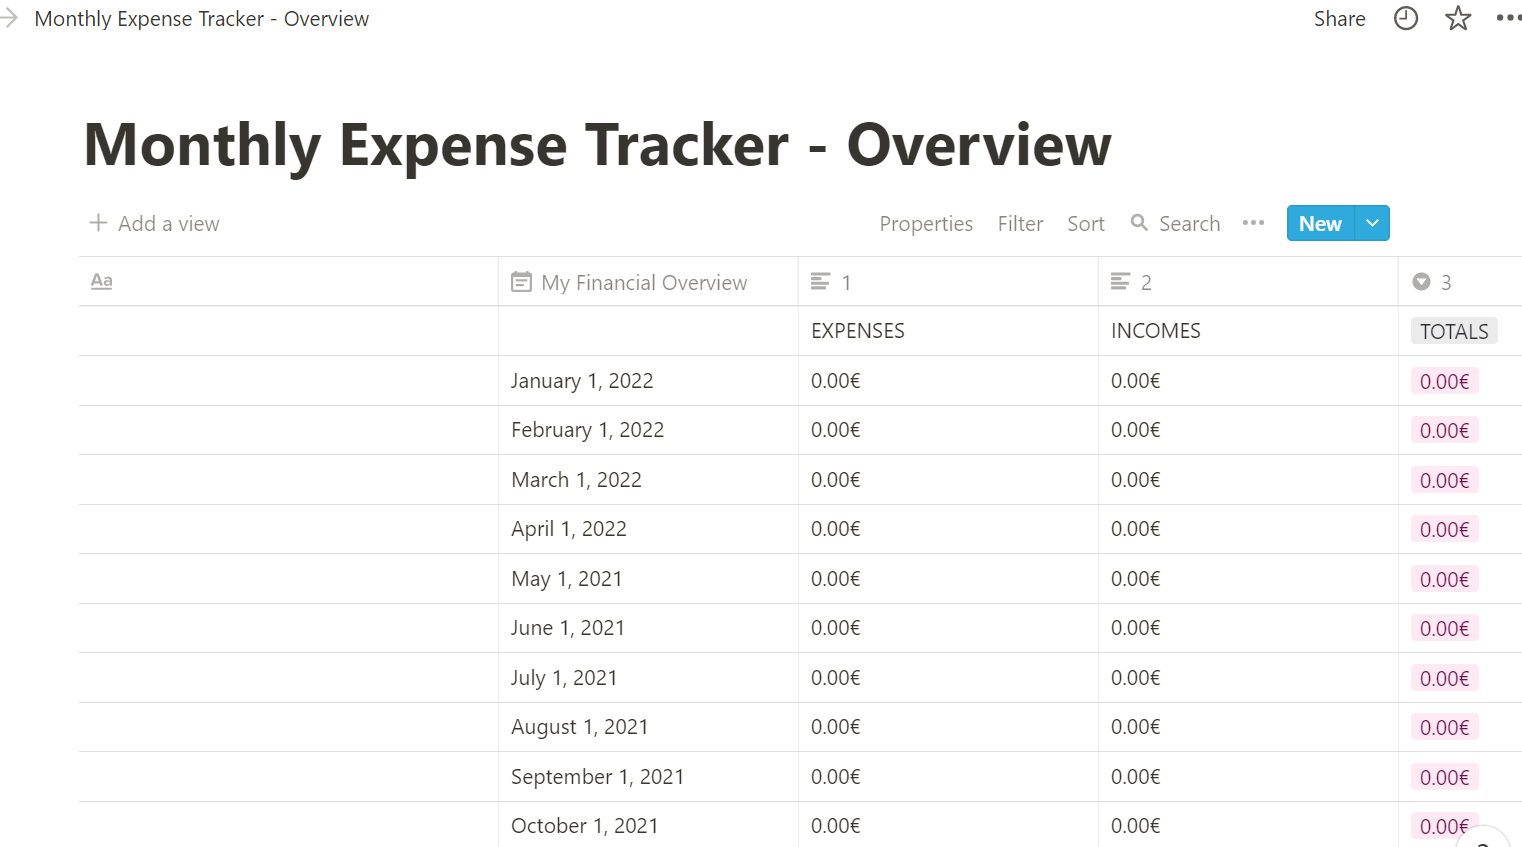
Теперь ваш лист Google импортирован в Notion и отображается в виде таблицы.

Добавление файла Excel или таблицы Google в базу данных Notion
Вместо того, чтобы импортировать данные в новую таблицу Notion, вы можете объединить содержимое из файла Excel или таблицы Google в существующую таблицу Notion. Помните, что это можно сделать только с полностраничными таблицами, но не с встроенными таблицами.
Но сначала вам необходимо убедиться, что и ваша таблица Excel/Google Sheet, и ваша таблица Notion имеют общие имена столбцов (например, в обоих должны быть столбцы «Имя», «Фамилия», «Дата» и т. д. ).
Сначала экспортируйте лист Excel/Google в файл CSV, как мы это делали для импорта листов Excel/Google в Notion.
Затем откройте страницу”Понятие”, содержащую таблицу, с которой нужно объединить, и нажмите горизонтальное многоточие (… ) в правом верхнем углу окна”Понятие”.

Затем перейдите к папке, содержащей экспортированный файл CSV, в проводнике файлов и выберите ее. И нажмите «Открыть», чтобы объединить файл.

Теперь CSV-файл объединен (добавлен) с вашей таблицей понятий, и его содержимое будет добавлено в конец существующей таблицы понятий (см. ниже).
Вот как вы импортируете базы данных Excel и Google таблицы в Notion.
Рассказываем на примере Excel, Google Sheets и no-code инструмента Rows, как перенести электронную таблицу в Notion.
Иногда в рабочее пространство нужно выгрузить табличные данные. Часто таблица «ломается» при копировании, и информация выгружается как попало, из-за чего ее приходится доделывать вручную. На помощь — как и всегда — приходит зерокодинг, предлагающий автоматическое импортирование данных. С сохранением форматирования.
В этой статье мы поговорим о четырех инструментах: Excel, Google Sheets, Rows и Notion. Rows — это no-code платформа для работы с таблицами и интеграции их в приложения: красивая, понятная, с массой автоматизаций. Notion — некогда простенький инструмент для заметок и постановки задач, но теперь полноценная рабочая среда для всей команды.
Читайте также: «Обзор Notion — единого рабочего пространства с большим функционалом».
Notion и Rows — зерокодинговые инструменты. Мы рассказываем о разработке без кода на бесплатном двухдневном марафоне от онлайн-университета «Зерокодер». Приходите!
Excel пока не планирует устаревать, хотя первая его версия была запущена аж в 1985 году. У программы невероятный функционал, и многие продолжают решать с ее помощью рабочие задачи.
Поэтому потребность перенести данные из таблички в рабочую среду по-прежнему возникает.
Что нужно сделать для переноса данных в Notion:
1. Открыть Excel и сохранить таблицу в формате .csv. Файл — Сохранить как — csv.
2. Открыть Notion и нажать на кнопку Import («Импортировать»), которая находится снизу слева, после чего выбрать из поп-ап меню формат csv.
3. Открыть еще один поп-ап, который позволит выбрать сохраненный на компьютере csv-файл Excel.

4. Выбрать файл и нажать Open («Открыть»). Это позволит Notion импортировать и отрендерить данные, чтобы они хорошо смотрелись в рабочей среде платформы.
Изменять информацию можно прямо в Notion, без повторного импортирования данных. Это включает в себя форматирование строк и столбцов, вычисления с использованием формул, сортировку и отображение.
Из Google Sheets в Notion
Со временем на смену Excel пришли облачные таблицы Google Sheets — все то же самое, но с возможностью поделиться проектом между командой. Импорт тут не сильно отличается от экселевского.
Как это сделать:
1. Скачать файл из Google Sheets на компьютер, выбрав формат .csv. Для этого нужно нажать на «Файл», выбрать в выпадающем меню «Скачать» и «Формат CVS».

2. Открыть Notion и снова нажать на кнопку Import в левом нижнем углу. Выскочит попап, из которого нужно выбрать формат .csv.
3. Открыть новый попап, выбрать скачанный из Google документ.
4. Нажать на Open, чтобы система сама все красиво отрендерила.
Однако у Google Sheets функционал шире, чем у Excel. Таблицу можно встроить в рабочую среду Notion вместо того, чтобы ее загружать.
Что для этого нужно:
1. Нажать на «Файл», потом «Поделиться» и «Открыть доступ».

2. Выбрать уровень доступа. Их несколько: «Читатель» означает, что пользователи будут просто видеть данные без возможности редактировать. «Комментатор» — что они смогут оставлять комментарии. И наконец, «Редактор» — высший тип доступа. Пользователи смогут вносить правки напрямую в таблицу.

3. Открыть Notion и набрать /embed, после чего скопировать ссылку из Google Sheets.
Все правки, внесенные в таблицу в Notion, будут вноситься и в Google Sheets. И наоборот.
Встроить получится только весь список целиком — к сожалению, облачные таблицы Google пока не позволяют выбрать, например, отдельный столбец. Зато это умеет инструмент, о котором мы расскажем дальше.
Из Rows в Notion
Rows разработчики называют гибридом электронной таблицы и Zapier — простого no-code инструмента для подключения одних сервисов к другим. Он объединяет в себе функции Google Sheets и интеграции с соцсетями, платформами для анализа данных, разными бэкенд-решениями. Выглядит как таблица, но с интерактивными кнопками и адаптивной версткой.
Из него тоже можно выгрузить данные в Notion.
Как это сделать:
1. Нажать на кнопку Share («Поделиться»), которая находится в правом верхнем углу меню, и выбрать Share privately («Поделиться в частном порядке»).

2. Перейти в таблицу и кликнуть по ней. Появится меню с несколькими вариантами, из которых нужно выбрать Embed («Встроить»). Возникнет попап. Оттуда нужно скопировать ссылку.
3. Вставить ссылку в нужное место рабочей среды Notion. Потом останется только определиться с размером — таблицы Rows очень адаптивные.
Как и в Google Sheets, встроенная в Notion таблица связывается с оригиналом. Как только изменения вносятся в него, они появляются и в копии. И наоборот: если внести правки в таблицу, размещенную в рабочей среде, они возникнут и в оригинальной версии.
Кроме того, Rows позволяет встраивать отдельные элементы таблицы.

Вот и все! Загружать таким образом в Notion можно не только табличные файлы и базы данных на их основе, но и, например, документы.
Содержание
- Я зерокодер
- Как импортировать данные из электронной таблицы в Notion
- Из Excel в Notion
- Из Google Sheets в Notion
- Из Rows в Notion
- How to Import An Excel Spreadsheet into Notion
- Open Page You Want to Import Spreadsheet Into
- Click the Import button at the bottom of the left-hand panel
- Choose CSV from the Import Options screen
- Pick the Excel file in the file chooser and click Open
- You imported the Excel file, now what?
- What can you do in Notion to the table?
- What can’t you do in Notion that you can do in Excel
- Does the Notion import process support Excel files with multiple worksheets?
- Check out our Resources page
- Summary
- Please Subscribe to our Newsletter
- Subscribe Form
Я зерокодер
Медиа про зерокодинг, разработку и онлайн-образование

Как импортировать данные из электронной таблицы в Notion
Иногда в рабочее пространство нужно выгрузить табличные данные. Часто таблица «ломается» при копировании, и информация выгружается как попало, из-за чего ее приходится доделывать вручную. На помощь — как и всегда — приходит зерокодинг
Рассказываем на примере Excel, Google Sheets и no-code инструмента Rows, как перенести электронную таблицу в Notion.
Иногда в рабочее пространство нужно выгрузить табличные данные. Часто таблица «ломается» при копировании, и информация выгружается как попало, из-за чего ее приходится доделывать вручную. На помощь — как и всегда — приходит зерокодинг, предлагающий автоматическое импортирование данных. С сохранением форматирования.
В этой статье мы поговорим о четырех инструментах: Excel, Google Sheets, Rows и Notion. Rows — это no-code платформа для работы с таблицами и интеграции их в приложения: красивая, понятная, с массой автоматизаций. Notion — некогда простенький инструмент для заметок и постановки задач, но теперь полноценная рабочая среда для всей команды.
Notion и Rows — зерокодинговые инструменты. Мы рассказываем о разработке без кода на бесплатном двухдневном марафоне от онлайн-университета «Зерокодер». Приходите!
Из Excel в Notion
Excel пока не планирует устаревать, хотя первая его версия была запущена аж в 1985 году. У программы невероятный функционал, и многие продолжают решать с ее помощью рабочие задачи.
Поэтому потребность перенести данные из таблички в рабочую среду по-прежнему возникает.
Что нужно сделать для переноса данных в Notion:
1. Открыть Excel и сохранить таблицу в формате .csv. Файл — Сохранить как — csv.
2. Открыть Notion и нажать на кнопку Import («Импортировать»), которая находится снизу слева, после чего выбрать из поп-ап меню формат csv.
3. Открыть еще один поп-ап, который позволит выбрать сохраненный на компьютере csv-файл Excel.
4. Выбрать файл и нажать Open («Открыть»). Это позволит Notion импортировать и отрендерить данные, чтобы они хорошо смотрелись в рабочей среде платформы.
Изменять информацию можно прямо в Notion, без повторного импортирования данных. Это включает в себя форматирование строк и столбцов, вычисления с использованием формул, сортировку и отображение.
Из Google Sheets в Notion
Со временем на смену Excel пришли облачные таблицы Google Sheets — все то же самое, но с возможностью поделиться проектом между командой. Импорт тут не сильно отличается от экселевского.
Как это сделать:
1. Скачать файл из Google Sheets на компьютер, выбрав формат .csv. Для этого нужно нажать на «Файл», выбрать в выпадающем меню «Скачать» и «Формат CVS».
2. Открыть Notion и снова нажать на кнопку Import в левом нижнем углу. Выскочит попап, из которого нужно выбрать формат .csv.
3. Открыть новый попап, выбрать скачанный из Google документ.
4. Нажать на Open, чтобы система сама все красиво отрендерила.
Однако у Google Sheets функционал шире, чем у Excel. Таблицу можно встроить в рабочую среду Notion вместо того, чтобы ее загружать.
Что для этого нужно:
1. Нажать на «Файл», потом «Поделиться» и «Открыть доступ».
2. Выбрать уровень доступа. Их несколько: «Читатель» означает, что пользователи будут просто видеть данные без возможности редактировать. «Комментатор» — что они смогут оставлять комментарии. И наконец, «Редактор» — высший тип доступа. Пользователи смогут вносить правки напрямую в таблицу.
3. Открыть Notion и набрать /embed, после чего скопировать ссылку из Google Sheets.
Все правки, внесенные в таблицу в Notion, будут вноситься и в Google Sheets. И наоборот.
Встроить получится только весь список целиком — к сожалению, облачные таблицы Google пока не позволяют выбрать, например, отдельный столбец. Зато это умеет инструмент, о котором мы расскажем дальше.
Из Rows в Notion
Rows разработчики называют гибридом электронной таблицы и Zapier — простого no-code инструмента для подключения одних сервисов к другим. Он объединяет в себе функции Google Sheets и интеграции с соцсетями, платформами для анализа данных, разными бэкенд-решениями. Выглядит как таблица, но с интерактивными кнопками и адаптивной версткой.
Из него тоже можно выгрузить данные в Notion.
Как это сделать:
1. Нажать на кнопку Share («Поделиться»), которая находится в правом верхнем углу меню, и выбрать Share privately («Поделиться в частном порядке»).
2. Перейти в таблицу и кликнуть по ней. Появится меню с несколькими вариантами, из которых нужно выбрать Embed («Встроить»). Возникнет попап. Оттуда нужно скопировать ссылку.
3. Вставить ссылку в нужное место рабочей среды Notion. Потом останется только определиться с размером — таблицы Rows очень адаптивные.
Как и в Google Sheets, встроенная в Notion таблица связывается с оригиналом. Как только изменения вносятся в него, они появляются и в копии. И наоборот: если внести правки в таблицу, размещенную в рабочей среде, они возникнут и в оригинальной версии.
Кроме того, Rows позволяет встраивать отдельные элементы таблицы.
Вот и все! Загружать таким образом в Notion можно не только табличные файлы и базы данных на их основе, но и, например, документы.
Источник
How to Import An Excel Spreadsheet into Notion
Please enable JavaScript
Notion is a great all-in-one productivity tool. It is the Swiss army knife of productivity tools. It supports a variety of tools and formats and allows you to work the way you want to work. One of the ways that Notion shines is its ability to embed and import files from other applications and services. This blog post will show you how to import Excel files into Notion.
So how do you import an Excel file into Notion? Enclosed below are the high level steps required to import an Excel file into Notion:
- Open Page You Want to Import Spreadsheet Into
- Click theImportbutton at the bottom of the left-hand panel
- ChooseCSVfrom the Import Options screen
- Pick the Excel file in the file chooser and clickOpen
- The Excel file’s content will appear as a table in the Notion page
While these are the high level steps required to import the Excel file into Notion, the rest of this blog post will provide the step-by-step process complete with images of every screen encountered and every button pushed.
Before we get started, looking for more Notion tips? Check out our article containing 14 essential Notion tips at the link below:
If you are looking to learn even more about Notion or other apps, Skillshare is a great resource to check out. Skillshare has courses on Notion, Evernote, Todoist, Things 3, Trello and more. In fact, there is a great Notion course by Francesco D’Alessio on Notion that you can check out at the link below:
Now that we know the high-level steps, let’s get started with the import process.
Open Page You Want to Import Spreadsheet Into
To get started, open up Notion. Notion is based on pages. Pages in Notion are like simple web pages that can hold a variety of different content types. Notion is essentially a wiki. A wiki is a set of webpages that can hold a variety of content and can have multiple contributors. Notion, like a wiki, allows you to create pages and subpages.
Once you have Notion open, either open the page you want to import the excel spreadsheet into or create a new page.
Click the Import button at the bottom of the left-hand panel
Once you have your pages opened or created, the next step is to click on the Import button. 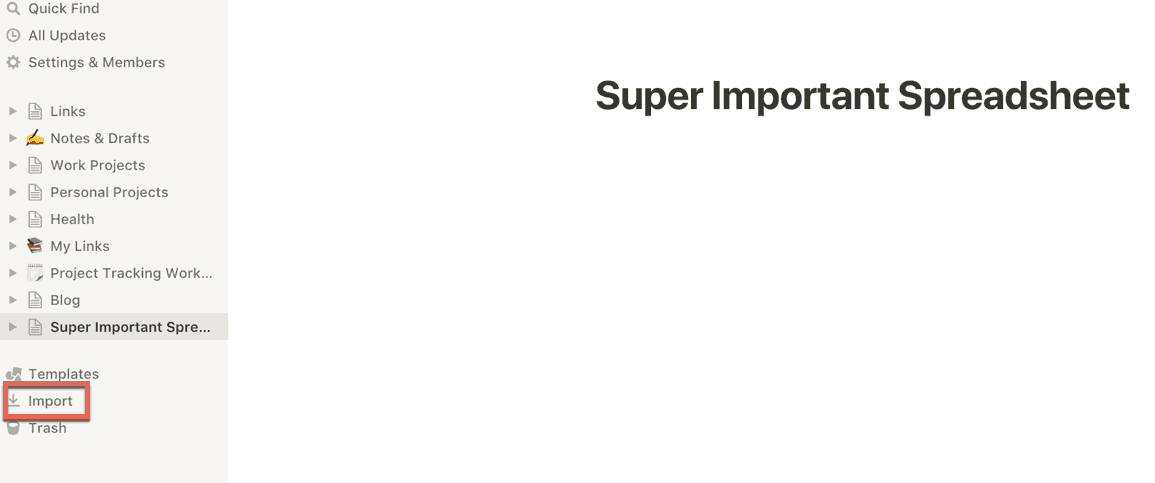 Click “Import” to bring up the Import options
The import button is located toward the bottom of the panel on the left-hand side of the Notion window. Pressing the import button will bring up the import options window.
Choose CSV from the Import Options screen
Once the import options window is displayed, you will be given several options for importing a file. You will also probably notice that while Microsoft Word is an import option, Microsoft Excel is not. Fortunately we can use the import CSV option. CSV stands for comma-separated values and is essentially the lowest common denominator file format for representing spreadsheet data. Think of csv files as the txt (text) files of spreadsheets. Select CSV
Press or Click the CSV option. You should now be presented with a file picker window.
Pick the Excel file in the file chooser and click Open
Once the file picker window is displayed, locate the Excel spreadsheet file and press or click Open. Your Excel data will now appear in your Notion page as a table. 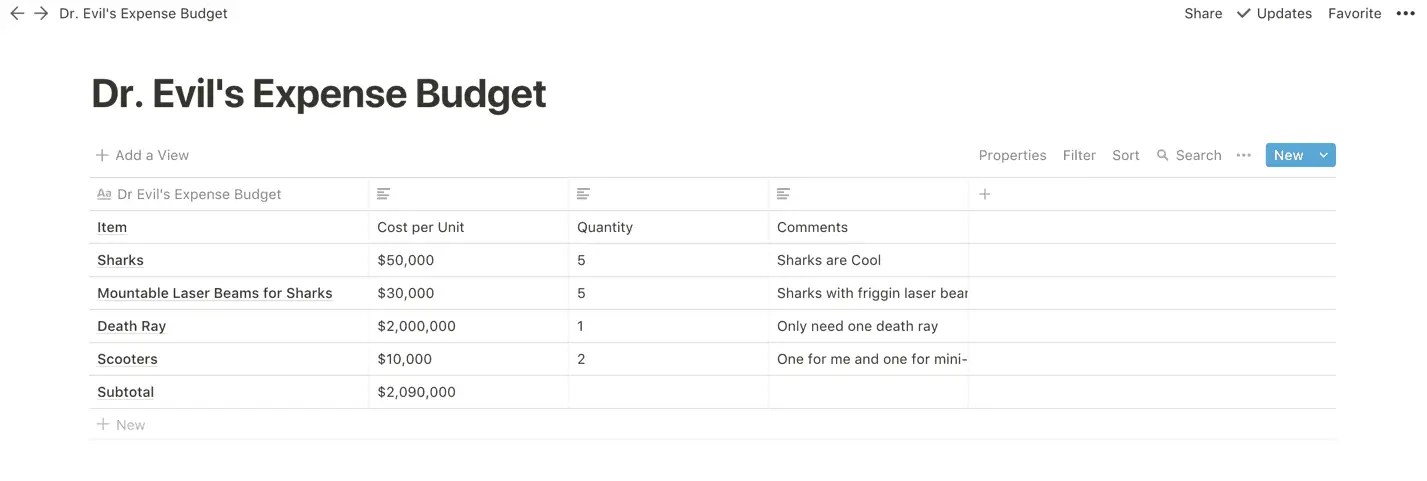 Your Excel Data in Notion
You imported the Excel file, now what?
Now that you have the contents of the Excel file into Notion, you can work with it in Notion. The imported data will appear as a table. Tables are very powerful in Notion and you will be able to do a ton of things to them in Notion but the data will likely need to be massaged a little bit.
For one thing, you data will come into Notion but data types will be text. So any numbers, currency, etc. will be text. Also you table column headers will be placed in the first row of your table rather than the column headers section. Any computed cells will be converted to text. Please note that you will need to adjust this in Notion. To add the expected column headers to the column headers section, do the following:
- Add a column to your Notion table to hold the values that were in your first column in your excel spreadsheet
- Copy and Paste the values of each cell in the first column into your new column
- Copy and Paste the title of the column to the column header section of your new column
- Move the new column so that it is the second column in your table
- Delete the first row of your table (it should be an empty row)
- Click on each column header that was a data type other than text in Excel and convert it to the appropriate data type (i.e. text to number)
Converting text to number format
If you convert a text column to numbers and those numbers need to be in a specific format (like currency for example), select the top value cell in your column. A little rectangular box marked 123 will appear. Click/press that button and a list of number formats will appear. The following number formats are available:
Once you change one of the cells in the row, all of the cells in the row will automatically convert to the new format. Your table should now be ready to work with in Notion. 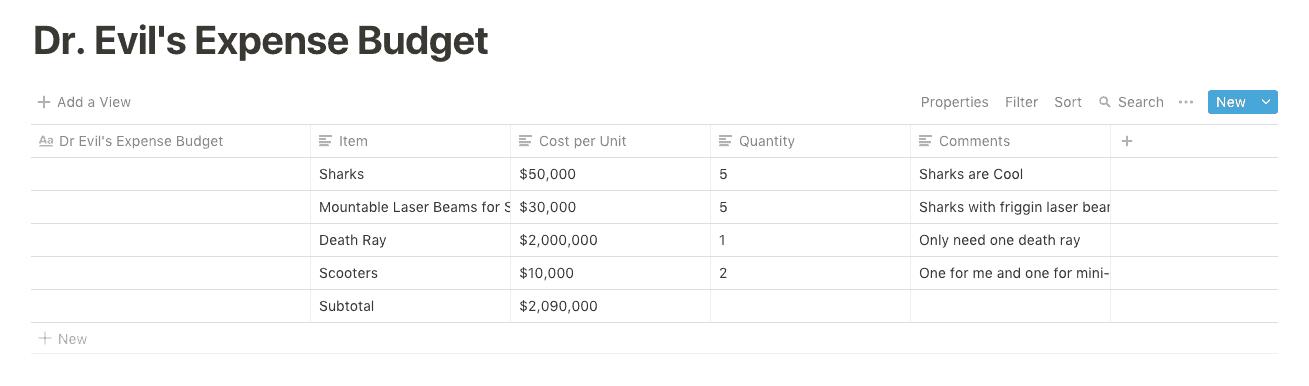 Cleaned up table in Notion
What can you do in Notion to the table?
The short answer is a lot. Tables in Notion are databases and have many of the benefits you get with a database. You can create views of your tables. If you have numbers in your table, you can perform certain operations and sorting on them such as: Calculation and Sorting options in Notion
- Count
- Empty
- Not Empty
- Unique
- Percent Empty
- Percent Not Empty
- Percent Unique
- Sum
- Average
- Median
- Min
- Max
- Range
Creating a relation to another database in Notion
The big piece of functionality in Notion in regard to tables are relations. Relations work like the do in any relational database system. Relations allow you to create a relationship or loose coupling between two different tables. Now data in one database or table can be tied to another data in another database or table.  A new table with a relation to our prior table
What can’t you do in Notion that you can do in Excel
Excel has way more calculations and formulas. It has pivot tables (although Notion relations and rollups are similar). It has multi-sheet support. It has these things and more because it is a spreadsheet program. Notion is a wiki service that supports database and table functions. That said, Notion’s rich support for these table and database functions are great and comparing Notion and Excel in this regard is a lot like comparing an apple to an orange.
Does the Notion import process support Excel files with multiple worksheets?
No. If you import an Excel spreadsheet with more than one worksheet, only the first worksheet will be imported. You will need to create separate excel files and import them one at a time in order to get all of the worksheets into Notion.
Check out our Resources page
Check out our resources page for the products and services we use everyday to get things done or make our lives a little easier at the link below:
Summary
Notion allows you to import files from a variety of services. Importing Excel files into Notion is a straight-forward process to get the data into Notion but takes some cleanup work to make the table usable. However, once you have the data in Notion, you can use Notion’s strong relational database functionality to leverage your table with other related tables to marry your data together. I hope you enjoyed this blog post. If you have any questions or comments, please let me know in the comments section at the end of this post.
Please Subscribe to our Newsletter
If you like the content on this site, please subscribe to our newsletter. We promise not to be spammy!
Subscribe Form
Источник
In this tutorial, we will show you How to import excel sheet into Notion
( How to Embed a Google Sheet into Notion Page )
Overview of Steps which you need to follow :
- Open the Notion Page where you need to import the excel spreadsheet.
- Convert the file to CSV format,if you don’t have a CSV file.
- Click the Import button on the bottom left of Notion navigation menu .
- Once you click on import ,you will get a window with import options
- Out of the available options select ,CSV
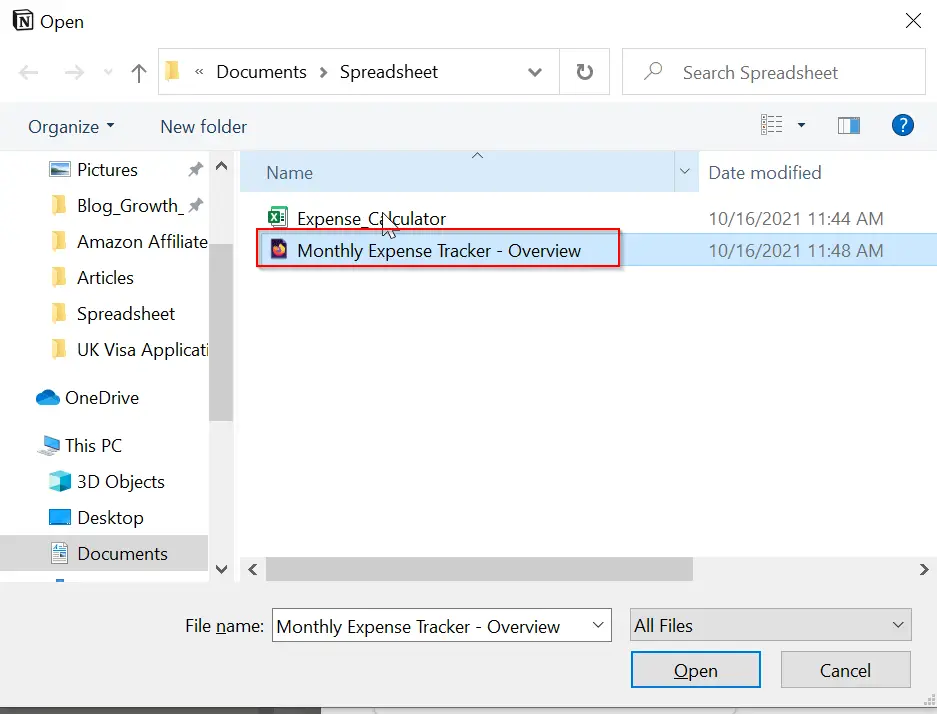
- Choose the excel file using the file explorer and click on open
- The excel file contents will be shown inside the Notion Page.
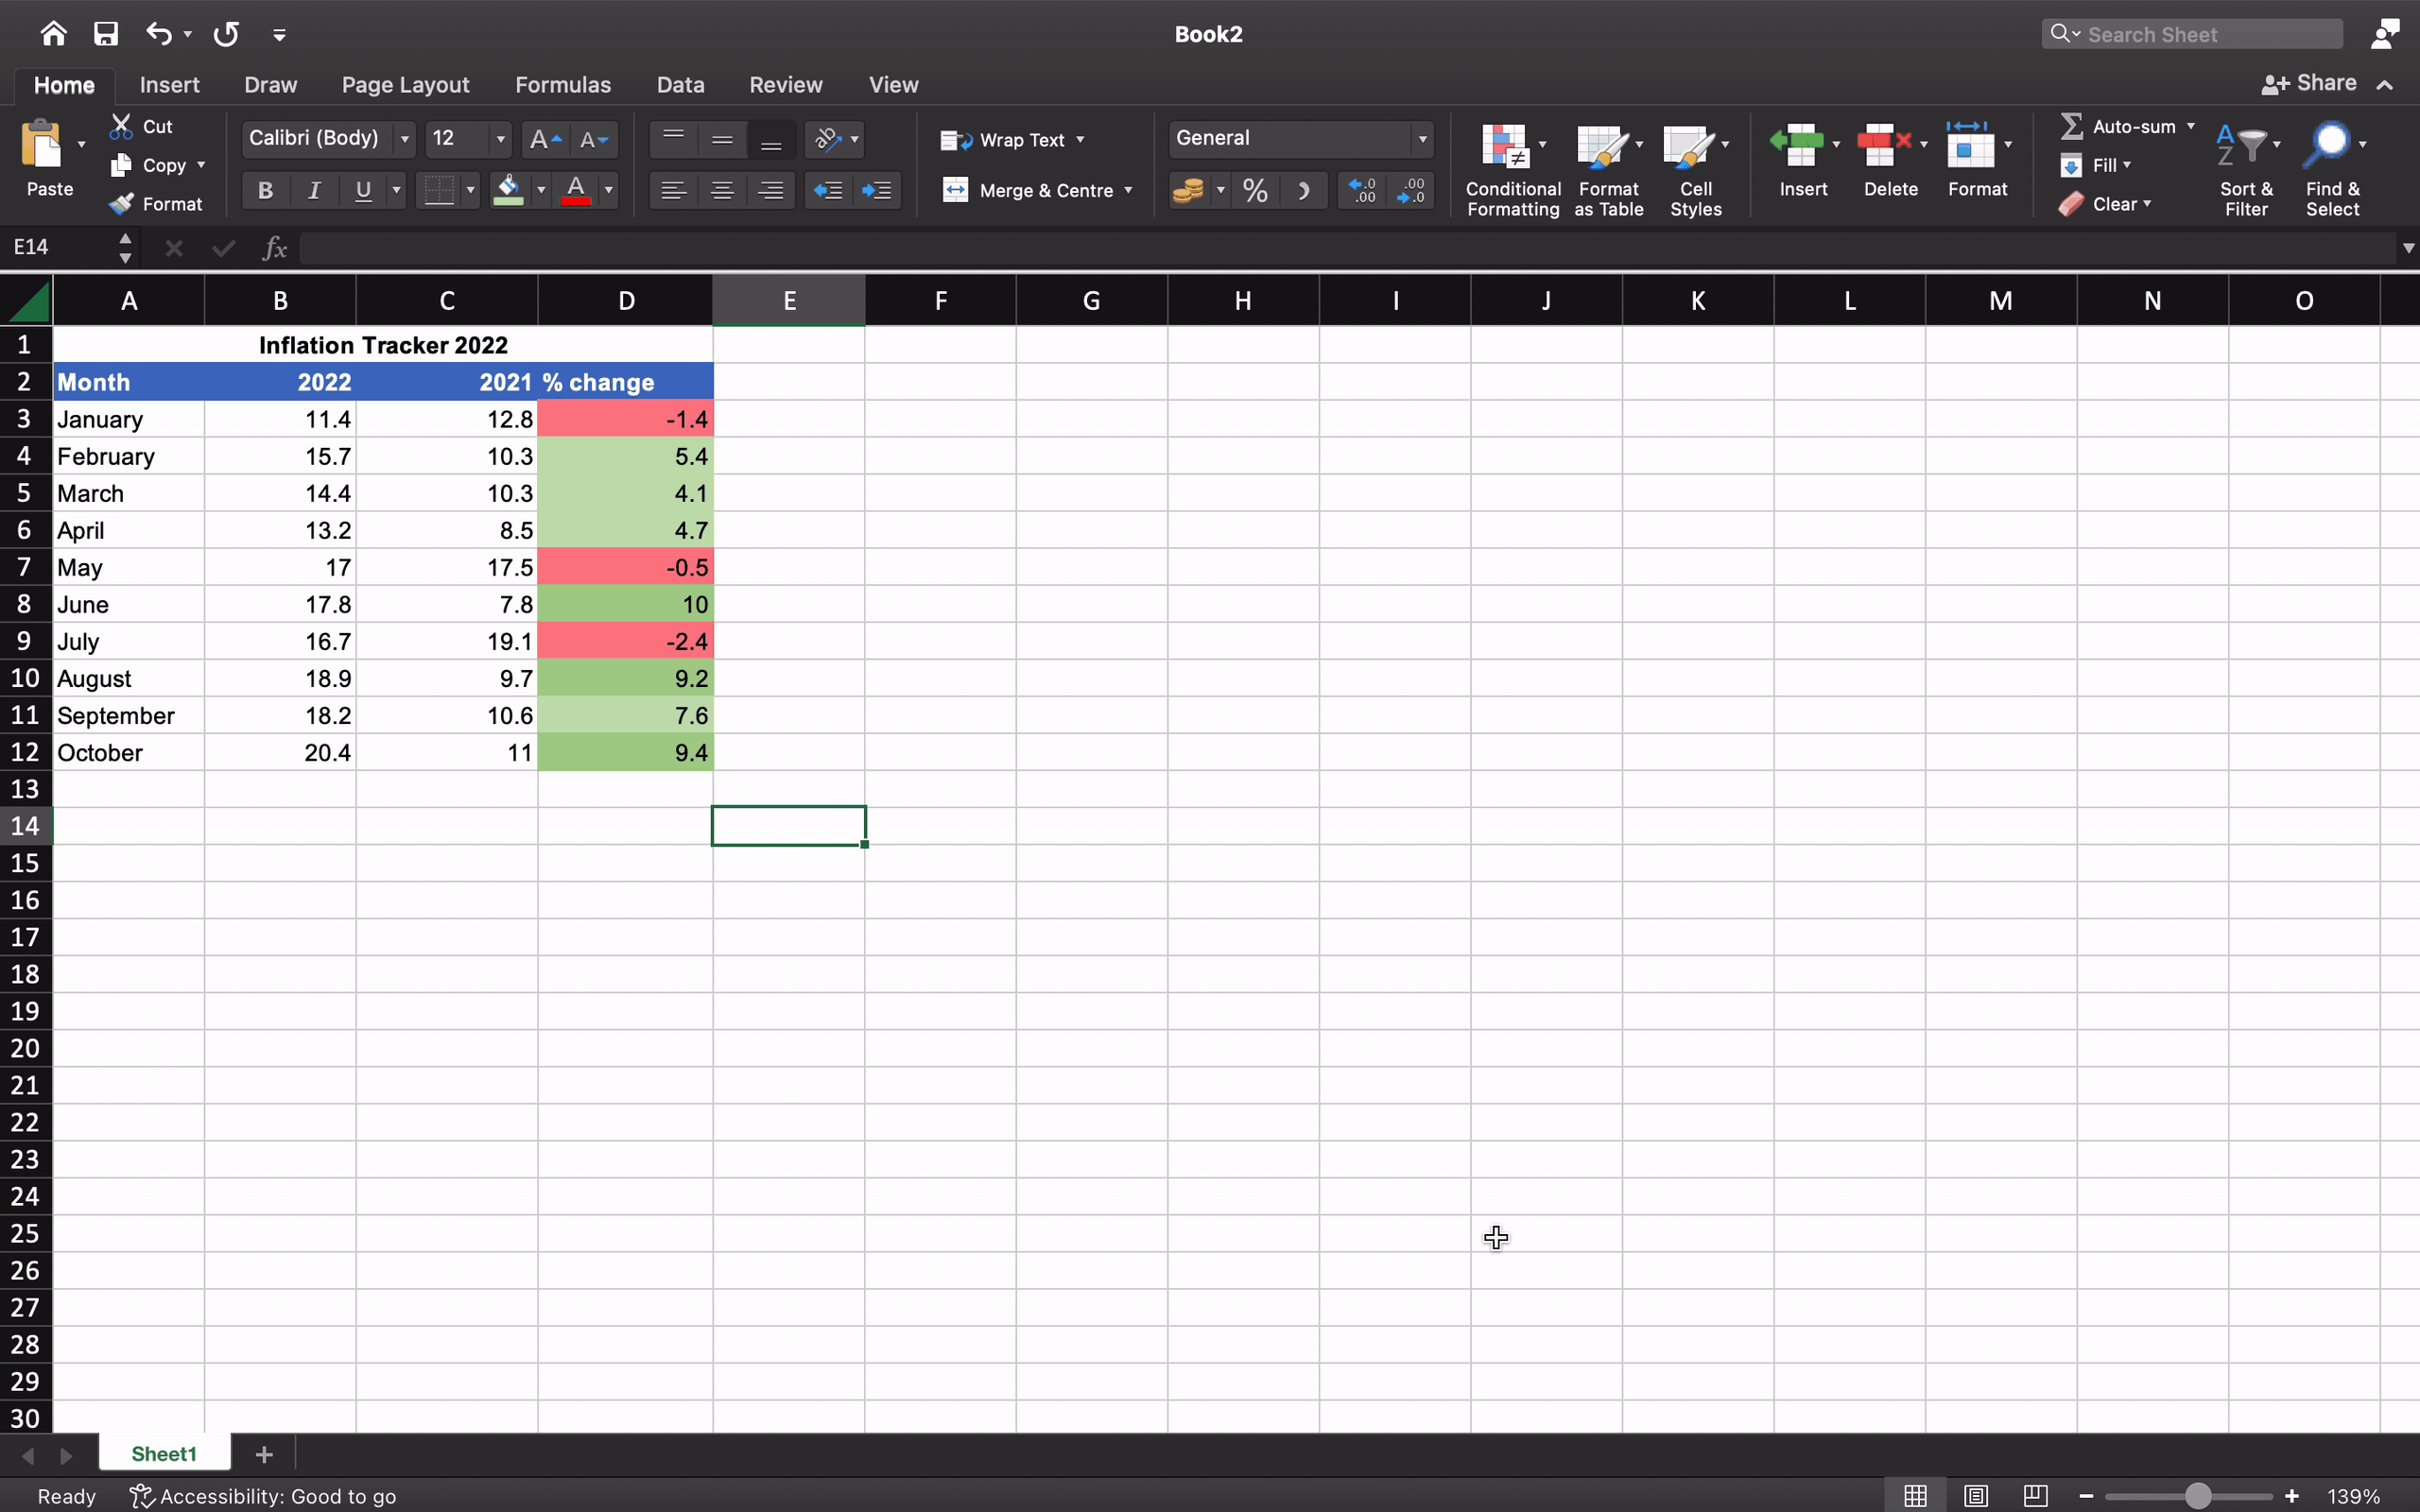
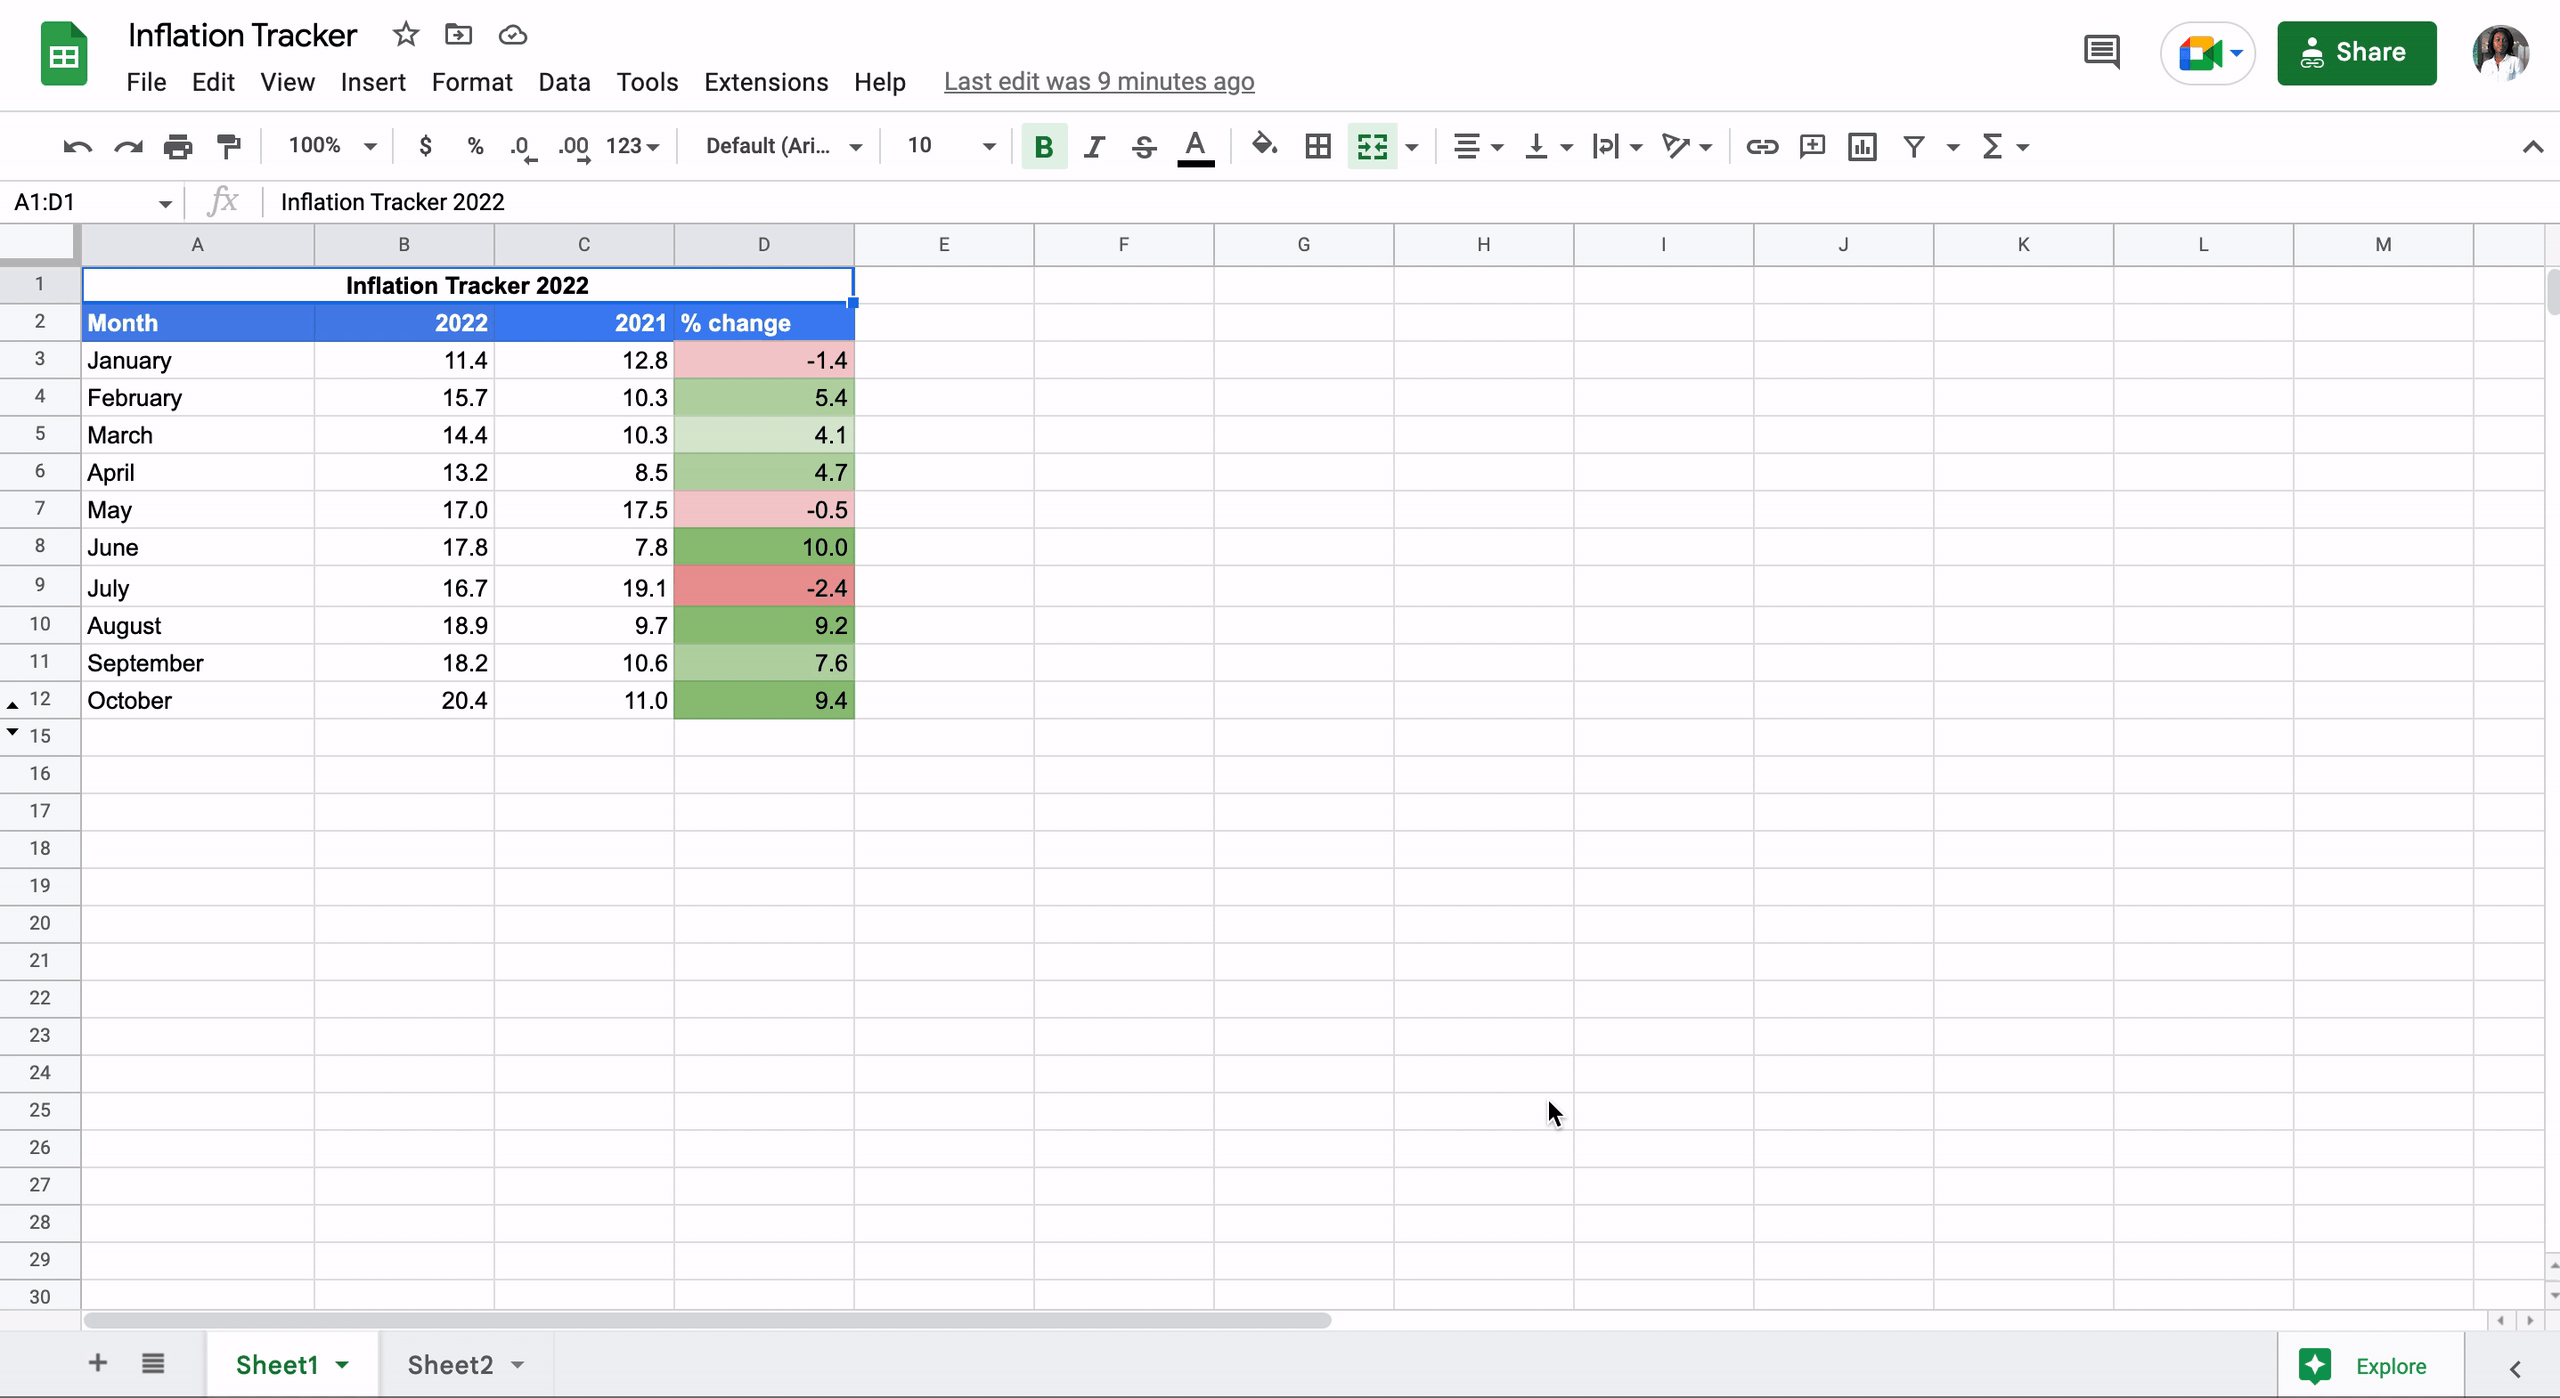
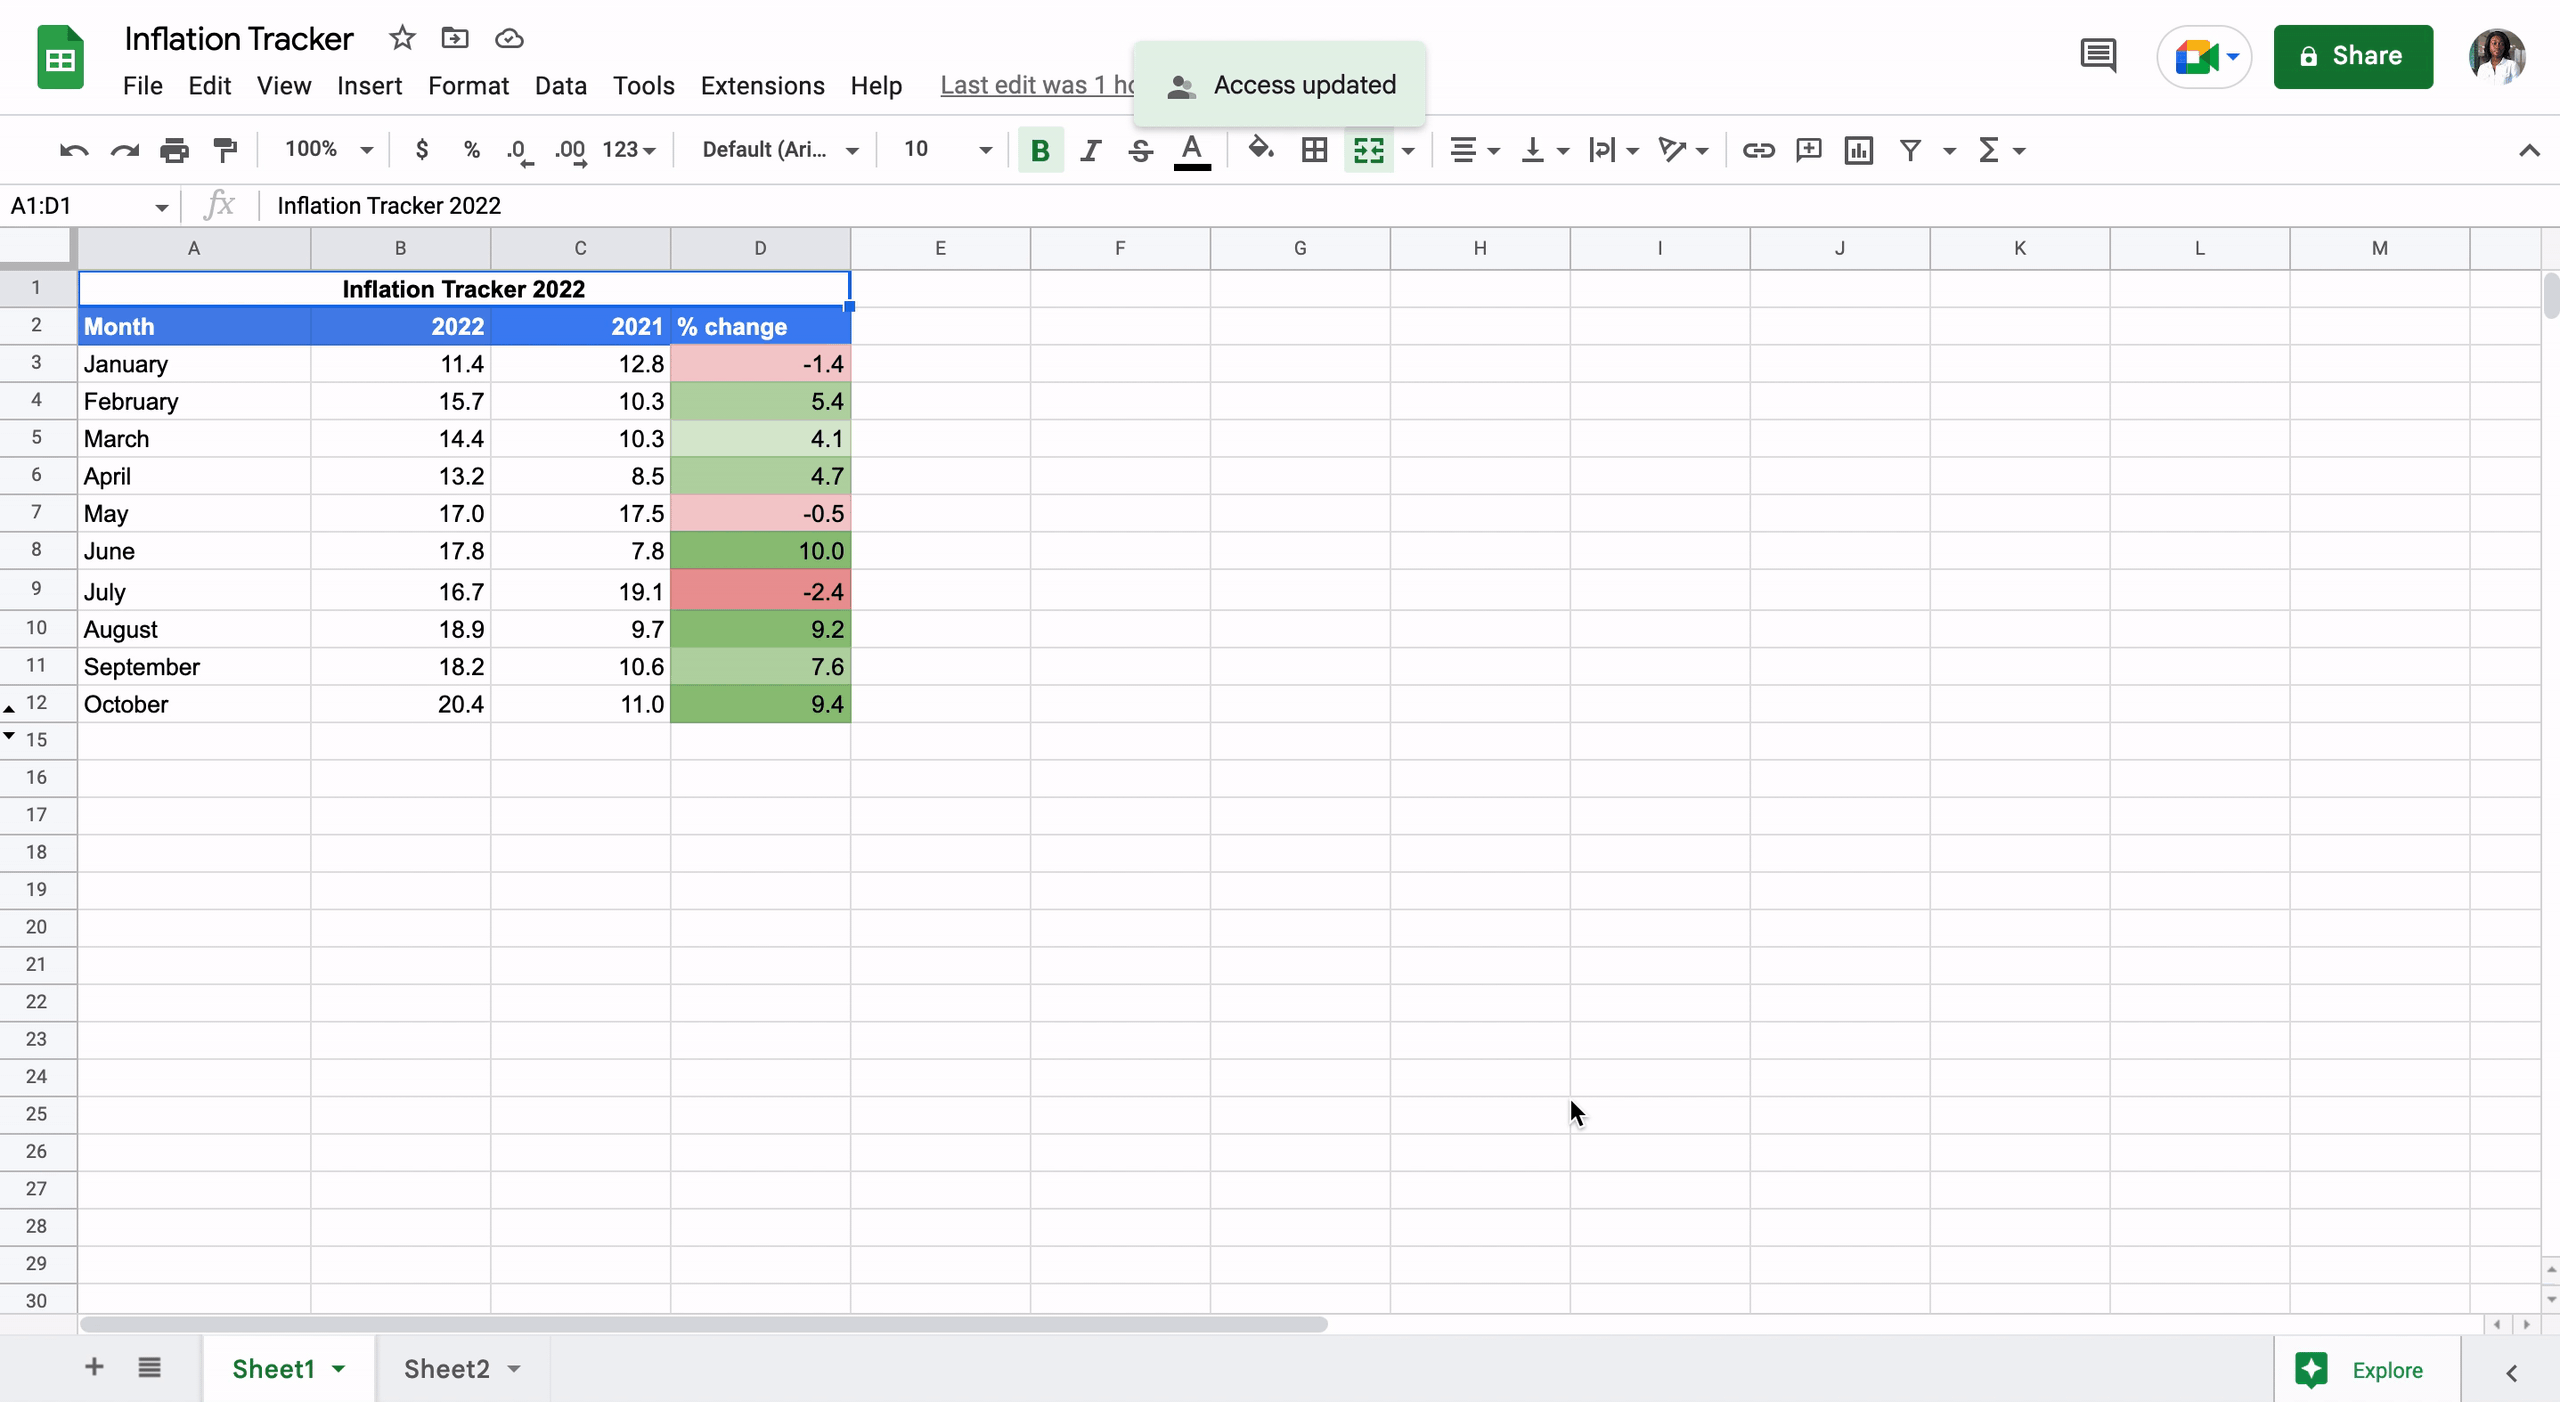
In this example, we will try to import a Monthly Expense tracker excel sheet into Notion.
Step 1: Open the Notion Page where you need to import the excel spreadsheet.
Step 2: Convert the file to CSV format
( Skip to Step 3 ,if you already have a CSV file )
Notion Supports the following file type formats :
- CSV (.csv)
- Microsoft Word (.docx)
- HTML (.html)
- Plaintext (.txt)
- Markdown (.md or .markdown)
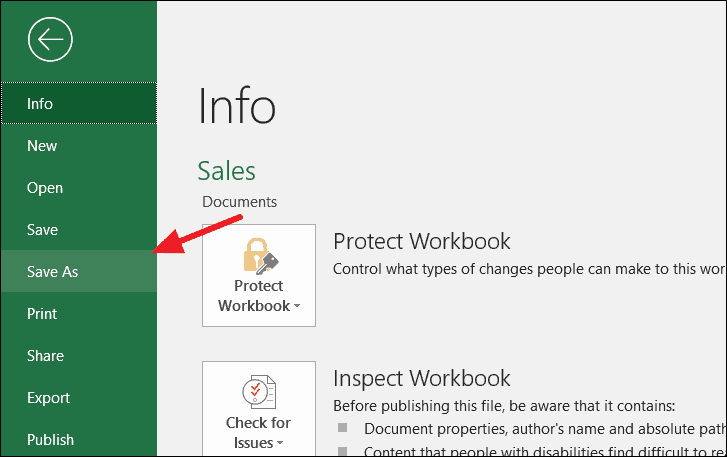
- However, first, you need to convert the file into CSV format. To convert the file simply Open the Excel spreadsheet and save it in CSV file format.
- To begin, open the Excel file you want to import into Notion. Then select the ‘Save As’ option on the left-hand side as shown below.
Example for Microsoft excel sheet :
You can also save the file to your personal Onedrive.
Change the file format in the “Save as type” option to CSV and save the file

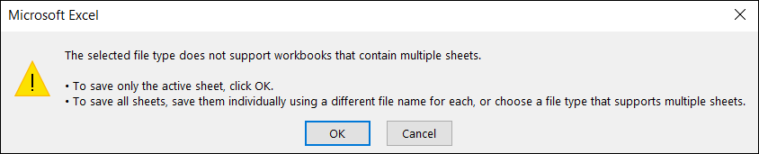
If your workbook contains multiple sheets you will get a warning message similar to this .
“The selected file type does not support workbooks that contain multiple sheets”
Click ok
Step 3 : Once you click on import, you will get a window with import options.

Following the above steps, you can easily import Microsoft excel sheets or Google spreadsheets into Notion.
You can also use any online file converter Service like Zamzar to Change the file format from XLS to CSV.
We hope this tutorial was helpful. Wasn’t that easy 🙂
Other Useful Articles :
How to Embed Codepen into Notion
Can Notion sync with Google Calendar
Does Notion Support Spotlight Search
How to View Word Count in Notion
Notion is an all-in-one productivity solution for writing, planning, knowledge management, data management, team collaboration, among others things.
Notion is one of the most advanced and useful database tools available today. Notion allows you to create two types of databases: Full-page database or In-line database (which means a database component like a table in the middle of a text or other document). Also, there are five important types of databases you can create on Notion, they are list, gallery, table, boards, and calendar.
More and more users transitioning from Google Sheets and Microsoft Excel to Notion due to its flexibility and customization capabilities. If you have decided to move your databases to Notion, but don’t know-how. Here in this post, we are going to show how to import your Google sheets and Excel (.xslx or .xls) files into Notion tables.
Importing a Google Sheet or Excel File into Notion
Notion is a great online database platform that can be used by both individuals and professionals.
Notion allows you to import data from the following file types:
- Plaintext (.txt)
- Markdown (.md or .markdown)
- Microsoft Word (.docx)
- CSV (.csv)
- HTML (.html)
You can also import data from various applications into Notion.
Besides these, you can also embed Google sheets into Notion. But the problem with embedding Google Sheets is when you lose access to the file or the file is deleted on Google drive or if the URL breaks, the embedding will also break.
The best way to import an Excel file or a Google sheet is to convert them into a CSV (.csv) file first and upload them into Notion.
How to Import an Excel File into Notion
Since Notion doesn’t support .xslx (Excel) files, you need to export them into a .csv file and then upload/import them into Notion.
First, open the Excel workbook that you want to import into Notion. Then go to the ‘File’ tab to open Excel backstage view and select ‘Save As’.
In the Save As page, select ‘CSV UTF-8 (Comma delimited)(*.csv)’ as your save as file type. This format also supports Non-English characters and Unicode-8 characters. Or you can choose the simple ‘CSV (Comma Delimited)(.*csv)’ file type which does not support special characters. Both will work fine if your table only contains texts, numbers, and dates.
CSV is a delimited text file that contains a list of data. They are often used for importing and exporting data in applications.
Then, click the ‘Save’ button. If you have only one sheet in the workbook, it will be saved right away. Or if you have multiple sheets in the workbook, Excel will show you this warning message, saying click ‘OK’ to save only the active sheet as a CSV file and if you have multiple sheets, save them individually with different names.

Once you saved your data as a CSV file, open your Notion application or open Notion on your browser. Then, open the notion page where you want to import the CSV file and click ‘Import’ in the left panel as shown below.

The Import dialog window will open-up. Choose ‘CSV’ option in the dialog box.

Now, navigate to the folder containing your CSV file in the file chooser, select it and then, click ‘Open’.
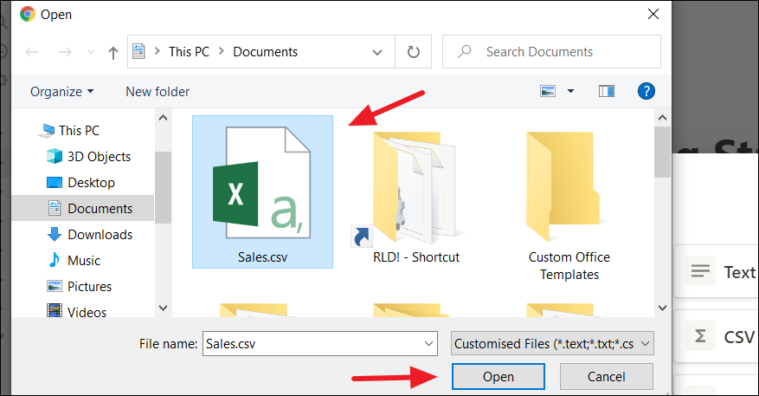
The CSV file will be imported into Notion and your Excel data will appear as a table.

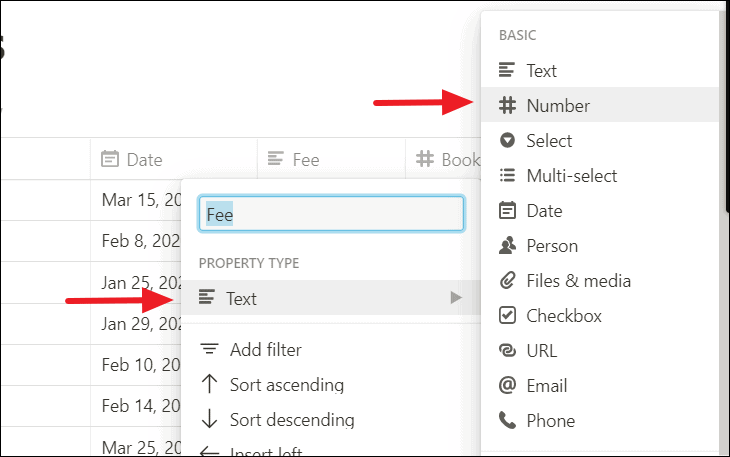
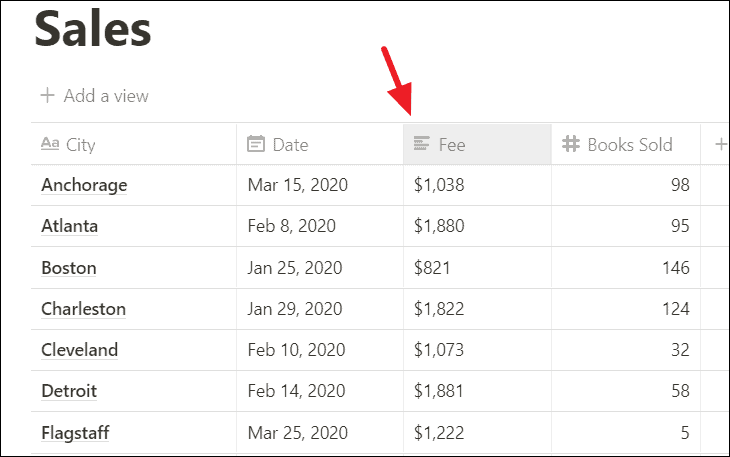
Changing Property Type in Notion
Once the data has been successfully imported, there’s one more thing you need to do that is checking if the property types (data types) of each column match the data. Most of the time you’ll get the correct data types, but sometimes data will come into Notion as texts. For example, if you import currency data or unrecognized Date format, etc., it will come as text.
So when that happens, you will need to convert your columns to the appropriate property type. You can find out you’re column’s data type by looking at the icon before the column title. If you have texts, it will be a paragraph icon, calendar icon for dates and hash sign for numbers, and so on.
As you can see below when we imported this table from an Excel file, the ‘Fee’ column with currency values is formatted as a text column. Now we need to change the property type (data type) of the ‘Fee’ column to number.
To do that click on the column title and you’ll get a drop-down. In that, click ‘Text’ under Property Type and choose the appropriate data type (Number).

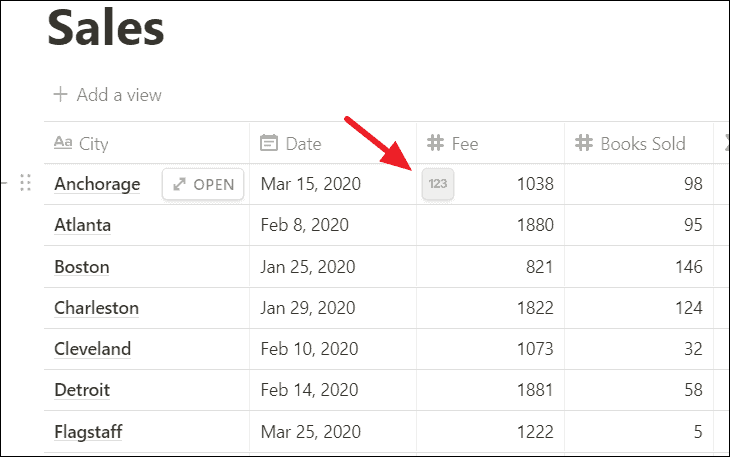
Now, we converted the values but we lost the currency format. Don’t worry it’s easy to add. To convert the number to a specific format, just hover your cursor over one of the values of the column and you will see a 123 button.

Click on the 123 button and choose your preferred number format from the list.
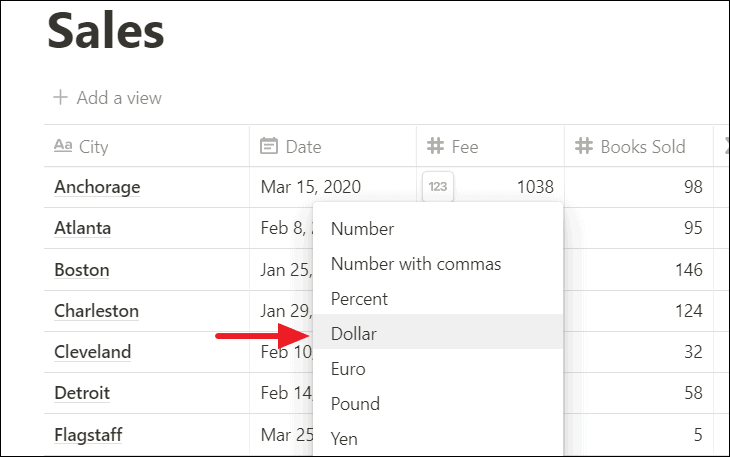
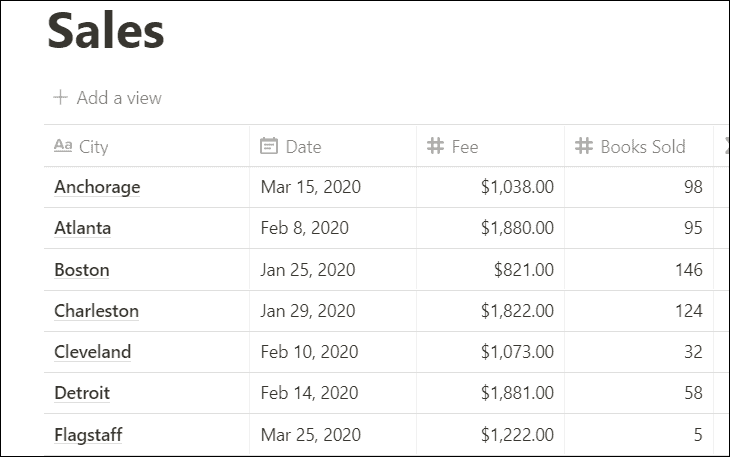
Now, the number values in the Fee column are formatted as currency.

How to Import a Google Sheet into Notion
To import Google sheets into Notion, you need to download the spreadsheet as a CSV file first.
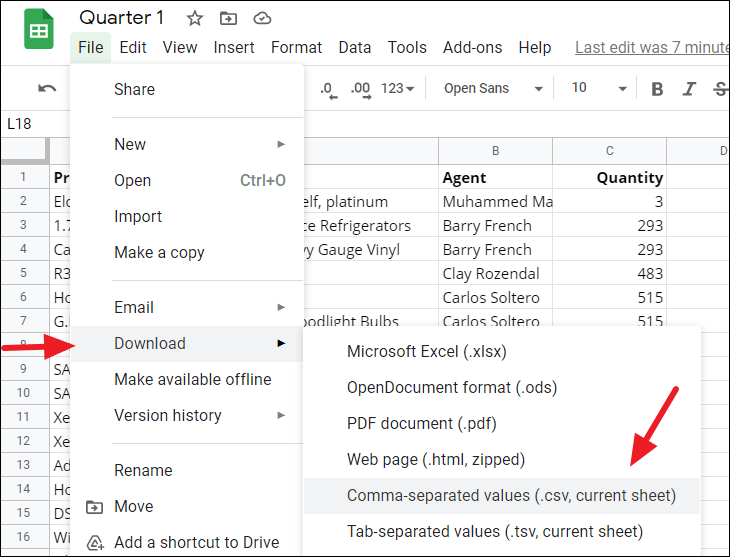
To download Google sheets, open the Google spreadsheet that you want to import and click the ‘File’ menu in the menu bar. In the drop-down, expand the ‘Download’ option and choose ‘Comma-separated values (.csv, current sheet)’ to download the file as a CSV file.

Next, open the notion page where you want to import the CSV file and click ‘Import’ in the lower part of the left sidebar.

Select your file from the File chooser and click ‘Open’ to import that CSV file into Notion.
Now, your Google sheet is imported into Notion and displayed as a table.
Appending an Excel File or a Google Sheet to a Notion Database
Instead of importing data into a new Notion table, you can merge contents from an Excel file or Google sheet into an existing Notion table. Remember you can only do this with full-page tables, not in-line tables.
But first, you need to make sure that both your Excel/Google Sheet table and your Notion table have common column names (for example, both should have “First name”, “Last name”, “Date” etc. columns).
First, export your Excel/Google sheets worksheet into a CSV file as we did for importing Excel/Google sheets into Notion.
Next, open the Notion page containing the table you want to merge with and click on the horizontal ellipsis (…) in the upper-right corner of the Notion window.
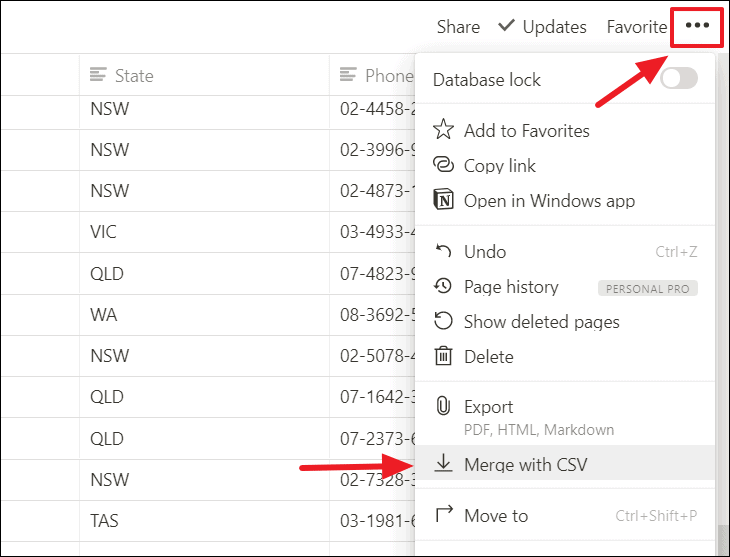
Then, navigate to the folder containing your exported CSV file in File explorer and select it. And click ‘Open’ to merge the file.

Now the CSV file is merged (appended) with your Notion table and its contents will be added to the end of the existing Notion table (see below).

That’s how you import Excel and Google sheets databases into Notion.
Notion first came into our lives as a modern note taking app. It has since grown to be not just a companion for individuals but the preferred documentation tool for thousands of businesses. It acts as a company wiki, a CRM for Sales, a study planner or anything in between.
One of the coolest things about Notion is the ability to import or embed features from other applications. Similar to our recent article on creating charts in Notion, this article will guide you on how to import or embed third party data — from spreadsheets — in Notion.
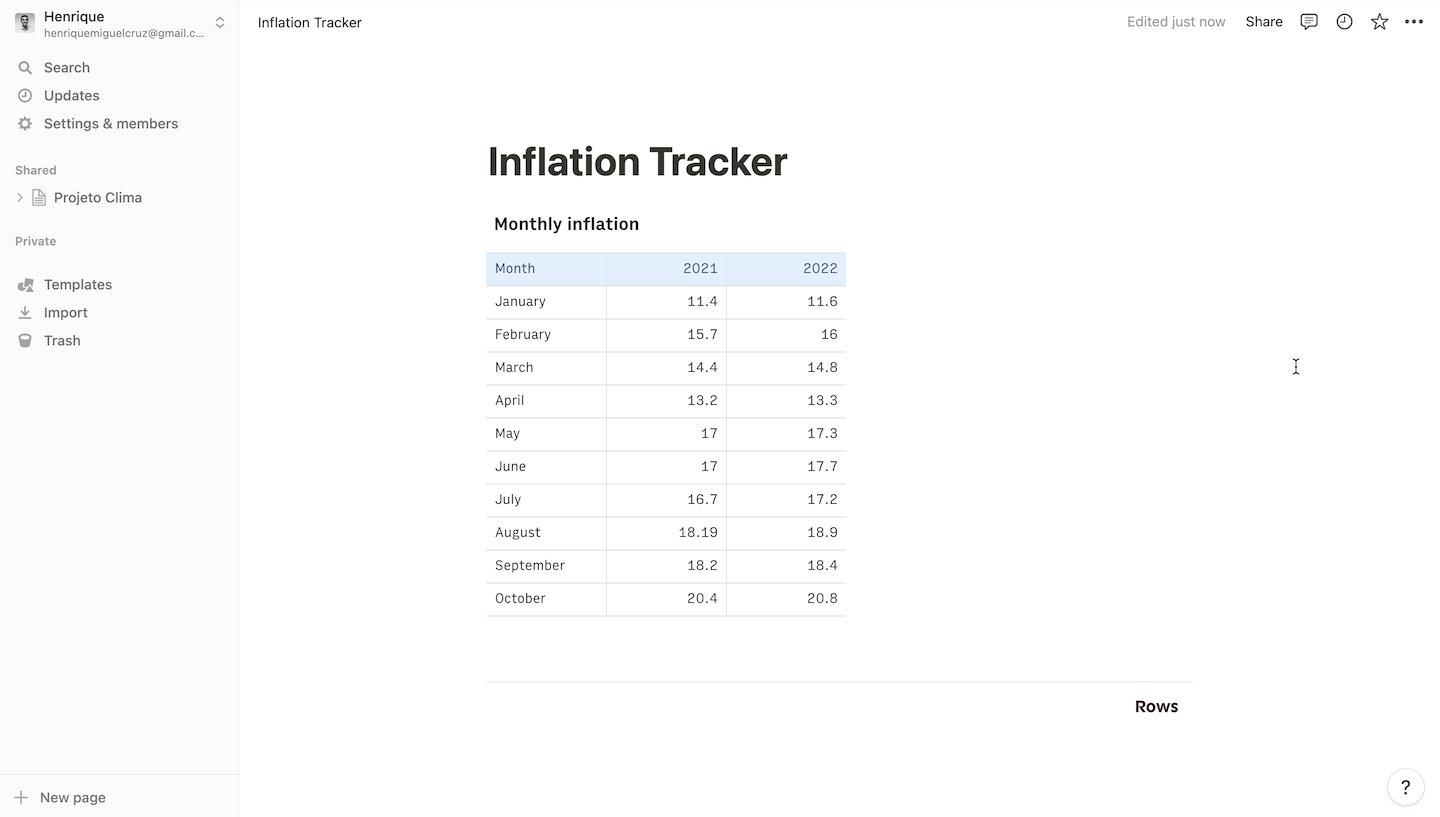
1. Rows
Rows is a web application for creating modern, beautiful and rich spreadsheets. It combines a spreadsheet editor, data integrations (e.g. Social media, Google Analytics, Salesforce, Stripe) and a novel sharing experience that turns any spreadsheet into a website in one-click.
Import a spreadsheet from Rows into Notion by following these steps:
-
If you haven’t signed up for Rows, do that here and login to your account.
-
Create a spreadsheet by clicking on the Create Spreadsheet button and add your data. If you already have data in a csv or xlsx file, click Import file and import it to Rows.
-
Once the data is ready, click the Share button on the top right corner of the toolbar, next to the Live button and turn on Share privately with the link.
4. On the spreadsheet, click on the table with the data you want to import to reveal the “…” options menu on its top right corner. Select Embed from the list of options. From the popup, select Copy URL to copy the link to Notion.
5. In your Notion, paste your link and choose the Create embed option. Adjust the size of the embed.
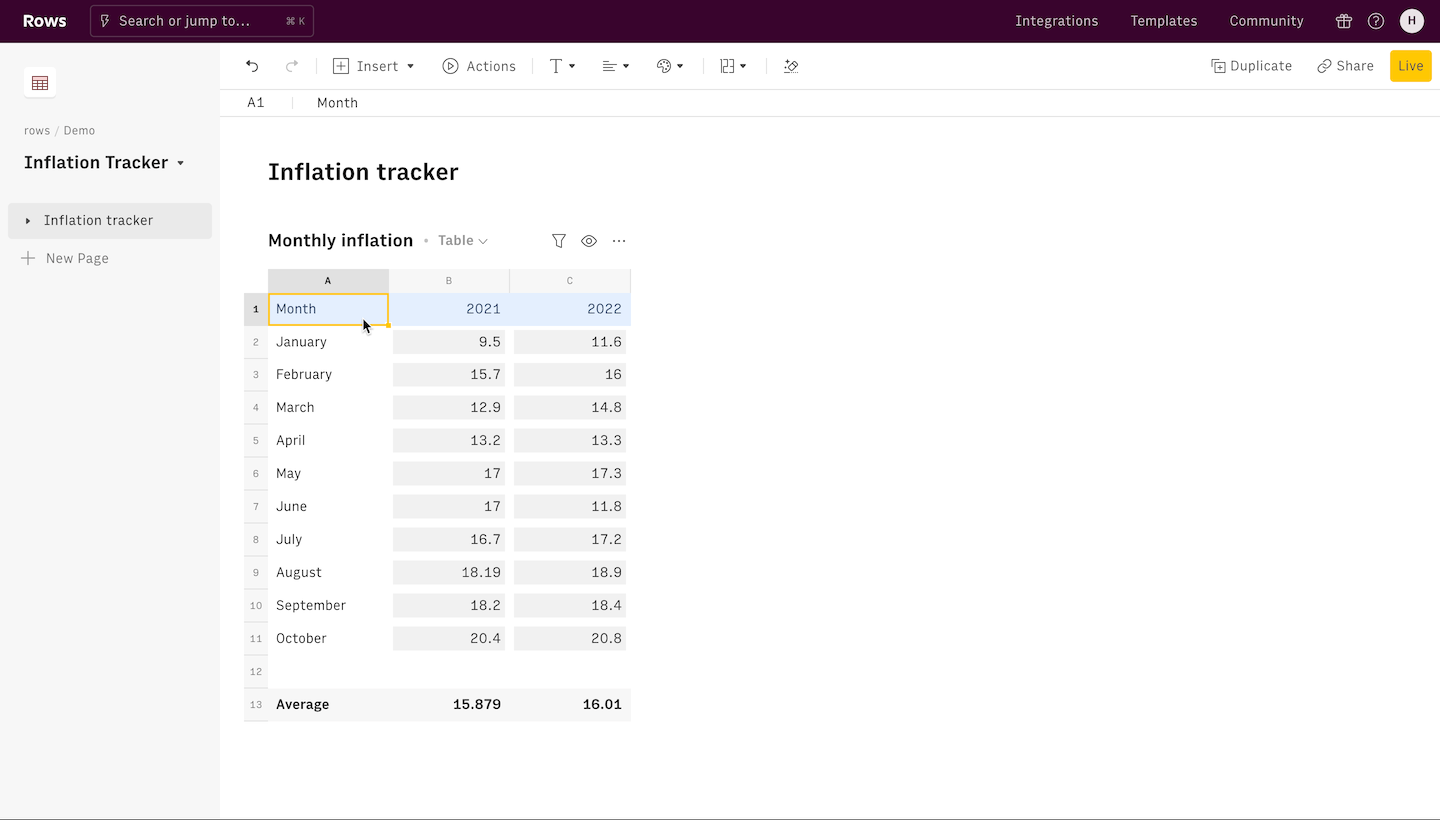
The great thing about this method is that the Notion document is now synced with the spreadsheet. Changes made to the spreadsheet database in Rows, update automatically in Notion, with no need to manually manipulate data in Notion.
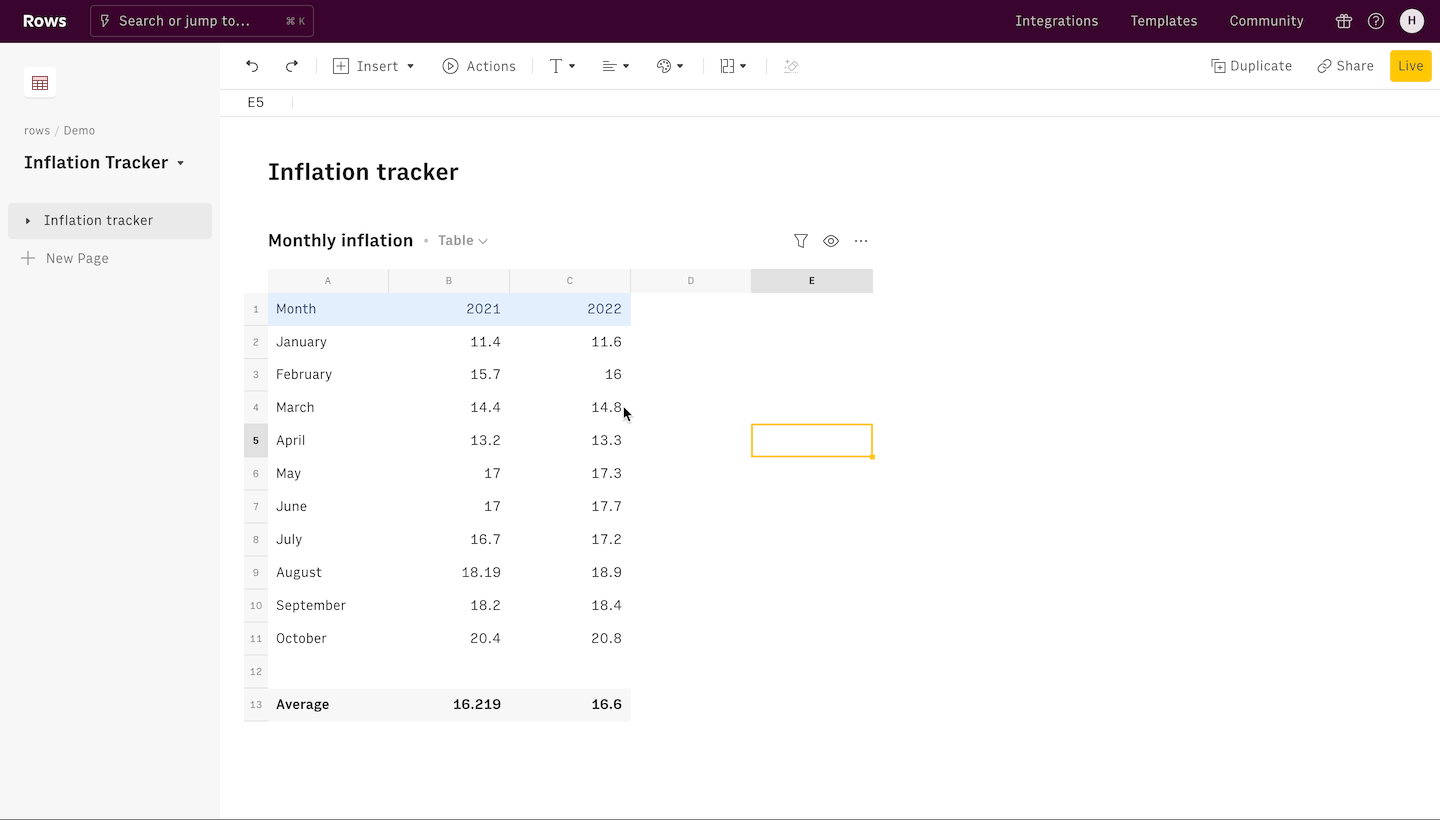
Once embedded, you can scroll inside the table and even perform calculations inside it using Rows’ action elements. This is perfect for adding long lists of data inside Notion, or adding budget calculations, forecasts or other mathematical tools inside a Notion page.
Plus, you can embed specific elements from the spreadsheet such as charts and make your reports stand out with interactive charts.
There are plenty of other ways to use Rows to make your Notion documents stand out. Learn more about it here or see our pre-built Notion templates for a Paid Marketing Report, a Website Traffic Overview Report, a Growth Experiments Report, and for your Weekly Team Sync Notes.
 Combine tables and charts to add interactive charts to Notion
2. Excel
You can also use Microsoft Excel to create spreadsheets and import them in Notion. Here’s how:
-
First, save your Excel sheet as a csv file. To do that click File and then Save As. From the file format drop-down options, select csv.
2. In Notion, click the Import button at the bottom of the left-hand side panel.
3. From the popup menu select the CSV option.
4. This will open another popup menu that lets you locate the csv file on your computer. Choose the file that you exported from Excel.
5. Select the file and click Open to import and render the spreadsheet into your Notion.
Now that your data was imported to Notion, you can do any changes directly in the Notion database. Importing an Excel spreadsheet into Notion opens it up to a number of features and controls. You can format rows and columns, add formulas, filter and sort the display of the data. Learn how to add formulas to a Notion database here.
3. Google Sheets
Google Sheets is one of Google’s suite of online web-based applications. It is used to create, edit and collaborate on spreadsheets. You can also use it to import spreadsheets in Notion. You can both import and embed Google Sheets in Notion. Let’s see how to do it.
Import a Google Sheet file into Notion
-
Download your Google Sheets file with the Comma Separated Values (.csv) extension. To do that click File and then Download. From the file format drop-down options, select csv.
2. In Notion, click the Import button at the bottom of the left panel.
3. From the popup menu select the CSV option.
4. This will open another popup menu that lets you locate and choose the csv file you saved from Google Sheets onto your computer.
5. Select the file and click Open to import and render the spreadsheet into Notion.
Embed a Google Sheet file into Notion
-
On your Google Sheets file, click the Share button to reveal a popup.
-
Inside General Access select Anyone with the link and copy the link.
-
By default, this means that people who see the embed can view the content of the spreadsheet.
-
If you want people to edit the spreadsheet inside Notion, choose the “Editor” role on the option next to the Anyone with the link permission
-
3. In Notion, type /embed and paste your link to render your spreadsheet.
Changes made to the spreadsheet in Google Sheets update automatically in Notion and vice versa.
Unlike in Rows, with Google Sheets you can only embed the full spreadsheet inside the Notion document. This is helpful if you want to add the full context of the spreadsheet to Notion, but limiting in case you just want to add a specific element to the doc — a table, or a chart.
Conclusion
The world changes, but one thing stays the same. Spreadsheets are the easiest way for businesses to use data and manipulate freely. As Notion becomes more embedded into a team’s workflow, so does the need to sync your wiki with your spreadsheets,
Rows is the easiest way to embed spreadsheets in Notion. Be it large tables of data, charts or calculators, thousands of fast-growing teams rely on Rows as the perfect number-crunching sidekick to their Notion docs. Sign up today and try a new way to spreadsheet.
Answer
- There are a few ways to import a Google Sheet or Excel file into Numerology: Open the spreadsheet in a web browser and copy the URL.
- Open Numerology and click on the File menu. Select Import from URL and paste the URL into the input field.
- Open Numerology and click on the File menu. Select Import from File and navigate to the folder where you saved the spreadsheet file.
How to Embed a Google Sheet in Notion
How do I create a CSV file from Google Sheets?
To create a CSV file from Google Sheets, first open the spreadsheet in Google Sheets. From the File menu, select Export -> CSV. In the Export dialog box, enter a filename and click Save.
Can you link an excel spreadsheet to Notion?
Yes, you can link an excel spreadsheet to Notion.
Can I import Google Sheet into Notion?
Yes, you can import a Google Sheet into Notion. To do this, open Notion and click on the File menu button. Then, select Import from Google Sheets. On the next screen, select the sheet you want to import and click OK.
How do you convert XLS to CSV?
There are a few ways to convert an XLS spreadsheet into a CSV file. The easiest way is to use the Microsoft Excel CSV Import Tool. This tool will automatically convert the data into a comma-separated value (CSV) file. Alternatively, you can use a spreadsheet application like Google Sheets to export the data as a CSV file.
How do I upload files to Notion?
To upload files to Notion, first open the Notion app and go to File > Upload. You will be prompted to select a file to upload. Once you have selected the file, you will be asked to choose a destination for the file.
What is difference between CSV and XLS?
CSV stands for comma-separated values, while XLS stands for Excel spreadsheet. CSV is a text-based file format that can be read by most spreadsheet applications, while XLS is a binary file format that can only be read by Microsoft Excel.
Can you make a spreadsheet in Notion?
Yes, you can make a spreadsheet in Notion. To do this, open Notion and click File -> New -> Spreadsheet. You will then be able to create a new spreadsheet or open an existing one.
Which is better Notion or Google Docs?
Notion is a great alternative to Google Docs. Notion offers more features and customization options, making it a better choice for some users.
Can Notion sync with Google Docs?
Notion is not currently compatible with Google Docs. However, we are working on a solution and hope to have it available in the future.
Does Notion have a spreadsheet?
Notion does not have a spreadsheet.
What is the difference between XLS and XLSX?
XLS is a Microsoft office file format that is used for storing data in a tabular format. It is typically used for financial and accounting data. XLSX is a newer file format that was created to improve upon the XLS format. XLSX is more efficient and can be opened and edited faster than XLS.
Why is CSV better than Excel?
There are a few reasons why CSV is better than Excel. First, CSV is more efficient when it comes to transferring data between applications. Second, CSV is easier to work with because it has less formatting requirements. Finally, CSV can be opened in a wide range of software applications, which makes it more versatile.
Which is better XLS or XLSX?
There is no right or wrong answer to this question – it depends on what you are looking for.
XLSX is better if you are looking for more features and flexibility, while XLS is better if you are looking for a more traditional spreadsheet experience.
What does XLS stand for?
XLS stands for Excel Workbook.
Is XLS an Excel file?
No, XLS is not an Excel file.
Расчетное время чтения: 5 мин
Как и у большинства людей, у вас, вероятно, есть данные, документы и заметки, разбросанные по многим файлам и приложениям. Вы можете собрать свою информацию в одном месте, переместив ее в Notion 🚚.
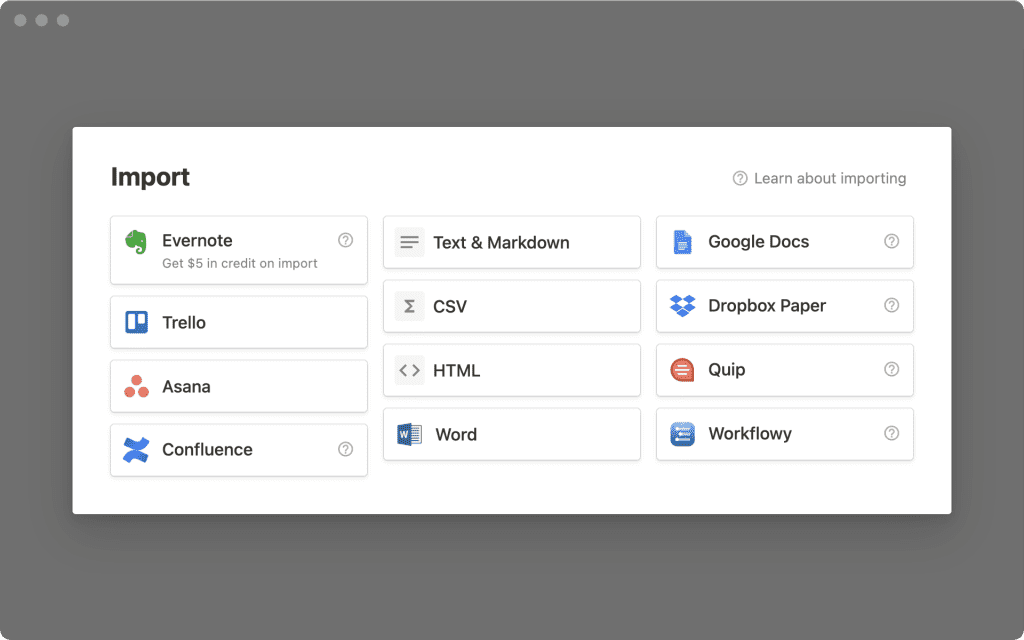
Как импортировать
- Notion позволяет напрямую импортировать следующие типы файлов:
- Обычный текст (.txt)
- Markdown (.md или .markdown)
- Microsoft Word (.docx)
- CSV (.csv)
- HTML (.html)
- Вы также можете импортировать данные из ряда других приложений (таких как Confluence, Asana, Evernote и Trello — это лишь некоторые из них).
- Для этого нажмите Import ( Импорт ) в нижней части левой боковой панели.
- Откроется окно импорта, где вы можете выбрать приложение для переноса. Инструкции по импорту конкретных приложений приведены ниже!
Примечание: Импортировать содержимое можно только на настольном ПК или в Интернете, но не на мобильных устройствах.
Инструкции по приложениям
Confluence
Вы можете импортировать все рабочее пространство Confluence в рабочее пространство Notion.
Шаг 1: Экспортируйте пространство Confluence в HTML
- В рабочем пространстве Confluence перейдите к разделу Space Settings ( Настройки пространства ) в правой верхней боковой панели.
- Выберите Content Tools ( Инструменты содержимого ) на верхней панели инструментов, а затем Экспорт на панели инструментов ниже. Если вы не видите ни одной из этих опций, вам может потребоваться запросить разрешение на экспорт у администратора рабочего пространства.
- Выберите HTML из списка форматов
- Выберите Custom Export ( Пользовательский экспорт ) и снимите флажок Include comments ( Включать комментарии ).
- Выберите страницы, которые вы хотите экспортировать — обратите внимание, что страницы, содержащие большие вложения, могут значительно увеличить размер и сложность экспорта!
- Дайте экспорту завершить обработку — это может занять некоторое время, если у вас большое рабочее пространство.
- После завершения экспорта нажмите Download ( Загрузить ) здесь, чтобы сохранить экспорт на компьютере.
- У вас должен получиться файл с названием типа Confluence-space-export-XXXXXX.html.zip , где XXXXXX последовательность цифр.
Шаг 2: Импортируйте пространство Confluence в Notion
- Начните с перехода к рабочему пространству Notion, в которое вы хотите импортировать содержимое Confluence.
- Нажмите кнопку Import ( Импорт ) в нижней части левой боковой панели, затем выберите Confluence в появившемся всплывающем окне
- Перейдите к .zip -файлу, экспортированному из Confluence в предыдущем шаге, и выберите его для загрузки. Вам не нужно распаковывать файл! Просто загрузите весь архив.
- Вы должны увидеть сообщение «Uploading…», когда браузер загрузит ваш файл, а затем сообщение о состоянии по мере выполнения импорта.
- Когда импорт завершится, вы перейдете к новому импортированному содержимому!
Evernote
Вы можете импортировать все данные Evernote в Notion одним махом, сохранив их организацию.
- В окне импорта выберите Evernote .
- Войдите в свою учетную запись Evernote.
- Авторизуйте Evernote для подключения к Notion.
- После того как учетная запись Evernote будет подключена, установите флажки рядом с блокнотами, которые вы хотите перенести, и нажмите кнопку Import ( Импорт ).
- Ваши записные книжки Evernote появятся в виде страниц на боковой панели Notion. Внутри вы найдете свои заметки в виде элементов в базе данных списков.
- Каждую заметку можно перетащить в любое другое место в Notion.
Trello
Вы можете перенести данные Trello в свое рабочее пространство — и все это из Notion.
- Перейдите в раздел Import ( Импорт ) на левой боковой панели и выберите Trello.
- Войдите в свою учетную запись Trello.
- Предоставьте доступ к Notion, чтобы вы могли импортировать свои доски Trello.
- После подключения учетной записи Trello выберите в выпадающем меню доски, которые вы хотите перенести.
- Если вы хотите импортировать дополнительные доски, просто нажмите Import ( Импорт ) в боковой панели Notion, выберите Trello и выберите другую доску.
Документы Google
В Google Docs вы можете экспортировать файлы по отдельности или все сразу.
Перенос отдельных файлов:
- Перейдите в меню File ( Файл ), затем Download ( Загрузить ) и выберите формат Microsoft Word .
- В Notion перейдите в раздел Import ( Импорт ), выберите Word и загрузите файл .docx.
Перенесите сразу все файлы Google Docs:
- Перейдите в Google Takeout.
- Нажмите кнопку Deselect all ( Отменить выбор всех ) в правом верхнем углу окна над флажками.
- Прокрутите страницу до Drive ( Диска ) и установите флажок рядом с ним. Вы также можете нажать Advanced settings ( Расширенные настройки ), чтобы выбрать, какие файлы вы хотите перенести.
- Нажмите кнопку Next step ( Следующий шаг ) в нижней части окна.
- На следующей странице нажмите Create archive ( Создать архив ).
- Вы получите электронное письмо со ссылкой для загрузки. Она сохранит zip-файл на вашем компьютере.
- В Notion перейдите в раздел Import ( Импорт ) на левой боковой панели, выберите Word и загрузите файлы .docx.
Asana
Вы можете перенести данные из Asana в свое рабочее пространство — и все это не выходя из Notion.
- Перейдите в раздел Import ( Импорт ) на левой боковой панели и выберите Asana .
- Войдите в свою учетную запись Asana.
- Предоставьте доступ к Notion, чтобы вы могли импортировать свои задачи из Asana.
- После подключения учетной записи Asana выберите в выпадающем меню доски и списки, которые вы хотите перенести.
- Если вы хотите импортировать дополнительные задачи, просто нажмите Import ( Импорт ) на боковой панели Notion, выберите Asana и выберите другой список или доску.
Quip
К сожалению, Quip не позволяет экспортировать более одной страницы за раз. Однако вы можете перемещать отдельные страницы в Notion.
- В Quip нажмите на значок документа в левом верхнем углу любой страницы и выберите Export ( Экспорт ).
- Экспортируйте как Markdown или HTML.
- В Notion перейдите в раздел Import ( Импорт ) на левой боковой панели и выберите HTML или Text & Markdown . Загрузите файл, который вы экспортировали из Quip.
Dropbox Paper
В Dropbox Paper вы можете экспортировать файлы по отдельности или все сразу.
Перенос отдельных файлов:
- В Dropbox Paper выберите Download ( Загрузить ) в меню в правом верхнем углу экрана.
- Загрузите страницу в формате Word .
- В Notion перейдите в раздел Import ( Импорт ) на левой боковой панели, выберите Word и загрузите скачанный файл в формате .docx .
Перенесите все документы сразу:
- В Dropbox paper в меню в левой нижней части экрана выберите Download docs you created ( Загрузить созданные вами документы ).
- Выберите загрузить как Word . Это приведет к загрузке zip-файла на ваш компьютер.
- Распакуйте файл, перейдите в Notion и выберите Import ( Импорт ) в левой боковой панели. Выберите Word и загрузите файлы .docx.
Hackpad
В Hackpad вы можете экспортировать все файлы сразу!
- Выберите Export ( Экспорт ) в правой части ленты Hackpad.
- Выберите экспорт в формате Markdown. Вы загрузите zip-файл.
- Распакуйте загруженный файл, перейдите в Notion и выберите Import ( Импорт ) на левой боковой панели. Выберите Text & Markdown и загрузите файлы Markdown, которые вы экспортировали из Hackpad.
Microsoft Word
- В Notion нажмите Import ( Импорт ) в левой боковой панели. В появившемся окне выберите Word .
- Загрузите файлы в формате .docx , которые вы хотите импортировать со своего компьютера.
Microsoft Excel
- В Microsoft Excel экспортируйте содержимое в формат .csv .
- В Notion нажмите Import ( Импорт ) в левой боковой панели. В появившемся окне выберите CSV .
- Загрузите экспортированные файлы .csv , которые вы хотите импортировать с вашего компьютера.
WorkFlowy
В WorkFlowy вы можете экспортировать все файлы сразу 👌.
- Нажмите на всплывающую стрелку справа от Help ( Справка ).
- Выберите Plain text ( Обычный текст ) и нажмите загрузить.
- В Notion выберите Import ( Импорт )в левой боковой панели, а затем Text & Markdown ( Текст и разметка ) . Загрузите файлы, которые вы экспортировали из WorkFlowy.
CSV
- В Notion нажмите Import ( Импорт ) в левой боковой панели. В появившемся окне выберите CSV.
- Загрузите любые файлы .csv , которые вы хотите импортировать с вашего компьютера.
- Также вы можете использовать кнопку Merge with CSV ( Объединить с CSV ) в меню ••• в правом верхнем углу базы данных, чтобы импортировать CSV в существующую базу данных.
Часто задаваемые вопросы
Какие версии Confluence поддерживаются?
Мы официально поддерживаем импорт из Confluence Cloud, на страницах, созданных с помощью нового редактора, который Confluence представил в конце 2018 года.
Из-за недостаточного количества данных в экспорте индексов мы не поддерживаем импорт из Confluence Server.
За помощью в импорте всего рабочего пространства из устаревшего редактора обращайтесь в службу поддержки по адресу team@makenotion.com.
Учитываются ли импортированные блоки в лимите хранения 1000 блоков для испытаний Team Plan?
Нет, импортированные блоки не учитываются в лимите. Однако любые блоки, созданные впоследствии на импортированных страницах, будут учитываться в лимите, как обычно.
Существует ли максимальный размер импорта для импорта Confluence?
Объем импорта Confluence ограничен 2,5 ГБ каждый.
Если вы столкнулись с ограничением, вы можете попробовать использовать опцию пользовательского экспорта для выбора страниц для экспорта, опуская страницы с большим количеством вложений.
Когда я пытаюсь импортировать из Confluence, я не могу выбрать файл в окне загрузки файла.
Пожалуйста, убедитесь, что вы загружаете .zip -файл, созданный функцией экспорта в пространство Confluence. Документы Word и отдельные HTML-файлы не будут работать, поскольку Notion полагается на весь импорт для сохранения структуры и связей между страницами.
Я не могу найти возможность экспорта моего рабочего пространства Confluence.
Если вкладка «Экспорт» не появляется в разделе Content Tools в настройках рабочего пространства, возможно, у вас нет соответствующих разрешений на экспорт страниц. Обратитесь за разрешением к администратору рабочего пространства.
Я не могу импортировать данные из Evernote China/Evernote Business.
К сожалению, на данный момент наш импортер поддерживает только стандартную версию Evernote. Мы работаем над этим!
Была ли эта статья полезной?
Да
6
Нет
3