
There are many ways to import data into a database, some are pretty straightforward, and others are more complex depending on the type of data you receive and which format it is in. I will show you how to import data from an excel file using the DBA tool DBeaver.
File Conversion
When you receive a file in Excel format, you must convert this data into a readable format. This format is usually .csv (Comma Delimited) but can often be in a format that has a delimiter that isn’t so common.
Excel file Conversion
Excel file extensions are usually xls or xlsx, open your file in Excel. You’ll need to convert this into a CSV file, which is extremely easy. All you need to do is Save As and change the “Save as type:” to “CSV (Comma delimited) (*.csv)” and click Save. The file name will change automatically, no need to change it to .csv.
![]()
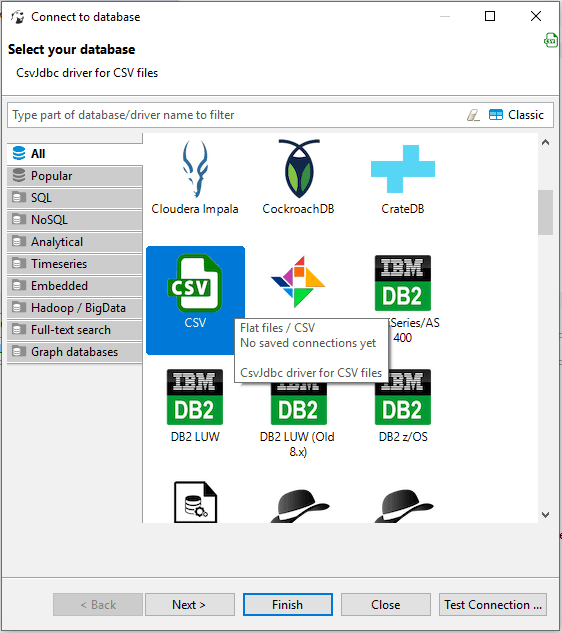
Create csv Connection
Right-click your database connection (or anywhere if your connections are empty), click Create and then click Connection.
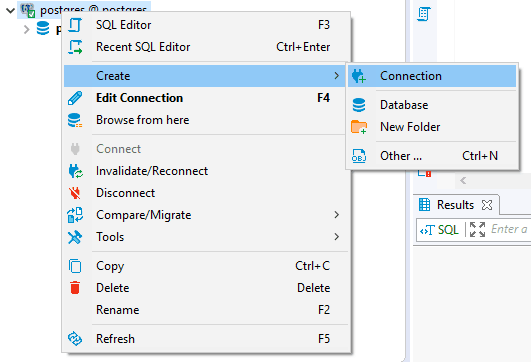
Make sure the All tab is selected on the left and scroll down to CSV. Click Next.
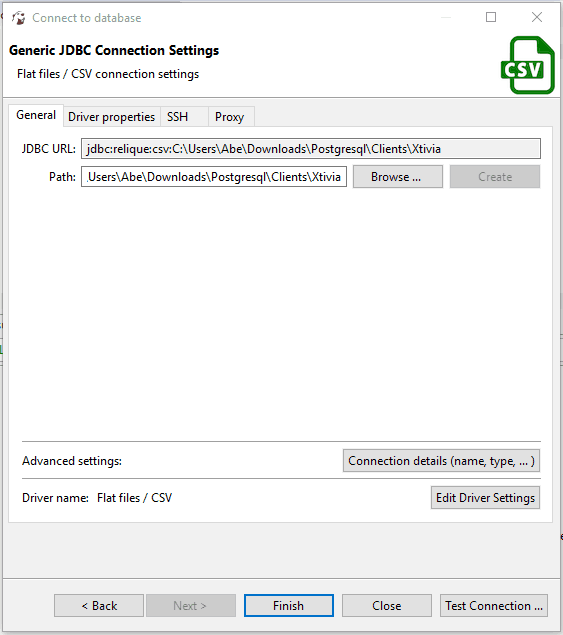
Click Browse… and select the folder where your csv file is that you saved from Excel. You’re selecting a folder here, not a file. The connection will load ALL csv files in that folder. Click Finish.
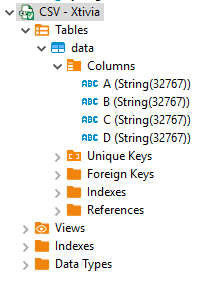
You will now see a new connection; this connection is set up exactly like a regular connection. Each csv file in your folder will be set up as a table with columns.
Data Import
Once the connection is made, you’re able to query the data just like you would any other table with sql syntax.

You can now import this data into your PostgreSQL table. Right-click the table you want to import into PostgreSQL and click Export Data.

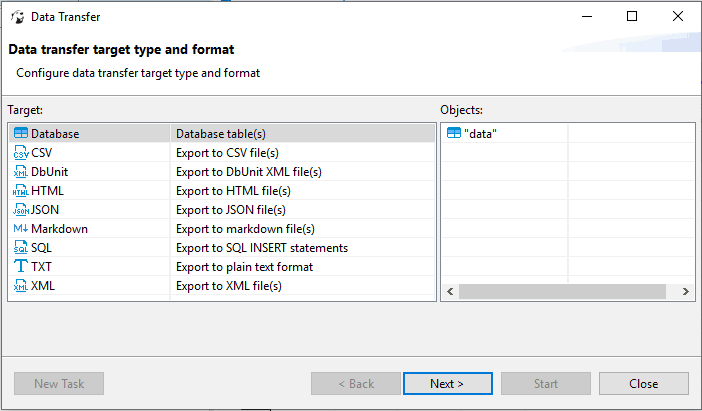
Select Database and click Next.
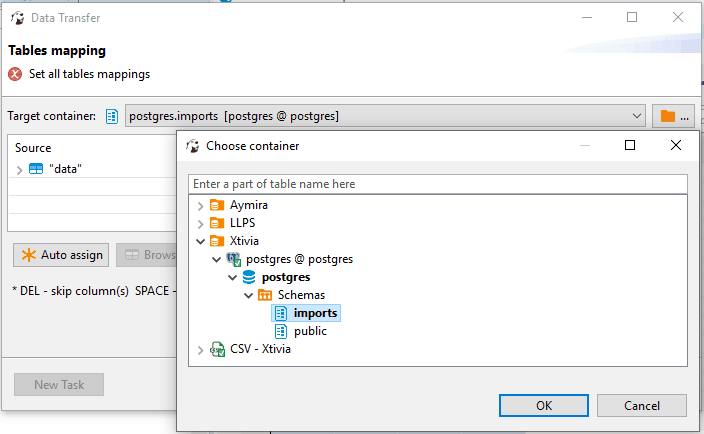
Change the target container to the schema where your table is in PostgreSQL. Click Ok.
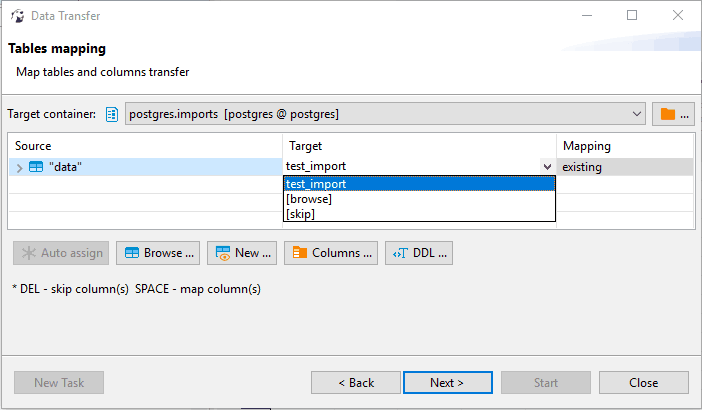
Select the target (table) where you want to import the data.
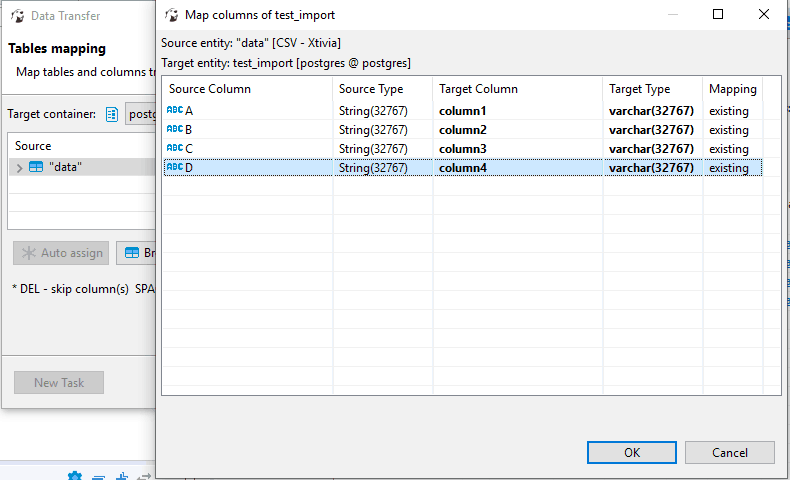
Click Columns and set the target column for each column of data. If you have headers already in your data that match the table columns, then this will automatically map. Click Ok. Click Next.
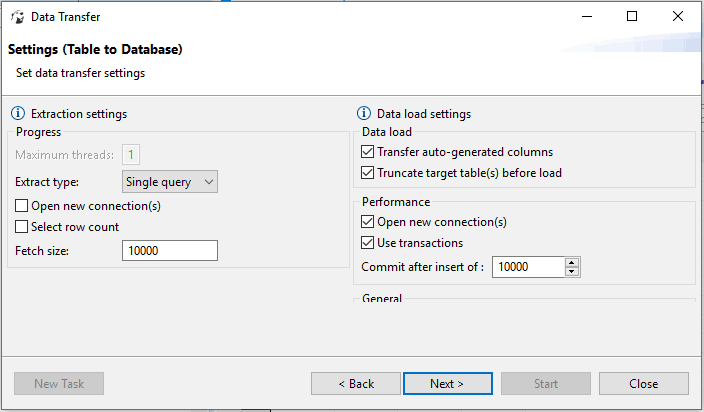
Set the options for connections and data load. If you only want to add data to the table and not overwrite the data, you will want to remove the option for truncating target table. Click Next.
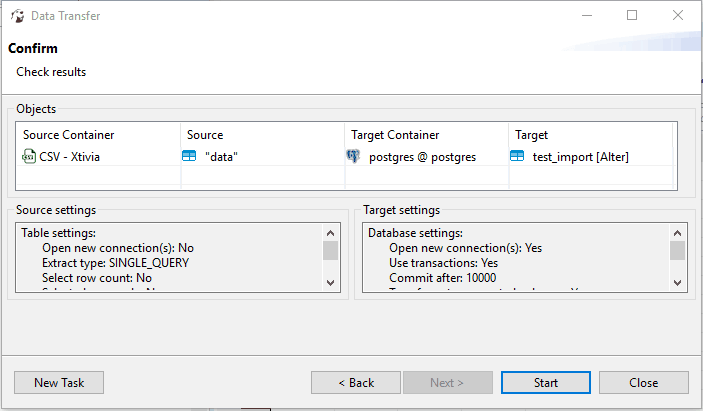
Check to make sure the source and target are correct and then click Start to begin the import.
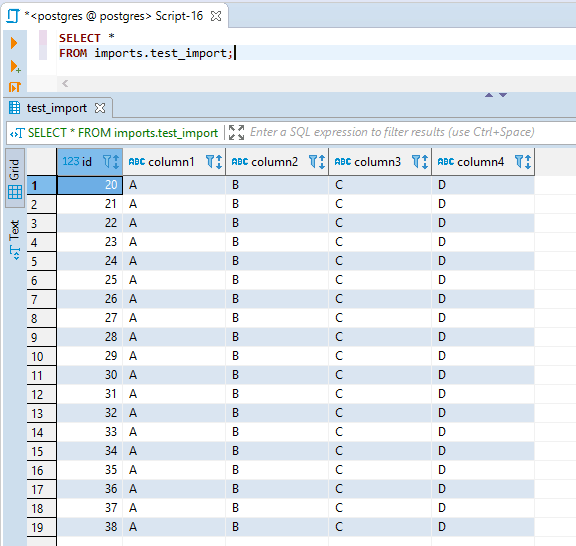
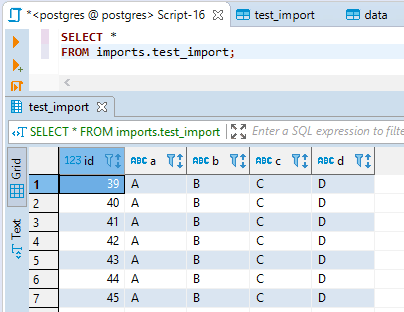
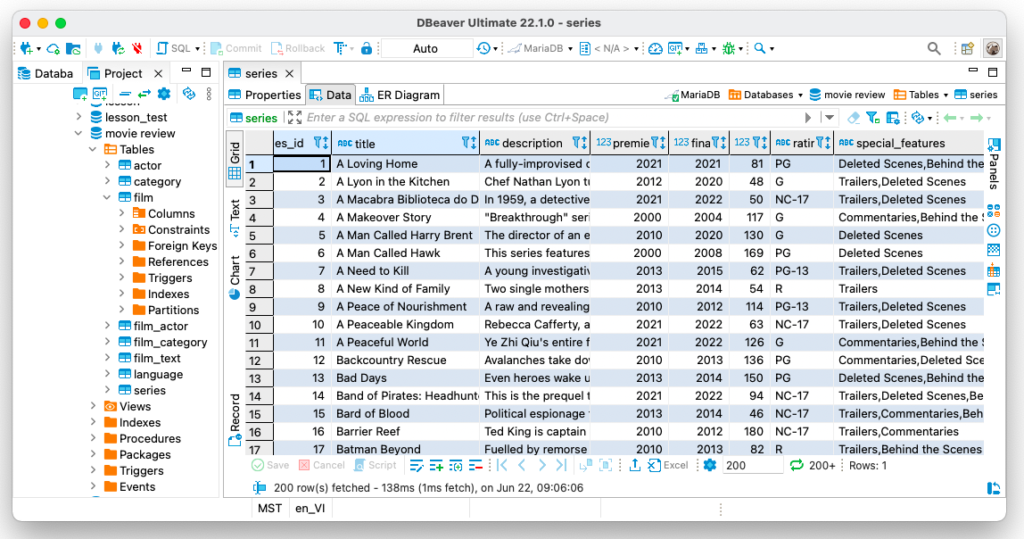
You can now select the data from your PostgreSQL table.
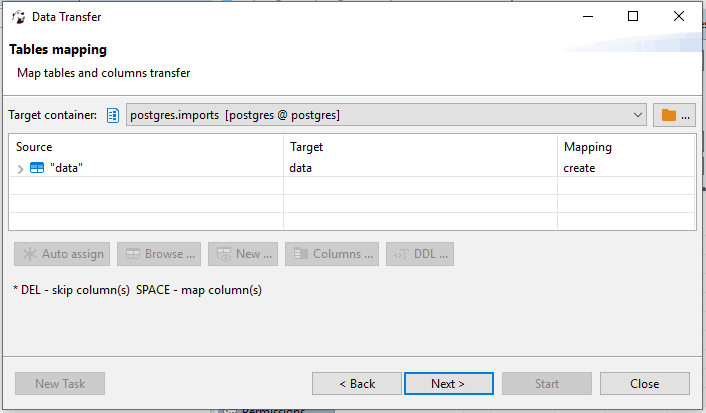
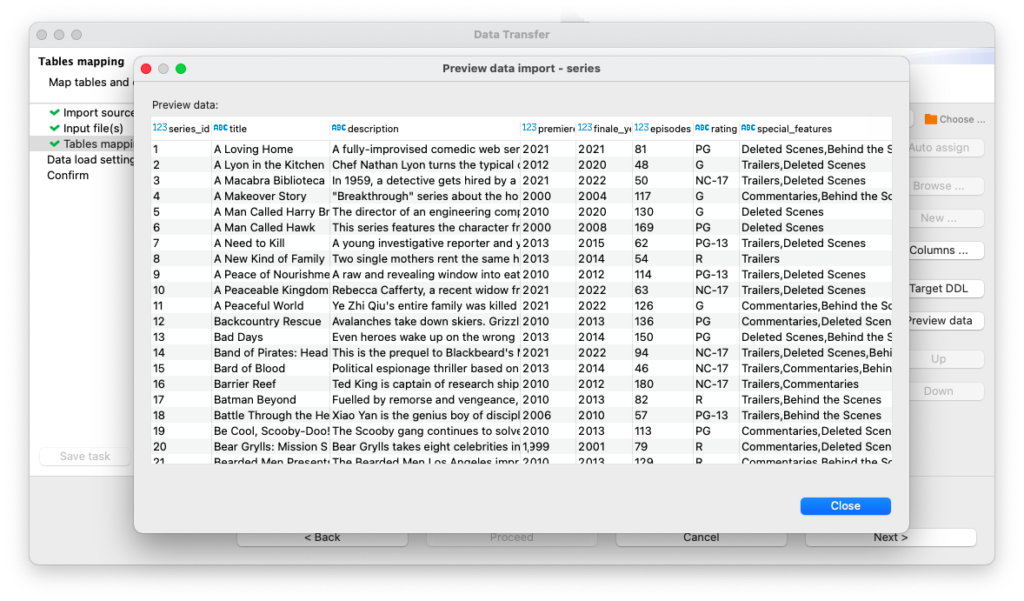
You can also create an empty table structure and select create under mapping in the Tables Mapping window, and it will create the columns for you. This is best used when you have headers.
When you select data from the table after the import, the first row in the import data will be what the columns are named.
*NOTE*
When you import data and have headers in your data, it will be used as the first row if you already have a table structure in place. This could cause your import to fail, or it could cause your data to be inconsistent with your column data.
PostgreSQL Updating Data Using CSV File with DBeaver
PostgreSQL Custom Delimited Imports with DBeaver
Our readers are already familiar with Louis, who not only uses DBeaver for his work but also uses it for his favorite hobby. He has a website where he regularly publishes information about films, and he stores all the necessary data in a database. Louis realized one day that it was not only he but also his readers who were interested in information about popular TV series.

Louis knows that some actors star in both films and TV series, and it’s convenient for him to add a new table to an existing catalog. The problem is that our friend Louis stores all the information about the series in an XLSX format. Is it possible to import data from it without wasting much time? Yes, it’s quite simple, and today we will tell you how Louis has solved this issue.
How to upload data
Louis collected information about the TV series in an excel format before he started working with DBeaver. His file already contains all the necessary columns but our hero does not want to transfer some of them to the database as they were created for his personal use and are not relevant to the site visitors. To quickly load only the data that he needs for the site, he can use DBeaver’s data import feature.
First, Louis needs to right-click on the connection in the navigation tree and select “Import data”. Using the wizard window that opens, he can upload his XLSX file from his hard drive.
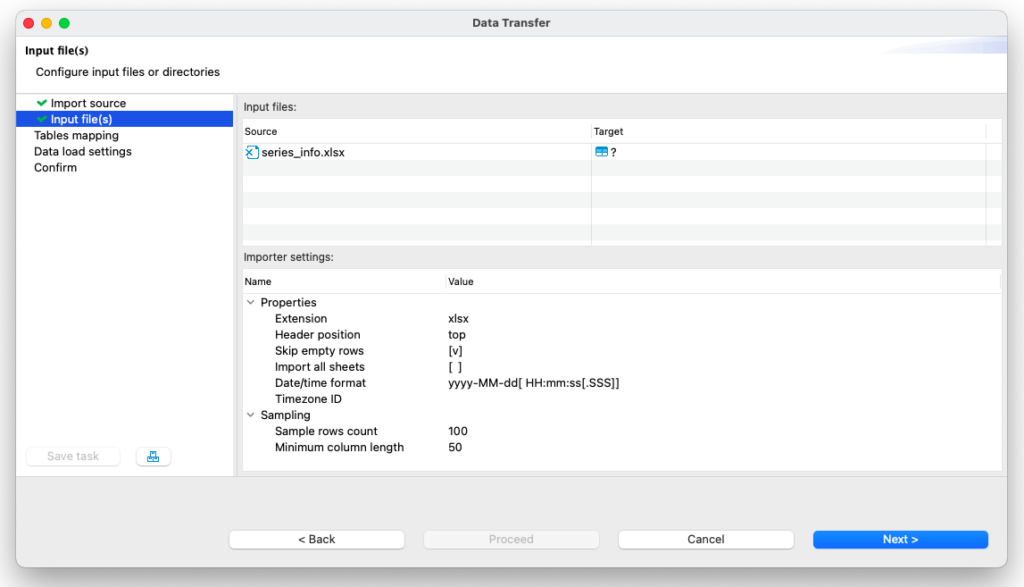
DBeaver PRO supports the import of files in CSV, XLSL and XML formats.
The Community version only works with the CSV format.
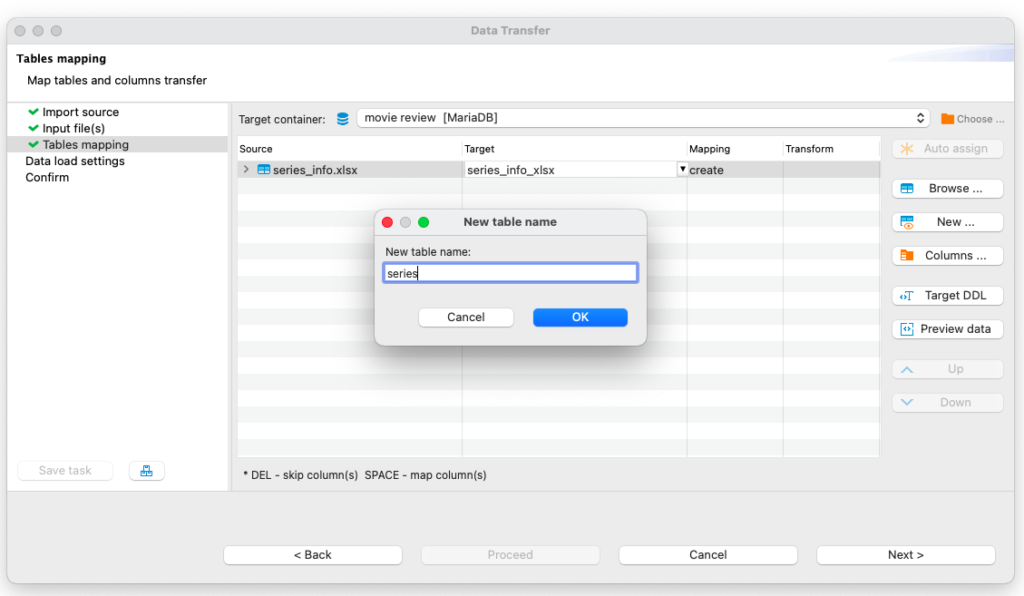
Louis has a file with all the necessary data, however, there is still no suitable table in the database yet. He can create it now by clicking on the NEW button and entering the desired name.
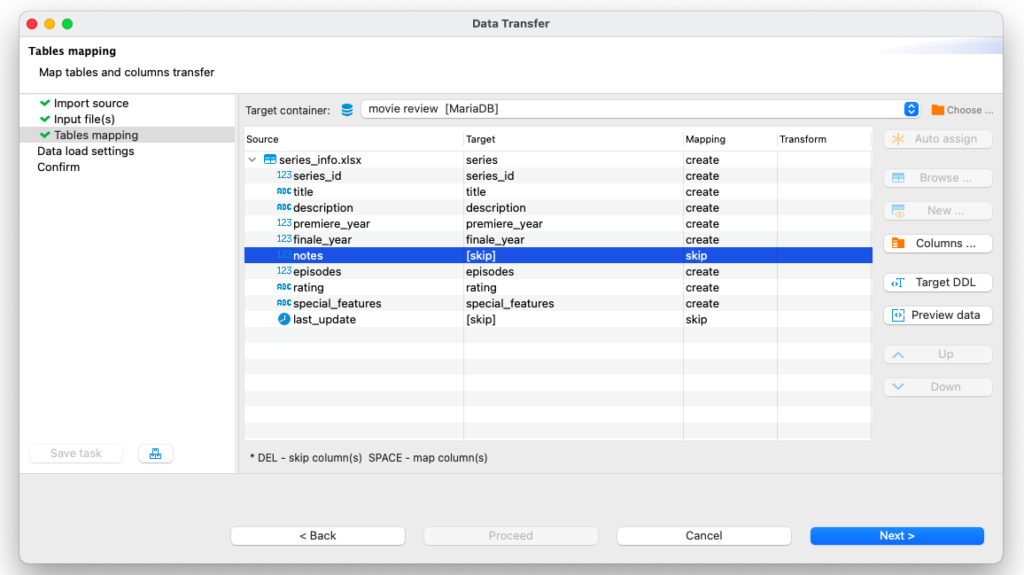
Also at this step, our hero can exclude unnecessary columns from the import. To do this, he just needs to select a column and click the DEL button.
To make sure that all the data will be loaded in the right way, he needs to click the “Preview data” button. After seeing that everything is correct, Louis can now move on to the next step.
Depending on your needs, you can import one or several tables at once.
Thanks to the default settings selected in the next wizard’s step, the table will open after the download is complete and our hero will see the results of the import.
If you sequentially load two tables linked by keys, you might run into some problems.
This is related to the fact that the foreign keys of the first table point to the primary keys of the not-existing-yet-second table.
In this case, you can check the box “Disable referential integrity checks during the transfer”.
That’s it. Thanks to DBeaver, Louis quickly added a new table with data to an existing database. Now he can update it with new TV series for his site through the app interface. If necessary in the future he can change the data format or the number of characters in the cells using the Properties tab.
Louis also uses other data transfer features for his work and hobbies. We will talk about them in our future articles.
Содержание
- PostgreSQL Excel Data Imports Using DBeaver
- File Conversion
- Excel file Conversion
- Create csv Connection
- Data Import
- DBeaver Forum
- Import/Export Excel & XML
- Import/Export Excel & XML
- Re: Import/Export Excel & XML
- Re: Import/Export Excel & XML
- Re: Import/Export Excel & XML
- Re: Import/Export Excel & XML
- Where is the Excel export option in DBeaver Community Edition
- 2 Answers 2
- Related
- Hot Network Questions
- Subscribe to RSS
- Connect to Excel Data in DBeaver
- Ready to get started?
- Create a JDBC Data Source for Excel Data
- Create a Connection to Excel Data
- Built-in Connection String Designer
- Query Excel Data
- Import excel to dbeaver
- How to upload data
PostgreSQL Excel Data Imports Using DBeaver
There are many ways to import data into a database, some are pretty straightforward, and others are more complex depending on the type of data you receive and which format it is in. I will show you how to import data from an excel file using the DBA tool DBeaver.
File Conversion
When you receive a file in Excel format, you must convert this data into a readable format. This format is usually .csv (Comma Delimited) but can often be in a format that has a delimiter that isn’t so common.
Excel file Conversion
Excel file extensions are usually xls or xlsx, open your file in Excel. You’ll need to convert this into a CSV file, which is extremely easy. All you need to do is Save As and change the “Save as type:” to “CSV (Comma delimited) (*.csv)” and click Save. The file name will change automatically, no need to change it to .csv.

Create csv Connection
Right-click your database connection (or anywhere if your connections are empty), click Create and then click Connection.
Make sure the All tab is selected on the left and scroll down to CSV. Click Next.
Click Browse… and select the folder where your csv file is that you saved from Excel. You’re selecting a folder here, not a file. The connection will load ALL csv files in that folder. Click Finish.
You will now see a new connection; this connection is set up exactly like a regular connection. Each csv file in your folder will be set up as a table with columns.
Data Import
Once the connection is made, you’re able to query the data just like you would any other table with sql syntax.
You can now import this data into your PostgreSQL table. Right-click the table you want to import into PostgreSQL and click Export Data.
Select Database and click Next.
![]()
Change the target container to the schema where your table is in PostgreSQL. Click Ok.
Select the target (table) where you want to import the data.
Click Columns and set the target column for each column of data. If you have headers already in your data that match the table columns, then this will automatically map. Click Ok. Click Next.
Set the options for connections and data load. If you only want to add data to the table and not overwrite the data, you will want to remove the option for truncating target table. Click Next.
![]()
Check to make sure the source and target are correct and then click Start to begin the import.
![]()
You can now select the data from your PostgreSQL table.
You can also create an empty table structure and select create under mapping in the Tables Mapping window, and it will create the columns for you. This is best used when you have headers.
![]()
When you select data from the table after the import, the first row in the import data will be what the columns are named.
*NOTE*
When you import data and have headers in your data, it will be used as the first row if you already have a table structure in place. This could cause your import to fail, or it could cause your data to be inconsistent with your column data.
Источник
DBeaver Forum
Free Universal Database Manager
- Board index‹DBeaver‹Feature Requests
- Change font size
- Print view
- FAQ
- Login
Import/Export Excel & XML
Import/Export Excel & XML
by Wichart009 » Sat Oct 13, 2012 10:15 am
I has use import and export result set, it work good and very fast. But I think if we can import/export directly from Excel instead of .CSV file is much better. And I have a new job to import data in .XML format to Database. If possible, may add import/export in .XML format.
Re: Import/Export Excel & XML
by Serge » Mon Oct 15, 2012 11:56 am
XML export feature is not a big deal, probably we will include it in the next version.
However data import feature is not yet implemented in DBeaver at all. It has many complex parts, especially concerning data type conversions and SQL dialoct differences so I’m afraid we won’t include this feature in nearest version.
Re: Import/Export Excel & XML
by Serge » Thu Mar 21, 2013 12:03 pm
DBeaver 2.1.0 has new feature — Data transfer. Generally you may import data into database table from another database table.
To perform import from CSV (or DBF or Excel) you have to use JDBC driver for CSV (DBF or Excel) — there are plenty of them, many are free to use.
Then you need to create connection to your CSV (Excel) file and export some particular csv file into your database table (right click on table, click on Data Export menu item).
Data transfer wizard allows columns/types mapping tuning.
Please ask any questions concerning data transfer feature. Any feedback is welcome.
Re: Import/Export Excel & XML
by Wichart009 » Fri Mar 22, 2013 1:03 am
Re: Import/Export Excel & XML
by rethus » Thu Mar 26, 2015 1:05 pm
Источник
Where is the Excel export option in DBeaver Community Edition
Am using DBeaver 6.3.4 Community Edition and it doesn’t show XLSX ( Excel) option when Data Export feature is selected as in the screenshot. This excel option appeared in my Trial version of Enterprise Ed.
Please help me enable/install this excel option or does Community Ed support at all?


2 Answers 2
Excel export also works for the community edition (CE). Tested with Version 7.3.2.202101032114. How-to (via Google «dbeaver excel»):
An alternative to «Export data . » is to select the cells to be exported in the result grid and the right click -> Open with -> Excel.
Excel export option is available only in Enterprise edition which is a Licensed version also while Community edition is for free.
Hot Network Questions
To subscribe to this RSS feed, copy and paste this URL into your RSS reader.
Site design / logo © 2023 Stack Exchange Inc; user contributions licensed under CC BY-SA . rev 2023.3.17.43323
By clicking “Accept all cookies”, you agree Stack Exchange can store cookies on your device and disclose information in accordance with our Cookie Policy.
Источник
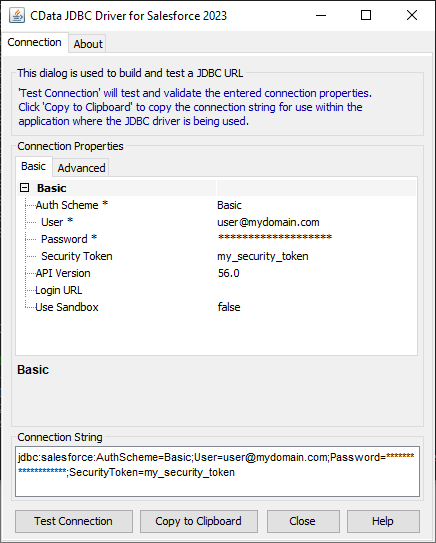
Connect to Excel Data in DBeaver
Ready to get started?
Download for a free trial:
Easily connect Java/J2EE applications with real-time data from Excel spreadsheets. Use Excel to manage the data that powers your applications.
Manage Excel data with visual tools in DBeaver like the query browser.
The CData JDBC Driver for Excel implements JDBC standards that enable third-party tools to interoperate, from wizards in IDEs to business intelligence tools. This article shows how to connect to Excel data with wizards in DBeaver and browse data in the DBeaver GUI.
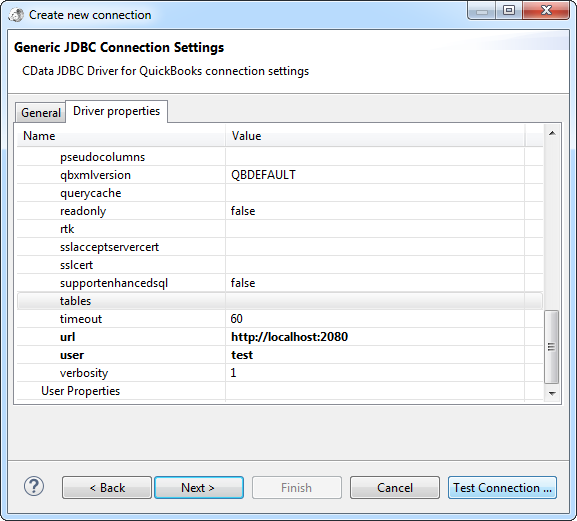
Create a JDBC Data Source for Excel Data
Follow the steps below to load the driver JAR in DBeaver.
- Open the DBeaver application and, in the Databases menu, select the Driver Manager option. Click New to open the Create New Driver form.
- In the Driver Name box, enter a user-friendly name for the driver.
- To add the .jar, click Add File.
- In the create new driver dialog that appears, select the cdata.jdbc.excel.jar file, located in the lib subfolder of the installation directory.
- Click the Find Class button and select the ExcelDriver class from the results. This will automatically fill the Class Name field at the top of the form. The class name for the driver is cdata.jdbc.excel.ExcelDriver.
- Add jdbc:excel: in the URL Template field.
Create a Connection to Excel Data
Follow the steps below to add credentials and other required connection properties.
- In the Databases menu, click New Connection.
- In the Create new connection wizard that results, select the driver.
- On the next page of the wizard, click the driver properties tab.
Enter values for authentication credentials and other properties required to connect to Excel.
The ExcelFile, under the Authentication section, must be set to a valid Excel File.
Built-in Connection String Designer
For assistance in constructing the JDBC URL, use the connection string designer built into the Excel JDBC Driver. Either double-click the JAR file or execute the jar file from the command-line.
java -jar cdata.jdbc.excel.jar
Fill in the connection properties and copy the connection string to the clipboard.
Below is a typical connection string:
jdbc:excel:Excel File=’C:/MyExcelWorkbooks/SampleWorkbook.xlsx’;
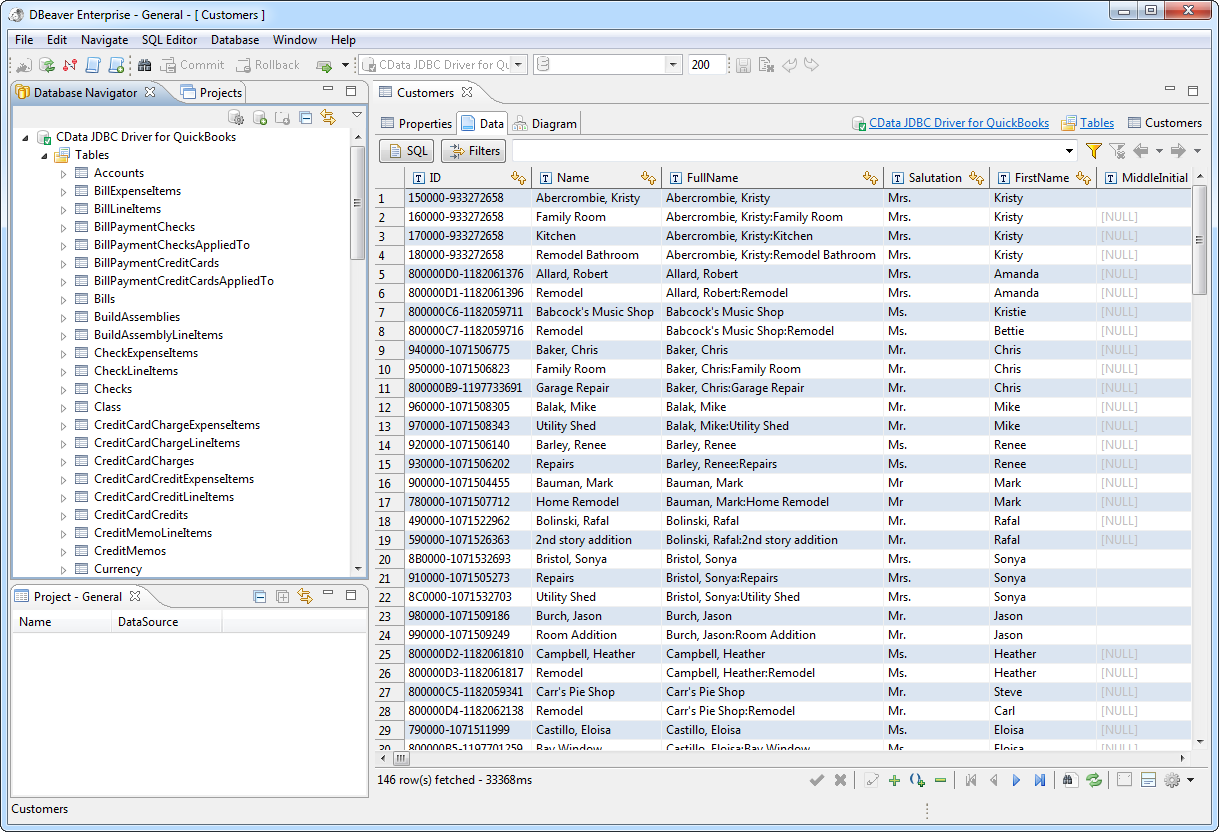
Query Excel Data
You can now query information from the tables exposed by the connection: Right-click a Table and then click Edit Table. The data is available on the Data tab.
CData Software is a leading provider of data access and connectivity solutions. Our standards-based connectors streamline data access and insulate customers from the complexities of integrating with on-premise or cloud databases, SaaS, APIs, NoSQL, and Big Data.
Источник
Import excel to dbeaver
Our readers are already familiar with Louis, who not only uses DBeaver for his work but also uses it for his favorite hobby. He has a website where he regularly publishes information about films, and he stores all the necessary data in a database. Louis realized one day that it was not only he but also his readers who were interested in information about popular TV series.
Louis knows that some actors star in both films and TV series, and it’s convenient for him to add a new table to an existing catalog. The problem is that our friend Louis stores all the information about the series in an XLSX format. Is it possible to import data from it without wasting much time? Yes, it’s quite simple, and today we will tell you how Louis has solved this issue.
How to upload data
Louis collected information about the TV series in an excel format before he started working with DBeaver. His file already contains all the necessary columns but our hero does not want to transfer some of them to the database as they were created for his personal use and are not relevant to the site visitors. To quickly load only the data that he needs for the site, he can use DBeaver’s data import feature.
First, Louis needs to right-click on the connection in the navigation tree and select “Import data”. Using the wizard window that opens, he can upload his XLSX file from his hard drive.
DBeaver PRO supports the import of files in CSV, XLSL and XML formats.
The Community version only works with the CSV format.
Louis has a file with all the necessary data, however, there is still no suitable table in the database yet. He can create it now by clicking on the NEW button and entering the desired name.
Also at this step, our hero can exclude unnecessary columns from the import. To do this, he just needs to select a column and click the DEL button.
To make sure that all the data will be loaded in the right way, he needs to click the “Preview data” button. After seeing that everything is correct, Louis can now move on to the next step.
Depending on your needs, you can import one or several tables at once.
Thanks to the default settings selected in the next wizard’s step, the table will open after the download is complete and our hero will see the results of the import.
If you sequentially load two tables linked by keys, you might run into some problems.
This is related to the fact that the foreign keys of the first table point to the primary keys of the not-existing-yet-second table.
In this case, you can check the box “Disable referential integrity checks during the transfer”.
That’s it. Thanks to DBeaver, Louis quickly added a new table with data to an existing database. Now he can update it with new TV series for his site through the app interface. If necessary in the future he can change the data format or the number of characters in the cells using the Properties tab.
Louis also uses other data transfer features for his work and hobbies. We will talk about them in our future articles.
Источник
Import/Export Excel & XML
Import/Export Excel & XML
I has use import and export result set, it work good and very fast. But I think if we can import/export directly from Excel instead of .CSV file is much better. And I have a new job to import data in .XML format to Database. If possible, may add import/export in .XML format.
Thanks.
- Wichart009
- Posts: 7
- Joined: Mon Aug 13, 2012 4:42 pm
Re: Import/Export Excel & XML
![]() by Serge » Mon Oct 15, 2012 11:56 am
by Serge » Mon Oct 15, 2012 11:56 am
Hi,
XML export feature is not a big deal, probably we will include it in the next version.
However data import feature is not yet implemented in DBeaver at all. It has many complex parts, especially concerning data type conversions and SQL dialoct differences so I’m afraid we won’t include this feature in nearest version.
Thanks!
- Serge
- Posts: 1526
- Joined: Sat Feb 26, 2011 8:24 pm
- Location: SPb
-
- Website
Re: Import/Export Excel & XML
![]() by Serge » Thu Mar 21, 2013 12:03 pm
by Serge » Thu Mar 21, 2013 12:03 pm
DBeaver 2.1.0 has new feature — Data transfer. Generally you may import data into database table from another database table.
To perform import from CSV (or DBF or Excel) you have to use JDBC driver for CSV (DBF or Excel) — there are plenty of them, many are free to use.
Then you need to create connection to your CSV (Excel) file and export some particular csv file into your database table (right click on table, click on Data Export menu item).
Data transfer wizard allows columns/types mapping tuning.
Please ask any questions concerning data transfer feature. Any feedback is welcome.
- Serge
- Posts: 1526
- Joined: Sat Feb 26, 2011 8:24 pm
- Location: SPb
-
- Website
Re: Import/Export Excel & XML
![]() by Wichart009 » Fri Mar 22, 2013 1:03 am
by Wichart009 » Fri Mar 22, 2013 1:03 am
Thanks a lot for you kindly support, Great!. I just have seen it, let me try out & I’ll be feedback. if any further information, I’ll let you know.
- Wichart009
- Posts: 7
- Joined: Mon Aug 13, 2012 4:42 pm
Re: Import/Export Excel & XML
![]() by rethus » Thu Mar 26, 2015 1:05 pm
by rethus » Thu Mar 26, 2015 1:05 pm
Is there also a CSV-Import for the eclipse-Plugin Version of DBeaver?
Where can I found it?
- rethus
- Posts: 38
- Joined: Tue Jan 22, 2013 2:48 pm
Return to Feature Requests
Who is online
Users browsing this forum: No registered users and 5 guests
Am using DBeaver 6.3.4 Community Edition and it doesn’t show XLSX ( Excel) option when Data Export feature is selected as in the screenshot. This excel option appeared in my Trial version of Enterprise Ed.
Please help me enable/install this excel option or does Community Ed support at all?
asked Feb 18, 2020 at 13:46
![]()
LonelyRogueLonelyRogue
3581 gold badge2 silver badges10 bronze badges
1
Excel export option is available only in Enterprise edition which is a Licensed version also while Community edition is for free.
answered May 20, 2020 at 14:52
![]()
LonelyRogueLonelyRogue
3581 gold badge2 silver badges10 bronze badges
1
You can perform data export/import or migration for database table(s).
We will describe most typically used cases.
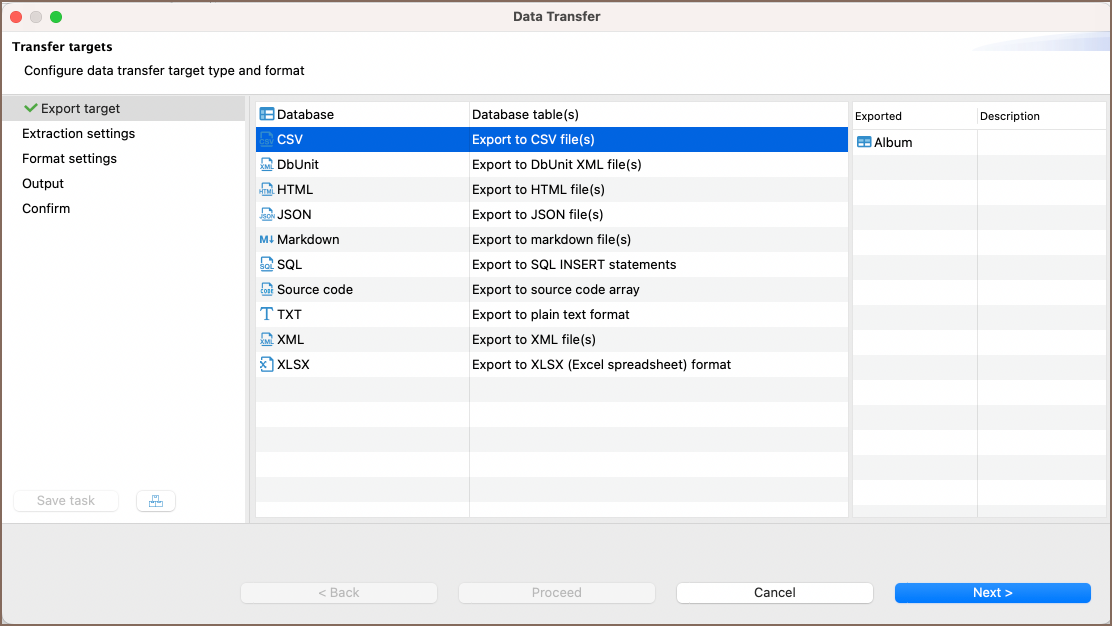
Exporting table data to CSV format
- Select a table or tables you want to export. In the context menu choose Export Data.
(Note: you can also export data from custom SQL queries results. To do that, choose Export data in the results context menu).

- Choose export format. DBeaver supports many different output formats including CSV, HTML, XLSX, etc:
- Set data extraction options (how the data will be read from the tables). This may affect the extraction’s performance.
And set export format option. They are specific to the data format you chose on step 2:

- Set options for output files or clipboard.
Note: Timestamp pattern is used here to target the file name pattern:

- Review what you want to format and into which format you will export it. You can also save all your settings as a task in this step or change the task variables:

- Press finish. See extraction progress. You can keep working with your database during the export process as the extraction will be performed in the background.
Note: avoid changing data in tables you have selected to be exported while the exporting is in progress.
In the end you will see status message:

Importing data from CSV format
You can import data from CSV file(s) directly into your database table(s).
- Select a table(s) to which you want to import data. In the context menu choose Import Data:

- Choose import format (CSV):

- Select input CSV file for each table you want to import and you can change the Importer settings (format specific) at this step:

- Set CSV-to-table mappings.
You need to set a column in the CSV file for each database table column.
You can skip columns (the value will be set to NULL in the target table column).
You can set constant values for the table column if there is no source column for it in the CSV.

- Set options for loading data in the database. These options may affect the loading’s performance:

About the replacing method option, you can read here.
- Review which file(s) and to which table(s) you will import. You can also save all your settings as a task in this step:

- Press finish. See extraction progress. You can keep working with your database during the export process as the data loading will be performed in the background.
Note: avoid changing data in tables you have selected to be imported while the import is in progress.
In the end you will see the status message:

Related topic: Migrating table(s) data to another database table(s)
Striver
Но обычно с экселем всё сложнее и приходится писать отдельный код считывания под каждый вид таблицы.
Именно так. Вы автоматизируете ввод таблиц а через неделю у вас появятся таблицы с другим количеством столбцов еще через пару дней вам столбцы по другому обзовут/переставят, потом сменят тип данных, потом получите xls, odt, csv,… вместо xlsx и так далее…
Все зависит от задачи, но обычно кончается все одним из трех способов.
1 Вы пишете импортировщик и отдаете его тем кто делает файлы эксела и они уже сами заносят данные в СУБД (если что не так, то они сами разбираются)
2. Вы пишете десктопное приложение которое теоретически не позволяет неправильно вводить данные (это одна из основных причин создания таких приложений). Далее отдаете приложение поставщикам данных и наотрез отказываетесь принимать xls файлы. Поставщикам данных поначалу плохо вам поначалу тоже плохо но греет душу что в перспективе будет хорошо.
3. Ежик импортирует данные колется но продолжает есть кактус. Можно нанять штат девочек которые будут колоться вместо вас и будут исправлять 3 очевидных ошибки и вносить 5 неочевидных.
Я бы для постоянной работы рекомендовал десктоп или веб приложение, для разового импорта импортирующий скрипт.
p.s.
Очевидно еще понадобится psycopg2.
pandas для этой задачи тяжеловат, не рекомендую. По идее достаточен xlrd.
В пакостных случаях может потребоваться win32com (им вы можете например парой строк скинуть csv а дальше не думать о экселе вообще).
Если решаться на десктоп то pyqt,pyside,wxpython.