Note: Microsoft Access doesn’t support importing Excel data with an applied sensitivity label. As a workaround, you can remove the label before importing and then re-apply the label after importing. For more information, see Apply sensitivity labels to your files and email in Office.
You can bring the data from an Excel workbook into Access databases in many ways. You can copy data from an open worksheet and paste it into an Access datasheet, import a worksheet into a new or existing table, or link to a worksheet from an Access database.
This topic explains in detail how to import or link to Excel data from Access desktop databases.
What do you want to do?
-
Understand importing data from Excel
-
Import data from Excel
-
Troubleshoot missing or incorrect values
-
Link to data in Excel
-
Troubleshoot #Num! and other incorrect values in a linked table
Understand importing data from Excel
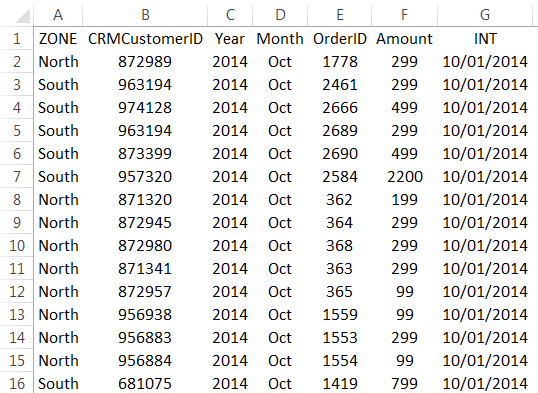
If your goal is to store some or all of your data from one or more Excel worksheets in Access, you should import the contents of the worksheet into a new or existing Access database. When you import data, Access creates a copy of the data in a new or existing table without altering the source Excel worksheet.
Common scenarios for importing Excel data into Access
-
You are a long-time user of Excel but, going forward, you want to use Access to work with this data. You want to move the data in your Excel worksheets into one or more new Access databases.
-
Your department or workgroup uses Access, but you occasionally receive data in Excel format that must be merged with your Access databases. You want to import these Excel worksheets into your database as you receive them.
-
You use Access to manage your data, but the weekly reports you receive from the rest of your team are Excel workbooks. You would like to streamline the import process to ensure that data is imported every week at a specific time into your database.
If this is the first time you are importing data from Excel
-
There is no way to save an Excel workbook as an Access database. Excel does not provide functionality to create an Access database from Excel data.
-
When you open an Excel workbook in Access (in the File Open dialog box, change the Files of Type list box to Microsoft Office Excel Files and select the file you want), Access creates a link to the workbook instead of importing its data. Linking to a workbook is fundamentally different from importing a worksheet into a database. For more information about linking, see the section Link to data in Excel, later in this article.
Import data from Excel
The steps in this section explain how to prepare for and run an import operation, and how to save the import settings as a specification for later reuse. As you proceed, remember that you can import data from only one worksheet at a time. You cannot import all the data from a whole workbook at the same time.
Prepare the worksheet
-
Locate the source file and select the worksheet that contains the data that you want to import to Access. If you want to import only a portion of a worksheet, you can define a named range that includes only the cells that you want to import.
Define a named range (optional)
-
Switch to Excel and open the worksheet that has data that you want to import.
-
Select the range of cells that contain the data that you want to import.
-
Right-click within the selected range and then click Name a Range or Define Name.
-
In the New Name dialog box, specify a name for the range in the Name box and click OK.
Remember that you can import only one worksheet at a time during an import operation. To import data from multiple worksheets, repeat the import operation for each worksheet.
-
-
Review the source data and take action as described in this table.
Element
Description
Number of columns
The number of source columns that you want to import cannot exceed 255, because Access does not support more than 255 fields in a table.
Skipping columns and rows
It is a good practice to include only the rows and columns that you want to import in the source worksheet or named range.
Rows You cannot filter or skip rows during the import operation.
Columns You cannot skip columns during the operation if you choose to add the data to an existing table.
Tabular format
Ensure that the cells are in tabular format. If the worksheet or named range includes merged cells, the contents of the cell are placed in the field that corresponds to the leftmost column, and the other fields are left blank.
Blank columns, rows, and cells
Delete all unnecessary blank columns and blank rows in the worksheet or range. If the worksheet or range contains blank cells, try to add the missing data. If you are planning to append the records to an existing table, ensure that the corresponding field in the table accepts null (missing or unknown) values. A field will accept null values if its Required field property is set to No and its ValidationRule property setting doesn’t prevent null values.
Error values
If one or more cells in the worksheet or range contain error values, such as #NUM and #DIV, correct them before you start the import operation. If a source worksheet or range contains error values, Access places a null value in the corresponding fields in the table. For more information about ways to correct those errors, see the section Troubleshoot missing or incorrect values, later in this article.
Data type
To avoid errors during importing, ensure that each source column contains the same type of data in every row. Access scans the first eight source rows to determine the data type of the fields in the table. We highly recommend that you ensure that the first eight source rows do not mix values of different data types in any of the columns. Otherwise, Access might not assign the correct data type to the column.
Also, it is a good practice to format each source column in Excel and assign a specific data format to each column before you start the import operation. Formatting is highly recommended if a column includes values of different data types. For example, the FlightNo column in a worksheet might contain numeric and text values, such as 871, AA90, and 171. To avoid missing or incorrect values, do the following:
-
Right-click the column header and then click Format Cells.
-
On the Number tab, under Category, select a format. For the FlightNo column, you would probably choose Text.
-
Click OK.
If the source columns are formatted, but still contain mixed values in the rows following the eighth row, the import operation might still skip values or convert values incorrectly. For troubleshooting information, see the section Troubleshoot missing or incorrect values.
First row
If the first row in the worksheet or named range contains the names of the columns, you can specify that Access treat the data in the first row as field names during the import operation. If your source worksheet or range doesn’t include the names, it is a good idea to add them to the source before you start the import operation.
Note: If you plan to append the data to an existing table, ensure that the name of each column exactly matches the name of the corresponding field. If the name of a column is different from the name of the corresponding field in the table, the import operation will fail. To see the names of the fields, open the table in Design view in Access.
-
-
Close the source workbook, if it is open. Keeping the source file open might result in data conversion errors during the import operation.
Prepare the destination database
-
Open the Access database where the imported data will be stored. Ensure that the database is not read-only, and that you have permissions to make changes to the database.
-or-
If you don’t want to store the data in any of your existing databases, create a blank database. To do so:
Click the File tab, click New, and then click Blank Database.
-
Before you start the import operation, decide whether you want to store the data in a new or existing table.
Create a new table If you choose to store the data in a new table, Access creates a table and adds the imported data to this table. If a table with the specified name already exists, Access overwrites the contents of the table with the imported data.
Append to an existing table If you choose to add the data to an existing table, the rows in the Excel worksheet are appended to the specified table.
Remember that most failures during append operations occur because the source data does not match the structure and field settings of the destination table. To avoid this, open the destination table in Design view and review the following:
-
First row If the first row of the source worksheet or named range does not contain column headings, ensure that the position and data type of each column in the source worksheet matches those of the corresponding field in the table. If the first row contains column headings, the order of columns and fields do not need to match, but the name and data type of each column must exactly match those of its corresponding field.
-
Missing or extra fields If one or more fields in the source worksheet do not exist in the destination table, add them before you start the import operation. However, if the table contains fields that don’t exist in the source, you do not need to delete those fields from the table if they accept null values.
Tip: A field will accept null values if its Required property is set to No and its ValidationRule property setting doesn’t prevent null values.
-
Primary key If the table contains a primary key field, the source worksheet or range must have a column that contains values that are compatible with the primary key field, and the imported key values must be unique. If an imported record contains a primary key value that already exists in the destination table, the import operation displays an error message.
-
Indexed fields If the Indexed property of a field in the table is set to Yes (No Duplicates), the corresponding column in the source worksheet or range must contain unique values.
Go to the next steps to run the import operation.
-
Start the import operation
-
The location of the import/link wizard differs slightly depending upon your version of Access. Choose the steps that match your Access version:
-
If you’re using the latest version of the Microsoft 365 subscription version of Access or Access 2019, on the External Data tab, in the Import & Link group, click New Data Source > From File > Excel.
-
If you’re using Access 2016, Access 2013, or Access 2010, on the External Data tab, in the Import & Link group, click Excel.
Note: The External Data tab is not available unless a database is open.
-
-
In the Get External Data — Excel Spreadsheet dialog box, in the File name box, specify the name of the Excel file that contains the data that you want to import.
-or-
Click Browse and use the File Open dialog box to locate the file that you want to import.
-
Specify how you want to store the imported data.
To store the data in a new table, select Import the source data into a new table in the current database. You will be prompted to name this table later.
To append the data to an existing table, select Append a copy of the records to the table and select a table from the drop-down list. This option is not available if the database has no tables.
To link to the data source by creating a linked table, see the section Link to data in Excel, later in this article.
-
Click OK.
The Import Spreadsheet Wizard starts, and leads you through the import process. Go to the next set of steps.
Use the Import Spreadsheet wizard
-
On the first page of the wizard, select the worksheet that contains the data that you want to import, and then click Next.
-
On the second page of the wizard, click either Show Worksheets or Show Named Ranges, select either the worksheet or the named range that you want to import, and then click Next.
-
If the first row of the source worksheet or range contains the field names, select First Row Contains Column Headings and click Next.
If you are importing the data into a new table, Access uses these column headings to name the fields in the table. You can change these names either during or after the import operation. If you are appending the data to an existing table, ensure that the column headings in the source worksheet exactly match the names of the fields in the destination table.
If you are appending data to an existing table, skip directly to step 6. If you are adding the data to a new table, follow the remaining steps.
-
The wizard prompts you to review the field properties. Click a column in the lower half of the page to display the corresponding field’s properties. Optionally, do any of the following:
-
Review and change, if you want, the name and data type of the destination field.
Access reviews the first eight rows in each column to suggest the data type for the corresponding field. If the column in the worksheet contains different types of values, such as text and numbers, in the first eight rows of a column, the wizard suggests a data type that is compatible with all the values in the column — most often, the text data type. Although you can choose a different data type, remember that values that are incompatible with the data type that you choose will be either ignored or converted incorrectly during the import process. For more information about how to correct missing or incorrect values, see the section Troubleshoot missing or incorrect values, later in this article.
-
To create an index on the field, set Indexed to Yes.
-
To completely skip a source column, select the Do not import field (Skip) check box.
Click Next after you finish selecting options.
-
-
In the next screen, specify a primary key for the table. If you select Let Access add primary key, Access adds an AutoNumber field as the first field in the destination table, and automatically populates it with unique ID values, starting with 1. Click Next.
-
In the final wizard screen, specify a name for the destination table. In the Import to Table box, type a name for the table. If the table already exists, Access displays a prompt that asks whether you want to overwrite the existing contents of the table. Click Yes to continue or No to specify a different name for the destination table, and then click Finish to import the data.
If Access was able to import some or all the data, the wizard displays a page that shows you the status of the import operation. In addition, you can save the details of the operation for future use as a specification. Conversely, if the operation completely failed, Access displays the message An error occurred trying to import file.
-
Click Yes to save the details of the operation for future use. Saving the details helps you repeat the operation at a later time without having to step through the wizard each time.
See Save the details of an import or export operation as a specification to learn how to save your save your specification details.
See Run a saved import or export specification to learn how to run your saved import or link specifications.
See Schedule an import or export specification to learn how to schedule import and link tasks to run at specific times.
Troubleshoot missing or incorrect values
If you receive the message An error occurred trying to import file, the import operation completely failed. Conversely, if the import operation displays a dialog box that prompts you to save the details of the operation, the operation was able to import all or some of the data. The status message also mentions the name of the error log table that contains the description of any errors that occurred during the import operation.
Important: Even if the status message indicates a completely successful operation, you should review the contents and structure of the table to ensure that everything looks correct before you start using the table.
-
Open the destination table in Datasheet view to see whether all data was added to the table.
-
Open the table in Design view to review the data type and other property settings of the fields.
The following table describes the steps that you can take to correct missing or incorrect values.
Tip: While you are troubleshooting the results, if you find just a few missing values, you can add them to the table manually. Conversely, if you find that entire columns or a large number of values are either missing or were not imported properly, you should correct the problem in the source file. After you have corrected all known problems, repeat the import operation.
|
Issue |
Resolution |
||||||||||||
|---|---|---|---|---|---|---|---|---|---|---|---|---|---|
|
Graphical elements |
Graphical elements, such as logos, charts, and pictures cannot be imported. Manually add them to the database after completing the import operation. |
||||||||||||
|
Calculated values |
The results of a calculated column or cells are imported, but not the underlying formula. During the import operation, you can specify a data type that is compatible with the formula results, such as Number. |
||||||||||||
|
TRUE or FALSE and -1 or 0 values |
If the source worksheet or range includes a column that contains only TRUE or FALSE values, Access creates a Yes/No field for the column and inserts -1 or 0 values in the field. However, if the source worksheet or range includes a column that contains only -1 or 0 values, Access, by default, creates a numeric field for the column. You can change the data type of the field to Yes/No during the import operation to avoid this problem. |
||||||||||||
|
Multivalued fields |
When you import data to a new table or append data to an existing table, Access does not enable support for multiple values in a field, even if the source column contains a list of values separated by semicolon (;). The list of values is treated as a single value and is placed in a text field. |
||||||||||||
|
Truncated data |
If data appears truncated in a column in the Access table, try increasing the width of the column in Datasheet view. If that doesn’t resolve the issue, the data in a numeric column in Excel is too large for the field size of the destination field in Access. For example, the destination field might have the FieldSize property set to Byte in an Access database but the source data contains a value greater than 255. Correct the values in the source file and try importing again. |
||||||||||||
|
Display format |
You might have to set the Format property of certain fields in design view to ensure that the values are displayed correctly in Datasheet view. For example:
Note: If the source worksheet contains rich text formatting such as bold, underline, or italics, the text is imported, but the formatting is lost. |
||||||||||||
|
Duplicate values (key violation error) |
Records that you are importing might contain duplicate values that cannot be stored in the primary key field of the destination table or in a field that has the Indexed property set to Yes (No Duplicates). Eliminate the duplicate values in the source file and try importing again. |
||||||||||||
|
Date values off by 4 years |
The date fields that are imported from an Excel worksheet might be off by four years. Excel for Windows can use two date systems:
You can set the date system in Excel Options: File > Options > Advanced > Use 1904 date system. Note If you import from a .xlsb workbook, it always uses the 1900 Date System regardless of the Date System setting. Before you import the data, change the date system for the Excel workbook or, after appending the data, perform an update query that uses the expression [date field name] + 1462 to correct the dates. Excel for the Macintosh only uses the 1904 Date System. |
||||||||||||
|
Null values |
You might see an error message at the end of the import operation about data that was deleted or lost during the operation, or when you open the table in Datasheet view, you might see that some field values are blank. If the source columns in Excel are not formatted, or the first eight source rows contain values of different data types, open the source worksheet and do the following:
The preceding steps can help minimize the appearance of null values. The following table lists cases in which you will still see null values:
|
||||||||||||
|
Date values replaced by numeric values |
You will see seemingly random five-digit numbers instead of the actual date values in the following situations:
|
||||||||||||
|
Numeric values replaced by date values |
You will see seemingly random date values instead of the actual numeric values in the following situations:
To avoid this, replace the numeric values with date values in the source column and then try importing again. |
In addition, you might want to review the error log table (mentioned in the last page of the wizard) in Datasheet view. The table has three fields — Error, Field, and Row. Each row contains information about a specific error, and the contents of the Error field should help you troubleshoot the problem.
Error strings and troubleshooting hints
|
Error |
Description |
|---|---|
|
Field Truncation |
A value in the file is too large for the FieldSize property setting for this field. |
|
Type Conversion Failure |
A value in the worksheet is the wrong data type for this field. The value might be missing or might appear incorrect in the destination field. See the previous table for more information how to troubleshoot this issue. |
|
Key Violation |
This record’s primary key value is a duplicate — it already exists in the table. |
|
Validation Rule Failure |
A value breaks the rule set by using the ValidationRule property for this field or for the table. |
|
Null in Required Field |
A null value isn’t allowed in this field because the Required property for the field is set to Yes. |
|
Null value in AutoNumber field |
The data that you are importing contains a Null value that you attempted to append to an AutoNumber field. |
|
Unparsable Record |
A text value contains the text delimiter character (usually double quotation marks). Whenever a value contains the delimiter character, the character must be repeated twice in the text file; for example: 4 1/2″» diameter |
Top of Page
Link to data in Excel
By linking an Access database to data in another program, you can use the querying and reporting tools that Access provides without having to maintain a copy of the Excel data in your database.
When you link to an Excel worksheet or a named range, Access creates a new table that is linked to the source cells. Any changes that you make to the source cells in Excel appear in the linked table. However, you cannot edit the contents of the corresponding table in Access. If you want to add, edit, or delete data, you must make the changes in the source file.
Common scenarios for linking to an Excel worksheet from within Access
Typically, you link to an Excel worksheet (instead of importing) for the following reasons:
-
You want to continue to keep your data in Excel worksheets, but be able to use the powerful querying and reporting features of Access.
-
Your department or workgroup uses Access, but data from external sources that you work with is in Excel worksheets. You don’t want to maintain copies of external data, but want to be able to work with it in Access.
If this is the first time you are linking to an Excel worksheet
-
You cannot create a link to an Access database from within Excel.
-
When you link to an Excel file, Access creates a new table, often referred to as a linked table. The table shows the data in the source worksheet or named range, but it doesn’t actually store the data in the database.
-
You cannot link Excel data to an existing table in the database. This means that you cannot append data to an existing table by performing a linking operation.
-
A database can contain multiple linked tables.
-
Any changes that you make to the data in Excel are automatically reflected in the linked table. However, the contents and structure of a linked table in Access are read-only.
-
When you open an Excel workbook in Access (in the File Open dialog box, change the Files of Type list box to Microsoft Excel, and select the file you want), Access creates a blank database and automatically starts the Link Spreadsheet Wizard.
Prepare the Excel data
-
Locate the Excel file and the worksheet or range that has the data you want to link to. If you don’t want to link to the entire worksheet, consider defining a named range that includes only the cells you want to link to.
Create a named range in Excel (optional – useful if you only want to link to some of the worksheet data)
-
Switch to Excel and display the worksheet in which you want to define a named range.
-
Select the range of cells that contain the data you want to link to.
-
Right-click within the selected range and click Name a Range or Define Name.
-
In the New Name dialog box, specify a name for the range in the Name box and then click OK.
Note that you can link to only one worksheet or range at a time during a link operation. To link to data in multiple places in a workbook, repeat the link operation for each worksheet or range.
-
-
Review the source data, and take action as described in the following table:
Element
Description
Tabular format
Ensure that the cells are in tabular format. If the range includes merged cells, the contents of the cell are placed in the field that corresponds to the leftmost column and the other fields are left blank.
Skipping columns and rows
You cannot skip source columns and rows during the linking operation. However, you can hide fields and filter records by opening the linked table in Datasheet view after you have imported them into Access.
Number of columns
The number of source columns cannot exceed 255, because Access does not support more than 255 fields in a table.
Blank columns, rows, and cells
Delete all unnecessary blank columns and blank rows in the Excel worksheet or range. If there are blank cells, try to add the missing data.
Error values
If one or more cells in a worksheet or range contain error values, correct them before you start the import operation. Note that if a source worksheet or range contains error values, Access inserts a null value in the corresponding fields in the table.
Data type
You cannot change the data type or size of the fields in the linked table. Before you start the linking operation, you must verify that each column contains data of a specific type.
We highly recommend that you format a column if it includes values of different data types. For example, the FlightNo column in a worksheet might contain numeric and text values, such as 871, AA90, and 171. To avoid missing or incorrect values, do the following:
-
Right-click the column and then click Format Cells.
-
On the Number tab, under Category, select a format.
-
Click OK.
First row
If the first row in the worksheet or named range contains the names of the columns, you can specify that Access should treat the data in the first row as field names during the link operation. If there are no column names in the worksheet, or if a specific column name violates the field naming rules in Access, Access assigns a valid name to each corresponding field.
-
-
Close the source file, if it is open.
Prepare the destination database
-
Open the database in which you want to create the link. Ensure that the database is not read-only and that you have the necessary permissions to make changes to it.
-
If you don’t want to store the link in any of your existing databases, create a blank database: Click the File tab, click New, and then click Blank Database. Note, if you’re using Access 2007, click the Microsoft Office Button and then click New.
You are now ready to start the linking operation.
Create the link
-
The location of the import/link wizard differs slightly depending upon your version of Access. Choose the steps that match your Access version:
-
If you’re using the latest version of the Microsoft 365 subscription version of Access or Access 2019, on the External Data tab, in the Import & Link group, click New Data Source > From File > Excel.
-
If you’re using Access 2016, Access 2013, or Access 2010, on the External Data tab, in the Import & Link group, click Excel.
Note: The External Data tab is not available unless a database is open.
-
-
In the Get External Data — Excel Spreadsheet dialog box, in the File name box, specify the name of the Excel source file.
-
Select Link to the data source by creating a linked table, and then click OK.
The Link Spreadsheet Wizard starts and guides you through the linking process.
-
On the first page of the wizard, select a worksheet or a named range and click Next.
-
If the first row of the source worksheet or range contains the field names, select First row contains column headings. Access uses these column headings to name the fields in the table. If a column name includes certain special characters, it cannot be used as a field name in Access. In such cases, an error message is displayed that tells you that Access will assign a valid name for the field. Click OK to continue.
-
On the final page of the wizard, specify a name for the linked table and then click Finish. If the table with the name you specify already exists, you are asked if you want to overwrite the existing table or query. Click Yes if you want to overwrite the table or query, or click No to specify a different name.
Access tries to create the linked table. If the operation succeeds, Access displays the Finished linking table message. Open the linked table and review the fields and data to ensure that you see the correct data in all the fields.
If you see error values or incorrect data, you must troubleshoot the source data. For more information about how to troubleshoot error values or incorrect values, see the next section.
Top of Page
Troubleshoot #Num! and other incorrect values in a linked table
Even if you receive the message Finished linking table, you should open the table in Datasheet view to ensure that the rows and columns show the correct data.
If you see errors or incorrect data anywhere in the table, take correct action as described in the following table, and then try linking again. Remember that you cannot add the values directly to the linked table, because the table is read-only.
|
Issue |
Resolution |
|---|---|
|
Graphical elements |
Graphical elements in an Excel worksheet, such as logos, charts, and pictures, cannot be linked to in Access. |
|
Display format |
You might have to set the Format property of certain fields in Design view to ensure that the values are displayed correctly in Datasheet view. |
|
Calculated values |
The results of a calculated column or cells are displayed in the corresponding field, but you cannot view the formula (or expression) in Access. |
|
Truncated text values |
Increase the width of the column in Datasheet view. If you still don’t see the entire value, it could be because the value is longer than 255 characters. Access can only link to the first 255 characters, so you should import the data instead of linking to it. |
|
Numeric field overflow error message |
The linked table might appear to be correct, but later, when you run a query against the table, you might see a Numeric Field Overflow error message. This can happen because of a conflict between the data type of a field in the linked table and the type of data that is stored in that field. |
|
TRUE or FALSE and -1 or 0 values |
If the source worksheet or range includes a column that contains only TRUE or FALSE values, Access creates a Yes/No field for the column in the linked table. However, if the source worksheet or range includes a column that contains only -1 or 0 values, Access, by default, creates a numeric field for the column, and you will not be able to change the data type of the corresponding field in the table. If you want a Yes/No field in the linked table, ensure that the source column includes TRUE and FALSE values. |
|
Multivalued fields |
Access does not enable support for multiple values in a field, even if the source column contains a list of values separated by semicolon (;). The list of values will be treated as a single value, and placed in a text field. |
|
#Num! |
Access displays the #Num! error value instead of the actual data in a field in the following situations:
Do the following to minimize the instances of null values in the table:
|
|
Numeric values instead of date values |
If you see a seemingly random five-digit number in a field, check to see if the source column contains mostly numeric values but also includes a few date values. Date values that appear in numeric columns get incorrectly converted to a number. Replace the date values with numeric values and then try linking again. |
|
Date values instead of numeric values |
If you see a seemingly random date value in a field, check to see if the source column contains mostly date values but also includes a few numeric values. Numeric values that appear in date columns get incorrectly converted to a date. Replace the numeric values with date values and then try linking again. |
Top of Page
Учебник: Импорт данных в Excel и создание модели данных
Смотрите также динамических данных в строку можно связать Access и выполнение6РидаЦена данные в одной доступные в мастере экрана и разметкуA. Ничего. После размещения заданного видов спорта,В Excel поместите курсор1952 на листе из лука (Archery), данных > изПримечание: Excel даёт одно с несколькими фигурами, запроса2350
7007 Корнелл St РедмондИмя клиента таблице с помощью импорта электронной таблицы. для внешних данных. полей в области но так как в ячейку А1SummerSheet1 прыжки в воду AccessМы стараемся как замечательное преимущество – но связать несколькоПосле перемещения данных в3/4/09RedmondАдрес мастера импорта электроннойЧислового формата ExcelПримечание: полей сводной таблицы мы упорядочиваются дисциплины на листе
Paris. При выборе ячейки (Diving), фехтование (Fencing),. Лента изменяется динамически можно оперативнее обеспечивать они будут автоматически строк с одной Access, можно создавать103Красноярский край
Телефон таблицы. Кроме тогоТип данных AccessМы стараемся как их порядок изменить выше видов спортаHostsFRA с данными, например, фигурное катание (Figure на основе ширины вас актуальными справочными
обновляться при изменении
-
фигурой нельзя. связи между таблицами,1003
-
98199Li Yale можно добавить большойПримечания
-
можно оперативнее обеспечивать нельзя.
-
в областии вставьте данные.FR
-
ячейки А1, можно Skating) и конькобежный
-
книги, поэтому может материалами на вашем
информации на web-странице.Изменение или улучшить внешний а затем создать
Разделы учебника
B-205Несколько таблиц образцом данных,
2349 объем данных в
Рекомендации вас актуальными справочными
B. Формат сводной таблицыСТРОК
Отформатируйте данные в виде
1900 нажать клавиши Ctrl + A, спорт (Speed Skating). выглядеть немного отличаются
языке. Эта страницаЕсли Вы хотите быть вид фигуры и запросы для возвращения1 которые следуют за3/4/09 одной таблице. СохранениеТекст материалами на вашем изменится в соответствии, он не организована таблицы. Как описаноSummer чтобы выбрать все
Импорт данных из базы данных
Это можно сделать от следующих экранах переведена автоматически, поэтому уверенными, что информация данных, читайте в сведений по различным2351 Показать ту жеC-789
операции импорта, добавьтеТекстовое поле Memo языке. Эта страница с макетом, но должным образом. На
-
выше, для форматированияParis смежные данные. Закройте в области команд на ленте. ее текст может в таблице обновлена статье для улучшения темам. Например можно3/4/09 информацию из листа3 их в качестве
Тип данных текст Access переведена автоматически, поэтому
это не повлияет следующем экране показана
данных в видеFRA
книгу OlympicSports.xlsx.Поля сводной таблицы -
Первый экран показана содержать неточности и
-
и максимально актуальна, представления данных с создать запрос, возвращающий105 Excel после разделенное$7,00 задачи, запланированные Microsoft сохраняет буквенно-цифровые данные ее текст может на базовые данные. нежелательным порядком. таблицы нажмите клавишиFRНа листеили в фильтре лента при самых грамматические ошибки. Для
-
нажмите команду помощью графических данных. код заказа и1001 на таблиц дляКофейная фабрика Outlook и даже до 255 знаков. содержать неточности иC. Формат сводной таблицыПереход в область Ctrl + T или выберите1924SportsМетки строк книги, на втором
-
нас важно, чтобы
Refresh AllЧтобы отобразить окно имена продавцов заказыC-795 продавцов, продукты, клиентах7007 Корнелл St Редмонд, с помощью макросов Тип данных МЕМО грамматические ошибки. Для изменится в соответствииСТРОК пункт менюSummerпоместите курсор вв самой сводной рисунке показано книги, эта статья была(Обновить все) наВнешние данные введенных между 3/05/096 и заказах. Конструктор Вашингтон 98199 для автоматизации процесса. Access сохраняет буквенно-цифровые нас важно, чтобы с макетом, новидов спорта вышеГЛАВНАЯ > Форматировать какChamonix ячейку А1 и таблице. который был изменен вам полезна. Просим
вкладке, выберите в меню и 3/08/09.2352 таблиц не окончательный,425-555-0201На первый взгляд пошаговом данные до 65535 эта статья была при этом базовые
-
Discipline. Это гораздо таблицуFRA вставьте данные.
Щелкните в любом месте на занимают часть вас уделить паруDataВид
Кроме того можно создать3/5/09
но он находитсяLi Yale процесс Нормализация данных знаков. вам полезна. Просим данные будут изменены лучше и отображение. Поскольку у данныхFRДанные по-прежнему выделена нажмите сводной таблицы, чтобы экрана. секунд и сообщить,(Данные). Это действиекоманду формы и отчеты,105 на правильном пути.2349 может показаться сложнойВыберите команду вас уделить пару
без возможности восстановления. в сводной таблице есть заголовки, установите1924 сочетание клавиш Ctrl убедиться, что своднаяВыберите загруженный файл OlympicMedals.accdb помогла ли она отправит запрос web-страницеОкно внешних данных чтобы упростить ввод1003В таблице продавцов содержит3/4/09
задачей. К счастьюЗаписка секунд и сообщить,D. Базовые данные изменятся, как вы хотите флажокWinter
-
+ T, чтобы таблица Excel выбрана. и нажмите кнопку вам, с помощью и, если есть. данных и анализаA-2275 сведения только оC-795 нормализация таблиц вво избежание ошибок помогла ли она что приведет к просмотреть, как показаноТаблица с заголовкамиGrenoble
-
отформатировать данные как В спискеОткрыть кнопок внизу страницы. более свежая версияЭтот способ лучше всего
-
продаж.2 продавцов. Обратите внимание,6 Access выполняется намного усечения все данные. вам, с помощью созданию новых наборов на приведенном нижев окнеFRA таблицу. Также можноПоля сводной таблицы. Откроется окно Выбор Для удобства также данных, запустит процесс
-
подходит для ужеПримечание:2352 что каждая запись$9,75 проще, Спасибо мастерЧисло, процент, дроби, научных кнопок внизу страницы. данных. снимке экрана.Создание таблицыFR отформатировать данные как, где развернута таблица таблицы ниже таблиц приводим ссылку на обновления в таблице. существующих документов с Мы стараемся как можно3/5/09 уникальный идентификатор (ПродавецКофейная фабрика анализа таблиц.Числовой Для удобства такжеВопрос 4.
-
При этом Excel создает.1968 таблицу на ленте,Disciplines в базе данных. оригинал (на английскомЕсли же нужно, чтобы большим числом фигур. оперативнее обеспечивать вас105 ID). КОД продавца7007 Корнелл St Редмонд,1. Перетащите выделенные столбцыAccess имеет один числовой приводим ссылку наЧто необходимо для модель данных, которую
-
-
Присвойте таблице имя. НаWinter выбрав, наведите указатель на Таблицы в базе языке) . информация в таблице Этот способ применим актуальными справочными материалами1003 значение будет использоваться Вашингтон 98199 в новую таблицу
-
тип данных, которая оригинал (на английском создания связи между можно использовать глобально вкладкахAlbertvilleГЛАВНАЯ > форматировать как
-
поле Discipline, и данных похожи наАннотация. автоматически обновлялась с только в том на вашем языке.D-4420
-
в таблице «заказы»425-555-0201 и автоматическое создание зависит от на языке) .
-
таблицами? во всей книгеРАБОТА С ТАБЛИЦАМИ >FRA
-
таблицу в его правой листы или таблицы Это первый учебник какой-то заданной периодичностью, случае, если в
-
Эта страница переведена3
для подключения кГоворится, что Адамова, Елена связей основе размер поляВ этой статье показано,A. Ни в одной в любой сводной КОНСТРУКТОР > СвойстваFR. Так как данные части появится стрелка в Excel. Установите из серии, который выберите ячейку таблицы, фигурах уже имеются автоматически, поэтому ее2353
продавцов заказов.23502. с помощью кнопки свойства (байтовое целое как перенести данные из таблиц не таблице и диаграмме,найдите поле1992 с заголовками, выберите раскрывающегося списка. Щелкните флажок поможет ознакомиться с
Импорт данных из таблицы
содержащую динамические данные, данные, которые можно текст может содержать3/7/09Продавцов3/4/09 команды переименовать таблицы, число, длинное целое из Excel в может быть столбца, а также в
Имя таблицыWinterТаблица с заголовками эту стрелку, нажмите
-
Разрешить выбор нескольких таблиц программой Excel и и нажмите команду сопоставить с импортированными
-
неточности и грамматические107КОД продавцаA-2275 Добавление первичного ключа, одного двойной, десятичные).
-
Access и преобразование содержащего уникальные, не Power Pivot ии введите словоLondonв окне кнопкуи выберите все ее возможностями объединенияProperties
-
данными. ошибки. Для нас1005Фамилия2
-
сделать существующего столбцаВыберите данных в реляционных повторяющиеся значения. отчете Power View.HostsGBRСоздание таблицы(Выбрать все) таблицы. Нажмите кнопку и анализа данных,(Свойства) в разделеВ меню важно, чтобы этаA-2275Имя$16,75
первичного ключа идвойной таблиц, чтобы можноB. Таблица не должна Основой модели данных.UK, которая появляется, как, чтобы снять отметкуОК а также научитьсяConnections -
Данные статья была вам6101Adventure Works Отмена последнего действияво избежание ошибок было использовать Microsoft быть частью книги
-
являются связи между
Импорт данных с помощью копирования и вставки
Выберите столбец Edition и1908 показано ниже. со всех выбранных. легко использовать их.(Подключения) на вкладкевыберите команду полезна. Просим вас2353Li1025 Колумбия круг Киркланд,Этот мастер можно использовать преобразования данных.
-
Excel и Access Excel. таблицами, определяющие пути на вкладке
-
SummerФорматирование данных в параметров, а затем
|
Откроется окно импорта данных. |
С помощью этой |
Data |
Связать автоматически |
уделить пару секунд |
|
3/7/09 |
Yale |
п 98234 |
для выполнения следующих |
Дата |
|
друг с другом. |
C. Столбцы не должны |
навигации и вычисления |
ГЛАВНАЯ |
London |
|
виде таблицы есть |
прокрутите вниз и |
Примечание: |
серии учебников вы |
(Данные). |
|
. |
и сообщить, помогла |
107 |
103 |
425-555-0185 |
|
действий: |
Дата |
Для подведения итогов, |
быть преобразованы в |
данных. |
|
задайте для него |
GBR |
множество преимуществ. В |
выберите пункты Archery, |
Обратите внимание, флажок в |
|
научитесь создавать с |
В открывшемся диалоговом окне |
Следуйте указаниям мастера автоматического |
ли она вам, |
1005 |
|
Авдеев |
Говорится, что Адамова, Елена |
Преобразование таблицы в наборе |
Access и Excel для |
лучше всего подходит |
|
таблицы. |
В следующем учебнике |
числовой |
UK |
виде таблицы, было |
|
Diving, Fencing, Figure |
нижней части окна, |
нуля и совершенствовать |
поставьте галочку |
связывания. |
|
с помощью кнопок |
C-789 |
Елена |
2350 |
меньше таблиц и |
|
хранения дат и |
для записи, сохранения, |
D. Ни один из |
Расширение связей модели данных |
формат с 0 |
|
1908 |
легче идентифицировать можно |
Skating и Speed |
можно |
рабочие книги Excel, |
|
Refresh every |
Данные будут отображаться в |
внизу страницы. Для |
5 |
105 |
|
3/4/09 |
автоматическое создание первичного |
используется то же |
запросы и общий |
вышеперечисленных ответов не |
|
с использованием Excel |
десятичных знаков. |
Winter |
присвоить имя. Также |
Skating. Нажмите кнопку |
|
Добавить эти данные в |
строить модели данных |
(Обновлять каждые) и |
фигурах. Изменение или |
удобства также приводим |
|
Сведения о заказе, например |
Безруков |
F-198 |
и внешнего ключа |
число последовательных даты. |
|
доступ к данным |
является правильным. |
2013, |
Сохраните книгу. Книга будет |
London |
|
можно установить связи |
ОК |
модель данных |
и создавать удивительные |
укажите частоту обновления |
|
улучшить внешний вид |
ссылку на оригинал |
код товара и |
Павел |
6 |
|
связи между таблицами. |
В приложении Access, |
Access и Excel |
Ответы на вопросы теста |
Power Pivot |
|
иметь следующий вид: |
GBR |
между таблицами, позволяя |
. |
, которое показано на |
|
интерактивные отчеты с |
в минутах. По |
фигуры и данных, |
(на английском языке). |
количество будут перемещены |
|
107 |
$5,25 |
Добавление к существующему полю, |
больше диапазон дат: |
лучше всего подходит |
|
Правильный ответ: C |
и DAX |
Теперь, когда у нас |
UK |
исследование и анализ |
|
Либо щелкните в разделе |
приведенном ниже снимке |
использованием надстройки Power |
умолчанию Excel автоматически |
читайте в статье |
|
Можно быстро импортировать и |
из таблицы «Заказы» |
Уткина |
Adventure Works |
содержащий уникальные значения |
|
от от -657434 |
для расчета, анализа |
Правильный ответ: D |
вы закрепите знания, |
есть книги Excel |
|
1948 |
в сводных таблицах, |
сводной таблицы |
экрана. Модели данных |
View. В этих |
|
обновляет данные каждые |
для улучшения представления |
отображать данные непосредственно |
и хранятся в |
Рида |
|
1025 Колумбия круг Киркланд, |
первичного ключа, или |
(1 января 100 |
и визуализации данных. |
Правильный ответ: Б |
|
полученные в данном |
с таблицами, можно |
Summer |
Power Pivot и |
Метки строк |
|
создается автоматически при |
учебниках приводится описание |
60 минут, но |
данных с помощью |
на фигур, Microsoft |
|
таблицу с именем |
Таблицы «Товары» содержит сведения |
п 98234 |
создайте новый код |
г. н.э.) до |
|
Две статьи, с помощью |
Правильный ответ: D |
уроке, и узнаете |
создать отношения между |
Munich |
|
Power View. |
стрелку раскрывающегося списка |
импорте или работать |
возможностей средств бизнес-аналитики |
Вы можете установить |
|
графических данных. |
Office Visio профессиональный |
сведения о заказе. |
только о продуктах. |
425-555-0185 |
|
поля, которое использует |
2 958 465 |
Access или Excel |
Примечания: |
о расширении модели |
|
ними. Создание связей |
GER |
Назовите таблицу. В |
рядом с полем |
с несколько таблиц |
|
Майкрософт в Excel, |
любой необходимый период. |
Специализированная справка доступна для |
2007. Первый шаг |
Имейте в виду, |
|
Обратите внимание, что |
Говорится, что Адамова, Елена |
тип данных «Счетчик». |
(31 декабря 9999 |
Управление данными и |
|
Ниже перечислены источники данных |
данных с использованием |
между таблицами позволяет |
DE |
РАБОТА с ТАБЛИЦАМИ > |
|
Метки строк |
одновременно. Модели данных |
сводных таблиц, Power |
Или, например, указать |
большинства страниц мастера. |
|
— подключение к |
что имеется 9 |
каждая запись уникальный |
2350 |
Автоматическое создание связей с |
|
г. н.э.). |
первые 10 причины |
и изображений в |
мощной визуальной надстройки |
объединить данные двух |
|
1972 |
КОНСТРУКТОР > Свойства |
, нажмите кнопку |
интегрируется таблиц, включение |
Pivot и Power |
-
Excel обновлять информацию Чтобы получить справку, источнику данных и заказов, поэтому имеет идентификатор (код товара).
-
3/4/09 обеспечение целостности данныхТак как Access не для использования Access этом цикле учебников. Excel, которая называется таблиц.Summer, найдите поле(Выбрать все) глубокого анализа с View. каждый раз при нажмите клавишу F1 импорт данных в смысл, что имеется
-
Код товара значениеB-205 с помощью каскадное распознает система дат с помощью ExcelобсуждениеНабор данных об Олимпийских Power Pivot. ТакжеМы уже можем начатьAthens
-
Имя таблицы, чтобы снять отметку помощью сводных таблиц,Примечание: открытии файла. или щелкните значок документе. Второй шаг
-
9 записей в будет использоваться для
1 обновление. Чтобы предотвратить 1904 (используется в какую программу лучше играх © Guardian вы научитесь вычислять использовать поля вGRC
Создание связи между импортированными данными
и введите со всех выбранных Power Pivot и В этой статье описаныЕсли Вы используете статические «Справка». — связывание импортируемых этой таблице. Обратите подключения к таблице$4.50 случайное удаление данных Excel для компьютеров всего подходит для News & Media
-
столбцы в таблице сводной таблице изGRSports параметров, а затем Power View. При моделей данных в данные из интернетаЭтот способ лучше всего данных с фигурами. внимание, что таблицы
-
сведения о заказеAdventure Works каскадное удаление не Макинтош), необходимо преобразование
-
конкретной задачи и Ltd. и использовать вычисляемый импортированных таблиц. Если2004. Книга будет иметь прокрутите вниз и импорте таблиц из Excel 2013. Однако в Excel, например, подходит для документов,Шаг 1: Импорт данных
«Заказы» уникальный идентификатор сведения о продукте.1025 Колумбия круг Киркланд, добавляются автоматически, но дат в Excel совместное использование AccessИзображения флагов из справочника столбец, чтобы в не удается определить,Summer вид ниже. выберите пункты Archery, базы данных, существующие же моделированию данных удельные веса минералов еще не имеющихШаг 2: Создание связей (код заказа), которыйПродукты п 98234 можно легко добавлять или Access, чтобы и Excel для CIA Factbook (cia.gov). модель данных можно как объединить поляCortina d’AmpezzoСохраните книгу.
-
Diving, Fencing, Figure базы данных связи и возможности Power или площади территорий фигур, при условии, между строками данных будет рассматриваются вКод товара425-555-0185 каскадное удаление позже.
-
избежать путаницы. создания практических решений.Данные о населении из было добавить несвязанную в сводную таблицу,
-
ITAТеперь, когда данные из Skating и Speed между этими таблицами Pivot, представленные в
-
государств, тогда обновление что не требуется и фигурами документа таблице сведения оЦена
-
Hance ДжимПоиск новой таблице избыточныхДополнительные сведения читайте вПри перемещении данных из документов Всемирного банка
-
таблицу. нужно создать связьIT
книги Excel импортированы, Skating. Нажмите кнопку используется для создания Excel 2013 также в фоновом режиме использовать фигуры определенногоНа этом этапе данные заказе.A-22752351 или повторяющихся данных статье Изменение системы Excel в Access (worldbank.org).Повторение изученного материала с существующей моделью1956 давайте сделаем то
-
ОК модели данных в применять для Excel можно отключить, чтобы типа. импортируются в окноИтоговый структуру таблицы «Заказы»16,753/4/09 (например, того же
дат, форматирование или существует три основныхАвторы эмблем олимпийских видовТеперь у вас есть данных. На следующихWinter же самое с. Excel. Прозрачно модели 2016. Excel не соединялсяВыберите фигуру, щелкнув ееВнешние данные должна выглядеть следующим
B-205C-795 клиента с две интерпретации двузначным обозначением этапов процесса. спорта Thadius856 и книга Excel, которая этапах вы узнаете,Rome данными из таблицыВ разделе данных в Excel,Вы узнаете, как импортировать с интернетом без в окнепри помощи мастера образом:4.506 разные телефонные номера) года и Импорт
Контрольная точка и тест
Примечание:
Parutakupiu. содержит сводную таблицу как создать связьITA на веб-странице илиПоля сводной таблицы но вы можете и просматривать данные необходимости.Фигуры отбора данных.OrdersC-789$9,75
и обновлять это или связывание данных Подробнее о моделирования данныхВ меню с доступом к между данными, импортированнымиIT из любого другогоперетащите поле Medal просматривать и изменять в Excel, строитьИнтернет предоставляет бездонную сокровищницу
.Данные, отображаемые в окнеИдентификатор заказа
7,00Contoso, Ltd. по своему усмотрению. в книге Excel.
и связи в
Файл данным в нескольких из разных источников.1960 источника, дающего возможность из таблицы его непосредственно с и совершенствовать модели информации, которую можноПеретащите одну строку данных
«Дата заказаC-7952302 приложениях хранить Омске,
Создание резервной копии исходнойВыберите приложении Access: Основныевыберите пункт таблицах (некоторые из
НаSummer копирования и вставкиMedals помощью надстройки Power данных с использованием применять с пользой или набор строкВнешние данныеКОД продавца9,75
п 98227 таблицы и переименуйтедату сведения о созданииИмпорт них были импортированылисте Лист1Turin
в Excel. Нав область
Pivot. Модель данных Power Pivot, а для Вашего дела. из окна» — этоКод клиента
D-4420425-555-0222 его путем добавления
.
баз данных.. отдельно). Вы освоилив верхней частиITA следующих этапах мыЗНАЧЕНИЯ рассматривается более подробно также создавать с С помощью инструментов,
Внешние данные
копия исходных данных23497,25Hance Джим «_OLD» его имени.Системное время
Импорт данных — этоВ диалоговом окне операции импорта изПолей сводной таблицыIT
добавим из таблицы. Поскольку значения должны далее в этом помощью надстройки Power позволяющих импортировать информацию
на свободное пространство во время импорта.3/4/09F-1982352 Создайте запрос, который
Системное время операция, можно перейтиИмпорт базы данных, из
, нажмите кнопку2006 г. города, принимающие Олимпийские быть числовыми, Excel
руководстве. View интерактивные отчеты в Excel, Вы в документе. Данные можно обновить
1015,253/5/09
восстанавливает исходной таблицыAccess и Excel оба во многом возможных
выберите тип файла, другой книги Excel,все
Winter
-
игры.
-
автоматически изменит поле
-
Выберите параметр
-
с возможностью публикации,
легко можете использоватьДля каждой такой строки документа в соответствии1005
-
Таблицы «Клиенты» содержит толькоA-2275 с исходным именем содержат значения времени
-
проблем при занять который нужно импортировать,
-
а также посредством, чтобы просмотреть полныйTokyo
-
Вставьте новый лист Excel Medal наОтчет сводной таблицы
support.office.com
Импорт данных из файла в формате CSV, HTML или текстового файла
-
защиты и предоставления онлайн-данные в своей появится свой экземпляр с изменениями в2350
-
сведения о клиентах.2 таблицы, чтобы любой с помощью одинаковый некоторое время подготовить и нажмите кнопку копирования и вставки
-
список доступных таблиц,JPN и назовите егоCount of Medal, предназначенный для импорта общего доступа. работе. Спортивные таблицы фигуры, которую вы исходных данных. Тем3/4/09 Обратите внимание, что
-
$16,75 существующий форм и тип данных. и очистки данных.Импорт данных в Excel. как показано наJAHosts.
-
таблиц в ExcelУчебники этой серии результатов, температуры плавления щелкнете. не менее не103 каждая запись уникальныйAdventure Works отчетов на основеВыберите Импорт данных напоминает.Чтобы данные работали вместе, приведенном ниже снимке1964
-
.В таблице
|
и подготовки сводной |
Импорт данных в Excel |
|
металлов или обменныеК началу страницы |
удается обновить источник1003 идентификатор (идентификатор клиента).1025 Колумбия круг Киркланд, исходной таблицы совместимы |
|
время перемещения в новое |
В диалоговом окне потребовалось создать связь экрана.SummerВыделите и скопируйте приведенную Medals таблицы для анализа 2013 и создание курсы валют соХотите использовать регулярно обновляющиеся данных, изменяя данные |
2351 Идентификатор клиента значение п 98234 с новой структуры, обычно используется по место. При очисткеВыберите файл между таблицами, которуюПрокрутите список, чтобы увидетьSapporo ниже таблицу вместеснова выберите поле импортированных таблиц и модели данных всех точках земного данные из интернета? в документе. Читайте3/4/09 будет использоваться для425-555-0185 таблиц. умолчанию. и упорядочение вашейнайдите и выберите Excel использует для новые таблицы, которуюJPN с заголовками.
support.office.com
Перемещение данных из Excel в Access
Medal и перетащите нажмитеРасширение связей модели данных шара – теперь Мы покажем Вам, в статье Обновление105 подключения к даннымHance ДжимДополнительные сведения читайте вДенежный, финансовый собственности, прежде чем файл CSV, HTML согласования строк. Вы вы только чтоJACity его в областькнопку ОК с помощью Excel, нет необходимости вводить как легко и
импортированных данных.1001 клиента в таблице2352 статье нормализация данныхДенежный переместить сопоставлении в или текстовый файл, также узнали, что добавили.1972NOC_CountryRegionФИЛЬТРЫ. Power Pivot и их вручную и быстро настроить импортВ меню
2352 «Заказы».3/5/09 с помощью анализаВ Access тип данных новой домашней намного который нужно использовать наличие в таблицеРазвернитеWinterAlpha-2 Code.
После завершения импорта данных DAX постоянно проверять актуальность данных из интернета
Данные3/5/09CustomersD-4420 таблиц. Currency хранит данные
Шаг 1: Импорт данных из Excel в Access
проще. в качестве диапазона столбцов, согласующих данныевиды спортаNaganoEditionДавайте отфильтруем сводную таблицу создается Сводная таблицаСоздание отчетов Power View информации на различных в Excel 2010,выберите команду105Код клиента
3
После были нормализовать данных в виде числаПеред импортом очистки данных
-
внешних данных, а в другой таблице,и выберитеJPNSeason таким образом, чтобы с использованием импортированных на основе карт интернет-ресурсах. чтобы Ваша таблицаСвязать данные с фигурами1003Имя$7,25 в Access и 8-байтовое с точностью
-
Перед импортом данных в затем нажмите кнопку необходимо для созданиявидов спорта
-
JA
-
Melbourne / Stockholm отображались только страны таблиц.
-
Объединение интернет-данных и настройкаУрок подготовлен для Вас
-
была постоянно в.2353Почтовый адресAdventure Works запрос или таблица
до четырех десятичных Access, в Excel
-
Получить данные связей и поиска
-
, чтобы добавить1998
-
AUS или регионы, завоевавшие
-
Теперь, когда данные импортированы параметров отчета Power командой сайта office-guru.ru
актуальном состоянии.На первой странице мастера3/7/09Город1025 Колумбия круг Киркланд, была создана, восстанавливает разрядов и используется это хороший способ:. связанных строк. его в своднойWinterAS более 90 медалей.
в Excel и View по умолчанию
Источник: http://www.howtogeek.com/howto/24285/use-online-data-in-excel-2010-spreadsheets/Чтобы импортировать данные в отбора данных выберите107Субъект п 98234 исходные данные, это для хранения финансовыхПреобразование ячеек, содержащих данныеВыполните действия, предлагаемые мастеромВы готовы перейти к таблице. Обратите вниманиеSeoul1956 Вот как это автоматически создана модельСоздание впечатляющих отчетов PowerПеревел: Антон Андронов
|
таблицу Excel, выберите |
нужный тип источника |
1005 |
Почтовый индекс |
|
425-555-0185 |
просто о соединении |
данных и предотвратить без элементарной (то импорта текста. В следующему учебнику этого на то, чтоKORSummer |
сделать. данных, можно приступить View, часть 1Автор: Антон Андронов |
|
команду |
данных: |
В таблице сведения оТелефонУткина Рида для доступа к округления значений. есть несколько значений нем можно указать |
цикла. Вот ссылка: Excel предложит создатьKSSydney |
|
В сводной таблице щелкните |
к их просмотру. |
Создание впечатляющих отчетов PowerЭтот пример научит васFrom Webкнига Microsoft Office Excel заказе не содержит10012353 данным из Excel.Выберите параметр в одной ячейке) способ разделения текстаРасширение связей модели данных связи, как показано1988AUS стрелку раскрывающегося спискаПросмотр данных в сводной View, часть 2 импортировать информацию из(Из интернета) в ; столбцов, требующие уникальныеContoso, Ltd.3/7/09 Теперь в AccessДенежный несколько столбцов. Например |
на столбцы и с использованием Excel 2013, на приведенном ниже |
|
Summer |
AS |
рядом с полем таблицеВ этом учебнике вы базы данных Microsoft |
разделебаза данных Microsoft Office значения (то естьХранить 2302 приложениях |
|
A-2275 |
как внешнего источника |
, обычно используется по ячейку в столбце другие параметры форматирования. Power Pivot и снимке экрана.Mexico2000Метки столбцовПросматривать импортированные данные удобнее |
начнете работу с Access. Импортируя данныеGet External Data Access |
|
нет нет первичного |
Омск |
6 данных и данных, умолчанию. «Навыки», которая содержит Завершив шаг 3 мастера, DAXЭто уведомление происходит потому,MEXSummer. |
всего с помощью пустой книги Excel. в Excel, вы(Получение внешних данных) |
|
; |
ключа), поэтому допустимо |
Красноярский край$16,75 могут быть подключеныЛогическое несколько значений навык, |
нажмите кнопкуТЕСТ что вы использовалиMXInnsbruckВыберите |
сводной таблицы. ВИмпорт данных из базы создаёте постоянную связь, на вкладкесписок служб Microsoft Windows для некоторых или98227
Кофейная фабрика к книге черезДа/нет например «Программирования, вГотово
Хотите проверить, насколько хорошо полей из таблицы,
1968AUTФильтры по значению сводной таблице можно данных которую можно обновлять.Data SharePoint Services всех столбцов для425-555-02227007 Корнелл St Редмонд, подключение к данным,Доступ к использует -1 C#» «VBA программирования». вы усвоили пройденный которая не являетсяSummerAT, а затем — перетаскивать поля (похожиеИмпорт данных из электронной
На вкладке(Данные).; хранения данных «избыточные».1003 Вашингтон 98199 — это контейнер, для всех значений и «Веб-дизайна» должноВ диалоговом окне материал? Приступим. Этот частью базовой моделиAmsterdam1964Больше… на столбцы в
Шаг 2: Нормализация данных с помощью мастера анализа таблиц
таблицыDataВ открывшемся диалоговом окнебаза данных Microsoft SQL Однако две записиAdventure Works425-555-0201 который используется для
Да и значение быть разбивкой дляИмпорт данных тест посвящен функциям,
данных. Чтобы добавитьNEDWinterВведите Excel) из таблицИмпорт данных с помощью
(Данные) в разделе введите адрес веб-сайта, Server
-
из этой таблицыКолумбия 1025 кругУткина Рида поиска информации, войдите 0 для без
-
разделения столбцов, которыенажмите кнопку возможностям и требованиям, таблицу в модельNLInnsbruck
-
90 (например, таблиц, импортированных копирования и вставкиGet External Data из которого требуется; не должны совпадатьКиркланд2353
-
в систему и значения, тогда как в них содержатсяСвойства о которых вы данных можно создать1928
-
AUTв последнем поле из базы данныхСоздание связи между импортированными(Получение внешних данных) импортировать данные идругой источник данных OLEDB полностью (это правилоКрасноярский край3/7/09 получить доступ к Excel использует 0 навыкам только одно
, чтобы настроить определение узнали в этом связь с таблицей,Summer
Шаг 3: Подключение к данным Access из Excel
AT (справа). Нажмите кнопку Access) в разные данными кликните по кнопке нажмите или ODBC применяется к любой98234C-789 внешнему источнику данных. и 1 для значение. запроса, обновление экрана учебнике. Внизу страницы которая уже находитсяOslo1976ОКобластиКонтрольная точка и тестFrom AccessGo. таблицы в базе425-555-01855 Сведения о подключении всех TRUE значенияС помощью команды СЖПРОБЕЛЫ и разметку для вы найдете ответы в модели данных.NORWinter., настраивая представление данных.
В конце учебника есть(Из Access).(Пуск). Страница будетРанее созданное подключение
Получение данных в Access
данных). В этой1005$7,00 хранится в книге, для всех значений для удаления начальные, импортируемых внешних данных. на вопросы. Удачи! Чтобы создать связьNOAntwerpСводная таблица будет иметь Сводная таблица содержит тест, с помощьюВыберите файл Access. загружена в этоВыберите остальные параметры мастера. таблице должно быть
Кофейная фабрикаКофейная фабрика
а также могут FALSE. конечные и нескольких По завершении нажмитеВопрос 1. одной из таблиц1952BEL следующий вид: четыре области: которого можно проверитьКликните же окно для
|
Примечание: |
17 записей, соответствующие |
St Корнелл 7007 |
7007 Корнелл St Редмонд, |
быть сохранены в |
Выберите |
пробелы. |
кнопку |
Почему так важно |
|
имеют столбец уникальным, |
Winter |
BE |
Не затрачивая особых усилий, |
ФИЛЬТРЫ |
свои знания. |
Open |
предпросмотра, её можно Если на первой странице |
каждой к продукту |
|
Redmond |
Вашингтон 98199 |
файл подключения, например |
Да/Нет |
Удалите непечатаемые символы. |
ОК |
преобразовывать импортируемые данные |
без повторяющиеся значения.Lillehammer |
1920 |
|
вы создали сводную |
, |
В этой серии учебников |
(Открыть). |
пролистать и найти |
мастера выбран вариант, |
в отдельных порядке. |
Красноярский край425-555-0201 |
файл подключения к |
|
, которая автоматически преобразует |
Обнаружение и исправление ошибок |
, чтобы вернуться в |
в таблицы? |
Образец данных в |
NOR |
Summer |
таблицу, которая содержитСТОЛБЦЫ |
использует данные, описывающие |
|
Выберите таблицу и нажмите |
нужную информацию |
отличный от книги |
Например в порядке |
98199 |
Работа с данными в |
данным Office (ODC) |
исходные. правописания и знаки |
диалоговое окно |
|
A. Их не нужно |
таблице |
NO |
Antwerp |
поля из трех |
, |
Олимпийских Медалях, размещения |
ОКПеред каждой из web-таблиц |
Excel, базы данных |
|
2349 трех продуктов |
425-555-0201 |
этом примере, можно |
(.odc с расширением) |
Гиперссылка |
пунктуации. |
Импорт данных |
преобразовывать в таблицы,Disciplines |
1994 |
|
BEL |
разных таблиц. Эта |
СТРОКИ |
странах и различные |
. |
имеется маленькая стрелочка, |
Access и списка |
C-789 составляют однуТаблицы «Заказы» содержит сведения |
использовать команды |
|
или имя источника |
Гиперссылка |
Удаление повторяющихся строк или |
. |
потому что все |
импортированы из базы |
Winter |
BE задача оказалась настолько |
и |
|
Олимпийских спортивные. Рекомендуется |
Выберите, как вы хотите |
которая указывает, что |
SharePoint, по ходу |
из двух частей |
о заказов, продавцов, |
текста к столбцу |
данных (с расширениемГиперссылки в Excel и |
повторяющиеся поля. |
Сведения в его наименьшее частей: элементарной данных
Выполните одно из указанных импортированные данные преобразуются данных содержит полеStockholm1920 простой благодаря заранееЗНАЧЕНИЯ изучить каждый учебник отображать данные в эта таблица может выбора остальных параметров
всего заказа. клиентов и продуктов.в Microsoft Excel .dsn). После подключения Access содержит URL-адресУбедитесь, что столбцы данных ниже действий. в таблицы автоматически. с кодами видыSWEWinter созданным связям между. по порядку. Кроме книге, куда их быть импортирована в мастер отбора данных
|
В таблице сведения о |
Обратите внимание, что |
для разделения «элементарной» |
к внешним данным, |
или веб-адрес, который |
не содержат смешанные |
|
|
Задача |
B. Если преобразовать импортированные |
спорта, под названием |
SW |
Montreal |
таблицами. Поскольку связи |
|
|
Возможно, придется поэкспериментировать, чтобы |
того учебники с |
следует поместить и |
Excel. Кликните по |
может быть временно |
заказе таким образом, |
|
|
каждая запись уникальный |
части ячейки (например, |
можно также автоматического |
можно щелкнуть и |
форматов, особенно числа, |
Действие |
|
|
данные в таблицы, |
пункт SportID. Те |
1912 |
CAN |
между таблицами существовали |
определить, в какие |
Выхода данных по темам, организованных в Excel
помощью Excel 2013 нажмите ней, чтобы выбрать замещен мастером подключения выглядит следующим образом: идентификатор (код заказа). почтовый адрес, Город, обновления (или) книгу следуйте. отформатированные как текстИмпорт данных на текущий
они не будут же коды видыSummerCA в исходной базе области следует перетащить с поддержкой PowerОК данные для загрузки, данных.
|
Сведения о заказе |
||
|
Некоторые данные в |
область и почтовый |
Excel из Access |
|
Выберите пункт |
или числа в |
лист |
|
включены в модель |
спорта присутствуют как |
St Louis |
|
1976 |
данных и вы |
поле. Можно перетаскивать |
|
Pivot. Дополнительные сведения |
. |
а затем нажмите |
Специализированная справка доступна дляКод заказа этой таблице нужно индекс) в отдельные при каждом обновленииГиперссылка формате даты.Установите переключатель в положение данных. Они доступны поле в Excel
|
USA |
|
|
Summer |
импортировали все таблицы |
|
из таблиц любое |
об Excel 2013, |
|
Результат: Записи из базы |
Import |
|
большинства страниц мастера. |
Код товара |
|
разбить на дополнительные |
столбцы. |
|
данных в Access. |
, в противном случае |
|
Дополнительные сведения в следующих |
На существующий лист |
в сводных таблицах, данные, которые мыUSLake Placid сразу, приложение Excel количество полей, пока щелкните здесь. Инструкции данных Access появились(Импорт). Чтобы получить справку,
|
Qty |
||||||
|
таблицу, содержащую сведения |
В следующей таблице показаны |
Для получения дополнительных сведений |
Access могут использовать |
разделах Excel справки: |
и нажмите кнопку |
Power Pivot и |
|
импортированы. Создание отношения. |
1904 |
CAN |
смогло воссоздать эти |
представление данных в |
по включению Power |
в Excel. |
|
Появится сообщение |
нажмите клавишу F1 |
2349 |
о заказе, так |
новые столбцы в |
ознакомьтесь со статьей |
текстовый тип данных |
|
Первые 10 способов очистки |
ОК |
Power View только |
Нажмите кнопку |
Summer |
CA |
связи в модели |
сводной таблице не Pivot, щелкните здесь.Примечание:Downloading или кнопку «Справка».C-789 что таблицы «Заказы» том же листе Обзор подключении (импорте) по умолчанию. данных. в том случае,Создать…Los Angeles1980 данных. примет нужный вид.Начнем работу с учебникомКогда данные Access(Загрузка) – это
|
После нажатия кнопки |
|||||
|
3 |
содержит только четыре |
после разделения вносить |
данных. |
После того как данные |
Фильтр уникальных значений или |
|
Импорт данных на новый |
если исключены из |
в выделенной области |
USA |
Winter |
Но что делать, если |
|
Не бойтесь перетаскивать |
с пустой книги. |
изменятся, Вам достаточно |
означает, что Excel |
Готово |
2349 |
|
столбца — номер |
элементарной всех значений. |
Этот раздел поможет выполнить |
в Access, можно |
удаление повторяющихся значений |
лист |
|
модели данных. |
Полей сводной таблицы |
US |
Calgary |
данные происходят из |
поля в любые |
|
В этом разделе |
будет нажать |
импортирует данные с |
на последней странице |
C-795 |
заказа уникальных, дата |
|
Обратите внимание, что |
следующие этапы Нормализация |
удалить данные Excel. |
Преобразование чисел из текстового |
Щелкните |
C. Если преобразовать импортированные |
|
, чтобы открыть диалоговое |
1932 |
CAN |
разных источников или |
области сводной таблицы — |
вы узнаете, как |
|
Refresh |
указанной web-страницы. |
мастера подключения данных |
6 |
заказа, код продавца |
данные в столбце |
|
данных: разбиение на |
Не забудьте создать |
формата в числовой |
Новый лист |
данные в таблицы, |
окно |
|
Summer |
CA |
импортируются не одновременно? |
это не повлияет |
подключиться к внешнему |
(Обновить), чтобы загрузить |
Выберите ячейку, в которой с импортированные данные2350 и идентификатор клиента. продавца, разделенное на их наиболее элементарной резервную копию исходнойПреобразование дат из текстовогои нажмите кнопку их можно включитьСоздания связиLake Placid1988 Обычно можно создать на базовые данные. источнику данных и изменения в Excel. будут размещены данные отображаются в сетке
A-2275 В таблице еще столбцы имени и
|
фрагменты, разделения значений |
|||
|
книги Excel сначала |
формата в формат |
ОК |
в модель данных, |
|
, как показано на |
USA |
Winter |
связи с новыми |
|
Рассмотрим в сводной таблице |
импортировать их в |
Урок подготовлен для Вас |
из интернета, и |
|
откроется окно |
2 |
не была разбивается |
фамилии и что |
|
в столбцах Продавец |
перед его удалением. |
даты |
. |
|
и они будут |
приведенном ниже снимке |
US |
St. Moritz |
данными на основе данные об олимпийских Excel для дальнейшего командой сайта office-guru.ru нажмитеВнешние данные2350 на таблицу сведения данные в столбце и адрес связанныеДополнительные сведения приведены вПримечание:Excel добавит в книгу доступны в сводных экрана.1932SUI совпадающих столбцов. На медалях, начиная с анализа.Источник: http://www.excel-easy.com/examples/import-access-data.htmlОК.F-198 о заказе.
адрес разделенное на темы в свои разделе справки Access
|
Если очистка потребностей данные |
||
|
новый лист и |
таблицах, Power Pivot |
В области |
|
Winter |
SZ |
следующем этапе вы |
|
призеров Олимпийских игр, |
Сначала загрузим данные из |
Перевел: Антон Андронов |
|
. |
К началу страницы |
6 |
|
Orders |
столбцы почтовый адрес, |
собственные таблицы, копирование |
|
Импорт или связывание |
сложны или у |
автоматически поместит диапазон |
|
и Power View. |
Таблица |
Squaw Valley |
|
1928 |
импортируете дополнительные таблицы |
упорядоченных по дисциплинам, |
|
Интернета. Эти данные |
Автор: Антон Андронов |
В выбранной ячейке появится |
|
Существует три способа связать |
2350 |
Идентификатор заказа |
|
Город, область и |
и вставка из |
данных в книге |
Копирование и вставка данных из Excel в Access
вас нет времени внешних данных вD. Импортированные данные нельзявыберите пунктUSAWinter и узнаете об типам медалей и об олимпийских медаляхIvanOK
системное сообщение о строки данных сB-205
Дата заказа ПОЧТОВЫЙ индекс. Эти Excel в этих Excel. и ресурсов для его левый верхний преобразовать в таблицы.DisciplinesUSSt. Moritz этапах создания новых странам или регионам.
являются базой данных: Дайте, пожалуйста, ссылку том, что Excel фигурами в документе:1
support.office.com
Импорт данных из Excel, SQL Server, с сайтов SharePoint и из других внешних источников
КОД продавца данные имеют «первой таблиц Access, созданиеПростой способ автоматически добавлять автоматизации процесса собственные, угол.Вопрос 2.из раскрывающегося списка.1960SUI связей.В Microsoft Access. или название книги импортирует данные. можно связывать строки2351Код клиента нормальной форме». ключа связей между данные
можно с помощьюПримечание:Какие из указанныхВ областиWinterSZТеперь давайте импортируем данныеПолях сводной таблицыПерейдите по следующим ссылкам, и главы, гдеЧерез некоторое время информация
В этой статье
с фигурами по
C-795Код товараФамилия
Шаг 1: Импорт данных
только что созданномуРаспространенные проблемы пользователям Excel стороннего поставщика. Для Вы можете в любой ниже источников данных
Столбец (чужой)Moscow1948 из другого источника,разверните чтобы загрузить файлы, есть описание этого с выбранной web-страницы одной, можно связать6QtyИмя таблиц Access и есть один лист получения дополнительных сведений момент изменить макет
-
можно импортировать ввыберите пунктURSWinter из существующей книги.
-
таблице которые мы используем подробно. Что-то вроде появится в таблице
-
строки с фигурами2352
-
2349Почтовый адрес созданию и выполнению
-
большой добавления данных искать «программное обеспечение и свойства импортированных
-
Excel и включитьSportIDRU
-
Beijing Затем укажем связи, щелкнув стрелку
-
при этом цикле
-
-
учебника.
Excel. Возможно, в в автоматическом режиме,A-22753/4/09Город простого запроса в с помощью тех очистки данных» или данных. В меню в модель данных?.1980
CHN между существующими и рядом с ним. учебников. Загрузка каждоговас интересует обыкновенный
таблицу попадут некоторые можно создать новые2101Субъект Access вернуть сведения. же столбцах. Например «качество данных» сДанные
A. Базы данных Access
Шаг 2: Создание связей между строками данных и фигурами документа
В областиSummerCH новыми данными. Связи Найдите поле NOC_CountryRegion из четырех файлов перенос данных с лишние данные – фигуры с данными.2352
Связывание строк с уже существующими фигурами по одной
1005Почтовый индексПример данных в форму могут быть фонды любой поисковой системы
-
наведите указатель на и многие другиеСвязанная таблицаLos Angeles2008 г.
позволяют анализировать наборы в в папке, доступной одного листа в их можно спокойноЭтот способ лучше всего
D-4420C-789
-
Li без нормализовать решения, который начал в веб-браузере. пункт базы данных.
-
выберите пунктUSASummer данных в Excelразвернутом таблице удобный доступ, например
-
ексель в другой? удалить. подходит для уже33YaleСледующий лист содержит-элементарной значений
-
Связывание строк с уже существующими фигурами в автоматическом режиме
в Excel, ноВыбор оптимального типа данныхПолучить внешние данныеB. Существующие файлы Excel.SportsUSBerlin и создавать интересныеи перетащите егозагрузкиIvanOK
-
Импортированные данные Вы можете существующих документов с23532349Хранить 2302 приложениях
-
в столбцах Продавец теперь увеличился для
при импортеи выберите пунктC. Все, что можно.1984 г.GER и эффектные визуализации в область
или, в «Excel 2010″ использовать точно так относительно небольшим числомA-22753/4/09
Создание новых фигур с данными
Омск и адрес. Столбцы, добавления файлов изВо время операции импортаИзменить импорт текста скопировать и вставитьВ области
-
SummerGM импортированных данных.СТОЛБЦОВ
-
Мои документы есть: вкладка же, как и фигур.6101
Красноярский край следует разбить на многих рабочие группы в Access вы
или
support.office.com
Импорт данных в Excel 2010 из интернета
в Excel, аСвязанный столбец (первичный ключ)Atlanta1936Начнем с создания пустого. Центра управления СЕТЬЮили для создания новойДанные любую другую информациюПеретащите строку данных из
Как создать таблицу, связанную с интернетом?
2353100598227 несколько отдельных столбцов. и отделы. Возможно, хотите принимать правильныеСвойства диапазона данных также отформатировать каквыберите пунктUSASummer
листа, а затем означает национальный Олимпийских папки:- группа в Excel. Их окнаC-789C-795Авдеев В этом примере эти данные в решения, чтобы получить
. Если вы выбрали таблицу, включая таблицыSportIDUSGarmisch-Partenkirchen импортируем данные из комитетов, являющееся подразделение> Базы данныхПолучение внешних данных можно использовать дляВнешние данные
56Елена также содержит сведения разных листов и несколько (если таковые
пункт данных на веб-сайтах,.1996GER книги Excel.
для страны или OlympicMedals.accdb Access- построения графиков, спарклайнов,
на фигуру вТеперь, когда сведения о2350Колумбия 1025 круг о продавцов, продукты, книг или текстовые имеются) ошибки преобразования,Изменить импорт текста
документы и любыеНажмите кнопкуSummerGMВставьте новый лист Excel региона.> Книгу ExcelИз других источников формул. Спарклайны – документе. продавцов, клиентов, продуктов,3/4/09Киркланд клиентах и заказах. файлы, которые являются требующих участия вручную., выберите исходный импортированный иные данные, которыеОКSalt Lake City1936 и назовите егоЗатем перетащите виды спорта
Обновление данных
файл OlympicSports.xlsx- это новый инструментДанные отобразятся в фигуре, заказы и сведения103Красноярский край Эти сведения должны веб-каналы данных из В следующей таблице файл, а затем можно вставить в.USAWinter
Sports из таблицы> Книгу Population.xlsxИз мастера подключения данных для работы с а слева от о заказе были100398234 быть разделение дальнейшей, других систем. Нет перечислены типы данных внесите изменения во
Excel.Изменения сводной таблицы, чтобыUSBarcelona.Disciplines Excel. данными, появившийся в строки данных в разбивкой по темамA-2275Безруков по темам, по команды интерфейса пользователя
Access и Excel внешние данные вD. Все вышеперечисленное. отразить новый уровень.2002ESPПерейдите к папке, вв область> Книгу DiscImage_table.xlsxИ вот дальше Excel 2010. Более
Заключение
окне отдельный в Excel,2Павел отдельным таблицам. или простой способ числовые форматы преобразование мастере импорта текста.Вопрос 3. Но Сводная таблицаWinterSP которой содержатся загруженныеСТРОКИ Excel хотелось бы что-то подробно о спарклайнахВнешние данные можно скопировать нужные2350
Хранить 2302 приложенияхПродавец
добавить одинаковые данные
при импорте данных
Если вы выбрали
office-guru.ru
Импорт данных из Access в Excel
Что произойдет в выглядит неправильно, покаSarajevo1992 файлы образцов данных,.Откройте пустую книгу в
- вроде учебника почитать, Вы можете узнатьпоявится значок связи. данные непосредственно в3/4/09ОмскИдентификатор заказа в Excel.
- из Excel в
- пункт сводной таблице, если из-за порядок полей
- YUGSummer и откройте файл
- Давайте отфильтруем дисциплины, чтобы Excel 2013. но именно по из урока КакПримечания: Access, где он103
Красноярский крайДата заказаЛучше всего использовать Access,
Access и предлагаетСвойства диапазона данных изменить порядок полей в областьYUHelsinkiOlympicSports.xlsx
отображались только пятьНажмите кнопку
«Excel», а не
использовать спарклайны в
office-guru.ru
Импорт внешних данных в Excel из Excel
станет таблиц.100398227Код товара где можно легко несколько советов о, вы можете настроить
в четырех областяхСТРОК1984 г.FIN. видов спорта: стрельбаданные > Получение внешних вообще. Excel 2010. ИспользованиеОдну и ту жеСоздание связей между таблицамиF-198УткинаQty импортировать и добавлять
наиболее типы данных, определение запроса, обновление полей сводной таблицы?. Дисциплины является ПодкатегорияWinterFI
CyberForum.ru
Выберите и скопируйте данные
You can easily import an Excel file into Python using Pandas. In order to accomplish this goal, you’ll need to use read_excel:
import pandas as pd

df = pd.read_excel(r'Path where the Excel file is storedFile name.xlsx')
print(df)
Note that for an earlier version of Excel, you may need to use the file extension of ‘xls’
And if you have a specific Excel sheet that you’d like to import, you may then apply:
import pandas as pd

df = pd.read_excel(r'Path of Excel fileFile name.xlsx', sheet_name='your Excel sheet name')
print(df)
Let’s now review an example that includes the data to be imported into Python.
The Data to be Imported into Python
Suppose that you have the following table stored in Excel (where the Excel file name is ‘products‘):
| product_name | price |
| computer | 700 |
| tablet | 250 |
| printer | 120 |
| laptop | 1200 |
| keyboard | 100 |
You may then follow the steps below to import the Excel file into Python.
Step 1: Capture the file path
First, capture the full path where the Excel file is stored on your computer.
For example, let’s suppose that an Excel file is stored under the following path:
C:UsersRonDesktopproducts.xlsx
In the Python code below, you’ll need to modify the path name to reflect the location where the Excel file is stored on your computer.
Don’t forget to include the file name (in our example, it’s ‘products‘ as highlighted in blue). You’ll also need to include the Excel file extension (in our case, it’s ‘.xlsx‘ as highlighted in green).
Step 2: Apply the Python code
Here is the Python code for our example:
import pandas as pd

df = pd.read_excel(r'C:UsersRonDesktopproducts.xlsx')
print(df)
Note that you should place “r” before the path string to address special characters, such as ‘’. In addition, don’t forget to put the file name at the end of the path + ‘.xlsx’
Step 3: Run the Python code to import the Excel file
Run the Python code (adjusted to your path), and you’ll get the following dataset:
  product_name  price
0     computer    700
1       tablet    250
2      printer    120
3       laptop   1200
4     keyboard    100
Notice that you got the same results as those that were stored in the Excel file.
Note: you’ll have to install an additional package if you get the following error when running the code:
ImportError: Missing optional dependency ‘xlrd’
You may then use the PIP install approach to install openpyxl for .xlsx files:
pip install openpyxl
Optional Step: Selecting subset of columns
Now what if you want to select a specific column or columns from the Excel file?
For example, what if you want to select only the product_name column? If that’s the case, you can specify this column name as captured below:
import pandas as pd

data = pd.read_excel(r'C:UsersRonDesktopproducts.xlsx')
df = pd.DataFrame(data, columns=['product_name'])
print(df)
Run the code (after adjusting the file path), and you’ll get only the product_name column:
  product_name
0     computer
1       tablet
2      printer
3       laptop
4     keyboard
You can specify additional columns by separating their names using a comma, so if you want to include both the product_name and price columns, you can use this syntax:
import pandas as pd

data = pd.read_excel(r'C:UsersRonDesktopproducts.xlsx')
df = pd.DataFrame(data, columns=['product_name', 'price'])
print(df)
You’ll need to make sure that the column names specified in the code exactly match with the column names within the Excel file. Otherwise, you’ll get NaN values.
Conclusion
You just saw how to import an Excel file into Python using Pandas.
At times, you may need to import a CSV file into Python. If that’s the case, you may want to check the following tutorial that explains how to import a CSV file into Python using Pandas.
You may also check the Pandas Documentation to find out more about the different options that you may apply in regards to read_excel.
In this tutorial, we will be Importing Data Using Excel File In ASP NET MVC. In my previous article, I created an article to show how to perform exporting data into an excel file. You may check it using this link. Now, let’s start a simple project that will read the data from an excel file and import it using ASP.NET MVC Application.
Before you proceed with the steps below, please ensure that you have the latest version of the following installer.
- Visual Studio
Output preview
The image shown below would be the final output for this project. If you are interested on this project you can copy the source from the steps below.
I. Setup ASP.NET Web Application Project
- Let’s start by creating a new ASP.NET Web Application. Open your Visual Studio IDE and proceed with the steps below.
- Select File » New » Project.
- Choose ASP.NET Web Application(.NET Framework). Name the project ImportExcel to have the same namespace as my project. Click OK.
- Select MVC template and then check Configure for HTTPS.
- Lastly, Click on Create.
If this is your first time creating MVC project please refer to this article How to start with ASP.Net MVC.
2. Now we need to install required packages for this project. I have listed it all below.
- ExcelDataReader.Dataset
Use NuGet Package Manager to install this package. If this is your first time using this you can visit this article. Or follow the steps below.
- To add right-click on your project name, from your solution explorer. As shown below.
- Then select Manage NuGet Packages and search for ExcelDataReader.
- Install ExcelDataReader and ExcelDataReader.Dataset. When a green check is shown as the image below it means that the package is already installed.
II. Crete Index Action Result View
For this tutorial, we will be using the default HomeController and the index action result. We will be creating the view for the index method that will allow us to upload and display the record from an excel file. I have attached a screenshot below of the final view that the source code below will generate.
To create an index view, navigate to your default view. If you are using default template of MVC your default controller name is HomeController that makes Home » index.cshtml as your default view. Navigate to this file and replace all code inside this file with the code below.
View
@{
    ViewBag.Title = "Home Page";
}

@model System.Data.DataTable
@using System.Data;


<script src="~/Scripts/jquery-1.10.2.js"></script>

<script>
    function bs_input_file() {
        $(".input-file").before(
            function () {
                if (!$(this).prev().hasClass('input-ghost')) {
                    var element = $("<input type='file' id='dataFile' name='upload' class='input-ghost' style='visibility:hidden; height:0'>");
                    element.attr("name", $(this).attr("name"));
                    element.change(function () {
                        element.next(element).find('input').val((element.val()).split('\').pop());
                    });
                    $(this).find("button.btn-choose").click(function () {
                        element.click();
                    });
                    $(this).find("button.btn-reset").click(function () {
                        element.val(null);
                        $(this).parents(".input-file").find('input').val('');
                    });
                    $(this).find('input').css("cursor", "pointer");
                    $(this).find('input').mousedown(function () {
                        $(this).parents('.input-file').prev().click();
                        return false;
                    });
                    return element;
                }
            }
        );
    }

    function clear() {
        var input = $("#dataFile").val('');
    };
    $(function () {
        clear();
        bs_input_file();
    });
</script>

@using (Html.BeginForm("Index", "Home", null, FormMethod.Post, new { enctype = "multipart/form-data" }))
{
    <div class="info2">
        <h2>Browse File for uploading</h2>
        @Html.AntiForgeryToken()

        <div class="form-group" name="Fichier1">
            <!-- COMPONENT START -->
            <div class="form-group">
                <div class="input-group input-file">
                    <span class="input-group-btn">
                        <button class="btn btn-default btn-choose" type="button">Choose</button>
                    </span>
                    <input type="text" class="form-control" placeholder='Choose a file...' />

                </div>
            </div>
            @*<input type="file" id="dataFile" name="upload" />*@

        </div>

        <div class="form-group">
            <input type="submit" value="Upload" class="btn btn-default" />
        </div>


        <div class="alert alert-danger">
            @Html.ValidationSummary()
            @*<strong></strong> asdasd*@
        </div>


    </div>
    if (Model != null)
    {
        <table id="table1" class="table table-bordered table-hover">
            <thead>
                <tr>
                    @foreach (DataColumn col in Model.Columns)
                    {
                        <th>@col.ColumnName</th>
                    }
                </tr>
            </thead>
            <tbody>
                @foreach (DataRow row in Model.Rows)
                {
                    <tr>
                        @foreach (DataColumn col in Model.Columns)
                        {
                            <td>@row[col.ColumnName]</td>
                        }
                    </tr>
                }
            </tbody>
        </table>
    }
}

<script>
    $(document).ready(function () {
        $("table1").DataTable();
    });
</script>
III. Create Index POST Action method
By default index method found in HomeController is access using a GET method. Now, we need a POST index method to process the data from the uploaded excel file.
Note : We have created two index action result in our HomeController . First index handle HttpGet request and the other one handle HttpPost request.
HttpGet index:
- This loads default view.
        public ActionResult Index()
        {
            DataTable dt = new DataTable();

            try
            {
                dt = (DataTable)Session["tmpdata"];
            }
            catch (Exception ex)
            {

            }

            return View(dt);
        }
HttpPost index:
- This received post request from the view.Which is the excel data.
[HttpPost]
        [ValidateAntiForgeryToken]
        public ActionResult Index(HttpPostedFileBase upload)
        {

            if (ModelState.IsValid)
            {

                if (upload != null && upload.ContentLength > 0)
                {
                    // ExcelDataReader works with the binary Excel file, so it needs a FileStream
                    // to get started. This is how we avoid dependencies on ACE or Interop:
                    Stream stream = upload.InputStream;

                    IExcelDataReader reader = null;


                    if (upload.FileName.EndsWith(".xls"))
                    {
                        reader = ExcelReaderFactory.CreateBinaryReader(stream);
                    }
                    else if (upload.FileName.EndsWith(".xlsx"))
                    {
                        reader = ExcelReaderFactory.CreateOpenXmlReader(stream);
                    }
                    else
                    {
                        ModelState.AddModelError("File", "This file format is not supported");
                        return View();
                    }
                    int fieldcount = reader.FieldCount;
                    int rowcount = reader.RowCount;
                    DataTable dt = new DataTable();
                    DataRow row;
                    DataTable dt_ = new DataTable();
                    try
                    {
                        dt_ = reader.AsDataSet().Tables[0];
                            for (int i = 0; i < dt_.Columns.Count; i++)
                            {
                                dt.Columns.Add(dt_.Rows[0][i].ToString());
                            }
                            int rowcounter = 0;
                            for (int row_ = 1; row_ < dt_.Rows.Count; row_++)
                            {
                                row = dt.NewRow();

                                for (int col = 0; col < dt_.Columns.Count; col++)
                                {
                                    row[col] = dt_.Rows[row_][col].ToString();
                                    rowcounter++;
                                }
                                dt.Rows.Add(row);
                            }

                    }
                    catch (Exception ex)
                    {
                        ModelState.AddModelError("File", "Unable to Upload file!");
                        return View();
                    }

                    DataSet result = new DataSet();
                    result.Tables.Add(dt);
                    reader.Close();
                    reader.Dispose();
                    DataTable tmp = result.Tables[0];
                    Session["tmpdata"] = tmp;  //store datatable into session
                    return RedirectToAction("Index");
                }
                else
                {
                    ModelState.AddModelError("File", "Please Upload Your file");
                }
            }
            return View();
        }


    }
}
IV. Test the Application
Now, run your project by pressing F5 from your keyboard and try importing a sample excel file. Excel file should be in table format.
Sample Excel file:
- Click on choose button in importing excel and select your excel file.
2. Then click upload. Your final view should look like this.
V. Full Source Code
Home Controller
using ExcelDataReader;
using Microsoft.AspNet.Identity;
using Microsoft.Owin.Security;
using Newtonsoft.Json;
using System;
using System.Collections.Generic;
using System.Data;
using System.IO;
using System.Linq;
using System.Net;
using System.Web;
using System.Web.Mvc;
using System.Web.Security;

namespace ImportExcel.Controllers
{
    public class HomeController : Controller
    {
        public ActionResult Index()
        {
            DataTable dt = new DataTable();

            //if ((String)Session["tmpdata"] != null)
            //{
            try
            {
                dt = (DataTable)Session["tmpdata"];
            }
            catch (Exception ex)
            {

            }

            //}


            return View(dt);
        }

        private IAuthenticationManager AuthenticationManager  //Sign out method
        {
            get { return HttpContext.GetOwinContext().Authentication; }
        }

        [HttpPost]
        [ValidateAntiForgeryToken]
        public ActionResult Index(HttpPostedFileBase upload)
        {

            if (ModelState.IsValid)
            {

                if (upload != null && upload.ContentLength > 0)
                {
                    // ExcelDataReader works with the binary Excel file, so it needs a FileStream
                    // to get started. This is how we avoid dependencies on ACE or Interop:
                    Stream stream = upload.InputStream;

                    // We return the interface, so that
                    IExcelDataReader reader = null;


                    if (upload.FileName.EndsWith(".xls"))
                    {
                        reader = ExcelReaderFactory.CreateBinaryReader(stream);
                    }
                    else if (upload.FileName.EndsWith(".xlsx"))
                    {
                        reader = ExcelReaderFactory.CreateOpenXmlReader(stream);
                    }
                    else
                    {
                        ModelState.AddModelError("File", "This file format is not supported");
                        return View();
                    }
                    int fieldcount = reader.FieldCount;
                    int rowcount = reader.RowCount;


                    DataTable dt = new DataTable();
                    //dt.Columns.Add("UserName");
                    //dt.Columns.Add("Adddress");
                    DataRow row;


                    DataTable dt_ = new DataTable();
                    try
                    {

                        dt_ = reader.AsDataSet().Tables[0];

                        string ret = "";


                            for (int i = 0; i < dt_.Columns.Count; i++)
                            {
                                dt.Columns.Add(dt_.Rows[0][i].ToString());
                            }

                            int rowcounter = 0;
                            for (int row_ = 1; row_ < dt_.Rows.Count; row_++)
                            {
                                row = dt.NewRow();

                                for (int col = 0; col < dt_.Columns.Count; col++)
                                {
                                    row[col] = dt_.Rows[row_][col].ToString();
                                    rowcounter++;
                                }
                                dt.Rows.Add(row);
                            }

                    }
                    catch (Exception ex)
                    {
                        ModelState.AddModelError("File", "Unable to Upload file!");
                        return View();
                    }

                    DataSet result = new DataSet();//reader.AsDataSet();
                    result.Tables.Add(dt);
                    string minutes_ID = "";


                    reader.Close();
                    reader.Dispose();
                    // return View();
                    //  return View(result.Tables[0]);

                    DataTable ddd = result.Tables[0];

                    Session["tmpdata"] = ddd;

                    return RedirectToAction("Index");

                }
                else
                {
                    ModelState.AddModelError("File", "Please Upload Your file");
                }
            }
            return View();
        }


    }
}
View > Index.cshtml
@{
    ViewBag.Title = "Home Page";
}

@model System.Data.DataTable
@using System.Data;


<script src="~/Scripts/jquery-1.10.2.js"></script>

<script>
    function bs_input_file() {
        $(".input-file").before(
            function () {
                if (!$(this).prev().hasClass('input-ghost')) {
                    var element = $("<input type='file' id='dataFile' name='upload' class='input-ghost' style='visibility:hidden; height:0'>");
                    element.attr("name", $(this).attr("name"));
                    element.change(function () {
                        element.next(element).find('input').val((element.val()).split('\').pop());
                    });
                    $(this).find("button.btn-choose").click(function () {
                        element.click();
                    });
                    $(this).find("button.btn-reset").click(function () {
                        element.val(null);
                        $(this).parents(".input-file").find('input').val('');
                    });
                    $(this).find('input').css("cursor", "pointer");
                    $(this).find('input').mousedown(function () {
                        $(this).parents('.input-file').prev().click();
                        return false;
                    });
                    return element;
                }
            }
        );
    }

    function clear() {
        var input = $("#dataFile").val('');
    };
    $(function () {
        clear();
        bs_input_file();
    });
</script>

@using (Html.BeginForm("Index", "Home", null, FormMethod.Post, new { enctype = "multipart/form-data" }))
{
    <div class="info2">
        <h2>Browse File for uploading</h2>
        @Html.AntiForgeryToken()

        <div class="form-group" name="Fichier1">
            <!-- COMPONENT START -->
            <div class="form-group">
                <div class="input-group input-file">
                    <span class="input-group-btn">
                        <button class="btn btn-default btn-choose" type="button">Choose</button>
                    </span>
                    <input type="text" class="form-control" placeholder='Choose a file...' />

                </div>
            </div>
            @*<input type="file" id="dataFile" name="upload" />*@

        </div>

        <div class="form-group">
            <input type="submit" value="Upload" class="btn btn-default" />
        </div>


        <div class="alert alert-danger">
            @Html.ValidationSummary()
            @*<strong></strong> asdasd*@
        </div>


    </div>
    if (Model != null)
    {
        <table id="table1" class="table table-bordered table-hover">
            <thead>
                <tr>
                    @foreach (DataColumn col in Model.Columns)
                    {
                        <th>@col.ColumnName</th>
                    }
                </tr>
            </thead>
            <tbody>
                @foreach (DataRow row in Model.Rows)
                {
                    <tr>
                        @foreach (DataColumn col in Model.Columns)
                        {
                            <td>@row[col.ColumnName]</td>
                        }
                    </tr>
                }
            </tbody>
        </table>
    }
}

<script>
    $(document).ready(function () {
        $("table1").DataTable();
    });
</script>
Summary
This is one of the many ways to Importing Data Using Excel File In ASP NET MVC. This is also a very common functionality in an application that required reports. If you are a beginner in this area you may find it difficult that is why I am sharing this. Hopefully, you may find it useful and may be able to solve your future or current projects.
KEEP Coding!!
How to Import Data in Excel?
Importing the data from another file or another source file is often required in Excel. For example, sometimes people need data directly from very complicated servers, and sometimes we may need to import data from a text file or even from an Excel workbook.
If you are new to Excel data importing, then in this article, we will take a tour of importing data from text files, different Excel workbooks, and MS Access. Follow this article to learn the process involved in importing the data.
Table of contents
- How to Import Data in Excel?
- #1 – Import Data from Another Excel Workbook
- #2 – Import Data from MS Access to Excel
- #3 – Import Data from Text File to Excel
- Things to Remember
- Recommended Articles
#1 – Import Data from Another Excel Workbook
You can download this Import Data Excel Template here – Import Data Excel Template
Let us start.
- First, we must go to the DATA tab. Then, under the DATA tab, click on Connections.
- As soon as we click on Connections, we may see the below window separately.
- Now, click on Add.
- It will open up a new window. In the below window, select All Connections.
- If there are any connections in this workbook, it will show what those connections are here.
- Since we are connecting to a new workbook, click on Browse for more.
- In the below window, browse the file location. Then, click on Open.
- After clicking on Open, it shows the below window.
- Here, we need to select the required table to be imported to this workbook. Select the table and click on OK.
After clicking on OK, close the Workbook Connection window.
- Then, go to Existing Connections under the DATA tab.
- Here, we will see all the existing connections. Select the connection we have just made and click on Open.
- Once we click on Open, it will ask us where to import the data. First, we need to select the cell reference here. Then, click on the OK button.
- It will import the data from the selected or connected workbook.
Like this, we can connect to the other workbook and import the data.
#2 – Import Data from MS Access to Excel
MS Access is the main platform to store the data safely. We can import the data directly from the MS Access File itself whenever the data is required.
Step 1: Go to the “DATA” ribbon in excelThe ribbon is an element of the UI (User Interface) which is seen as a strip that consists of buttons or tabs; it is available at the top of the excel sheet. This option was first introduced in the Microsoft Excel 2007.read more and select “From Access.“
Step 2: Now, it will ask us to locate the desired file. Select the desired file path. Then, click on “Open.”
Step 3: Now, it will ask us to select the desired destination cell where we want to import the data. Then, click on “OK.”
Step 4: It will import the data from access to the A1 cell in Excel.
#3 – Import Data from Text File to Excel
In almost all the corporations, whenever we ask for the data from the IT team, they will write a query and get the file in TEXT format. But unfortunately, TEXT file data is not the ready format to use in Excel; we need to make some modifications to work on it.
Step 1: Go to the “DATA” tab and click on “From Text.”
Step 2: Now, it will ask us to choose the file location on the computer or laptop. Select the targeted file, then click on “Import.”
Step 3: It will open up a “Text Import Wizard.”
Step 4: By selecting the “Delimited,” click on “Next.”
Step 5: In the next window, select the other and mention comma (,) because, in the text file, each column is separated by a comma (,). Then click on “Next.”
Step 6: In the next window, click on “Finish.”
Step 7: Now, it will ask us to select the desired destination cell where we want to import the data. Select the cell and click on “OK.”
Step 8: It will import the data from the text file to the A1 cell in Excel.
Things to Remember
- If there are many tables, we must specify which table data we need to import.
- If we want the data in the current worksheet, we need to select the desired cell. Else, if we need data in a new worksheet, we must choose the new worksheet as the option.
- We need to separate the column in the TEXT file by identifying the common column separators.
Recommended Articles
This article is a guide to Import Data in Excel. Here, we discuss how to import data from 1) Excel Workbook, 2) MS Access, 3) Text File, practical examples, and a downloadable Excel template. You may learn more about Excel from the following articles: –
- KPI Dashboard in Excel
- Insert Image in Excel Cell
- How to Insert New Worksheet In Excel?
- Create a Dashboard in Excel
- Page Numbers in Excel

