
Содержание
- Create or edit .csv files to import into Outlook
- Create a .csv file from another program or email provider
- Download and open a sample .csv file for importing contacts to Outlook
- Create an Excel file and save it as a CSV file
- Download a template CSV file
- Edit a .csv file of contacts you want to import to Outlook
- Problem: All my data appears in the first column
- How to Import Email to Excel Automatically
- Create or edit .csv files to import into Outlook
- Create a .csv file from another program or email provider
- Download and open a sample .csv file for importing contacts to Outlook
- Create an Excel file and save it as a CSV file
- Download a template CSV file
- Edit a .csv file of contacts you want to import to Outlook
- Problem: All my data appears in the first column
Create or edit .csv files to import into Outlook
A CSV (Comma Separated Values) file is a special type of file that you can create or edit in Excel. Rather than storing information in columns, CSV files store information separated by commas. When text and numbers are saved in a CSV file, it’s easy to move them from one program to another. For example, you can export your contacts from Google into a CSV file, and then import them to Outlook.
For assistance importing a list of calendar entries into Outlook, see Import and export Outlook email, contacts, and calendar.
Create a .csv file from another program or email provider
When you export your contacts from another program, for example, from Gmail, you can usually select one of several formats. Gmail offers you the choice of a Google CSV file, an Outlook CSV file, or vCards. When exporting from one Outlook profile to import into another profile, you can choose to export into a Comma Separated Values file or an Outlook Data File (.pst).
Download and open a sample .csv file for importing contacts to Outlook
If you want to create a CSV file for your contacts manually, you can do that one of two ways.
Create an Excel file and save it as a CSV file
If you have contact information in a program that doesn’t allow you to export it, you can type it in manually.
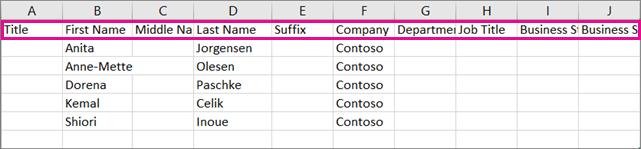
Create a new document in Excel.
Add a column heading for each piece of information you want to record (for example, first name, last name, email address, phone number, and birthday), and then type the information in the appropriate columns.
When you’re done, your Excel file should look something like this.
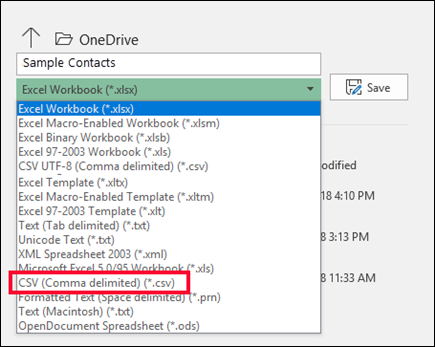
Select File > Save As.
Use the drop-down box to select CSV (Comma delimited) (*.csv), give your file a name, and then select Save.
You can now use this new CSV file to import your contacts into Outlook.
Download a template CSV file
If you’d like to start with a blank CSV file, you can download the sample file below.
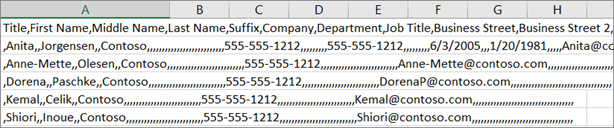
Download this sample .csv file to your computer. When prompted, choose to Save the file to your computer as a CSV file. If you save it as an Excel file (.xls or .xlsm) all of the data will be stuffed into one column!
On your computer, open Excel.
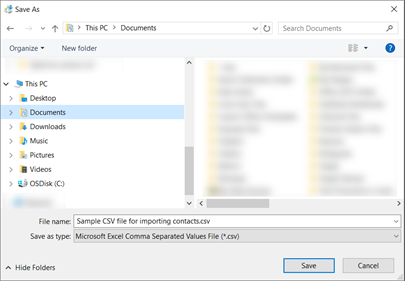
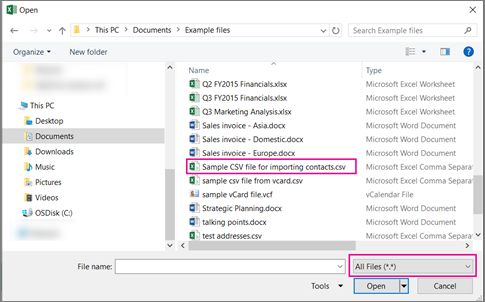
In Excel, go to File > Open > and then navigate to the .csv file you just downloaded to your computer. To find the .csv file, be sure to look at All Files. Click on the .csv file to open it.
There are a few things to remember when working with this sample CSV file:
Outlook requires column headings in the first row so don’t replace them with something else.
The language of the column headings must match Outlook’s default language. If Outlook’s default language is set to Portuguese, for example, you must edit the column headings so they appear in Portuguese.
You can delete the data in rows 2-6 (the sample names, phone numbers, email addresses, etc).
You don’t need to enter values for every column. Only enter the info you want.
Save the file with a new name as a CSV file type (.csv). If you use Excel to work in the file, when you save it, Excel will prompt you a few times with «are you sure you want to save it in CSV format?» Always choose Yes. If you choose No, the file will be saved in Excel’s native format (.xlsx) and Outlook won’t be able to use it to import data.
Practice importing your CSV file with a few contacts to make sure you like the results. Afterwards, you can delete the imported contacts, add more to your CSV file, and import it again.
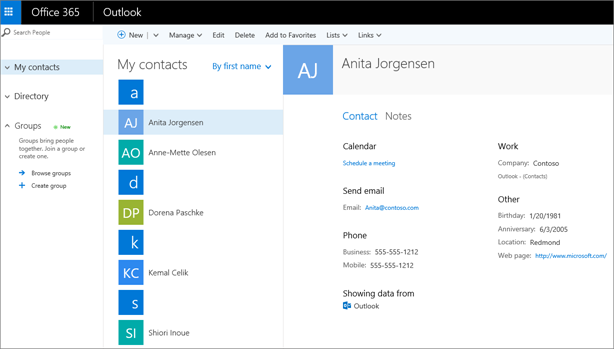
If you were to import the data in the sample CSV file, here’s what it would look like in Outlook on the web for Microsoft 365:
Let’s say you want to edit a .csv file that you exported from Outlook, and then import it back to Outlook or another email provider. Using Excel makes it easy to edit the .csv file.
Here are a few things to remember when editing a .csv file:
Keep the column headings in the first row.
When you save it, Excel will prompt you a few times with «are you sure you want to save it in CSV format?» Always choose Yes. If you choose No, the file will be saved in Excel’s native format (.xlsx) and it won’t work for importing into Outlook.
Problem: All my data appears in the first column
Here are a few reasons this happens, and things you can do to try to fix this problem:
If you save CSV file in another format, such as .xls, .xlsx, or .xlm, all of the data will appear in the first column. Go back to the original CSV file and make sure to save it as type .csv.
It’s possible that the program creating the CSV file is putting extra quote marks in the data. As a result, Excel treats the data as a single unit. For example, let’s says your data looks like this:
a, b, c, d — Excel puts each letter in it’s own column.
«a, b, c, d», e — Excel puts a,b,c,d in one column and e in another column.
To see if this is the problem with your file, open your file in Notepad: Right-click on the CSV file in Windows, choose Open With > Notepad. Search for extra quote marks.
If you find extra quote marks, here’s how to fix your file:
Use Excel to open the CSV file. All the data will be in column A and the quote marks will be gone.
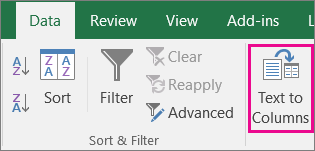
Now use the Text to Columns wizard to separate the data in column A into individual columns: on the menu bar, choose Data > Text to Columns.
 Text to Columns» loading=»lazy»>
Choose Delimited > Next. Then choose Commas > Finish.
Save the file as type .cvs so you can still import it into Outlook.
Источник
How to Import Email to Excel Automatically
Спасибо! Поделитесь с друзьями!
Вам не понравилось видео. Спасибо за то что поделились своим мнением!

In this step-by-step tutorial, learn how to import email from either Gmail or Outlook into Microsoft Excel using Power Automate. First, we visit Office.com and sign in with a free account. Next, we set up a new workbook in Microsoft Excel and enter the columns that we want to populate with content from an email. We proceed to Power Automate, where we set up a flow to take the contents of an email and insert them into our workbook table. Finally, we test the flow to ensure that the email successfully imports into the Excel worksheet. By the end, you’ll be able to take the contents from an email and fill it into your Excel workbook. The resulting flow will work automatically in the cloud and there’s no need to launch Outlook, Gmail, or Excel for this to work.
. Additional resources
— How to use Microsoft Power Automate: https://youtu.be/dDO4Y4aDYXw
— Reference guide to using functions in expressions for Power Automate — this will help you understand the expressions below and how they parse text in an email: https://docs.microsoft.com/en-us/azure/logic-apps/workflow-definition-language-functions-reference
— The expression in the «Cookie Type» field:
first(skip(split(first(split(body(‘Html_to_text’),’Quantity’)),’: ‘),1))
— The expression in the «Quantity» field:
first(skip(split(first(split(body(‘Html_to_text’),’Delivery Method’)),’Quantity: ‘),1))
— The expression in the «Delivery Method» field:
first(skip(split(body(‘Html_to_text’),’Delivery Method: ‘),1))
⌚ Timestamps
0:00 Introduction
0:56 Sign into office.com
1:28 Create new Excel workbook
3:07 Navigate to Power Automate
4:02 Build automated cloud flow
5:15 Example email to import into Excel
5:39 Step 1: Check when a new email arrives & filters
6:35 Step 2: Convert HTML into text
7:20 Step 3: Add new row into Excel table with email contents
9:55 Extract content from body of email using expression
11:28 Test flow
13:05 Wrap up
. Watch related playlists
— Playlist with all my videos on Power Automate: https://youtube.com/playlist?list=PLlKpQrBME6xKE_fxQ_YzHVV7HluHpifW9
— Playlist with all my videos on Outlook: https://youtube.com/playlist?list=PLlKpQrBME6xJswJLJ69wbWWf6QlwZ84nA
— Playlist with all my videos on Excel: https://youtube.com/playlist?list=PLlKpQrBME6xLYoubjOqowzcCCd0ivQVLY
. Connect with me on social
— LinkedIn: https://www.linkedin.com/in/kevinstratvert/
— Twitter: https://twitter.com/kevstrat
— Facebook: https://www.facebook.com/Kevin-Stratvert-101912218227818
— TikTok: https://www.tiktok.com/@kevinstratvert
. Subscribe to my YouTube channel
https://www.youtube.com/user/kevlers?sub_confirmation=1
. Want to watch again? Navigate back to my YouTube channel quickly
http://www.kevinstratvert.com
. Support me with your Amazon purchases: https://amzn.to/3kCP2yz
⚖ As full disclosure, I use affiliate links above. Purchasing through these links gives me a small commission to support videos on this channel — the price to you is the same.
Источник
Create or edit .csv files to import into Outlook
A CSV (Comma Separated Values) file is a special type of file that you can create or edit in Excel. Rather than storing information in columns, CSV files store information separated by commas. When text and numbers are saved in a CSV file, it’s easy to move them from one program to another. For example, you can export your contacts from Google into a CSV file, and then import them to Outlook.
For assistance importing a list of calendar entries into Outlook, see Import and export Outlook email, contacts, and calendar.
Create a .csv file from another program or email provider
When you export your contacts from another program, for example, from Gmail, you can usually select one of several formats. Gmail offers you the choice of a Google CSV file, an Outlook CSV file, or vCards. When exporting from one Outlook profile to import into another profile, you can choose to export into a Comma Separated Values file or an Outlook Data File (.pst).
Download and open a sample .csv file for importing contacts to Outlook
If you want to create a CSV file for your contacts manually, you can do that one of two ways.
Create an Excel file and save it as a CSV file
If you have contact information in a program that doesn’t allow you to export it, you can type it in manually.
Create a new document in Excel.
Add a column heading for each piece of information you want to record (for example, first name, last name, email address, phone number, and birthday), and then type the information in the appropriate columns.
When you’re done, your Excel file should look something like this.
Select File > Save As.
Use the drop-down box to select CSV (Comma delimited) (*.csv), give your file a name, and then select Save.
You can now use this new CSV file to import your contacts into Outlook.
Download a template CSV file
If you’d like to start with a blank CSV file, you can download the sample file below.
Download this sample .csv file to your computer. When prompted, choose to Save the file to your computer as a CSV file. If you save it as an Excel file (.xls or .xlsm) all of the data will be stuffed into one column!
On your computer, open Excel.
In Excel, go to File > Open > and then navigate to the .csv file you just downloaded to your computer. To find the .csv file, be sure to look at All Files. Click on the .csv file to open it.
There are a few things to remember when working with this sample CSV file:
Outlook requires column headings in the first row so don’t replace them with something else.
The language of the column headings must match Outlook’s default language. If Outlook’s default language is set to Portuguese, for example, you must edit the column headings so they appear in Portuguese.
You can delete the data in rows 2-6 (the sample names, phone numbers, email addresses, etc).
You don’t need to enter values for every column. Only enter the info you want.
Save the file with a new name as a CSV file type (.csv). If you use Excel to work in the file, when you save it, Excel will prompt you a few times with «are you sure you want to save it in CSV format?» Always choose Yes. If you choose No, the file will be saved in Excel’s native format (.xlsx) and Outlook won’t be able to use it to import data.
Practice importing your CSV file with a few contacts to make sure you like the results. Afterwards, you can delete the imported contacts, add more to your CSV file, and import it again.
If you were to import the data in the sample CSV file, here’s what it would look like in Outlook on the web for Microsoft 365:
Let’s say you want to edit a .csv file that you exported from Outlook, and then import it back to Outlook or another email provider. Using Excel makes it easy to edit the .csv file.
Here are a few things to remember when editing a .csv file:
Keep the column headings in the first row.
When you save it, Excel will prompt you a few times with «are you sure you want to save it in CSV format?» Always choose Yes. If you choose No, the file will be saved in Excel’s native format (.xlsx) and it won’t work for importing into Outlook.
Problem: All my data appears in the first column
Here are a few reasons this happens, and things you can do to try to fix this problem:
If you save CSV file in another format, such as .xls, .xlsx, or .xlm, all of the data will appear in the first column. Go back to the original CSV file and make sure to save it as type .csv.
It’s possible that the program creating the CSV file is putting extra quote marks in the data. As a result, Excel treats the data as a single unit. For example, let’s says your data looks like this:
a, b, c, d — Excel puts each letter in it’s own column.
«a, b, c, d», e — Excel puts a,b,c,d in one column and e in another column.
To see if this is the problem with your file, open your file in Notepad: Right-click on the CSV file in Windows, choose Open With > Notepad. Search for extra quote marks.
If you find extra quote marks, here’s how to fix your file:
Use Excel to open the CSV file. All the data will be in column A and the quote marks will be gone.
Now use the Text to Columns wizard to separate the data in column A into individual columns: on the menu bar, choose Data > Text to Columns.
Text to Columns» loading=»lazy»>
Choose Delimited > Next. Then choose Commas > Finish.
Save the file as type .cvs so you can still import it into Outlook.
Источник
Take a look at my Outlook Inbox. We want to bring in only the messages stored in the “Action Required” folder below the main Inbox folder.

If I can send all these messages into an Excel Table, reading through and processing the messages will be a bit easier to manage.
Creating an Outlook Query in Excel
We begin by starting a blank workbook in Excel and creating a connection to our Outlook Inbox using Power Query.
Select Data (tab) -> Get Data -> From Other Sources -> From Microsoft Exchange.

Enter your email address in the Mailbox Address field.

If this is the first time you have connected to your Outlook account using Power Query, you will need to provide your account name and password to permit Power Query the needed access to your Exchange email.
This is a one-time requirement. Further connections will utilize the same credentials provided at this step.
In this example, I will use my email address associated with my Microsoft account.

Provide your password and click the Connect button to proceed.
Connecting to the Outlook Inbox
Power Query creates a connection to the Outlook mailbox and displays the top-level sections of the account.

If you click on one of the listed tables you can see a preview of the data in that table, such as all the email folders and their contents.

These tables make it easy to import the full data then filter and sort the data in any way you need.

We’ll select the Mail table and click the Transform Data button to load the contents of the email into Power Query.
Filtering the Inbox for Only Needed Messages
Once we have brought the Inbox information into Power Query, check out these categories across the top of the table.

These headings allow us to sort and filter the table to include only the needed items.
Useful columns for filtering include:
- Recipients names & email addresses
- Date and time the email was sent
- Date and time the email was received
- Message importance/priority level
- Attachment indicator and attachment filenames
- Message read/unread status
An interesting column is the “Body” column. This contains two versions of the email message: a plain text version and an HTML version of the message.

I want to filter the “Folder Path” column to only include messages from the “Action Required” subfolder.

You can also filter using pre-build text filters for items that begin, end, include, or don’t include specific text.

Other columns, like the “Subject” column display all the email subject lines. The “Sender” column contains nested information about the name and email address of the sender.

If we want to include the “Sender” information in the output table, we can click the Expand Table button at the top of the “Sender” column and click OK to extract the names and email addresses as additional columns in the current table.


Getting Rid of the Unwanted Columns
As the table contains many unneeded columns, an easy way to get rid of those columns is to use the Choose Columns feature located on the Home ribbon.

From here we can easily select only the needed columns from the table.

Updating the Table When New Messages Arrive
As all the transformation steps have been recorded in the query, it will be a simple matter of pressing a Refresh button to re-execute the steps, updating the table results.

To send the results to an Excel Table, click the “Close & Load” button on the far left of the Home ribbon.


Updating the Query Results
When a new message is received that meets the query criteria, we can click the Refresh button on the Data or Table Design ribbons (or right-click the table and select Refresh) to re-execute the query to bring in the latest messages.
We see a newly added message in the “Action Required” sub-folder.

To bring the new message into the Excel Table, click Refresh.

The new message appears at the bottom of the Excel Table.

Getting Outlook and Excel to Work Together
When pulling messages from an Outlook folder, it’s a good idea to set up a rule in Outlook that automatically sends specific messages to the desired folder.
This way, you don’t even have to have Outlook open and running for the Excel query to reach into the Inbox and download the needed information.
You can set the query to automatically refresh when the Excel file is opened, making this a 100% hands-free operation.
Published on: May 13, 2021
Last modified: February 21, 2023


Leila Gharani
I’m a 5x Microsoft MVP with over 15 years of experience implementing and professionals on Management Information Systems of different sizes and nature.
My background is Masters in Economics, Economist, Consultant, Oracle HFM Accounting Systems Expert, SAP BW Project Manager. My passion is teaching, experimenting and sharing. I am also addicted to learning and enjoy taking online courses on a variety of topics.
If you get a lot of emails and you need to analyse the data in them, then importing your emails from Outlook into Excel with VBA will save you a lot of time. In this post we’re going to explore a way to import all emails in a given folder that were received after a certain date. Obviously, you will need to have Microsoft Outlook installed on your computer for this to work.
If you’re unfamiliar with VBA, then it’s probably a good idea to read this post about How To Use The VBA Code You Find Online before continuing reading and working with the completed workbook.
For this code you will need the Microsoft Outlook 16.0 Object Library enabled. In the visual basic editor, go to Tools then References and check the box next to it and press OK button to enable it.
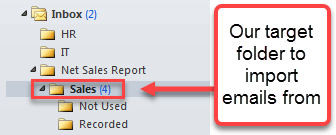
In this example I’m going to be importing from an Outlook folder called Inbox/Net Sales Report/Sales. If you wanted to import from a subfolder of Sales then you would need to append another .Folders(“Subfolder Name”) onto the Set Folder = line of code.
I have added named ranges to the workbook as referring to a cell with a named range in VBA rather than the generic cell address such as Range(“A1”) means you can move things around in your workbook without worrying about breaking your code. These are the named ranges the code will use.
- From_date – This cell will allow the user to input a From Date so that only emails received (and in our Sales folder) after this date are returned.
- eMail_subject – This cell contains the Subject column heading. Subjects from emails will be imported just below this cell.
- eMail_date – This cell contains the Date column heading. Date received from emails will be imported just below this cell.
- eMail_sender – This cell contains the Sender column heading. Sender information from emails will be imported just below this cell.
- eMail_text – This cell contains the Email Text column heading. The main text body from emails will be imported just below this cell.
Here is the code.
Sub GetFromOutlook()

Dim OutlookApp As Outlook.Application
Dim OutlookNamespace As Namespace
Dim Folder As MAPIFolder
Dim OutlookMail As Variant
Dim i As Integer

Set OutlookApp = New Outlook.Application
Set OutlookNamespace = OutlookApp.GetNamespace("MAPI")
Set Folder = OutlookNamespace.GetDefaultFolder(olFolderInbox).Folders("Net Sales Report").Folders("Sales")

i = 1

For Each OutlookMail In Folder.Items
    If OutlookMail.ReceivedTime >= Range("From_date").Value Then
        Range("eMail_subject").Offset(i, 0).Value = OutlookMail.Subject
        Range("eMail_date").Offset(i, 0).Value = OutlookMail.ReceivedTime
        Range("eMail_sender").Offset(i, 0).Value = OutlookMail.SenderName
        Range("eMail_text").Offset(i, 0).Value = OutlookMail.Body

        i = i + 1
    End If
Next OutlookMail

Set Folder = Nothing
Set OutlookNamespace = Nothing
Set OutlookApp = Nothing

End Sub
It’s a pretty simple VBA procedure, but it can be very useful if you have to deal with a lot of similar emails.
About the Author
John is a Microsoft MVP and qualified actuary with over 15 years of experience. He has worked in a variety of industries, including insurance, ad tech, and most recently Power Platform consulting. He is a keen problem solver and has a passion for using technology to make businesses more efficient.
Here’s how:
- In your workbook, click the worksheet with the contact information you want to import.
- Click File > Save As.
- Choose where to save your file.
- In the Save as type box, choose CSV (Comma delimited) (*.
- Click OK.
- Click Yes to have Excel save the current worksheet as a CSV file.
- Close the CSV file.
Contents
- 1 How do I import email addresses from Excel to Outlook?
- 2 How do I copy bulk email addresses from Excel?
- 3 How do I import email addresses from Excel to a group?
- 4 Can I import email addresses from Excel into Gmail?
- 5 How do I create a CSV file from Excel contacts?
- 6 How do I format an Excel column for email addresses?
- 7 How do I copy and paste email addresses?
- 8 How do I copy and paste multiple email addresses?
- 9 How do I convert Excel to contacts?
- 10 How do I send an email from Excel to Gmail?
- 11 How do I Import a CSV file into Gmail contacts?
- 12 How do I import contacts into CSV file?
- 13 How do I import contacts from Excel to CSV and Gmail?
- 14 How do I convert Excel to CSV without losing data?
- 15 How do I save a list of email addresses?
- 16 How can I get a list of email addresses?
- 17 How do I save an email address to a group?
- 18 What is a distro copy?
- 19 How do I import contacts from Excel to Gmail?
- 20 How do I create a CSV file from email address?
Import contacts from Excel to Outlook
Open Outlook, go to File > Open & Export and click the option Import/Export. You’ll get Import and Export Wizard. Select the option Import from another program or file and then click the Next button.
How do I copy bulk email addresses from Excel?
Right-click and select “Paste special” Select “All” and select “Transpose” then click “OK” The email addresses are now all in that cell reading across (the LF characters are gone) With the new cell still selected press Ctrl-C or right-click Copy.
How do I import email addresses from Excel to a group?
Open the address book list and select the contacts folder we created. Select all the contacts in the list and add them to Members. Click OK and Save & Close. To send email to the contact group, type the group name on the To line, or type it on the Bcc line if you want to hide the addresses from recipients.
Can I import email addresses from Excel into Gmail?
Google Mail allows you to import a contact group from an Excel file into Google Contacts. This process consists of two steps: saving the contact group Excel file as a . CSV file and then importing the . CSV file into your Google Contacts.
How do I create a CSV file from Excel contacts?
Here’s how:
- In your workbook, click the worksheet with the contact information you want to import.
- Click File > Save As.
- Choose where to save your file.
- In the Save as type box, choose CSV (Comma delimited) (*.
- Click OK.
- Click Yes to have Excel save the current worksheet as a CSV file.
- Close the CSV file.
How do I format an Excel column for email addresses?
Select the cells that you want to only allowed to type with email addresses format, and then click Data > Data Validation > Data Validation, see screenshot: 2. In the Data Validation dialog box, under the Settings tab, choose Custom from the Allow drop down, and then enter this formula: =ISNUMBER(MATCH(“*@*.?*
How do I copy and paste email addresses?
Select the email address that you want to copy. Click the email address once to highlight it then press Ctrl + C simultaneously to copy. Move the cursor to the body of the letter then press Ctrl + V to paste it.
How do I copy and paste multiple email addresses?
Now that all the recipients are highlighted, press CTRL+C to copy them or right click on the selected addresses and choose Copy. Press the “Add Members” button and select “From Address Book”. Place your cursor in the field next to the “Members->” button. Press CTRL+V to paste the copied addresses.
How do I convert Excel to contacts?
Type a name for the contact list in the “File Name” text box. Click the “Save as Type” drop-down box and select “Microsoft Excel 5.0/95 Workbook (*xls).” Click “Save” to save the file as another Excel spreadsheet. Doing this ensures that you can return to the spreadsheet later and update if needed.
How do I send an email from Excel to Gmail?
If you have Outlook installed and are using your Gmail account in it, you can email directly from Excel using File > Share and then Choosing Send a Copy from the window that pops up.
How do I Import a CSV file into Gmail contacts?
Importing contacts to Gmail via a CSV / VCF file
- Click the Google Apps button at the top right.
- Click the Contacts button.
- Click the Import button in the Contacts window.
- Click the Select file button and select the contact file to be imported.
- Click the Import button.
How do I import contacts into CSV file?
Convert Excel file to CSV
- Open the Import file. This can be done through spreadsheet software such as Microsoft Excel and can also be done via TextEdit (Mac) or Notepad (Windows)
- Select your import File.
- Enter your contact details for Name and Email.
- Click Save As.
- Rename the file if you prefer then select .
- Click Save.
How do I import contacts from Excel to CSV and Gmail?
Open your Google contacts in Gmail. Click the More button above the contact list and select Import. Click the Choose File button and navigate to your . CSV file.
How do I convert Excel to CSV without losing data?
In the Save as type box, choose to save your Excel file as CSV (Comma delimited).
Do this by following the below instructions:
- Select the column with such data.
- Open Data >> Text to Columns.
- Select Delimited >> Next >> Deselect all delimiters >> Next >> Select Text as Column Data Format and Finish.
- Save as CSV.
How do I save a list of email addresses?
Find the message from a person you wish to save to your contact list and click the subject line to view the message. Click the gray downward pointing arrow, located on the top-right of the message, and select “Add to Contacts list.” The sender’s email address to your contacts.
How can I get a list of email addresses?
16 Easy Ways to Collect Email Addresses — Expert Tips
- Make sure there’s something in it for them (and never, ever, spam)
- Offer useful resources.
- Use Facebook ads.
- Offer free tutorial videos.
- Promote your newsletter signup throughout your website.
- Get personal.
- Use popups to promote special offers.
- Host contests!
How do I save an email address to a group?
To create a contact group using the contacts picker:
- While composing an email message, open the contacts picker by clicking the To: link.
- In the Search contacts box, start typing the name of a contact you want to add to the group.
- When you are finished, click Save as Group.
- Enter the name of the group, and click OK.
What is a distro copy?
Distribution files satisfy only limited researcher needs, and are not intended to substitute for the original record if the original is damaged, destroyed, or not retained. Distribution copies are generally derived from preservation master or reproduction master files.
How do I import contacts from Excel to Gmail?
Step 2: Import CSV File to Gmail
- To begin with, sign-in to the Gmail account. For that, provide the credentials i.e., Username and Password in the appropriate fields.
- Now, click on Google apps icon, from there select Contacts.
- Then, click Import Contacts to import phone numbers from excel to Gmail.
How do I create a CSV file from email address?
- From the menu in Windows Mail, Select Tools > ‘Windows Contacts…’
- Click Export in the toolbar.
- Highlight CSV (Comma Separated Values).
- Click Export.
- Click Browse….
- Select a folder in which to save the exported contacts.
- Type the desired name (such as “Windows Mail contacts”) under ‘File name’.
I am trying to import email information from a sub-folder of a shared inbox in Outlook into an excel spreadsheet. I encountered lots of issues so far, namely accessing the sub-folder of the inbox, but have found solutions. The problem I now have is the code stopping after the same number of emails that are present in the Inbox. For example, I am trying to get information from the «Archive» folder (a sub-folder of the Inbox) but if there are 20 emails in my Inbox, then the code stops when the count reaches 20 and only gives me the information for 20 items in the «Archive» folder
See my code below executed from Outlook. I have marked where the code stops. It gives me the error «aOutput(lCnt, 1) = Subscript out of range» when I hoover the cursor over «aOutput». If I skip the code to the «SetxlApp…» line it will give me the excel sheet populated with data for all emails up to that point (20 emails i.e. the same number of items in my Inbox) but I need it to keep looping through the rest of the folder (could be thousands of items). Could anyone shed any light on this please? Any other suggestions? Thanks for your help.
Sub EmailStats()

Dim olMail As Outlook.MailItem
Dim aOutput() As Variant
Dim lCnt As Long
Dim xlApp As Excel.Application
Dim xlSh As Excel.Worksheet
Dim flInbox As Folder
Dim olFolder As Outlook.MAPIFolder

Dim myNamespace As Outlook.NameSpace
Dim myRecipient As Outlook.Recipient
Set myNamespace = Application.GetNamespace("MAPI")
Set myRecipient = myNamespace.CreateRecipient("Team Inbox")

Set flInbox = Application.GetNamespace("MAPI").GetSharedDefaultFolder(myRecipient, olFolderInbox)

Set olFolder = flInbox.Folders("ARCHIVE")
ReDim aOutput(1 To flInbox.Items.Count, 1 To 4)

For Each olMail In olFolder.Items
    If TypeName(olMail) = "MailItem" Then
    On Error GoTo ErrorSkip
        lCnt = lCnt + 1
        aOutput(lCnt, 1) = olMail.SenderEmailAddress '**Code stops here**
        aOutput(lCnt, 2) = olMail.ReceivedTime
        aOutput(lCnt, 3) = olMail.ConversationTopic
        aOutput(lCnt, 4) = olMail.Subject
    End If
ErrorSkip:
Next olMail

Set xlApp = New Excel.Application
Set xlSh = xlApp.Workbooks.Add.Sheets(1)

xlSh.Range("A1").Resize(UBound(aOutput, 1), UBound(aOutput, 2)).Value = aOutput
xlApp.Visible = True

End Sub