
Экспорт можно выполнить в один из следующих вариантов:
-
Excel книги Данные имеет одностороннее подключение к исходному списку. Периодическое обновление книги извлекать изменения, внесенные в список. -
CSV-файл (разделенные запятыми значения) Его можно открыть в Блокноте или Excel. Данные не подключены к исходному списку. (В macOS единственным доступным вариантом является экспорт в CSV.)
Важно:
-
Максимальное число строк, которые можно экспортировать в CSV-файл, составляет 30 000.
-
Возможно, вы заметили, что в библиотеках документов на короткое время включен параметр «Экспорт в CSV». Параметр был включен непреднамеренное, поэтому нам пришлось его отключить. Мы будем рады использовать эту возможность в библиотеках документов, и мы работаем над ней, но не можем оценить время, которое можно использовать совместно.
-
Экспорт в Excel книги
-
На панели команд списка выберите » Экспортировать >в Excel».

Важно:
Параметры экспорта доступны только в том случае, если элементы списка не выбраны.В зависимости от браузера вы можете сохранить, открыть или открыть файл напрямую.
Примечание: При сохранении файла имя файла по умолчанию для первой копии — query.iqy, и оно помещается в папку загрузки по умолчанию для браузера. Чтобы изменить имя и расположение, используйте команду «Сохранить как» в браузере.
-
При необходимости нажмите кнопку >«Открыть » после начала скачивания файла.
-
Если появится запрос и вы доверяете SharePoint сайту, на Excel безопасности нажмите кнопку «Включить».
-
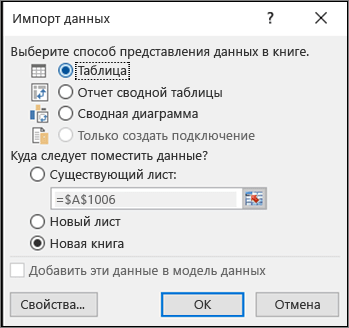
В диалоговомExcel «Импорт данных» выберите «Как вы хотите просмотреть эти данные» и «Где следует поместить параметры данных».
-
По завершении нажмите кнопку «ОК». Список должен отображаться в Excel.

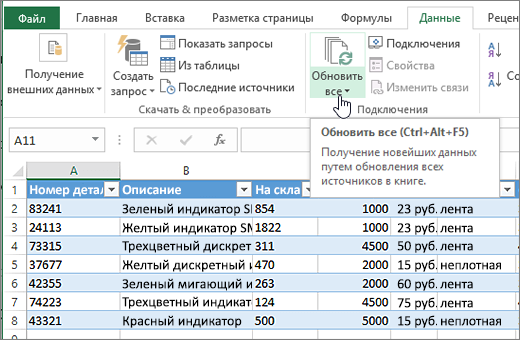
Excel создает Excel с односторонним подключением к данным на основе файла веб-запроса. Чтобы перенести новую копию списка SharePoint в Excel, выберите «Обновить все» на вкладке «Данные «. Изменения, внесенные Excel таблицы, не будут отправляться в SharePoint списка.
Если SharePoint содержит папки, структура папок не отображается в результирующей Excel таблицы. Однако столбцы «Тип элемента» и «Путь» добавляются в таблицу Excel, что позволяет фильтровать и сортировать данные в зависимости от типа и расположения или вложенной папки списка.
Экспорт в CSV-файл
При экспорте в CSV-файл можно экспортировать не более 30 000 строк данных.
-
Откройте список, данные которого требуется экспортировать.
-
На панели команд над списком выберите » Экспорт >экспорт в CSV-файл » в качестве типа выходных данных.
(В macOS на панели команд над списком просто выберите «Экспорт в CSV-файл».)
Примечание: Параметр «Экспорт » доступен только в том случае, если элементы списка не выбраны.
-
Нажмите кнопку « Открыть», чтобы открыть файл в Excel. Затем можно сохранить файл в виде Excel книги, которая позволяет добавлять форматирование данных в нужном формате.
Кроме того, можно выбрать команду «Сохранить» , чтобы сохранить файл в .csv формате на компьютере.
-
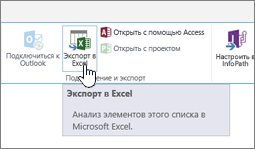
На панели команд списка SharePoint выберите «Экспорт в Excel
«.Важно:
Экспорт в Excel доступен только в том случае, если элементы списка не выбраны.Классический интерфейс SharePoint показывает ленту над списком, а не панель команд. Выберите вкладку «Список » на ленте и нажмите кнопку «Экспорт Excel«.
В зависимости от браузера вы можете сохранить, открыть или открыть файл напрямую.
Примечание: При сохранении файла имя файла по умолчанию для первой копии — query.iqy, и оно помещается в папку загрузки по умолчанию для браузера. Чтобы изменить имя и расположение, используйте команду «Сохранить как» в браузере.
-
При необходимости нажмите кнопку >«Открыть » после начала скачивания файла.
-
Если появится запрос и вы доверяете SharePoint сайту, на Excel безопасности нажмите кнопку «Включить».
-
В диалоговомExcel «Импорт данных» выберите «Как вы хотите просмотреть эти данные» и «Где следует поместить параметры данных».
-
По завершении нажмите кнопку «ОК». Список должен отображаться в Excel.
 «.
«.
Excel создает Excel с односторонним подключением к данным на основе файла веб-запроса. Чтобы перенести новую копию списка SharePoint в Excel, выберите «Обновить все» на вкладке «Данные «. Изменения, внесенные вExcel таблицы, не будут отправляться в SharePoint списка.
Если SharePoint содержит папки, структура папок не отображается в результирующей Excel таблицы. Однако столбцы «Тип элемента» и «Путь» добавляются в таблицу Excel, что позволяет фильтровать и сортировать данные в зависимости от типа и расположения или вложенной папки списка.
SharePoint is a Microsoft online platform that most companies use as an internal website or intranet, i.e., a cloud storage and management system for all business-related data, including your Excel documents. Although you can use OneDrive to share an Excel file, SharePoint unlocks features for more advanced collaboration.
In this post, you’ll understand what a SharePoint list is, how to import data from Excel into a SharePoint list, and how to export from SharePoint to Excel.
If you want to import data into Google Sheets, you can do that easily using Layer. Layer is a free add-on that allows you to share sheets or ranges of your main spreadsheet with different people. On top of that, you get to monitor and approve edits and changes made to the shared files before they’re merged back into your master file, giving you more control over your data.
Install the Layer Google Sheets Add-On today and Get Free Access to all the paid features, so you can start managing, automating, and scaling your processes on top of Google Sheets!
Sharepoint is a web-based collaboration platform developed by Microsoft. It combines various aspects of document management and storage, intranet portals, extranets, and social networking tools into one integrated package. Sharepoint is designed to help businesses manage workflow and collaborate more effectively with colleagues, partners, and customers. By utilizing this platform’s features, organizations can streamline their processes, create virtual workplaces and securely share information.
Sharepoint is available to businesses of all sizes, from small startups to large corporations. It provides users with an easy-to-use interface for accessing documents, tracking tasks, and communicating with others. With Sharepoint, organizations can quickly and easily share files, track projects, assign tasks and hold discussions.
As a result, employees can work more efficiently, complete tasks faster, and improve collaboration between teams. Sharepoint also provides users with a range of other features, such as analytics tools, enterprise search capabilities, document libraries, and mobile access. These additional tools make it easier for businesses to manage their data, stay organized and collaborate from any location.
Sharepoint can be used to store, manage and share documents with colleagues. It also provides a platform for collaboration on projects so that teams can easily work together on tasks in real-time. Sharepoint allows users to create custom webpages, such as intranets and extranets, which can be used for team collaboration or client interaction. Users can also access Sharepoint from their mobile devices, making it easier to stay connected and collaborate on the go.
In addition to the features mentioned above, Sharepoint also offers a range of other tools for managing documents, including document libraries, lists, workflows, and discussions. These features make it easier for users to organize and manage their data, resulting in improved efficiency and collaboration.
A SharePoint list is mainly a data container, similar to an Excel table with rows and columns. These lists can keep all types of detailed information on your clients, employees, products, or services.
SharePoint lists allow you to set up columns according to the data format, i.e., text, number, dates, currency, etc. You can attach photos or hyperlinks to make your list as detailed as possible.
Let’s first start by creating a SharePoint list by importing the data from Excel.
How to Combine Multiple Excel Files Into One
Discover the most popular methods used to manually or automatically combine multiple Excel spreadsheets and data inputs into one master file
READ MORE

To export Excel data to a SharePoint List, you need to make sure of three things:
- You have formatted the data as a table.
- You have named the table.
- You have named the columns.
This is how you can export an Excel table to a SharePoint list.
- 1. Open your Excel workbook and select the whole table. Then, go to Table Design > Export > Export Table to SharePoint List.

Import And Export From SharePoint To Excel — Export Table to SharePoint List
- 2. Enter the URL of your SharePoint site in the “Address” bar.

Import And Export From SharePoint To Excel — SharePoint site URL
- 3. Tick the box “Create a read-only connection to the new SharePoint list”. This allows the new data to show up in your Excel table when you add or refresh your SharePoint list.

Import And Export From SharePoint To Excel — Create read-only connection
- 4. Type in the “Name” for the SharePoint List. Optionally, you can add further information in the “Description” box. Then, click “Next”.

Import And Export From SharePoint To Excel — Name and Description
- 5. Review the data types per column in case you need to make any changes. Once you’re ready to export, click “Finish”.

Import And Export From SharePoint To Excel — Finish to export
- 6. Go to your SharePoint site to check that it has exported the table correctly. It will appear under the “Activity” group, as shown below.
Import And Export From SharePoint To Excel — Check Excel in SharePoint
Now that you know how to export an Excel table to a SharePoint list, let’s see how you can do the reverse process.
To export data from a SharePoint list to Excel, follow these steps.
- 1. Go to the SharePoint site and click on the SharePoint list you just created to open. Go to Export > Export to Excel. This will export your list as a “query.iqy” file.

Import And Export From SharePoint To Excel — Select SharePoint list
- 2. Open the “query.iqy” file and click on “Enable” if you get the “Microsoft Excel Security Notice” alter.

Import And Export From SharePoint To Excel — Enable
Let’s see how you can perform these same actions automatically using Power Query.
How To Use Excel Power Query for Beginners?
With Power Query, you can import data from different sources and prepare the data for analysis. Here’s how to use Power Query in Excel.
READ MORE

PowerQuery is an automation feature in Excel that allows you to perform repetitive tasks automatically. Unlike the read-only connection set in the previous method, this will give you more control over which data in the SharePoint list you would like to import or export.
However, to import or export a SharePoint list in Excel using Power Query, you will need to subscribe to an Enterprise Plan.
- 1. Open your Excel spreadsheet and go to Data > Get Data > From Online Services > From SharePoint Online List.
- 2. Enter the URL to your SharePoint site. Click “OK” to continue.
- 3. Select the SharePoint list to import. Then, a preview of the list should appear on the right.
Please note: All SharePoint lists assign a unique identifier to each column. This ID column is created automatically on SharePoint. Simply edit according to preference to exclude any unwanted column.
- 4. Select the columns to import by pressing down the Ctrl key and right-click on any of the selected headings to “Remove Other Columns”.
- 5. Once you finish, “Save” and “Load”. In the Power Query Editor, go to Home > Close & Load.
Now that you’ve set up your PowerQuery connections between SharePoint and Excel, you can quickly update your SharePoint list from Excel.
To automatically update a SharePoint list from Excel, you can do so manually by simply clicking on the “Refresh” button under the “Table Design” tab. If you want Excel to do this automatically through a workflow, you can do so using PowerQuery, Power BI, or Power Automate. However, note that automating with PowerQuery requires you to have the Enterprise Plan. This is how you can quickly update a SharePoint list from Excel using Power Automate.
- 1. Launch Power Automate and go to “Templates” on the left-side menu.

Import And Export From SharePoint To Excel — Templates
- 2. Type in “When a file is modified in OneDrive, synchronize the changes to SharePoint” to quickly access the template.

Import And Export From SharePoint To Excel — Type in template name
- 3. Make sure you are logged in to all applications to proceed. Click “Continue”.

Import And Export From SharePoint To Excel — Continue
- 4. Select the folder where you have stored the Excel file to trigger the “When a file is modified” action. Then, select the SharePoint folder where you saved the list. Once you finish, click “Save”.

Import And Export From SharePoint To Excel — Fill in flow details
- 5. Test the flow to check that it runs correctly by clicking on the “Test” button to the far right.

Import And Export From SharePoint To Excel — Test flow
Additionally, Power Automate may ask you to make a change in your Excel file to trigger the flow. You can also create an automatic trigger. However, this requires a more complex setup which you can learn in more detail here.
Want to Boost Your Team’s Productivity and Efficiency?
Transform the way your team collaborates with Confluence, a remote-friendly workspace designed to bring knowledge and collaboration together. Say goodbye to scattered information and disjointed communication, and embrace a platform that empowers your team to accomplish more, together.
Key Features and Benefits:
- Centralized Knowledge: Access your team’s collective wisdom with ease.
- Collaborative Workspace: Foster engagement with flexible project tools.
- Seamless Communication: Connect your entire organization effortlessly.
- Preserve Ideas: Capture insights without losing them in chats or notifications.
- Comprehensive Platform: Manage all content in one organized location.
- Open Teamwork: Empower employees to contribute, share, and grow.
- Superior Integrations: Sync with tools like Slack, Jira, Trello, and more.
Limited-Time Offer: Sign up for Confluence today and claim your forever-free plan, revolutionizing your team’s collaboration experience.
Conclusion
SharePoint has proven to be a great platform to store and manage data for any organization. Moreover, it provides powerful features to reach advanced levels of collaboration across various departments within a company.
In this article, you have learned how SharePoint and Excel integrate, so you can export and import data manually and automatically using the PowerQuery tool. You simply have to consider that the features offered for Office 365 are more limited in the Business Plan, than in the Enterprise Plan.
If you’re interested in unlocking the full potential of Office 365 tools and creating your own workflows between apps, read Power Automate & Excel: Examples And Use Cases.
I recently started a consulting job for a construction company to fix their Excel quotation template. But even the best Excel based template in the world wasn’t going to solve all their problems.
After a bit of investigation, I came to the conclusion that what they really needed was a custom quote app which could be built fairly easily with Microsoft PowerApps.
PowerApps can easily connect to and save data to many different data sources, so after a bit more investigating, I decided I would use SharePoint lists to store all the quote data from the app.
I had heard about SharePoint before, but I never really knew what it was.
I had also come across it in Excel since Excel Tables have the ability to export to SharePoint.
In this post, I’m going to share with you what I found out about SharePoint and Excel.
What is SharePoint?
As the name might suggest, it’s a place to share stuff.
It’s a browser based platform from Microsoft that can house all the content (data, files, folders, photos, documents etc.) related to your work to make it easier to share and collaborate with others on the same work.
You can think of it as an internal company website (intranet) that can help improve your organization’s data management. A sort of Wikipedia style server or information portal. It’s also a bit like OneDrive in that it can store and manage your files in the cloud, but with some more advanced collaboration features.
I set up my SharePoint site quickly and didn’t bother to edit or customize anything. This is what you get straight out of the box.
There’s a lot of customization possible, but I’m just using it to store a couple data lists so didn’t think it was worth spending any time on.
How Do I Get SharePoint?
SharePoint doesn’t come with any of the Office 365 Home products. It’s really only intended for business use so it’s only available with an Office 365 Business account subscription.
In fact, you’ll have to shell out for the Office 365 Business Premium account if you want to use SharePoint. It’s not available with the regular business account.
What is a SharePoint List?
A SharePoint list is similar to an Excel Table, it’s a container for data.
SharePoint lists allow you to store data in list format with rows and columns.
You can use a list to house all your customer contact details, employee details, product pricing etc. If you can organize the data into a table structure, then it can be stored in a SharePoint list.
Unlike Excel tables, the columns in a SharePoint list allow you to set a column as a certain type of data like text, number, date, hyperlink etc… A SharePoint list can even contain attachments so you could attach a photo to each employee in your employee details list.
Creating a New List in SharePoint
Creating a new list in SharePoint is easy.
From the homepage of your SharePoint site, press the New button then choose List from the options. Give the list a name and description and press the Create button.
You will now have a blank SharePoint list!
All SharePoint lists contain a Title column, and this should usually be reserved for a field that contains unique values.
You can customize your new list by adding columns, assigning data types to each column and then adding data to the list.
The new list might appear in your site navigation menu, but if not you can use the Site Contents menu item to navigate back to the list from any place on your SharePoint site.
Exporting an Excel Table to a SharePoint List
If your data already exists in Excel, then there is an easier way to create a new SharePoint list.
You can export data from Excel to SharePoint. This way, you can avoid the tedious task of creating and assigning data types to columns.
If your data already has column names in Excel, then these are also exported to your new SharePoint list. The Export wizard will also guess what SharePoint data types to use for the columns based on the data.
Create an Excel Table for the Data
First, the data is going to need to be in a table format.
Select the data then go to the Insert tab and choose Table. Another way to turn your data into a table is to use the Ctrl + T keyboard shortcut.
Make sure you name the table after by going to the Table Tools Design tab and giving it a new name in the Properties section.
Export the Excel Table to a SharePoint List
Select the table and go to the Table Tools Design tab and select the Export command then choose Export Table to SharePoint List.
The first step in the Export to SharePoint List wizard.
- Enter the URL for your SharePoint site.
- Check the box if you want to create a read-only connection to the SharePoint list. This means when you add data to the list on your SharePoint site, the new data will show up in your Excel table when you right click and refresh the table.
- Enter a Name for the new list.
- Enter a Description for the new list. This is an optional entry.
- Press the Next button to review the data types selected before exporting.
Your SharePoint URL should be something like https://yourcompany.sharepoint.com/sites/yoursitename.
In step 2 of the export wizard, review the data types for each of the columns in the data. If a selected data type is incorrect, you’ll need to cancel the export and either fix the key cell in the table or change the entire column of data in the table.
When you’re happy with the data types in the export wizard, press the Finish button to complete the export.
How big the list is will affect how long the export takes. A handful of rows will be near instant but a couple thousand rows can take several minutes to export.
When the export process completes successfully, you’ll get a pop up notification with a link to the location of the new list.
You can click on this link and the SharePoint list will open in your default browser. Alternatively, you can find the list from the Site Contents navigation menu.
Refreshing an Excel Table with a Read-Only Connection to a SharePoint List
In the export table wizard there was an option to create a read-only connection to the new SharePoint list.
If you select this option then you’ll be able to refresh your Excel table with any new or changed data from the SharePoint list.
Select the table and go to the Table Tools Design tab and press the Refresh button or right click on the table and select Refresh from the menu.
The data in the Excel table will be updated with the latest data from the SharePoint list.
Exporting a SharePoint List to an Excel Table
You can also move data the other way by exporting from SharePoint to Excel.
There’s a big Export to Excel button in each list.
Press this button and the browser will download a query.iqy file.
Open this file and Excel will launch and prompt you to choose where to load the data (Table, Pivot Table or Pivot Chart) and choose the location to load it (an existing worksheet, new worksheet or new workbook).
This is actually the exact same read-only setup that was an option when exporting from Excel. If you missed enabling that option, no worries because you can achieve the same thing by exporting from your SharePoint list.
Importing a SharePoint List to Excel with Power Query
Power query can be used to connect to all sorts of data sources and SharePoint lists are one of them.
This will give you more control over which data in the list you import as compared to creating a read-only connection to the SharePoint list.
Create a SharePoint Power Query
To create a new SharePoint list query, go to the Data tab ➜ select Get Data ➜ choose From Online Services ➜ choose From SharePoint Online List.
This option is also available under the From Other Sources menu as From SharePoint List.
You will be prompted to enter the URL to the SharePoint site. This should be of the format https://yourcompany.sharepoint.com/sites/yoursitename. Then you can press the OK button.
This will open the power query navigator preview where you can select the list you want to import. Once selected, a preview of the list will show on the right.
A large number of columns in the data preview will look unfamiliar. This is because SharePoint lists contain a lot of extra columns even if they aren’t being used.
For example, every SharePoint list will have an ID column which is a unique identifier automatically created for each row in the list.
You will need to edit the query slightly to avoid importing all these unfamiliar columns. Press the Transform Data button to open the power query editor.
There are a lot of extra columns, so it will usually be easier to select the columns you want to keep (hold the Ctrl key to select multiple columns). Then right click on any of the selected column headings and choose Remove Other Columns from the menu.
You can also do any other type of data transformation available with power query if you would like.
Once you’re finished with the query, you can save it and load the data into Excel. Go to the Home tab in the power query editor and press the Close & Load command to save the query and load the data into an Excel table in your workbook.
Importing Files from a SharePoint Document Library or Folder with Power Query
SharePoint can store more than just lists, it can also store all types of files in a document library.
You can use use power query to import and combine data from multiple data files like Excel workbooks or CSV’s.
What is a SharePoint Document Library or Folder?
A SharePoint document library is very similar to a folder on your computers hard drive. It’s a place to store all your related files.
You might set up a document library for all your monthly sales files.
Here I have a document library called Sales and in a folder called 2018Q1 in which I have 3 Excel workbooks.
Each file has sales data by day for the particular month.
Export a Folder to Excel
If you click on the Export to Excel button found in the SharePoint folder this will download a query.iqy file.
When you open this file it launches Excel and creates a read-only connection to the list of files in the folder. You can refresh this just like when exporting a SharePoint List to an Excel Table.
This table only contains the names of files and not the actual contents of the files. There is a handy clickable hyperlink for each of the file or folder names. This will open up the SharePoint file or folder.
Create a From SharePoint Folder Query
You’ll need power query if you want to import and combine the data inside all the files.
To create a SharePoint Folder query go to the Data tab ➜ select Get Data ➜ choose From File ➜ choose From SharePoint Folder.
Now you’ll need to input the site URL (not the folder URL).
The Navigation preview will show a list of all files in the site and you’ll need to use power query to filter down to the files you want. Press the Transform Data button.
Filter on the Folder Path column to the desired folder. Then further filter on any file Name or Extension to get exactly the files you want.
When only the files you want to import and combine are left, click on the Combine Files toggle in the Content column heading.
Power query will import and combine the files based on a sample file. You can then select which sheets to import and view a preview of the data on the right side. Press the OK button to combine the files.
You can then Close & Load the query to import all the data. Now if you add a new monthly sales files to the folder and refresh the query, the new file’s data will be included in the query’s output.
Conclusions
SharePoint is a great place for storing files for collaboration and data that’s shared throughout the company.
But it might not be the best place for further using or analyzing the files or data.
That’s ok though, SharePoint and Excel are very well integrated. It’s easy to push and pull data from SharePoint to Excel.
You can quickly get data using the export options in either Excel or SharePoint. If you’re comfortable with power query, you can even use that.
About the Author
John is a Microsoft MVP and qualified actuary with over 15 years of experience. He has worked in a variety of industries, including insurance, ad tech, and most recently Power Platform consulting. He is a keen problem solver and has a passion for using technology to make businesses more efficient.
Have you ever had to query and import the SharePoint list to Excel? Or ever required to use SharePoint list as an Excel data source? Well, just follow these steps to excel data connection to use SharePoint list as excel data source:
Go to your SharePoint list and create a new view matching your requirement by adding necessary columns.
Step 2: Use Export to Excel to generate Data Source Connection
Navigate to your SharePoint list view created in Step-1, use the “Export to Excel” button under the “List” tab. This imports the SharePoint list to Excel and establishes the data source connection in Excel as below.

Make sure you set the below properties to skip column width and preserve sort/filter/layout/formats.

You can also set the data refresh when opening the file.

How to Refresh the Data?
All you have to do is either right-click on any data imported and click “Refresh” in the context menu, or click on the “Refresh All” button under the “Data” tab of Excel.
Once you click refresh, Your Excel sheet will be synced from the SharePoint list (One way – from the SharePoint list!)

Fix data format in Lookup and People picker columns
When you import data from the SharePoint list to Excel, it imports the data in the same format SharePoint stores internally. E.g., You’ll see John Mathew;#157;#Omar Saad in the people picker column.
Solution:
Let’s create a custom function in VBA code to replace the format “Number#;” in People Picker, Lookup columns with regular expressions:
- Go to Excel >> File >> Options >> Customize Ribbon >> Enable “Developer” check box under Customize the Ribbon. This adds a new tab “Developer” in the Ribbon.
- Click on the “View Code” button under the “Controls” group of the Developer Tab.
- Click on Tools >> Add Reference >> Pick “” to add Regular Expressions library: Microsoft VBScript Regular Expressions 5.5

- Right-Click the VBAProject >> Insert >> Module. Insert the below code into the Module.

Function xREPLACE(pattern As String, searchText As String, replacementText As String, Optional ignoreCase As Boolean = True) As String
    On Error Resume Next
    Dim RegEx As New RegExp
    RegEx.Global = True
    RegEx.MultiLine = True
    RegEx.pattern = pattern
    RegEx.ignoreCase = ignoreCase
    xREPLACE = RegEx.Replace(searchText, replacementText)
End Function
- Now, create a new column in Excel, Say for E.g. You are going to properly format the “Deal Lead” column, Enter the formula as:
=xREPLACE(“#d*;|#d*|d*;#”,TRIM([Deal lead]),” “) - You can hide the original column “Deal Lead” and Name your new columns similar to “Deal Lead”, say “Deal leader” or add a . (dot) prefix.
- Save the Excel file as “XLSM” format so that the code saved along with your Excel sheet.
Salaudeen Rajack
Salaudeen Rajack — SharePoint Expert with Two decades of SharePoint Experience. Love to Share my knowledge and experience with the SharePoint community, through real-time articles!


In this SharePoint tutorial, we will discuss how to open SharePoint list in excel or how to export SharePoint list to excel. I will also show, how to update excel from SharePoint list automatically.
Also, we will see how to fix the error, Access to the resource is forbidden excel SharePoint that comes while trying to open SharePoint list in excel.
Now, let us see how to Open SharePoint list in excel. Here, we will connect with the SharePoint Online site from excel.
In my SharePoint Online site, I have created a custom list as Employees. And the list looks like below with some data.

Now, let us see how to open this SharePoint Online list in excel.
First of all Open a excel file in your desktop.
Then click on Data -> Get Data -> From Online Services -> From SharePoint Online List like below:

Then it will ask you to provide the SharePoint Online Site URL like below, you can provide also the list URL, but you might get an error.

Once you click on OK, it will ask you to enter the Credentials. Here first select Microsoft account.
It will show the Sign-in button if you have not already signed in with an Office 365 account.
Click on the Sign-in button and then it will ask you to enter the user name and password.

Then you can see it will show you Sign in as different user. Then select the SharePoint site where you list exists.
Then click on the Connect button.

Then it will display all the lists and libraries presented in the SharePoint Online site.
Select the particular list, in this case I selected Employees list. In the right site it will display all the columns that includes all the out of box hidden columns also.
If you want to load all the columns, then click on the Load button.
But if you want to load the select columns then click on the Transform Data button like below:
Here, I want to select a few specific columns from the SharePoint Online list.

Once you will click on the Transform Data button, it will open the Excel Power Query Editor from where we can select the columns that we want to display from the list.
Here click on Home -> Choose Columns -> Choose Columns like below:

Then it will Open a dialog box, from where we can Choose Columns.
Here, you can uncheck every column and select only those columns that we required.
Here I wanted to show the below SharePoint list columns:
- ID
- Title
- FullName
- Designation

Once you click on Choose columns, then click on OK. Then Close & Load button from the ribbon, like below:

Now, you can see your SharePoint List data or items will be there in the excel.

This is how we can open SharePoint list in excel.
Update excel from sharepoint list automatically
Once your SharePoint Online list data in excel, the next question is how to update excel from SharePoint list automatically.
Meaning If you insert an item to SharePoint Online list, then it will automatically update excel spreadsheet from SharePoint list.
From the excel spreadsheet, click on Data -> Queries & Connections like below:

Then click on the Refresh icon like below:

This will open the Query Properties dialog box from where we can enable auto update excel from SharePoint list option.
If the properties window did not open, then click on the Refresh icon and then click on … and then click on Properties like below:

Here in the Query Properties dialog box, check the below checkboxes:
- Enable background refresh: Once you enable background refresh, it will refresh and sync list data to excel in the background.
- Refresh every minutes: Here, you can set the interval when you want the refresh to happen. I have set it for 2 minutes. So in every 2 minutes, the refresh will happen and if any new records are there in the SharePoint list, the list item will be synced with the excel.
- Refresh data when opening the file: If you will enable Refresh data when opening the file, then when you will open the excel, it will do the refresh.
- Refresh this connection on Refresh All: Once you enable this option, if you will click on Refresh All button from the ribbon, then refresh will happen.

Click on OK.
Enter a few items to the SharePoint list, and wait for 2 minutes, it will update excel from SharePoint list automatically.
You can see here I have added 3 items to the SharePoint Online list.

Once the automatic refresh will happen, you can see the SharePoint list items have been automatically updated in the excel.

This is how we can update excel from SharePoint list automatically without using flow.
Access to the resource is forbidden excel SharePoint
In the beginning, when I was trying to Open SharePoint list in excel, I got an error as access to the resource is forbidden excel SharePoint.
The error looks like below:
Unable to connect. We encountered an error while trying to connect. Details: “Access to the resource is forbidden“.

The error comes because I tried to get data by using the below method,
Data -> From Web and then I enter the SharePoint site URL to connect.

To fix excel sharepoint connection access to the resource is forbidden issue, the ideal way is to connect from Data -> Get Data -> From Online Services -> From SharePoint Online List.

In case you want to check out all the SharePoint connections, then you can go to Data -> Get Data -> Data Souce Settings.

This will open the Data source settings page from where you can see all your data connections.
There you can edit permissions or you can also clear permissions and make the connection again.

This is how we can fix error, access to the resource is forbidden excel SharePoint online.
The remote server returned an error 404 not found excel SharePoint
I also got an error that says, Unable to connect. We encountered an error while trying to connect.
Details: “Microsoft.Mashup.Engine1.Library.Resources.HttpResource: Request failed:”. The remote server returned an error 404 not found.

The error was coming when I give the direct SharePoint Online list URL like below:

To fix this issue, enter the SharePoint site URL and then choose your particular list.

This is how we can fix error, The remote server returned an error 404 not found.
You may also like the following tutorials:
- How to create PowerApps collection from Excel
- Create a canvas app from Excel in Power Apps
- Create a Data Table from Excel Data using Power Apps
- Create a Power BI report from Excel using Power BI Desktop
- How to directly save Excel File into SharePoint Online Document Library
- How to export excel table to SharePoint List
- Import excel spreadsheet into SharePoint list 2013
- SharePoint audience targeting – Everything you need to know
In this SharePoint tutorial, we learned:
- How to open a SharePoint list in excel
- Update excel from sharepoint list automatically
- Access to the resource is forbidden excel SharePoint
- The remote server returned an error 404 not found excel SharePoint

I am Bijay a Microsoft MVP (8 times – My MVP Profile) in SharePoint and have more than 15 years of expertise in SharePoint Online Office 365, SharePoint subscription edition, and SharePoint 2019/2016/2013. Currently working in my own venture TSInfo Technologies a SharePoint development, consulting, and training company. I also run the popular SharePoint website EnjoySharePoint.com