2,077 Introduction Word Stock Photos, Images & Pictures
-
Most relevant
Best selling
Latest uploads -
Within Results
-
People
People
Reset
No People
Only with people
Number
Any
1
2
3
4
5+Gender
Any
Male
FemaleAge range
Any
<1
1-4
5-9
10-15
16-20
21-30
31-45
46-65
65>Ethnicity
Asian
African American
Hispanic
Multi-racial
Caucasian/White
Other
CANCEL
APPLY -
Pricing
Pricing
Reset
Level
Any
0
1
2
3
4
5CANCEL
APPLY -
License
License
Reset
Royalty-Free
Editorial
Exclusive
Extended
WE-L
P-EL
SR-EL
CANCEL
APPLY -
Media Properties
Image Orientation
Reset
Portrait
Landscape
Square
Panorama
Color
Color Composition
Any
Color
MonochromePrimary
Percentage
Secondary
Percentage
Resolution
Size
Any
<5 MP
8 MP
15 MP
20+ MPCANCEL
APPLY -
More
Contributor
Reset
From Contributor (separated by comma)
within editors’ choice
Exclude
Keywords (separated by comma)
CANCEL
APPLY -
Safe Search
- Filters
Reset All Filters
-
hello
Browse 2,077 professional introduction word stock photos, images & pictures available royalty-free.
Presentation on theme: «Microsoft Word 2010 Lesson 1: Introduction to Word.»— Presentation transcript:
1
Microsoft Word 2010 Lesson 1: Introduction to Word
2
This interactive lesson will give you all the knowledge and understanding you need to move on to todays assignment and quiz. To complete this lesson first click F5 to start the slideshow. To move forward click the space bar. If you need to return to the last page or the table of contents c lick the links at the bottom of the page. Instructions: RETURN TO LAST SLIDE TABLE OF CONTENTS
3
The Word Window The Word Window Opening Word Opening Word Adding Shortcuts Adding Shortcuts Tabs Tabs Ribbons/ Groups Ribbons/ Groups Dialog Box Dialog Box Commands Commands Table of Contents RETURN TO LAST SLIDE TABLE OF CONTENTS Menus Menus Mini Toolbar Mini Toolbar Shortcut Menu Shortcut Menu Quick Access Quick Access Undo Redo Undo Redo Key Tip Key Tip File Menu File Menu Help Button Help Button Open Files Open Files Minimize/ Mazimize/ Close Minimize/ Mazimize/ Close Scroll Bars Scroll Bars Hand Panning Hand Panning Select Browse Object Select Browse Object Select Text Select Text The View Tab The View Tab
4
File Menu Quick Access Toolbar Document Title Minimize Maximize Close Help Button View Ruler Scroll Button Scroll Box Scroll Button Previous Page Select Object Next Page Zoom Slider Status Bar Insertion Point Ribbon The Word Window
5
STEPS: 1.Click Start 2.Click All Programs 3.Click Microsoft Office 4.Click Microsoft Word Try it yourself! Then come back to the Lesson to continue on. Opening Word RETURN TO LAST SLIDE TABLE OF CONTENTS
6
Sometimes it’s easier to open Word using shortcuts. Let’s pin word to the Taskbar (the bar at the bottom of the screen) STEPS: 1.Right Click on the Word icon that appears on the taskbar 2.Click pin this program to the taskbar. Try it yourself! Then come back to the Lesson to continue on. Adding Short Cuts RETURN TO LAST SLIDE TABLE OF CONTENTS
7
Tabs are the eight areas of activity in Microsoft Word. Below you can see the tabs. The active tab is the tab that you are currently click on. Understanding Check: In this picture what is the active tab? The HOME tab Tabs RETURN TO LAST SLIDE TABLE OF CONTENTS
8
Q: In this picture what is the active tab? A: The HOME tab Understanding Check RETURN TO LAST SLIDE TABLE OF CONTENTS
9
When clicked, each tab opens a ribbon full of commands. The commands are separated into groups. The Ribbon & Groups Tabs Ribbon Group RETURN TO LAST SLIDE TABLE OF CONTENTS
10
Q: In this picture what is the active tab? A: Insert Q: In this picture what group is shapes located in? A: Illustrations Understanding Check
11
The dialog box launcher is a small arrow in the lower right corner of a group that you can click to launch a dialog box. Dialog Box Launcher RETURN TO LAST SLIDE TABLE OF CONTENTS
12
A dialog box displays additional options or information to help you execute a command. Dialog Box RETURN TO LAST SLIDE TABLE OF CONTENTS
13
Commands A command is a button you click or a box where you enter information that tells Word what you want it to do. Commands RETURN TO LAST SLIDE TABLE OF CONTENTS
14
A menu is indicated by a downward pointing arrow. Menus allow you to choose from a list of options. To the right you can see the Font menu Menus RETURN TO LAST SLIDE TABLE OF CONTENTS
15
The mini toolbar is a small toolbar with popular commands that appears when you point to selected text. In Word, type something, select it and try to view the mini toolbar Mini Toolbar RETURN TO LAST SLIDE TABLE OF CONTENTS
16
The shortcut menu is a menu that displays useful commands when you right click on your document. You will notice when you right click the mini toolbar also appears. Shortcut Menu RETURN TO LAST SLIDE TABLE OF CONTENTS
17
The quick access toolbar contains commands that you use most often, such as Save, Undo and Redo The Quick Access Toolbar RETURN TO LAST SLIDE TABLE OF CONTENTS Quick Access Toolbar
18
The undo command lets you cancel or undo your last command. Click it as many times as necessary to undo previous commands. The redo command repeats your last action. If this command is not available its picture will remain dimmed. Undo & Redo RETURN TO LAST SLIDE TABLE OF CONTENTS
19
Key tips appear when you press the “Alt” key on your keyboard. Key tips are small square labels (called badges) that correspond to the command you want to use. Every command on the ribbon has a key tip. Practice using key tips now. Key Tip RETURN TO LAST SLIDE TABLE OF CONTENTS
20
Q: To save your file using key tips, first press “Alt,” then what? A: Then Press 1 Q: Which badge in the picture above corresponds to the Page Layout tab? A: The P badge Understanding Check RETURN TO LAST SLIDE TABLE OF CONTENTS
21
The File Menu is located in the upper left corner of the screen. When click it displays basic commands for opening, saving, printing and advanced options. NOTICE: You must click the File Menu button again to close the menu. The File Menu RETURN TO LAST SLIDE TABLE OF CONTENTS
22
Click the Microsoft Word Help button in the upper right corner of the screen to open a dialog box of help options. The Help Button RETURN TO LAST SLIDE TABLE OF CONTENTS Help Button
23
In the lower right corner of the Word Help dialog box you will find the connection status menu. By clicking this menu you can access more help topics at Microsoft Office Online. The Help Button RETURN TO LAST SLIDE TABLE OF CONTENTS
24
STEPS: 1.Click File 2.Click Open 3.From the dialog box choose your file 4.Click Open Opening Existing Files RETURN TO LAST SLIDE TABLE OF CONTENTS
25
Q: Where do you go to find answers to questions you have about Word? A: The Help button Q: What are the step to open an existing file? A: File, Open, Choose the document, click open Understanding Check RETURN TO LAST SLIDE TABLE OF CONTENTS
26
At the top right of the word window you will see the commands for maximize (make bigger) minimize (place on the taskbar) and close (exit the document) MINIMIZE MAXIMIZE CLOSE Maximize, Minimize, Close RETURN TO LAST SLIDE TABLE OF CONTENTS
27
Along the right of the Word Window (and occasionally the bottom, depending on window size) you will find scroll bars. You can scroll by using the arrows of clicking and moving the bar itself. Scroll Bars RETURN TO LAST SLIDE TABLE OF CONTENTS
28
The hand panning button allows you to click anywhere in the document and scroll up and down with the hand Hand Panning RETURN TO LAST SLIDE TABLE OF CONTENTS
29
Select Browse Object RETURN TO LAST SLIDE TABLE OF CONTENTS This menu, found at the bottom of the scroll bars Gives you options for quickly and easily browsing your document, and finding information.
30
Selecting Text RETURN TO LAST SLIDE TABLE OF CONTENTS
31
Understanding Check RETURN TO LAST SLIDE TABLE OF CONTENTS Q: How do you select any amount of text? A: click and drag across the text
32
The View Tab/ Ribbon RETURN TO THE VIEW TAB TABLE OF CONTENTS Click the parts of the view tab to view what they do. When finished reading what a part does click “return to view tab.” When you reach the “Switch Windows” slide simply press the space bar to continue with the lesson.
33
Words default view is “Print Layout,” which shows your what your document would look like if you printed it out. Print Layout TABLE OF CONTENTS RETURN TO THE VIEW TAB
34
This mode lays your document out like a book. Full Screen Reading TABLE OF CONTENTS RETURN TO THE VIEW TAB
35
This view shows you what your document would look like if turned into a Web page. Web Layout TABLE OF CONTENTS RETURN TO THE VIEW TAB
36
This view comes with a separate tab, ribbon and commands that help you transform a document into an outline- or notes. Outline TABLE OF CONTENTS RETURN TO THE VIEW TAB
37
Draft view is meant to help you quickly edit text. Headers and footers are not visible when in draft view. Draft TABLE OF CONTENTS RETURN TO THE VIEW TAB
38
This shows the ruler allowing you to line up elements within your document. Ruler TABLE OF CONTENTS RETURN TO THE VIEW TAB
39
Adds grid lines to your document to help you align elements within the document. Gridlines TABLE OF CONTENTS RETURN TO THE VIEW TAB
40
If you have headings within your document the navigation pane allows you to quickly and easy navigate to them and through the document. By click the thumbnails icon in the navigation pane you can view small images or thumbnails of each page in your document. Navigation Pane TABLE OF CONTENTS RETURN TO THE VIEW TAB
41
Click zoom will open a dialog box giving you options for zooming in and out of your document. You can also use the zoom slider in the bottom right corner of the Word window Zoom TABLE OF CONTENTS RETURN TO THE VIEW TAB
42
This button makes it so you automatically get a 100% on anything you turn in… …Just kidding, it actually zooms the document to 100% automatically. 100% Button TABLE OF CONTENTS RETURN TO THE VIEW TAB
43
One Page: Zooms so one entire page is show on the screen Two Page: changes the view so two entire pages are shown on the screen Page Width: zooms the document so the width of the page matches the width of the window. One Page, Two Page, Page Width TABLE OF CONTENTS RETURN TO THE VIEW TAB
44
One Page: Zooms so one entire page is show on the screen Two Page: changes the view so two entire pages are shown on the screen Page Width: zooms the document so the width of the page matches the width of the window. One Page, Two Page, Page Width TABLE OF CONTENTS RETURN TO THE VIEW TAB
45
Open a duplicate copy of the same document in a new window. New Window TABLE OF CONTENTS RETURN TO THE VIEW TAB
46
Arranges all open Word windows so that you can view them all at once on the screen. Arrange All TABLE OF CONTENTS RETURN TO THE VIEW TAB
47
Splits the document into two views so you can view separate portions of the document at the same time. Split Screen TABLE OF CONTENTS RETURN TO THE VIEW TAB
48
Allows you to view two separate documents side by side to compare their contents. Side by Side TABLE OF CONTENTS RETURN TO THE VIEW TAB
49
Allows you to scroll two documents at the same pace using one scroll bar, or your mouse scroll wheel. Synchronize Scrolling TABLE OF CONTENTS RETURN TO THE VIEW TAB
50
Resets window to side-by-side view. If windows are still in this view it will alternate their positions. Reset Window Position TABLE OF CONTENTS RETURN TO THE VIEW TAB
51
Allows you to choose from a list of other open Word windows, and switch to whichever window you choose. Switch Windows TABLE OF CONTENTS RETURN TO THE VIEW TAB
New to VectorStock?
We’re the largest royalty-free, vector-only stock agency in the world.
Every week we add new premium graphics by the thousands.
Whether you’re a global ad agency or a freelance graphic designer, we have the vector graphics to make your project come to life.
Buy Vectors, sell Vectors or both. Sign up now, it’s free.
Email / Username
Password
Or Login With
-
Google
-
Facebook
Related Premium Searches
- Word
- Introduction
- Word Art
- Calligraphy Word
- Kindergarten Word
- N Word
- Doodle Word
- Friends Word
- Sunshine Word
- Good Night Word
- Smile Word Art
- King Word Typography
- Introduction Cartoon Funny
- Introduction Icon Symbol
- Team Introduction
Best match
Newest
Oldest
Most popular
Royalty-free
Rights-managed
RF and RM
Microsoft word is a word processor software developed by Microsoft in 1983. It is the most commonly used word processor software. It is used to create professional quality documents, letters, reports, resumes, etc and also allows you to edit or modify your new or existing document. The file saved in Ms Word has .docx extension. It is a component of the Microsoft Office suite, but you can buy it separately and is available for both Windows and macOS. The latest version of Ms Word is 2019. In this article we will learn the features of Ms Word, but first we learn how to open Ms Word?
How to open MS Word?
The following step shows how to open MS words:
Step 1: Type Ms Word in the search bar.
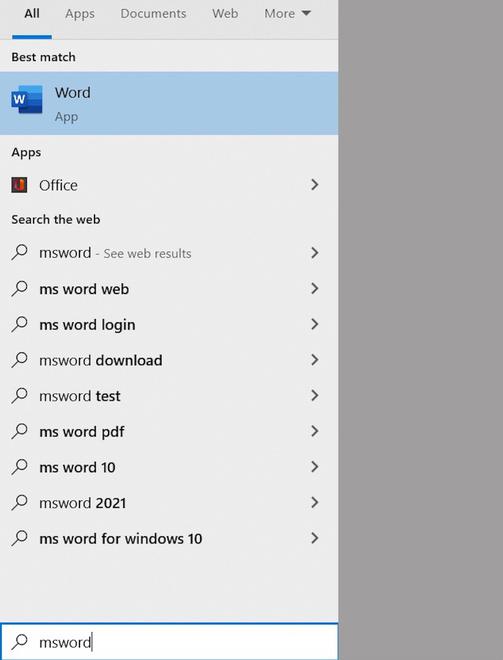
Step 2: Select Ms Word application.
Step 3: Select a blank document and press create button.
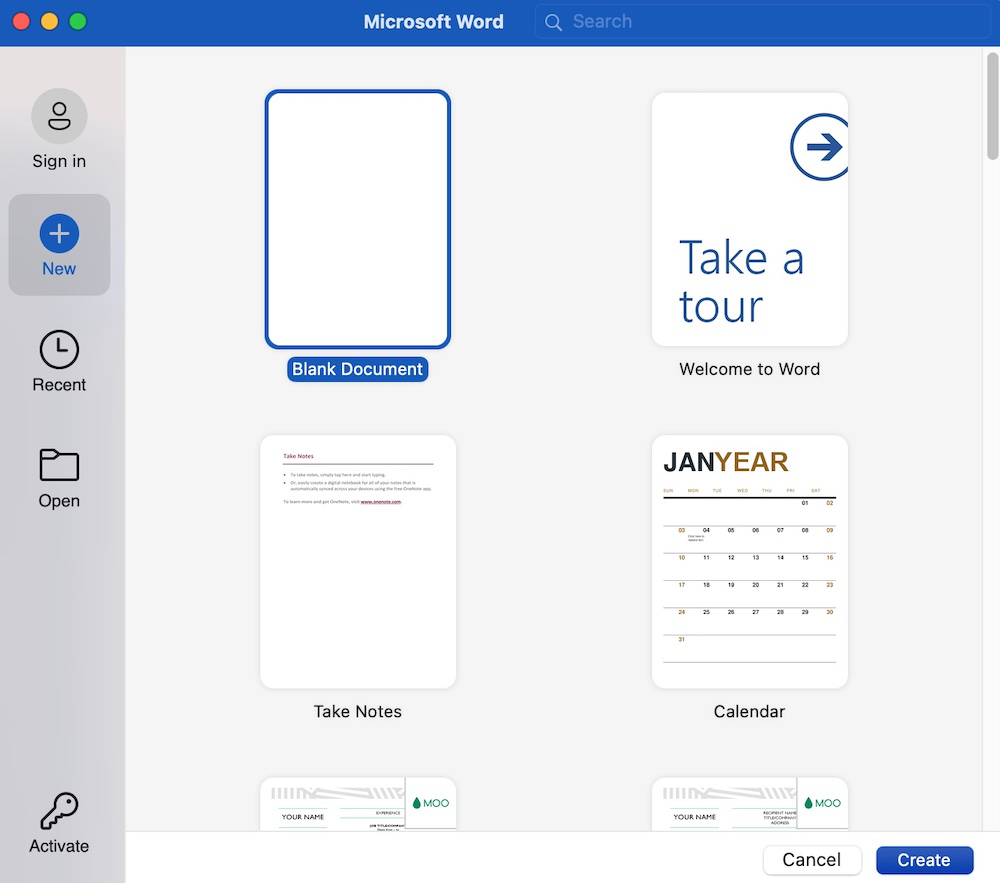
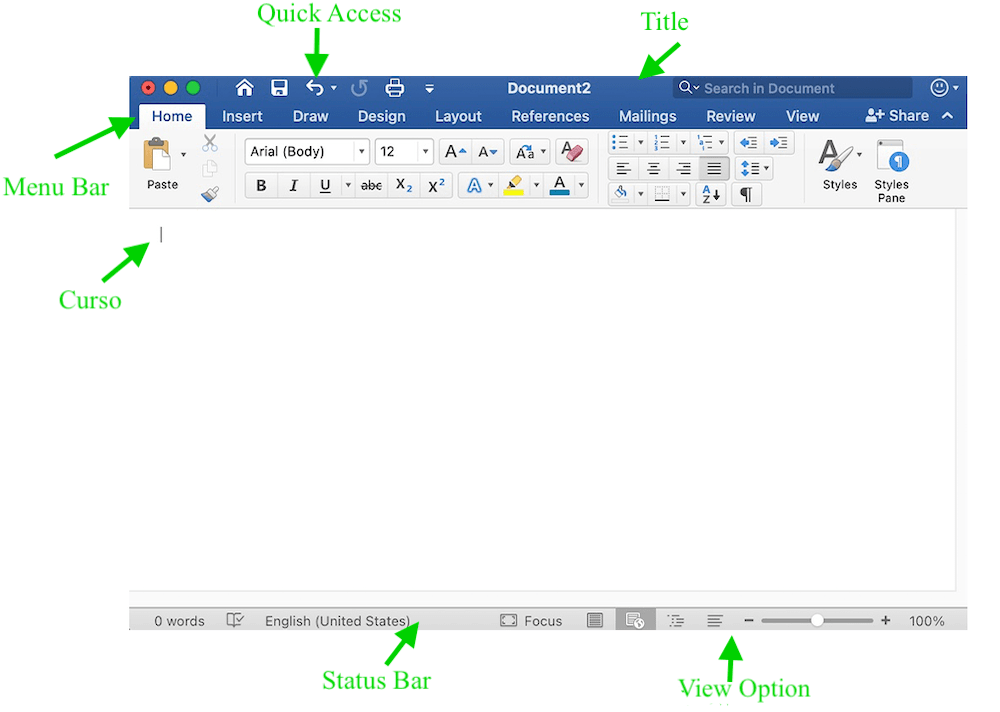
Then you will get a window like in the image below where you can write your content and perform different types of operations on that content, like font type, style, bold, italic, etc. You can also add images, tables, charts to your document.
Features of MS Word
Now let us discuss the features or components of the Ms Word. Using these features, you can perform different types of operations on your documents, like you can create, delete, style, modify, or view the content of your document.
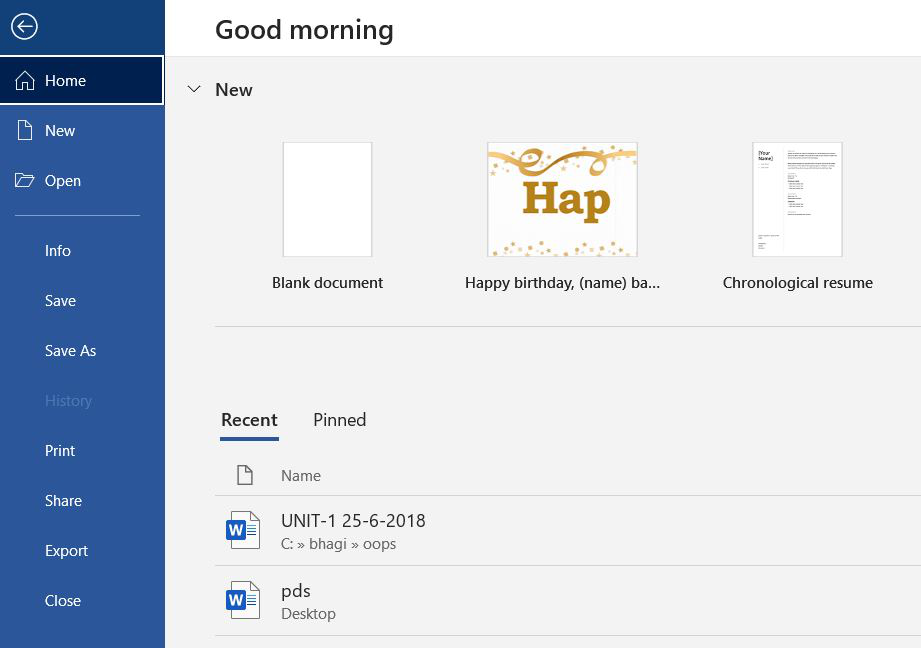
1. File
It contains options related to the file, like New(used to create a new document), Open(used to open an existing document), Save(used to save document), Save As(used to save documents), History, Print, Share, Export, Info, etc.
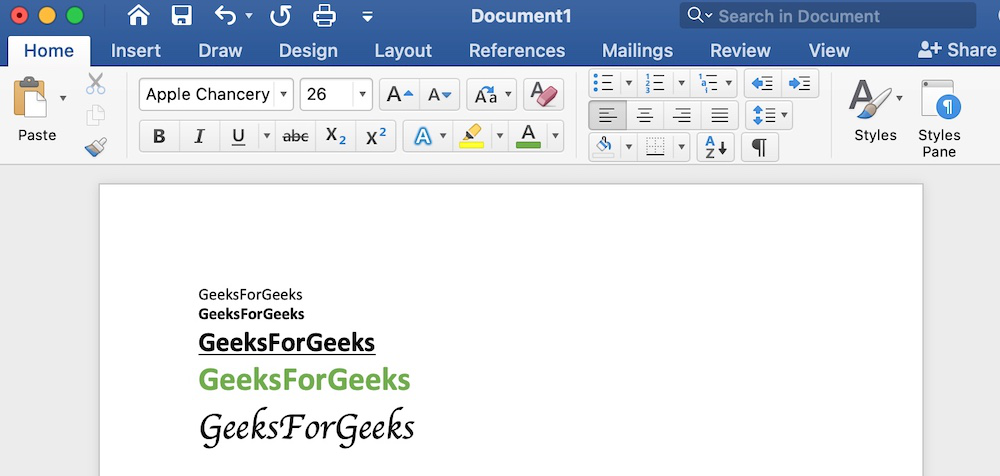
2. Home
It is the default tab of Ms Word and it is generally divided into five groups, i.e., Clipboard, Font, Paragraph, Style and Editing. It allows you to select the color, font, emphasis, bullets, position of your text. It also contains options like cut, copy, and paste. After selecting the home tab you will get below options:
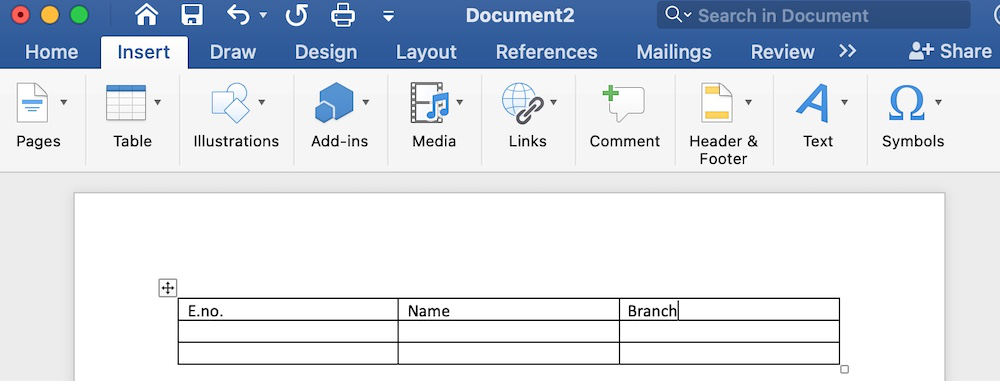
3. Insert
It is the second tab present on the menu bar or ribbon. It contains various items that you may want to insert into a Microsoft word. It includes options like tables, word art, hyperlinks, symbols, charts, signature line, date and time, shapes, header, footer, text boxes, links, boxes, equations, etc., as shown in the below image:
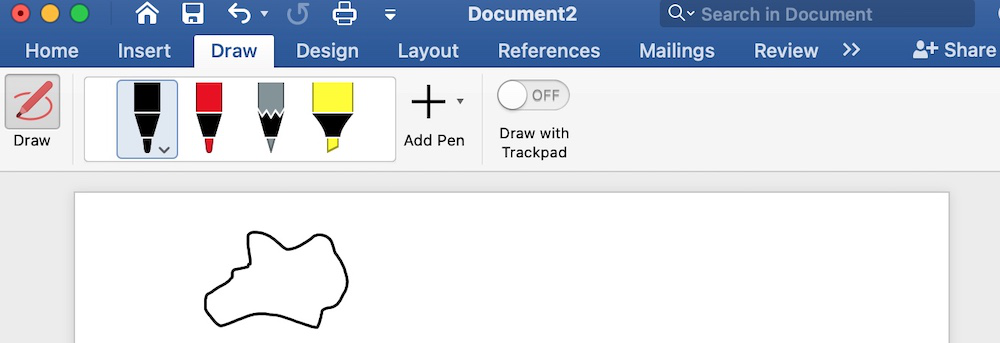
4. Draw
It is the third tab present in the menu bar or ribbon. It is used for freehand drawing in Ms Word. It provides different types of pens for drawing as shown below:
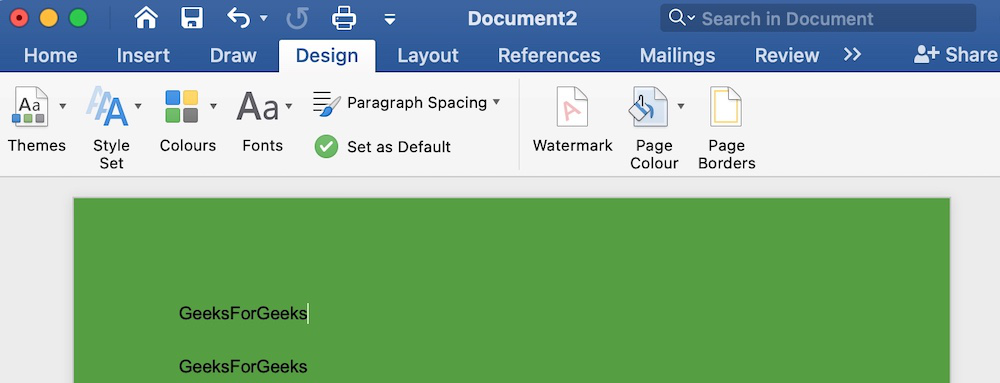
5. Design
It is the fourth tab present in the menu bar or ribbon. The design tab contains document designs that you can select, such as documents with centered titles, offset headings, left-justified text, page borders, watermarks, page color, etc., as shown in the below image:
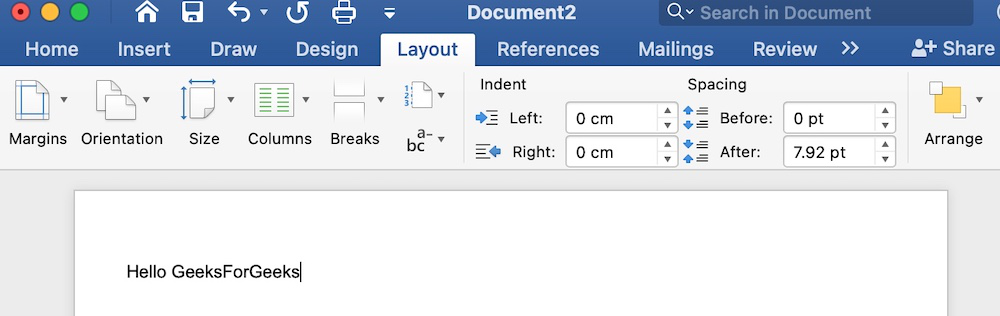
6. Layout
It is the fifth tab present on the menu bar or ribbon. It holds all the options that allow you to arrange your Microsoft Word document pages just the way you want them. It includes options like set margins, display line numbers, set paragraph indentation, and lines apply themes, control page orientation and size, line breaks, etc., as shown in the below image:
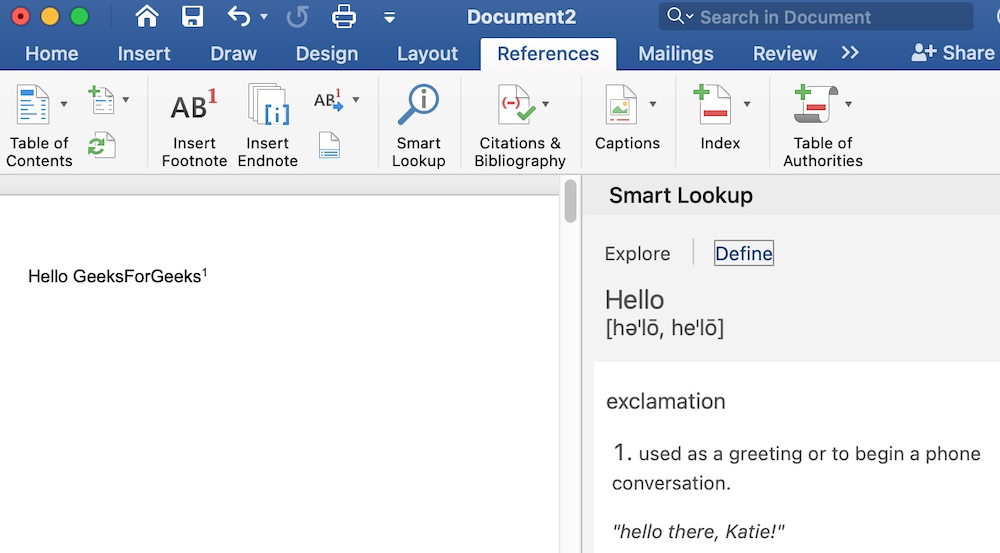
7. References
It is the sixth tab present in the menu bar or ribbon. The references tab lets you add references to a document, then create a bibliography at the end of the text. The references are generally stored in a master list, which is used to add references to further documents. It includes options like, Table of Contents, Footnotes, Citations & Bibliography, Captions, Index, Table of Authorities, smart look, etc. After selecting References tab, you will get the below options:
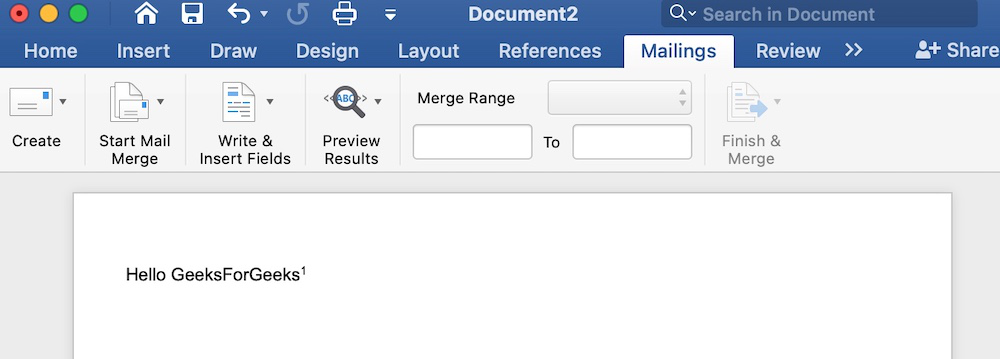
8. Mailings
It is the seventh tab present in the menu bar or ribbon. It is a least used tab in the menu bar. This tab is where you would create labels, print them on envelopes, do mail merge, etc. After selecting mailing, you will get the below options:
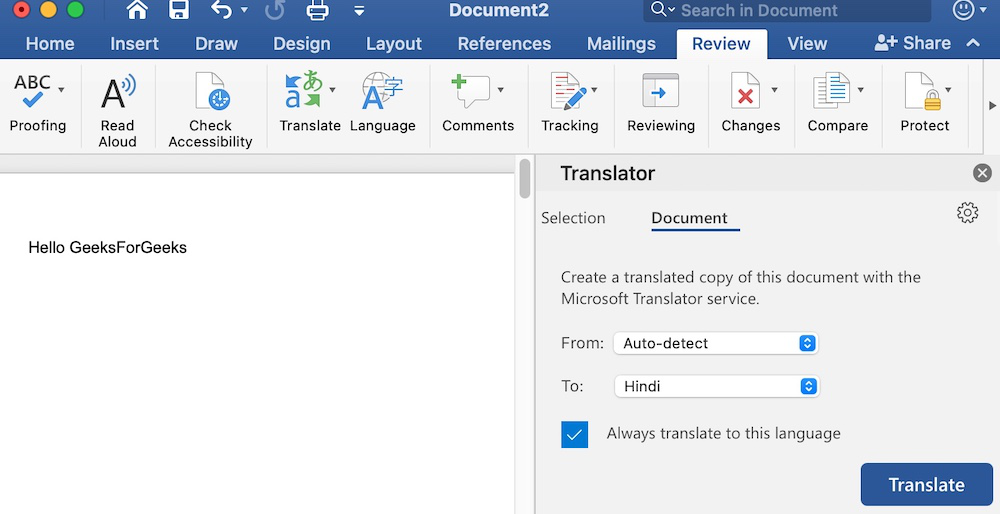
9. Review
It is the eighth tab present in the menu bar or ribbon. The review tab contains, commenting, language, translation, spell check, word count tools. It is good for quickly locating and editing comments. After selecting a review tab, you will get the options below:
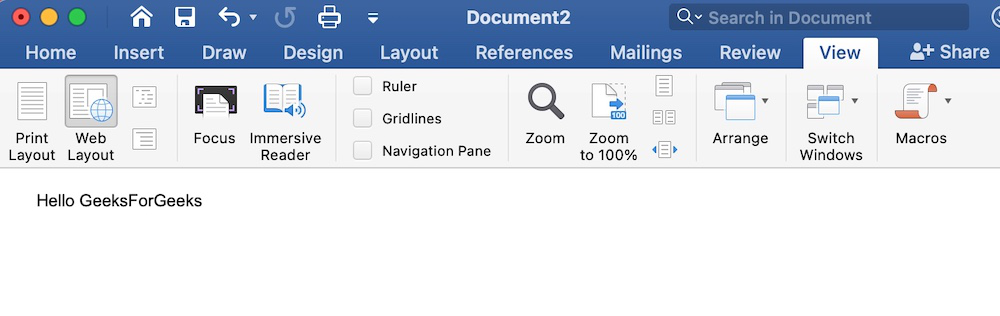
10. View
It is the ninth tab present in the menu bar or ribbon. View tab allows you to switch between single page or double page and also allows you to control the layout tools It includes print layout, outline, web layout, task pane, toolbars, ruler, header and footer, footnotes, full-screen view, zoom, etc. as shown in the below image: