
Download PC Repair Tool to quickly find & fix Windows errors automatically
To insert an image into a text in Microsoft Word 365 can be challenging, unlike PowerPoint, where an image can be easily inserted into a text. Most individuals will give up their thinking of inserting images into text in Word and try to do this procedure in some other software, but they do not have to do so; there is another way to insert an image into text in Word.
Open Microsoft Word.
Click the Insert tab on the menu bar.

On the Insert tab, click the SmartArt button in the Illustration group.
A Choose SmartArt Graphic dialog box will pop up.
Inside the dialog box on the left pane, click List.
On the List page, click the first one called Basic Block List, then Ok.
Five text boxes will appear in the word document; delete all except one.
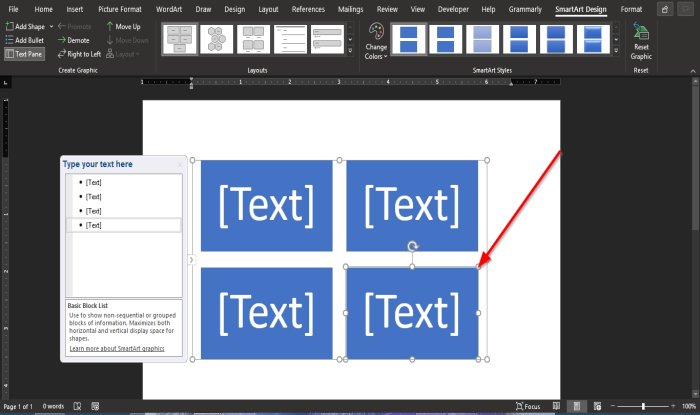
To delete the text box, click the textbox’s Resize Point and press the Delete key on the keyboard.
Now, enter a text into the textbox.
You can change the size or font of the text if you want.
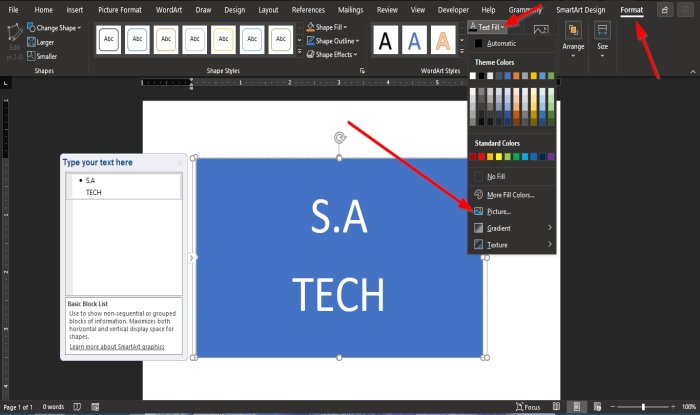
Then, click the Format tab that appeared on the menu bar.
On the Format tab, click the Text Fill button in the WordArt Styles group.
In the drop-down list, click Pictures.
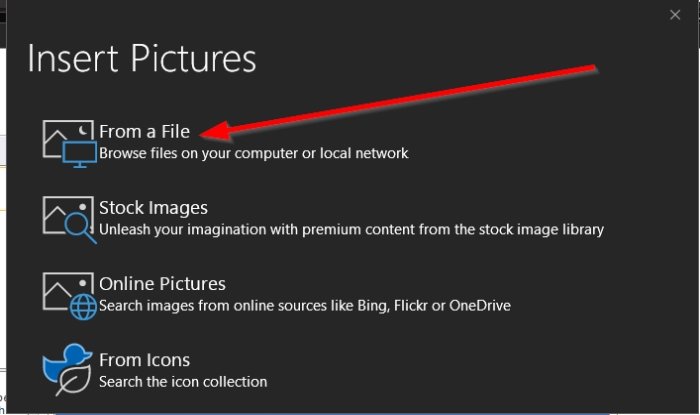
An Insert Pictures dialog box will appear.
Inside the dialog box, click From a File.
An Insert Picture dialog box will appear, select the file you want, and click Insert.
The picture is inserted in the text.
You can also change the background of the text box to the color that suits the image.
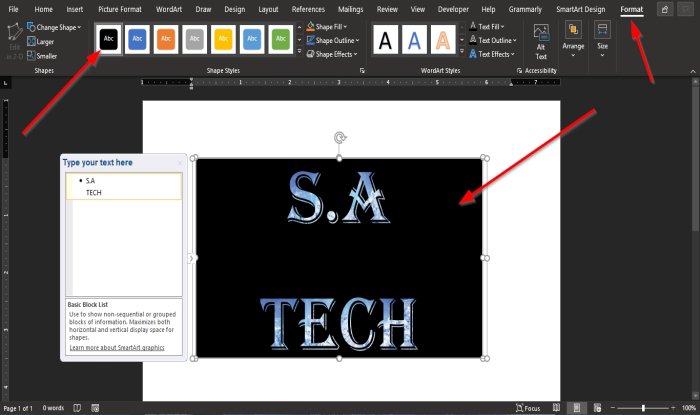
On the Format tab, go to the Shape Style group’s build-in outlines and select an Outline that matches the text containing the picture.
Once you select an Outline, you will notice that the color of the text box changes.
We hope this tutorial helps you understand how to insert an image into text in Word.
Read next: How to extract Text from an Image in Microsoft Word.

Shantel has studied Data Operations, Records Management, and Computer Information Systems. She is quite proficient in using Office software. Her goal is to become a Database Administrator or a System Administrator.
 Please Note:
This article is written for users of the following Microsoft Word versions: 97, 2000, 2002, and 2003. If you are using a later version (Word 2007 or later), this tip may not work for you. For a version of this tip written specifically for later versions of Word, click here: Wrapping Text around a Graphic in a Text Box.
![]()
Written by Allen Wyatt (last updated February 25, 2022)
This tip applies to Word 97, 2000, 2002, and 2003
Doris is trying to put together a newsletter and is using text boxes so she can flow the continuation of an article from the front page to a later page. She wants to use a graphic image with one of the articles, but can’t get Word to flow the text around the image within the text box.
The reason that this won’t work is because wrapping of text, in Word, is implemented through the interaction of two layers of content: the text layer and the drawing layer. When an object is on the drawing layer, information on the text layer can be wrapped around it. Any text within a text box cannot be wrapped around another object in the text box because both the text and the object are on the same layer—the drawing layer.
This means that if you still want to wrap text around the graphic, you’ll need to take a different approach to laying out your newsletter. For instance, you might use multiple text boxes, butted up next to each other, to give the appearance of the text flowing around the graphic.
If you want to stick with a single text box, you could insert a two- or three-column table inside the text box and put the graphic in one of the columns. You can then add text to the other column and it appears to be beside the graphic. You would, of course, need to experiment with the borders and shading of the table to make sure they don’t detract from the layout you are trying to achieve.
WordTips is your source for cost-effective Microsoft Word training.
(Microsoft Word is the most popular word processing software in the world.)
This tip (430) applies to Microsoft Word 97, 2000, 2002, and 2003. You can find a version of this tip for the ribbon interface of Word (Word 2007 and later) here: Wrapping Text around a Graphic in a Text Box.
Author Bio
With more than 50 non-fiction books and numerous magazine articles to his credit, Allen Wyatt is an internationally recognized author. He is president of Sharon Parq Associates, a computer and publishing services company. Learn more about Allen…
MORE FROM ALLEN
Deleting a View
When you no longer need a view, you can get rid of it by deleting it. Deleting unnecessary views is a good idea because …
Discover More
Copying a File in VBA
Need to have your macro copy a file from one place to another? It’s easy to do using the FileCopy command, described in …
Discover More
Using Multiple Print Settings
Do you have a worksheet from which you need to print only portions of the data available? There are two ways you can …
Discover More
More WordTips (menu)
Including Text Box Text in Word Counts
If you use text boxes in the layout of your documents, you should know that any word counts you perform do not include …
Discover More
Finding an Invisible Text Box
Text boxes can be a great aid in designing the layout of your document. What do you do when you can’t find a text box …
Discover More
No-border Text Boxes by Default
Text boxes can be a great design element when laying out your documents. If you want those text boxes to have no borders …
Discover More
It is easy to have great success with Microsoft Word and your labels by knowing a few tips and tricks working with image placement.
Table of Contents:
-
Open Your Template
-
How to Wrap Your Images
-
Working with Text Boxes
-
Setting Precise Positions for Text & Images
-
Changing the Size of Your Images
-
Copy and Paste your Label
open your template
![]()
Dashleigh Label and Hangtag templates now compatible with Canva Online Designer.
Sign up for free.
Use our “Find your Template” page to download your label or hang tag Word template.
We recommend using the “Tables” version of our Word templates.
Un-hiding Gridlines
Certain versions of Microsoft Word hide the grid-lines of tables upon opening the file.
To un-hide your grid-lines:
-
TABLE > Show Grid-lines
-
LAYOUT > View Grid-lines
Now that you have opened your Microsoft Word template, you are ready to start designing.
Adding an image
-
Click the place in your document where you want the picture to appear.
-
Access the «Insert Picture» dialog box.
-
Browse to the photo you want to insert.
-
Click the file, then click «Insert.»
-
Modify the picture as necessary.
Print a Test Page
Before you add your label sheets to your printer, we recommend printing a test page before hand.
-
Make sure the printer settings are set to “Actual Size”
-
All margins and spacing measurements are available on the template download page of your specific labels.
Extra Tips & Tricks
How to Wrap Your Images:
Sometimes adding a new image can cause your previously placed images to move around your template.
The best way to make sure your images to stay in place is to change the «wrapping».
Best Image Layout Options:
Select the image after adding it to your template. Right click to select «Wrap Text» from the menu.

1. Set your Image to «Behind Text«. This is allow you to place an image in an exact place regardless of new images or text that you add to your template.
2. Set the image «fix position on page«. This will allow you to type into your template and the text will move around your image.
You can also set these wrapping conditions under the top menu select Format under the Drawing Tools tab. Select Wrap Text > More Layout Options.

Working with Text
We highly recommend adding your text to a text box instead of typing directly in the table cell. By adding your text to a text box, you can treat it like an image. This will allow you to move the text, rotate it and have the text float above or next to your image.
Select the text box after adding it to your template.
1. Add a text box from the Insert. Set the fill color to «No Fill» and set the outline to «no outline».

2. Set your Text Box to «In Front Text». This is allow you to place an image in an exact place regardless of new images or text that you add to your template.
3. Set the image «Fix Position on Page». This will allow you to type into your template and the text will move around your image.

Setting Precise Positions for Your Images and Text
If you want to be ultra precise with your images, we recommend setting the images in the Layout Options > Position Window.

You can find the exact margins and dimensions of your template on the same page that you downloading your templates. You can use these margins to define exactly where you want your images to place on the page.
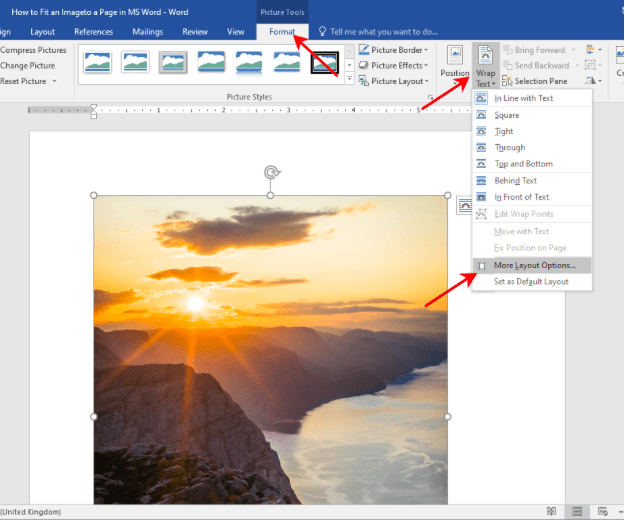
Select the Image. In the top menu select Format under the Drawing Tools tab. Select Wrap Text > More Layout Options.
Use the specifications below to set your image in an exact spot. Change the inches in the absolute positions to move your images exactly into place. Use the «page» option under the absolute position dropdown to set your image exactly from the right and top borders of your page.
Selecting «Lock Anchor» will guarantee that the image does not move as you add new images.
Unselect «Move Object with Text» will also help keeping the image in place.
Changing the Size of Your Image

Select the Image. In the top menu select Format under the Drawing Tools tab.
Select Wrap Text > More Layout Options. In the Size Tab- use either the Absolute checkbox to use the inches.
Check the «lock aspect ratio» if you do not want the image to stretch or distort.
Moving the Image Behind the Template Outlines

Right Click the image you want to move. From the fly out menu select «Send to Back».
Select «Send to Back» again to move the image behind object on your Microsoft Word template.
How to Copy and Paste Your Label
Now that you have created your first label, you are ready to paste this label into the other template spaces on the page.

1. Select all components that you want to copy. While holding the «shift» key on the keyboard, select with your mouse all of the images and text boxes that are included in your label.
If you are having trouble selected all of the elements, you will need to set the Text Wrap to «Tight» for all components. (Picture Tools > Format > Text Wrap > Tight)

When all elements are selected.

2. Once everything is selected- you will want to group them as one image. To do this, while the elements are selected, in Picture Tools > Format > Group > Group. This will make the individual components look like one.
3. Once grouped, you image is now ready to copy. Select Ctrl+C on your keyboard to copy the element. Click into the next label. Select Ctrl+P to paste the grouped label. Continue this throughout the template.


- Using a Text Wrapping Style
- Inserting a Text Box
- Inserting a WordArt
Method 1: Place Text Over Image Using Text Wrapping Style
If you have a long chunk of text and you just want to put a background image or a watermark on a document, then this method is best for you.
Step 1: Open up a Word document.

Step 2: Set the image as background.
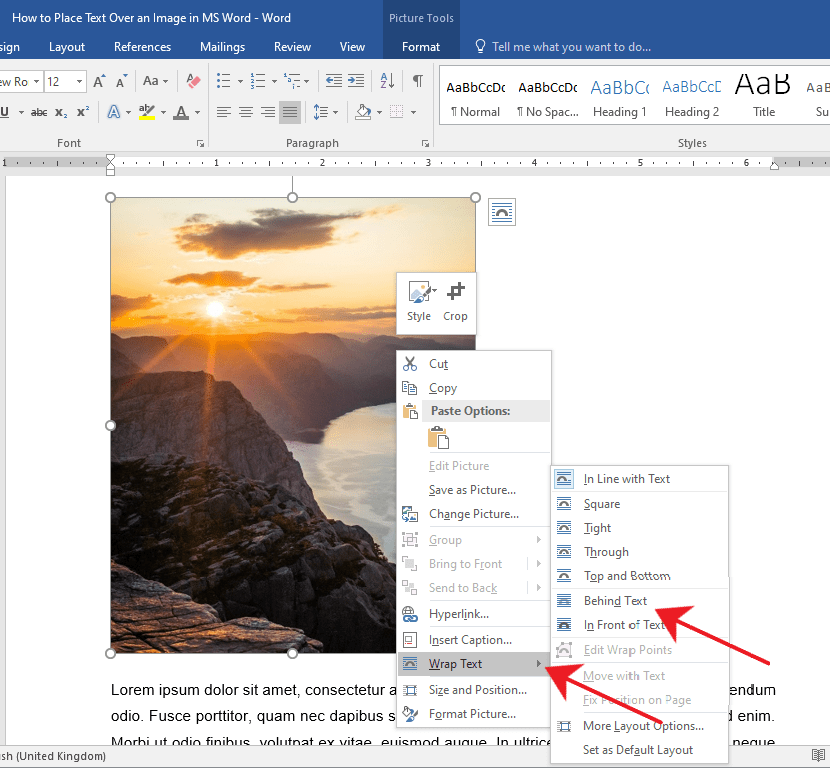
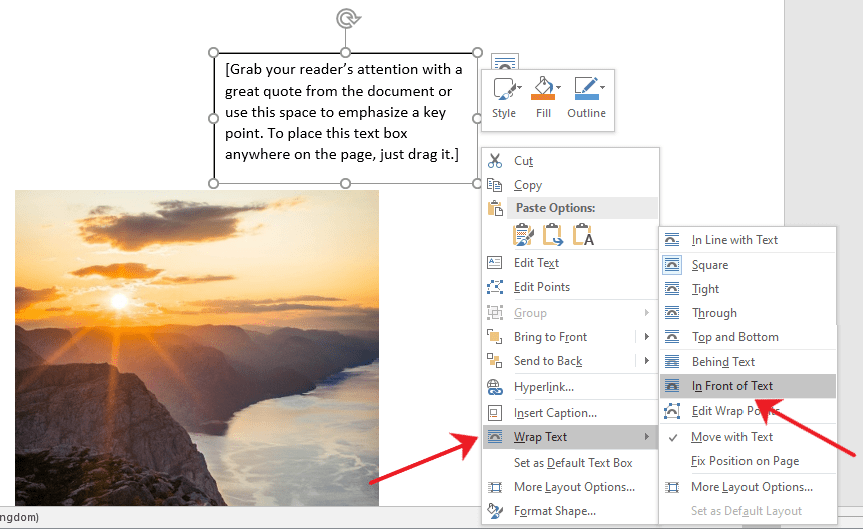
Right-click on the image and select the Wrap Text option.
This will display a horizontal drop-down menu on the right. Once you see the drop-down menu, select Behind Text.
You’ll notice the images and text will rearrange automatically as you hover over the text wrapping options.
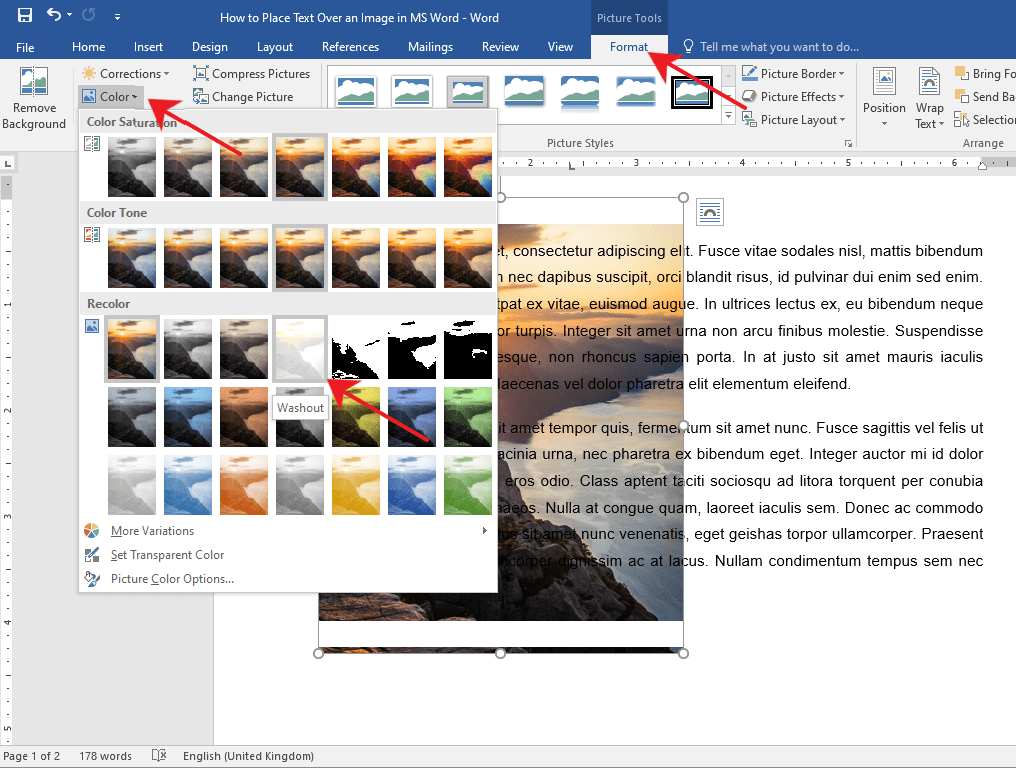
If after you’ve inserted a background image and the text becomes unreadable, you can change the image’s opacity or color.
Simply double-click on the image to activate the Format tab in the Ribbon.
After that, click on the Color drop-down menu and select Washout under the Recolor group.
You can also get creative and explore other options to suit your needs.
Method 2: Place Text Over Image Using a Text Box
Step 1: Open up a Word document.
Step 2: Insert a text box.
Go to the Insert tab on the Ribbon.
Now, navigate to the right side of the Ribbon and click on the Text Box drop-down menu.
Then, select a text box style of your preference. For this example, we’ll use the Simple Text Box.
Step 3: Type in the text.
Type in the text that you want to put on top of your image.

Step 4: Set the text wrapping style of the text box.
Select the text box and click the Layout button found at the upper right-hand corner of the text box.
Then, select the In Front of Text option.
Step 5: Place the text box over the image.
Click and drag the text box to place it over your image. You’ll notice that your text box has a background color by default and is covering a part of the image.

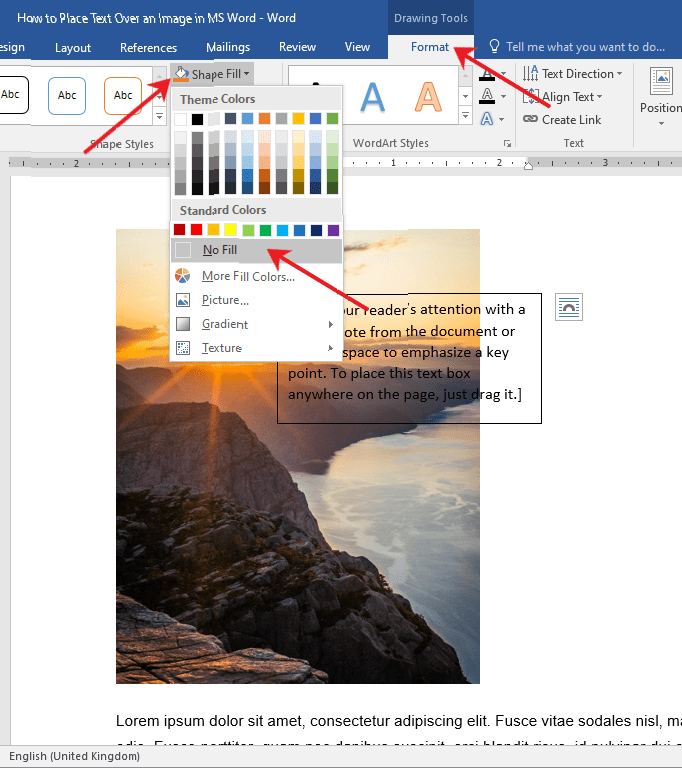
You can change your text box’s background and border color by accessing the Format tab.
This way, only the text will be visible on top of your image. Now, Double-click the text box and go to the Format tab.
From there, click on the Shape Fill drop-down menu and choose No Fill.
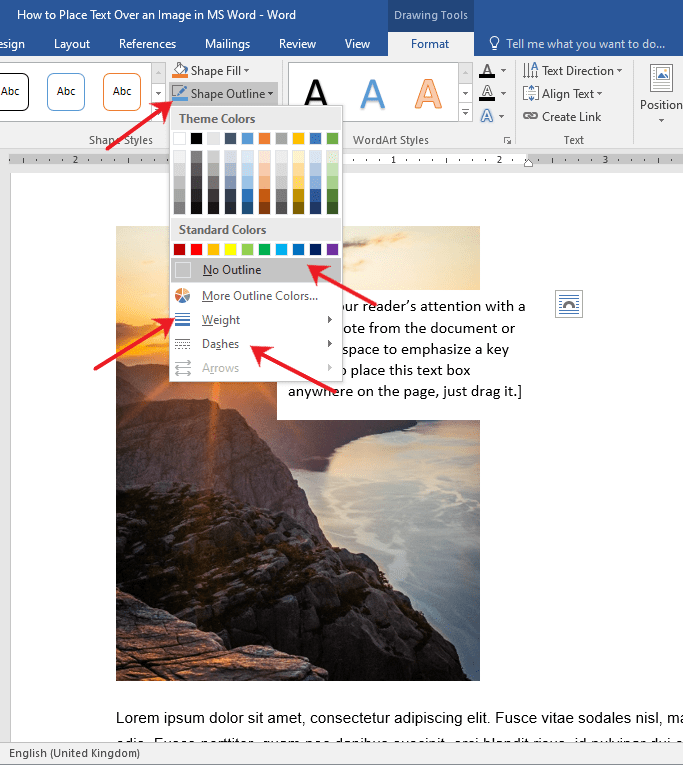
To change the border color, select the Shape Outline drop-down menu and choose No Outline.
You can also change the border’s weight and design by exploring the Dashes and Weight options.
Method 3: Place Text Over Image Using Word Art
If you find yourself needing to put a title, a name, or a couple of words over an image, then this method has got you covered.
Step 1: Open up a Word file.

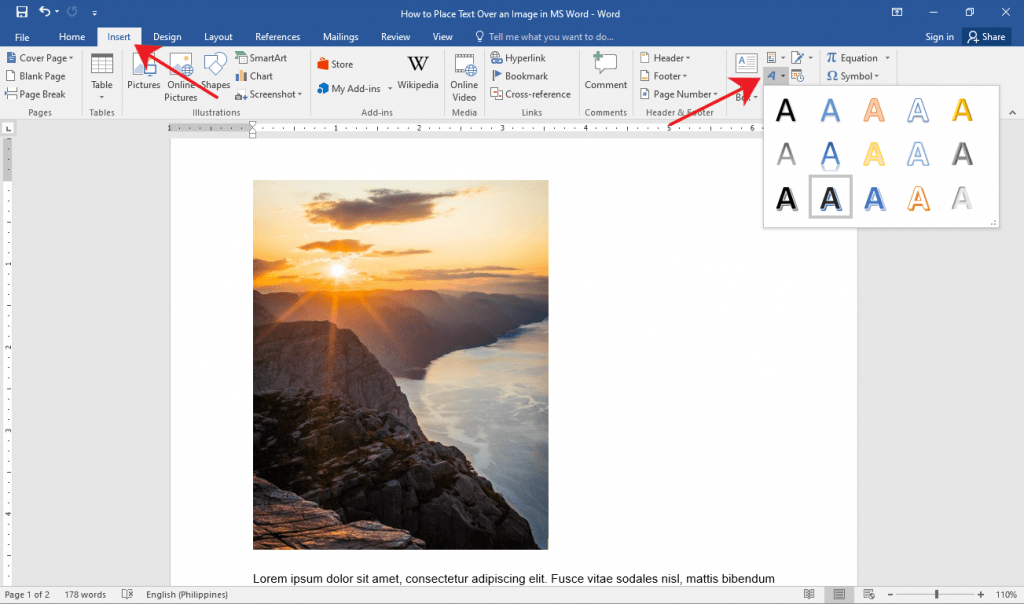
Step 2: Insert the WordArt
Click the Insert tab on the Ribbon.
Now, click the WordArt button found at the right side of your screen.
It’s the slanted letter A icon under the Text group. After that, choose a WordArt that suits the style of your document.
Step 3: Place the WordArt over the image.
Click on the WordArt and type in the text you want.
From there, select and drag the WordArt to easily move it around to the perfect location on your document.
You can also resize the WordArt like any other text box by grabbing either one of its corners.

Tip: If you’re using a pen or touch-enabled computer, you can directly write text over an image using the Draw option.
Editing and Deleting Text Over an Image
If you used Method 1, simply select the erroneous text and edit or delete it just as you would with any other text.
For Methods 2 and 3, click on the inside of the text box or the WordArt and start editing.
If you want to delete the entire text box or WordArt, click on any of the borders of the text box or WordArt and hit the Delete button on your keyboard.
Conclusion
That’s the rest of it. We hope you’ve found this article helpful!
Hello,
I want to insert image in text-box using microsoft.office.interop.word. For
doing this I have created a simple console application. Through console application I am opening word document file and replacing some text inside the text box.
So I am able to replace the text in text-box but unable
to insert image in text-box. Is there any way to insert image in textbox. I am able to insert image in Table but I want to insert image in textbox.
I have tried but unable to find the solution.
Below is the code for same
using System;
using System.Collections.Generic;
using System.IO;
using System.Linq;
using System.Text;
using System.Threading.Tasks;
using Microsoft.Office.Interop.Word;
using System.Net;

using System.Data.SqlClient;

using System.Data;
using System.Configuration;
using System.Globalization;

using System.Runtime.InteropServices;

namespace PrintSticker
{

    class Program
    {

        public static Microsoft.Office.Interop.Word.Document aDoc = null;
        public static Microsoft.Office.Interop.Word.Application wordApp = new Microsoft.Office.Interop.Word.Application();
        public static object missing = System.Reflection.Missing.Value;

        private static void FindReplace(Microsoft.Office.Interop.Word.Document aDoc, Dictionary<string, string> lstPrintData)
        {

            try
            {

                int counter = 0;

                int intdctCount = 0;
                for (int j = 0; j < lstPrintData.Count; j++)
                {
                    // string Findtext = element.Key; ;
                    // string ReplaceText = element.Value;
                    if (intdctCount == lstPrintData.Count - 1)
                    {
                        break;
                    }
                    string Findtext = Convert.ToString(lstPrintData.Keys.ElementAt(intdctCount));
                    string ReplaceText = Convert.ToString(lstPrintData.Values.ElementAt(intdctCount));

                    var range = aDoc.Range();
                    range.Find.Execute(FindText: Findtext, Replace: WdReplace.wdReplaceAll, ReplaceWith: ReplaceText);
                    var shapes = aDoc.Shapes;


                    foreach (Microsoft.Office.Interop.Word.Shape shape in shapes)
                    {
                        string shapename = Convert.ToString(shape.Name);
                        string shapevalue = Convert.ToString(shape.TextFrame.TextRange.Text);


                        if (shapevalue != "r")
                        {
                            var initialText = shape.TextFrame.TextRange.Text;
                            if (initialText == Findtext + "r")
                            {
                                var resultingText = initialText.Replace(Findtext, ReplaceText);
                                shape.TextFrame.TextRange.Text = resultingText;
                                if (initialText == Findtext + "r")
                                {
                                    intdctCount++;
                                    break;
                                }
                            }
                            else if (initialText.Contains(Findtext))
                            {
                            ReagainReplace:
                                var resultingText = initialText.Replace(Findtext, ReplaceText);
                                shape.TextFrame.TextRange.Text = resultingText;
                                if (initialText.Contains(Findtext))
                                {
                                    if (intdctCount < lstPrintData.Count - 1)
                                    {
                                        intdctCount++;
                                        Findtext = Convert.ToString(lstPrintData.Keys.ElementAt(intdctCount));
                                        ReplaceText = Convert.ToString(lstPrintData.Values.ElementAt(intdctCount));

                                        initialText = resultingText;
                                        goto ReagainReplace;
                                        //break;
                                    }
                                    else
                                    {
                                        break;
                                    }
                                }
                                else
                                {
                                    break;
                                }
                            }
                            counter++;
                        }
                    }
                }


                Console.WriteLine(counter);
            }
            catch (Exception exc)
            {
                Console.WriteLine(exc.Message);

            }

        }

        static void Main(string[] args)
        {
            try
            {
                Console.WriteLine(DateTime.Now);

                object filename = @"D:USER DATANitinSticker.docx";

                if (File.Exists((string)filename))
                {

                    object readOnly = false;
                    object isVisible = false;
                    // make visible Word application
                    wordApp.Visible = false;
                    // open word template
                    aDoc = wordApp.Documents.Open(ref filename, ref missing,
                            ref readOnly, ref missing,
                            ref missing, ref missing,
                            ref missing, ref missing,
                            ref missing, ref missing,
                            ref missing, ref isVisible,
                            ref missing, ref missing,
                            ref missing, ref missing);
                    aDoc.Activate();

                    Dictionary<string, string> dictionary = new Dictionary<string, string>();


                    dictionary.Add("#FullName", "Mr.Nitin Jagtap");
                    dictionary.Add("#UCID", "UCH-908890");
                    dictionary.Add("#Age", "26");
                    dictionary.Add("#Sex", "M");
                    dictionary.Add("#FullAddress ", "Matoshri Niwas,Rajmudra Housing Society");
                    dictionary.Add("#Contact", "91-9503808004");
                    dictionary.Add("#Date", "18/08/1989");
                    dictionary.Add("#DoctorName", "Dr.Shivajirao Bhosale");
                    dictionary.Add("#OPDID", "UC/OPD/1703/1367");


                    FindReplace(aDoc, dictionary);

                    object DocNoParam = Type.Missing;
                    object SaveToFormat = Microsoft.Office.Interop.Word.WdSaveFormat.wdFormatPDF;
                    object outputFileName;

                    outputFileName = @"D:USER DATANitinSticker.pdf";

                    // Save word template in pdf format
                    aDoc.SaveAs(ref outputFileName, ref SaveToFormat,
                                            ref DocNoParam, ref DocNoParam,
                                            ref DocNoParam, ref DocNoParam,
                                            ref DocNoParam, ref DocNoParam,
                                            ref DocNoParam, ref DocNoParam,
                                            ref DocNoParam, ref DocNoParam,
                                            ref DocNoParam, ref DocNoParam,
                                            ref DocNoParam, ref DocNoParam);
                }

            }
            catch (Exception exc)
            {

                Console.Write(exc.Message);

            }
            finally
            {
                object saveChanges = WdSaveOptions.wdDoNotSaveChanges;
                ((_Document)aDoc).Close(ref saveChanges, ref missing, ref missing);
                wordApp.Quit();
                Marshal.ReleaseComObject(aDoc);
                Marshal.ReleaseComObject(wordApp);
                Console.WriteLine(DateTime.Now);
            }
        }
    }
}
I want output like below.
Could you please help me to sort out this issue.
Thanks,
Nitin
-
Edited by
Tuesday, March 28, 2017 8:47 AM
-
Moved by
CoolDadTx
Tuesday, March 28, 2017 2:00 PM
Office related