
Word for Microsoft 365 for Mac Word 2021 for Mac Word 2019 for Mac Word 2016 for Mac Word for Mac 2011 More…Less
Graphic file types that you can insert in Office documents
Any graphic file type that opens in your version of QuickTime is likely to open in Office. You can insert any of the graphic file types listed below in Office documents. The graphic files that you insert are saved with the Office documents.
|
File type |
File format |
|---|---|
|
BMP |
Windows bitmap |
|
EMF |
Windows Enhanced Metafile |
|
EMZ |
Compressed Windows Enhanced Metafile |
|
EPS |
Encapsulated PostScript |
|
FPix, FPX |
FlashPix |
|
GIF |
Graphics Interchange Format |
|
JPEG, JFIF, JPEG-2000 |
Joint Photographic Experts Group |
|
|
Portable Document Format |
|
PICT, PCT |
Macintosh Picture |
|
PNG |
Portable Network Graphics |
|
PNTG |
Macintosh Paint |
|
PSD |
Photoshop Document |
|
QTIF |
QuickTime Image Format |
|
SGI |
Silicon Graphics Incorporated |
|
TGA, TPIC |
Targa |
|
TIFF, TIF |
Tagged Image File Format |
|
WMF |
Windows Metafile |
|
WMZ |
Compressed Windows Metafile |
File types that you can use to save a separate graphic file
You can save graphics and objects contained in Office documents as separate files in a variety of file types. Certain graphic file types are more appropriate for specific tasks than are other file types. Use the following table to help you determine which graphic file type is more appropriate for your task.
Note: When you save a graphic contained in an Office application as a separate file, you cannot control the compression or other settings that affect the quality of the image. If you have the original version of a graphic file, you can control the compression and other characteristics of the image by using a dedicated graphic software application to save the file.
|
When saving graphics f |
Use this graphic file type |
|---|---|
|
For use with browsers |
JPEG, GIF, PNG |
|
For use on both Macintosh and Windows-based computers |
GIF, JPEG, PNG, PDF |
|
With thousands or millions of colors |
JPEG, PNG, BMP |
|
With 256 or fewer colors |
GIF |
|
For use in other Macintosh applications |
GIF, JPEG, PDF |
Need more help?

Word is such a useful tool that it is common to work with graphics in this class of documents . But not many people are aware of the extent of the aspect ratio functions of this processor.
In order to get the most out of picture editing, in text you should use Picture Tools feature . Which contains a wide variety of settings to help you work like a pro.
Then he You will need to know all the secrets that this powerful Word tool has , which you can discover in this article.
Image formatting is a set of tools used to give a certain style to a photograph that has been inserted into text . In this way, the color can be adjusted and different artistic visions can be granted. It will also be possible to incorporate effects into the images and establish a certain position in the sheet.
It is a useful tool when images need to have a certain appearance consistent with the writing and can reinforce the idea of the text so that the reader feels comfortable and attracted to the illustrations.
What are the differences between formatting a picture and formatting text in Word?
Image formats are related to color and the effects that illustrations may have . Moreover, it also offers the possibility to add borders of different colors and thicknesses. It is dedicated to the position that the image will have on the sheet and to the possibility of modifying the margins in the printing area.
Instead, the text formats are related to the font type, color and size that a title (and the rest of the paragraphs) will have in the document . Also, it supports the type of typography that can be applied, for example, the location of a shadow or the variety of lighting that each letter will have.
Steps to configure the format of a picture in Microsoft Word
In order to configure the format of an image, you must first insert it and then you must select it. This will automatically activate the function «Image tools» , which you can see next to the name you gave the document.
When you click elsewhere in the text, this feature is automatically disabled. To let you know in depth what it is in the format of an image, we will analyze it by function group. You have to keep in mind that you will have to click on the tab «Format» to be able to work with all the options.
Adjust
«UPDATE ✅ Do you want to know more about the format of images in Microsoft Word documents? ⭐ ENTER HERE ⭐ and learn all about SCRATCH! ”
In this group of functions, you can use the following tools:
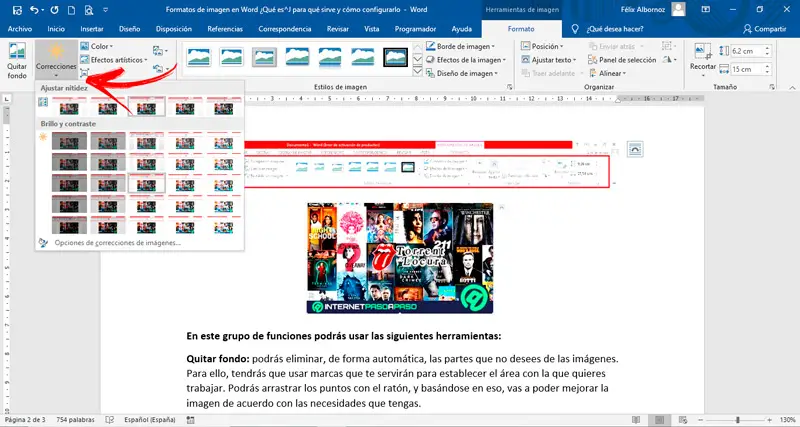
- Remove the background: you can automatically remove unwanted parts from images. To do this, you will need to use landmarks that will help you establish the area you want to work with. You can drag the dots with the mouse, and based on this, you can enhance the image according to your needs.
- Fixes: With this function, you can adjust the brightness, sharpness and contrast of the image. You have to keep in mind that you will need the illustration to look consistent with the text, so you will need to find the right balance to get the job done like the experts.
- COLOR: When you need to change the hue or saturation of the image, you can choose some of the formats predefined by Word. If you prefer, you can also use other types of variations and set a transparent color so that the image is in optimal condition.
- Artistic effects: this tool is useful when you want your image to look like a painting or a sketch. In this way, you can generate mosaic globes, visual blur, and bright screen, among many other options.
- Adjust: in case you need to compress the image, you will need to click this function to get it the right size. You have to keep in mind that this format is necessary for you to do this correctly, as the size of the illustration is the most important aspect that you need to consider in any text.
- Change image: you can swap the photo you typed in the text for another, which can be on the computer or on the Internet. This feature will help you when you find that the illustration you have chosen is not clear enough or does not match the general theme of the writing.
- Reset Image: Word allows you to revert to the original image after changing various aspects of it. This will help you to try out different functions and when you combine them and see that this is not what you are looking for you can go back to where you started.
Style
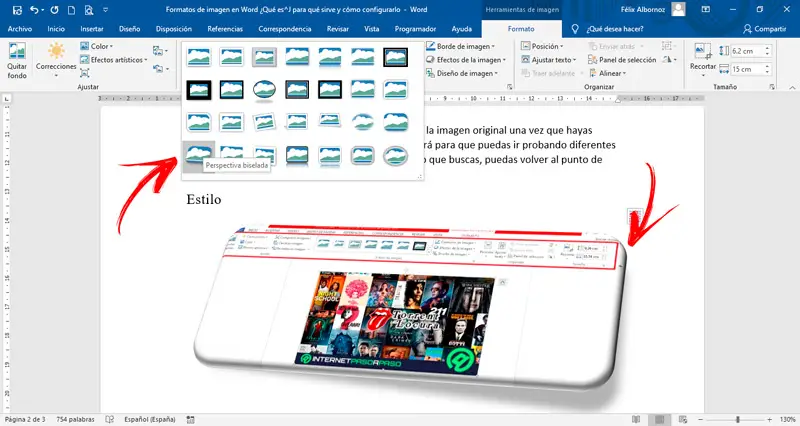
The tools you can use in this group are:
- Picture styles: When you need to make your image look different, you can select some default aspect, which will help the illustration to have eye-catching effect. This way, you will combine the orientation and lighting that the graphic will have in the document. If you can’t find the style you need from the most used one, you can click the drop down menu to find a wide variety.
- Image borders: you can easily change the border style of the illustration. You should assume that Word has an invisible border by default so that you can choose a large number of sizes and colors for this element of the illustration.
- Image Effects: this tool is useful when you need the graphic to have a 3D look, shadow, reflection, or any other style you can combine. This will make the image stand out in the document so that you can provide crisp and prominent text to the reader.
- Image design: if you are looking to convert images to SmartArt, this tool allows you to give it a title and quickly change the size of the illustrations. In this way, you will convert the images to graphics in just a few steps, and then you can edit them easily.
Organize
The functions that make up this group are:
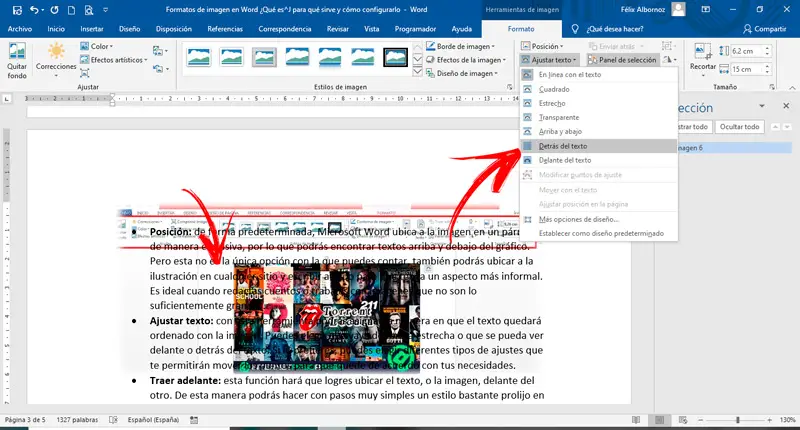
- Position: By By default, Microsoft Word places the image in a paragraph exclusively, so that you can find text above and below the graphic. But that’s not the only option you can rely on, you can also place the illustration anywhere and write next to it to make it look more informal. This is ideal when you are writing stories or working with images that are not enough
- Adjust text: with this tool, you can assign the way the text will be arranged with the image. You can choose to be narrow or visible in front of or behind the text. If you prefer, you can choose different types of settings that will allow you to move the points according to your needs.
- Moving forward: this function will allow you to place the text, or the image, in front of the other. This way you will be able to create a pretty neat style in the text with very simple steps.
- Resend: is the inverse of the previous function.
- Panel selection: if you need a list of all the objects you have, you can include a panel that will appear to the right of the text with all the graphics you have in the document. This way you will be able to click on each of them and select them automatically.
- Align : if you are working with different sizes of images, you can align them according to the format you have in the text. This will make your job professional and you can have the same page border compared to other elements.
- Group objects: this function is useful when you have incorporated different graphic shapes in a text and you need it every time you move the image to act together. To do this, you will need to select by pressing the «Ctrl» key and by clicking on each of the illustrations.
- Rotate objects: it is very useful when you want to give another orientation to the image you have inserted and see it convenient for the reader’s interpretation.
Size
When you need to work with the image size, you can have these functions:
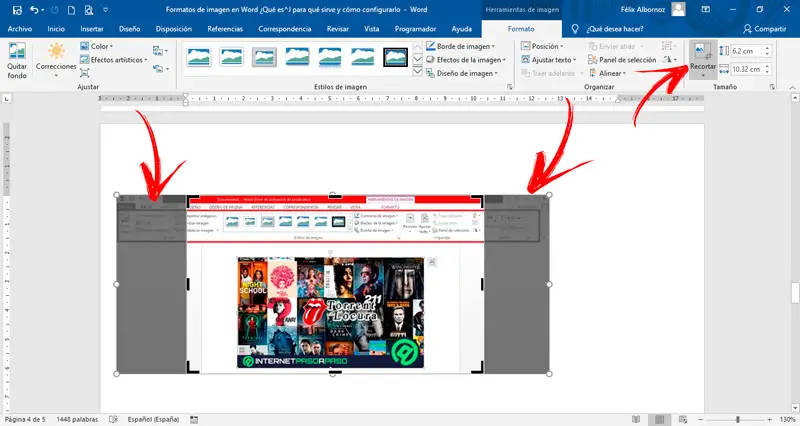
- Size : in case you want to cut out the illustration, since you are only interested in part of it You will need to select this tool and then move the coverage area. This will automatically remove the part you don’t need.
- Form height: in this function, you will find next to its icon a field which indicates the centimeters of the figure that you have incorporated in the text. To enlarge or reduce it, you will have to click on the directional arrows.
- Width of the shape: as for the height, you can also work with the width of the image. You can add or remove centimeters with the arrows.
If you have any questions, please leave them in the comments, we will get back to you as soon as possible, and it will be a great help for more community members as well. Thank you!

Microsoft Office supports most of the common image formats, which means you can import almost any kind of photo or graphic into a Word document to print. As long as Word can open an image, you can print the image from Word. Certain image file-types print better than others, though image size and resolution affect print quality more than file type.
Compatibility
Microsoft Word supports images in most common file types: EMG, GIF, JPG, PNG, BMP, WMF and TIFF. Additionally, with the use of filters, you can add support to Word for images in CDR, CGM, EPS and PCT format. Once you’ve imported an image into Word, you’ll be able to print it as it appears on the screen. But some image formats are better than others for retaining quality, so when printing large images — full page at 8.5 by 11 inches or bigger — the type of file you use begins to matter.
Compression and Color Depth
Not all image file types are the same. Windows bitmap (BMP) files, and graphical interchange format (GIF) files, for example, have limited resolution and color depth. At maximum, GIF files can store 256 colors, while your printer may be able to create millions of colors. While Word supports GIF files, you won’t have the same depth of image as you might with a JPG or TIFF file, which can support photos and images at very high resolutions, without compression. To save hard drive space, programs compress BMP and GIF images, which can reduce print quality substantially. These image formats are often intended for use on the Web.
Resolution
More than anything, the resolution of an image affects how it will print. If a photo is only 300 pixels wide, it will become grainy as you enlarge it in Word and it will look pixilated when you print it. In Word, you can change its size to be bigger or smaller, but compressed photos with small resolutions won’t print well on any printer, once enlarged in Word. Selecting high-resolution photos ensures that photos will print clearly.
JPG and TIFF
When downloading photos from the Internet or saving photos in another program to import into Word, use JPG or TIFF formats. If you are creating your own image files, save JPGs at maximum quality and without compression for best printing results. TIFF files are almost never compressed, so all TIFF images will retain their details when stretched in Word. If your photos are appearing pixilated after you print, save the photo at a higher resolution and import it into Word again.
References
Writer Bio
Living in Canada, Andrew Aarons has been writing professionally since 2003. He holds a Bachelor of Arts in English literature from the University of Ottawa, where he served as a writer and editor for the university newspaper. Aarons is also a certified computer-support technician.
Image Credit
Creatas/Creatas/Getty Images
As the title suggests:
Which image formats (raster and vector) are supported by Microsoft Word 2010 for Windows / 2011 for Mac? They should support the same formats but still.
I have not found this information elsewhere.
asked Feb 21, 2011 at 12:52
![]()
From the «Insert Picture» dialog we have:
- Windows Enhanced Metafile (*.emf)
- Windows Metafile (*.wmf)
- JPEG File Interchange Format(*.jpg; *.jpeg; *.jfif; *.jpe)
- Portable Network Graphics (*.png)
- Windows Bitmap (*.bmp; *.dib; *.rle; *.bmz)
- Graphics Interchange Format (*.gif; *.gfa)
- Compressed Windows Enhanced Metafile (*.emz)
- Compressed Windows Metafile (*.wmz)
- Compressed Macintosh PICT (*.pcz)
- Tag Image File Format (*.tif; *.tiff)
- Computer Graphics Metafile (*.cgm)
- Encapsulated Postscript (*.eps)
- Macintosh PICT (*.pct; *.pict)
- WordPerfect Graphics (*.wpg)
This is actually for Word 2007 on Windows (I misread the question) — but I can’t see the list getting any shorter for Word 2010. Double check the Insert Picture dialog to make sure.
answered Feb 21, 2011 at 12:57
![]()
ChrisFChrisF
41.2k17 gold badges97 silver badges152 bronze badges
3
In Microsoft Word 2011, go to the Help menu and select Word Help. In the Help window search box, type «image file types» (without the quotes) and press return. In the list of topics at the left select the topic, «Graphics file types you can insert and save.» Expand each topic that appears on the right and you will have a comprehensive list of the supported file types for Office 2011 (not just Word).
answered Mar 27, 2011 at 18:46
![]()
answered Nov 27, 2014 at 11:45
![]()
More than ever, pictures are critical to the effectiveness of your communication materials. With the image formatting and layout tools in Microsoft Word, it’s possible to add and manipulate pictures in your document—even if you’re a beginner.


Starting with a Microsoft Word template makes it even easier. With a well-designed Word template, the positioning and formatting of pictures have already been done for you. All you’ve got to do is to drag your pictures into the image placeholders.
Even if you’re using a template for Word, it’s good to know how to format pictures so you can make your document look exactly the way you want it to.
In this article, you’re going to see, step-by-step, how to work with pictures in Microsoft Word.
(Note: The screenshots below show Microsoft Word for Mac. The screens and steps may be slightly different if you’re using a different version of Word.)
How to Insert a Picture in Word
To add a picture to a Word document, click Insert > Pictures. From here, you’ve got three options:
1. Photo Browser
If you choose this option, you’ll be able to select an image from the existing photo sets on your computer. On a Mac, that includes photos in iPhoto and Photo Booth. When you find the picture you want to use, click on it, then drag it into the document.


2. Picture From File
This option lets you insert an image from another location on your computer. Find the image file, select it, then click Insert.


3. Online Pictures
Insert pictures in Word from the web by selecting Online Pictures…. This opens a Bing image search right inside your document. Type a keyword or phrase in the search bar.


By default, the Creative Commons only filter is checked. Keep this selected to make sure you don’t violate any copyright laws. Click on the filter icon to filter the image results by other parameters.


Select an image by clicking on it, then click Insert. You can select several images before clicking the Insert button.


Microsoft Word automatically includes the image attribution and license details as a caption.


Note: While you can import many image formats into Word, the ones that work best are JPG and PNG.
How to Format Pictures in Word
After importing pictures into Word, you can apply different formatting settings to each Microsoft Word picture and control its appearance. Below are some of the most basic image formatting you can apply in Word:
1. Resize an Image
Resize a picture in two ways:
Resizing Method 1
Click on the picture. Press and hold the Shift key, then click and drag one of the sizing handles either towards or away from the center.


Holding the Shift key ensures that the proportion of the picture is retained. Otherwise, it would become distorted and your entire document will look amateurish.
Resizing Method 2
This method allows you to resize the picture to a specific length or width. Click on the picture, then click on the Picture Format tab. Type the length or width you wish the image to have.


By default, the original proportion of the image is retained even when you change either the length or width of the image. Keep this checked to avoid distorting the image.
2. Rotate or Flip Images
To rotate an image, do so either manually or by a specific amount.
Manual Image Rotation
To rotate an image manually, click on the image to select it. Click on the rotation handle and drag it in the direction you want.


Flip or Rotate an Image By a Specific Amount
Rotate a picture by a specific amount. Click on the picture, then go to Picture Format > Rotate. From here, you’ve got the option to:
- Rotate Right 90°
- Rotate Left 90°
- Flip Vertical
- Flip Horizontal
- Select More Rotation Options
To rotate a picture to an exact angle, choose Select More Rotation Options.


Type in the amount you wish to rotate the object, then click OK.


How to Crop Photos in Word
If you’re wondering how to crop a picture in Microsoft Word, it’s not difficult. Follow the steps below to not only crop an image, but also to dress it up by cropping it to a shape or adding decorative borders:
1. Basic Image Cropping
To crop a picture, select the picture, then go to Picture Format > Crop > Crop.
Black cropping handles appear on the sides of the picture. From here:
- Crop one side. Drag one side handle inward.
- Crop two adjacent sides at the same time. Drag one corner inward.
Click outside the image to apply the crop.
2. Crop Image to a Shape
To crop the picture to a specific shape, select the picture. Go to Picture Format > Crop > Crop to Shape. Select a shape from the selection that appears.


Click away from the picture to apply the new shape.


3. Frames and Borders
Borders are an easy way to dress up a picture in Microsoft Word. To add a border, select the picture, go to Picture Format. Click on the Picture Border button on the ribbon to reveal the border options.


From here, choose the color, weight, and dash style you wish to use for the border.


To add a frame, click on the picture, then go to Picture Format. Click on the Picture Quick Styles button on the ribbon. Select the border you want to use.


How to Use Image Editing Tools
There are many Word image editing tools. Learn how to format pictures in Word by removing the background or adjusting the brightness. Here’s how:
1. Remove Background
Microsoft Word allows you to remove the background from your pictures. This feature works best if the color of the background is distinct from the colors on the main subject of the picture.
To remove the background, select the image. Go to Picture Format > Remove Background.


Use the tools provided to select which parts of the image you wish to keep and which parts you want to remove.


The parts that’ll be removed are colored pink.
When you’re happy with the selection, click Keep Changes.


2. Sharpness and Brightness Corrections
Improve the sharpness and brightness of your pictures in Microsoft Word. To adjust these, select the picture. Go to Picture Format > Corrections. Select the sharpness and brightness/contrast settings you wish to use.


To more finely control these settings, go to Picture Format > Corrections > Picture Corrections Options. The Format Picture sidebar appears. It allows you to provide specific settings for sharpness, brightness, and contrast.


3. Picture Color
Microsoft Word also allows you to control the color saturation and tone of your picture. And you can recolor the entire picture for special effects. Select the picture, go to Picture Format > Color. Select any of the options that appear.


From here choose:
- More Variations. Recolors the image with a different color from the options provided.
- Set Transparent Color. Makes certain colors transparent so that the color of the background shows through.
- Picture Color Options. Opens the Format Picture sidebar, where you can fine-tune the settings for color saturation, tone, and recolor.
How to Use Layout Options
Microsoft Word’s layout options for images lets you control how photos are displayed alongside text.
By default, a picture is set to be «In line with text.» This means the picture is treated as an object that moves with the text. This means whatever formatting is applied to the text applies to the picture as well, which may not be how you want it to appear. When a picture is in line with text, you won’t be able to drag and drop it to a different part of the document.
To set up a picture’s layout options, select the image, then go to Picture Format > Position. Select one of the pre-configured layout options to position your picture on the page.


Gain more control by going to Picture Format > Wrap Text.


Select one of the text wrapping options:
- Square — wraps text around the picture in a square shape


- Tight — wraps text following the shape of the picture


- Through — shows text through all the “open” parts of the picture (may only be visible with certain picture shapes)


- Top and Bottom — wraps text only above and below the picture


These text wrapping options allow you to overlay pictures in Word or merge them together into a collage-type layout.
You’ve got other options:
- Behind text. Overlays the text in front of the picture
- In Front of Text. Places text behind the picture, covering it
- Edit Wrap Boundary. Lets you fine-tune how text wraps around the picture, which is especially useful if it’s irregularly shaped
- Move with text. Keeps the picture anchored to the text
- Fix position on page. Keeps the picture on the same position relative to the page, even if the text moves
- More Layout Options …. Gives you precise control over the picture layout
How to Move Pictures in Word and Arrange them on the Page
You may be wondering how to move a picture in Microsoft Word. The easiest way to move a picture is by clicking and dragging it. If this doesn’t work, the picture is probably set to be inline with text. Follow the instructions above to select a different text wrapping option.
To move multiple images, hold the shift key down as you click on each picture. Then, drag and drop them into place.
You can also move images using precise measurements. Select the image, go to Picture Format > Position > More Layout Options …. Specify the horizontal and vertical position of the picture relative to an element of the page.


Get Creative With Pictures in Word
Use the skills you learned above to add pictures in your Word documents and display them exactly the way you envision. As you’ve seen, it’s easy to control the appearance and placement of images on the page. By following the steps above, you can produce professional-looking documents all by yourself. However, we’ve only scratched the surface of the many ways you can work with pictures in Word!
Of course, if you prefer to have these design choices made for you, you’ve got the option to start with a Microsoft Word template. If you make a lot of Word documents, then you’ll like the cost-effectiveness of Envato Elements. You get unlimited downloads of templates as well as fonts, stock photos, and more for one low subscription price. On the other hand, GraphicRiver may be a better option if you only need the one-off template.
This gives you the ultimate convenience because professionally-designed Word templates have image placeholders. All you’ve got to do is to drag and drop your own pictures into the placeholders. The picture formatting steps in this article will help you fine-tune the image settings as you wish.
Now you, too, can get more creative—and effective—with pictures in Microsoft Word. But first, get your head start by downloading your favorite MS Word Template from Envato Elements or GraphicRiver.