
This post may contain affiliate links, which means I may earn a commission if you decide to purchase through my links.
Especially for print work, having images that are high resolution and at least 300 DPI is important. It’s not always an intuitive thing to check though. Despite being so important, a lot of programs seem to bury it in a mix of settings.
To check an image’s resolution or DPI on a Mac computer, open it with the “Preview” application and click on “Show Inspector” within the “Tools” menu. On a Windows computer, right click on the image and click on “Details” within the “Properties” tab.
Let’s talk about a number of ways to access your DPI, whether you’re using a Mac, Windows, or some of the more popular design programs.
How to Check DPI and Image Resolution in the Finder with a Mac and Windows
Checking the DPI of your image from your desktop is easy, but it isn’t intuitive. There isn’t a simple “DPI” button you can click. Once you know where your image’s DPI information lives though, it’s quick and easy to check.
Check the DPI of an Image on a Mac
1. Open your image with the Preview app. This is my default app for opening images, mainly because it’s a simple and stress-free app, but also because it’s easy to check DPI with it.
2. Click on “Tools” in the top menu bar
3. Click on “Show Inspector” within the “Tools” menu
4. Look for the “DPI” label
You can also find your DPI in the “Adjust Size” settings. Simply look for the “Resolution” label, making sure that it’s set to “pixels/inch”
The Preview app isn’t the only way to check an image’s DPI, but it’s the simplest…and the cheapest. Free is always great in my book.
Check the DPI of an Image on a Windows
1. Right click on your image file
2. Click on “Properties”
3. Click on “Details”
4. Find the image section of the box that pops up and scan for the “Horizontal Resolution” and “Vertical Resolution”
5. That’s your DPI!
If you have a PDF, it’s likely that it will default to opening with Adobe Acrobat. I love this program, but it won’t let you check the resolution of your PDF without the Pro version.
Even if you have the Pro version of Adobe Acrobat, checking the DPI of your PDF isn’t easy. There’s actually a great reason for this. PDFs don’t have a single DPI rating; each image within the PDF has its own resolution.
Don’t worry though; there’s an easy workaround to figuring out the DPI of your PDFs.
To check the DPI of a PDF, convert it to a JPG or PNG, making sure that you maintain the same image quality during the conversion. Check the DPI of the resulting image that was converted from your PDF.
This isn’t a perfect system, but it’s pretty close. This is how I check the DPI of all of my PDFs and I’ve never run into any issues with it. Here’s an easy converter to use.
Like I said, getting the Pro version of Adobe Acrobat just for checking DPI isn’t worth it. But, if you already have a Pro subscription for other reasons, might as well get another feature out of it. Here’s how to check the DPI of your PDFs with the Pro version.
Check the DPI of a PDF with Adobe Acrobat Pro
PDFs don’t have a single DPI, as each image in the PDF has its own DPI. With Adobe Acrobat Pro, click the “Output Preview” setting under the “Print Production” menu. Use the “Object Inspector” to look at each of the images in your PDF.
Let’s run through those steps individually:
1. Click on “Print Production”
2. Click on “Output Preview”
3. In the box that pops up, under the label that says “Preview,” scroll down to “Object Inspector”
4. Click on the images in your PDF
5. Make sure the “Image Attributes” menu is expanded and scan for the “Resolution” label
6. Repeat for all of the images in your PDF and you’ll get a good sense whether all of your images are high resolution or not.
One of the reasons I love designing with Canva is that, when you download with their “PDF Print” option, it spits out a 300 DPI PDF automatically. No need to worry that it will be anything less.
I absolutely love Canva’s design software. If you’re using the free version, or have yet to explore Canva’s great features, read my post about why Canva Pro is worth the money. I pay for a year long subscription and it’s worth every penny.

Check the DPI of an Image with Illustrator
To check the DPI of an image in Illustrator, click on the “Window” tab in the top toolbar and scroll down to “Document Info.” You’ll see a section for “Resolution,” which will state the DPI of your design.
Illustrator makes it fairly easy and straightforward to check the DPI of your images. As they should. They are a well-respected design program for a reason and things like image resolution really matter.
Here’s the step-by step:
1. Click on “Window” in the top toolbar
2. Click on “Document Info”
3. Look for “Resolution”
Check the DPI of an Image with Microsoft Word
Microsoft Word will keep the DPI of your image the same, as long as your settings are correct. Within the “Edit” section of Word’s “Properties,” make sure that you check the box that says “Do not compress images in file.” Otherwise, set a default DPI below that.
Microsoft Word will compress your images unless you tell it not to. You also have to specifically tell it to do this for ALL of your documents, not just the one you’re working on. I’ll list that clearly in the steps, but it’s really important, so it’s worth noting again.
1. Open a Word Doc and click on “Word” in the top toolbar
2. Click on “Preferences”
3. Click on “Edit”
4. Scroll down to “Image Size and Quality:
5. Important! Click on the drop down next to “Image Size and Quality” and select “All New Documents.” Of course, if you don’t want this to apply to all of your documents, leave it selected for the current document you’re working on.
6. Click on “Do not compress images in file”
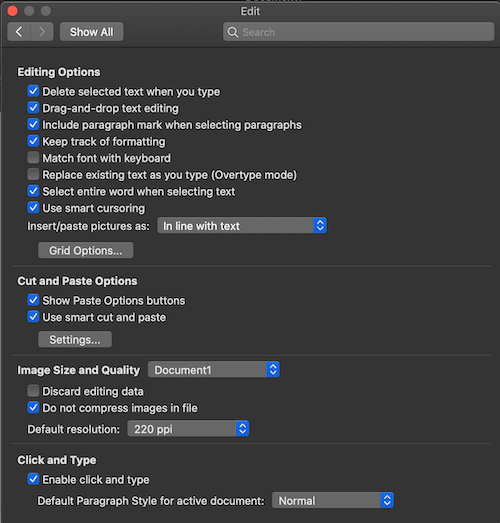
Important note: checking the box for “Do not compress images in file” overrides the DPI setting you’ll see below that. Microsoft Word will take your image as is and won’t adjust the DPI.
But, let’s say that you want all of your images in Word to be a consistent DPI. Instead of checking the “Do not compress images in file,” select the standard DPI you would like Word to use for your images.
Checking the DPI of an image on a desktop is one thing, but what about an iPad program like Procreate? Luckily, Procreate makes this easy to do right within the app.
Check the DPI of an Image with Procreate
To check the DPI of an image in Procreate, Click on the “Canvas” button within the “Actions” tab. Scroll down to “Canvas Info” and then click on “Dimensions.” You’ll see the DPI at the bottom.
User friendly features like this is a reason why I love Procreate so much. It’s such a powerful program, but it’s also so easy to use. Here are the steps again:
1. Click on the “Actions” tab in the top menu bar. It’s the one that looks like a wrench.
2. Click on “Canvas”
3. At the bottom of the “Canvas” menu, click on “Canvas Info”
4. Within the “Canvas Info” menu, click on dimensions
5. You’ll see your DPI at the bottom of the bottom of the list of your canvas dimensions
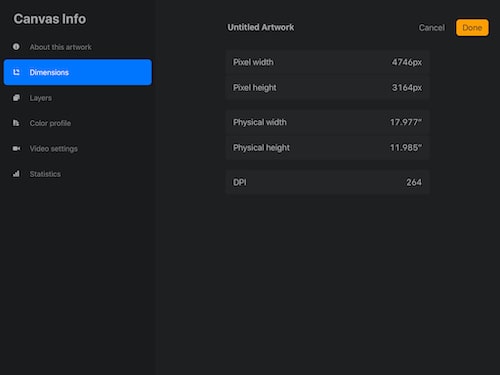
Image resolution is an important part of graphic design. If you end up with something that has a low DPI, it could mean disaster for your print work. Luckily, there are a number of simple and quick ways to check the resolution of your images across a number of platforms. With this guide, you can design confidently, knowing that your images will be the high quality that you need.
Go forth and create great art!

Diana has been an artist for over 26 years and has training in drawing, painting, digital drawing and graphic design. Diana’s latest obsession is digitally drawing with Procreate and creating t-shirt designs with Canva. Diana has experience selling her art across a number of platforms and loves helping other artists learn how to make money from their art as well.
Copy the artwork in Word, and paste it into the graphics program. Go to the program’s Resize dialog (in IrfanView, it’s on the Image menu) and set the 300 dpi resolution, as well as the correct size in pixels needed to keep the image at the desired size. When the picture has been resized/resampled, save it.
How do I change the DPI of a picture in Word?
To change the default resolution to high fidelity in Word or Excel (version 2016 or newer): Click File > Options > Advanced. Under Image Size and Quality, select High fidelity in the Default resolution list.
How do I check the DPI of an image in Word?
Microsoft Word will take your image as is and won’t adjust the DPI….Check the DPI of an Image on a Windows
- Right click on your image file.
- Click on “Properties”
- Click on “Details”
- Find the image section of the box that pops up and scan for the “Horizontal Resolution” and “Vertical Resolution”
- That’s your DPI!
How do I save an image as 300 DPI?
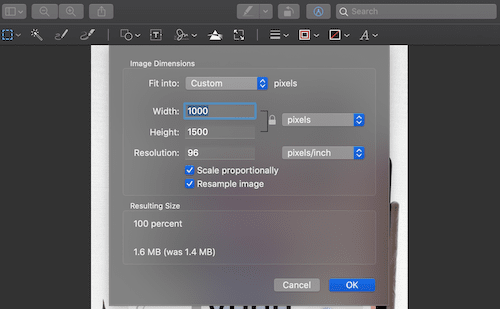
Open your image in Preview. Go to Tools > Adjust size… In the Resolution box you’ll see the DPI of your image. If it’s different than 300, uncheck the “Resample image” box and enter your desired DPI (300).
How do I make an image 300 DPI in Windows 10?
Click on the Image > Resize/ Resample option to open the Resize/ Resample image dialog window. And then, in the DPI field, enter the new DPI of the image and then press the OK button. Finally, save the modified image.
How many pixels is a 300 DPI photo?
Image size is expressed as DPI (dots per inch) and PPI (pixels per inch). So, when you ask yourself, “what is 300 DPI in Pixels Per Inch per image,” the answer is 300 because 300 DPI in an image means there are 300 pixels per inch in your web design image.
How do I make an Image 300 DPI in Windows 10?
How do I know if an image is 300 DPI?
To find out an image’s DPI in Windows, right-click on the file name and select Properties > Details. You’ll see the DPI in the Image section, labeled Horizontal Resolution and Vertical Resolution. On a Mac, you need to open the image in Preview and select Tools > Adjust Size. It’s labeled Resolution.
https://www.youtube.com/watch?v=eO-iGwC0c-8
To change the default resolution to high fidelity in Word or Excel (version 2016 or newer): Click File > Options > Advanced. Under Image Size and Quality, select High fidelity in the Default resolution list.
How do I convert a Word document to a high resolution JPEG?
Convert Word to JPG Online for Free
- Open the Word converter and drag your file in.
- We will first convert the Word file to a PDF.
- On the following page, click ‘to JPG’.
- Smallpdf will commence the conversion to a JPG file.
- All done – download your JPG image to your computer.
What DPI is Microsoft Word?
Word 2010 and Word 2013 use a single DPI for the whole document when printing to a PDF document. This DPI is determined by the capabilities of the printer. During printing, Word will try to adjust the image to reach the print DPI. For example, the PDF printer is treated as a printer with a highest DPI of 600.
How do you fix a blurry Word document?
Text is Blurry in Microsoft Office
- Within Microsoft Word, go to File -> Options.
- Within that window ,select Advanced and then scroll down to ‘Display. ‘
- Scroll to the bottom of that section and uncheck the option for ‘Use subpixel positioning to smooth fonts on screen. ‘
How do I increase DPI on my printer?
Go to Control Panel, select Devices and Printers, and then select the printer(s) in question. Right-click on the printer, and select Properties, then look for the print quality or DPI settings page to change your printers default resolution.
How can I increase DPI of an Image?
To change an image’s DPI in Photoshop, go to Image > Image Size. Uncheck Resample Image, because this setting will upscale your image, which will make it lower quality. Now, next to Resolution, type in your preferred resolution, set as Pixels/Inch. Notice how the Width and Height figures change, too.
Does Word reduce image quality?
Microsoft Word has a “feature” that compresses your images to 220ppi after saving. This saves file space for your documents, but images at this resolution do not meet Graduate School requirements for printing.
How do I save a Word document as a PDF without losing quality?
The easiest way to convert your document and preserve image quality is to use a PDF tool like Adobe Acrobat online services and follow these steps:
- Click Select A File and choose your Word document, or drag and drop the file.
- Sit back as Acrobat online services automatically convert your document.
- Download the PDF.
How do I make a PDF 300 DPI?
In the print dialog, you can select Printing Preferences. Click Advanced Options to get access to the DPI setting. A value of 300 DPI will usually result in a good quality output and a reasonable file size.
How to create a 300 dpi JPEG from artwork created in word?
Get a good graphics program, such as the free IrfanView. Copy the artwork in Word, and paste it into the graphics program. Go to the program’s Resize dialog (in IrfanView, it’s on the Image menu) and set the 300 dpi resolution, as well as the correct size in pixels needed to keep the image at the desired size.
Which is better 300 dpi or 600 dpi?
When printing images, different resolutions are used. Good results for printing yields 300 DPI, but it is better to apply 600 DPI. The DPI for the image to be printed is largely dependent on the printer (or plotter) on which it is printed.
What does DPI stand for in DPI converter?
If you set it to 72DPI, the image size in centimeters will not change, but the size will change in pixels (it will be 288 * 432 pixels). When you begin to digitally process your photos, one of the first terms you’ll come across is DPI. Abbreviation DPI stands for “dots per inch”, and is related to the quality of your photo.
How to change the resolution of a Word document?
How to Change the Resolution of a Word Document 1 Click File > Options > Advanced . 2 Under Image Size and Quality , select High fidelity in the Default resolution list. See More….
- Remove From My Forums
-
Вопрос
-
Как в ворде и других продуктах офиса задавать dpi всего документа — текста, картинок и прочего, а ничего то одного. Особенно меня текст интересует. И какое там вообще dpi по умолчанию?
Вообще когда начал заниматься проектированием интерфейсов, очень разочаровало что у большинства продуктов разных компаний вопрос с dpi вообще игнорируются. Работаю с MS word, Axure и Scrivener и в каждом свои размеры для одних и тех же шрифтов одного и того
же кегля. И никто не позволяет это настраивать или как то согласовывать. А главное ни одна программа даже не попыталась «объяснить» ситуацию. В Axure правда все же нашел настройку dpi, но идентичности с вордом так и не добился.
Ответы
-
Тогда задавайте свой вопрос прямо, Вы хотите добиться вывода на
экран монитора листа бумаги формата А4 с ГОСТовским размером 210х197 в его реальном виде, а у Вас это не получается. В чём причина и как её побороть.Как Вам уже выше писалось, что для этого необходимо использовать регулирующие настройки вывода на экран монитора, заложенные в операционной системе Windows:

Выбрав Особые параметры…, откроется дополнительное окно настройки Масштабной линейки:
Установите её масштаб, в соответствие с реальной масштабной линейкой и посмотрите результат.
Да, я Жук, три пары лапок и фасеточные глаза :))
-
Помечено в качестве ответа
19 декабря 2012 г. 9:21
-
Помечено в качестве ответа
I ran into this problem with bringing screenshots into Word 2016.
The problem is that Word wants to bring your 96 dpi image into a 220 dpi document. (Your dpi values may vary.)
When, say, a screenshot is pasted into Word, it inflates the size by a factor of 220 dpi/96 dpi ≈ 2.29167. (I don’t understand the point of this «feature», but this is what my Word install does by default.)
To counteract this, after having pasted the image in, right click on the image and click ‘Size and Position…». In the Scale subpanel, set your height and width percentages to 96/220 ≈ 43.6436%. This will scale the image back down to its original dpi.
Bonus pro tip:
Wait until you’ve got all your (poorly sized) images pasted into your document; don’t resize any of them until you’re done writing the doc. When ready, resize the first image as described above and hit Okay. Then click the next image once and hit F4. F4 repeats the last process, so hitting F4 will now resize the next image to ~43.6%. Click the next image and repeat your way down the file.
PS: Incidentally, changes to File>Options>Advanced>Image Size and Quality>Set default target output to… do not affect how my install of Word resizes pasted-in images.