
The IF function allows you to make a logical comparison between a value and what you expect by testing for a condition and returning a result if that condition is True or False.
-
=IF(Something is True, then do something, otherwise do something else)
But what if you need to test multiple conditions, where let’s say all conditions need to be True or False (AND), or only one condition needs to be True or False (OR), or if you want to check if a condition does NOT meet your criteria? All 3 functions can be used on their own, but it’s much more common to see them paired with IF functions.
Use the IF function along with AND, OR and NOT to perform multiple evaluations if conditions are True or False.
Syntax
-
IF(AND()) — IF(AND(logical1, [logical2], …), value_if_true, [value_if_false]))
-
IF(OR()) — IF(OR(logical1, [logical2], …), value_if_true, [value_if_false]))
-
IF(NOT()) — IF(NOT(logical1), value_if_true, [value_if_false]))
|
Argument name |
Description |
|
|
logical_test (required) |
The condition you want to test. |
|
|
value_if_true (required) |
The value that you want returned if the result of logical_test is TRUE. |
|
|
value_if_false (optional) |
The value that you want returned if the result of logical_test is FALSE. |
|
Here are overviews of how to structure AND, OR and NOT functions individually. When you combine each one of them with an IF statement, they read like this:
-
AND – =IF(AND(Something is True, Something else is True), Value if True, Value if False)
-
OR – =IF(OR(Something is True, Something else is True), Value if True, Value if False)
-
NOT – =IF(NOT(Something is True), Value if True, Value if False)
Examples
Following are examples of some common nested IF(AND()), IF(OR()) and IF(NOT()) statements. The AND and OR functions can support up to 255 individual conditions, but it’s not good practice to use more than a few because complex, nested formulas can get very difficult to build, test and maintain. The NOT function only takes one condition.
Here are the formulas spelled out according to their logic:
|
Formula |
Description |
|---|---|
|
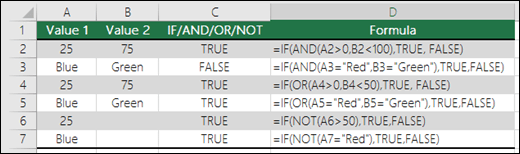
=IF(AND(A2>0,B2<100),TRUE, FALSE) |
IF A2 (25) is greater than 0, AND B2 (75) is less than 100, then return TRUE, otherwise return FALSE. In this case both conditions are true, so TRUE is returned. |
|
=IF(AND(A3=»Red»,B3=»Green»),TRUE,FALSE) |
If A3 (“Blue”) = “Red”, AND B3 (“Green”) equals “Green” then return TRUE, otherwise return FALSE. In this case only the first condition is true, so FALSE is returned. |
|
=IF(OR(A4>0,B4<50),TRUE, FALSE) |
IF A4 (25) is greater than 0, OR B4 (75) is less than 50, then return TRUE, otherwise return FALSE. In this case, only the first condition is TRUE, but since OR only requires one argument to be true the formula returns TRUE. |
|
=IF(OR(A5=»Red»,B5=»Green»),TRUE,FALSE) |
IF A5 (“Blue”) equals “Red”, OR B5 (“Green”) equals “Green” then return TRUE, otherwise return FALSE. In this case, the second argument is True, so the formula returns TRUE. |
|
=IF(NOT(A6>50),TRUE,FALSE) |
IF A6 (25) is NOT greater than 50, then return TRUE, otherwise return FALSE. In this case 25 is not greater than 50, so the formula returns TRUE. |
|
=IF(NOT(A7=»Red»),TRUE,FALSE) |
IF A7 (“Blue”) is NOT equal to “Red”, then return TRUE, otherwise return FALSE. |
Note that all of the examples have a closing parenthesis after their respective conditions are entered. The remaining True/False arguments are then left as part of the outer IF statement. You can also substitute Text or Numeric values for the TRUE/FALSE values to be returned in the examples.
Here are some examples of using AND, OR and NOT to evaluate dates.
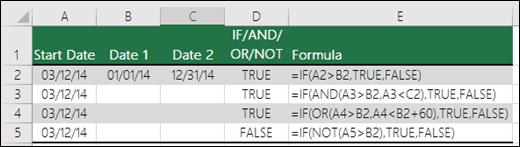
Here are the formulas spelled out according to their logic:
|
Formula |
Description |
|---|---|
|
=IF(A2>B2,TRUE,FALSE) |
IF A2 is greater than B2, return TRUE, otherwise return FALSE. 03/12/14 is greater than 01/01/14, so the formula returns TRUE. |
|
=IF(AND(A3>B2,A3<C2),TRUE,FALSE) |
IF A3 is greater than B2 AND A3 is less than C2, return TRUE, otherwise return FALSE. In this case both arguments are true, so the formula returns TRUE. |
|
=IF(OR(A4>B2,A4<B2+60),TRUE,FALSE) |
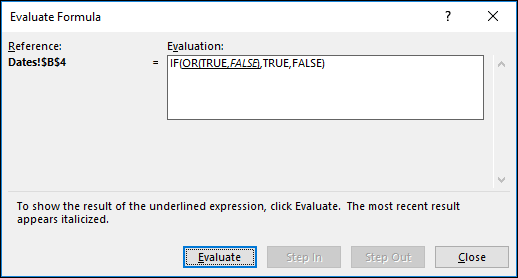
IF A4 is greater than B2 OR A4 is less than B2 + 60, return TRUE, otherwise return FALSE. In this case the first argument is true, but the second is false. Since OR only needs one of the arguments to be true, the formula returns TRUE. If you use the Evaluate Formula Wizard from the Formula tab you’ll see how Excel evaluates the formula. |
|
=IF(NOT(A5>B2),TRUE,FALSE) |
IF A5 is not greater than B2, then return TRUE, otherwise return FALSE. In this case, A5 is greater than B2, so the formula returns FALSE. |
Using AND, OR and NOT with Conditional Formatting
You can also use AND, OR and NOT to set Conditional Formatting criteria with the formula option. When you do this you can omit the IF function and use AND, OR and NOT on their own.
From the Home tab, click Conditional Formatting > New Rule. Next, select the “Use a formula to determine which cells to format” option, enter your formula and apply the format of your choice.

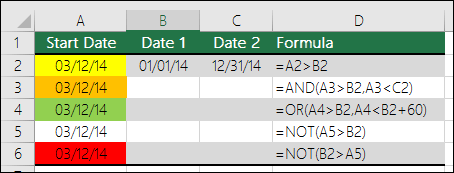
Using the earlier Dates example, here is what the formulas would be.
|
Formula |
Description |
|---|---|
|
=A2>B2 |
If A2 is greater than B2, format the cell, otherwise do nothing. |
|
=AND(A3>B2,A3<C2) |
If A3 is greater than B2 AND A3 is less than C2, format the cell, otherwise do nothing. |
|
=OR(A4>B2,A4<B2+60) |
If A4 is greater than B2 OR A4 is less than B2 plus 60 (days), then format the cell, otherwise do nothing. |
|
=NOT(A5>B2) |
If A5 is NOT greater than B2, format the cell, otherwise do nothing. In this case A5 is greater than B2, so the result will return FALSE. If you were to change the formula to =NOT(B2>A5) it would return TRUE and the cell would be formatted. |
Note: A common error is to enter your formula into Conditional Formatting without the equals sign (=). If you do this you’ll see that the Conditional Formatting dialog will add the equals sign and quotes to the formula — =»OR(A4>B2,A4<B2+60)», so you’ll need to remove the quotes before the formula will respond properly.
Need more help?

See also
You can always ask an expert in the Excel Tech Community or get support in the Answers community.
Learn how to use nested functions in a formula
IF function
AND function
OR function
NOT function
Overview of formulas in Excel
How to avoid broken formulas
Detect errors in formulas
Keyboard shortcuts in Excel
Logical functions (reference)
Excel functions (alphabetical)
Excel functions (by category)
Содержание
- Использование операторов If. Then. Else
- Выполнение операторов, если условие равно True
- Выполнение определенных операторов, если условие равно True, и выполнение других операторов, если оно равно False
- Проверка второго условия, если первое условие равно False
- См. также
- Поддержка и обратная связь
- IF function
- Simple IF examples
- Common problems
- Need more help?
- Using IF with AND, OR and NOT functions
- Examples
- Using AND, OR and NOT with Conditional Formatting
- Need more help?
- See also
- Функция ЕСЛИ в Excel. Как использовать?
- Что возвращает функция
- Синтаксис
- Аргументы функции
- Дополнительная информация
- Функция Если в Excel примеры с несколькими условиями
- Пример 1. Проверяем простое числовое условие с помощью функции IF (ЕСЛИ)
- Пример 2. Использование вложенной функции IF (ЕСЛИ) для проверки условия выражения
- Пример 3. Вычисляем сумму комиссии с продаж с помощью функции IF (ЕСЛИ) в Excel
- Пример 4. Используем логические операторы (AND/OR) (И/ИЛИ) в функции IF (ЕСЛИ) в Excel
- Пример 5. Преобразуем ошибки в значения “0” с помощью функции IF (ЕСЛИ)
Использование операторов If. Then. Else
Используйте оператор If. Then. Else для выполнения определенного оператора или блока операторов в зависимости от значения условия. Операторы If. Then. Else могут быть вложены в любое необходимое число слоев.
Однако для удобства читаемости лучше использовать оператор Select Case вместо нескольких уровней вложенных операторов If. Then. Else.
Выполнение операторов, если условие равно True
Чтобы выполнить только один оператор, когда условие равно True, используйте однострочный синтаксис оператора If. Then. Else. В следующем примере показан однострочный синтаксис с ключевым словомElse.
Чтобы выполнить несколько строк кода, необходимо использовать многострочный синтаксис. Этот синтаксис включает оператор End If, как показано в примере ниже.
Выполнение определенных операторов, если условие равно True, и выполнение других операторов, если оно равно False
Используйте оператор If. Then. Else для определения двух блоков исполняемых операторов: один блок выполняется, если условие равно True, а другой блок выполняется, если условие равно False.
Проверка второго условия, если первое условие равно False
Можно добавить операторы ElseIf в оператор If. Then. Else для проверки второго условия, если первое условие равно False. Например, в следующей процедуре функция вычисляет бонус на основе классификации задания. Оператор, следующий за оператором Else, выполняется в том случае, если условия во всех операторах If и ElseIf равны False.
См. также
Поддержка и обратная связь
Есть вопросы или отзывы, касающиеся Office VBA или этой статьи? Руководство по другим способам получения поддержки и отправки отзывов см. в статье Поддержка Office VBA и обратная связь.
Источник
IF function
The IF function is one of the most popular functions in Excel, and it allows you to make logical comparisons between a value and what you expect.
So an IF statement can have two results. The first result is if your comparison is True, the second if your comparison is False.
For example, =IF(C2=”Yes”,1,2) says IF(C2 = Yes, then return a 1, otherwise return a 2).

Use the IF function, one of the logical functions, to return one value if a condition is true and another value if it’s false.
IF(logical_test, value_if_true, [value_if_false])
The condition you want to test.
The value that you want returned if the result of logical_test is TRUE.
The value that you want returned if the result of logical_test is FALSE.
Simple IF examples
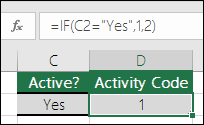
In the above example, cell D2 says: IF(C2 = Yes, then return a 1, otherwise return a 2)

In this example, the formula in cell D2 says: IF(C2 = 1, then return Yes, otherwise return No)As you see, the IF function can be used to evaluate both text and values. It can also be used to evaluate errors. You are not limited to only checking if one thing is equal to another and returning a single result, you can also use mathematical operators and perform additional calculations depending on your criteria. You can also nest multiple IF functions together in order to perform multiple comparisons.
 B2,”Over Budget”,”Within Budget”)» loading=»lazy»>
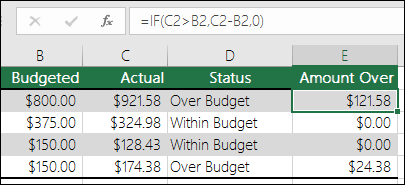
=IF(C2>B2,”Over Budget”,”Within Budget”)
In the above example, the IF function in D2 is saying IF(C2 Is Greater Than B2, then return “Over Budget”, otherwise return “Within Budget”)
 B2,C2-B2,»»)» loading=»lazy»>
In the above illustration, instead of returning a text result, we are going to return a mathematical calculation. So the formula in E2 is saying IF(Actual is Greater than Budgeted, then Subtract the Budgeted amount from the Actual amount, otherwise return nothing).
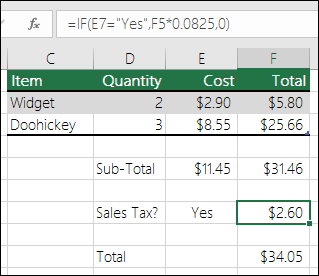
In this example, the formula in F7 is saying IF(E7 = “Yes”, then calculate the Total Amount in F5 * 8.25%, otherwise no Sales Tax is due so return 0)
Note: If you are going to use text in formulas, you need to wrap the text in quotes (e.g. “Text”). The only exception to that is using TRUE or FALSE, which Excel automatically understands.
Common problems
What went wrong
There was no argument for either value_if_true or value_if_False arguments. To see the right value returned, add argument text to the two arguments, or add TRUE or FALSE to the argument.
This usually means that the formula is misspelled.
Need more help?
You can always ask an expert in the Excel Tech Community or get support in the Answers community.
Источник
Using IF with AND, OR and NOT functions
The IF function allows you to make a logical comparison between a value and what you expect by testing for a condition and returning a result if that condition is True or False.
=IF(Something is True, then do something, otherwise do something else)
But what if you need to test multiple conditions, where let’s say all conditions need to be True or False ( AND), or only one condition needs to be True or False ( OR), or if you want to check if a condition does NOT meet your criteria? All 3 functions can be used on their own, but it’s much more common to see them paired with IF functions.
Use the IF function along with AND, OR and NOT to perform multiple evaluations if conditions are True or False.
IF(AND()) — IF(AND(logical1, [logical2], . ), value_if_true, [value_if_false]))
IF(OR()) — IF(OR(logical1, [logical2], . ), value_if_true, [value_if_false]))
IF(NOT()) — IF(NOT(logical1), value_if_true, [value_if_false]))
The condition you want to test.
The value that you want returned if the result of logical_test is TRUE.
The value that you want returned if the result of logical_test is FALSE.
Here are overviews of how to structure AND, OR and NOT functions individually. When you combine each one of them with an IF statement, they read like this:
AND – =IF(AND(Something is True, Something else is True), Value if True, Value if False)
OR – =IF(OR(Something is True, Something else is True), Value if True, Value if False)
NOT – =IF(NOT(Something is True), Value if True, Value if False)
Examples
Following are examples of some common nested IF(AND()), IF(OR()) and IF(NOT()) statements. The AND and OR functions can support up to 255 individual conditions, but it’s not good practice to use more than a few because complex, nested formulas can get very difficult to build, test and maintain. The NOT function only takes one condition.
Here are the formulas spelled out according to their logic:
=IF(AND(A2>0,B2 0,B4 50),TRUE,FALSE)
IF A6 (25) is NOT greater than 50, then return TRUE, otherwise return FALSE. In this case 25 is not greater than 50, so the formula returns TRUE.
IF A7 (“Blue”) is NOT equal to “Red”, then return TRUE, otherwise return FALSE.
Note that all of the examples have a closing parenthesis after their respective conditions are entered. The remaining True/False arguments are then left as part of the outer IF statement. You can also substitute Text or Numeric values for the TRUE/FALSE values to be returned in the examples.
Here are some examples of using AND, OR and NOT to evaluate dates.
Here are the formulas spelled out according to their logic:
IF A2 is greater than B2, return TRUE, otherwise return FALSE. 03/12/14 is greater than 01/01/14, so the formula returns TRUE.
=IF(AND(A3>B2,A3 B2,A4 B2),TRUE,FALSE)
IF A5 is not greater than B2, then return TRUE, otherwise return FALSE. In this case, A5 is greater than B2, so the formula returns FALSE.
Using AND, OR and NOT with Conditional Formatting
You can also use AND, OR and NOT to set Conditional Formatting criteria with the formula option. When you do this you can omit the IF function and use AND, OR and NOT on their own.
From the Home tab, click Conditional Formatting > New Rule. Next, select the “ Use a formula to determine which cells to format” option, enter your formula and apply the format of your choice.
Edit Rule dialog showing the Formula method» loading=»lazy»>
Using the earlier Dates example, here is what the formulas would be.
If A2 is greater than B2, format the cell, otherwise do nothing.
=AND(A3>B2,A3 B2,A4 B2)
If A5 is NOT greater than B2, format the cell, otherwise do nothing. In this case A5 is greater than B2, so the result will return FALSE. If you were to change the formula to =NOT(B2>A5) it would return TRUE and the cell would be formatted.
Note: A common error is to enter your formula into Conditional Formatting without the equals sign (=). If you do this you’ll see that the Conditional Formatting dialog will add the equals sign and quotes to the formula — =»OR(A4>B2,A4
Need more help?
See also
You can always ask an expert in the Excel Tech Community or get support in the Answers community.
Источник
Функция ЕСЛИ в Excel. Как использовать?
Функция ЕСЛИ в Excel — это отличный инструмент для проверки условий на ИСТИНУ или ЛОЖЬ. Если значения ваших расчетов равны заданным параметрам функции как ИСТИНА, то она возвращает одно значение, если ЛОЖЬ, то другое.
Что возвращает функция
Заданное вами значение при выполнении двух условий ИСТИНА или ЛОЖЬ.
Синтаксис
=IF(logical_test, [value_if_true], [value_if_false]) — английская версия
=ЕСЛИ(лог_выражение; [значение_если_истина]; [значение_если_ложь]) — русская версия
Аргументы функции
- logical_test (лог_выражение) — это условие, которое вы хотите протестировать. Этот аргумент функции должен быть логичным и определяемым как ЛОЖЬ или ИСТИНА. Аргументом может быть как статичное значение, так и результат функции, вычисления;
- [value_if_true] ([значение_если_истина]) — (не обязательно) — это то значение, которое возвращает функция. Оно будет отображено в случае, если значение которое вы тестируете соответствует условию ИСТИНА;
- [value_if_false] ([значение_если_ложь]) — (не обязательно) — это то значение, которое возвращает функция. Оно будет отображено в случае, если условие, которое вы тестируете соответствует условию ЛОЖЬ.
Дополнительная информация
- В функции ЕСЛИ может быть протестировано 64 условий за один раз;
- Если какой-либо из аргументов функции является массивом — оценивается каждый элемент массива;
- Если вы не укажете условие аргумента FALSE (ЛОЖЬ) value_if_false (значение_если_ложь) в функции, т.е. после аргумента value_if_true (значение_если_истина) есть только запятая (точка с запятой), функция вернет значение “0”, если результат вычисления функции будет равен FALSE (ЛОЖЬ).
На примере ниже, формула =IF(A1> 20,”Разрешить”) или =ЕСЛИ(A1>20;»Разрешить») , где value_if_false (значение_если_ложь) не указано, однако аргумент value_if_true (значение_если_истина) по-прежнему следует через запятую. Функция вернет “0” всякий раз, когда проверяемое условие не будет соответствовать условиям TRUE (ИСТИНА). |
| - Если вы не укажете условие аргумента TRUE(ИСТИНА) (value_if_true (значение_если_истина)) в функции, т.е. условие указано только для аргумента value_if_false (значение_если_ложь), то формула вернет значение “0”, если результат вычисления функции будет равен TRUE (ИСТИНА);
На примере ниже формула равна = IF (A1>20;«Отказать») или =ЕСЛИ(A1>20;»Отказать») , где аргумент value_if_true (значение_если_истина) не указан, формула будет возвращать “0” всякий раз, когда условие соответствует TRUE (ИСТИНА).
![]()
Функция Если в Excel примеры с несколькими условиями
Пример 1. Проверяем простое числовое условие с помощью функции IF (ЕСЛИ)
При использовании функции ЕСЛИ в Excel, вы можете использовать различные операторы для проверки состояния. Вот список операторов, которые вы можете использовать:
![]()
Ниже приведен простой пример использования функции при расчете оценок студентов. Если сумма баллов больше или равна «35», то формула возвращает “Сдал”, иначе возвращается “Не сдал”.
Пример 2. Использование вложенной функции IF (ЕСЛИ) для проверки условия выражения
Функция может принимать до 64 условий одновременно. Несмотря на то, что создавать длинные вложенные функции нецелесообразно, то в редких случаях вы можете создать формулу, которая множество условий последовательно.
В приведенном ниже примере мы проверяем два условия.
- Первое условие проверяет, сумму баллов не меньше ли она чем 35 баллов. Если это ИСТИНА, то функция вернет “Не сдал”;
- В случае, если первое условие — ЛОЖЬ, и сумма баллов больше 35, то функция проверяет второе условие. В случае если сумма баллов больше или равна 75. Если это правда, то функция возвращает значение “Отлично”, в других случаях функция возвращает “Сдал”.
Пример 3. Вычисляем сумму комиссии с продаж с помощью функции IF (ЕСЛИ) в Excel
Функция позволяет выполнять вычисления с числами. Хороший пример использования — расчет комиссии продаж для торгового представителя.
В приведенном ниже примере, торговый представитель по продажам:
- не получает комиссионных, если объем продаж меньше 50 тыс;
- получает комиссию в размере 2%, если продажи между 50-100 тыс
- получает 4% комиссионных, если объем продаж превышает 100 тыс.
Рассчитать размер комиссионных для торгового агента можно по следующей формуле:
=ЕСЛИ(B2 — русская версия
![]()
В формуле, использованной в примере выше, вычисление суммы комиссионных выполняется в самой функции ЕСЛИ . Если объем продаж находится между 50-100K, то формула возвращает B2 * 2%, что составляет 2% комиссии в зависимости от объема продажи.
Пример 4. Используем логические операторы (AND/OR) (И/ИЛИ) в функции IF (ЕСЛИ) в Excel
Вы можете использовать логические операторы (AND/OR) (И/ИЛИ) внутри функции для одновременного тестирования нескольких условий.
Например, предположим, что вы должны выбрать студентов для стипендий, основываясь на оценках и посещаемости. В приведенном ниже примере учащийся имеет право на участие только в том случае, если он набрал более 80 баллов и имеет посещаемость более 80%.
![]()
Вы можете использовать функцию AND (И) вместе с функцией IF (ЕСЛИ) , чтобы сначала проверить, выполняются ли оба эти условия или нет. Если условия соблюдены, функция возвращает “Имеет право”, в противном случае она возвращает “Не имеет право”.
Формула для этого расчета:
=IF(AND(B2>80,C2>80%),”Да”,”Нет”) — английская версия
=ЕСЛИ(И(B2>80;C2>80%);»Да»;»Нет») — русская версия
Пример 5. Преобразуем ошибки в значения “0” с помощью функции IF (ЕСЛИ)
С помощью этой функции вы также можете убирать ячейки содержащие ошибки. Вы можете преобразовать значения ошибок в пробелы или нули или любое другое значение.
Формула для преобразования ошибок в ячейках следующая:
=IF(ISERROR(A1),0,A1) — английская версия
=ЕСЛИ(ЕОШИБКА(A1);0;A1) — русская версия
Формула возвращает “0”, в случае если в ячейке есть ошибка, иначе она возвращает значение ячейки.
ПРИМЕЧАНИЕ. Если вы используете Excel 2007 или версии после него, вы также можете использовать функцию IFERROR для этого.
Точно так же вы можете обрабатывать пустые ячейки. В случае пустых ячеек используйте функцию ISBLANK, на примере ниже:
=IF(ISBLANK(A1),0,A1) — английская версия
=ЕСЛИ(ЕПУСТО(A1);0;A1) — русская версия
Источник
Функция ЕСЛИ в Excel — это отличный инструмент для проверки условий на ИСТИНУ или ЛОЖЬ. Если значения ваших расчетов равны заданным параметрам функции как ИСТИНА, то она возвращает одно значение, если ЛОЖЬ, то другое.
Содержание
- Что возвращает функция
- Синтаксис
- Аргументы функции
- Дополнительная информация
- Функция Если в Excel примеры с несколькими условиями
- Пример 1. Проверяем простое числовое условие с помощью функции IF (ЕСЛИ)
- Пример 2. Использование вложенной функции IF (ЕСЛИ) для проверки условия выражения
- Пример 3. Вычисляем сумму комиссии с продаж с помощью функции IF (ЕСЛИ) в Excel
- Пример 4. Используем логические операторы (AND/OR) (И/ИЛИ) в функции IF (ЕСЛИ) в Excel
- Пример 5. Преобразуем ошибки в значения “0” с помощью функции IF (ЕСЛИ)
Что возвращает функция
Заданное вами значение при выполнении двух условий ИСТИНА или ЛОЖЬ.
Синтаксис
=IF(logical_test, [value_if_true], [value_if_false]) — английская версия
=ЕСЛИ(лог_выражение; [значение_если_истина]; [значение_если_ложь]) — русская версия
Аргументы функции
- logical_test (лог_выражение) — это условие, которое вы хотите протестировать. Этот аргумент функции должен быть логичным и определяемым как ЛОЖЬ или ИСТИНА. Аргументом может быть как статичное значение, так и результат функции, вычисления;
- [value_if_true] ([значение_если_истина]) — (не обязательно) — это то значение, которое возвращает функция. Оно будет отображено в случае, если значение которое вы тестируете соответствует условию ИСТИНА;
- [value_if_false] ([значение_если_ложь]) — (не обязательно) — это то значение, которое возвращает функция. Оно будет отображено в случае, если условие, которое вы тестируете соответствует условию ЛОЖЬ.
Дополнительная информация
- В функции ЕСЛИ может быть протестировано 64 условий за один раз;
- Если какой-либо из аргументов функции является массивом — оценивается каждый элемент массива;
- Если вы не укажете условие аргумента FALSE (ЛОЖЬ) value_if_false (значение_если_ложь) в функции, т.е. после аргумента value_if_true (значение_если_истина) есть только запятая (точка с запятой), функция вернет значение “0”, если результат вычисления функции будет равен FALSE (ЛОЖЬ).
На примере ниже, формула =IF(A1> 20,”Разрешить”) или =ЕСЛИ(A1>20;»Разрешить») , где value_if_false (значение_если_ложь) не указано, однако аргумент value_if_true (значение_если_истина) по-прежнему следует через запятую. Функция вернет “0” всякий раз, когда проверяемое условие не будет соответствовать условиям TRUE (ИСТИНА).
 |
| - Если вы не укажете условие аргумента TRUE(ИСТИНА) (value_if_true (значение_если_истина)) в функции, т.е. условие указано только для аргумента value_if_false (значение_если_ложь), то формула вернет значение “0”, если результат вычисления функции будет равен TRUE (ИСТИНА);
На примере ниже формула равна =IF (A1>20;«Отказать») или =ЕСЛИ(A1>20;»Отказать»), где аргумент value_if_true (значение_если_истина) не указан, формула будет возвращать “0” всякий раз, когда условие соответствует TRUE (ИСТИНА).

Функция Если в Excel примеры с несколькими условиями
Пример 1. Проверяем простое числовое условие с помощью функции IF (ЕСЛИ)
При использовании функции ЕСЛИ в Excel, вы можете использовать различные операторы для проверки состояния. Вот список операторов, которые вы можете использовать:
Ниже приведен простой пример использования функции при расчете оценок студентов. Если сумма баллов больше или равна «35», то формула возвращает “Сдал”, иначе возвращается “Не сдал”.
Пример 2. Использование вложенной функции IF (ЕСЛИ) для проверки условия выражения
Функция может принимать до 64 условий одновременно. Несмотря на то, что создавать длинные вложенные функции нецелесообразно, то в редких случаях вы можете создать формулу, которая множество условий последовательно.
В приведенном ниже примере мы проверяем два условия.
- Первое условие проверяет, сумму баллов не меньше ли она чем 35 баллов. Если это ИСТИНА, то функция вернет “Не сдал”;
- В случае, если первое условие — ЛОЖЬ, и сумма баллов больше 35, то функция проверяет второе условие. В случае если сумма баллов больше или равна 75. Если это правда, то функция возвращает значение “Отлично”, в других случаях функция возвращает “Сдал”.
Пример 3. Вычисляем сумму комиссии с продаж с помощью функции IF (ЕСЛИ) в Excel
Функция позволяет выполнять вычисления с числами. Хороший пример использования — расчет комиссии продаж для торгового представителя.
В приведенном ниже примере, торговый представитель по продажам:
- не получает комиссионных, если объем продаж меньше 50 тыс;
- получает комиссию в размере 2%, если продажи между 50-100 тыс
- получает 4% комиссионных, если объем продаж превышает 100 тыс.
Рассчитать размер комиссионных для торгового агента можно по следующей формуле:
=IF(B2<50,0,IF(B2<100,B2*2%,B2*4%)) — английская версия
=ЕСЛИ(B2<50;0;ЕСЛИ(B2<100;B2*2%;B2*4%)) — русская версия
В формуле, использованной в примере выше, вычисление суммы комиссионных выполняется в самой функции ЕСЛИ. Если объем продаж находится между 50-100K, то формула возвращает B2 * 2%, что составляет 2% комиссии в зависимости от объема продажи.
Больше лайфхаков в нашем Telegram Подписаться
Пример 4. Используем логические операторы (AND/OR) (И/ИЛИ) в функции IF (ЕСЛИ) в Excel
Вы можете использовать логические операторы (AND/OR) (И/ИЛИ) внутри функции для одновременного тестирования нескольких условий.
Например, предположим, что вы должны выбрать студентов для стипендий, основываясь на оценках и посещаемости. В приведенном ниже примере учащийся имеет право на участие только в том случае, если он набрал более 80 баллов и имеет посещаемость более 80%.
Вы можете использовать функцию AND (И) вместе с функцией IF (ЕСЛИ), чтобы сначала проверить, выполняются ли оба эти условия или нет. Если условия соблюдены, функция возвращает “Имеет право”, в противном случае она возвращает “Не имеет право”.
Формула для этого расчета:
=IF(AND(B2>80,C2>80%),”Да”,”Нет”) — английская версия
=ЕСЛИ(И(B2>80;C2>80%);»Да»;»Нет») — русская версия
Пример 5. Преобразуем ошибки в значения “0” с помощью функции IF (ЕСЛИ)
С помощью этой функции вы также можете убирать ячейки содержащие ошибки. Вы можете преобразовать значения ошибок в пробелы или нули или любое другое значение.
Формула для преобразования ошибок в ячейках следующая:
=IF(ISERROR(A1),0,A1) — английская версия
=ЕСЛИ(ЕОШИБКА(A1);0;A1) — русская версия
Формула возвращает “0”, в случае если в ячейке есть ошибка, иначе она возвращает значение ячейки.
ПРИМЕЧАНИЕ. Если вы используете Excel 2007 или версии после него, вы также можете использовать функцию IFERROR для этого.
Точно так же вы можете обрабатывать пустые ячейки. В случае пустых ячеек используйте функцию ISBLANK, на примере ниже:
=IF(ISBLANK(A1),0,A1) — английская версия
=ЕСЛИ(ЕПУСТО(A1);0;A1) — русская версия
Однострочная и многострочная конструкции оператора If…Then…Else и функция IIf, используемые в коде VBA Excel — синтаксис, компоненты, примеры.
Оператор If…Then…Else предназначен для передачи управления одному из блоков операторов в зависимости от результатов проверяемых условий.
Однострочная конструкция
Оператор If…Then…Else может использоваться в однострочной конструкции без ключевых слов Else, End If.
Синтаксис однострочной конструкции If…Then…
|
If [условие] Then [операторы] |
Компоненты однострочной конструкции If…Then…
- условие — числовое или строковое выражение, возвращающее логическое значение True или False;
- операторы — блок операторов кода VBA Excel, который выполняется, если компонент условие возвращает значение True.
Если компонент условие возвращает значение False, блок операторов конструкции If…Then… пропускается и управление программой передается следующей строке кода.
Пример 1
|
Sub Primer1() Dim d As Integer, a As String d = InputBox(«Введите число от 1 до 20», «Пример 1», 1) If d > 10 Then a = «Число « & d & » больше 10″ MsgBox a End Sub |
Многострочная конструкция
Синтаксис многострочной конструкции If…Then…Else
|
If [условие] Then [операторы] ElseIf [условие] Then [операторы] ———————— Else [операторы] End If |
Компоненты многострочной конструкции If…Then…Else:
- условие — числовое или строковое выражение, следующее за ключевым словом If или ElseIf и возвращающее логическое значение True или False;
- операторы — блок операторов кода VBA Excel, который выполняется, если компонент условие возвращает значение True;
- пунктирная линия обозначает дополнительные структурные блоки из строки
ElseIf [условие] Thenи строки[операторы].
Если компонент условие возвращает значение False, следующий за ним блок операторов конструкции If…Then…Else пропускается и управление программой передается следующей строке кода.
Самый простой вариант многострочной конструкции If…Then…Else:
|
If [условие] Then [операторы] Else [операторы] End If |
Пример 2
|
Sub Primer2() Dim d As Integer, a As String d = InputBox(«Введите число от 1 до 40», «Пример 2», 1) If d < 11 Then a = «Число « & d & » входит в первую десятку» ElseIf d > 10 And d < 21 Then a = «Число « & d & » входит во вторую десятку» ElseIf d > 20 And d < 31 Then a = «Число « & d & » входит в третью десятку» Else a = «Число « & d & » входит в четвертую десятку» End If MsgBox a End Sub |
Функция IIf
Функция IIf проверяет заданное условие и возвращает значение в зависимости от результата проверки.
Синтаксис функции
|
IIf([условие], [если True], [если False]) |
Компоненты функции IIf
- условие — числовое или строковое выражение, возвращающее логическое значение True или False;
- если True — значение, которое возвращает функция IIf, если условие возвратило значение True;
- если False — значение, которое возвращает функция IIf, если условие возвратило значение False.
Компоненты если True и если False могут быть выражениями, значения которых будут вычислены и возвращены.
Пример 3
|
Sub Primer3() Dim d As Integer, a As String Instr: On Error Resume Next d = InputBox(«Введите число от 1 до 20 и нажмите OK», «Пример 3», 1) If d > 20 Then GoTo Instr a = IIf(d < 10, d & » — число однозначное», d & » — число двузначное») MsgBox a End Sub |
Пример 4
Стоит отметить, что не зависимо от того, выполняется условие или нет, функция IIf вычислит оба выражения в параметрах если True и если False:
|
Sub Primer4() On Error GoTo Instr Dim x, y x = 10 y = 5 MsgBox IIf(x = 10, x + 5, y + 10) MsgBox IIf(x = 10, x + 5, y / 0) Exit Sub Instr: MsgBox «Произошла ошибка: « & Err.Description End Sub |
При нажатии кнопки «Cancel» или закрытии крестиком диалогового окна InputBox из первых двух примеров, генерируется ошибка, так как в этих случаях функция InputBox возвращает пустую строку. Присвоение пустой строки переменной d типа Integer вызывает ошибку. При нажатии кнопки «OK» диалогового окна, числа, вписанные в поле ввода в текстовом формате, VBA Excel автоматически преобразует в числовой формат переменной d. В третьем примере есть обработчик ошибок.
In Excel VBA, IF Then Else statement allows you to check for a condition, and perform an action accordingly.
This is extremely valuable in many situations as we will see in the examples later in this tutorial.
To give you a simple example, suppose you have a list of grades in Excel and you want to highlight all those students who have scored an A. Now, if I ask you to do this manually, you will check each student’s grade and if it’s an A, you’ll highlight it, and if it isn’t, then you’ll leave it as is.
The same logic can be built in VBA using the If Then Else statement as well (and of course do a lot more than just highlighting grades).
In this tutorial, I’ll show you different ways the ‘If Then Else’ construct can be used in Excel VBA, and some practical examples in action.
But before I get into the specifics, let me give you the syntax of the ‘IF Then Else’ statement.
If you’re interested in learning VBA the easy way, check out my Online Excel VBA Training.
Syntax – IF Then Else
Below is the generic syntax of If Then Else construct in VBA
IF condition Then true_code [Else false_code]
Or
IF condition Then
true_code
Else
false_code
End IF
Note that the Else part of this statement is optional.
Now if you’re wondering what’s the difference between the two syntaxes, let me clarify.
The first syntax is a simple one-line IF THEN ELSE statement where you don’t need to use the END IF statement.
However, in the second syntax, the true_code part is in the second line. This is helpful when the code that you need to run in case the IF condition is true is long and consists of multiple lines.
When you split the IF statement into multiple lines, you need to tell VBA where the IF Then construct ends.
Hence you need to use the End IF statement.
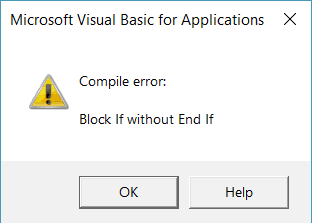
In case you don’t use End IF when required, VBA will show you an error – “Block IF without END IF”
Examples of Using IF Then Statement in VBA
To give you an idea of how the IF-THEN statement works in VBA, let me start with some basic examples (some practical and more useful examples are covered later in this tutorial).
Suppose you have a student’s score in cell A1 and you want to check whether the student passed the exam or not (passing marks threshold being 35).
Then you can use the following code:
Sub CheckScore()
If Range("A1").Value >=35 Then MsgBox "Pass"
End Sub
The above code has a single line of IF statement that checks the value in cell A1.
If it’s more than 35, it shows the message – “Pass”.
If it’s less than 35, nothing happens.
But what if you want to show a message in both the cases, whether a student passed or failed the exam.
The below code would do this:
Sub CheckScore()
If Range("A1").Value >= 35 Then
MsgBox "Pass"
Else
MsgBox "Fail"
End If
End Sub
The above code uses the IF as well as the ELSE statement to execute two different conditions. When the score is more than (or equal to) 35, the IF condition is true, and the code right below it gets executed (everything before the Else statement).
But when the IF condition is FALSE, the code jumps to the Else part and executes the code block in it.
Note that when we use a single line of IF Then statement, we don’t need to use End IF. But when we split it into more than one line, we need to use the End If statement.
Nested IF Then (Multiple IF Then statements)
So far we have used a single IF Then statement.
In case you have multiple conditions to check, you can use:
- Multiple IF conditions
- If Then Else statement
- IF Then ElseIf Else construct
Let me show you how these differ and how to use this in Excel VBA.
Multiple IF Then Statements
Let’s take the same example of using a student’s score.
If the student scores less than 35, the message to display is ‘Fail’, if the score is more than or equal to 35, the message to display is ‘Pass’.
We can use the below code to get this done:
Sub CheckScore()
If Range("A1").Value < 35 Then MsgBox "Fail"
If Range("A1").Value >= 35 Then MsgBox "Pass"
End Sub
You can use multiple IF Then statement as shown above. While this works, it’s not an example of good coding (as you will see the alternatives below).
In case you decide to use this, remember that these statements should either be independent or mutually exclusive. The important thing to know here is that in the above construct, all the IF statements are evaluated and the ones where the condition is true, the code is executed.
So even if the first IF statement is correct, the second would still be evaluated.
IF Then Else Statement
Suppose this time, instead of just displaying the message Pass/Fail, we have one more condition.
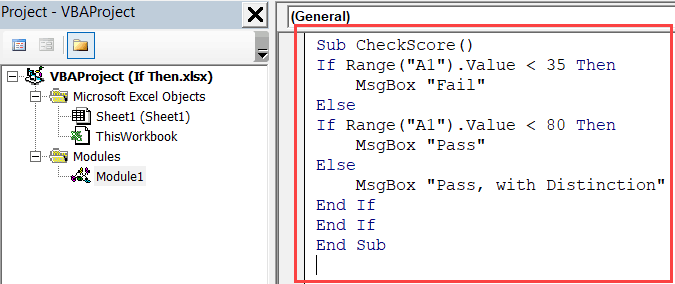
If the student scores less than 35, the message to display is ‘Fail’, if the score is more than or equal to 35, the message to display is ‘Pass’, and if the score is more than 80, the message to display is ‘Pass, with Distinction’.
We can use the below code to get this done:
Sub CheckScore()
If Range("A1").Value < 35 Then
MsgBox "Fail"
Else
If Range("A1").Value < 80 Then
MsgBox "Pass"
Else
MsgBox "Pass, with Distinction"
End If
End If
End Sub
In the above code, we have used multiple IF statements (nested IF Then) with the help of Else.
So there is an ‘IF Then Else’ construct within an ‘IF Then Else’ construct. This type of nesting allows you to check for multiple conditions and run the relevant block of code.
IF Then ElseIf Else Statement
The above code (that we saw in the previous section) can be further optimized by using the ElseIf statement.
Here is what we’re trying to do – If the student scores less than 35, the message to display is ‘Fail’, if the score is more than or equal to 35, the message to display is ‘Pass’, and if the score is more than 80, the message to display is ‘Pass, with Distinction’.
Sub CheckScore()
If Range("A1").Value < 35 Then
MsgBox "Fail"
ElseIf Range("A1").Value < 80 Then
MsgBox "Pass"
Else
MsgBox "Pass, with Distinction"
End If
End Sub
The above code uses ElseIf, which allows us to keep all the conditions within one single IF Then statement.
Using AND and OR in IF Then Else
So far in this tutorial, we have only checked for a single condition at a time.
However, when you have multiple dependent conditions, you can use the AND or OR statement with the IF conditions.
Below is the syntax of using AND/OR condition with the IF Then statement.
IF Condition1 AND Condition2 Then
true_code
Else
false_code
End IF
In the above code, only when both Condition1 and Condition2 are met, the true_code is executed. Even if one of the conditions is false, it will execute the false_code.
With OR, even if one of the conditions are true, it will execute the true_code. Only when all the conditions are false, it executes the false_code.
Now let’s see how AND and OR statement work with the IF Then Else construct.
Suppose you have the scores for two subjects instead of one, and you want to check for the following conditions:
- Fail – When the score is less than 35 in any of the subjects.
- Pass – When the score is more than or equal to 35, but less than 80 in both the subjects.
- Pass, with Distinction – When the score is more than 35 in both the subjects and is more than or equal to 80 in one or both the subjects.
Here is the code that will do this:
Sub CheckScore()
If Range("A1").Value < 35 Or Range("B1").Value < 35 Then
MsgBox "Fail"
ElseIf Range("A1").Value < 80 And Range("B1").Value < 80 Then
MsgBox "Pass"
Else
MsgBox "Pass, with Distinction"
End If
End Sub
The above code uses both OR and AND statements.
You can also write this same code with a slight change (using OR instead of AND).
Sub CheckScore()
If Range("A1").Value < 35 Or Range("B1").Value < 35 Then
MsgBox "Fail"
ElseIf Range("A1").Value > 80 Or Range("B1").Value > 80 Then
MsgBox "Pass, with Distinction"
Else
MsgBox "Pass"
End If
End Sub
Both the above VBA codes will give you the same result. Personally, I prefer the first one as it has a logical flow of checking the scores (but that’s just me).
Using Not Equal to in If Then
In all the examples above, we have used the conditions that check whether a value equal to a specified value or not.
You can also use similar codes when checking when the value is not equal to a specified value in the VBA code. Not equal to represented by <> the Excel VBA.
To see a practical example of using <>, have a look at Example 1 below.
Using If Then Else with Loops in VBA
So far, we have been going through some examples that are good to understand how the ‘IF-THEN’ statements work in VBA, however, are not useful in the practical world.
If I need to grade students, I can easily do that using Excel functions.
So let’s have a look at some useful and practical examples that can help you automate some stuff and be more efficient.
Example 1 – Save and Close All Workbooks Except The Active Workbook
If you have a lot of workbooks open and you quickly want to close all, except the active workbook, you can use the below code,
Sub SaveCloseAllWorkbooks()
Dim wb As Workbook
For Each wb In Workbooks
On error resume next
If wb.Name <> ActiveWorkbook.Name Then
wb.Save
wb.Close
End If
Next wb
End Sub
The above code would save and close all the workbooks (except the active one).
It uses the For Next loop to go through the collection of all the open workbooks and checks the name using the IF condition.
If the name is not the same as that of the Active workbook, it saves and closes it.
In case there is a VBA code in any of the workbooks and you haven’t saved it as .xls or .xlsm, you will see a warning (as the vba codes are lost when you save it in .xlsx format).
Example 2 – Highlight Cells with Negative Values
Suppose that you have a column full of numbers and you want to quickly highlight all the cells with negative values in red, you can do that using the below code.
Sub HighlightNegativeCells()
Dim Cll As Range
For Each Cll In Selection
If Cll.Value < 0 Then
Cll.Interior.Color = vbRed
Cll.Font.Color = vbWhite
End If
Next Cll
End Sub
The above code uses the For Each loop and checks each cell in the selection that you have made. If the cell has a value that is negative, it’s highlighted in red with white font color.
Example 3 – Hide All the Worksheet Except the Current Worksheet
In case you want to quickly hide all the worksheets except the active one, you can use the below code:
Sub HideAllExceptActiveSheet()
Dim ws As Worksheet
For Each ws In ThisWorkbook.Worksheets
If ws.Name <> ActiveSheet.Name Then ws.Visible = xlSheetHidden
Next ws
End Sub
The above code uses the For Each loop to go through a collection of worksheets. It checks the name of each worksheet and hides it if it’s not the active worksheet.
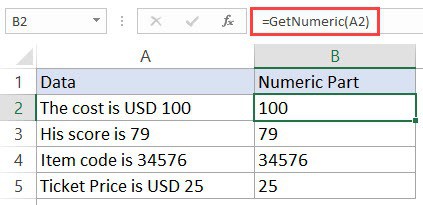
Example 4 – Extract the Numeric Part from an Alphanumeric String
If you have alphanumeric strings in cells and you want to extract the numeric part from it, you can do that using the below code:
Function GetNumeric(CellRef As String)
Dim StringLength As Integer
StringLength = Len(CellRef)
For i = 1 To StringLength
If IsNumeric(Mid(CellRef, i, 1)) Then Result = Result & Mid(CellRef, i, 1)
Next i
GetNumeric = Result
End Function
This code will create a custom function in Excel that can use within the worksheet (just like a regular function).
Where to Put the VBA Code?
Wondering where the VBA code goes in your Excel workbook?
Excel has a VBA backend called the VB editor. You need to copy and paste the code in the VB Editor module code window.
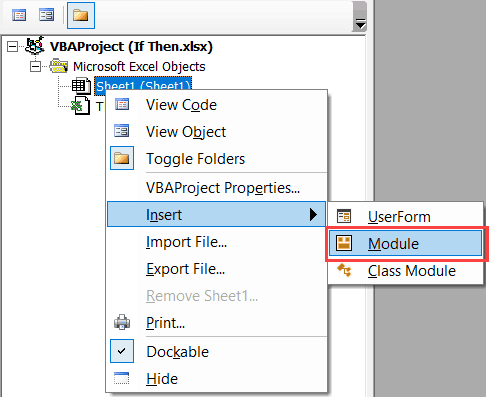
Here are the steps to do this:
- Go to the Developer tab.

- Click on Visual Basic option. This will open the VB editor in the backend.
- In the Project Explorer pane in the VB Editor, right-click on any object for the workbook in which you want to insert the code. If you don’t see the Project Explorer go to the View tab and click on Project Explorer.
- Go to Insert and click on Module. This will insert a module object for your workbook.

- Copy and paste the code in the module window.


You May Also Like the Following Excel Tutorials:
- How to Record a Macro in Excel.
- Working with Cells and Ranges in Excel VBA.
- Working with Worksheets in Excel VBA.
- Working with Workbooks in Excel VBA.
- Creating a Custom Function in Excel Using VBA.
- Excel VBA Events – An Easy (and Complete) Guide.
- Excel VBA MsgBox
- How to Run a Macro in Excel.
- How to Create and Use an Excel Add-in.
- Excel Personal Macro Workbook | Save & Use Macros in All Workbooks.
- Useful Excel Macro Examples for VBA Beginners (Ready-to-use).
- How to Use Excel VBA InStr Function (with practical EXAMPLES).