Before we get started with advanced IF functions, let’s do a quick IF function refresher first. Watch this video for some examples.
Want more?
Nest a function within a function
IF function
SUMIFS function
COUNTIFS function
AVERAGEIFS function
IFERROR function
We’ll cover complex examples and variations of the IF function in a few minutes.
But first, a quick IF function refresher.
I am determining if my travel expenses are over or within budget.
If the Actual expense is greater than the Budgeted expense, Status is Over Budget.
Otherwise, it is Within Budget.
In the formula, text (like Over Budget and Within Budget) must be in quotes.
And now, I am copying the formula.
Now, I am determining if a category of merchandise requires a shipping surcharge.
If Packing is equal to Fragile (comparing text with the IF function is not case sensitive), the Surcharge is $75.
Otherwise, it is 0.
I am copying the formula again.
If the text has extra spaces, comparing text with a function may not return the results we expect.
The text in B3 has a leading space, and it is not returning the results I expect.
It should have a $75 surcharge because it is fragile.
Getting this wrong would take 75 dollars per mistake out of our revenue.
Adding the TRIM function to the formula will help.
The TRIM function removes spaces from a text string except for single spaces between words.
And now, the formula handles extra spaces in text strings.
This is the syntax, or grammar, of the IF function.
Logical_test is required.
It can be any expression that can be evaluated to TRUE or FALSE, like comparing one number or cell to another, such as C2>B2.
It can also be text, such as B2=»fragile».
Value_if_true is optional. This is the value if the logical_test evaluates to TRUE.
For example, if C2>B2 is TRUE, return Over Budget.
If the logical_test evaluates to TRUE and we don’t provide the value for value_if_true, the function returns 0.
Value_if_false is also optional.
This is the value if the logical_test evaluates to FALSE.
For example, if C2>B2 is FALSE, return Within Budget.
If the logical_test evaluates to FALSE and we don’t provide the value for value_if_false, the function returns 0.
Up next, nested IF functions.
The syntax of the IF() function is the following:
= IF ( logical_test , [value_if_TRUE] , [value_if_FALSE] )
The first two attributes are obligatory, i.e. without them, the formula doesn’t work, and produces an error message.
- logical _test – a placeholder for the condition we want to test
- value_if_TRUE – an attribute where we need to specify a value (text, or another function) that the IF formula returns when the result of the logical_test is TRUE
The third parameter is Optional, i.e. we can skip it and in such a case, the IF() function returns the default value FALSE.
- value_if_FALSE – an attribute for a value, text or another formula that the IF() function must return when the result of the logical test is FALSE.
In other words, IF() function is used to test the specific conditions and can be described as the statement:
IF something is true, THEN return the first value, ELSE – return then second value.
The simplest IF() function may be written with the first two parameters only.
For example, this formula is absolutely correct:
=IF(C2=1,"Hello!")This formula tests the condition we set (C2=1) and if it is true, the formula returns the text message (“Hello!”).
Otherwise, it returns the default value FALSE.
Interesting Fact!!! You can use another simpler test in Excel for a certain condition. Just place a formula like “=C2>C3” in a cell and press ENTER. If this statement is true, the formula returns the default value – TRUE. Else (i.e. when a value in C2 is NOT larger than a value in C3 cell) the formula will return another default value – FALSE. We use the IF() function in these cases; when we want to trigger some further actions or calculations depending on the results of the logical test.
Typically, the IF() function is used in situations when we need to calculate or flag the results based on certain conditions (for example, smaller than, equal to, greater than and others).
Despite the fact that Excel usually provides multiple choices on how to solve every specific task, the IF() function can play a good role in such cases.
Another simple example of the IF() function:
=IF(C3="Hello!",1, 0)If a value of the C3 cell is the text “Hello!” then this formula returns the one (1) value.
Else (i.e. if this cell contains any other text, number or blank value), the formula returns zero.
The big advantage of the IF() function (like many other Excel functions) is how we can replace all three arguments in this example with whatever we want/need and it still works properly (if we follow the syntax, of course).
For example, let’s replace the one (as a value_if_true) to another formula “C3+C4” and replace zero value (0) to TODAY() function.
Our initial formula becomes:
=IF(C3="Hello!",C2+C3,TODAY())That means – IF a value in C2 cell equals one, THEN do the addition C2+C3.
ELSE (i.e. when C2 doesn’t equal “Hello!”), THEN execute the TODAY() function and return its result.
IF() function is a universal function, i.e. it accepts as an attribute different types of a value, such as numeric value, text, date/time, other functions, named ranges and others).
The IF function can be easily used as a part of other more complex formulas.
Moreover, you can use the so-called nested IF() function and replace the [value_if_false] with another IF() function.
The most common reason to do that is when you need to create a multi-choice comparison like a waterfall.
The last value_if_FALSE attribute is a value that we want the formula to return if the result of ALL logical tests in the formula is FALSE.
We know that we need to use a nested IF() (i.e. one IF() inside another IF() statement) when we have a “but” keyword inside the sentence with a logical test.
Take a look at the screenshot below.
In this example, we need to add the text “flag” if a value is greater than 200, BUT if this value is less than 50 we need to return “follow up” text.
We know that we need to use a nested IF() when there is the “but” keyword in the logical test.
Pro Tip: Be cautious. The more IF iterations we use, the more complex the formula becomes and the more difficult it is to understand. In addition, the complex formulas that contain multiple IF functions along with other Excel functions may slow down the calculation speed, especially if they use large ranges of cells. Also, it’s very easy to make an accidental mistake or typo inside the long and complex formulas, and such errors are difficult to trace properly.
The IF() function is often used with other logical functions such as AND() or OR() functions that we will discuss further.
Let’s look at some practical examples…
TEST CASE №1 Adding the word “Good” if the Revenue is greater than 15000
This is a typical use of the IF() function.
Let’s flag all apps if their Revenue is above 15,000.
Step 1. Go to the first cell where we need to insert a formula (cell C5 in this example).
Start the formula with an equal sign (=), add the keyword IF and the opened parentheses to make the formula look like:
=IF(Step 2. The first argument of the IF() function is a logical test.
In this example, we want to flag a value in cell B5 (Revenue) if it is above 15000.
So, let’s continue the formula =IF(B5>15000,
Do not forget to put a comma once this step is ready.
This coma is used by Excel as a delimiter to separate the arguments from each other.
Pro tip: We can either type a numeric value in the logical test or use a cell reference to a cell that contains such a value (C2 cell in our example). The second approach is preferred because it gives us more flexibility in the future. Once we copy/paste the formula to the entire range, all we need to do in this case – if want to change that value – is go to the referral cell and change it there without needing to re-write the formula for all related cells.
NOTE: Keep in mind that if we want to use this approach, we need to fix the cell reference to look like $C$2. This fixed cell address is required for copying the formula to the entire range. Without that, the formula will return the wrong result. We can simply press F4 to fix the cell reference in the formula (make sure that the cursor is located near the appropriate cell address)
The formula becomes:
=IF(B5>$C$2,Step 3. The second argument of IF() function, as we remember, is a value_if_TRUE.
Let’s type the text “Good” as a second attribute in the formula:
=IF(B5>$C$2, "Good",Do not forget to put a comma once this step is ready.
Also, be careful – if you type a text value, you need to put it inside a double quotation mark (“your text”)
Pro tip: We can either type a numeric value in the logical test or use a cell reference to a cell that contains such a value (C3 cell in our example). If in the future we’ll decide to change the “Good” word to something else (“Not Bad”, for example), then all we need to do is go to cell C3 and change that text in the cell without the necessity to re-do the entire formula.
Our formula becomes:
=IF(B5>$C$2,$C$3,NOTE: Don’t forget to fix the cell reference to look like $C$3 address. Press F4 to make an absolute reference. Without that, the formula will return a wrong result.
Step 4. The third argument of the IF() function is value_if_FALSE. We can skip this attribute (in such cases Excel returns the default value – FALSE). However, if we want to do that in a more aesthetic way, let the formula return a blank value. The blank value in Excel is equal to nothing between two quotation marks, like “”. So, the final version of the formula becomes:
=IF(B5>$C$2,$C$3,"")NOTE: Don’t forget to close the brackets and press ENTER.
Step 5. Drag the formula down to the entire range.
Make a quick check manually to ensure that the formula returns the correct result according to our expectations.
TEST CASE №2 Adding the word “Good” if the Revenue is greater than 15000 and less than 20000
Let’s flag all apps if their Revenue is above 15,000 but under 20,000
Step 1. Go to the first cell where we need to insert a formula (cell D5 in this example).
Start the formula with an equal sign (=), add the keyword IF and the opened parentheses to make the formula look like:
=IF(Step 2. The first argument of the IF() function is a logical test.
In this example, we want to flag a value in cell B5 (Revenue) if it is above 15000 and less than 20,000.
This is a typical situation when we can use the AND() logical function to unite several certain conditions into a single logical test.
AND() function can accept up to 255 conditions as its arguments.
Let’s continue the formula and add the second keyword AND with an opened parenthesis.
Once we’ve done that, we can type both conditions for the logical test inside AND() block and close its second parenthesis.
The formula looks like:
=IF(AND(B5>$D$2,B5<$D$3),NOTE: Don’t forget to fix the cell reference to look like $D$2 and $D$3 address.
Press F4 to make an absolute reference.
Without that, the formula will return a wrong result after we drag it down to the entire range.
NOTE: Don’t forget to use a comma once this step is ready.
This comma is used by Excel as a delimiter to separate the arguments from each other.
Step 2. The second argument of IF() function, as we remember, is a value_if_TRUE.
Let’s add another cell reference as a second attribute in the formula:
=IF(AND(B5>$D$2,B5<$D$3),$C$3,NOTE: Don’t forget to put a comma after the attribute once this step is ready. Be careful. If you type a text value, you need to put it inside a double quotation mark (“your text”)
Step 3. The third argument of the IF() function is a value_if_FALSE.
We can skip this attribute and Excel returns the default value – FALSE.
However, the more aesthetic way to do that is to return nothing (or blank value).
Nothing in Excel is denoted as a double quotation mark without any space:
=IF(AND(B5>$D$2,B5<$D$3),$C$3,"")NOTE: Don’t forget to close the bracket and press ENTER.
Step 4. Drag the formula down to the entire range.
Make a quick check manually to ensure that the formula returns the correct result according to our expectations.
TEST CASE №3 Adding the word “Good” if the Revenue is greater than 15000 and less than 20000. Adding the word “Exceptional” if the Revenue is greater than or equal to 20,000. Otherwise, keeping the values
This time we’ll flag all apps as “Good” if their Revenue is above 15,000 and under 20,000.
In addition, we’ll flag them as “Exceptional” if their Revenue is greater than or equal to 20,000
Step 1. Go to the first cell where we need to insert a formula (cell E5 in this example).
Start the formula with an equal sign (=), add the keyword IF and the open parentheses to make the formula look like:
=IF(Step 2. The first argument of the IF() function is a logical test.
The first part of the formula in this example is the same as we wrote in the previous example:
=IF(AND(B5>$E$2,B5<$E$3),$C$3,NOTE: Don’t forget to to put a comma after the attribute once this step is ready.
Step 3. Usually, the third argument of the IF() function is a value_if_FALSE.
However, this time we need to add the second condition when a value in cell B5 is greater than or equal to 20,000.
We can do that if we use nested IF() function.
Let’s add another IF() block as a third parameter now:
=IF(AND(B5>$E$2,B5<$E$3),$C$3,IF(Step 4. Add the second logical test, and the second value_if_TRUE.
In our example, the formula must return the “Exceptional” keyword if the value in cell B5 is greater than or equal to 20,000.
Let’s type this:
=IF(AND(B5>$E$2,B5<$E$3),$C$3,IF(B5>=$E$3,"Exceptional",NOTE: If you type a value as a text, you need to put it inside a double quotation mark (“your text”)
Step 5. We need to write a value that the formula will return if the result of both logical tests is FALSE.
In our example, the formula must return the raw Revenue value in this case.
Let’s place this attribute as the third argument in the second IF() block:
=IF(AND(B5>$E$2,B5<$E$3),$C$3,IF(B5>=$E$3,"Exceptional",B5))NOTE: Don’t forget to close the brackets.
We created two IF blocks, so we need to close two brackets at the end.
Step 6. Drag the formula down to the entire range.
Make a quick check manually to ensure that the formula returns the correct result according to our expectations.
TEST CASE №4 Adding the word “Flag” if the Revenue is greater than or equal to 20,000 OR it is lesser than or equal to 15,000
Let’s flag all apps if their Revenue is <= 15,000 or >= 20,000
Step 1. Go to the first cell where we need to insert a formula (cell D5 in this example).
Start the formula with an equal sign (=), add the keyword IF and the open parentheses to make the formula look like:
=IF(Step 2. The first argument of the IF() function is a logical test.
In this example we want to flag a value in cell B5 (Revenue) if it is below or equal to 15000 OR above or equal to 20,000.
This is a situation when we can use OR() logical function that allows the testing of multiple logical conditions and return a true value if ANY of them is true.
Let’s continue the formula and add the second keyword OR with an opened bracket.
Once we’ve done that, we can type both conditions for the logical test inside OR() block and close its second parentheses.
The formula looks like:
=IF(OR(B5>=$F$2,B5=<$F$3),NOTE: Press the F4 button on the keyboard to make an absolute reference.
Step 3. The second argument of the IF() function, as we remember, is a value_if_TRUE.
Let’s add this attribute in the formula:
=IF(AND(B5>$D$2,B5<$D$3),"Flag",NOTE: If you type a text value, you need to put it inside a double quotation mark (“your text”)
Step 4. The third argument of the IF() function is a value_if_FALSE.
Let’s add a double quotation mark without any space to return a blank value:
=IF(AND(B5>$D$2, B5<$D$3),"Flag","")NOTE: Don’t forget to close the bracket and press ENTER.
Step 5. Drag the formula down to the entire range.
Quickly check to ensure that the formula returns the correct result.
TEST CASE №5 Using other formulas inside the logical functions
Let’s calculate the difference between Actual Revenue and Budget Revenue and flag those cases when the difference is larger than +/- 10%.
Step 1. The easiest way to start building such a complex formula is to calculate the core value (this is the +/-10% threshold value in our case).
Step 2. Go to the first cell where we need to insert a formula (cell D23 in this example).
Start the formula with an equal sign (=), add the formula to calculate the difference (Actual divided by Budget minus one:
=B23/C23 - 1Step 3. Let’s add the IF() block and the appropriate logical test.
This is a situation when we can use the OR() logical function as we need to flag a value if it is greater than +10% or lower than -10%:
=IF(OR(B23/C23 - 1>10%,B23/C23 - 1<-10%),Step 4. The second argument of the IF() function, as we remember, is a value_if_TRUE.
In this example we need to return the exact deviation, so let’s do that, by simply copying the initial formula.
=IF(OR(B23/C23 - 1>10%,B23/C23 - 1<-10%),B23/C23 - 1,Step 5. The third argument of the IF() function is a value_if_FALSE.
Let’s add a double quotation mark without any space to return a blank value:
=IF(OR(B23/C23 - 1>10%,B23/C23 - 1<-10%),B23/C23 - 1,"")NOTE: Don’t forget to close the bracket and press ENTER.
Step 6. Drag the formula down to the entire range.
Quickly check to ensure that the formula returns the correct result.
TEST CASE №6 Using text symbols as the result of the IF() function
Let’s mark the positive deviation with the up arrow and the negative deviation with the down arrow.
Step 1. We’ll continue the previous example.
Let’s say we want to mark all positive deviations with a symbol that looks like an up arrow and all negative deviations with a symbol that looks like a down arrow.
First of all, a few preparations.
Let’s go to the cells above the test range (A20 and A21 cells in this example).
Feel free to select any other cells if you prefer.
Step 2. Insert the symbols that will indicate all positive and negative deviations.
To do this, we need to go on the INSERT tab on the Excel Ribbon and follow the path: INSERT > Symbol > Arial > Geometric Shapes
Click Insert once you have selected a shape.
Go to another cell below and insert the second arrow in the same way.
Step 3. Go to the first cell in the range where we want to add these visual indicators.
Replicate the IF() function with the cell references containing the arrows as the value_if_TRUE and value_if_FALSE attributes.
=IF(B23/C23 - 1>10%,$A$20,IF(B23/C23 - 1<-10%,$A$21,""))NOTE: Don’t forget to close the bracket and press ENTER.
Step 4. Drag the formula down to the entire range.
Quickly check that the formula returns the correct result.
Workbook for Download
Feel free to Download the Workbook HERE.
Published on: February 1, 2018
Last modified: February 24, 2023
Leila Gharani
I’m a 5x Microsoft MVP with over 15 years of experience implementing and professionals on Management Information Systems of different sizes and nature.
My background is Masters in Economics, Economist, Consultant, Oracle HFM Accounting Systems Expert, SAP BW Project Manager. My passion is teaching, experimenting and sharing. I am also addicted to learning and enjoy taking online courses on a variety of topics.
Содержание
- IF function – nested formulas and avoiding pitfalls
- Remarks
- Examples
- Additional examples
- Did you know?
- Need more help?
- Using IF with AND, OR and NOT functions
- Examples
- Using AND, OR and NOT with Conditional Formatting
- Need more help?
- See also
- Advanced IF functions
- Want more?
IF function – nested formulas and avoiding pitfalls
The IF function allows you to make a logical comparison between a value and what you expect by testing for a condition and returning a result if True or False.
=IF(Something is True, then do something, otherwise do something else)
So an IF statement can have two results. The first result is if your comparison is True, the second if your comparison is False.
IF statements are incredibly robust, and form the basis of many spreadsheet models, but they are also the root cause of many spreadsheet issues. Ideally, an IF statement should apply to minimal conditions, such as Male/Female, Yes/No/Maybe, to name a few, but sometimes you might need to evaluate more complex scenarios that require nesting* more than 3 IF functions together.
* “Nesting” refers to the practice of joining multiple functions together in one formula.
Use the IF function, one of the logical functions, to return one value if a condition is true and another value if it’s false.
IF(logical_test, value_if_true, [value_if_false])
The condition you want to test.
The value that you want returned if the result of logical_test is TRUE.
The value that you want returned if the result of logical_test is FALSE.
While Excel will allow you to nest up to 64 different IF functions, it’s not at all advisable to do so. Why?
Multiple IF statements require a great deal of thought to build correctly and make sure that their logic can calculate correctly through each condition all the way to the end. If you don’t nest your formula 100% accurately, then it might work 75% of the time, but return unexpected results 25% of the time. Unfortunately, the odds of you catching the 25% are slim.
Multiple IF statements can become incredibly difficult to maintain, especially when you come back some time later and try to figure out what you, or worse someone else, was trying to do.
If you find yourself with an IF statement that just seems to keep growing with no end in sight, it’s time to put down the mouse and rethink your strategy.
Let’s look at how to properly create a complex nested IF statement using multiple IFs, and when to recognize that it’s time to use another tool in your Excel arsenal.
Examples
Following is an example of a relatively standard nested IF statement to convert student test scores to their letter grade equivalent.

This complex nested IF statement follows a straightforward logic:
If the Test Score (in cell D2) is greater than 89, then the student gets an A
If the Test Score is greater than 79, then the student gets a B
If the Test Score is greater than 69, then the student gets a C
If the Test Score is greater than 59, then the student gets a D
Otherwise the student gets an F
This particular example is relatively safe because it’s not likely that the correlation between test scores and letter grades will change, so it won’t require much maintenance. But here’s a thought – what if you need to segment the grades between A+, A and A- (and so on)? Now your four condition IF statement needs to be rewritten to have 12 conditions! Here’s what your formula would look like now:
It’s still functionally accurate and will work as expected, but it takes a long time to write and longer to test to make sure it does what you want. Another glaring issue is that you’ve had to enter the scores and equivalent letter grades by hand. What are the odds that you’ll accidentally have a typo? Now imagine trying to do this 64 times with more complex conditions! Sure, it’s possible, but do you really want to subject yourself to this kind of effort and probable errors that will be really hard to spot?
Tip: Every function in Excel requires an opening and closing parenthesis (). Excel will try to help you figure out what goes where by coloring different parts of your formula when you’re editing it. For instance, if you were to edit the above formula, as you move the cursor past each of the ending parentheses “)”, its corresponding opening parenthesis will turn the same color. This can be especially useful in complex nested formulas when you’re trying to figure out if you have enough matching parentheses.
Additional examples
Following is a very common example of calculating Sales Commission based on levels of Revenue achievement.
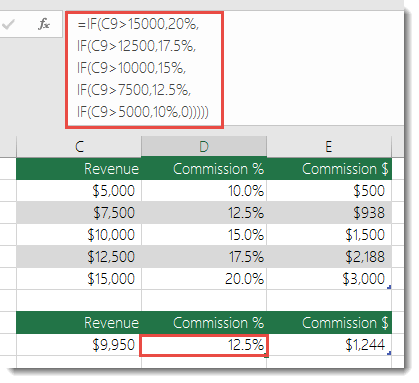
This formula says IF(C9 is Greater Than 15,000 then return 20%, IF(C9 is Greater Than 12,500 then return 17.5%, and so on.
While it’s remarkably similar to the earlier Grades example, this formula is a great example of how difficult it can be to maintain large IF statements – what would you need to do if your organization decided to add new compensation levels and possibly even change the existing dollar or percentage values? You’d have a lot of work on your hands!
Tip: You can insert line breaks in the formula bar to make long formulas easier to read. Just press ALT+ENTER before the text you want to wrap to a new line.
Here is an example of the commission scenario with the logic out of order:
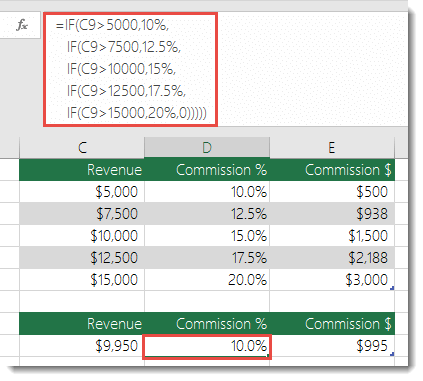
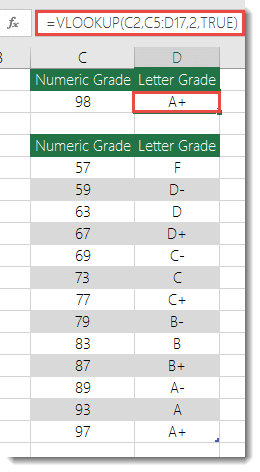
Can you see what’s wrong? Compare the order of the Revenue comparisons to the previous example. Which way is this one going? That’s right, it’s going from bottom up ($5,000 to $15,000), not the other way around. But why should that be such a big deal? It’s a big deal because the formula can’t pass the first evaluation for any value over $5,000. Let’s say you’ve got $12,500 in revenue – the IF statement will return 10% because it is greater than $5,000, and it will stop there. This can be incredibly problematic because in a lot of situations these types of errors go unnoticed until they’ve had a negative impact. So knowing that there are some serious pitfalls with complex nested IF statements, what can you do? In most cases, you can use the VLOOKUP function instead of building a complex formula with the IF function. Using VLOOKUP, you first need to create a reference table:
This formula says to look for the value in C2 in the range C5:C17. If the value is found, then return the corresponding value from the same row in column D.
Similarly, this formula looks for the value in cell B9 in the range B2:B22. If the value is found, then return the corresponding value from the same row in column C.
Note: Both of these VLOOKUPs use the TRUE argument at the end of the formulas, meaning we want them to look for an approxiate match. In other words, it will match the exact values in the lookup table, as well as any values that fall between them. In this case the lookup tables need to be sorted in Ascending order, from smallest to largest.
VLOOKUP is covered in much more detail here, but this is sure a lot simpler than a 12-level, complex nested IF statement! There are other less obvious benefits as well:
VLOOKUP reference tables are right out in the open and easy to see.
Table values can be easily updated and you never have to touch the formula if your conditions change.
If you don’t want people to see or interfere with your reference table, just put it on another worksheet.
Did you know?
There is now an IFS function that can replace multiple, nested IF statements with a single function. So instead of our initial grades example, which has 4 nested IF functions:
It can be made much simpler with a single IFS function:
The IFS function is great because you don’t need to worry about all of those IF statements and parentheses.
Note: This feature is only available if you have a Microsoft 365 subscription. If you are a Microsoft 365subscriber, make sure you have the latest version of Office.
Need more help?
You can always ask an expert in the Excel Tech Community or get support in the Answers community.
Источник
Using IF with AND, OR and NOT functions
The IF function allows you to make a logical comparison between a value and what you expect by testing for a condition and returning a result if that condition is True or False.
=IF(Something is True, then do something, otherwise do something else)
But what if you need to test multiple conditions, where let’s say all conditions need to be True or False ( AND), or only one condition needs to be True or False ( OR), or if you want to check if a condition does NOT meet your criteria? All 3 functions can be used on their own, but it’s much more common to see them paired with IF functions.
Use the IF function along with AND, OR and NOT to perform multiple evaluations if conditions are True or False.
IF(AND()) — IF(AND(logical1, [logical2], . ), value_if_true, [value_if_false]))
IF(OR()) — IF(OR(logical1, [logical2], . ), value_if_true, [value_if_false]))
IF(NOT()) — IF(NOT(logical1), value_if_true, [value_if_false]))
The condition you want to test.
The value that you want returned if the result of logical_test is TRUE.
The value that you want returned if the result of logical_test is FALSE.
Here are overviews of how to structure AND, OR and NOT functions individually. When you combine each one of them with an IF statement, they read like this:
AND – =IF(AND(Something is True, Something else is True), Value if True, Value if False)
OR – =IF(OR(Something is True, Something else is True), Value if True, Value if False)
NOT – =IF(NOT(Something is True), Value if True, Value if False)
Examples
Following are examples of some common nested IF(AND()), IF(OR()) and IF(NOT()) statements. The AND and OR functions can support up to 255 individual conditions, but it’s not good practice to use more than a few because complex, nested formulas can get very difficult to build, test and maintain. The NOT function only takes one condition.
Here are the formulas spelled out according to their logic:
=IF(AND(A2>0,B2 0,B4 50),TRUE,FALSE)
IF A6 (25) is NOT greater than 50, then return TRUE, otherwise return FALSE. In this case 25 is not greater than 50, so the formula returns TRUE.
IF A7 (“Blue”) is NOT equal to “Red”, then return TRUE, otherwise return FALSE.
Note that all of the examples have a closing parenthesis after their respective conditions are entered. The remaining True/False arguments are then left as part of the outer IF statement. You can also substitute Text or Numeric values for the TRUE/FALSE values to be returned in the examples.
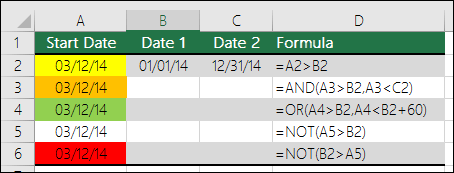
Here are some examples of using AND, OR and NOT to evaluate dates.
Here are the formulas spelled out according to their logic:
IF A2 is greater than B2, return TRUE, otherwise return FALSE. 03/12/14 is greater than 01/01/14, so the formula returns TRUE.
=IF(AND(A3>B2,A3 B2,A4 B2),TRUE,FALSE)
IF A5 is not greater than B2, then return TRUE, otherwise return FALSE. In this case, A5 is greater than B2, so the formula returns FALSE.
Using AND, OR and NOT with Conditional Formatting
You can also use AND, OR and NOT to set Conditional Formatting criteria with the formula option. When you do this you can omit the IF function and use AND, OR and NOT on their own.
From the Home tab, click Conditional Formatting > New Rule. Next, select the “ Use a formula to determine which cells to format” option, enter your formula and apply the format of your choice.
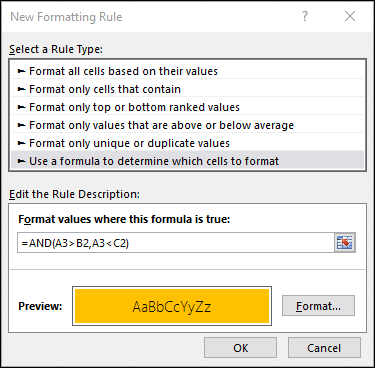
Using the earlier Dates example, here is what the formulas would be.
If A2 is greater than B2, format the cell, otherwise do nothing.
=AND(A3>B2,A3 B2,A4 B2)
If A5 is NOT greater than B2, format the cell, otherwise do nothing. In this case A5 is greater than B2, so the result will return FALSE. If you were to change the formula to =NOT(B2>A5) it would return TRUE and the cell would be formatted.
Note: A common error is to enter your formula into Conditional Formatting without the equals sign (=). If you do this you’ll see that the Conditional Formatting dialog will add the equals sign and quotes to the formula — =»OR(A4>B2,A4
Need more help?

See also
You can always ask an expert in the Excel Tech Community or get support in the Answers community.
Источник
Advanced IF functions
Before we get started with advanced IF functions, let’s do a quick IF function refresher first. Watch this video for some examples.
Want more?
We’ll cover complex examples and variations of the IF function in a few minutes.
But first, a quick IF function refresher.
I am determining if my travel expenses are over or within budget.
If the Actual expense is greater than the Budgeted expense, Status is Over Budget.
Otherwise, it is Within Budget.
In the formula, text (like Over Budget and Within Budget) must be in quotes.
And now, I am copying the formula.
Now, I am determining if a category of merchandise requires a shipping surcharge.
If Packing is equal to Fragile (comparing text with the IF function is not case sensitive), the Surcharge is $75.
Otherwise, it is 0.
I am copying the formula again.
If the text has extra spaces, comparing text with a function may not return the results we expect.
The text in B3 has a leading space, and it is not returning the results I expect.
It should have a $75 surcharge because it is fragile.
Getting this wrong would take 75 dollars per mistake out of our revenue.
Adding the TRIM function to the formula will help.
The TRIM function removes spaces from a text string except for single spaces between words.
And now, the formula handles extra spaces in text strings.
This is the syntax, or grammar, of the IF function.
Logical_test is required.
It can be any expression that can be evaluated to TRUE or FALSE, like comparing one number or cell to another, such as C2>B2.
It can also be text, such as B2=»fragile».
Value_if_true is optional. This is the value if the logical_test evaluates to TRUE.
For example, if C2>B2 is TRUE, return Over Budget.
If the logical_test evaluates to TRUE and we don’t provide the value for value_if_true, the function returns 0.
Value_if_false is also optional.
This is the value if the logical_test evaluates to FALSE.
For example, if C2>B2 is FALSE, return Within Budget.
If the logical_test evaluates to FALSE and we don’t provide the value for value_if_false, the function returns 0.
Источник
IF is the most used Excel function out there. Here are 10 advanced IF tricks to take your formulas to next-level 🚀
In this article, you will learn:
- Only one of, two out of three type rules
- Between condition check with MEDIAN
- Replacing Nested IF with shorter function
- Using boolean logic to replace IF formulas
- Arrays with IF function
- Wildcard checks with IF function
- How to use IF formula in other places
- Conditional formatting
- Data validation
- Charts
Sample data for the examples
All examples in this article use below sample data. Assume it is in the range C8:G23
You can download this data alone for practice purpose from here.
Includes sample data for practice, completed Excel workbook
#1 — Only one of condition
Identify employees who are only one of gender=male or salary under $85,000
=IF(XOR(D8="Male",G8<85000),"Include", "Exclude")
XOR function will return TRUE if an odd number inputs are TRUE, else FALSE.
So, our XOR(D8=”Male”, G8<85000) will be useful for checking only one of condition.
Note: XOR doesn’t work when you want to check only one of when you have more than 2 conditions. For that refer to next trick.
Also read: Either Or formula in Excel
#2 — Two out of Three Check
Flag employees when they meet any two out of below three conditions.
- Department is Website
- Year of join is 2019
- Salary is above $90,000
					=IF((E8="Website")+(YEAR(F8)=2019)+(G8>90000)>=2,
        "Include", "Exclude")
The trick is in understanding Excel treats TRUE as 1 and FALSE as 0.
So, the expression (E8=”Website”)+(YEAR(F8)=2019)+(G8>90000)
will be converted a bunch of 1s & 0s and added up, depending on the details of employee.
We can then simply check if such number is >=2 to see if any two out of three conditions are met.
More: Two out of three – other ways to do it
#3 — Using MEDIAN for Between Condition
Identify employees joined between 1-Jan-2019 and 30-Jun-2019.
					=IF(MEDIAN(F8,DATE(2019,1,1),DATE(2019,6,30))=F8,
        "Review","")
Normally, we use AND() function to check for between condition. But, you can also use MEDIAN for this.
The pattern goes like,
=MEDIAN(your value, above, below) = your value
The above will be TRUE if your value is between above and below values.
For example, =MEDIAN(7, 3,9) = 7 is TRUE.
Read more: How to write BETWEEN formula in Excel
#4 — Replacing Nested IF functions
Calculate staff bonus based on below rules:
- 1% for Website staff
- 3 % for Sales staff joined in 2018
- 2% for others
					=IFS(E8="Website",1%,
        AND(E8="Sales",YEAR(F8)=2018),3%,
        TRUE,2%)
Nested IF functions can be hard to write and tricky to maintain. That is why, you should use the newly introduced IFS() function.
The syntax for IFS goes like this:
=IFS(condition1, value1, condition2, value2…)
But, IFS() doesn’t have ELSE option…?
Well, you can use TRUE as last condition to fix this.
In the above formula TRUE, 2% part handles the ELSE case beautifully.
#5 — Boolean Logic to avoid IF formulas
Calculate staff bonus based on below rules, but don’t use any IF formulas:
- 1% for Website staff
- 3 % for Sales staff joined in 2018
- 2% for others
=2% - (E8="Website")*1% + AND(E8="Sales",YEAR(F8)=2018)*1%
You can use boolean logic checks to altogether avoid IF formulas. This works well when your outputs are numbers.
The above formula calculates staff bonus by using TRUE=1 & FALSE=0 notion.
Let’s test it out for below staff:
For Gigi:
- 2% – (FALSE)*1% + (TRUE)* 1% = 3%
For Curtice:
- 2% – (FALSE)*1% + (FALSE)*1% = 2%
Read more: Daniel Ferry’s excellent I heart IF
#6 — Checking if a value is in another list
Check if an employee is part of on call support team
(range: C32:C36)
=IF(COUNTIFS($C$32:$C$36,C8),"On call","Not on call")
We can use COUNTIFS or MATCH functions to do this. I prefer COUNTIFS.
Just count if a given data point is in another list.
Why don’t we check >0?
Remember, Excel treats any number other than 0 as TRUE. So we don’t need to write COUNTIFS($C$32:$C$36,C8)>0.
#7 — Arrays with IF formula
Calculate median salary of website staff
=MEDIAN(IF(E8:E23="Website",G8:G23))
When you use arrays in the IF formula, it will return an array of outcomes too.
So for eg. =IF({TRUE,TRUE,FALSE}, {1, 2, 3}, {“A”,”B”,”C”}) will return {1, 2, “C”}
We can use this powerful idea to calculate median salary of website staff too.
What about ELSE part? It’s missing no?
If you don’t mention the ELSE part of IF formula, it will simply return FALSE for those values.
So, in our case, we get
{FALSE;90700;48950;FALSE;FALSE;107700;…FALSE}
When MEDIAN reads those values, it will ignore the FALSEs and calculate MEDIAN for rest.
Read more: Calculating RANKIFS with Excel
Show all names of “Finance” staff in one cell, comma seperated.
=TEXTJOIN(",",,IF(E8:E23="Finance",C8:C23,""))
This works same as the MEDIAN(IF()) structure. For more applications of this technique, see the Excel Risk Map
#8 — Wildcard based conditions
Identify if an employee’s name contains letters bo
=IF(COUNTIFS(C8,"*bo*"),"bo person","not a bo person")
IF function is not aware of wildcards. But we can use one of the other wildcard aware functions inside IF to solve the problem. You can use either of XLOOKUP, XMATCH, MATCH, VLOOKUP, COUNTIFS for this.
I prefer COUNTIFS.
The COUNTIFS(C8, “*bo*”) will be 1 if name in C8 has bo in it, else 0.
Rest is self-explanatory.
Read more: Making VLOOKUP formula go wild | Not so wild lookups
#9 — IF formula with Conditional Formatting
Highlight employees that meet conditions specified in below cells.
=AND($E8=$J$50,$D8=$J$51)
#10 — Using IF with Charts
Make a chart with employee salaries, but highlight staff making above average salary in a different color.
- Add an extra column in your data and use IF formula to check if a person’s salary is above average.
- Make chart with both original salary & the new column.
- Overlap the bars (or columns) 100%
- Color them accordingly.
=IF(G8>AVERAGE($G$8:$G$23),G8,NA())
Resources — File & Video
Includes sample data for practice, completed Excel workbook
Watch the video & learn these techniques
More on IF formula
What is your favorite IF formula trick?
Share it in the comments. Let’s learn from each other.
Share this tip with your colleagues

Get FREE Excel + Power BI Tips
Simple, fun and useful emails, once per week.
Learn & be awesome.
-
13 Comments -
Ask a question or say something… -
Tagged under
advanced excel, between formula, countifs, downloads, excel formulas, if() excel formula, ifs, list posts, median, Microsoft Excel Conditional Formatting, videos
-
Category:
Learn Excel

Welcome to Chandoo.org
Thank you so much for visiting. My aim is to make you awesome in Excel & Power BI. I do this by sharing videos, tips, examples and downloads on this website. There are more than 1,000 pages with all things Excel, Power BI, Dashboards & VBA here. Go ahead and spend few minutes to be AWESOME.
Read my story • FREE Excel tips book


Excel School made me great at work.
5/5

From simple to complex, there is a formula for every occasion. Check out the list now.

Calendars, invoices, trackers and much more. All free, fun and fantastic.

Power Query, Data model, DAX, Filters, Slicers, Conditional formats and beautiful charts. It’s all here.

Still on fence about Power BI? In this getting started guide, learn what is Power BI, how to get it and how to create your first report from scratch.
Related Tips
13 Responses to “10 Advanced IF formula tricks you must know”
-
Michael says:
Great examples! Thanks so much for sharing.
-
Thank you so much Chandoo. It is a great post to be honest, with many super good functional tricks. Once again thank you!
-
Robert Clark says:
Minor point — in the first example on Median, you refer to above and below values, but in the example you then use a low and high value — may confuse some people!
-
Tetonne says:
Thank you so much Chandoo. your site is great.
-
Hi Chandoo
Thanks for sharing.
You could add an 11th tip.
The IF function and IFS can return a range.
Instead of
=IF(A1=B1,SUM(C1:C10),SUM(D1:D10)
you could use
=SUM(IF(A1=B1,C1:C10,D1:D10))
Regards
Neale -
Duncan Williamson says:
As always, you have posted something very useful, Chandoo. As I read through your examples, though, I thought the FILTER() function could probably be used as well.
I know you know this and I know you have FILTER() function examples elsewhere but I thought I would share some of them here to provide a contrast. I also want to say that there is absolutely nothing wrong with your examples and my suggestions are not trying to be corrections at all!
My answers return the name of the person rather than Include, Exclude and so on
Either Male or Salary <85,000:
Yours =IF(XOR(D8=»Male»,G8<85000),$H$4,$H$5)
Mine =FILTER(C8:C23,(D8:D23=»Male»)-(G8:G23 90,000″ is easy
Yours becomes =IF((E8=»Website»)*(YEAR(F8)=2019)*(G8>90000),$I$4,$I$5)
Mine =FILTER(C8:C23,(E8:E23=»Website»)*(YEAR(F8:F23)=2019)*(G8:G23>90000))
BUT as it is, I don’t have a solution to your question … yet!For Joined between 1-Jan-2019 and 30-Jun-2019
Yours =IF(MEDIAN(F8,DATE(2019,1,1),DATE(2019,6,30))=F8,$J$5,»»)
Mine =FILTER(C8:C23,(F8:F23>=DATE(2019,1,1)*(F8:F23<=DATE(2019,6,30)))) … BUT it gives me a rogue answer to BarrFor Check if an employee is part of on call support team in C32:C36
I used VLOOKUP: =IFERROR(VLOOKUP(C8:C23,C32:C36,1,0),»Not on Call»)Name contains bo
Yours =IF(COUNTIFS(C8,»*»&$O$5&»*»),»bo person»,»not a bo person»)
Mine =FILTER(C8:C23,ISNUMBER(SEARCH(«bo»,C8:C23)))Duncan
-
Lino Wchima says:
Thanks Chandoo for this great post, as always.
In response to your request of sharing our favorite IF formula tricks, I will add these grains of sand:1)
On tip “#5 — Boolean Logic to avoid IF formulas” I would add that it is also possible to avoid the “AND” boolean operator using “*” instead (i.e. multiplication operator).
Thus, your formula:
=2% — (E8=»Website»)*1% + AND(E8=»Sales»,YEAR(F8)=2018)*1%
may be written as follows with same results:
=2% — (E8=»Website»)*1% + (E8=»Sales»)*(YEAR(F8)=2018)*1%2)
The above technique of replacing OR and AND with + and * may be used to reduce the clutter in a complex “logical_test” of an IF function whose outputs are any type (not limited to numbers).3)
Your tip “#3 — Using MEDIAN for Between Condition” works nicely as it flagged five employees with the word “Review”.
But, sometimes is quite convenient flagging them instead with numbers: 1 for “Review”, 0 for not to “Review”. One reason for this convenience is that the numbers 1 and 0 may be used directly as TRUE and FALSE in other subsequent “logical_test” (i.e. in other columns). Another reason is that this technique eases counting.
Thus, your formula:
=IF(MEDIAN(F8,DATE(2019,1,1),DATE(2019,6,30))=F8, «Review»,»»)
may be written as follows with same “logic” results, with the aforementioned advantages for subsequent uses:
=—(MEDIAN(F8,DATE(2019,1,1),DATE(2019,6,30))=F8)
where obviously “—” is not a typo.Best regards,
Lino. -
Achyutanand Khuntia says:
Dear Sir,
Thank you for this great post , i appreciated all above logic.
but i asked about #7 formula that is =MEDIAN(IF(E8:E23=»Website»,G8:G23))
as per my understanding answer should be obtain
this row — Ches Bonnell Male Website 22-Jul-18 $88,050 .
i will love to understand how it can answer is $69,120
-
Philippe Briand says:
Dear Achyutanand,
The Median function gives the value which separates a group of value in two. In the Website department, there is seven persons, so if we order the values from the minus to the max, the function will give us the value un the forth position, $69,120. There are 3 values under and 3 values upper.
Best regards
Philippe
-
-
Philippe Briand says:
Hi Chandoo,
Many thanks for these tips.With tip 7, if we want to obtain the median salary of female working in finance department, we can use this formula :
=MEDIAN(if(D8:D23=»female»,SI(E8:E23=»finance»,G8:G23)))Best regards,
Philippe -
nana says:
hello need help with formula.. we need to incorporate this three formulas to one formula
SATURDAY FORMULA
=IF($K2=6,($J2+3),$J2)SUNDAY FORMULA
=IF($K2=7,($J2+2),$J2)MONDAY FORMULA
=IF($K2=1,($J2+1),$J2)
Leave a Reply
This is a guest article from Yoav Ezer. If you want to guest post on this blog, check out the guidelines here.
The IF() function is one of Excel’s super functions. It is a fundamental building-block of Excel formulas. You will find it present in almost any complex formula. There is a lot more power in Excel formulas conditions than just the basic IF() function, though.
Here are 7 conditional techniques that can help you create even more robust and useful Excel formulas:
1. Nested If Functions
This is the most basic type of ‘complex’ if() function. You can use an additional if function to create a more complex condition within your Excel formula.
For instance:
=IF(A1>10,IF(A1<20,"In range"))
The function above would test whether cell A1 contains a value that’s between 10 and 20. Only if both conditions are satisfied then the formula returns the value “In range”.
It is possible to use several levels of IF() function nesting. For example:
=IF(A1>10,IF(A1<20,IF(B2="HAS AMMO","FIRE!!!!")))
The formula above tests that A1 contains a number that is within range and that B2 holds the status ‘HAS AMMO’ and only if those three conditions are satisfied, it returns a value of “FIRE!”.
2. Logical-Boolean Functions
Nesting is powerful but it is complicated and often results in a formula that is difficult to read or change. A much better way to create complex conditions is to use Excel’s Boolean functions.
The AND() function will return true if all its parameters are true conditions.
So, the formula…
=IF(AND(A1>10,A1<20), "In range")
Will also check if cell A1 is between 10 and 20 pluse, it is much easier to understand (and to write) then the nested formula above.
The following formula…
=IF(AND(A1>10,A2<20,B1="HAS AMMO"),"FIRE!")
Is ten times easier to write/read then the corresponding nested IF() above
Another extremely useful Boolean function is the OR() function.
The formula…
=IF(OR(A1="CAT IS AWAY",A1="CAT IS BUSY"),"THE MICE PLAY")
Will return ‘THE MICE PLAY’ if A1 equals either ‘cat is away’ or ‘cat is busy’.
3. Countif, SumIf, Averageif, etc.
This group of functions allows you to apply a range function such as SUM(), COUNT() OR AVERAGE() only to rows that meet a specific condition.
For instance, you can sum or count all the sales that were made during the year 2001 as shown below:
It goes without saying that these conditional functions are very useful.
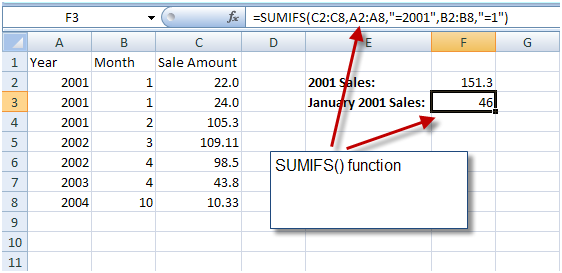
4. Countifs, SumIfs, Averageifs, etc.
The COUNTIFS() and SUMIFS() function (and the rest of the multiple conditions aggregate functions) were introduced in Excel 2007.
These functions enable us to apply an aggregation function to a subset of rows where those rows meet several conditions.
For instance, we can use the SUMIFS() function to sum all the sales that were made in the January of 2001, with a single function…
5. If and Array Formulas
Array formulas might be the most advanced of the formula techniques and while we can’t hope to cover the topic of array formulas in this article, it is important to mention that combining the IF() function with array formulas is a powerful tool.
In Excel versions prior to 2007, the formula AVERAGEIF() did not exist. So, if for example, you wished to average a range of numbers without including Zeros in the calculation, you needed to rely on an array formula:
Array formulas can also be used to mimic the working of countifs(), sumifs() and the rest of the xxxxxifs() functions, that simply did not exist in Excel versions before 2007.
They can also be used to implement new functions that does not exist such as MAXIF() and MINIF().
For a more in depth discussion of array formulas, look here.
6. IFError() function
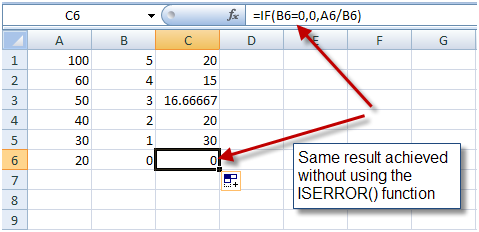
A close relative of the IF() function is the IFERROR() function. It allows you return a valid value in case a formula returns an error. For instance, if you have a formula that might cause a division by zero error, you can use the IFERROR() function to catch this event and return a valid value, as shown below:
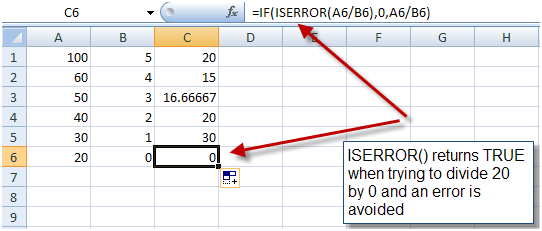
But there are cases when you cannot pretest the formula parameters and in those cases the ISERROR() function can come in handy.
7. Information functions
Distant relatives of the IF() function are the information functions. This group includes several functions that give you information about the type of the value contained in a cell (if it’s a string, a number, an odd number or an even number), if a cell is empty or if it contains an N/A value and more.
These functions, when used in conjunction with the IF() function can be pretty handy, for example, they allow you to easily check whether a cell is empty:
Summary
Our examples in this article only scratch the surface, we would encourage you to experiment more into what you can do. These seven simple functions hide a great deal of power and utility.
They are the building blocks of some very useful macros. We hope we have inspired you to put them to use in your own projects!
More Excel tips:
1. How to work with Date functions in Excel
2. Create an Interactive Timeline with Microsoft Excel
Yoav is the CEO of Cogniview, a company that creates PDF to XLS conversion software. Prior to that, Yoav Ezer was the CEO of Nocturnus, a technology-centered software solution company. For more Excel tips from Yoav, join him on Facebook or Twitter.






![sumif-function[3] sumif-function[3]](https://www.ampercent.com/wp/wp-content/uploads/post/7e6b1748bf3b_14723/sumiffunction3.png)
![averageif-array-formula[3] averageif-array-formula[3]](https://www.ampercent.com/wp/wp-content/uploads/post/7e6b1748bf3b_14723/averageifarrayformula3.png)
