
I was just wondering how I could use an IF formula in VBA. This is the formula that I currently have, but it is giving me the error..»End of Statement»
Range("a10").Select
Selection.End(xlDown).Select
lastrow = ActiveCell.Row
For i = 10 To lastrow
Sheets("20140618 Loans").Range("Z" & i).Formula = _
"=IF(ABS("Y" & i)>400,""CHECK"","""")"
Any ideas? Thanks.
asked Jun 24, 2014 at 20:43
![]()
4
so you need to do:
Sheets("20140618 Loans").Range("Z" & i).Formula = _
"=IF(ABS(Y" & i & ")>400,""CHECK"","""")"
answered Jun 24, 2014 at 21:10
![]()
DJ.DJ.
16k3 gold badges42 silver badges46 bronze badges
0
Range("a10").Select
Selection.End(xlDown).Select
lastrow = ActiveCell.Row
For i = 10 To lastrow
Sheets("20140618 Loans").Range("Z" & i).FormulaR1C1 = "=IF(ABS(R1C" & i &")>400,""CHECK"","""")"
answered Jun 24, 2014 at 20:44
![]()
ggleggle
4163 silver badges20 bronze badges
3
Home / VBA / VBA IF And (Test Multiple Conditions)
You can use the AND operator with the VBA IF statement to test multiple conditions, and when you use it allows you to test two conditions simultaneously and get true if both of those conditions are true. And, if any of the conditions is false it returns false in the result.
Combining IF AND
- First, start the IF statement with the “IF” keyword.
- After that, specify the first condition that you want to test.
- Next, use the AND keyword to specify the second condition
- In the end, specify the second condition that you want to test.

To have a better understanding let’s see an example.
Sub myMacro()
If 1 = 1 And 2 > 1 Then
    MsgBox "Both of the conditions are true."
Else
    MsgBox "Maybe one or both of the conditions are true."
End If
End Sub
If you look at the above example, we have specified two conditions one if (1 = 1) and the second is (2 > 1) and here both of the conditions are true, and that’s why it has executes the line of code that we have specified if the result is true.

Now lets if one of these two conditions is false, let me use the different code here.
Sub myMacro1()

If 1 = 1 And 2 < 1 Then

    MsgBox "Both of the conditions are true."

Else

    MsgBox "Maybe one or both of the conditions are true."

End If

End Sub
In the above code, the second condition is false (2 < 1) and when you run this macro it executes the line of code that we have specified if the result is false.

In the same way, you can also test more than two conditions at the same time. Let’s continue the above example and add the third condition to it.
Sub myMacro2()

If 1 = 1 And 2 > 1 And 1 - 1 = 0 Then

    MsgBox "All the conditions are true."

Else

    MsgBox "Some conditions are false."

End If

End Sub
Now we have three conditions to test and we have used the AND after the second condition to specify the third condition. As you learned above that when you use AND, all the conditions need to be true to get true in the result.
When you run this code, it executes the line of code that we have specified for the true.

And if any of the conditions is false, just like you have in the following code, it returns false.
Sub myMacro3()

If 1 = 1 And 2 < 1 And 1 + 1 = 0 Then

    MsgBox "All the conditions are true."

Else

    MsgBox "Some conditions are false."

End If

End Sub
In this lesson you can learn how to add a formula to a cell using vba. There are several ways to insert formulas to cells automatically. We can use properties like Formula, Value and FormulaR1C1 of the Range object. This post explains five different ways to add formulas to cells.
Table of contents
How to add formula to cell using VBA
Add formula to cell and fill down using VBA
Add sum formula to cell using VBA
How to add If formula to cell using VBA
Add formula to cell with quotes using VBA
Add Vlookup formula to cell using VBA
We use formulas to calculate various things in Excel. Sometimes you may need to enter the same formula to hundreds or thousands of rows or columns only changing the row numbers or columns. For an example let’s consider this sample Excel sheet.
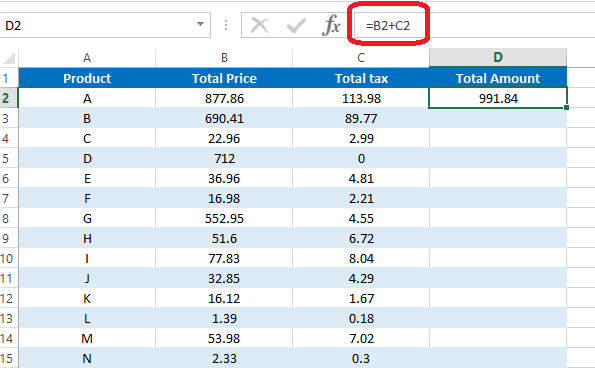
In this Excel sheet I have added a very simple formula to the D2 cell.
=B2+C2
So what if we want to add similar formulas for all the rows in column D. So the D3 cell will have the formula as =B3+C3 and D4 will have the formula as =B4+D4 and so on. Luckily we don’t need to type the formulas manually in all rows. There is a much easier way to do this. First select the cell containing the formula. Then take the cursor to the bottom right corner of the cell. Mouse pointer will change to a + sign. Then left click and drag the mouse until the end of the rows.
However if you want to add the same formula again and again for lots of Excel sheets then you can use a VBA macro to speed up the process. First let’s look at how to add a formula to one cell using vba.
How to add formula to cell using VBA
Lets see how we can enter above simple formula(=B2+C2) to cell D2 using VBA
In this method we are going to use the Formula property of the Range object.
Sub AddFormula_Method1()
Dim WS As Worksheet
Set WS = Worksheets(«Sheet1»)
WS.Range(«D2»).Formula = «=B2+C2»
End Sub
We can also use the Value property of the Range object to add a formula to a cell.
Sub AddFormula_Method2()
Dim WS As Worksheet
Set WS = Worksheets(«Sheet1»)
WS.Range(«D2»).Value = «=B2+C2»
End Sub
Next method is to use the FormulaR1C1 property of the Range object. There are few different ways to use FormulaR1C1 property. We can use absolute reference, relative reference or use both types of references inside the same formula.
In the absolute reference method cells are referred to using numbers. Excel sheets have numbers for each row. So you should think similarly for columns. So column A is number 1. Column B is number 2 etc. Then when writing the formula use R before the row number and C before the column number. So the cell A1 is referred to by R1C1. A2 is referred to by R2C1. B3 is referred to by R3C2 etc.
This is how you can use the absolute reference.
Sub AddFormula_Method3A()
Dim WS As Worksheet
Set WS = Worksheets(«Sheet1»)
WS.Range(«D2»).FormulaR1C1 = «=R2C2+R2C3»
End Sub
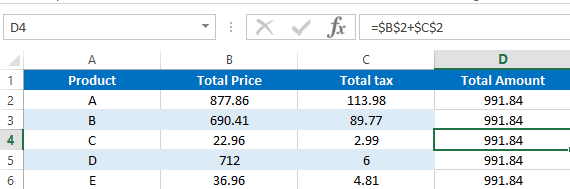
If you use the absolute reference, the formula will be added like this.
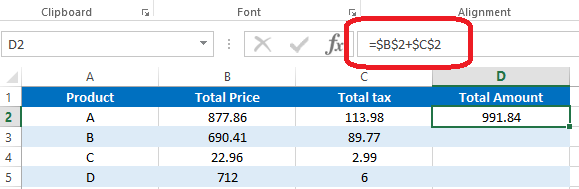
If you use the manual drag method explained above to fill down other rows, then the same formula will be copied to all the rows.
In Majority cases this is not how you want to fill down the formula. However this won’t happen in the relative method. In the relative method, cells are given numbers relative to the cell where the formula is entered. You should use negative numbers when referring to the cells in upward direction or left. Also the numbers should be placed within the square brackets. And you can omit [0] when referring to cells on the same row or column. So you can use RC[-2] instead of R[0]C[-2]. The macro recorder also generates relative reference type code, if you enter a formula to a cell while enabling the macro recorder.
Below example shows how to put formula =B2+C2 in D2 cell using relative reference method.
Sub AddFormula_Method3B()
Dim WS As Worksheet
Set WS = Worksheets(«Sheet1»)
WS.Range(«D2»).FormulaR1C1 = «=RC[-2]+RC[-1]»
End Sub

Now use the drag method to fill down all the rows.
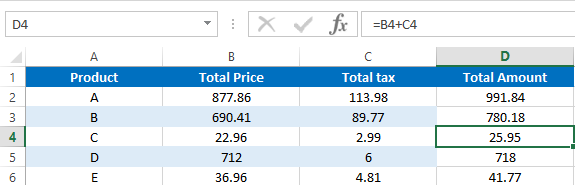
You can see that the formulas are changed according to the row numbers.
Also you can use both relative and absolute references in the same formula. Here is a typical example where you need a formula with both reference types.
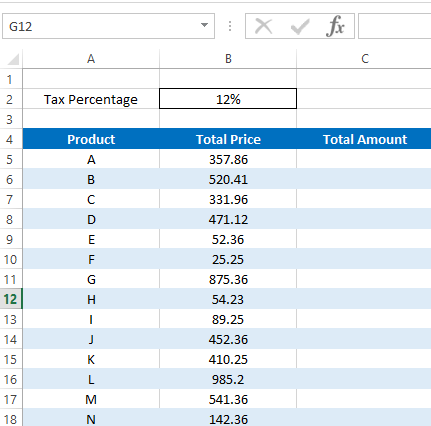
We can add the formula to calculate Total Amount like this.
Sub AddFormula_Method3C()
Dim WS As Worksheet
Set WS = Worksheets(«Sheet2»)
WS.Range(«C5»).FormulaR1C1 = «=RC[-1]+RC[-1]*R2C2»
End Sub
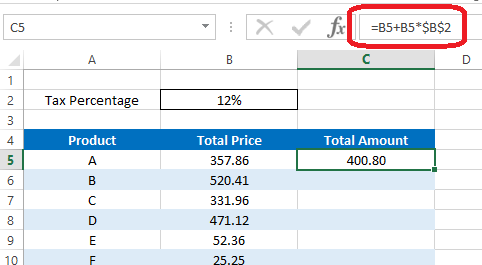
In this formula we have a absolute reference after the * symbol. So when we fill down the formula using the drag method that part will remain the same for all the rows. Hence we will get correct results for all the rows.
Add formula to cell and fill down using VBA
So now you’ve learnt various methods to add a formula to a cell. Next let’s look at how to fill down the other rows with the added formula using VBA.
Assume we have to calculate cell D2 value using =B2+C2 formula and fill down up to 1000 rows. First let’s see how we can modify the first method to do this. Let’s name this subroutine as “AddFormula_Method1_1000Rows”
Sub AddFormula_Method1_1000Rows()
End Sub
Then we need an additional variable for the For Next statement
Dim WS As Worksheet
Dim i As Integer
Next, assign the worksheet to WS variable
Set WS = Worksheets(«Sheet1»)
Now we can add the For Next statement like this.
For i = 2 To 1000
WS.Range(«D» & i).Formula = «=B» & i & «+C» & i
Next i
Here I have used «D» & i instead of D2 and «=B» & i & «+C» & i instead of «=B2+C2». So the formula keeps changing like =B3+C3, =B4+C4, =B5+C5 etc. when iterated through the For Next loop.
Below is the full code of the subroutine.
Sub AddFormula_Method1_1000Rows()
Dim WS As Worksheet
Dim i As Integer
Set WS = Worksheets(«Sheet1»)
For i = 2 To 1000
WS.Range(«D» & i).Formula = «=B» & i & «+C» & i
Next i
End Sub
So that’s how you can use VBA to add formulas to cells with variables.
Next example shows how to modify the absolute reference type of FormulaR1C1 method to add formulas upto 1000 rows.
Sub AddFormula_Method3A_1000Rows()
Dim WS As Worksheet
Dim i As Integer
Set WS = Worksheets(«Sheet1»)
For i = 2 To 1000
WS.Range(«D» & i).FormulaR1C1 = «=R» & i & «C2+R» & i & «C3»
Next i
End Sub
You don’t need to do any change to the formula section when modifying the relative reference type of the FormulaR1C1 method.
Sub AddFormula_Method3B_1000Rows()
Dim WS As Worksheet
Dim i As Integer
Set WS = Worksheets(«Sheet1»)
For i = 2 To 1000
WS.Range(«D» & i).FormulaR1C1 = «=RC[-2]+RC[-1]»
Next i
End Sub
Use similar techniques to modify other two types of subroutines to add formulas for multiple rows. Now you know how to add formulas to cells with a variable. Next let’s look at how to add formulas with some inbuilt functions using VBA.
How to add sum formula to a cell using VBA
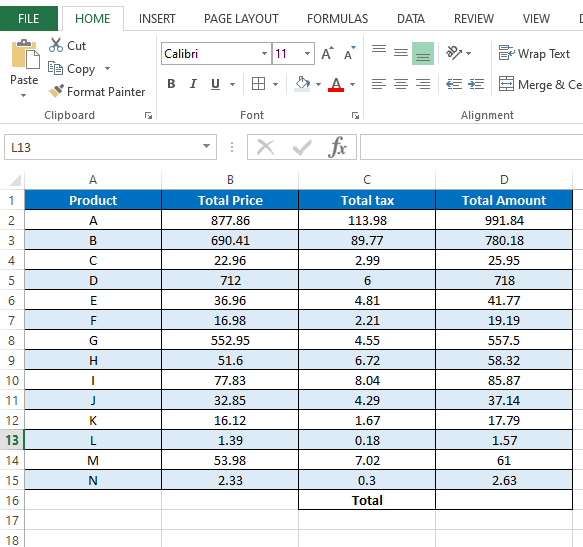
Suppose we want the total of column D in the D16 cell. So this is the formula we need to create.
=SUM(D2:D15)
Now let’s see how to add this using VBA. Let’s name this subroutine as SumFormula.
First let’s declare a few variables.
Dim WS As Worksheet
Dim StartingRow As Long
Dim EndingRow As Long
Assign the worksheet to the variable.
Set WS = Worksheets(«Sheet3»)
Assign the starting row and the ending row to relevant variables.
StartingRow = 2
EndingRow = 1
Then the final step is to create the formula with the above variables.
WS.Range(«D16»).Formula = «=SUM(D» & StartingRow & «:D» & EndingRow & «)»
Below is the full code to add the Sum formula using VBA.
Sub SumFormula()
Dim WS As Worksheet
Dim StartingRow As Long
Dim EndingRow As Long
Set WS = Worksheets(«Sheet3»)
StartingRow = 2
EndingRow = 15
WS.Range(«D16»).Formula = «=SUM(D» & StartingRow & «:D» & EndingRow & «)»
End Sub
How to add If Formula to a cell using VBA
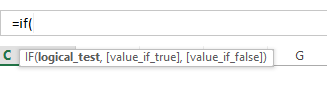
If function is a very popular inbuilt worksheet function available in Microsoft Excel. This function has 3 arguments. Two of them are optional.
Now let’s see how to add a If formula to a cell using VBA. Here is a typical example where we need a simple If function.
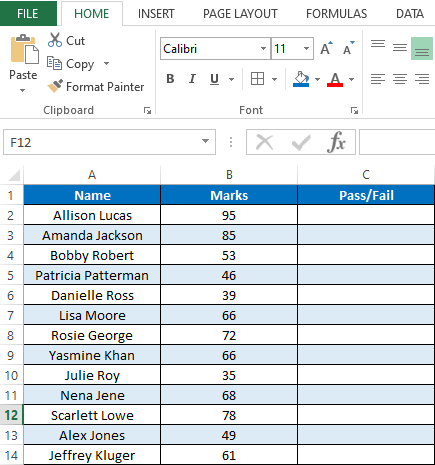
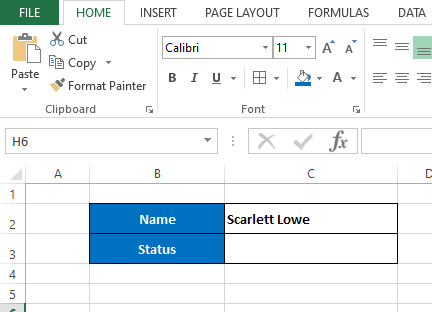
This is the results of students on an examination. Here we have names of students in column A and their marks in column B. Students should get “Pass” if he/she has marks equal or higher than 40. If marks are less than 40 then Excel should show the “Fail” in column C. We can simply obtain this result by adding an If function to column C. Below is the function we need in the C2 cell.
=IF(B2>=40,»Pass»,»Fail»)
Now let’s look at how to add this If Formula to a C2 cell using VBA. Once you know how to add it then you can use the For Next statement to fill the rest of the rows like we did above. We discussed a few different ways to add formulas to a range object using VBA. For this particular example I’m going to use the Formula property of the Range object.
So now let’s see how we can develop this macro. Let’s name this subroutine as “AddIfFormula”
Sub AddIfFormula()
End Sub
However we can’t simply add this If formula using the Formula property like we did before. Because this If formula has quotes inside it. So if we try to add the formula to the cell with quotes, then we get a syntax error.
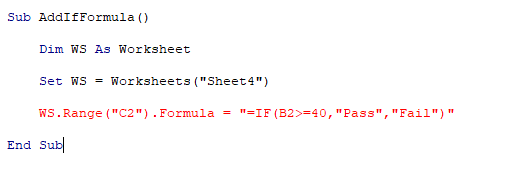
Add formula to cell with quotes
There are two ways to add the formula to a cell with quotes.
Sub AddIfFormula_Method1()
Dim WS As Worksheet
Set WS = Worksheets(«Sheet4»)
WS.Range(«C2»).Formula = «=IF(B2>=40,»»Pass»»,»»Fail»»)»
End Sub
Sub AddIfFormula_Method2()
Dim WS As Worksheet
Set WS = Worksheets(«Sheet4»)
WS.Range(«C2»).Formula = «=IF(B2>=40,» & Chr(34) & «Pass» & Chr(34) & «,» & Chr(34) & «Fail» & Chr(34) & «)»
End Sub
Add vlookup formula to cell using VBA
Finally I will show you how to add a vlookup formula to a cell using VBA. So I created a very simple example where we can use a Vlookup function. Assume we have this section in the Sheet5 of the same workbook.
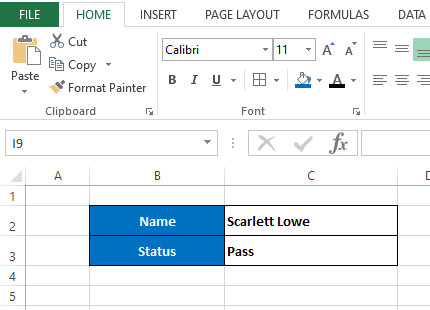
So here when we change the name of the student in the C2 cell, his/her pass or fail status should automatically be shown in the C3 cell. If the original data(data we used in the above “If formula” example) is listed in the Sheet4 then we can write a Vlookup formula for the C3 cell like this.
=VLOOKUP(Sheet5!C2,Sheet4!A2:C200,3,FALSE)
We can use the Formula property of the Range object to add this Vlookup formula to the C3 using VBA.
Sub AddVlookupFormula()
Dim WS As Worksheet
Set WS = Worksheets(«Sheet5»)
WS.Range(«C3»).Formula = «=VLOOKUP(Sheet5!C2,Sheet4!A2:C200,3,FALSE)»
End Sub
На чтение 19 мин. Просмотров 24.4k.

Пьер Корнель
Угадай, если сможешь, и выбери, если посмеешь
Содержание
- Краткое руководство по VBA If Statement
- Что такое IF и зачем оно тебе?
- Тестовые данные
- Формат операторов VBA If Then
- Простой пример If Then
- Условия IF
- Использование If ElseIf
- Использование If Else
- Используя If And/If Or
- Функция IIF
- Использование Select Case
- Попробуйте это упражнение
Краткое руководство по VBA If Statement
| Описание | Формат | Пример |
| If Then | If [условие верно] Then [действие] End If |
If score = 100 Then Debug.Print «Отлично» End If |
| If Else | If [условие верно] Then [действие] Else [действие] End If |
If score = 100 Then Debug.Print «Отлично» Else Debug.Print «Попробуй снова» End If |
| If ElseIf | If [1 условие верно] Then [действие] ElseIf [2 условие верно] Then [действие] End If |
If score = 100 Then Debug.Print «Отлично» ElseIf score > 50 Then Debug.Print «Пройдено» ElseIf score <= 50 Then Debug.Print «Попробуй снова» End If |
| Else и ElseIf (Else должно идти после ElseIf’s) |
If [1 условие верно] Then [действие] ElseIf [2 условие верно] Then [действие] Else [действие] End If |
If score = 100 Then Debug.Print «Отлично» ElseIf score > 50 Then Debug.Print «Пройдено» ElseIf score > 30 Then Debug.Print «Попробуй снова» Else Debug.Print «Ой» End If |
| If без Endif (Только одна строка) |
If [условие верно] Then [действие] |
If value <= 0 Then value = 0 |
В следующем коде показан простой пример использования
оператора VBA If
If Sheet1.Range("A1").Value > 5 Then
    Debug.Print "Значение больше 5."
ElseIf Sheet1.Range("A1").Value < 5 Then
    Debug.Print "Значение меньше 5."
Else
    Debug.Print "Значение равно 5."
End If
Что такое IF и зачем оно тебе?
Оператор VBA If используется, чтобы позволить вашему коду
делать выбор, когда он выполняется.
Вам часто захочется сделать выбор на основе данных, которые
читает ваш макрос.
Например, вы можете захотеть читать только тех учеников, у
которых оценки выше 70. Когда вы читаете каждого учащегося, вы можете
использовать инструкцию If для проверки отметок каждого учащегося.
Важным словом в последнем предложении является проверка. Оператор
If используется для проверки значения, а затем для выполнения задачи на основе
результатов этой проверки.
Тестовые данные
Мы собираемся использовать следующие тестовые данные для
примеров кода в этом посте.

Формат операторов VBA If Then
Формат оператора If Then следующий
За ключевым словом If следуют условие и ключевое слово Then
Каждый раз, когда вы используете оператор If Then, вы должны использовать соответствующий оператор End If.
Когда условие оценивается как истинное, обрабатываются все
строки между If Then и End If.
If [условие верно] Then
    [строки кода]
    [строки кода]
    [строки кода]
End If
Чтобы сделать ваш код более читабельным, рекомендуется
делать отступы между операторами If Then и End If.
Отступ между If и End If
Отступ означает просто переместить строку кода на одну вкладку вправо. Правило большого пальца состоит в том, чтобы сделать отступ между начальным и конечным операторами, такими как:
Sub … End Sub
If Then … End If
If Then… ElseIf … Else … Endif
For … Next
Do While … Loop
Select Case … End Case
Для отступа в коде вы можете выделить строки для отступа и нажать клавишу Tab. Нажатие клавиш Shift + Tab сделает отступ кода, т.е. переместит его на одну вкладку влево.
Вы также можете использовать значки на панели инструментов Visual Basic для отступа кода.

Если вы посмотрите на примеры кода на этом сайте, вы увидите, что код имеет отступ.
Простой пример If Then
Следующий код выводит имена всех студентов с баллами более 50.
Sub ChitatOcenki()

    Dim i As Long
    ' Пройдите столбцы отметок
    For i = 2 To 11
        ' Проверьте, больше ли баллов,чем 50
        If Sheet1.Range("C" & i).Value > 50 Then
            ' Напечатайте имя студента в «Immediate Window» (Ctrl + G)
            Debug.Print Sheet1.Range("A" & i).Value & " " & Sheet1.Range("B" & i).Value
        End If

    Next

End Sub
Результаты:
- Василий Кочин
- Максим Бородин
- Дмитрий Маренин
- Олеся Клюева
- Евгений Яшин
Поэкспериментируйте с этим примером и проверьте значение или знак > и посмотрите, как изменились результаты.
Условия IF
Часть кода между ключевыми словами If и Then называется условием. Условие — это утверждение, которое оценивается как истинное или ложное. Они в основном используются с операторами Loops и If. При создании условия вы используете такие знаки, как «>, <, <>,> =, <=, =».
Ниже приведены примеры условий:
| Условие | Это верно, когда |
| x < 5 | x меньше,чем 5 |
| x <= 5 | x меньше, либо равен 5 |
| x > 5 | x больше, чем 5 |
| x >= 5 | x больше, либо равен 5 |
| x = 5 | x равен 5 |
| x <> 5 | x не равен 5 |
| x > 5 And x < 10 | x больше, чем 5 И x меньше, чем 10 |
| x = 2 Or x >10 | x равен 2 ИЛИ x больше,чем 10 |
| Range(«A1») = «Иван» | Ячейка A1 содержит текст «Иван» |
| Range(«A1») <> «Иван» | Ячейка A1 не содержит текст «Иван» |
Вы могли заметить x = 5, как условие. Не стоит путать с х = 5, при использовании в качестве назначения.
Когда в условии используется «=», это означает, что «левая сторона равна правой стороне».
В следующей таблице показано, как знак равенства используется
в условиях и присваиваниях.
| Использование «=» | Тип | Значение |
| Loop Until x = 5 | Условие | Равен ли x пяти |
| Do While x = 5 | Условие | Равен ли x пяти |
| If x = 5 Then | Условие | Равен ли x пяти |
| For x = 1 To 5 | Присваивание | Установите значение х = 1, потом = 2 и т.д. |
| x = 5 | Присваивание | Установите х до 5 |
| b = 6 = 5 | Присваивание и условие |
Присвойте b результату условия 6 = 5 |
| x = MyFunc(5,6) | Присваивание | Присвойте х значение, возвращаемое функцией |
Последняя запись в приведенной выше таблице показывает
оператор с двумя равными. Первый знак равенства — это присвоение, а любые
последующие знаки равенства — это условия.
Поначалу это может показаться странным, но подумайте об этом
так. Любое утверждение, начинающееся с переменной и равно, имеет следующий
формат
[переменная] [=] [оценить эту часть]
Поэтому все, что находится справа от знака равенства, оценивается и результат помещается в переменную. Посмотрите на последние три строки таблицы, как:
[x] [=] [5]
[b] [=] [6 = 5]
[x] [=] [MyFunc (5,6)]
Использование If ElseIf
Инструкция ElseIf позволяет вам выбирать из нескольких вариантов. В следующем примере мы печатаем баллы, которые находятся в диапазоне.
Sub IspElseIf()

    If Marks >= 85 Then
        Debug.Print "Высший балл"
    ElseIf Marks >= 75 Then
        Debug.Print "Отлично"
    End If

End Sub
Важно понимать, что порядок важен. Условие If проверяется
первым.
Если это правда, то печатается «Высший балл», и оператор If заканчивается.
Если оно ложно, то код переходит к следующему ElseIf и
проверяет его состояние.
Давайте поменяемся местами If и ElseIf из последнего
примера. Код теперь выглядит так
Sub IspElseIfNeverno()

    ' Этот код неверен, так как ElseIf никогда не будет верным
    If Marks >= 75 Then
        Debug.Print "Отлично"
    ElseIf Marks >= 85 Then
        ' код никогда не достигнет здесь
        Debug.Print "Высший балл"
    End If

End Sub
В этом случае мы сначала проверяем значение более 75. Мы никогда не будем печатать «Высший балл», потому что, если значение больше 85, это вызовет первый оператор if.
Чтобы избежать подобных проблем, мы должны использовать два
условия. Они помогают точно указать, что вы ищете, чтобы избежать путаницы.
Пример ниже показывает, как их использовать. Мы рассмотрим более многочисленные
условия в разделе ниже.
If marks >= 75 And marks < 85 Then
    Debug.Print "Отлично"
ElseIf marks >= 85 And marks <= 100 Then
    Debug.Print "Высший балл"
End If
Давайте расширим оригинальный код. Вы можете использовать столько операторов ElseIf, сколько захотите. Мы добавим еще несколько, чтобы учесть все наши классификации баллов.
Использование If Else
Утверждение Else используется, как ловушка для всех. Это в основном означает «если бы не было условий» или «все остальное». В предыдущем примере кода мы не включили оператор печати для метки сбоя. Мы можем добавить это, используя Else.
Sub IspElse()

    If Marks >= 85 Then
        Debug.Print "Высший балл"
    ElseIf Marks >= 75 Then
        Debug.Print "Отлично"
    ElseIf Marks >= 55 Then
        Debug.Print "Хорошо"
    ElseIf Marks >= 40 Then
        Debug.Print "Удовлетворительно"
    Else
        ' Для всех других оценок
        Debug.Print "Незачет"
    End If

End Sub
Так что, если это не один из других типов, то это провал.
Давайте напишем некоторый код с помощью наших примеров
данных и распечатаем студента и его классификацию.
Sub DobClass()

    ' получить последнюю строку
    Dim startRow As Long, lastRow As Long
    startRow = 2
    lastRow = Sheet1.Cells(Sheet1.Rows.Count, 1).End(xlUp).Row

    Dim i As Long, Marks As Long
    Dim sClass As String

    ' Пройдите столбцы отметок
    For i = startRow To lastRow
        Marks = Sheet1.Range("C" & i).Value
        ' Проверьте отметки и классифицируйте соответственно
        If Marks >= 85 Then
            sClass = "Высший балл"
        ElseIf Marks >= 75 Then
            sClass = "Отлично"
        ElseIf Marks >= 55 Then
            sClass = "Хорошо"
        ElseIf Marks >= 40 Then
            sClass = "Удовлетворительно"
        Else
            ' Для всех других оценок
            sClass = "Незачет"
        End If

        ' Запишите класс в столбец E
        Sheet1.Range("E" & i).Value = sClass
    Next

End Sub
Результаты выглядят так: в столбце E — классификация баллов

Используя If And/If Or
В выражении If может быть несколько условий. Ключевые слова VBA And и Or позволяют использовать несколько условий.
Эти слова работают так же, как вы используете их на
английском языке.
Давайте снова посмотрим на наши примеры данных. Теперь мы
хотим напечатать всех студентов, которые набрали от 50 до 80 баллов.
Мы используем Аnd, чтобы добавить дополнительное условие. Код гласит: если оценка больше или равна 50 и меньше 75, напечатайте имя студента.
Sub ProverkaStrokiOcenok()

    Dim i As Long, marks As Long
    For i = 2 To 11

        ' Хранить оценки для текущего студента
        marks = Sheet1.Range("C" & i).Value

        ' Проверьте, если отметки больше 50 и меньше 75
        If marks >= 50 And marks < 80 Then
             ' Напечатайте имя и фамилию в Immediate window (Ctrl+G)
             Debug.Print Sheet1.Range("A" & i).Value & Sheet1.Range("B" & i).Value
        End If

    Next

End Sub
Вывести имя и фамилию в результаты:
- Дмитрий Маренин
- Олеся Клюева
- Евгений Яшин
В нашем следующем примере мы хотим знать, кто из студентов сдавал историю или геометрию. Таким образом, в данном случае мы говорим, изучал ли студент «История» ИЛИ изучал ли он «Геометрия» (Ctrl+G).
Sub ChitatObektOcenki()

    Dim i As Long, marks As Long

    ' Пройдите столбцы отметок
    For i = 2 To 11
        marks = Sheet1.Range("D" & i).Value
        ' Проверьте, если отметки больше 50 и меньше 80
        If marks = "История" Or marks = "Геометрия" Then
            ' Напечатайте имя и фамилию в Immediate window (Ctrl+G)
            Debug.Print Sheet1.Range("A" & i).Value & " " & Sheet1.Range("B" & i).Value
        End If

    Next

End Sub
Результаты:
- Василий Кочин
- Александр Грохотов
- Дмитрий Маренин
- Николай Куликов
- Олеся Клюева
- Наталия Теплых
- Дмитрий Андреев
Использование нескольких таких условий часто является
источником ошибок. Эмпирическое правило, которое нужно помнить, должно быть
максимально простым.
Использование IF AND
And работает следующим образом:
| Условие 1 | Условие 2 | Результат |
| ИСТИНА | ИСТИНА | ИСТИНА |
| ИСТИНА | ЛОЖЬ | ЛОЖЬ |
| ЛОЖЬ | ИСТИНА | ЛОЖЬ |
| ЛОЖЬ | ЛОЖЬ | ЛОЖЬ |
Что вы заметите, так это то, что And верно только тогда, когда все условия выполняются.
Использование IF OR
Ключевое слово OR работает следующим образом
| Условие 1 | Условие 2 | Результат |
| ИСТИНА | ИСТИНА | ИСТИНА |
| ИСТИНА | ЛОЖЬ | ИСТИНА |
| ЛОЖЬ | ИСТИНА | ИСТИНА |
| ЛОЖЬ | ЛОЖЬ | ЛОЖЬ |
Что вы заметите, так это то, что OR ложно, только когда все условия ложны.
Смешивание And и Or может затруднить чтение кода и привести к ошибкам. Использование скобок может сделать условия более понятными.
Sub OrSAnd()

 Dim subject As String, marks As Long
 subject = "История"
 marks = 5

 If (subject = "Геометрия" Or subject = "История") And marks >= 6 Then
     Debug.Print "ИСТИНА"
 Else
     Debug.Print "ЛОЖЬ"
 End If

End Sub
Использование IF NOT
Также есть оператор NOT. Он возвращает противоположный результат условия.
| Условие | Результат |
| ИСТИНА | ЛОЖЬ |
| ЛОЖЬ | ИСТИНА |
Следующие две строки кода эквивалентны.
If marks < 40 Then
If Not marks >= 40 Then
так же, как и
If True Then
If Not False Then
и
If False Then
If Not True Then
Помещение условия в круглые скобки облегчает чтение кода
If Not (marks >= 40) Then
Распространенное использование Not — при проверке, был ли установлен объект. Возьмите Worksheet для примера. Здесь мы объявляем рабочий лист.
Dim mySheet As Worksheet
' Некоторый код здесь
Мы хотим проверить действительность mySheet перед его использованием. Мы можем проверить, если это Nothing.
If mySheet Is Nothing Then
Нет способа проверить, является ли это чем-то, поскольку есть много разных способов, которым это может быть что-то. Поэтому мы используем NOT с Nothing.
If Not mySheet Is Nothing Then
Если вы находите это немного запутанным, вы можете использовать круглые скобки, как здесь
If Not (mySheet Is Nothing) Then
Функция IIF
VBA имеет функцию, аналогичную функции Excel If. В Excel вы часто используете функцию If следующим образом:
= ЕСЛИ (F2 =»»,»», F1 / F2)
Формат
= If (условие, действие, если ИСТИНА, действие, если ЛОЖЬ).
VBA имеет функцию IIf, которая работает так же. Давайте посмотрим на примере. В следующем коде мы используем IIf для проверки значения переменной val. Если значение больше 10, мы печатаем ИСТИНА, в противном случае мы печатаем ЛОЖЬ.
Sub ProveritVal()

    Dim result As Boolean
    Dim val As Long

    ' Печатает ИСТИНА
    val = 11
    result = IIf(val > 10, ИСТИНА, ЛОЖЬ)
    Debug.Print result

    ' печатает ЛОЖЬ
    val = 5
    result = IIf(val > 10, ИСТИНА, ЛОЖЬ)
    Debug.Print result

End Sub
В нашем следующем примере мы хотим распечатать «Удовлетворитеьно» или «Незачет» рядом с каждым студентом в зависимости от их баллов. В первом фрагменте кода мы будем использовать обычный оператор VBA If, чтобы сделать это.
Sub ProveritDiapazonOcenok()

    Dim i As Long, marks As Long
    For i = 2 To 11

        ' Хранить оценки для текущего студента
        marks = Sheet1.Range("C" & i).Value

        ' Проверьте, прошел ли студент или нет
        If marks >= 40 Then
             ' Запишите имена для столбца F
             Sheet1.Range("E" & i) = "Удовлетворительно"
        Else
             Sheet1.Range("E" & i) = "Незачет"
        End If

    Next

End Sub
В следующем фрагменте кода мы будем использовать функцию IIf. Код здесь намного аккуратнее.
Sub ProveritDiapazonOcenok ()

    Dim i As Long, marks As Long
    For i = 2 To 11

        ' Хранить оценки для текущего студента
        marks = Sheet1.Range("C" & i)

        ' Проверьте, прошел ли студент или нет
        Sheet1.Range("E" & i).Value = IIf(marks >= 40,"Удовлетворительно","Незачет")

    Next

End Sub
Функция IIf очень полезна для простых случаев, когда вы имеете дело с двумя возможными вариантами.
Использование Nested IIf
Вы также можете вкладывать IIf-операторы, как в Excel. Это означает использование результата одного IIf с другим. Давайте добавим еще один тип результата в наши предыдущие примеры. Теперь мы хотим напечатать «Отлично», «Удовлетворительно» или «Незачетт» для каждого студента.
Используя обычный VBA, мы сделали бы это так
Sub ProveritRezultatiTip2()

    Dim i As Long, marks As Long
    For i = 2 To 11

        ' Хранить оценки для текущего студента
        marks = Sheet1.Range("C" & i).Value

        If marks >= 75 Then
             Sheet1.Range("E" & i).Value = "Отлично"
        ElseIf marks >= 40 Then
             ' Запишите имена для столбца F
             Sheet1.Range("E" & i).Value = "Удовлетворительно"
        Else
             Sheet1.Range("E" & i).Value = "Незачет"
        End If

    Next

End Sub
Используя вложенные IIfs, мы могли бы сделать это так
Sub IspNestedIIF()

Dim i As Long, marks As Long, result As String
For i = 2 To 11

marks = Sheet1.Range("C" & i).Value
result = IIf(marks >= 55,"Хорошо",IIf(marks >= 40,"Удовлетворительно","Незачет"))

Sheet1.Range("E" & i).Value = result

Next

End Sub
Использование вложенного IIf хорошо в простых случаях, подобных этому. Код прост для чтения и, следовательно, вряд ли вызовет ошибки.
Чего нужно остерегаться
Важно понимать, что функция IIf всегда оценивает как
Истинную, так и Ложную части выражения независимо от условия.
В следующем примере мы хотим разделить по баллам, когда он не равен нулю. Если он равен нулю, мы хотим вернуть ноль.
marks = 0
total = IIf(marks = 0, 0, 60 / marks)
Однако, когда отметки равны нулю, код выдаст ошибку «Делить на ноль». Это потому, что он оценивает как Истинные, так и Ложные утверждения. Здесь ложное утверждение, т.е. (60 / Marks), оценивается как ошибка, потому что отметки равны нулю.
Если мы используем нормальный оператор IF, он будет
запускать только соответствующую строку.
marks = 0
If marks = 0 Then
    'Выполняет эту строку только когда отметки равны нулю
    total = 0
Else
    'Выполняет только эту строку, когда отметки не равны нулю
    total = 60 / marks
End If
Это также означает, что если у вас есть функции для ИСТИНА и ЛОЖЬ, то обе будут выполнены. Таким образом, IIF будет запускать обе функции, даже если он использует только одно возвращаемое значение. Например:
' Обе функции будут выполняться каждый раз
total = IIf(marks = 0, Func1, Func2)
IF против IIf
Так что лучше?
В этом случае вы можете видеть, что IIf короче для написания и аккуратнее. Однако если условия усложняются, вам лучше использовать обычное выражение If. Недостатком IIf является то, что он недостаточно известен, поэтому другие пользователи могут не понимать его так же, как и код, написанный с помощью обычного оператора if.
Кроме того, как мы обсуждали в последнем разделе, IIF всегда оценивает части ИСТИНА и ЛОЖЬ, поэтому, если вы имеете дело с большим количеством данных, оператор IF будет быстрее.
Мое эмпирическое правило заключается в том, чтобы
использовать IIf, когда
он будет прост для чтения и не требует вызовов функций. Для более сложных
случаев используйте обычный оператор If.
Использование Select Case
Оператор Select Case
— это альтернативный способ написания статистики If с большим количеством ElseIf. Этот тип операторов
вы найдете в большинстве популярных языков программирования, где он называется
оператором Switch. Например,
Java, C #, C ++ и Javascript
имеют оператор switch.
Формат
Select Case [переменная]
    Case [условие 1]
    Case [условие 2]
    Case [условие n]
    Case Else
End Select
Давайте возьмем наш пример DobClass сверху и перепишем его с помощью оператора Select Case.
Sub DobavitClass()

    ' получить последнюю строку
    Dim startRow As Long, lastRow As Long
    startRow = 2
    lastRow = Sheet1.Cells(Sheet1.Rows.Count, 1).End(xlUp).Row

    Dim i As Long, Marks As Long
    Dim sClass As String

    ' Пройдите столбцы отметок
    For i = startRow To lastRow
        Marks = Sheet1.Range("C" & i).Value
        ' Проверьте отметки и классифицируйте соответственно
        If Marks >= 85 Then
            sClass = "Высший балл"
        ElseIf Marks >= 75 Then
            sClass = "Отлично"
        ElseIf Marks >= 55 Then
            sClass = "Хорошо"
        ElseIf Marks >= 40 Then
            sClass = "Удовлетворительно"
        Else
            ' Для всех других оценок
            sClass = "Незачет"
        End If

        ' Запишите класс в столбец E
        Sheet1.Range("E" & i).Value = sClass
    Next

End Sub
Ниже приведен тот же код с использованием оператора Select Case. Главное, что вы заметите, это то, что мы используем “Case 85 to 100” rather than “marks >=85 And marks <=100”. , а не “marks >=85 And marks <=100”.
Sub DobavitClassSSelect()

    ' получить первую и последнюю строки
    Dim firstRow As Long, lastRow As Long
    firstRow = 2
    lastRow = Cells(Cells.Rows.Count, 1).End(xlUp).Row

    Dim i As Long, marks As Long
    Dim sClass As String

    ' Пройдите столбцы отметок
    For i = firstRow To lastRow
        marks = Sheet1.Range("C" & i).Value
        ' Проверьте отметки и классифицируйте соответственно
        Select Case marks
        Case 85 To 100
            sClass = "Высший балл"
        Case 75 To 84
            sClass = "Отлично"
        Case 55 To 74
            sClass = "Хорошо"
        Case 40 To 54
            sClass = "Удовлетворительно"
        Case Else
            ' Для всех других оценок
            sClass = "Незачет"
        End Select
        ' Запишите класс в столбец E
        Sheet1.Range("E" & i).Value = sClass
    Next

End Sub
Использование Case Is
Вы можете переписать оператор select в том же формате, что и оригинальный ElseIf. Вы можете использовать Is с Case.
Select Case marks
    Case Is >= 85
         sClass = "Высший балл"
    Case Is >= 75
        sClass = "Отлично"
    Case Is >= 55
        sClass = "Хорошо"
    Case Is >= 40
        sClass = "Удовлетворительно"
    Case Else
        ' Для всех других оценок
        sClass = "Незачет"
End Select
Вы можете использовать Is для проверки нескольких значений.
В следующем коде мы проверяем, равны ли оценки 5, 7 или 9.
Sub TestNeskZnach()

    Dim marks As Long
    marks = 7

    Select Case marks
        Case Is = 5, 7, 9
            Debug.Print True
        Case Else
            Debug.Print False
    End Select

End Sub
Попробуйте это упражнение
В этой статье много рассказывали о выражении If. Хороший способ помочь вам понять — это попытаться написать код, используя темы, которые мы рассмотрели. В следующем упражнении используются тестовые данные из этой статьи. Ответ на упражнение ниже.
Мы будем использовать ячейку G1, чтобы написать имя
субъекта.
В колонках от H до L запишите всех студентов, которые имеют оценки по этому предмету. Мы хотим классифицировать их результат как успешный или неудачный. Оценка ниже 40 — неудача, оценка 40 или выше — Зачет.
Колонка H: Имя
Колонка I: Фамилия
Колонка J: Баллы
Колонка H: Предмет
Столбец I: Тип результата — Зачет или Незачет
Если ячейка G1 содержит «Геометрия», то ваш результат должен выглядеть следующим образом:

Ответ на упражнение
Следующий код показывает, как выполнить вышеупомянутое упражнение.
Примечание: есть много способов выполнить задачу, поэтому не расстраивайтесь, если ваш код отличается.
Sub ZapisatRezultat()

    ' Получить тему
    Dim subject As String
    subject = Sheet1.Range("G1").Value

    If subject = "" Then
        Exit Sub
    End If

    ' Получить первый и последний ряд
    Dim firstRow As Long, lastRow As Long
    firstRow = 2
    lastRow = Cells(Cells.Rows.Count, 1).End(xlUp).Row

    ' Очистить любой существующий вывод
    Sheet1.Range("H:L").ClearContents

    ' Отслеживать выходной ряд
    Dim outRow As Long
    outRow = 1

    Dim i As Long, marks As Long, rowSubject As String
    ' Прочитать данные
    For i = firstRow To lastRow
        marks = Sheet1.Range("C" & i).Value
        rowSubject = Sheet1.Range("D" & i).Value
        If rowSubject = subject Then
            ' Запишите данные студента, если предмет Геометрия
            Sheet1.Range("A" & i & ":" & "D" & i).Copy
            Sheet1.Range("H" & outRow).PasteSpecial xlPasteValues

            ' Запишите Зачет или Незачет
            If marks < 40 Then
                Sheet1.Range("L" & outRow).Value = "Незачет"
            ElseIf marks >= 40 Then
                Sheet1.Range("L" & outRow).Value = "Зачет"
            End If
            ' Переместить вывод в следующую строку
            outRow = outRow + 1
        End If

    Next i

End Sub
Однострочная и многострочная конструкции оператора If…Then…Else и функция IIf, используемые в коде VBA Excel — синтаксис, компоненты, примеры.
Оператор If…Then…Else предназначен для передачи управления одному из блоков операторов в зависимости от результатов проверяемых условий.
Однострочная конструкция
Оператор If…Then…Else может использоваться в однострочной конструкции без ключевых слов Else, End If.
Синтаксис однострочной конструкции If…Then…
|
If [условие] Then [операторы] |
Компоненты однострочной конструкции If…Then…
- условие — числовое или строковое выражение, возвращающее логическое значение True или False;
- операторы — блок операторов кода VBA Excel, который выполняется, если компонент условие возвращает значение True.
Если компонент условие возвращает значение False, блок операторов конструкции If…Then… пропускается и управление программой передается следующей строке кода.
Пример 1
|
Sub Primer1() Dim d As Integer, a As String d = InputBox(«Введите число от 1 до 20», «Пример 1», 1) If d > 10 Then a = «Число « & d & » больше 10″ MsgBox a End Sub |
Многострочная конструкция
Синтаксис многострочной конструкции If…Then…Else
|
If [условие] Then [операторы] ElseIf [условие] Then [операторы] ———————— Else [операторы] End If |
Компоненты многострочной конструкции If…Then…Else:
- условие — числовое или строковое выражение, следующее за ключевым словом If или ElseIf и возвращающее логическое значение True или False;
- операторы — блок операторов кода VBA Excel, который выполняется, если компонент условие возвращает значение True;
- пунктирная линия обозначает дополнительные структурные блоки из строки
ElseIf [условие] Thenи строки[операторы].
Если компонент условие возвращает значение False, следующий за ним блок операторов конструкции If…Then…Else пропускается и управление программой передается следующей строке кода.
Самый простой вариант многострочной конструкции If…Then…Else:
|
If [условие] Then [операторы] Else [операторы] End If |
Пример 2
|
Sub Primer2() Dim d As Integer, a As String d = InputBox(«Введите число от 1 до 40», «Пример 2», 1) If d < 11 Then a = «Число « & d & » входит в первую десятку» ElseIf d > 10 And d < 21 Then a = «Число « & d & » входит во вторую десятку» ElseIf d > 20 And d < 31 Then a = «Число « & d & » входит в третью десятку» Else a = «Число « & d & » входит в четвертую десятку» End If MsgBox a End Sub |
Функция IIf
Функция IIf проверяет заданное условие и возвращает значение в зависимости от результата проверки.
Синтаксис функции
|
IIf([условие], [если True], [если False]) |
Компоненты функции IIf
- условие — числовое или строковое выражение, возвращающее логическое значение True или False;
- если True — значение, которое возвращает функция IIf, если условие возвратило значение True;
- если False — значение, которое возвращает функция IIf, если условие возвратило значение False.
Компоненты если True и если False могут быть выражениями, значения которых будут вычислены и возвращены.
Пример 3
|
Sub Primer3() Dim d As Integer, a As String Instr: On Error Resume Next d = InputBox(«Введите число от 1 до 20 и нажмите OK», «Пример 3», 1) If d > 20 Then GoTo Instr a = IIf(d < 10, d & » — число однозначное», d & » — число двузначное») MsgBox a End Sub |
Пример 4
Стоит отметить, что не зависимо от того, выполняется условие или нет, функция IIf вычислит оба выражения в параметрах если True и если False:
|
Sub Primer4() On Error GoTo Instr Dim x, y x = 10 y = 5 MsgBox IIf(x = 10, x + 5, y + 10) MsgBox IIf(x = 10, x + 5, y / 0) Exit Sub Instr: MsgBox «Произошла ошибка: « & Err.Description End Sub |
При нажатии кнопки «Cancel» или закрытии крестиком диалогового окна InputBox из первых двух примеров, генерируется ошибка, так как в этих случаях функция InputBox возвращает пустую строку. Присвоение пустой строки переменной d типа Integer вызывает ошибку. При нажатии кнопки «OK» диалогового окна, числа, вписанные в поле ввода в текстовом формате, VBA Excel автоматически преобразует в числовой формат переменной d. В третьем примере есть обработчик ошибок.
In this Article
- VBA If Statement
- If Then
- ElseIF – Multiple Conditions
- Else
- If-Else
- Nested IFs
- IF – Or, And, Xor, Not
- If Or
- If And
- If Xor
- If Not
- If Comparisons
- If – Boolean Function
- Comparing Text
- VBA If Like
- If Loops
- If Else Examples
- Check if Cell is Empty
- Check if Cell Contains Specific Text
- Check if cell contains text
- If Goto
- Delete Row if Cell is Blank
- If MessageBox Yes / No
- VBA If, ElseIf, Else in Access VBA
VBA If Statement
If Then
VBA If Statements allow you to test if expressions are TRUE or FALSE, running different code based on the results.
Let’s look at a simple example:
If Range("a2").Value > 0 Then Range("b2").Value = "Positive"This tests if the value in Range A2 is greater than 0. If so, setting Range B2 equal to “Positive”

Note: When testing conditions we will use the =, >, <, <>, <=, >= comparison operators. We will discuss them in more detail later in the article.
Here is the syntax for a simple one-line If statement:
If [test_expression] then [action]To make it easier to read, you can use a Line Continuation character (underscore) to expand the If Statements to two lines (as we did in the above picture):
If [test_expression] then _
    [action]
If Range("a2").Value > 0 Then _
Range("b2").Value = "Positive"End If
The above “single-line” if statement works well when you are testing one condition. But as your IF Statements become more complicated with multiple conditions, you will need to add an “End If” to the end of the if statement:
If Range("a2").Value > 0 Then
  Range("b2").Value = "Positive"
End If
Here the syntax is:
If [test_expression] then
  [action]
End If
The End If signifies the end of the if statement.
Now let’s add in an ElseIF:
ElseIF – Multiple Conditions
The ElseIf is added to an existing If statement. ElseIf tests if a condition is met ONLY if the previous conditions have not been met.
In the previous example we tested if a cell value is positive. Now we will also test if the cell value is negative with an ElseIf:
If Range("a2").Value > 0 Then
    Range("b2").Value = "Positive"
ElseIf Range("a2").Value < 0 Then
    Range("b2").Value = "Negative"
End If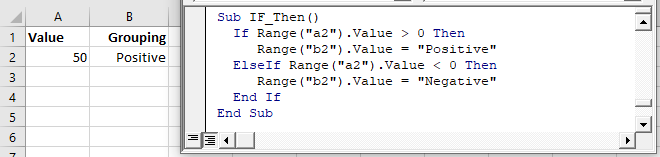
You can use multiple ElseIfs to test for multiple conditions:
Sub If_Multiple_Conditions()

    If Range("a2").Value = "Cat" Then
        Range("b2").Value = "Meow"
    ElseIf Range("a2").Value = "Dog" Then
        Range("b2").Value = "Woof"
    ElseIf Range("a2").Value = "Duck" Then
        Range("b2").Value = "Quack"
    End If

End Sub
Now we will add an Else:
Else
The Else will run if no other previous conditions have been met.
We will finish our example by using an Else to indicate that if the cell value is not positive or negative, then it must be zero:
If Range("a2").Value > 0 Then
    Range("b2").Value = "Positive"
ElseIf Range("a2").Value < 0 Then
    Range("b2").Value = "Negative"
Else
    Range("b2").Value = "Zero"
End If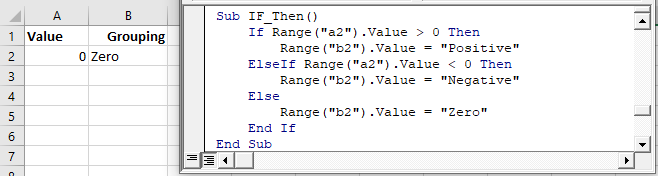
If-Else
The most common type of If statement is a simple If-Else:
Sub If_Else()
    If Range("a2").Value > 0 Then
        Range("b2").Value = "Positive"
    Else
        Range("b2").Value = "Not Positive"
    End If
End Sub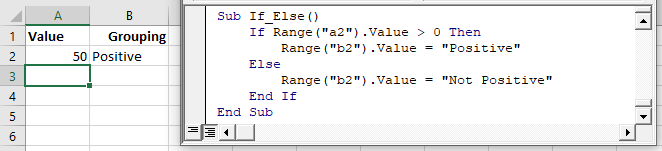
Nested IFs
You can also “nest” if statements inside of each other.
Sub Nested_Ifs()
    If Range("a2").Value > 0 Then
        Range("b2").Value = "Positive"
    Else
        If Range("a2").Value < 0 Then
            Range("b2").Value = "Negative"
        Else
            Range("b2").Value = "Zero"
        End If
    End If
End Sub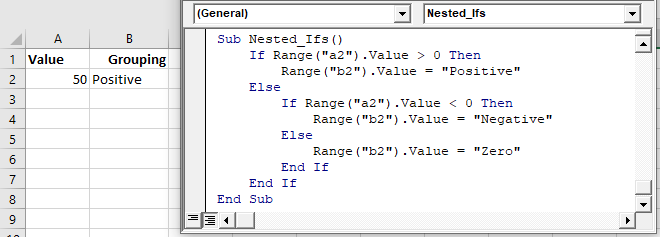
VBA Coding Made Easy
Stop searching for VBA code online. Learn more about AutoMacro — A VBA Code Builder that allows beginners to code procedures from scratch with minimal coding knowledge and with many time-saving features for all users!

Learn More
IF – Or, And, Xor, Not
Next we will discuss the logical operators: Or, And, Xor, Not.
If Or
The Or operator tests if at least one condition is met.
The following code will test if the value in Range A2 is less than 5,000 or greater than 10,000:
If Range("a2").Value < 5000 Or Range("a2").Value > 10000 Then
    Range("b2").Value = "Out of Range"
End If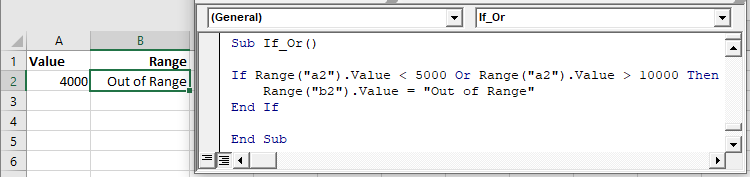
You can include multiple Ors in one line:
If Range("a2").Value < 5000 Or Range("a2").Value > 10000 Or Range("a2").Value = 9999 Then
    Range("b2").Value = "Out of Range"
End If
If you are going to use multiple Ors, it’s recommended to use a line continuation character to make your code easier to read:
If Range("a2").Value < 5000 Or _
   Range("a2").Value > 10000 Or _
   Range("a2").Value = 9999 Then

       Range("b2").Value = "Out of Range"
End If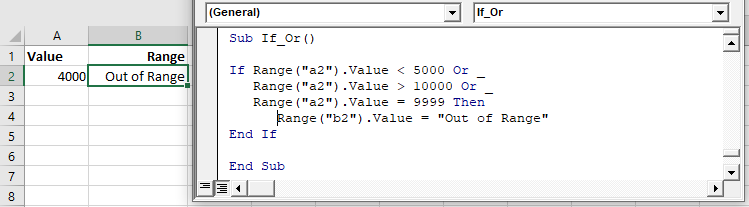
If And
The And operator allows you to test if ALL conditions are met.
If Range("a2").Value >= 5000 And Range("a2").Value <= 10000 Then
    Range("b2").Value = "In Range"
End If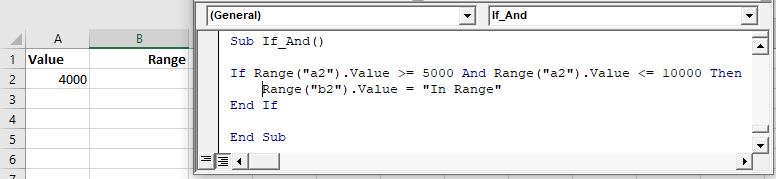
VBA Programming | Code Generator does work for you!
If Xor
The Xor operator allows you to test if exactly one condition is met. If zero conditions are met Xor will return FALSE, If two or more conditions are met, Xor will also return false.
I’ve rarely seen Xor used in VBA programming.
If Not
The Not operator is used to convert FALSE to TRUE or TRUE To FALSE:
Sub IF_Not()
    MsgBox Not (True)
End Sub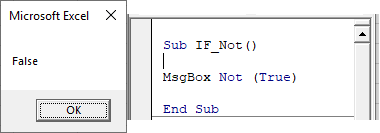
Notice that the Not operator requires parenthesis surrounding the expression to switch.
The Not operator can also be applied to If statements:
If Not (Range("a2").Value >= 5000 And Range("a2").Value <= 10000) Then
    Range("b2").Value = "Out of Range"
End If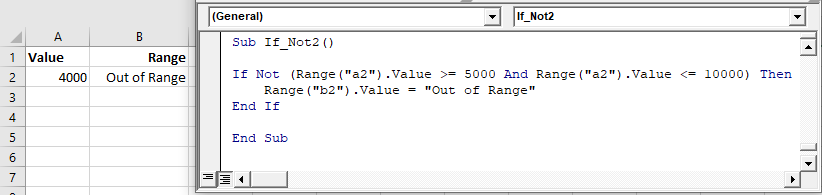
If Comparisons
When making comparisons, you will usually use one of the comparison operators:
| Comparison Operator | Explanation |
|---|---|
| = | Equal to |
| <> | Not Equal to |
| > | Greater than |
| >= | Greater than or Equal to |
| < | Less than |
| <= | Less than or Equal to |
However, you can also use any expression or function that results in TRUE or FALSE
If – Boolean Function
When build expressions for If Statements, you can also use any function that generates TRUE or False. VBA has a few of these functions:
| Function | Description |
|---|---|
| IsDate | Returns TRUE if expression is a valid date |
| IsEmpty | Check for blank cells or undefined variables |
| IsError | Check for error values |
| IsNull | Check for NULL Value |
| IsNumeric | Check for numeric value |
They can be called like this:
If IsEmpty(Range("A1").Value) Then MsgBox "Cell Empty"Excel also has many additional functions that can be called using WorksheetFunction. Here’s an example of the Excel IsText Function:
If Application.WorksheetFunction.IsText(Range("a2").Value) Then _
   MsgBox "Cell is Text"
You can also create your own User Defined Functions (UDFs). Below we will create a simple Boolean function that returns TRUE. Then we will call that function in our If statement:
Sub If_Function()

If TrueFunction Then
    MsgBox "True"
End If

End Sub

Function TrueFunction() As Boolean
    TrueFunction = True
End Function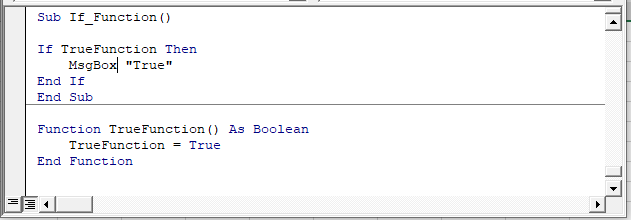
Comparing Text
You can also compare text similar to comparing numbers:
Msgbox "a" = "b"Msgbox "a" = "a"When comparing text, you must be mindful of the “Case” (upper or lower). By default, VBA considers letters with different cases as non-matching. In other words, “A” <> “a”.
If you’d like VBA to ignore case, you must add the Option Compare Text declaration to the top of your module:
Option Compare TextAfter making that declaration “A” = “a”:
Option Compare Text

Sub If_Text()
   MsgBox "a" = "A"
End Sub
AutoMacro | Ultimate VBA Add-in | Click for Free Trial!
VBA If Like
The VBA Like Operator allows you to make inexact comparisons of text. Click the “Like Operator” link to learn more, but we will show a basic example below:
Dim strName as String
strName = "Mr. Charles"

If strName Like "Mr*" Then
    MsgBox "True"
Else
    MsgBox "False"
End If
Here we’re using an asterisk “*” wildcard. The * stands for any number of any characters. So the above If statement will return TRUE. The Like operator is an extremely powerful, but often under-used tool for dealing with text.
If Loops
VBA Loops allow you to repeat actions. Combining IF-ELSEs with Loops is a great way to quickly process many calculations.
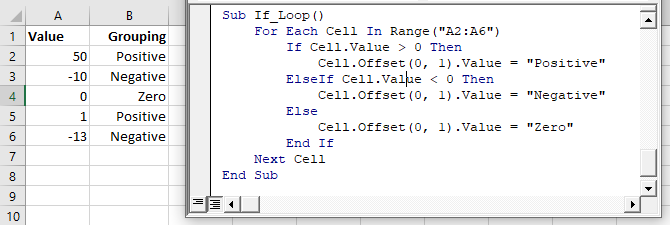
Continuing with our Positive / Negative example, we will add a For Each Loop to loop through a range of cells:
Sub If_Loop()
Dim Cell as Range

  For Each Cell In Range("A2:A6")
    If Cell.Value > 0 Then
      Cell.Offset(0, 1).Value = "Positive"
    ElseIf Cell.Value < 0 Then
      Cell.Offset(0, 1).Value = "Negative"
    Else
      Cell.Offset(0, 1).Value = "Zero"
     End If
  Next Cell

End Sub
If Else Examples
Now we will go over some more specific examples.
Check if Cell is Empty
This code will check if a cell is empty. If it’s empty it will ignore the cell. If it’s not empty it will output the cell value to the cell to the right:
Sub If_Cell_Empty()

If Range("a2").Value <> "" Then
    Range("b2").Value = Range("a2").Value
End If

End Sub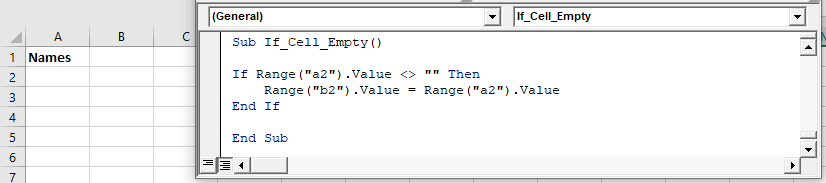
AutoMacro | Ultimate VBA Add-in | Click for Free Trial!
Check if Cell Contains Specific Text
The Instr Function tests if a string of text is found in another string. Use it with an If statement to check if a cell contains specific text:
If Instr(Range("A2").value,"text") > 0 Then
  Msgbox "Text Found"
End If
Check if cell contains text
This code will test if a cell is text:
Sub If_Cell_Is_Text()

If Application.WorksheetFunction.IsText(Range("a2").Value) Then
    MsgBox "Cell is Text"
End If

End Sub
If Goto
You can use the result of an If statement to “Go to” another section of code.
Sub IfGoTo ()

    If IsError(Cell.value) Then
        Goto Skip
    End If

    'Some Code

Skip:
End Sub
Delete Row if Cell is Blank
Using Ifs and loops you can test if a cell is blank and if so delete the entire row.
Sub DeleteRowIfCellBlank()

Dim Cell As Range

For Each Cell In Range("A2:A10")
    If Cell.Value = "" Then Cell.EntireRow.Delete
Next Cell

End Sub
AutoMacro | Ultimate VBA Add-in | Click for Free Trial!
If MessageBox Yes / No
With VBA Message Boxes you’re able to ask the user to select from several options. The Yes/No Message Box asks the user to select Yes or No. You can add a Yes / No Message Box to a procedure to ask the user if they would like to continue running the procedure or not. You handle the user’s input using an If statement.
Here is the Yes/No Message Box in practice:
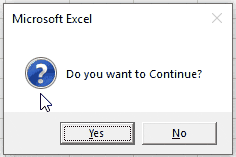
Sub MsgBoxVariable()

Dim answer As Integer
answer = MsgBox("Do you want to Continue?", vbQuestion + vbYesNo)

  If answer = vbYes Then
    MsgBox "Yes"
  Else
    MsgBox "No"
  End If

End Sub
VBA If, ElseIf, Else in Access VBA
The If, ElseIf and Else functions work exactly the same in Access VBA as in Excel VBA.
You can use an If statement to check if there are records in a Recordset.
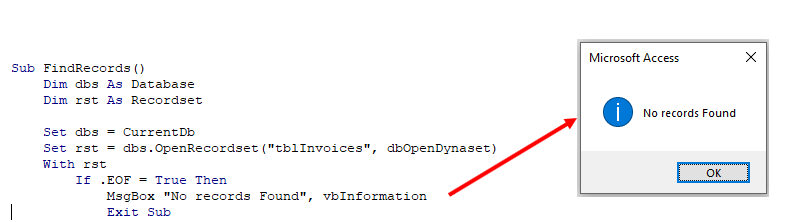
Macro processes only run if the criteria is true
VBA If Else statements
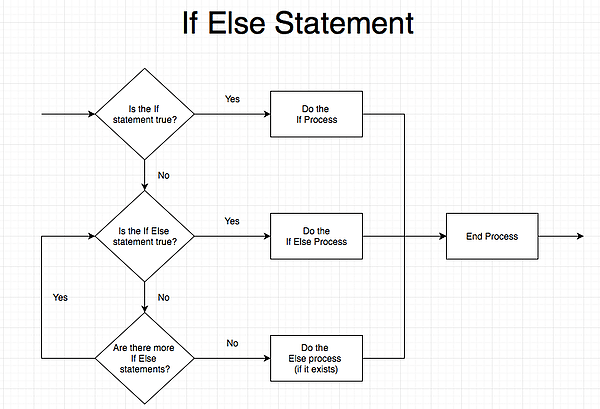
Building a VBA If Else[1] statement is quite similar to building a nested if formula inside Excel. The benefit of using VBA instead is that it’s much easier to follow, since nested IFs tend to complicate with multiple parenthesis enclosures. In a VBA if statement, each IF clause is separate from the other, and is instead laid out in order of priority from top to bottom.
If Statement Structure in VBA
If Range(“A5”) = “YES” Then
Range(“A5”).Value = “NO”
End If
- If statements begin with an If [CRITERIA] Then statement
- If the user does not wish to add additional statements, the if statement is closed by an End If
- In the above example, no false statement is present. Thus, if Cell A5 is not YES, VBA will simply skip this statement and move on to whatever code follows it. If Cell A5 is YES, the process contained in the If statement will be run.
If Range(“A5”) <= 100 Then
Range(“A6”).Value = “Decent Performance”
Else If Range(“A5”) > 100 Then
Range(“A6”).Value = “Great Performance”
End If
- If the user does want to add additional statements assuming the first If … Then is false, then the first if…then the process should be immediately followed by the Else If…Then statement.
- There can be multiple Else If…Then clauses in a VBA if statement, as long as each Else If … criteria is mutually exclusive from other Else If or If criteria.
- End If should close the last Else If…Then statement.
- In the above example, if Cell A5 is 91, then Cell A6 will be set to Decent Performance.
If Range(“A5”) <= 50 Then
Range (“A6”).Value = “Failing Grade”
Else If Range (“A5”) <= 80 Then
Range(“A6”).Value = “Passing Grade”
Else
Range(“A6”).Value = “Outstanding Grade”
End If
- The user can also elect to include one Else statement, which will activate if all other If and Else If statements are false.
- Else statements are not followed by Then, unlike If…Then and Else If…Then statements.
- End If should close an Else statement and only the Else statement, if it is used.
- In the above example, if Cell A5 is 91, then Cell A6 will be set to Outstanding Grade.
- Else statements act as a “catch-all” and will ensure that one process is run even if all the other If statements are false.
- Excluding an Else statement may result in the entire if to end if statement being skipped over if all criteria are false.
An If formula in Excel worksheets needs a clause to perform if the statement is true and one to perform if the statement is false. In contrast, a VBA if statement only needs code to perform if the statement is true. The section defining what to perform if that statement is false is optional. If the VBA statement turns out to be false and no process is defined for a false statement, then VBA will simply skip the if statement and move on to the next process.
Learn more in CFI’s VBA modeling course.
This is taught in CFI’s VBA modeling course.
Uses of the VBA If Else Statement
The VBA If Else statement allows you to set up “gates” that only activate or open when a certain criterion is met. If the criteria are not met, a VBA macro will simply skip over that portion of code. In financial modeling, this may be useful for creating a macro that only runs when a net income cell is positive, for example, or if a stock price exceeds a certain limit.
Because of the structure of the If statement and the ability to set different code depending on the value in the criteria, the If statement is also great for creating reactive macros that perform differently based on the situation. For example, a macro can be written for different cases of a valuation. An If statement can be used to perform a different action when the valuation follows the base case, the downside, or the upside.
If statements can also be used in conjunction with loops. In other words, If statements can contain loops that repeat a certain process. On the other hand, loops can also contain If statements, and will only perform that part of the loop when the stated criteria are met.
Learn more about VBA
Thank you for reading this CFI guide to VBA If Else statements. To learn more, explore these additional CFI resources below:
- VBA Referencing
- VBA Data Types
- VBA Do Loops
- VBA Methods
- VBA Modeling Course Online
- See all Excel resources
Article Sources
- VBA If Else